DAP222
New Member
- First Name
- Doug
- Joined
- Feb 6, 2024
- Threads
- 3
- Messages
- 4
- Reaction score
- 18
- Location
- MORONGO Basin, CA
- Vehicle(s)
- 2005 LJ, 2023 Gladiator Mojave
- Thread starter
- #1
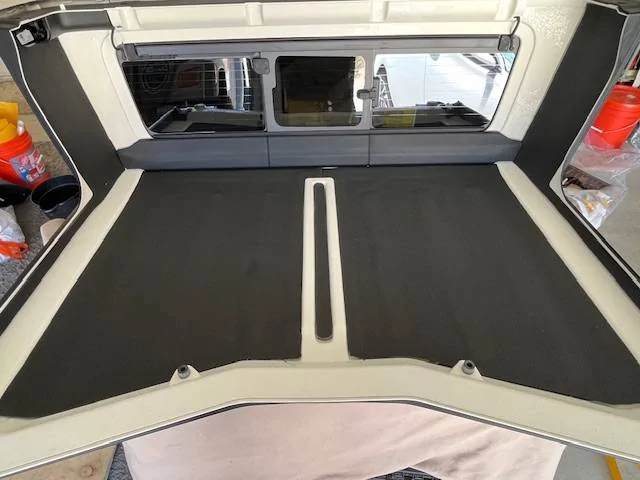
This is about installing a headliner on a 2023 Gladiator Mojave. I happen to live in the Mojave Desert so getting the headliner installed was a priority before the heat really hits. Went with the Kilmat 80 mil 36 Square Foot ($67 on Amazon) insulation/sound dampening for a base, then put the Design Engineering headliner ($235 on Amazon) on top of that.
Lessons learned:
1, have the right tools. Lumiteco Application Wheel Roller ($9 on Amazon) was invaluable to smooth out the Kilmat. Scissors. Utility knife with new razor blade. Lint-free cloth/rag and rubbing alcohol. Blue painters tape. And, this is very important: buy and wear some latex gloves (blue ones are cheap at Harbor Freight) when using the Kilmat. I made the mistake of initially not wearing gloves and the adhesive tar-like material residue is still stuck under some of my fingernails. Also have handy a pencil and sharpie pen.
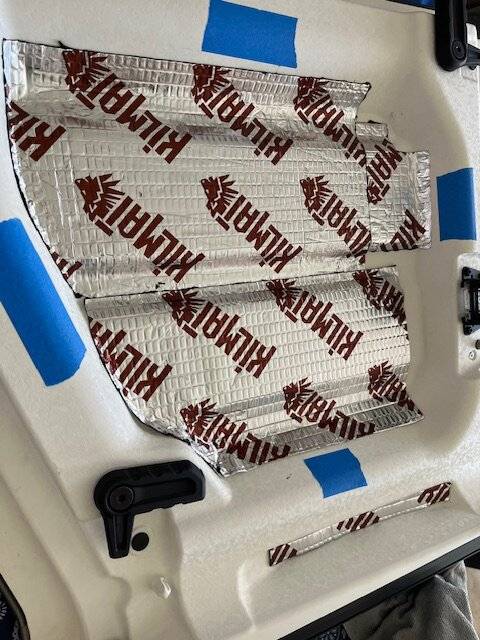
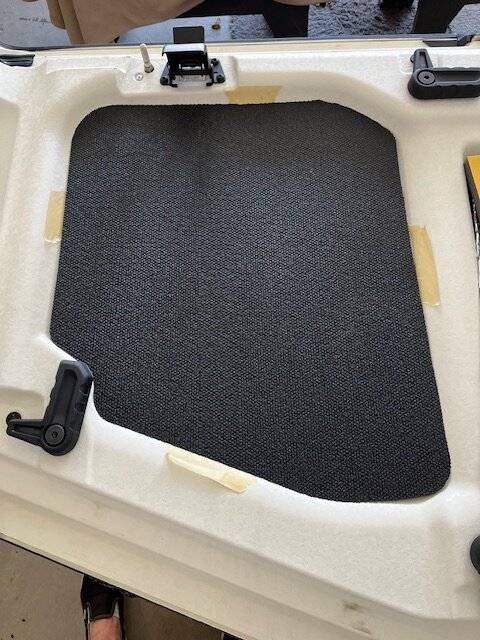
2, before laying the Kilmat, put the headliner into the space and mark its depth, that way you’ll know where the edges should be for your Kilmat, so the headliner completely covers it. Or you could mark with a pencil, I just didn’t want to write on the roof.
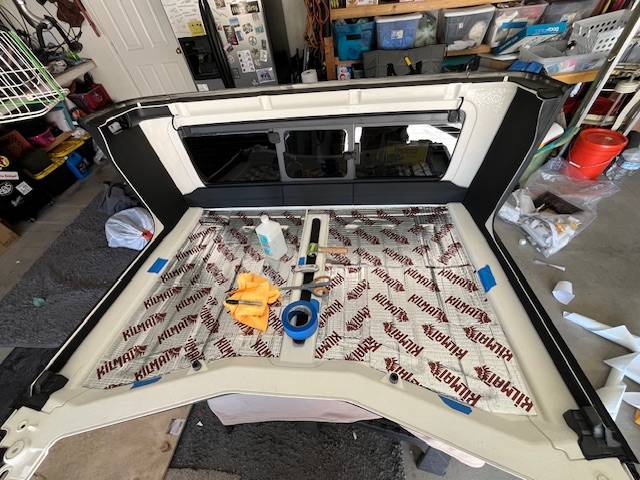
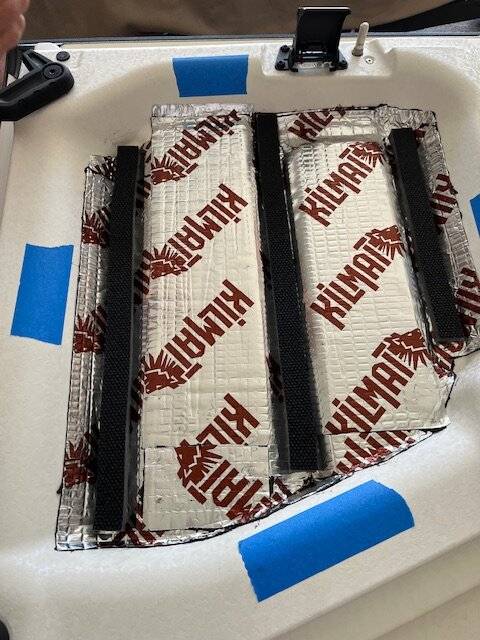
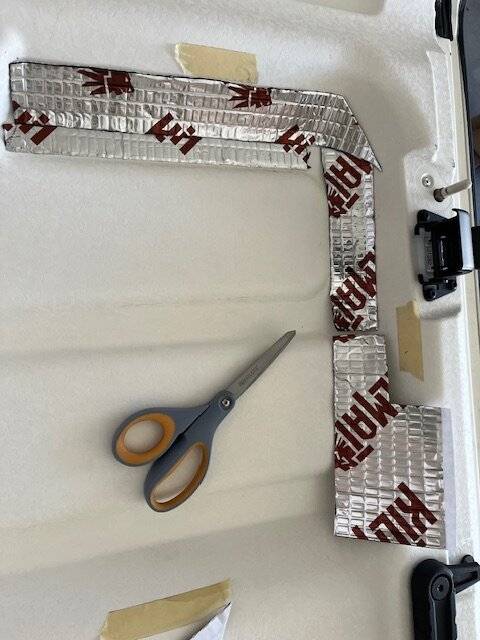
3, while using the Kilmat, don’t do what I did initially, which is try to be space-precise with my pieces and cuts and ended up taking a long time on the Freedom Tops. I’ve included pics. Instead, try to use as big of pieces of Kilmat as possible and cut the edges. Kilmat is pretty pliable so you can roll it into any crevice with the roller. I used much bigger pieces on the rear hard top roof and it went much quicker.
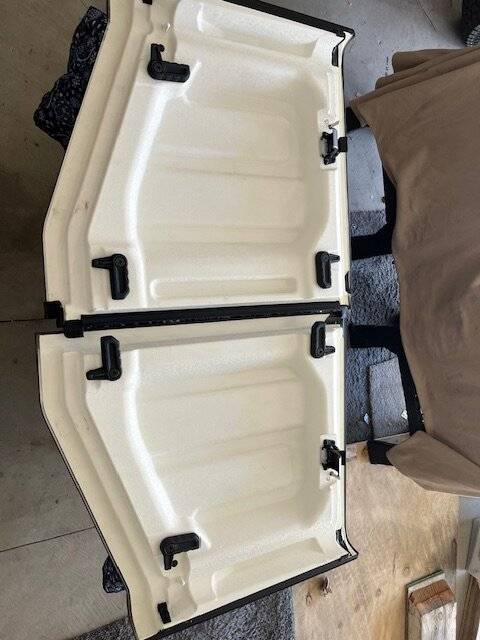
4, speaking of the rear roof, while it’s not heavy, it is awkward for one person to remove and flip upside down, strongly recommend a friend helping.
5, use rubbing alcohol to thoroughly clean the roof pre-Kilmat, and use it again to clean the Kilmat before installing the headliner
6, when installing the headliner, again it helps to have a friend. My wife and I did the bigger pieces together. I held it in place, she peeled off half of the backing, put down one side, then the other.
7, when installing the headliner, be careful and don’t stretch it, you need to just place it where you want it and tamp it down, the adhesive is VERY sticky and once it’s down, it’s down for good.
8, if you’re a perfectionist you might be disappointed. Though we tried hard to get the headliner exactly where we wanted it, it was slightly off due to our handling during final install. The good news is that when it is installed, it’s really hard to see the flaws, which looked worse when the tops were inverted before we put those back on the Gladiator.
I’ve attached photos showing before, marking placement on Freedom Top which looks just like finished, wasting time with overly-precise cuts and small pieces of Kilmat, showing how the painters tape marks the edge for the Kilmat and where the headliner ultimately sits, Freedom Top in progress, rear roof in progress, rear roof completed.
Driving to work today at 70 MPH it definitely seemed a bit quieter and less echo in the cab, easier to hear the radio, etc. Not sure how effective it’ll be for the heat since my rig is jet black, but, yesterday the headlined area was noticeably cooler than the uncovered parts of the ceiling. Good luck if you’re doing this—I do recommend it if you live in a warmer climate or want less noise in the cab while travelling. Plus, it looks much more like a finished vehicle than the bare white ceiling.


Lessons learned:
1, have the right tools. Lumiteco Application Wheel Roller ($9 on Amazon) was invaluable to smooth out the Kilmat. Scissors. Utility knife with new razor blade. Lint-free cloth/rag and rubbing alcohol. Blue painters tape. And, this is very important: buy and wear some latex gloves (blue ones are cheap at Harbor Freight) when using the Kilmat. I made the mistake of initially not wearing gloves and the adhesive tar-like material residue is still stuck under some of my fingernails. Also have handy a pencil and sharpie pen.
2, before laying the Kilmat, put the headliner into the space and mark its depth, that way you’ll know where the edges should be for your Kilmat, so the headliner completely covers it. Or you could mark with a pencil, I just didn’t want to write on the roof.
3, while using the Kilmat, don’t do what I did initially, which is try to be space-precise with my pieces and cuts and ended up taking a long time on the Freedom Tops. I’ve included pics. Instead, try to use as big of pieces of Kilmat as possible and cut the edges. Kilmat is pretty pliable so you can roll it into any crevice with the roller. I used much bigger pieces on the rear hard top roof and it went much quicker.
4, speaking of the rear roof, while it’s not heavy, it is awkward for one person to remove and flip upside down, strongly recommend a friend helping.
5, use rubbing alcohol to thoroughly clean the roof pre-Kilmat, and use it again to clean the Kilmat before installing the headliner
6, when installing the headliner, again it helps to have a friend. My wife and I did the bigger pieces together. I held it in place, she peeled off half of the backing, put down one side, then the other.
7, when installing the headliner, be careful and don’t stretch it, you need to just place it where you want it and tamp it down, the adhesive is VERY sticky and once it’s down, it’s down for good.
8, if you’re a perfectionist you might be disappointed. Though we tried hard to get the headliner exactly where we wanted it, it was slightly off due to our handling during final install. The good news is that when it is installed, it’s really hard to see the flaws, which looked worse when the tops were inverted before we put those back on the Gladiator.
I’ve attached photos showing before, marking placement on Freedom Top which looks just like finished, wasting time with overly-precise cuts and small pieces of Kilmat, showing how the painters tape marks the edge for the Kilmat and where the headliner ultimately sits, Freedom Top in progress, rear roof in progress, rear roof completed.
Driving to work today at 70 MPH it definitely seemed a bit quieter and less echo in the cab, easier to hear the radio, etc. Not sure how effective it’ll be for the heat since my rig is jet black, but, yesterday the headlined area was noticeably cooler than the uncovered parts of the ceiling. Good luck if you’re doing this—I do recommend it if you live in a warmer climate or want less noise in the cab while travelling. Plus, it looks much more like a finished vehicle than the bare white ceiling.

Sponsored