
My Jeep Story
Member
- First Name
- Casey
- Joined
- Nov 30, 2017
- Threads
- 2
- Messages
- 20
- Reaction score
- 53
- Location
- Boston, MA
- Website
- www.youtube.com
- Vehicle(s)
- 2005 Jeep WK
- Thread starter
- #1
I can't thank you all enough for the kind words and support that I got from my previous (and first ever) post regarding the Raptor Liner paint job I did to the full exterior of a JT. In that thread and in the video, I mentioned that I also was working on a projector retrofit for that same Jeep and I finally wrapped up the content for that build! That being said, I took fewer photos of the retrofit than I did the full paint job just due to the magnitude of both projects and the timeframe I was given to complete both undertakings. Regardless, I still have a ton of insight for anyone looking to do this to their headlights!
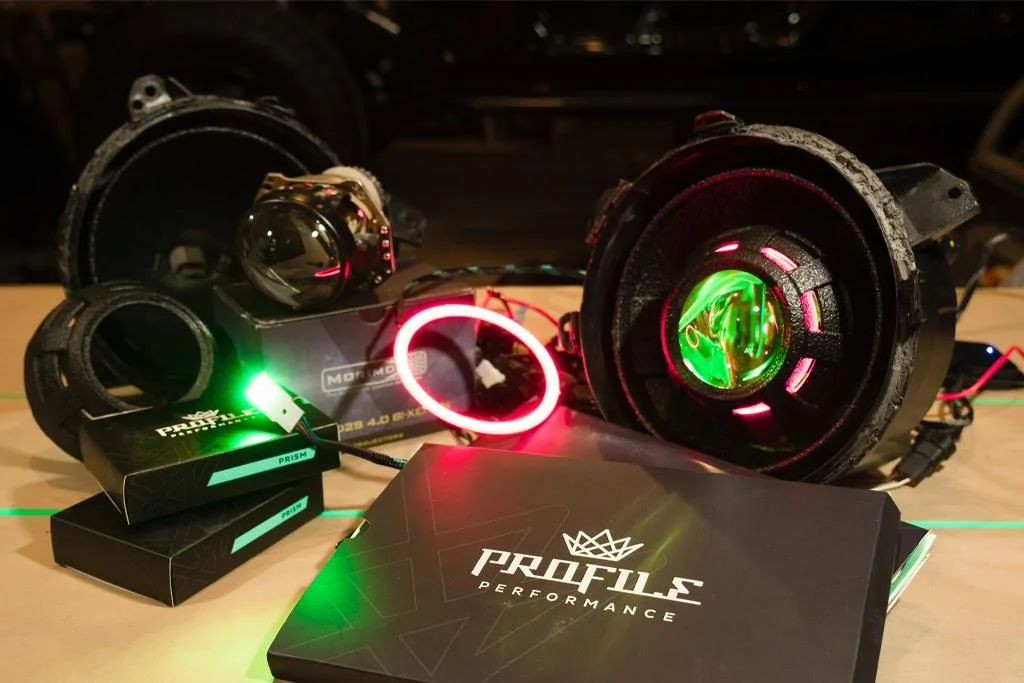
To summarize what I did, I took the factory halogen headlights and retrofitted a set of Morimoto Mini D2s 4.0 HID Projectors into them. I mounted a Profile Performance LED halo behind the shroud that covers the projector and their demon eye kit behind the lens of each projector. All of the parts can be seen in the photo below on the left with the finished product just on the right in the same photo. Every LED is an RGB unit and I wired them up to Morimoto's Bluetooth controller so the owner could control the colors and pattern of the halos and demon eyes via his phone. I highly recommend that controller as you can control three different channels so that the demon eyes and halos can be controlled separately. Not only that but if you forget to turn off the colored halos after you park, the controller defaults the halos to a white DRL to keep things legal.

I had to cut the lens off while I've read on some threads that others were able to bake the headlights and pry the lens of which would have been much preferred.
The cool thing about a retrofit is that you're only limited to your imagination- you can mount another set of halos, mount the halos on the front of the shroud, use a different shroud, etch the lens, etc. For this, I even paint matched the Raptor Liner paint job and used Raptor Liner on the inside of the headlight! Before doing so, I mocked up the 35W HID bulb setup in the headlights and turned them on for an hour to see what the temperatures would look like after a couple of hours as Raptor Liner gets soft at 212 degrees Fahrenheit.
To keep things organized with the addition of RGB wires and the cutoff shields solenoid, I used the included grommets from the Profile kits. This keeps things sealed and super clean. I made sure to label which wire was which to ensure I always knew which driver goes to which component, but in the case that I lose the labels, the top RGB cable is the demon eye and the bottom is the halo. It's important to make sure you know which is which!
You can also see a 12mm breather vent and what this does is allow moisture to escape, but not enter. Moisture within headlight housings is an issue even OEM manufacturers face, but in the case of a retrofit when you're prying around the channels, you don't want to take chances and risk these expensive components! Mounting the breather at the top of the headlight ensures heat and moisture can escape as heat inherently rises.
I was hoping to cover more details regarding the wiring process, but I ended up dropping and breaking my camera while working on the Raptor Liner paint job and missed out here, so I'll briefly cover how I did it. The relay harness comes with a fused wire that goes directly to your battery and I grounded the relay, and other components, using the many factory grounds that sit just behind the headlight mounting locations. The ballasts and relay heat up, so it's always best practice to mount these to a metal surface to allow proper heat transfer. The ballasts were mounted on either side on the Jeep's frame behind the bumper and the ignitor, which attaches to the HID bulb, was run up and to the headlight from there. The wiring harness is shown installed in the video, so hopefully, that gives a better picture of the details I mentioned here.
The LED component's wiring is much more universal and I'll end up covering that in another video. To keep it short, you provide a fused source of ignition only 12V to the controller of your choice. I make sure to again, mount the controller to a metal surface and ground it properly from there. Then, connect the wires from your halos and demon eyes to the controller. Some halos have a switchback function, so you'll then have to provide input from the factory turn signal so the halos know when to turn amber in conjunction with the factory blinkers.
The process is very involved but is something that's very rewarding for anyone looking to do this themselves. I'm happy to help answer any questions and I encourage you to check out the video below to see the entire process!
To summarize what I did, I took the factory halogen headlights and retrofitted a set of Morimoto Mini D2s 4.0 HID Projectors into them. I mounted a Profile Performance LED halo behind the shroud that covers the projector and their demon eye kit behind the lens of each projector. All of the parts can be seen in the photo below on the left with the finished product just on the right in the same photo. Every LED is an RGB unit and I wired them up to Morimoto's Bluetooth controller so the owner could control the colors and pattern of the halos and demon eyes via his phone. I highly recommend that controller as you can control three different channels so that the demon eyes and halos can be controlled separately. Not only that but if you forget to turn off the colored halos after you park, the controller defaults the halos to a white DRL to keep things legal.
I had to cut the lens off while I've read on some threads that others were able to bake the headlights and pry the lens of which would have been much preferred.
The cool thing about a retrofit is that you're only limited to your imagination- you can mount another set of halos, mount the halos on the front of the shroud, use a different shroud, etch the lens, etc. For this, I even paint matched the Raptor Liner paint job and used Raptor Liner on the inside of the headlight! Before doing so, I mocked up the 35W HID bulb setup in the headlights and turned them on for an hour to see what the temperatures would look like after a couple of hours as Raptor Liner gets soft at 212 degrees Fahrenheit.
To keep things organized with the addition of RGB wires and the cutoff shields solenoid, I used the included grommets from the Profile kits. This keeps things sealed and super clean. I made sure to label which wire was which to ensure I always knew which driver goes to which component, but in the case that I lose the labels, the top RGB cable is the demon eye and the bottom is the halo. It's important to make sure you know which is which!
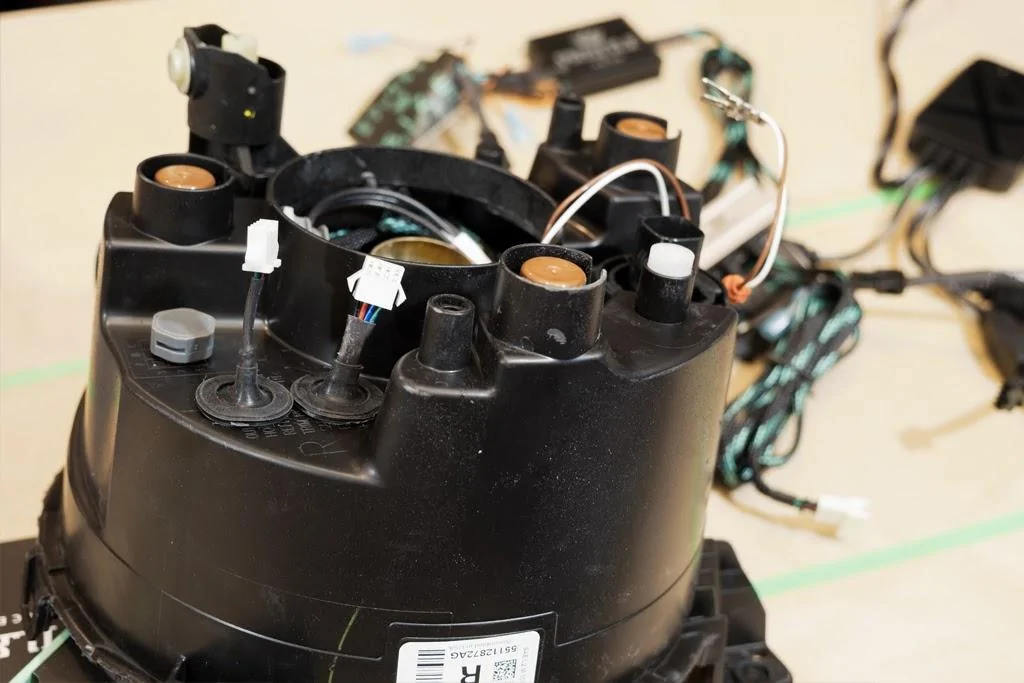
You can also see a 12mm breather vent and what this does is allow moisture to escape, but not enter. Moisture within headlight housings is an issue even OEM manufacturers face, but in the case of a retrofit when you're prying around the channels, you don't want to take chances and risk these expensive components! Mounting the breather at the top of the headlight ensures heat and moisture can escape as heat inherently rises.
I was hoping to cover more details regarding the wiring process, but I ended up dropping and breaking my camera while working on the Raptor Liner paint job and missed out here, so I'll briefly cover how I did it. The relay harness comes with a fused wire that goes directly to your battery and I grounded the relay, and other components, using the many factory grounds that sit just behind the headlight mounting locations. The ballasts and relay heat up, so it's always best practice to mount these to a metal surface to allow proper heat transfer. The ballasts were mounted on either side on the Jeep's frame behind the bumper and the ignitor, which attaches to the HID bulb, was run up and to the headlight from there. The wiring harness is shown installed in the video, so hopefully, that gives a better picture of the details I mentioned here.
The LED component's wiring is much more universal and I'll end up covering that in another video. To keep it short, you provide a fused source of ignition only 12V to the controller of your choice. I make sure to again, mount the controller to a metal surface and ground it properly from there. Then, connect the wires from your halos and demon eyes to the controller. Some halos have a switchback function, so you'll then have to provide input from the factory turn signal so the halos know when to turn amber in conjunction with the factory blinkers.
The process is very involved but is something that's very rewarding for anyone looking to do this themselves. I'm happy to help answer any questions and I encourage you to check out the video below to see the entire process!
Sponsored
Last edited:


