cort43202
Member
- Joined
- Apr 17, 2021
- Threads
- 4
- Messages
- 20
- Reaction score
- 30
- Location
- Cincinnati
- Vehicle(s)
- Gladiator Mojave (Wife's)
- Occupation
- Mgr
- Thread starter
- #1
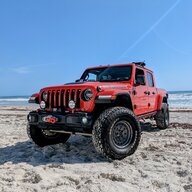
I started this thread looking for some help with installing the OEM LED Fog lights but now that I've finished the installation, I thought I'd add comments so hopefully someone else has an easier installation. I went from the OEM Mojave bumper with LED Fog lights to this bumper and also installed a Quadratec Stealth 10K lb winch. I'm new to Jeeps so some of what I say may be wrong and there could have been an easier way to do it.
Watch videos on YouTube for taking off the old bumper and to get an idea on how to install the new bumper.
Instructions aren't great. There must be a lot of differences between the Mojave and other Jeeps. For example, mounting Fog lights is not specific to the Mojave you have to get this right. More on that later.
Parts I didn't use - always scary when you get to the end and have parts left over. On the instructions listed as parts #7 & 8 - Bottom mounting brackets. Using these would have left the shock reservoir (I think that's what they are called) with no place to mount them to the new brackets and you have to take off the old ones. I left the old ones on and made it work. Holes were a little difficult to line up but it worked. Also didn't use two brackets that are used for different fog lights.
Now to the Fog Lights. You have to get this right!!! Have I mentioned you need to get this right? As mentioned above, instructions aren't great. The mounting brackets have 4 holes to mount the lights. Two on top and two on the bottom. Notice the spacing between the holes. The holes that are closest together have to go on the top when mounted to the bumper frame. Do this wrong and its like playing Chutes and Ladders.....go back 6 steps!!!
Fog Lights Part Two - I had to grind the mounting bracket so the holes would line up. Instructions say for the lights to be positioned behind the bracket. When you do this, the holes didn't line up. Put the bracket behind the light and the heat sink is in the way and keeps if from mounting flush to one another. I took a bench grinder and was able to take off enough that the holes lined up with the bracket in front.
Leave the M10 bolts loose for as long as you can so that you can get holes to line up easier. Torque is 40 ft-lbs. I thought it strange that they don't mention this when they tell you to tighten them up. Look further through the instructions and you'll find them mention this at step 16 out of 17. You've already had to tighten some of them by now. I guess that's why they tell you to read all instructions before beginning.
Pay attention to step 11. This is where you'll go from using an M10 Hex bolt to M10 button head. Instructions are clear but you get in a rhythm using the hex and you know the rest of the story.
I didn't have to use the included winch spacers for my application and if I would have, I would have had to go back and take them out as the top plate wouldn't have fit correctly.
Most people will do this on a weekend. Rugged Ridge has a phone number on the instructions, they aren't open on the weekends.
Use a dab of silicone caulk when putting the Fog Light plastic inserts on. They snap into place but the silicone on the backside is a little extra insurance.
Skid plate - the new bumper comes with a skid plate that you have to use as it wraps around the front and attaches to the top of the bumper. It doesn't protect the shock reservoir as well as the OEM one.
Take your time and have plenty of patience. You can also do this alone as none of the parts are that heavy but you could cut down on time with another person.
Good luck. Looks great and even though it was frustrating at times, I would do it again.
Watch videos on YouTube for taking off the old bumper and to get an idea on how to install the new bumper.
Instructions aren't great. There must be a lot of differences between the Mojave and other Jeeps. For example, mounting Fog lights is not specific to the Mojave you have to get this right. More on that later.
Parts I didn't use - always scary when you get to the end and have parts left over. On the instructions listed as parts #7 & 8 - Bottom mounting brackets. Using these would have left the shock reservoir (I think that's what they are called) with no place to mount them to the new brackets and you have to take off the old ones. I left the old ones on and made it work. Holes were a little difficult to line up but it worked. Also didn't use two brackets that are used for different fog lights.
Now to the Fog Lights. You have to get this right!!! Have I mentioned you need to get this right? As mentioned above, instructions aren't great. The mounting brackets have 4 holes to mount the lights. Two on top and two on the bottom. Notice the spacing between the holes. The holes that are closest together have to go on the top when mounted to the bumper frame. Do this wrong and its like playing Chutes and Ladders.....go back 6 steps!!!
Fog Lights Part Two - I had to grind the mounting bracket so the holes would line up. Instructions say for the lights to be positioned behind the bracket. When you do this, the holes didn't line up. Put the bracket behind the light and the heat sink is in the way and keeps if from mounting flush to one another. I took a bench grinder and was able to take off enough that the holes lined up with the bracket in front.
Leave the M10 bolts loose for as long as you can so that you can get holes to line up easier. Torque is 40 ft-lbs. I thought it strange that they don't mention this when they tell you to tighten them up. Look further through the instructions and you'll find them mention this at step 16 out of 17. You've already had to tighten some of them by now. I guess that's why they tell you to read all instructions before beginning.
Pay attention to step 11. This is where you'll go from using an M10 Hex bolt to M10 button head. Instructions are clear but you get in a rhythm using the hex and you know the rest of the story.
I didn't have to use the included winch spacers for my application and if I would have, I would have had to go back and take them out as the top plate wouldn't have fit correctly.
Most people will do this on a weekend. Rugged Ridge has a phone number on the instructions, they aren't open on the weekends.
Use a dab of silicone caulk when putting the Fog Light plastic inserts on. They snap into place but the silicone on the backside is a little extra insurance.
Skid plate - the new bumper comes with a skid plate that you have to use as it wraps around the front and attaches to the top of the bumper. It doesn't protect the shock reservoir as well as the OEM one.
Take your time and have plenty of patience. You can also do this alone as none of the parts are that heavy but you could cut down on time with another person.
Good luck. Looks great and even though it was frustrating at times, I would do it again.
Sponsored
Last edited: