Sponsored

Need help with CANBUS system what to look for next I’m at a loss, please help

charles121

Member
First Name
Charles
Joined
Oct 19, 2024
Threads
1
Messages
8
Reaction score
1
Location
St. Augustine
Vehicle(s)
2020 gladiator
Occupation
firefighter
2020 Jeep gladiator sport every light indicator you could imagine is lit up on the dash(Christmas tree) windshield wipers are on blower motor running, everything that is typical you read and everyone of these forms. I started investigating I did find rodent droppings so automatically went to a wire got chewed in half. After removing all interior seats, etc. I found one wire that was chewed on the back wall of the jeep. It goes to an antenna.(the wires been repaired) I have completely went through the entire harness can’t find any further issues so then I moved under the hood I found a braided ground strap from the block to the body that had corrosion on it going to be replacing that(please advise me if you think this could be an issue) the main battery was reading 12.6 V put it on the charger charged it to 13 100% charged It has sat for 24 hours since I’ve attempted to start it twice. All the issues are still going on will not turn over and the battery is at 12.5 again accessory battery tested. It was at 12.4 with 50% charge pulled it out charged it to 100% 13.5 V 24 hours later it’s at 12.5v , I have replaced the star connector behind the glove box

Now to the big mystery that I can’t figure out where to look further after reading forms and watching YouTube tested the star connection at each plug to see if I could find an issue and track a system, I have read that you should have 2.5v on can low and 2.5v on can high, minus reading on every wire on the star connector 2.5 on can low and 1.8 on can high, where should I start tracking the voltage loss please help
Sponsored

 

HorneyBadger

Well-Known Member
First Name
Samuel
Joined
Jun 21, 2019
Threads
6
Messages
755
Reaction score
1,028
Location
San Diego, Ca
Vehicle(s)
2020 JL Sport, 2022 JT Rubicon
Occupation
Performance Analyst
Do you have "any" accessories? lights, winch...etc? Have you checked the hood switches?
 

ShadowsPapa

Well-Known Member
First Name
Bill
Joined
Oct 12, 2019
Threads
247
Messages
40,514
Reaction score
54,044
Location
Runnells, Iowa
Vehicle(s)
'25 JTMX, '23 JLU 4xe, '82 SX4, '73 Javelin
Occupation
Retired auto mechanic, frmr gov't ntwrk security admin
Vehicle Showcase
3
2020 Jeep gladiator sport every light indicator you could imagine is lit up on the dash(Christmas tree) windshield wipers are on blower motor running, everything that is typical you read and everyone of these forms. I started investigating I did find rodent droppings so automatically went to a wire got chewed in half. After removing all interior seats, etc. I found one wire that was chewed on the back wall of the jeep. It goes to an antenna.(the wires been repaired) I have completely went through the entire harness can’t find any further issues so then I moved under the hood I found a braided ground strap from the block to the body that had corrosion on it going to be replacing that(please advise me if you think this could be an issue) the main battery was reading 12.6 V put it on the charger charged it to 13 100% charged It has sat for 24 hours since I’ve attempted to start it twice. All the issues are still going on will not turn over and the battery is at 12.5 again accessory battery tested. It was at 12.4 with 50% charge pulled it out charged it to 100% 13.5 V 24 hours later it’s at 12.5v , I have replaced the star connector behind the glove box

Now to the big mystery that I can’t figure out where to look further after reading forms and watching YouTube tested the star connection at each plug to see if I could find an issue and track a system, I have read that you should have 2.5v on can low and 2.5v on can high, minus reading on every wire on the star connector 2.5 on can low and 1.8 on can high, where should I start tracking the voltage loss please help
Ground strap first - you say it had "corrosion on it". That's like saying "I hurt". Where was the corrosion? on it - or at the point it bolts to the block or chassis? If it's just where it bolts up at either end, you can resolve that without replacing it - remove it, clean the block, clean the chassis where it bolts to, clean the ends of the strap or ground cable, bolt it back up. If it's where the ends are crimped onto it, that could be another issue. If it's just "on a ground strap" - it's of no real concern unless strands are broken.

It's hard to follow EXACTLY what you have done with the batteries......... not sure who tested, how tested and so on. Yes, it matters.
That's not really the "accessory" battery in the strict sense although it does more directly power certain electronics.

How did you access the batteries, and did you disconnect the main/crank battery when charging and testing it? Did you leave the two ground cables connected to each other when dealing with the main battery? If so, you may have blown one of the fuses in the high current fuse array.

It's a lot easier to "start over" than to try to figure out what you've done, so............

Pull the ground cables off the top of the IBS (intelligent battery sensor) on the main battery.
Remove and unplug the IBS and set it aside.

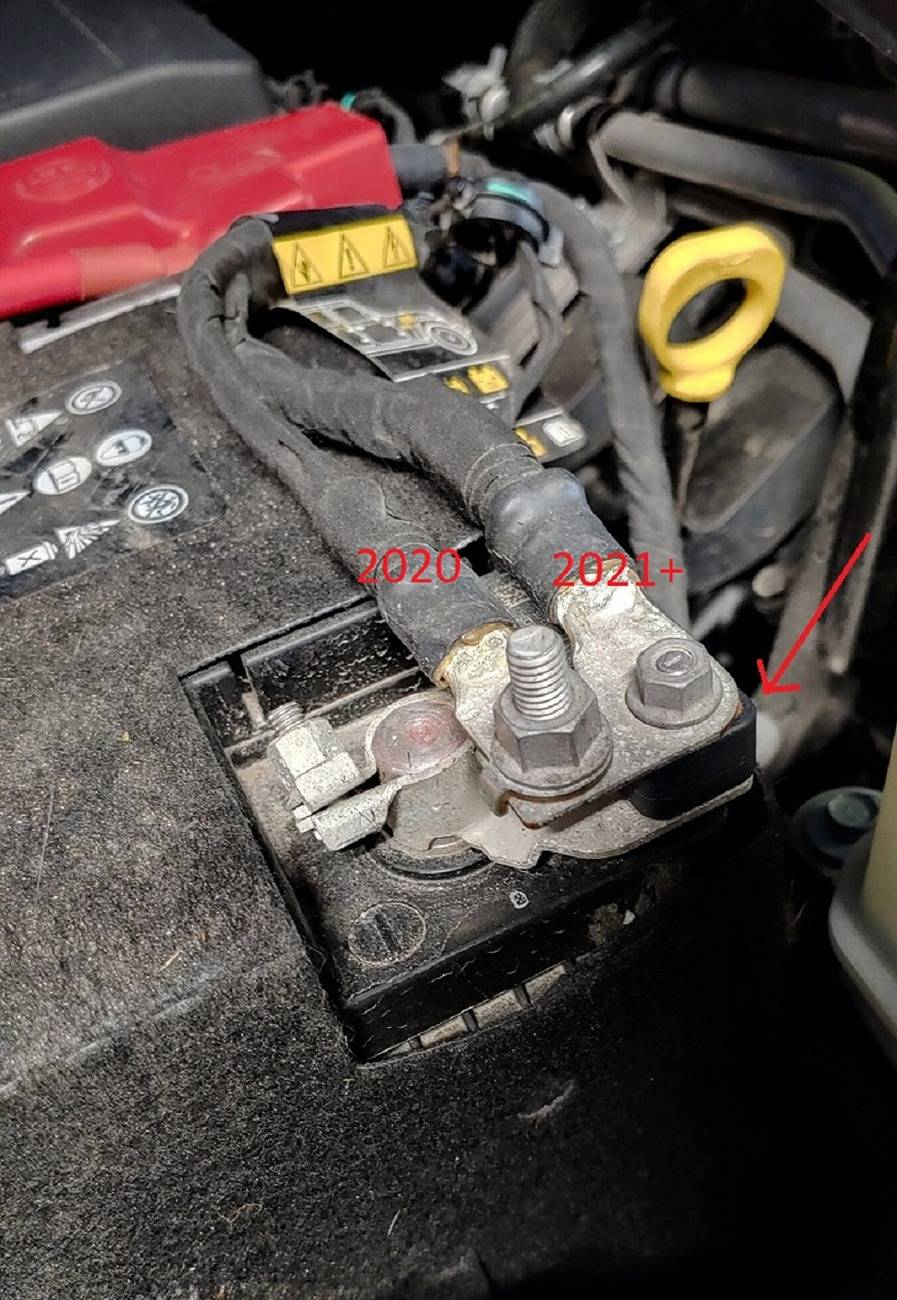
Separate the two ground cables from each other. (reference the picture below - the arrow points to the IBS)

Using a good AGM battery charger, fully charge the main battery. It will likely end up at 13.0 or so - that's surface charge. 12.7-12.8 is the actual full charge voltage of an AGM battery. Once charged, let it sit for a few hours with the negative post still naked - no IBS, etc. - on it.
Use a volt meter - not the truck - and measure the main battery voltage after sitting a bit. Without that negative cable connection, it should not lose voltage below ~12.7 or so. That's not a load test or anything, but if it drops, it's a sign you have battery troubles.

Now leaving the charger positive clamp on the main battery cable clamp (because it leads to the aux battery below via the PCR and high current fuse), put the negative charger clamp on the ground cable that leads to the aux battery below.

Jeep Gladiator Need help with CANBUS system what to look for next I’m at a loss, please help JT-neg-bat-post-cables-ibs


(don't yet reconnect the negative cables or IBS to the main battery)
Using a good AGM battery charger, fully charge the aux battery. It will likely end up at 13.0 or so - that's surface charge. 12.7-12.8 is the actual full charge voltage of an AGM battery. Once charged, let it sit for a few hours.
Use a volt meter - not the truck - and measure the aux battery voltage after sitting a bit. Without that negative cables connected to each other, thus, disconnected from the truck, it should not lose voltage below ~12.7 or so. That's not a load test or anything, but if it drops, it's a sign you have battery troubles.

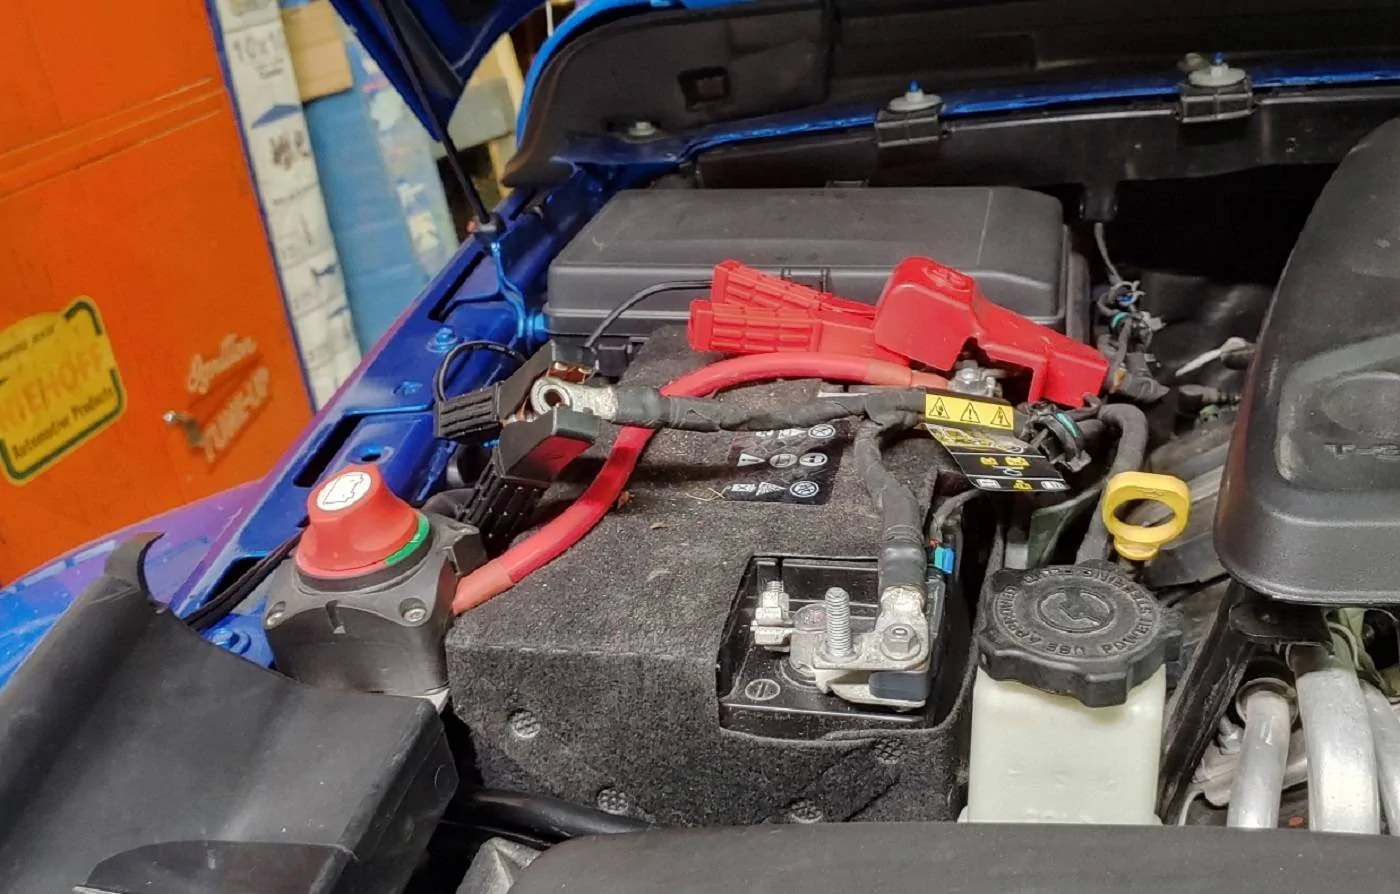
This is how I charged the aux battery by itself on the 2020 I used to have. Later models have the cables swapped around so you'd need to use the other negative cable, as shown in the picture above.

Jeep Gladiator Need help with CANBUS system what to look for next I’m at a loss, please help 2020-JT-charging


When done, if both batteries hold their charge after charging and while STILL DISCONNECTED AT THE NEGATIVE CABLES, reconnect everything and see how it goes.

I would frankly deal with correctly and properly checking the batteries before digging through the maze of wiring in these. Start with what's simple and go from there because low voltage detected by the system will cause these things to freak out like someone set off all the charges at once at your town's 4th of July fireworks display.

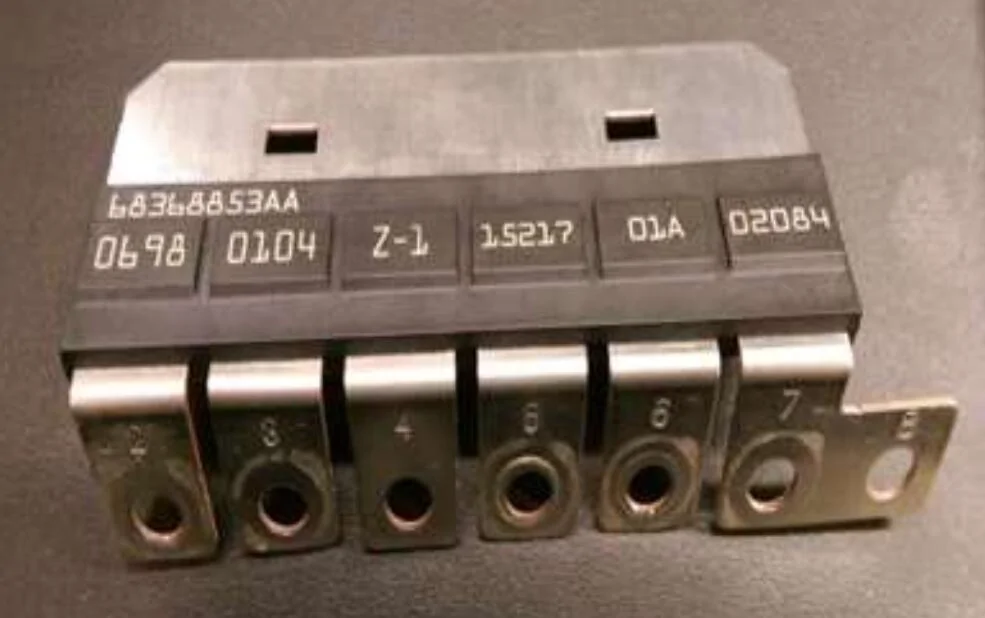
This is the high current fuse I mention - it's so super-easy to blow that fuse when working with the main battery because if that positive cable clamp even briefly touches a ground at any time, it can blow N3 in the high current fuse.

Jeep Gladiator Need help with CANBUS system what to look for next I’m at a loss, please help fuse-array-3
 
OP
OP

charles121

Member
First Name
Charles
Joined
Oct 19, 2024
Threads
1
Messages
8
Reaction score
1
Location
St. Augustine
Vehicle(s)
2020 gladiator
Occupation
firefighter
I charged both batteries out of the jeep on a good charger. I used a meter. To check both batteries wile out of the jeep separat from one another .The ground strap has a whitish green corrosion on the entire strap you can still see a little bit of silver through the corrosion, and is definitely significantly more corrosion I would say covered on the crimped end,which is the part that bolts to the body. Is there a way to check the fuse array to see if I might have blown it . Im at work today I’ll post a pic of the strap when I get home.
 
OP
OP

charles121

Member
First Name
Charles
Joined
Oct 19, 2024
Threads
1
Messages
8
Reaction score
1
Location
St. Augustine
Vehicle(s)
2020 gladiator
Occupation
firefighter
Ground strap first - you say it had "corrosion on it". That's like saying "I hurt". Where was the corrosion? on it - or at the point it bolts to the block or chassis? If it's just where it bolts up at either end, you can resolve that without replacing it - remove it, clean the block, clean the chassis where it bolts to, clean the ends of the strap or ground cable, bolt it back up. If it's where the ends are crimped onto it, that could be another issue. If it's just "on a ground strap" - it's of no real concern unless strands are broken.

It's hard to follow EXACTLY what you have done with the batteries......... not sure who tested, how tested and so on. Yes, it matters.
That's not really the "accessory" battery in the strict sense although it does more directly power certain electronics.

How did you access the batteries, and did you disconnect the main/crank battery when charging and testing it? Did you leave the two ground cables connected to each other when dealing with the main battery? If so, you may have blown one of the fuses in the high current fuse array.

It's a lot easier to "start over" than to try to figure out what you've done, so............

Pull the ground cables off the top of the IBS (intelligent battery sensor) on the main battery.
Remove and unplug the IBS and set it aside.

Separate the two ground cables from each other. (reference the picture below - the arrow points to the IBS)

Using a good AGM battery charger, fully charge the main battery. It will likely end up at 13.0 or so - that's surface charge. 12.7-12.8 is the actual full charge voltage of an AGM battery. Once charged, let it sit for a few hours with the negative post still naked - no IBS, etc. - on it.
Use a volt meter - not the truck - and measure the main battery voltage after sitting a bit. Without that negative cable connection, it should not lose voltage below ~12.7 or so. That's not a load test or anything, but if it drops, it's a sign you have battery troubles.

Now leaving the charger positive clamp on the main battery cable clamp (because it leads to the aux battery below via the PCR and high current fuse), put the negative charger clamp on the ground cable that leads to the aux battery below.

JT-neg-bat-post-cables-ibs.jpg


(don't yet reconnect the negative cables or IBS to the main battery)
Using a good AGM battery charger, fully charge the aux battery. It will likely end up at 13.0 or so - that's surface charge. 12.7-12.8 is the actual full charge voltage of an AGM battery. Once charged, let it sit for a few hours.
Use a volt meter - not the truck - and measure the aux battery voltage after sitting a bit. Without that negative cables connected to each other, thus, disconnected from the truck, it should not lose voltage below ~12.7 or so. That's not a load test or anything, but if it drops, it's a sign you have battery troubles.

This is how I charged the aux battery by itself on the 2020 I used to have. Later models have the cables swapped around so you'd need to use the other negative cable, as shown in the picture above.

2020-JT-charging.jpg


When done, if both batteries hold their charge after charging and while STILL DISCONNECTED AT THE NEGATIVE CABLES, reconnect everything and see how it goes.

I would frankly deal with correctly and properly checking the batteries before digging through the maze of wiring in these. Start with what's simple and go from there because low voltage detected by the system will cause these things to freak out like someone set off all the charges at once at your town's 4th of July fireworks display.

This is the high current fuse I mention - it's so super-easy to blow that fuse when working with the main battery because if that positive cable clamp even briefly touches a ground at any time, it can blow N3 in the high current fuse.

fuse-array-3.jpg

I charged both batteries out of the jeep on a good charger. I used a meter. To check both batteries wile out of the jeep separat from one another .The ground strap has a whitish green corrosion on the entire strap you can still see a little bit of silver through the corrosion, and is definitely significantly more corrosion I would say covered on the crimped end,which is the part that bolts to the body. Is there a way to check the fuse array to see if I might have blown it . Im at work today I’ll post a pic of the strap when I get home.
 

Sponsored

OP
OP

charles121

Member
First Name
Charles
Joined
Oct 19, 2024
Threads
1
Messages
8
Reaction score
1
Location
St. Augustine
Vehicle(s)
2020 gladiator
Occupation
firefighter
Do you have "any" accessories? lights, winch...etc? Have you checked the hood switches?
I have a few lights, no winch, the lights are all wired to a separate standalone accessory unit which has a positive and negative run to the battery to feed that unit power, but it has been disconnected to try to eliminate any outside things on the system while trying to figure this out . Hood switches?
 
OP
OP

charles121

Member
First Name
Charles
Joined
Oct 19, 2024
Threads
1
Messages
8
Reaction score
1
Location
St. Augustine
Vehicle(s)
2020 gladiator
Occupation
firefighter
Ground strap first - you say it had "corrosion on it". That's like saying "I hurt". Where was the corrosion? on it - or at the point it bolts to the block or chassis? If it's just where it bolts up at either end, you can resolve that without replacing it - remove it, clean the block, clean the chassis where it bolts to, clean the ends of the strap or ground cable, bolt it back up. If it's where the ends are crimped onto it, that could be another issue. If it's just "on a ground strap" - it's of no real concern unless strands are broken.

It's hard to follow EXACTLY what you have done with the batteries......... not sure who tested, how tested and so on. Yes, it matters.
That's not really the "accessory" battery in the strict sense although it does more directly power certain electronics.

How did you access the batteries, and did you disconnect the main/crank battery when charging and testing it? Did you leave the two ground cables connected to each other when dealing with the main battery? If so, you may have blown one of the fuses in the high current fuse array.

It's a lot easier to "start over" than to try to figure out what you've done, so............

Pull the ground cables off the top of the IBS (intelligent battery sensor) on the main battery.
Remove and unplug the IBS and set it aside.

Separate the two ground cables from each other. (reference the picture below - the arrow points to the IBS)

Using a good AGM battery charger, fully charge the main battery. It will likely end up at 13.0 or so - that's surface charge. 12.7-12.8 is the actual full charge voltage of an AGM battery. Once charged, let it sit for a few hours with the negative post still naked - no IBS, etc. - on it.
Use a volt meter - not the truck - and measure the main battery voltage after sitting a bit. Without that negative cable connection, it should not lose voltage below ~12.7 or so. That's not a load test or anything, but if it drops, it's a sign you have battery troubles.

Now leaving the charger positive clamp on the main battery cable clamp (because it leads to the aux battery below via the PCR and high current fuse), put the negative charger clamp on the ground cable that leads to the aux battery below.

JT-neg-bat-post-cables-ibs.jpg


(don't yet reconnect the negative cables or IBS to the main battery)
Using a good AGM battery charger, fully charge the aux battery. It will likely end up at 13.0 or so - that's surface charge. 12.7-12.8 is the actual full charge voltage of an AGM battery. Once charged, let it sit for a few hours.
Use a volt meter - not the truck - and measure the aux battery voltage after sitting a bit. Without that negative cables connected to each other, thus, disconnected from the truck, it should not lose voltage below ~12.7 or so. That's not a load test or anything, but if it drops, it's a sign you have battery troubles.

This is how I charged the aux battery by itself on the 2020 I used to have. Later models have the cables swapped around so you'd need to use the other negative cable, as shown in the picture above.

2020-JT-charging.jpg


When done, if both batteries hold their charge after charging and while STILL DISCONNECTED AT THE NEGATIVE CABLES, reconnect everything and see how it goes.

I would frankly deal with correctly and properly checking the batteries before digging through the maze of wiring in these. Start with what's simple and go from there because low voltage detected by the system will cause these things to freak out like someone set off all the charges at once at your town's 4th of July fireworks display.

This is the high current fuse I mention - it's so super-easy to blow that fuse when working with the main battery because if that positive cable clamp even briefly touches a ground at any time, it can blow N3 in the high current fuse.

fuse-array-3.jpg
I have aftermarket fenders and inner fenders so I access the second battery from the wheel well, I removing the fender. I think I have answered everything you asked me. I appreciate you helping me out.
 

Dp7

Well-Known Member
First Name
Dave
Joined
Aug 16, 2024
Threads
3
Messages
119
Reaction score
228
Location
Oregon
Vehicle(s)
'24 JT Nighthawk, '20 JL Willys
Is there a way to check the fuse array to see if I might have blown it
If your batteries are reinstalled, you can disconnect the N3 wire from the high amp fuse bus and check voltage on the N3 terminal. If the fuse is not blown, it will be connected through the high amp bus to your main battery positive (N2), so you should read main battery voltage (if you have your negative cable disconnected from your main battery, you can just use your meter between N3 and the negative battery post).

If your batteries are not in the Jeep, you can check continuity between N3 and N2... no continuity, blown fuse.

I have had flashing dash lights and exorcist wipers with a bad/low aux battery a few times. I've also had the N3 fuse blow from a bad battery, which causes the aux to receive no charge from the alternator... leading to crazy dash electronics.
 

Pilsner

Well-Known Member
Joined
Feb 28, 2023
Threads
10
Messages
245
Reaction score
225
Location
Midwest
Vehicle(s)
21 Bronco, 21 JTR
I could be wrong, but if you had chewed wires already, I will bet you find another one or two. This is coming from someone that has now dealt with 12 damned rodent attacks in the last 3 years. Every time I think I have checked everywhere, I eventually fine the missing one. I have repaired approaching 100 individual wires on 4 total vehicles. I have not had any that caused secondary issues yet.
I would check under the control modules, in the trans tunnel, follow the harnesses into the fender and along the frame. If you have chewed wires, odds are on more chewed wires. That is where I would bet money.
Also, start fighting the rodents now. I have found success on using both ultrasonic repellants along with poison bait stations. It seems to take both in my case. Keep an eye on the bait stations. When mine go empty, I get chewed wires.
 

Sponsored

OP
OP

charles121

Member
First Name
Charles
Joined
Oct 19, 2024
Threads
1
Messages
8
Reaction score
1
Location
St. Augustine
Vehicle(s)
2020 gladiator
Occupation
firefighter
So what did you find out?
@charles121
I have been taking time to carefully go through the harness. I haven’t found any other signs of chewing so I just dropped the $500 on batteries on my way home now to put those in. It’s hard for me to believe that it’s a coincidence that the batteries went bad at the same time as these other issues, but I will update you in a few hours
 

ShadowsPapa

Well-Known Member
First Name
Bill
Joined
Oct 12, 2019
Threads
247
Messages
40,514
Reaction score
54,044
Location
Runnells, Iowa
Vehicle(s)
'25 JTMX, '23 JLU 4xe, '82 SX4, '73 Javelin
Occupation
Retired auto mechanic, frmr gov't ntwrk security admin
Vehicle Showcase
3
I have been taking time to carefully go through the harness. I haven’t found any other signs of chewing so I just dropped the $500 on batteries on my way home now to put those in. It’s hard for me to believe that it’s a coincidence that the batteries went bad at the same time as these other issues, but I will update you in a few hours
Please be sure to charge each battery before install. It's in the docs that the IBS should be put on fully charged battery.
With the history of jeep batteries, anything is possible!

And good luck. Hope it works out.
 
OP
OP

charles121

Member
First Name
Charles
Joined
Oct 19, 2024
Threads
1
Messages
8
Reaction score
1
Location
St. Augustine
Vehicle(s)
2020 gladiator
Occupation
firefighter
No luck same issues with new charged batteries, I did find a wire chewed fixed that , my guess is I have to keep searching the wires , I have to be missing something
 

ourjeeps

Well-Known Member
First Name
Dennis
Joined
Jan 22, 2025
Threads
3
Messages
60
Reaction score
56
Location
Traveling the USA
Vehicle(s)
2024 JT RubiconX 2017 JKU Rubicon RECON 1974 CJ-5 AMC304 T18A
Occupation
MILVET Aviation PrgmMgr Prof Vintner Retired
I replaced the entire wiring harness, and ended up finding 12 spots chewed, everything is fixed and running now
Charles:

Read your whole saga in this thread. Nice to see all the detailed help/suggestions. - and that you have your vehicle back and functioning after all that effort!

👉 Was wondering specifically which "entire wiring harness(es)" you ended up replacing ? Lots of wire runs and harnesses in a ~18 foot Gladiator truck...

Decades ago in another vehicle we owned, we often had annual rodent chews in the oxygen sensor pigtail wiring - likely something in the high temp insulation chemistry the rodents specifically favored. All the other wire harnesses/runs were unmolested. The gent at the local auto parts store said he sold a lot of oxygen sensors each winter, in our rural area.

I also recall hearing of Honda's and Toyota's class action lawsuits from using (enviro friendly) soy-based (vegetable oil) based insulation. The brands sustained a huge number of rodent attacks compared to vehicles with conventional/normal wiring insulation. Just sounds like a REAL BAD idea to me (the soy-based insulation).

👉 See the 2018 Car& Driver article (linked title) Does Your Car Have Wiring That Rodents Think Is Tasty? --- Soy-based insulation in cars may be better for the environment, but it can also attract hungry vermin.

With each passing model year, I appreciate more and more the K.I.S.S. design of our non-electronic (not even a radio!) 304/T-18A equipped '74 CJ-5 w/analog gauges, carburetor, mechanical lockers, and the unsophisticated mechanical simplicity of leaf springs/etc. ... 🙄
Sponsored

 
  • Like
Reactions: MT1


Top