Sponsored

Rear Axle Seal Install Question

Food2000

Well-Known Member
First Name
vinh
Joined
Nov 21, 2019
Threads
9
Messages
63
Reaction score
34
Location
San Diego
Vehicle(s)
Gladiator Sport
Hi,

Hi Yall,
2020 Jeep gladiator 6speed manual trans
4.88 re-geared.
55k miles

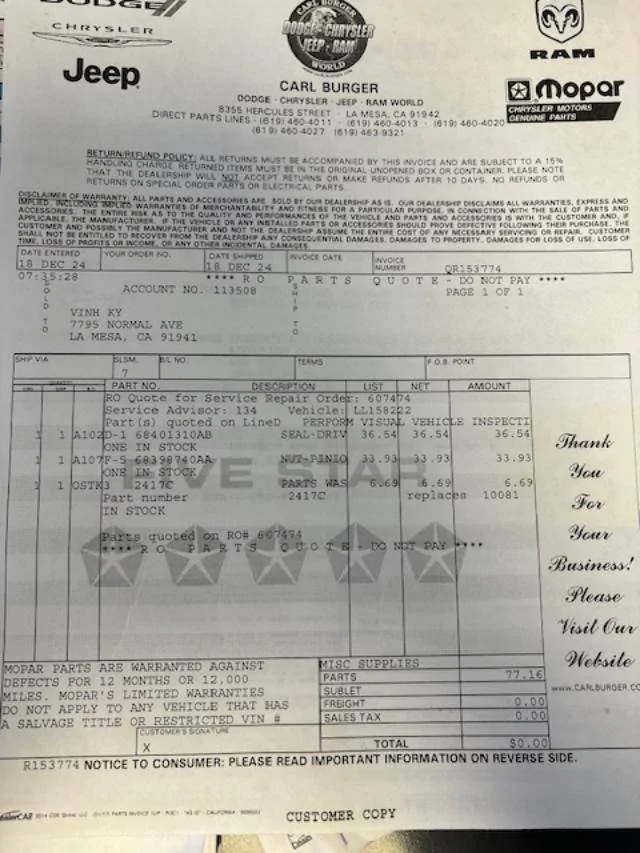
Question: replacing rear driveshaft seal.

My jeep is at the dealership for the w19 recall (pressure plate heating up and catching on fire) and they mentioned my rear driveshaft pinion seal is leaking... they want 1k to fix.
i am mechanically inclined so I've been kinda searching and here's what my repair looks like:
- remove driveshaft and remove the nut, pull the hub
- pry out seal, clean and replace seal.

- here's what i am not understanding is... there's some crush washers we're supposed to replace (looks like it goes behind the pinion)?
- how to pre-load the bearing?
- what ft lbs as i am reading 360ft lbs for that nut (new nut is required)?

Just checking on the steps as some of the videos i am watching are dana 44 but i am reading.. some are different for this repair?

Thanks for any advice
Jeep Gladiator Rear Axle Seal Install Question 1f642
, i don't see a puddle or anything on my garage floor so.. i imagine it's a slow leak.

Jeep Gladiator Rear Axle Seal Install Question thumbnail
Sponsored


Bbannongmu

Well-Known Member
First Name
JTR.Spartacus
Joined
Jan 18, 2020
Threads
34
Messages
2,146
Reaction score
2,531
Location
Earth
Website
m.facebook.com
Vehicle(s)
2020 Jeep Gladiator Rubicon
Build Thread
Link
Occupation
Certified Emergency Manager
Vehicle Showcase
1
Some thoughts. Haven't done an Advantek axle but done a few Dana 44s so YMMV...

First - verify the seal is actually leaking -- some shops make stuff up to get $$$.

Get the exploded view diagram and get the proper crush sleeve and any spacers, caps, shims, seals, and a new nut that you need. Study the diagram and understand how the parts work.

Doesn't matter how you get the seal out as long as you don't score anything but a good seal driver is helpful to install the new one- I've made them from wood in the past. Make sure you have a good ft/lb torque wrench and an inch lb torque wrench and a puller for the flange.

Get the proper torque specs and have them handy. Take your time.

Check the preload and write it down before you disassemble the pinion.
  • You do this by jacking up and supporting the Jeep securely - removing the wheels, brakes, axle shafts to remove drag
  • Mark the drive shaft and yoke relationship and the remove and support the driveshaft out of the way
  • check the flange/pinion yoke for end play. If any - stop --you have a different problem. If no play, proceed.
  • Then put the inch pond torque wrench on the pinion nut and observe the torque to rotation (aka how much torque does it require to rotate the pinion freely) - this is the preload value.
  • Check it again by rotating the other direction.
  • If the same and in spec, write it down. If significantly different, look for anything the pinion might be hanging up on. and repeat until you have identical values - trust me, this is worth the extra 2 minutes. It is possible that the preload is out with a faulty seal but not likely- that's usually a bearing, shim, or race problem or internals of the diff/R&P- a bigger problem

  • Next - check the torque of the pinion nut you are removing and write it down. This usually requires some ingenuity, a friend and/ or the correct tools to hold the yoke/flange still
  • Remove flange - use puller/slide as needed if you have one
  • Disassemble the seal
  • Re assemble per diagram
  • You need a minimum torque and maximum torque value. If you don't have this / can't find it, you can try using the torque from the pinion nut you removed as a bench mark
  • This is where preload comes in. You put the flange back on and a new pinion nut and tighten to the minimum torque or less than the torque of the nut you removed (I do like 60%) and check for play and if none (if you have play on the flange/yoke - slowly tighten and check again until no play), check the preload with an inch pound torque wrench - both ways as previously described. you can tighten the pinion nut to increase the crush / preload.
  • If you go too far, you'll need to back off and replace the crush sleeve because wrong preload can lead to premature bearing failure.
This all sounds complicated but it's important to make sure your pinion bearing will last a long time.
As mentioned - YMMV but this is the main idea. Post pics and Good luck!
 
OP
OP
Food2000

Food2000

Well-Known Member
First Name
vinh
Joined
Nov 21, 2019
Threads
9
Messages
63
Reaction score
34
Location
San Diego
Vehicle(s)
Gladiator Sport
Some thoughts. Haven't done an Advantek axle but done a few Dana 44s so YMMV...

First - verify the seal is actually leaking -- some shops make stuff up to get $$$.

Get the exploded view diagram and get the proper crush sleeve and any spacers, caps, shims, seals, and a new nut that you need. Study the diagram and understand how the parts work.

Doesn't matter how you get the seal out as long as you don't score anything but a good seal driver is helpful to install the new one- I've made them from wood in the past. Make sure you have a good ft/lb torque wrench and an inch lb torque wrench and a puller for the flange.

Get the proper torque specs and have them handy. Take your time.

Check the preload and write it down before you disassemble the pinion.
  • You do this by jacking up and supporting the Jeep securely - removing the wheels, brakes, axle shafts to remove drag
  • Mark the drive shaft and yoke relationship and the remove and support the driveshaft out of the way
  • check the flange/pinion yoke for end play. If any - stop --you have a different problem. If no play, proceed.
  • Then put the inch pond torque wrench on the pinion nut and observe the torque to rotation (aka how much torque does it require to rotate the pinion freely) - this is the preload value.
  • Check it again by rotating the other direction.
  • If the same and in spec, write it down. If significantly different, look for anything the pinion might be hanging up on. and repeat until you have identical values - trust me, this is worth the extra 2 minutes. It is possible that the preload is out with a faulty seal but not likely- that's usually a bearing, shim, or race problem or internals of the diff/R&P- a bigger problem

  • Next - check the torque of the pinion nut you are removing and write it down. This usually requires some ingenuity, a friend and/ or the correct tools to hold the yoke/flange still
  • Remove flange - use puller/slide as needed if you have one
  • Disassemble the seal
  • Re assemble per diagram
  • You need a minimum torque and maximum torque value. If you don't have this / can't find it, you can try using the torque from the pinion nut you removed as a bench mark
  • This is where preload comes in. You put the flange back on and a new pinion nut and tighten to the minimum torque or less than the torque of the nut you removed (I do like 60%) and check for play and if none (if you have play on the flange/yoke - slowly tighten and check again until no play), check the preload with an inch pound torque wrench - both ways as previously described. you can tighten the pinion nut to increase the crush / preload.
  • If you go too far, you'll need to back off and replace the crush sleeve because wrong preload can lead to premature bearing failure.
This all sounds complicated but it's important to make sure your pinion bearing will last a long time.
As mentioned - YMMV but this is the main idea. Post pics and Good luck!
Yes, that's a good idea... i'll double check to see if it's actually leaking as.. i didn't notice anything when i last inspected it.

I found this Video: and at the 28 min, they do the pre-load which looks like.. they just check the resistance which is at 14-15 ftlbs while spinning...

I think everything makes sense to me except the preload part, i'll need to research that part a little more, thanks for all the info though, i review some more over time and post how it goes :)
 

Svenable

Well-Known Member
First Name
Steve
Joined
Apr 23, 2024
Threads
0
Messages
51
Reaction score
44
Location
Houston
Vehicle(s)
2023 JT Rubicon, 2012 JKU Rubicon
Occupation
Retired
From the Service Manual:


INSTALLATION


During installation, torque the fasteners to the specifications in the torque table(s) below.


1 - Seal Installer
2 - Driver Handle

  1. Apply a light coating of gear lubricant on the lip of the pinion seal. Install the pinion seal using the Installer, Seal 9684 and C-4171 .


    1 - Pinion Flange
    2 - Pinion Flange Installer
  2. Install the pinion flange on the pinion shaft with the reference marks aligned.
  3. Install the pinion flange using the Installer, Pinion Flange 2054200030 (1) on the pinion shaft.
    1 - Pinion Flange
  4. Hold the pinion flange with Wrench, Spanner 6958 and tighten the Installer, Pinion Flange 2054200030 nut. Tighten the nut to remove all end play.
  5. Install the pinion washer and a NEW nut on the pinion gear.


    1 - Pinion Flange
  6. Hold the pinion flange with Wrench, Spanner 6958 and tighten the pinion nut to the proper torque specification.


    1 - Inch Pound Torque Wrench
  7. Measure the Total Torque To Rotate (TTTR) inch pound torque wrench. Total torque to rotate is recorded reading plus 0.56 N·m (5 In. Lbs.).
  8. If TTTR is low, Hold the pinion flange with a suitable tool and tighten the pinion nut in 6.8 N·m (5 Ft. Lbs.) increments until TTTR is achieved.
    NOTE: If maximum tightening torque of 678 N·m (500 Ft. Lbs.) is reached before torque to rotate is achieved, the collapsible spacer may have been damaged. Never loosen pinion gear nut to decrease rotating torque and never exceed specified preload torque. Failure to follow these instruction may result in damage.
  9. Install the driveshaft (Refer to 03 - Differential and Driveline/SHAFTS, Axle/Drive/Half/Removal and Installation) .
  10. Install brake components (Refer to 05 - Brakes, Base/Hydraulic/Mechanical/ROTOR, Brake/Removal and Installa
Sorry for the poor quality of copy and past.

Many of us pull the axle seal, clean everything up and reinstall the new seal, we do not disassemble beyond what is necessary to remove the seal, ( driveshaft, tires, rotors, everything easy to "unload" the TTTR number). You can buy a new pinion nut or clean the pinion threads and nut with brake cleaner and use red loctite on the threads of the nut.

Pinion nut Torque is 360 ft0lbs or 488 N-m.
TTTR 1.8 - 5.8 N·m (16 - 51 in. lbs.) New bearings

I would recommend checking the torque to rotate immediately before you remove the pinion nut, yoke and seal. I know you will have the axle shafts in and increasing the TTTR but if you tighten the pinion nut to the original TTTR You will probably be good.

The Service manual does not recommend disassembly of the differential and replacement of the crush sleeve, like in the old days. Pulling the axle shafts is not very difficult, just takes more time and will in effect be following the OEM procedure.

I'm sure there are others on this forum with experience with your issue on their previous or current Jeeps. Maybe they will chime in with their perspective. $1000 is a lot for a pretty simple repair IMO.
 

Svenable

Well-Known Member
First Name
Steve
Joined
Apr 23, 2024
Threads
0
Messages
51
Reaction score
44
Location
Houston
Vehicle(s)
2023 JT Rubicon, 2012 JKU Rubicon
Occupation
Retired
I am using the 2023 Gladiator Manuel for this procedure. I have done this same process on 2 TJ's a Dodge Ram 2500 AAM 11.5 axle, and my JK D44's with slight variations between vehicles. Both front and rear pinion seals.
 

Sponsored

OP
OP
Food2000

Food2000

Well-Known Member
First Name
vinh
Joined
Nov 21, 2019
Threads
9
Messages
63
Reaction score
34
Location
San Diego
Vehicle(s)
Gladiator Sport
Hi Everyone,

So... i got my jeep back from the dealer (they replaced whole clutch) and i do see.. it's "wet" from the a leak in the driveshaft seal but when i pulled the diff fill bolt, fluid came out.

Imo... it's a very.. very slow leak and i am thinking of just keeping an eye on it. Maybe if i start to see a visible Drip i'll tackle it?
 

LouisvEarlleJT

Well-Known Member
Joined
Mar 10, 2023
Threads
34
Messages
1,082
Reaction score
1,897
Location
USA
Vehicle(s)
2023 JT Willys Earl
Hi Everyone,

So... i got my jeep back from the dealer (they replaced whole clutch) and i do see.. it's "wet" from the a leak in the driveshaft seal but when i pulled the diff fill bolt, fluid came out.

Imo... it's a very.. very slow leak and i am thinking of just keeping an eye on it. Maybe if i start to see a visible Drip i'll tackle it?
In my experience those kinds of leaks never really amount to much and you can let it go until you feel like tackling it.
 

Bbannongmu

Well-Known Member
First Name
JTR.Spartacus
Joined
Jan 18, 2020
Threads
34
Messages
2,146
Reaction score
2,531
Location
Earth
Website
m.facebook.com
Vehicle(s)
2020 Jeep Gladiator Rubicon
Build Thread
Link
Occupation
Certified Emergency Manager
Vehicle Showcase
1
In my experience those kinds of leaks never really amount to much and you can let it go until you feel like tackling it.
I had one of these from 1995 - 2012 on an old M-38A1. Never did fix it and it never ran dry. Sold the seal with the Jeep.
Sponsored


Top