Sponsored

Auxbeam and off-road lights

TheDerb

Well-Known Member
First Name
Mike
Joined
May 26, 2022
Threads
43
Messages
322
Reaction score
771
Location
Murfreesboro, TN
Vehicle(s)
1984 CJ-7, 2025 Ford Maverick Hybrid XL.
I’m new to electrical mods. I have a couple of KC lights I Want to install on my front bumper.

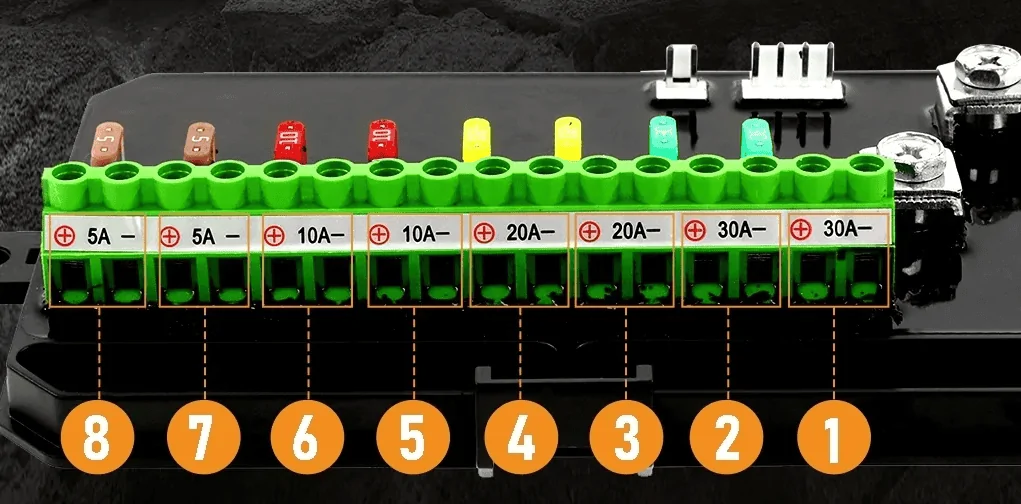
I have an 8 button Auxbeam switch I just installed. I am looking at the KC instructions prior to purchasing, and the wires out of the lights all end In closed metal loops. These won’t fit into the auxbeam switch panel.

Do these lights come with bare wire ends as well, or will I just need to strip the wires to facilitate their installation into the switch panel?

thanks for your help.
Sponsored


Phil_R

Well-Known Member
First Name
Phil
Joined
Dec 19, 2021
Threads
24
Messages
243
Reaction score
475
Location
Tennessee
Vehicle(s)
Jeep Gladiator Willys / Jeep Grand Cherokee L
Occupation
Retired for now!
Hi Mike! I can't comment on your KC lights, however I would be interested to know how your Auxbeam switch install went. I have a 6 button switch ordered and am not sure how and where I am going to run the wires and mount the switch yet. How did you do yours? Thanks and hello from Smithville! (Used to live in the Boro!)
 

ATL_Rubi

Well-Known Member
First Name
George
Joined
Oct 7, 2022
Threads
24
Messages
813
Reaction score
847
Location
Atlanta
Vehicle(s)
Caretaker to various super cars
Occupation
Sales
Most likely would need to strip the metal ends off and use the bare wire to the auxbeam, but I am unsure what the auxbeam panel looks like.
 
OP
OP
TheDerb

TheDerb

Well-Known Member
First Name
Mike
Joined
May 26, 2022
Threads
43
Messages
322
Reaction score
771
Location
Murfreesboro, TN
Vehicle(s)
1984 CJ-7, 2025 Ford Maverick Hybrid XL.
Hi Mike! I can't comment on your KC lights, however I would be interested to know how your Auxbeam switch install went. I have a 6 button switch ordered and am not sure how and where I am going to run the wires and mount the switch yet. How did you do yours? Thanks and hello from Smithville! (Used to live in the Boro!)
Hello!

So... The install went great. I didn't take any pictures of the install, but here are a few memorable things, and ill over-explain in case anybody searches one day-

1) I have a base Sport. (obligatory "Its a manual) I immediately installed Oracle headlights with daytime running lights, and I had used Fuse 52 to do this. I needed to adjust, so I moved the DRL's to fuse 57, which is for Drivers' heated seats for those who have them, but in my case it's a placeholder. The power draw of the DRL's is minimum, for what it's worth. The Auxbeam took over fuse 52.

2) I decided to adhere the main 60a fuse it comes with via a 3m strip to the top of the fuse box. It's not really out of the way, but the goal of the switch is to avoid having to dig into the fuse box.

3) I installed the wiring input box sort of above and to the right of the fuse box. I saw a YouTube video where somebody else did the same thing, and it works just fine.

4) Finding the firewall access was easy, I drilled an unnecessary hole in my panel in my dashboard, but such is life. I mounted the control pad via 3m strips to my dashboard because Im torn between putting it above and to the left of the steering wheel, or rigging it up at the top of the A pillar with the included mounts. I might even somehow make a hole in the A-Pillar cover that will allow it to mount. No need to rush on that, though. I bought the extra 47" cable for the controller just in case I end up needing it.

As far as attaching anything to it- I'm nervous as hell because I just don't have any experience, but I figure if as many people out there are using these things as they say there are... well, I can't mess it up too bad. And as long as there is a red and a black wire its sort of self explanatory... I guess.

Good luck!
 

HooliganActual

Well-Known Member
First Name
Robert
Joined
Jun 27, 2020
Threads
9
Messages
1,410
Reaction score
3,601
Location
10 miles from the Sun
Vehicle(s)
2020 Gladiator Rubicon
Occupation
Retired
Based on this picture from their website (if this is the same as yours), you would need to cut the ring terminals off the ends of the KC wiring, strip it back about a quarter inch, insert into your preferred circuit location on the green terminal strip and then tighten the corresponding screw(s) on the top of the terminal strip.
Jeep Gladiator Auxbeam and off-road lights Screen Shot 2023-04-06 at 8.12.15 AM
 

Sponsored

Phil_R

Well-Known Member
First Name
Phil
Joined
Dec 19, 2021
Threads
24
Messages
243
Reaction score
475
Location
Tennessee
Vehicle(s)
Jeep Gladiator Willys / Jeep Grand Cherokee L
Occupation
Retired for now!
Hello!

So... The install went great. I didn't take any pictures of the install, but here are a few memorable things, and ill over-explain in case anybody searches one day-

1) I have a base Sport. (obligatory "Its a manual) I immediately installed Oracle headlights with daytime running lights, and I had used Fuse 52 to do this. I needed to adjust, so I moved the DRL's to fuse 57, which is for Drivers' heated seats for those who have them, but in my case it's a placeholder. The power draw of the DRL's is minimum, for what it's worth. The Auxbeam took over fuse 52.

2) I decided to adhere the main 60a fuse it comes with via a 3m strip to the top of the fuse box. It's not really out of the way, but the goal of the switch is to avoid having to dig into the fuse box.

3) I installed the wiring input box sort of above and to the right of the fuse box. I saw a YouTube video where somebody else did the same thing, and it works just fine.

4) Finding the firewall access was easy, I drilled an unnecessary hole in my panel in my dashboard, but such is life. I mounted the control pad via 3m strips to my dashboard because Im torn between putting it above and to the left of the steering wheel, or rigging it up at the top of the A pillar with the included mounts. I might even somehow make a hole in the A-Pillar cover that will allow it to mount. No need to rush on that, though. I bought the extra 47" cable for the controller just in case I end up needing it.

As far as attaching anything to it- I'm nervous as hell because I just don't have any experience, but I figure if as many people out there are using these things as they say there are... well, I can't mess it up too bad. And as long as there is a red and a black wire its sort of self explanatory... I guess.

Good luck!
Thanks for the explanation, Mike! Can you please tell me where the firewall access hole is located, where you ran the control wire into the cab? Thanks a million!!!
 

Bobchadwickga

Well-Known Member
First Name
Bob
Joined
May 15, 2022
Threads
13
Messages
139
Reaction score
124
Location
Atlanta, GA
Vehicle(s)
2022 Jeep Gladiator Rubicon
Occupation
Insurance
I just added two sets of KC Lights to my JT connecting to a Voswitch.. The first was the low draw Gravity® LED Pro6 lights. The second were the higher drawing Appollo Pros.

Both came with a wiring harness. The Gravity's had a 5 amp fuse it in with all the same size wires. The Appollo's had a 20 amp fuse and two sizes of wires.

For the Gavity's I built my own wiring harness. I took the provided wires to the hardware store where they matched the wire size.

For the Appollo's I used the provided harness cutting out the various pieces of hardware such as the fuse, relay, etc. and shortened it to meet my needs.

Both attached to the Voswich box and did not require running wiring (beyond the wiring that I had already run for the Voswitch) through the firewall. I changed the fuses inside the Voswitch to match the fuse that was in the provided wiring harness.
 
OP
OP
TheDerb

TheDerb

Well-Known Member
First Name
Mike
Joined
May 26, 2022
Threads
43
Messages
322
Reaction score
771
Location
Murfreesboro, TN
Vehicle(s)
1984 CJ-7, 2025 Ford Maverick Hybrid XL.
Thanks for the explanation, Mike! Can you please tell me where the firewall access hole is located, where you ran the control wire into the cab? Thanks a million!!!
The firewall access is on the drivers side- it is a few inches down from the windshield- there is a an approximately 2" round black plastic cap that covers the hole. I left the cap out of the firewall hole and used a scrap of corrugated wiring wrap to protect the (already protected) wiring. You could probably drill a hole into the cap, and run the wiring through it and then click it back into the firewall hole and not lose any of the original pieces while retaining the original cap, but I wasn't worried.

You then run the cabling through dash by removing the side panel of the dash (this is the piece that's face "touches" the door when the door is closed. Run it up through the dash, then do with it as you wish.

You'll definitely want to get a set of plastic trim removal tools. they're probably about five bucks online.
 

Phil_R

Well-Known Member
First Name
Phil
Joined
Dec 19, 2021
Threads
24
Messages
243
Reaction score
475
Location
Tennessee
Vehicle(s)
Jeep Gladiator Willys / Jeep Grand Cherokee L
Occupation
Retired for now!
The firewall access is on the drivers side- it is a few inches down from the windshield- there is a an approximately 2" round black plastic cap that covers the hole. I left the cap out of the firewall hole and used a scrap of corrugated wiring wrap to protect the (already protected) wiring. You could probably drill a hole into the cap, and run the wiring through it and then click it back into the firewall hole and not lose any of the original pieces while retaining the original cap, but I wasn't worried.

You then run the cabling through dash by removing the side panel of the dash (this is the piece that's face "touches" the door when the door is closed. Run it up through the dash, then do with it as you wish.

You'll definitely want to get a set of plastic trim removal tools. they're probably about five bucks online.
Thank you, Mike! Great info to know!!!
Sponsored


Top