Sponsored

SwitchPro SP9000 install

chorky

Well-Known Member
First Name
Chad
Joined
Feb 26, 2022
Threads
175
Messages
3,466
Reaction score
3,801
Location
Montana
Website
www.youtube.com
Vehicle(s)
'22JTR, '06 LJ, '06 TJ GE
Build Thread
Link
Occupation
GIS Specialist
UPDATE: See Post #3 for beginning of install. Hopefully this may help others interested in doing the same.


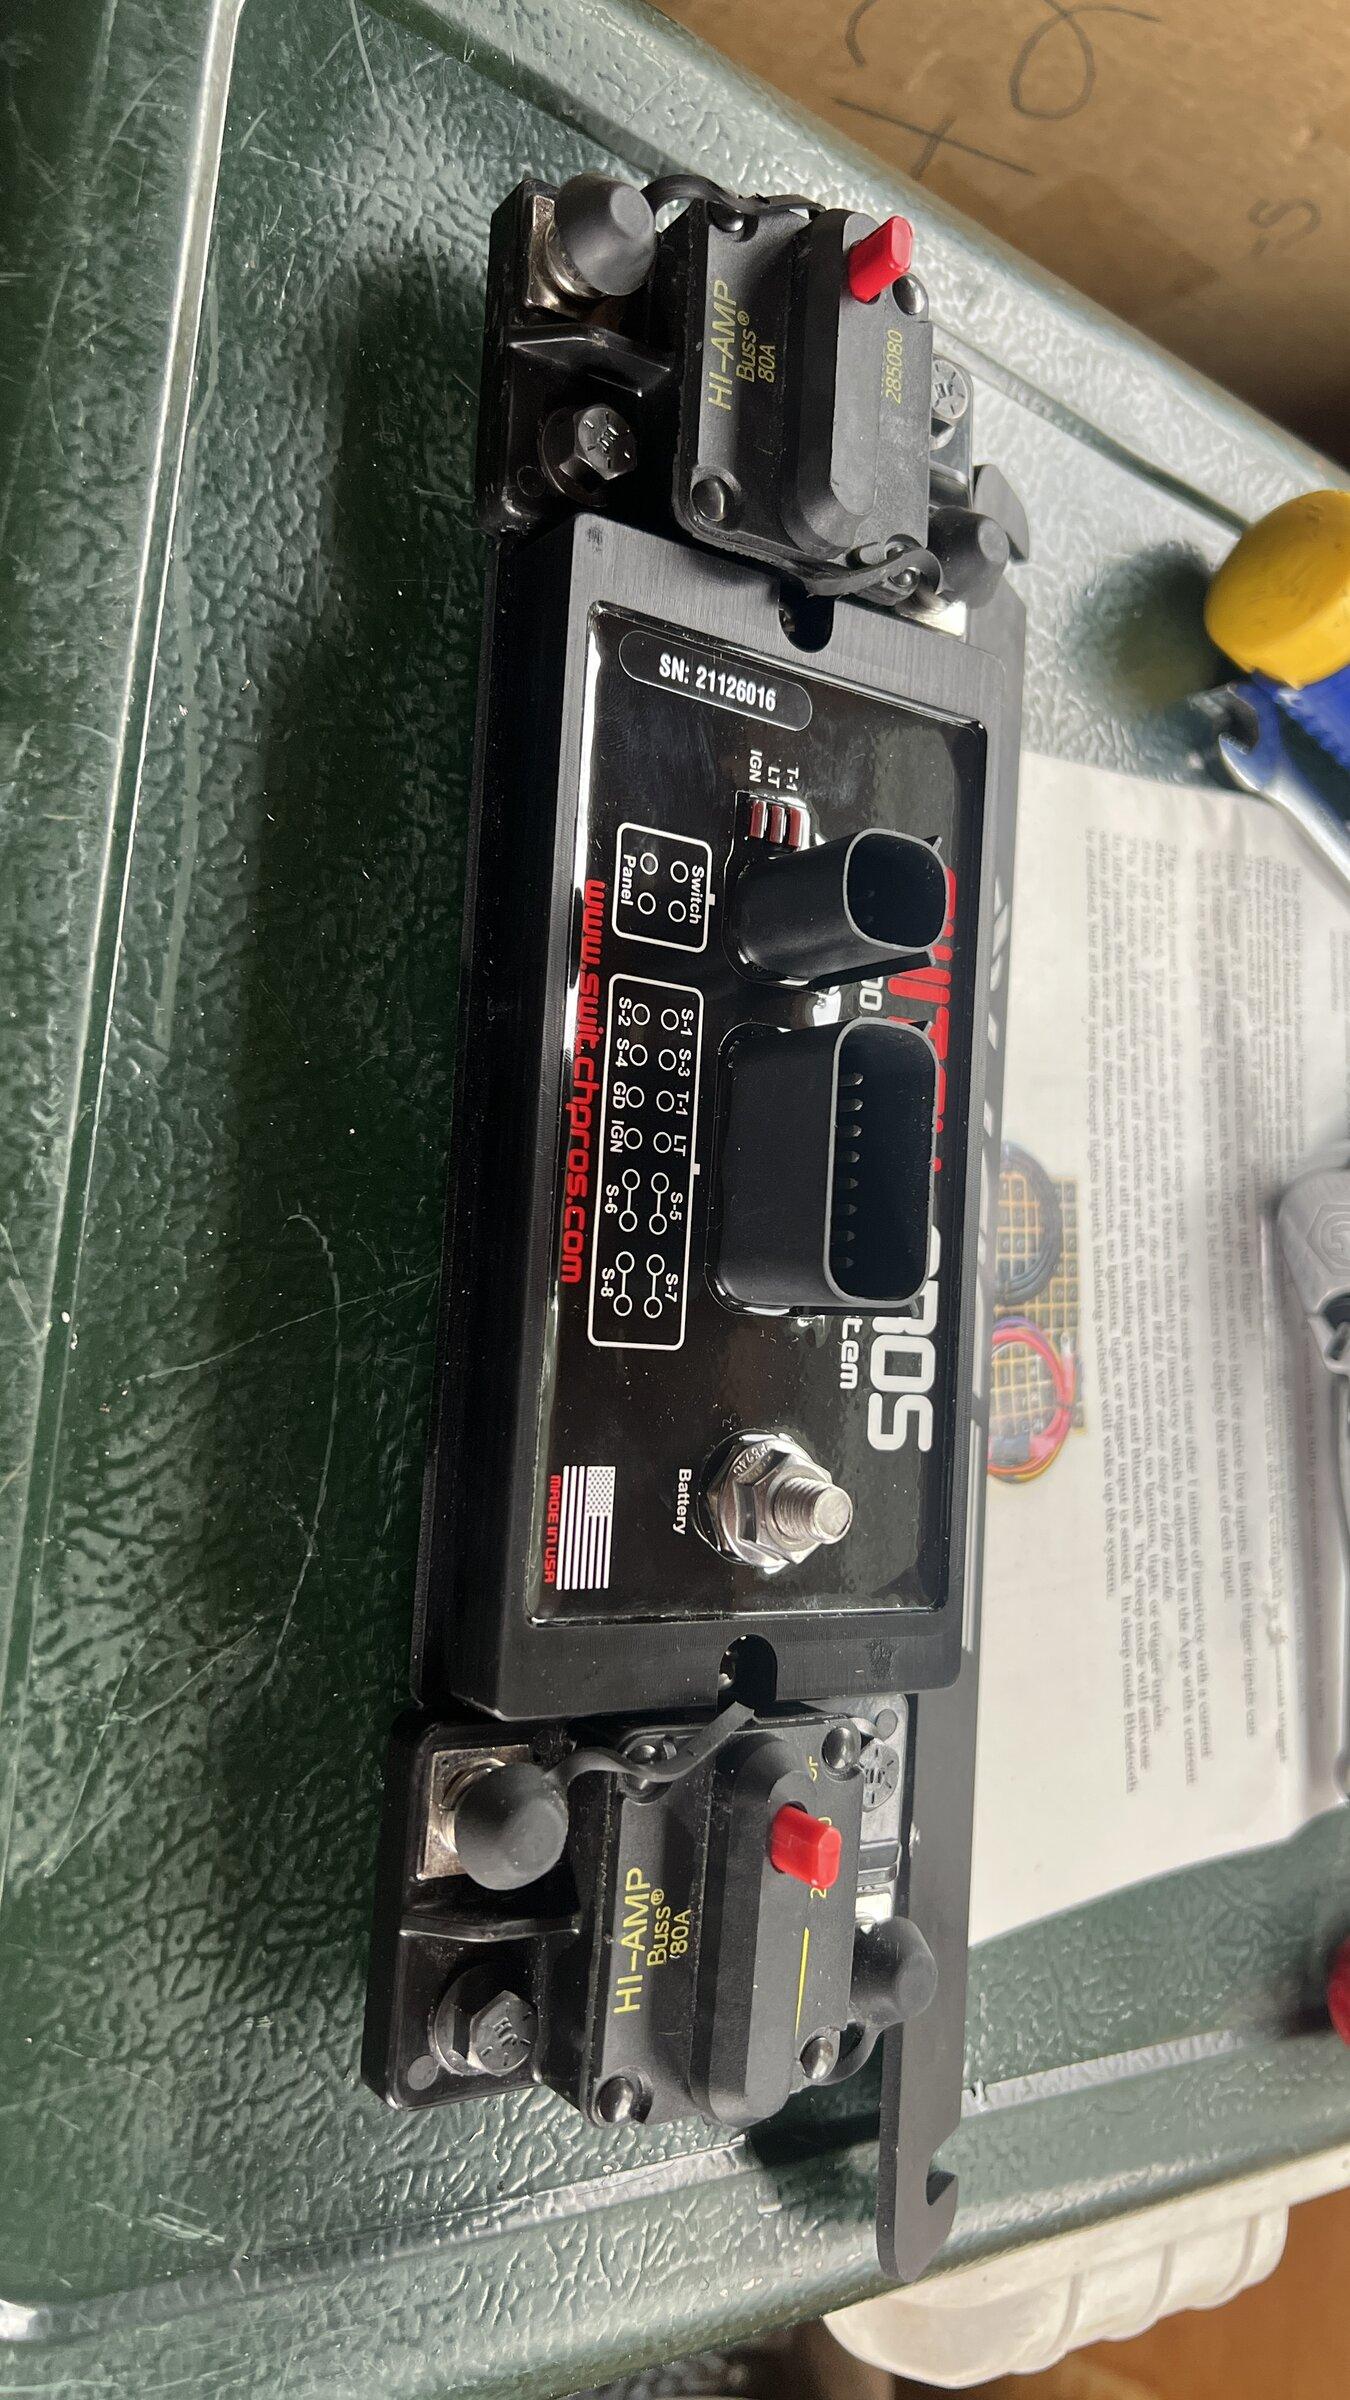
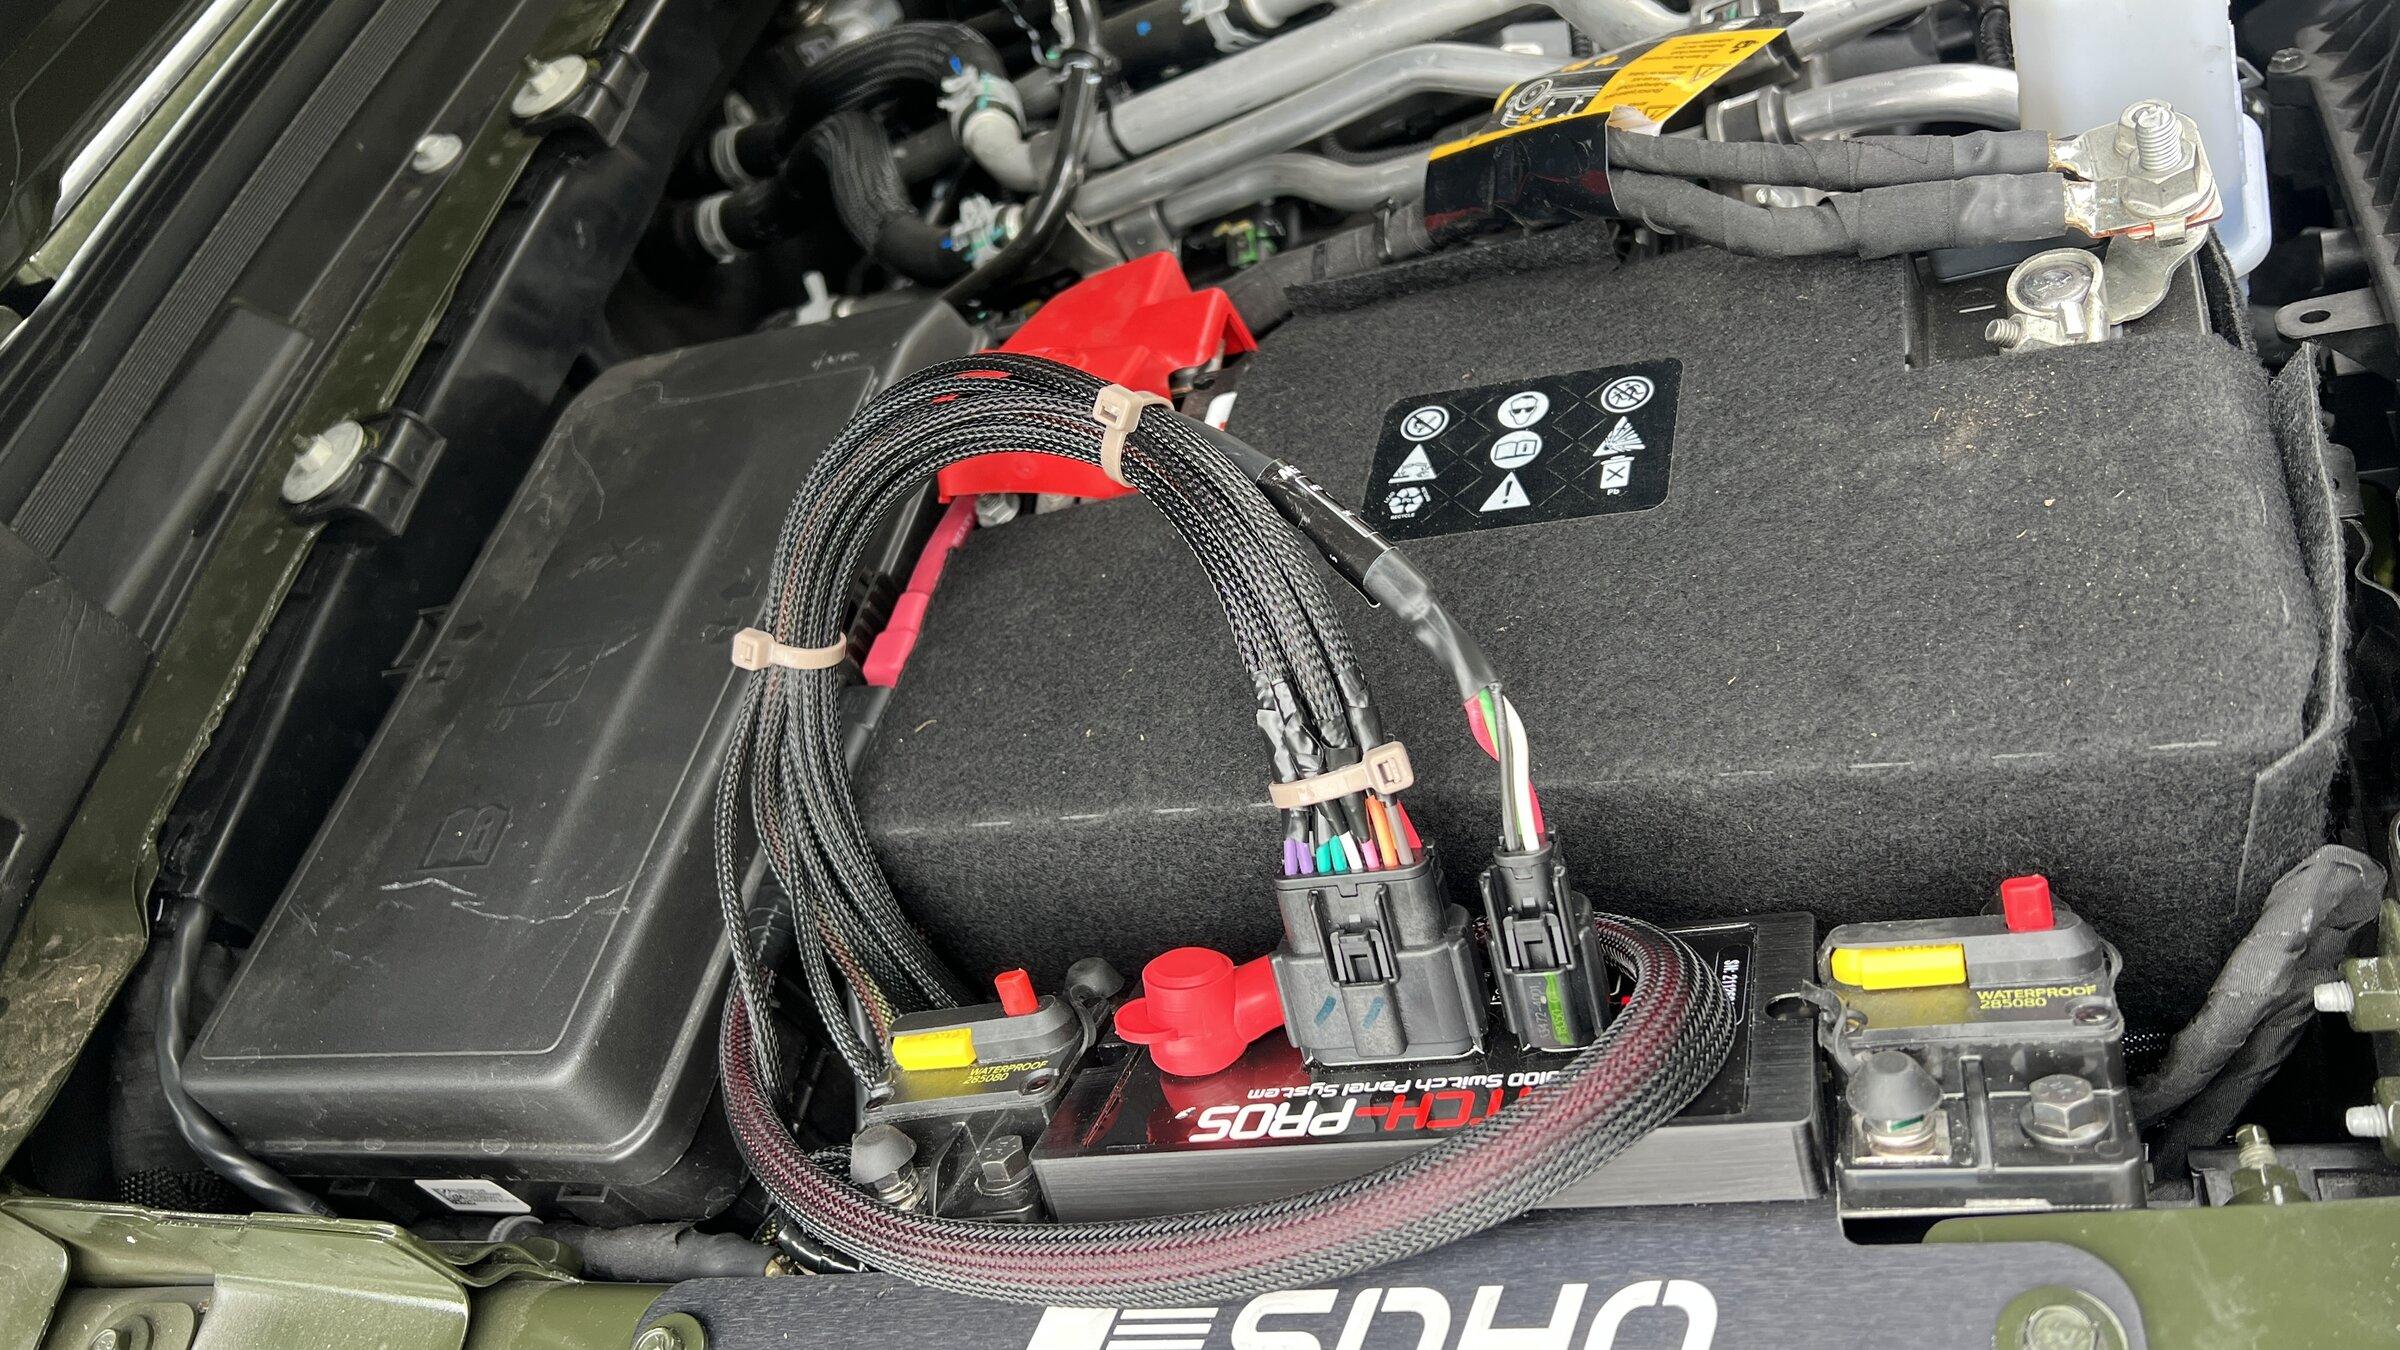
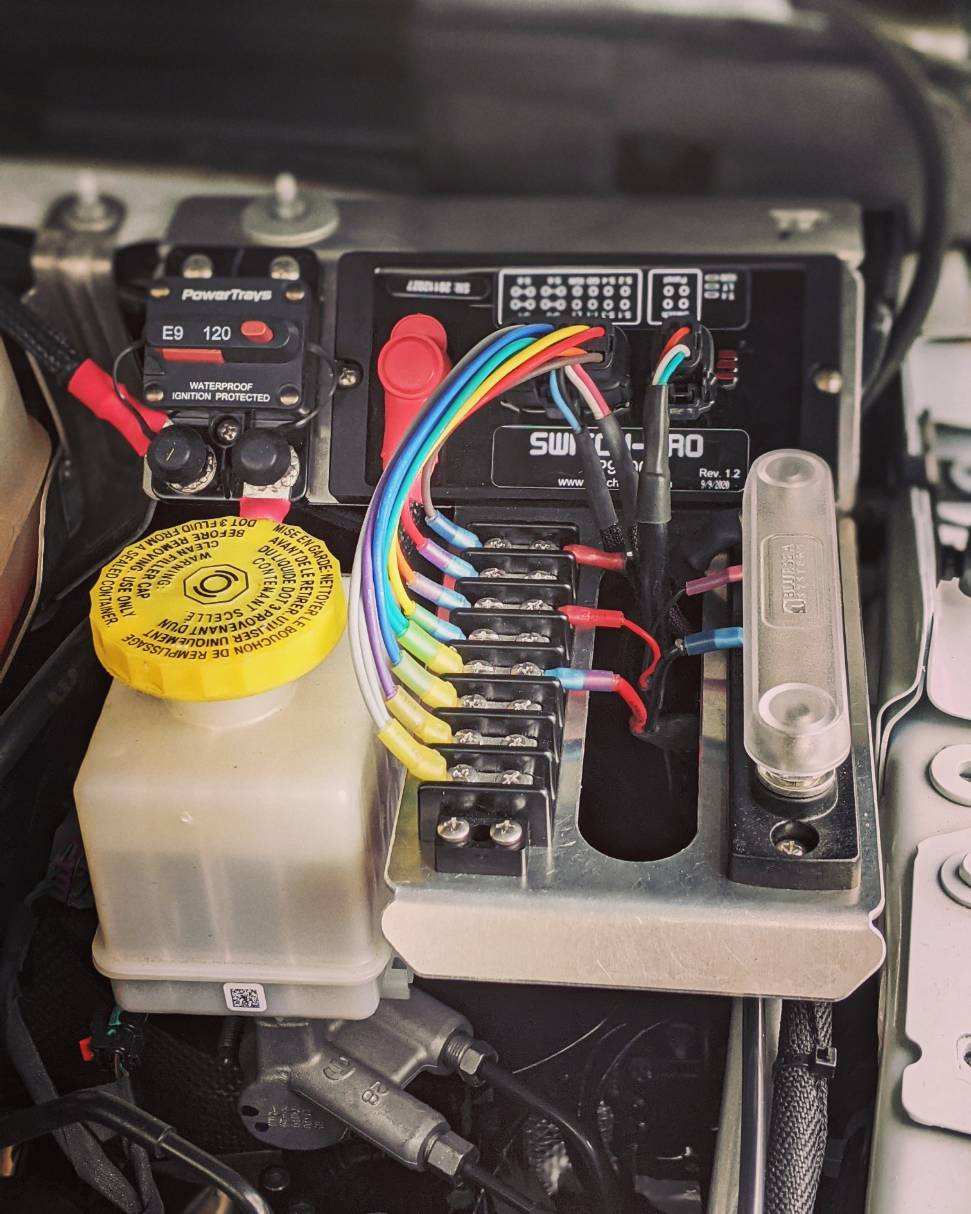
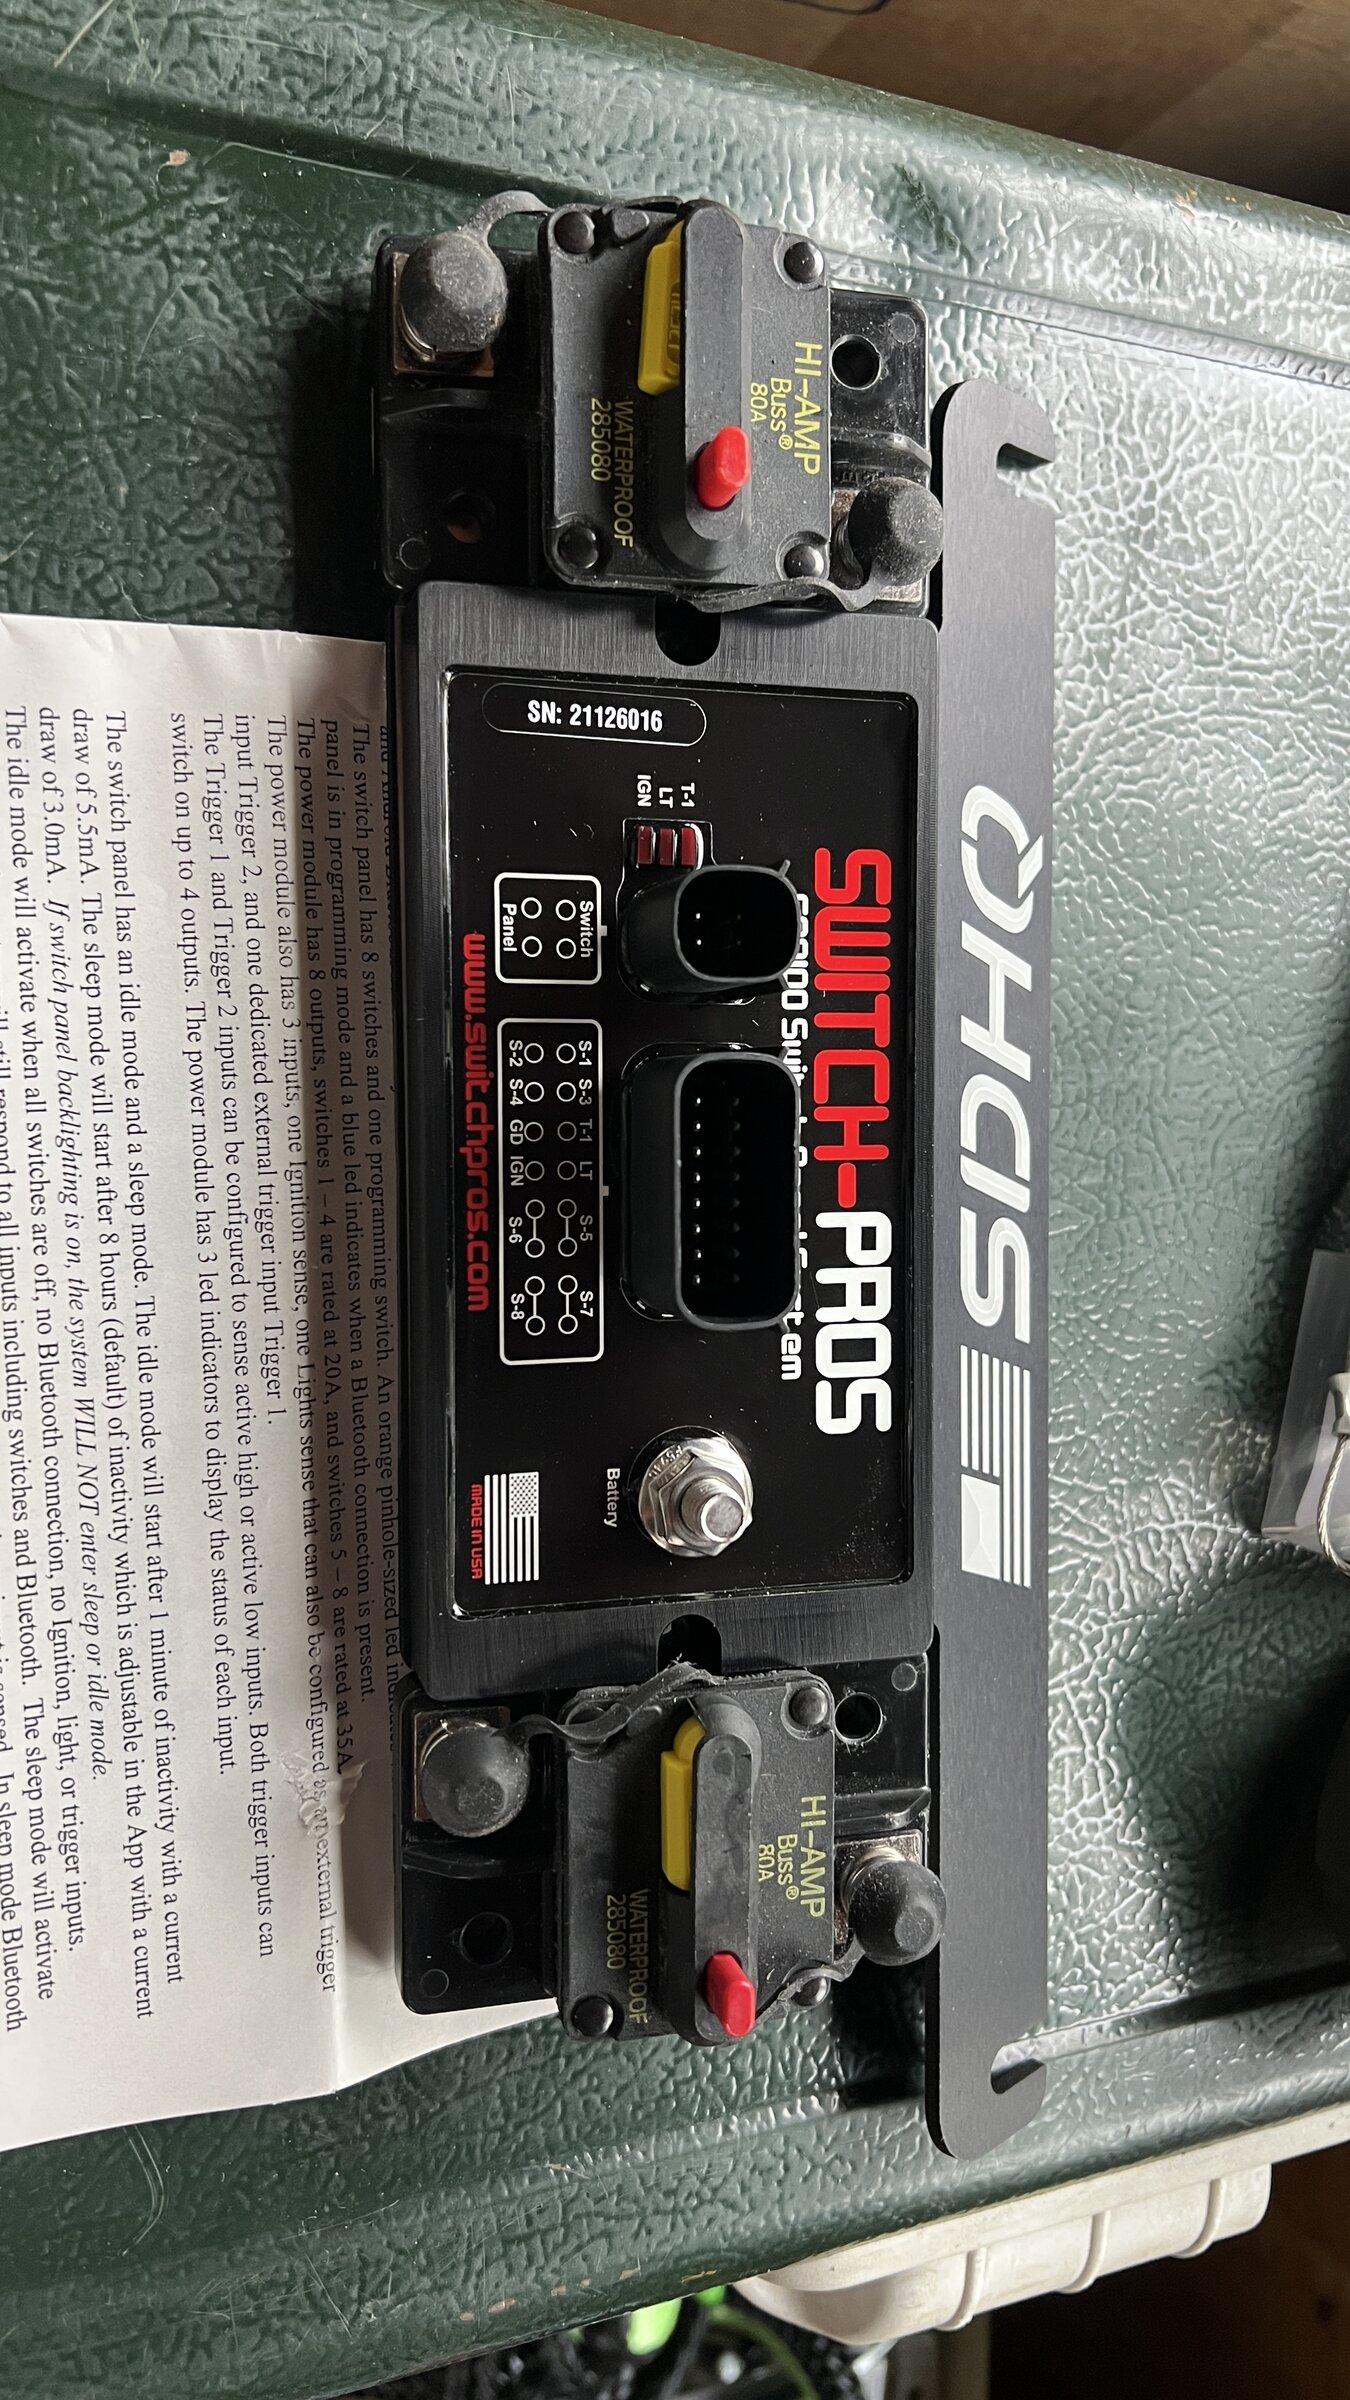
Ok so the switch pro has been on my table for a few weeks. I really need to try and get it installed this weekend. I also wanted to get the breakers installed even if they dont get hooked up right away. One breaker will be for the compressor and one for a DC/DC charger.

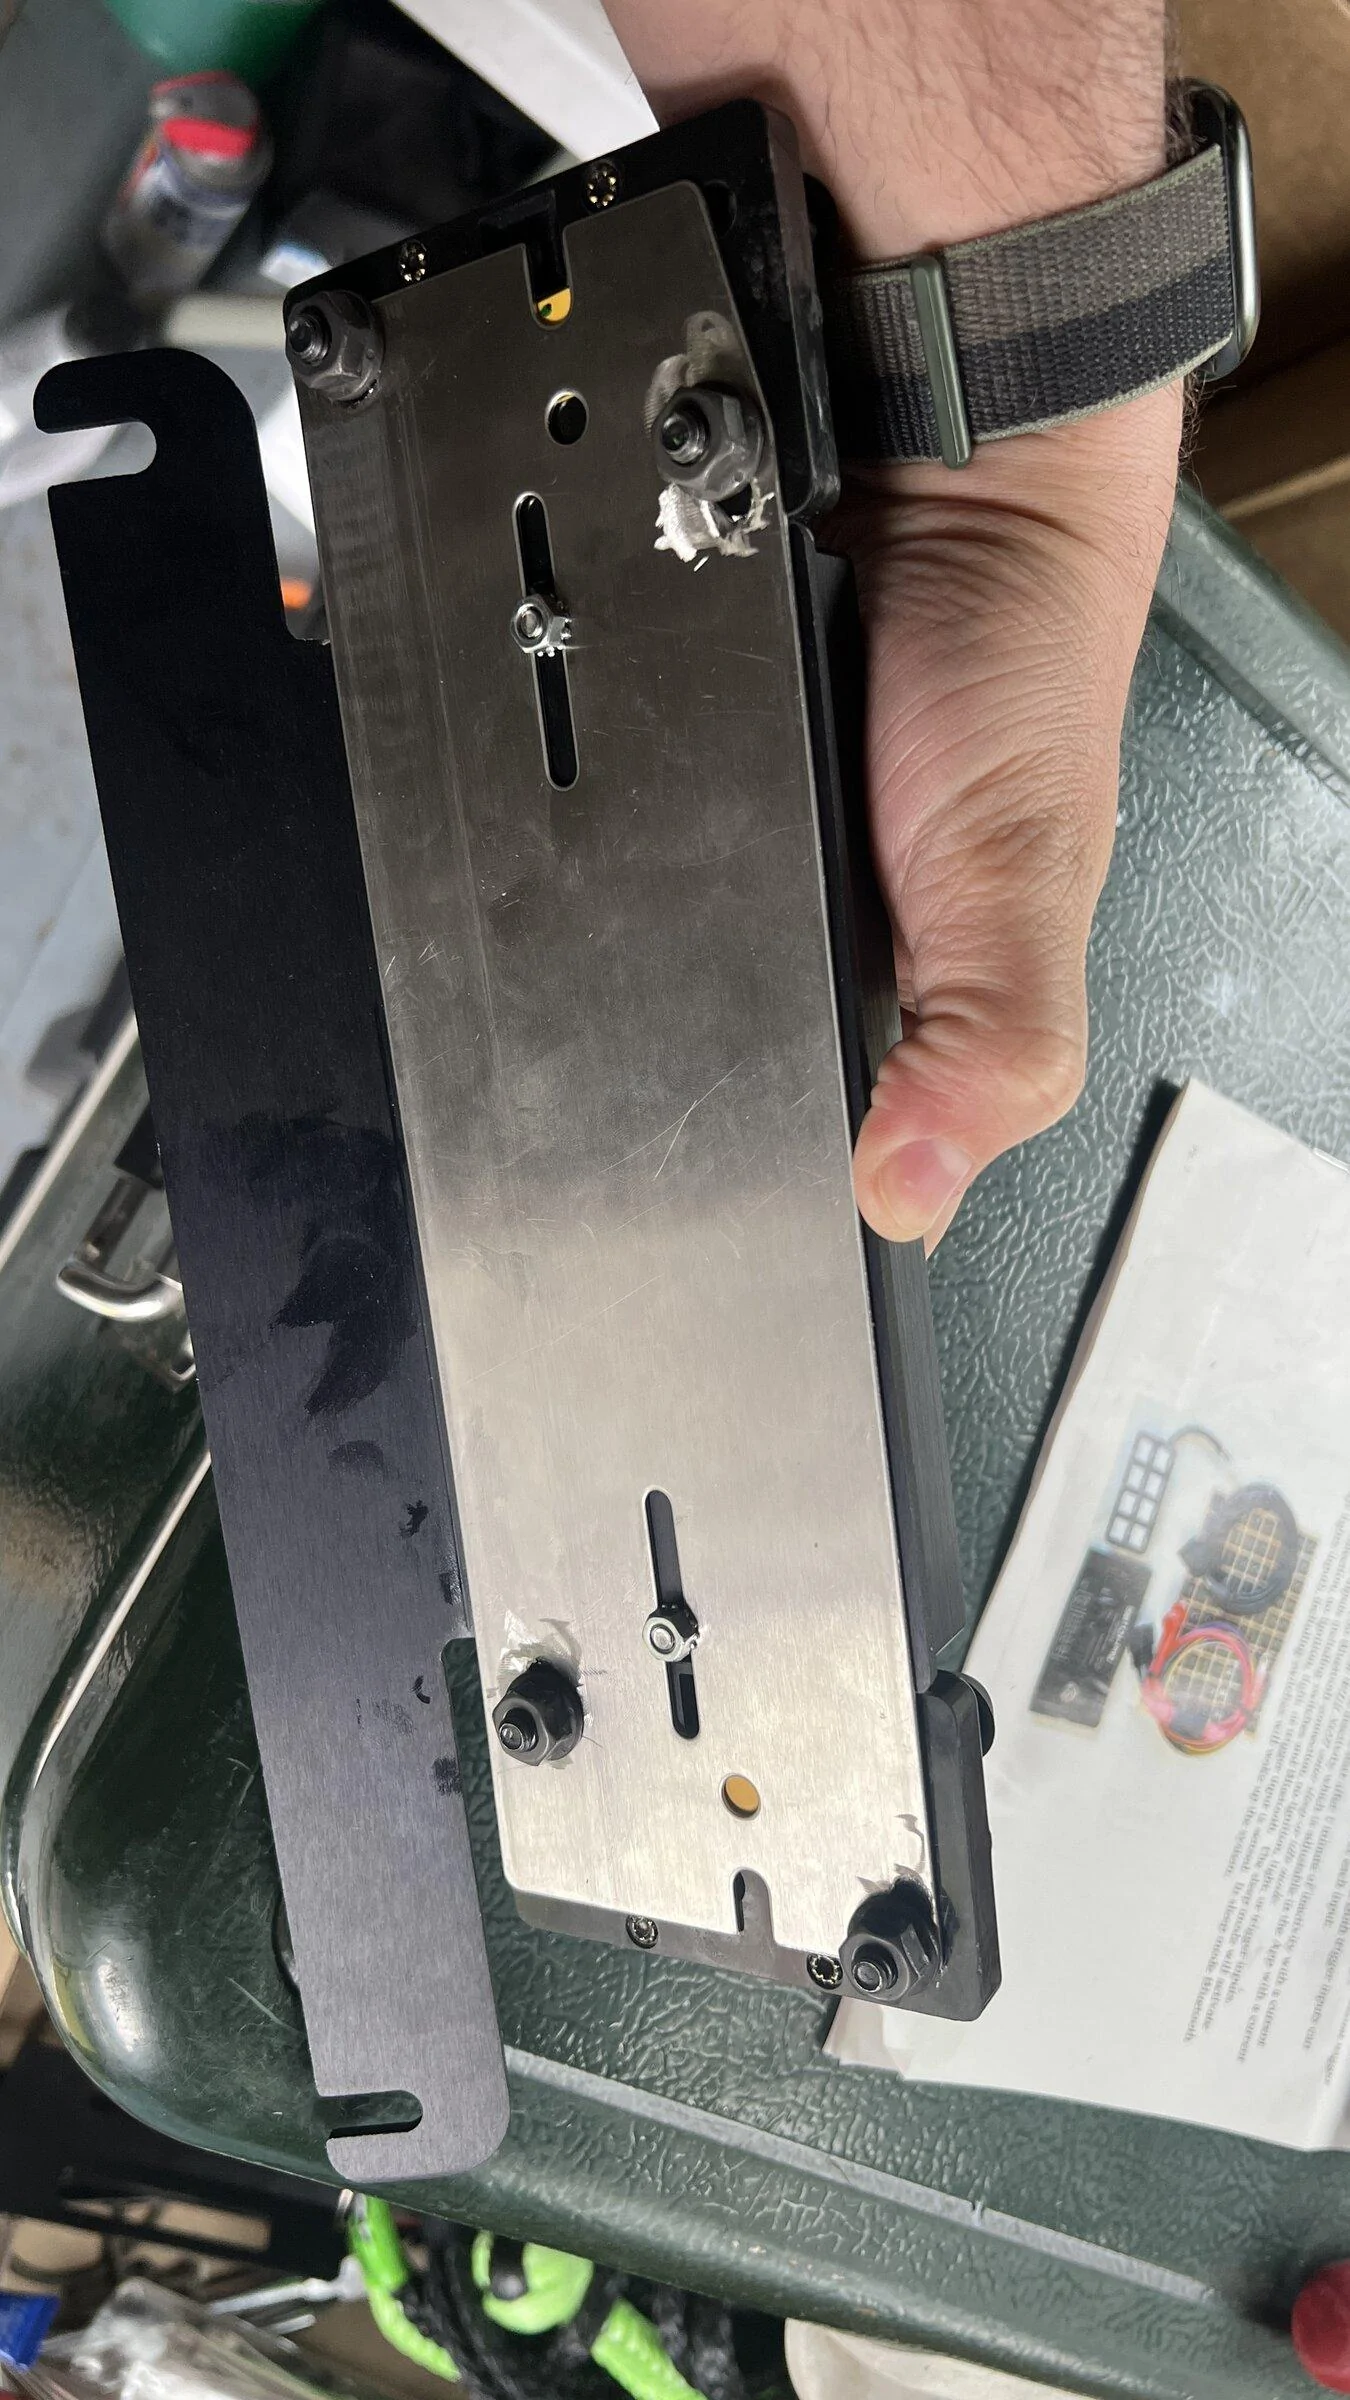
switchpros sent me both brackets for the JT and JL. Probably easier for them since its just a small sheet of aluminum.

Question is could they be bounted this way without issue or might there be a better way? Im not really a fan of the switchpro being so close to the battery in the first place but with these fancy new vehicles space is a premium.

Jeep Gladiator SwitchPro SP9000 install 82C693A8-CCE6-4ED6-A2D0-C578F363C9E9


Jeep Gladiator SwitchPro SP9000 install 8C78C4C3-64D8-4E23-B816-F0B9C35F00A9


I would be curious to see good pics of what others have done. A fromt and rear winch are also part of the future plans so space for additional breakers would be good to keep in mind. I was also thinking a positive and negative buss bar might be good to reduce the number of connections to the battery but really unsure of where said items should go.
Sponsored

 
Last edited:
OP
OP
chorky

chorky

Well-Known Member
First Name
Chad
Joined
Feb 26, 2022
Threads
175
Messages
3,466
Reaction score
3,801
Location
Montana
Website
www.youtube.com
Vehicle(s)
'22JTR, '06 LJ, '06 TJ GE
Build Thread
Link
Occupation
GIS Specialist
Has anyone also installed their switch pro switches under the factory headlight switch using the plastic mold from switch pro? I'm curious how it worked for you before I drill holes in the plastic....
 
OP
OP
chorky

chorky

Well-Known Member
First Name
Chad
Joined
Feb 26, 2022
Threads
175
Messages
3,466
Reaction score
3,801
Location
Montana
Website
www.youtube.com
Vehicle(s)
'22JTR, '06 LJ, '06 TJ GE
Build Thread
Link
Occupation
GIS Specialist
Well getting closer to having this thing wrapped up.

First, I wanted to find a way to mount 2 breakers along with the switch pro actuator just to try and keep things clean. Space is a premium of course. So I came up with this. The breakers will act as circuit protection for the compressor and dc/dc charger. This plate mount will probably change in the future but for now it works.

Jeep Gladiator SwitchPro SP9000 install IMG_8264.JPG

Jeep Gladiator SwitchPro SP9000 install IMG_8265


Then I started routing wires for the harness. The harness was tucked into the factory harness plastic moulding under the engine bay. it was a pain to get all the clips loose, but it looks clean and professional hidden nicely - hopefully it will never need to be touched. For firewall access I pulled out the plug just to the side of the brake booster that many use, cut a round hole, and put in a grommet. This was to allow for future wiring to go through that hole however I don't know how necessary that will end up being as just below it there is another grommet that provides access into the cab, as well as a very slick open hole in the door jam - pics to follow later of that.

Then the switch block itself was mounted. Not gonna lie, this was a major PITA. Mostly because I did not want to remove the entire dash panel since I didn't want to risk cracking the nice red plastic. However, it resulted in not being able to tighten the top two bolts that hold the plastic moulding to the dash. I did have to drill 4 small holes, and one large one for the bolts/harness to pass through the dash. If switch pros reads this, they need to redesign how this thing mounts. The moulding mounts to the dash but then the switch mounts to the moulding. Sorry, shoulda gotten pics of that part. But the only way to really secure it properly would require a HUGE 2" hole to be cut in the dash so that the moulding can be secured, and then the switch block bolted to the moulding. Otherwise you cannot access the nuts to tighten the switch block down onto the moulding. There has to be a better way... Maybe in the future, if it looks like its coming loose I will take it apart, drill a gaping hole for access, and tighten it down that way but for now hoping this will be sufficient.

It does look slick. Hoping it works and nothing needs to be warrantied as taking it apart would be pretty crappy.

Jeep Gladiator SwitchPro SP9000 install IMG_8273.JPG


More to follow as I get the rest of it mounted and working.
 
OP
OP
chorky

chorky

Well-Known Member
First Name
Chad
Joined
Feb 26, 2022
Threads
175
Messages
3,466
Reaction score
3,801
Location
Montana
Website
www.youtube.com
Vehicle(s)
'22JTR, '06 LJ, '06 TJ GE
Build Thread
Link
Occupation
GIS Specialist
So last weekend I finally finished the install. Here is a brief list of what was done.

  • Use extra bracket included in switch pro box as backing to mount 2 breakers for future items
  • separate and isolate into harness protection sleeve individual power 'output' wires as per my own use
    • example, switch 1 and 5 output wires sleeved together as they would switch the same item. Switch 1 turns on flood lights, switch 6 activates relay to close a circuit grounding said lights to dim them
  • remove and drill out existing plastic hole cover and insert grommet (where the clutch would be - just left of break booster
  • run additional wire with switch pro harness through hole to tie into factory 'ignition on' 10a fused wire
    • to be used to 'activate' the switch pro system
  • mount switch panel under factory headlight switch using included plastic molded cover
    • the hardest part of the process. it would have been best had I cut a bigger hole in the factory trim panel but I did not want to do that. This means the top two holes of the bolts mounting the molded plastic to the factory panel were only finger tight but considering the bottom two were accessible it holds nice and does not rattle around.
    • I had to drill 5 holes in total. 4 for the mounting bolts, and one in the center for the harness to pass through the factory panel. Not gonna lie I was nervous and hopefully the switch pro system doesn't fail or I would have to plug the holes somehow. I used a 3/4" hole bit
  • hook up lights and run wires as appropriate in protection sleeves.


I am so far happy with this setup. a couple things I dont like
  • the included battery cable for the switch pro system is too long making routing difficult. It also attaches to the aux battery side (smaller bolt) of the factory battery connection which I think is a poor choice. It should have had a larger hole connector to attach to the 'free' 1/2" stud instead of having to risk loosing power to some vehicle systems even if only for a moment
  • premium space - the included bracket mounts the switch panel close to the battery. I understand that space under the hood is a premium but it would be nice to have mounted this in a different location. If the battery ever needs replacing, the whole bracket probably will have to be removed. I would most certainly do that before taking it to any Jeep dealer seeing as how they seem to always be having issues with competent techs these days.


For others looking to do similar I highly recommend this. Especially if you want the switch panel to only operate lights - I say this because the location being under the factory headlight switch makes it look like it belongs there from the factory. It has a very nice 'push' button feel, and looks pretty slick. Much better than rocker switches of days past. It looks like it belongs much better.

Jeep Gladiator SwitchPro SP9000 install IMG_8289.JPG

Jeep Gladiator SwitchPro SP9000 install IMG_8288.JPG


Also for extra info I am using Baja Designs XL80 lights. I have two with the 'wide cornering' lens. The middle two are with the 'spot' lens. For me, this combination works very well. Take note that BD lights do not offer XL80's with the spot lens. I asked them why a while back and they said those lights aren't designed for that. When asking them why, and what the difference is between the Pro series that do have a 'spot' lens they couldn't (or rather wouldn't) explain to me the difference... I do know the 80 series have the highest quality LED they can get ahold of. But the cones (the shiny part inside the light) are the exact same between the 'spot' and 'wide cornering' options. So I just purchased a "Pro" series spot lens and put them on. Likely this is because they don't want to self compete with their own line of products. They should offer a "spot" and even a 'racer' (narrower cones / optics) version of the XL80's because the light output to me is excellent and superior to their other lights.
 

friskeljr

Well-Known Member
First Name
Mark
Joined
May 15, 2021
Threads
26
Messages
198
Reaction score
148
Location
Tennessee
Vehicle(s)
Gladiator Overland
Occupation
Air Force
you still liking the setup? any issues running it for a bit?
 

Sponsored

OP
OP
chorky

chorky

Well-Known Member
First Name
Chad
Joined
Feb 26, 2022
Threads
175
Messages
3,466
Reaction score
3,801
Location
Montana
Website
www.youtube.com
Vehicle(s)
'22JTR, '06 LJ, '06 TJ GE
Build Thread
Link
Occupation
GIS Specialist
you still liking the setup? any issues running it for a bit?
Yes I do. Very much worth the money. I think it is one of the better switch options out there and much smaller that others as well. So far zero issues. I dont care for the battery cable and mounting bracket under the hood. But I think they figure most people would end up with a custom mount option anyway since there are many variations of people and their accessories and wires. But I plan on buying a second one for the bed for ‘house’ battery items when camping. Its a high quality unit. Time will tell of course on longevity. I dont know if they offer any more of the plastic moulding though like how mine is mounted. I havent seen anybody else mount theirs that way but I prefer it.
 

taintedsaint

Well-Known Member
First Name
Joe
Joined
May 29, 2021
Threads
33
Messages
171
Reaction score
287
Location
Virginia
Vehicle(s)
2021 Gladiator
Occupation
retired military
I know this is an older post, I'm installing mine when I return from EJS. Did you not consider the Powertrays mount system? That's what I'm using. Goes on drivers side, up again cowl. Very slick.
Jeep Gladiator SwitchPro SP9000 install powertray
 
OP
OP
chorky

chorky

Well-Known Member
First Name
Chad
Joined
Feb 26, 2022
Threads
175
Messages
3,466
Reaction score
3,801
Location
Montana
Website
www.youtube.com
Vehicle(s)
'22JTR, '06 LJ, '06 TJ GE
Build Thread
Link
Occupation
GIS Specialist
I know this is an older post, I'm installing mine when I return from EJS. Did you not consider the Powertrays mount system? That's what I'm using. Goes on drivers side, up again cowl. Very slick.
powertray.jpeg
Originally I did not because at that time I didn't know of Power Trays. However, after half a year I came across them and ended up switching everything over. It did take me a few months to decide to do that because I had to rewire a bunch of stuff. It's been on the power trays system now probably for over 6 months and I am happy with the location because it freed up the battery side for the Genesis system.

More info on post #6 here
https://www.jeepgladiatorforum.com/forum/threads/destination-unknown-2022-jtr-journal.66430/


The only thing I dont like about the Power Trays, and its nothing to do with the tray itself, is the open and uncovered power side block (the one on the left side of the picture), and the location it is in is very very tight - any work on the ABS or brake system would require full removal of the tray, which would be a real pain in the butt. But, theres not really any other options anyway, so I think it's the best solution currently available.
Sponsored


Top