Sponsored

4 Tire Air Up/Down System with PowerTank

JBahr

Well-Known Member
First Name
Jonathan
Joined
Oct 24, 2020
Threads
10
Messages
84
Reaction score
135
Location
Denver Colorado
Vehicle(s)
2020 Gladiator Stingray Gray
Occupation
Sales
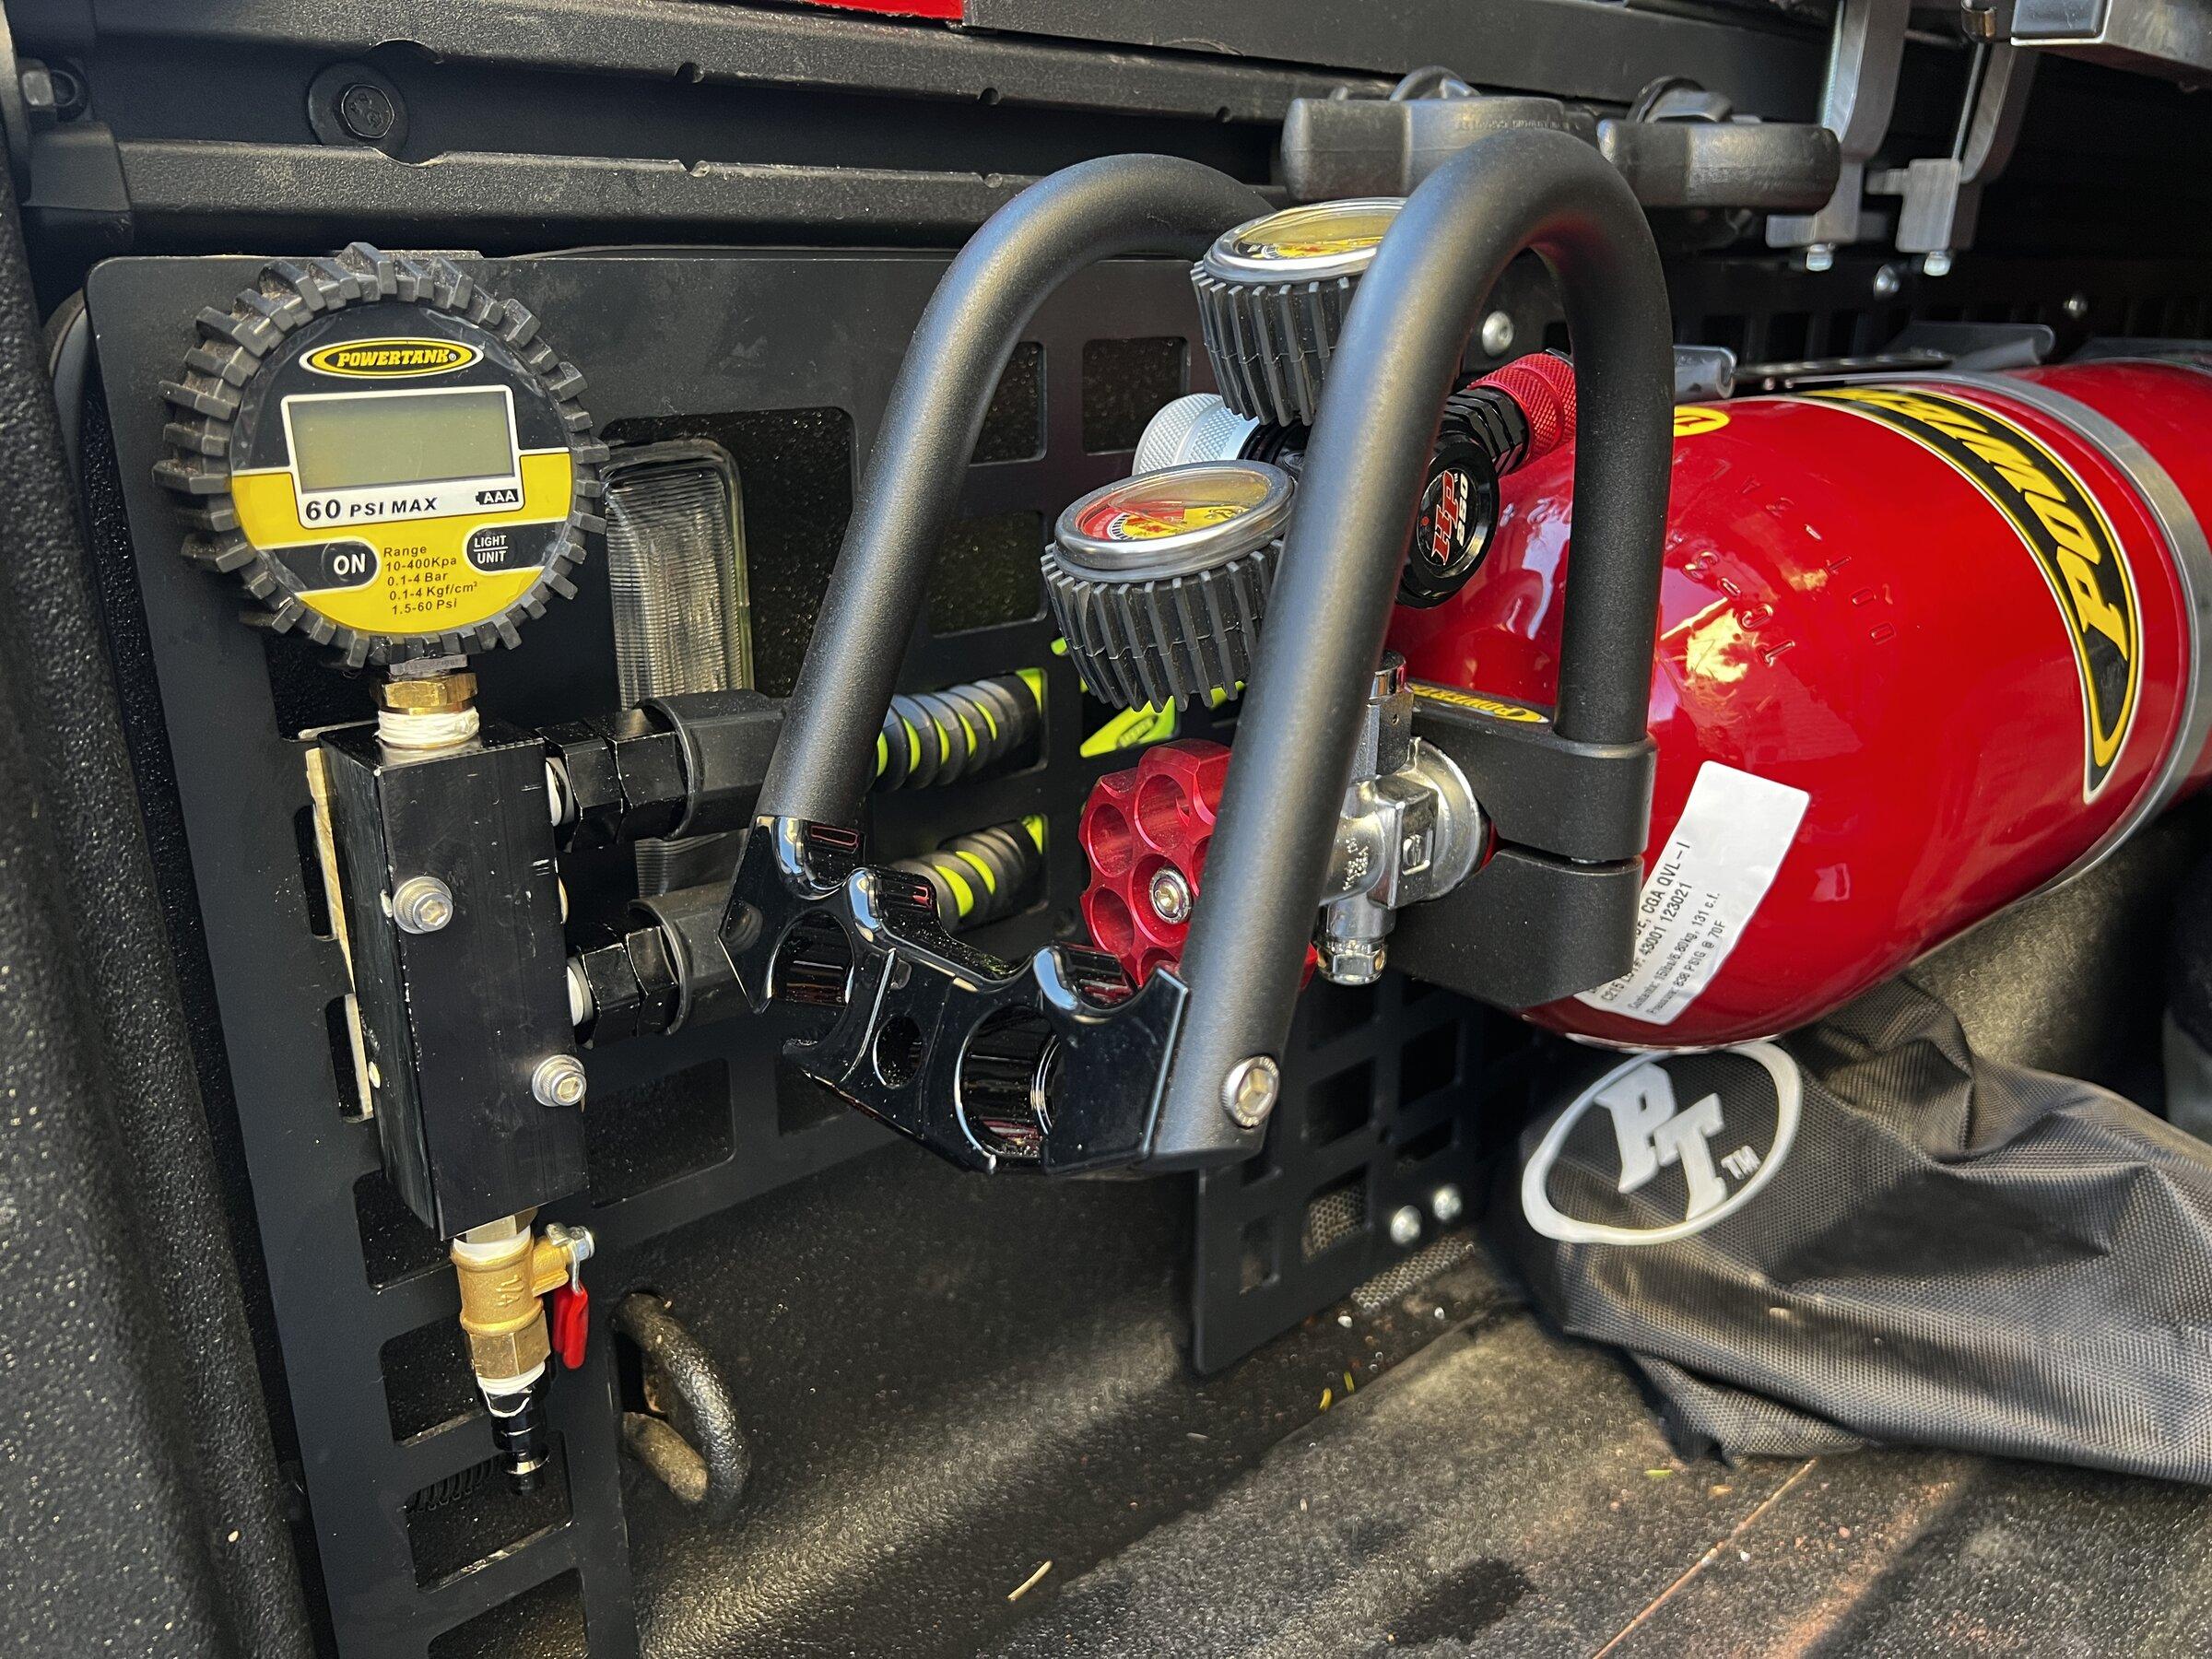
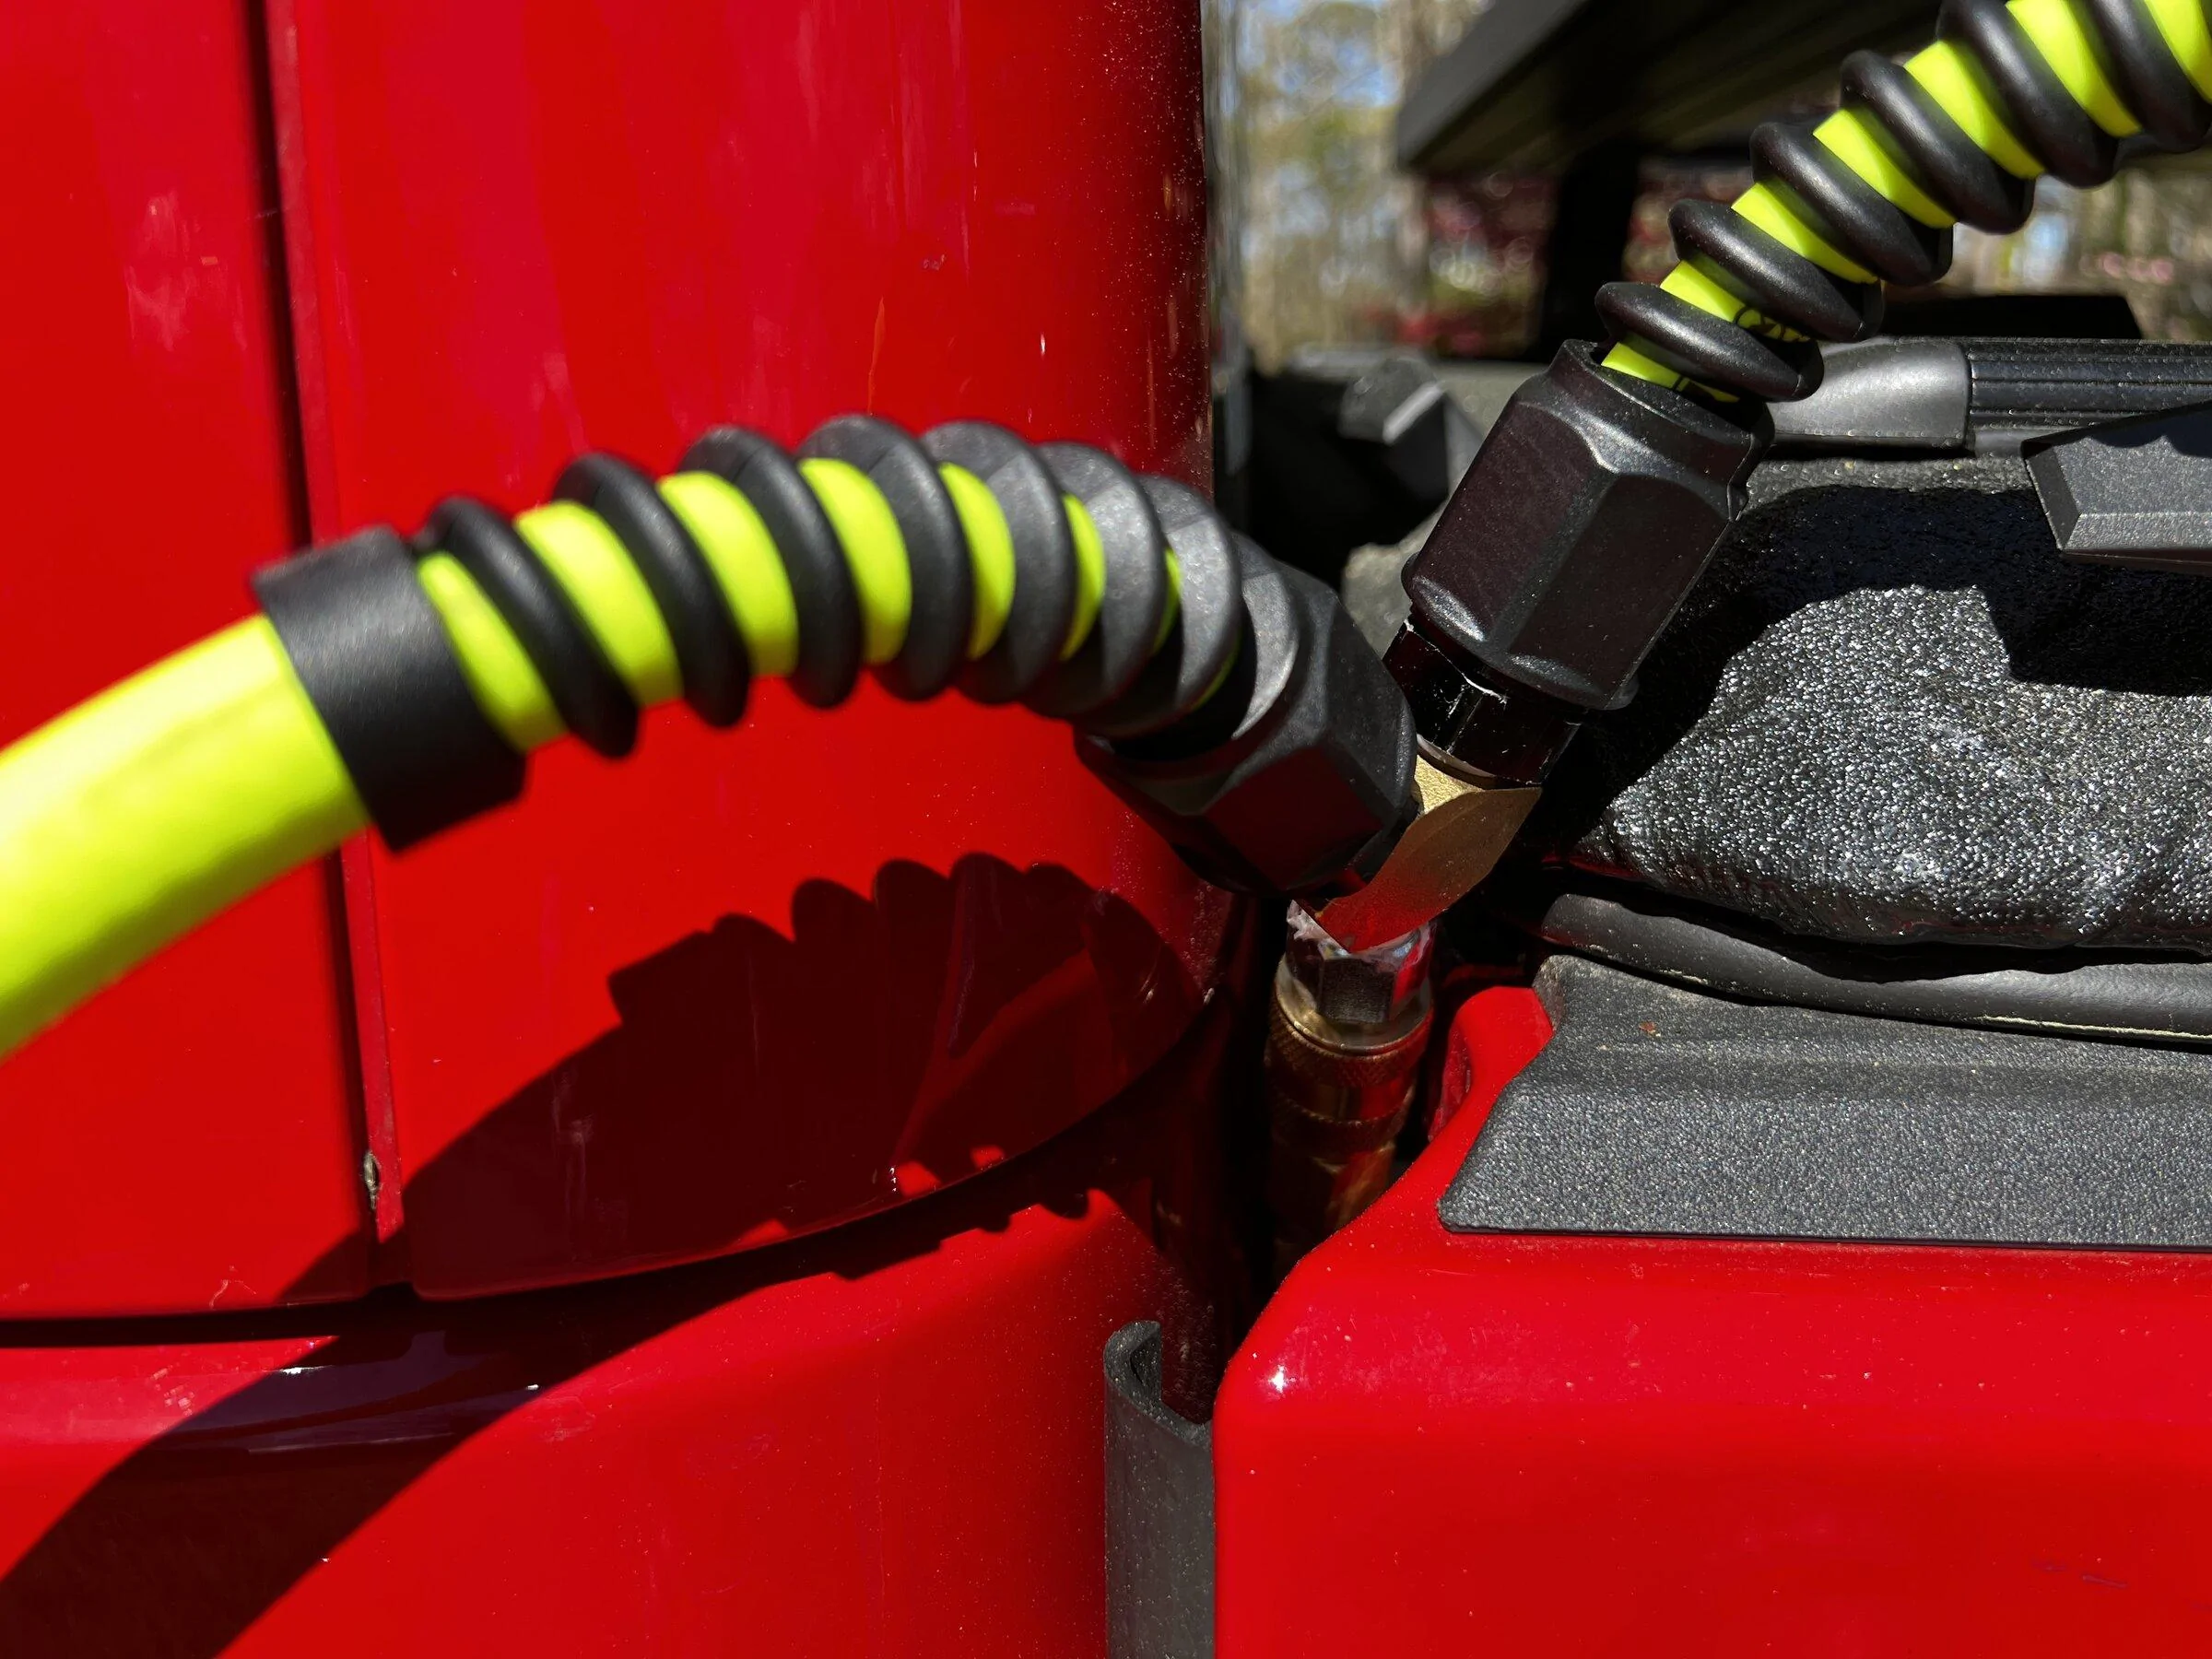
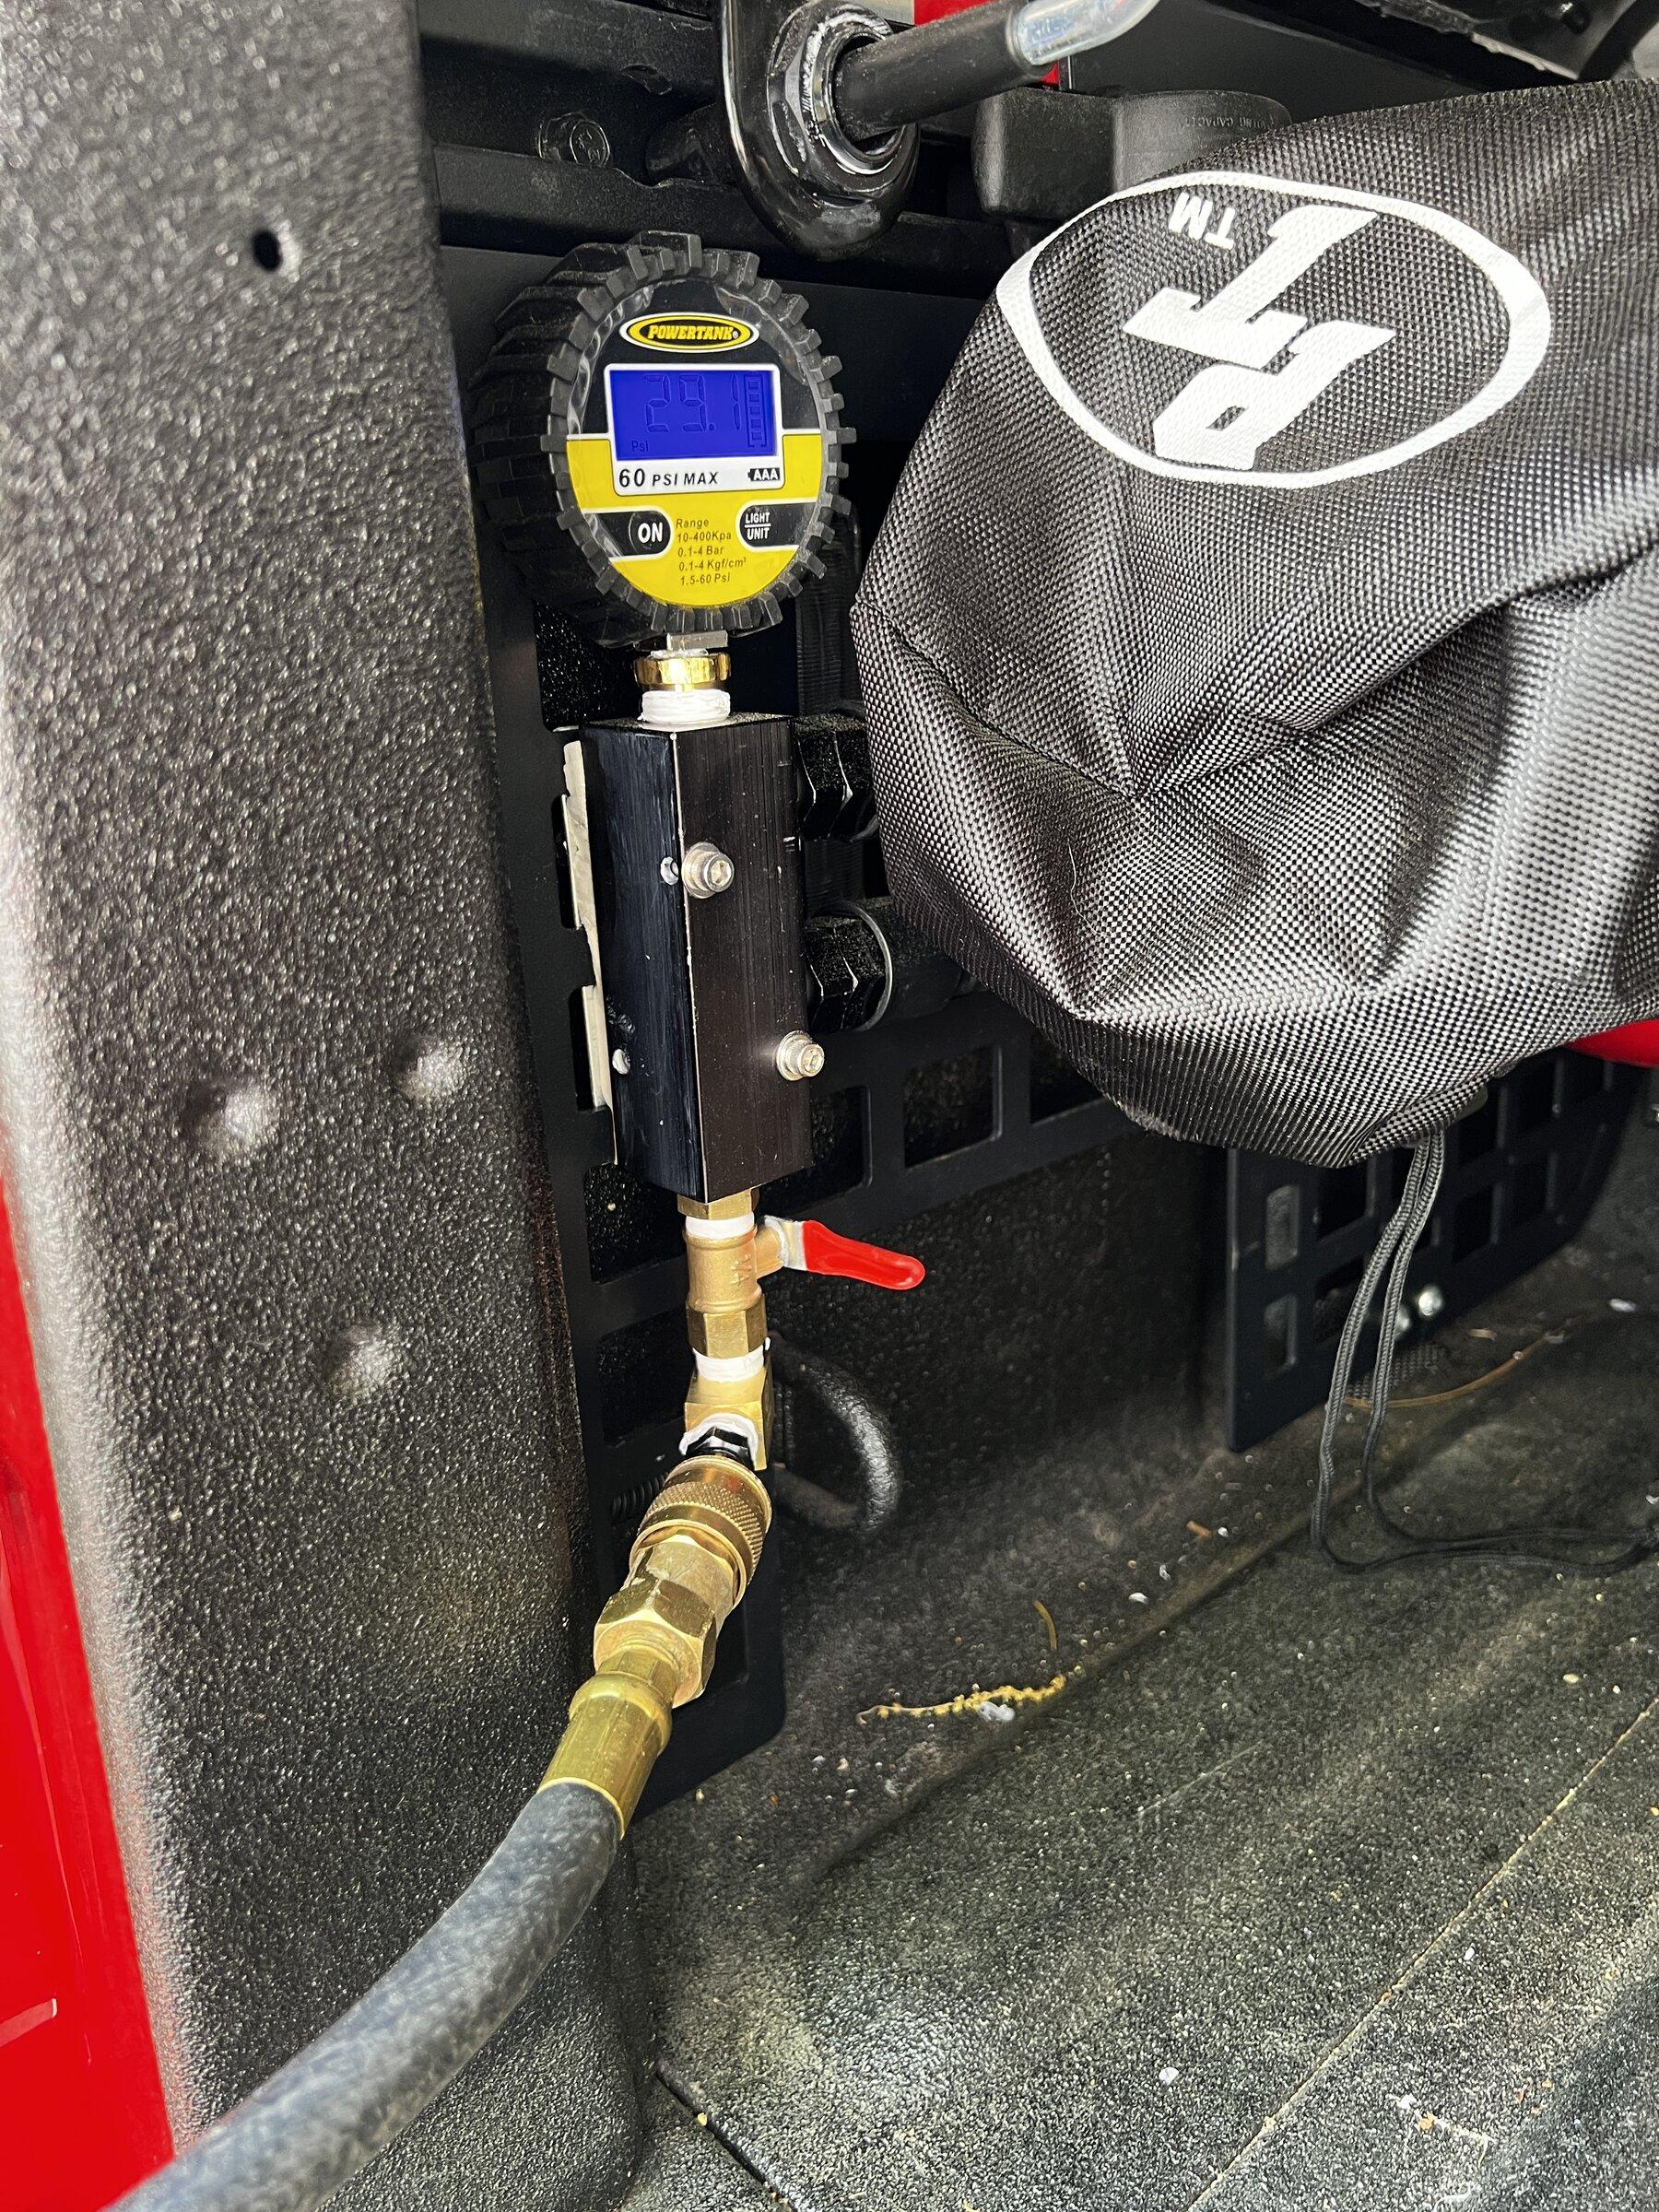
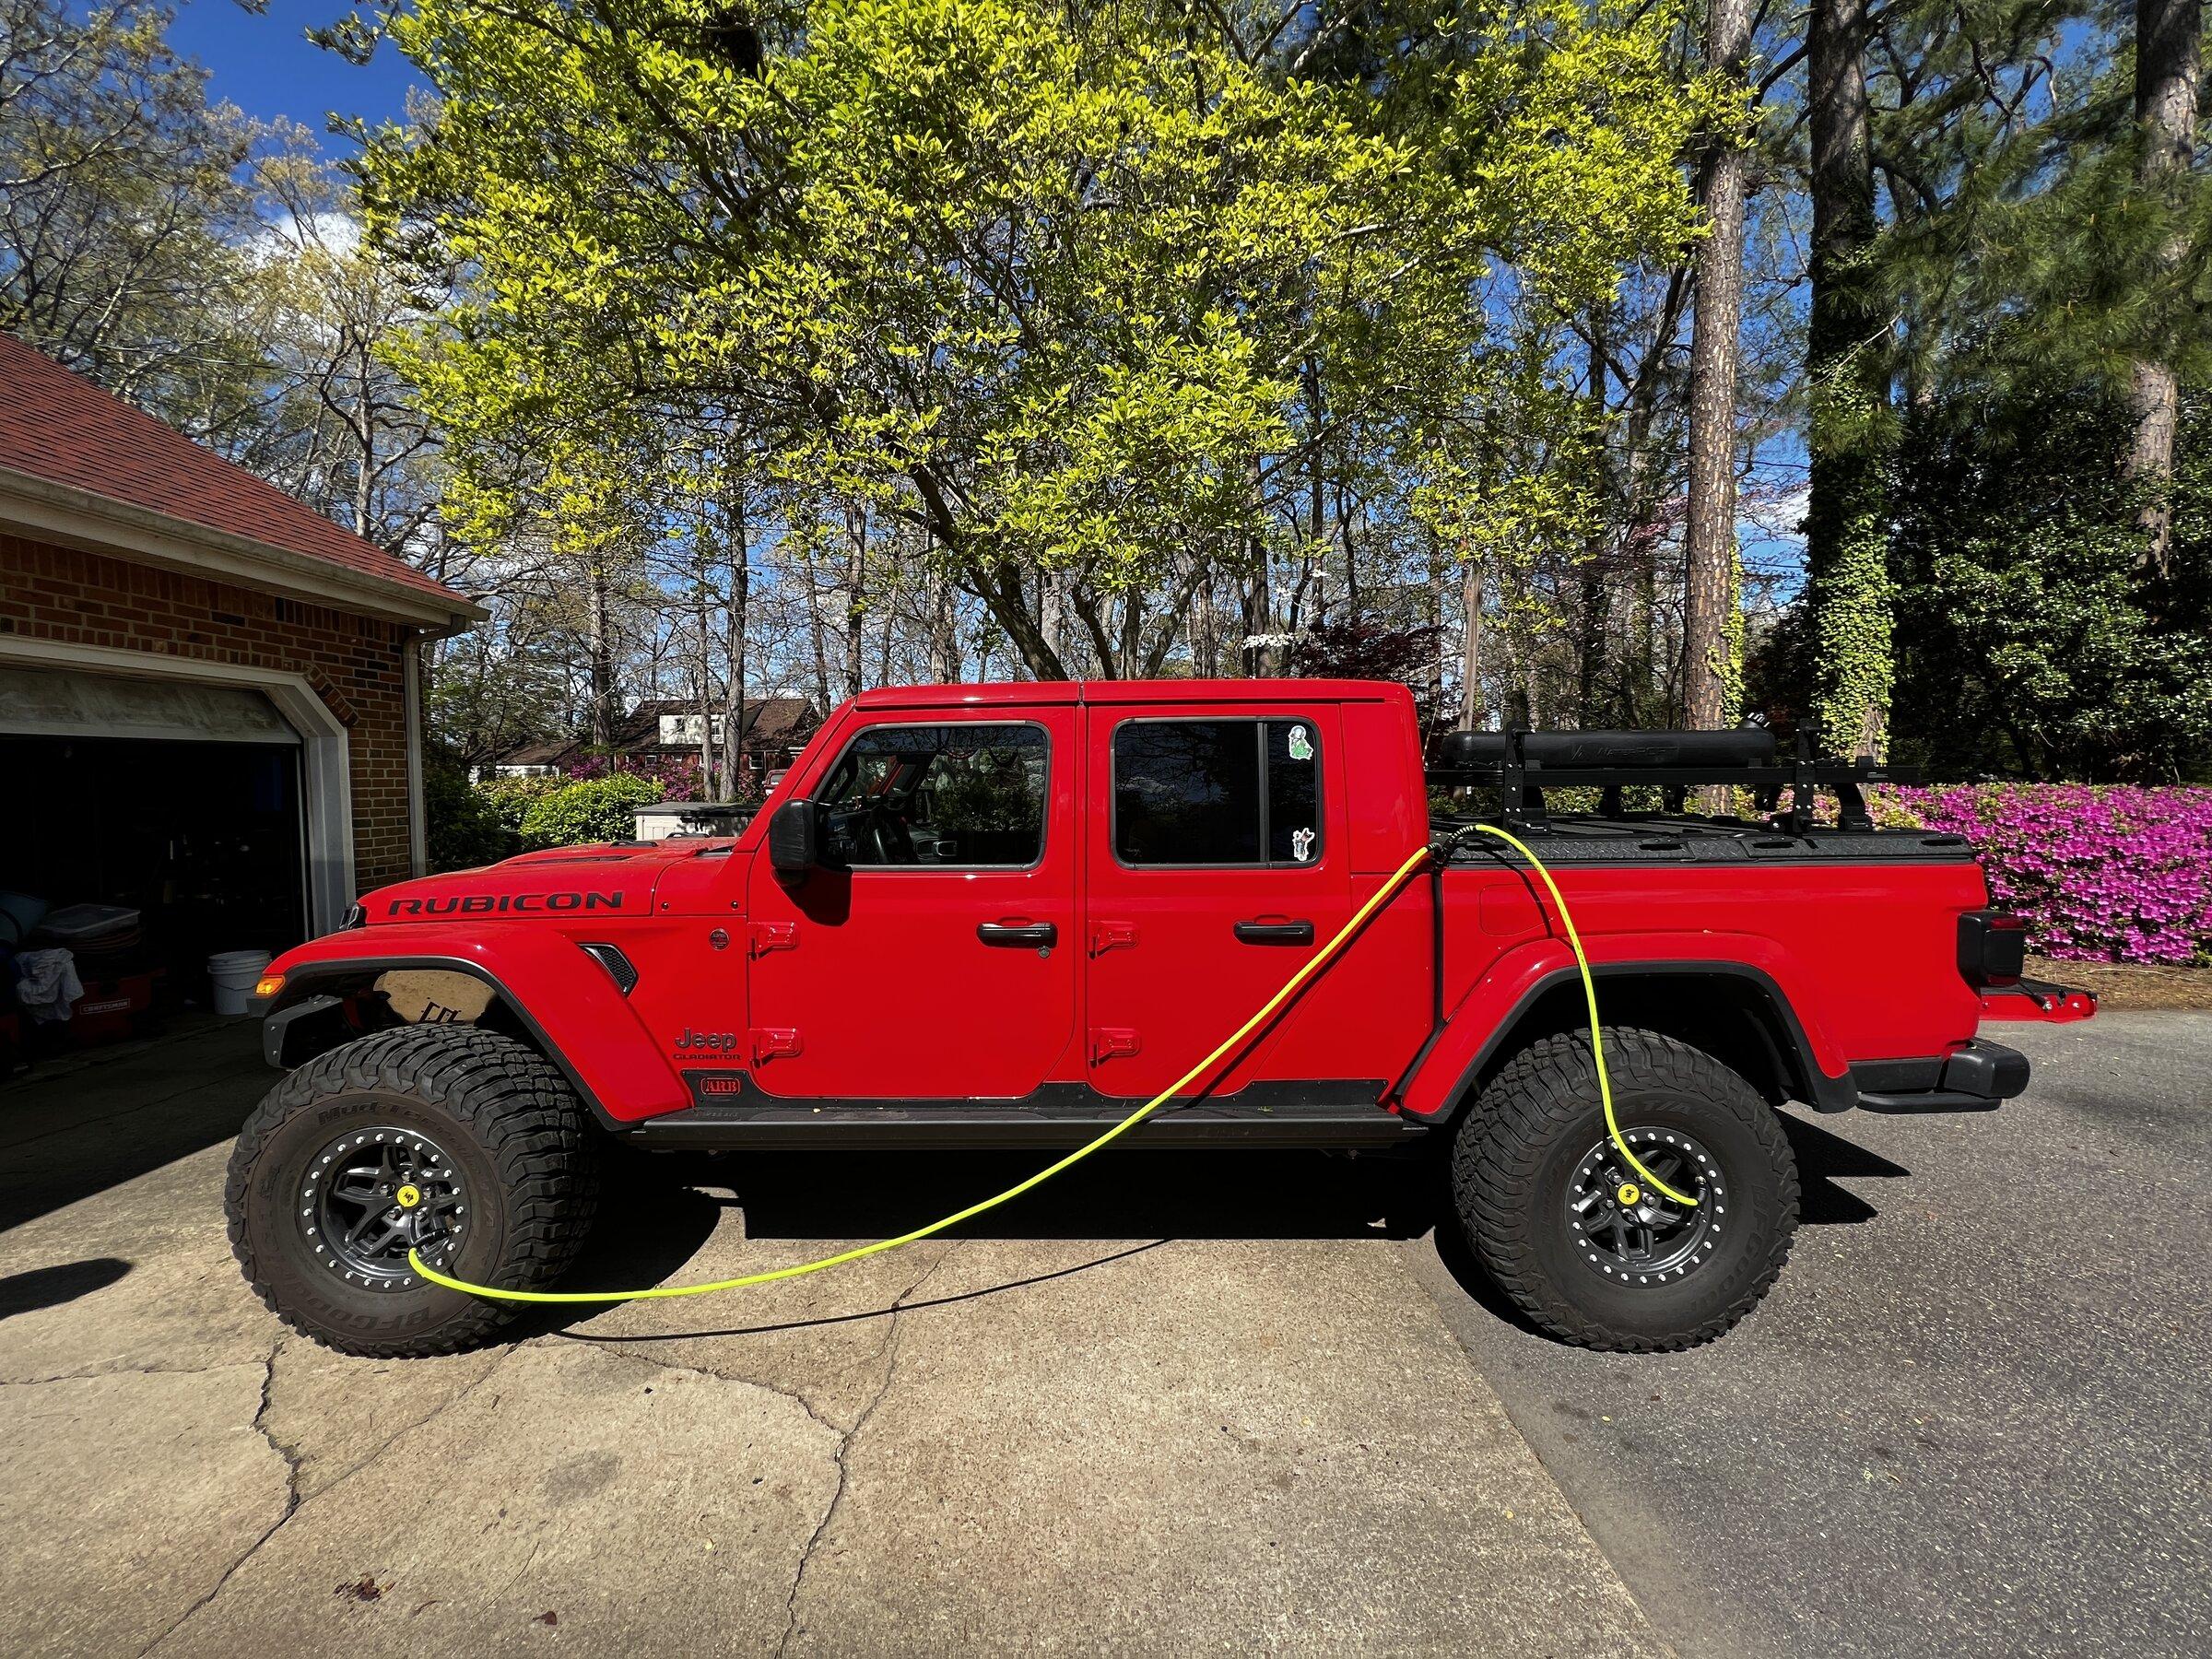
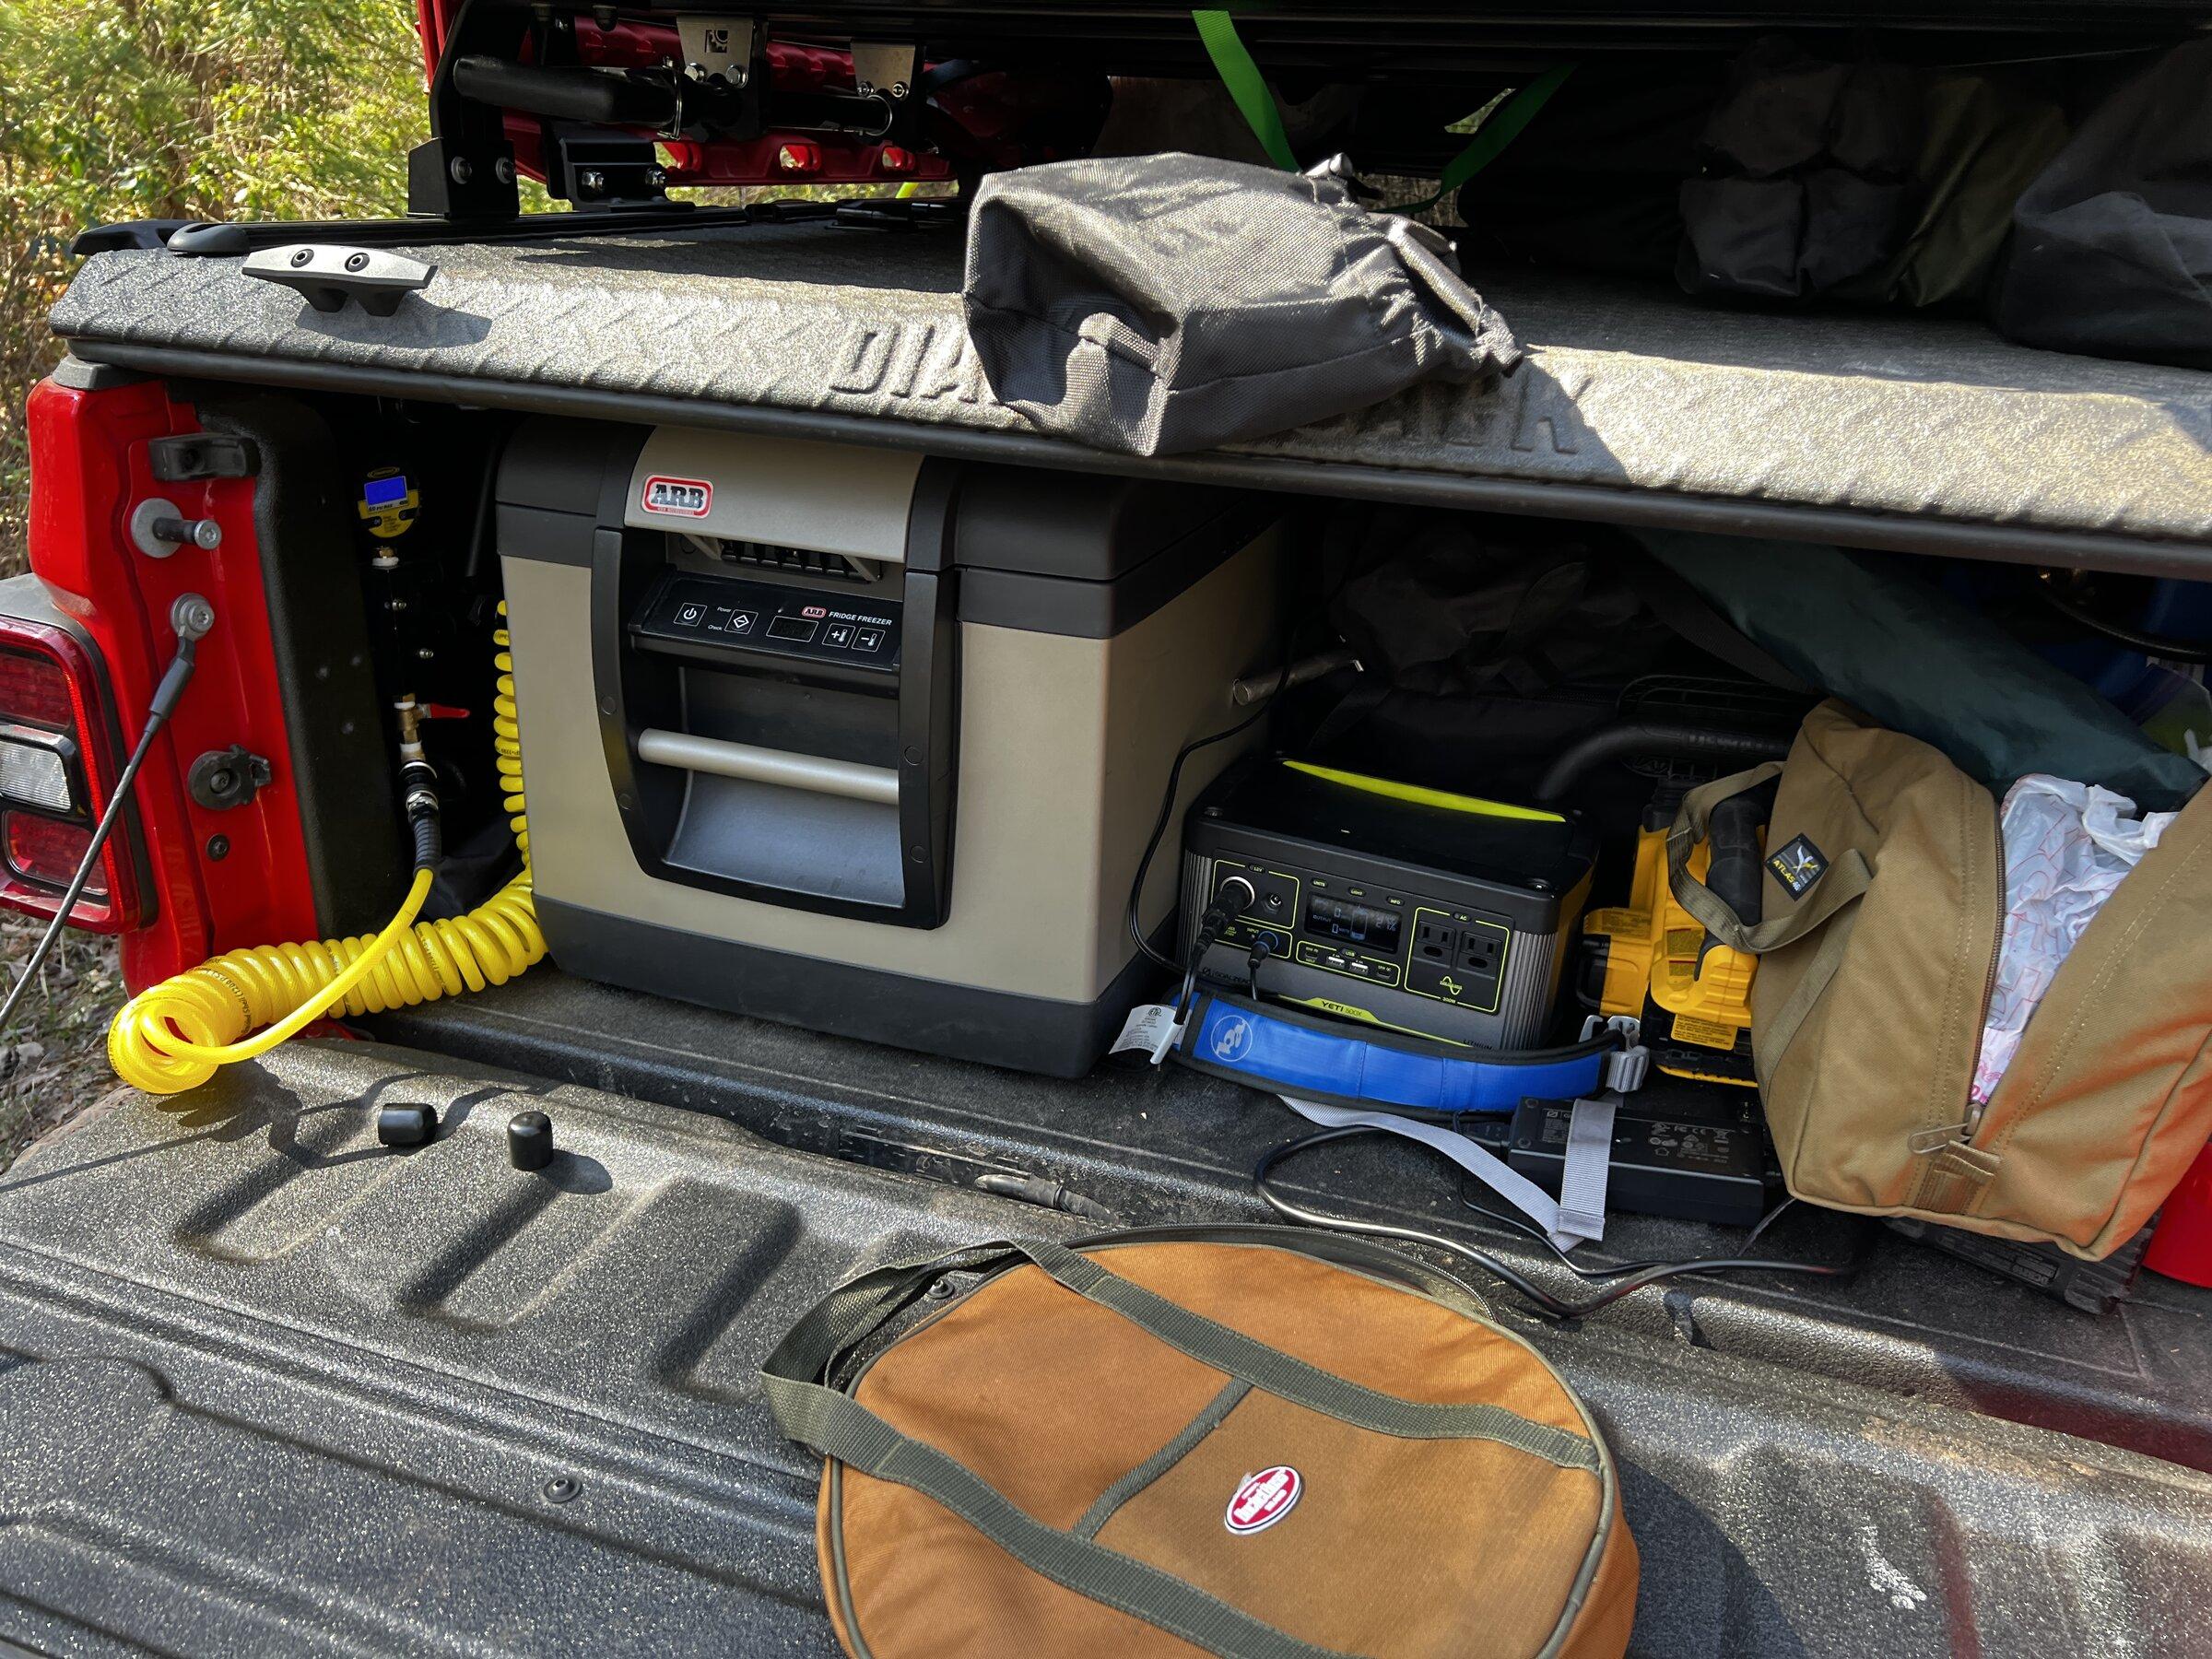
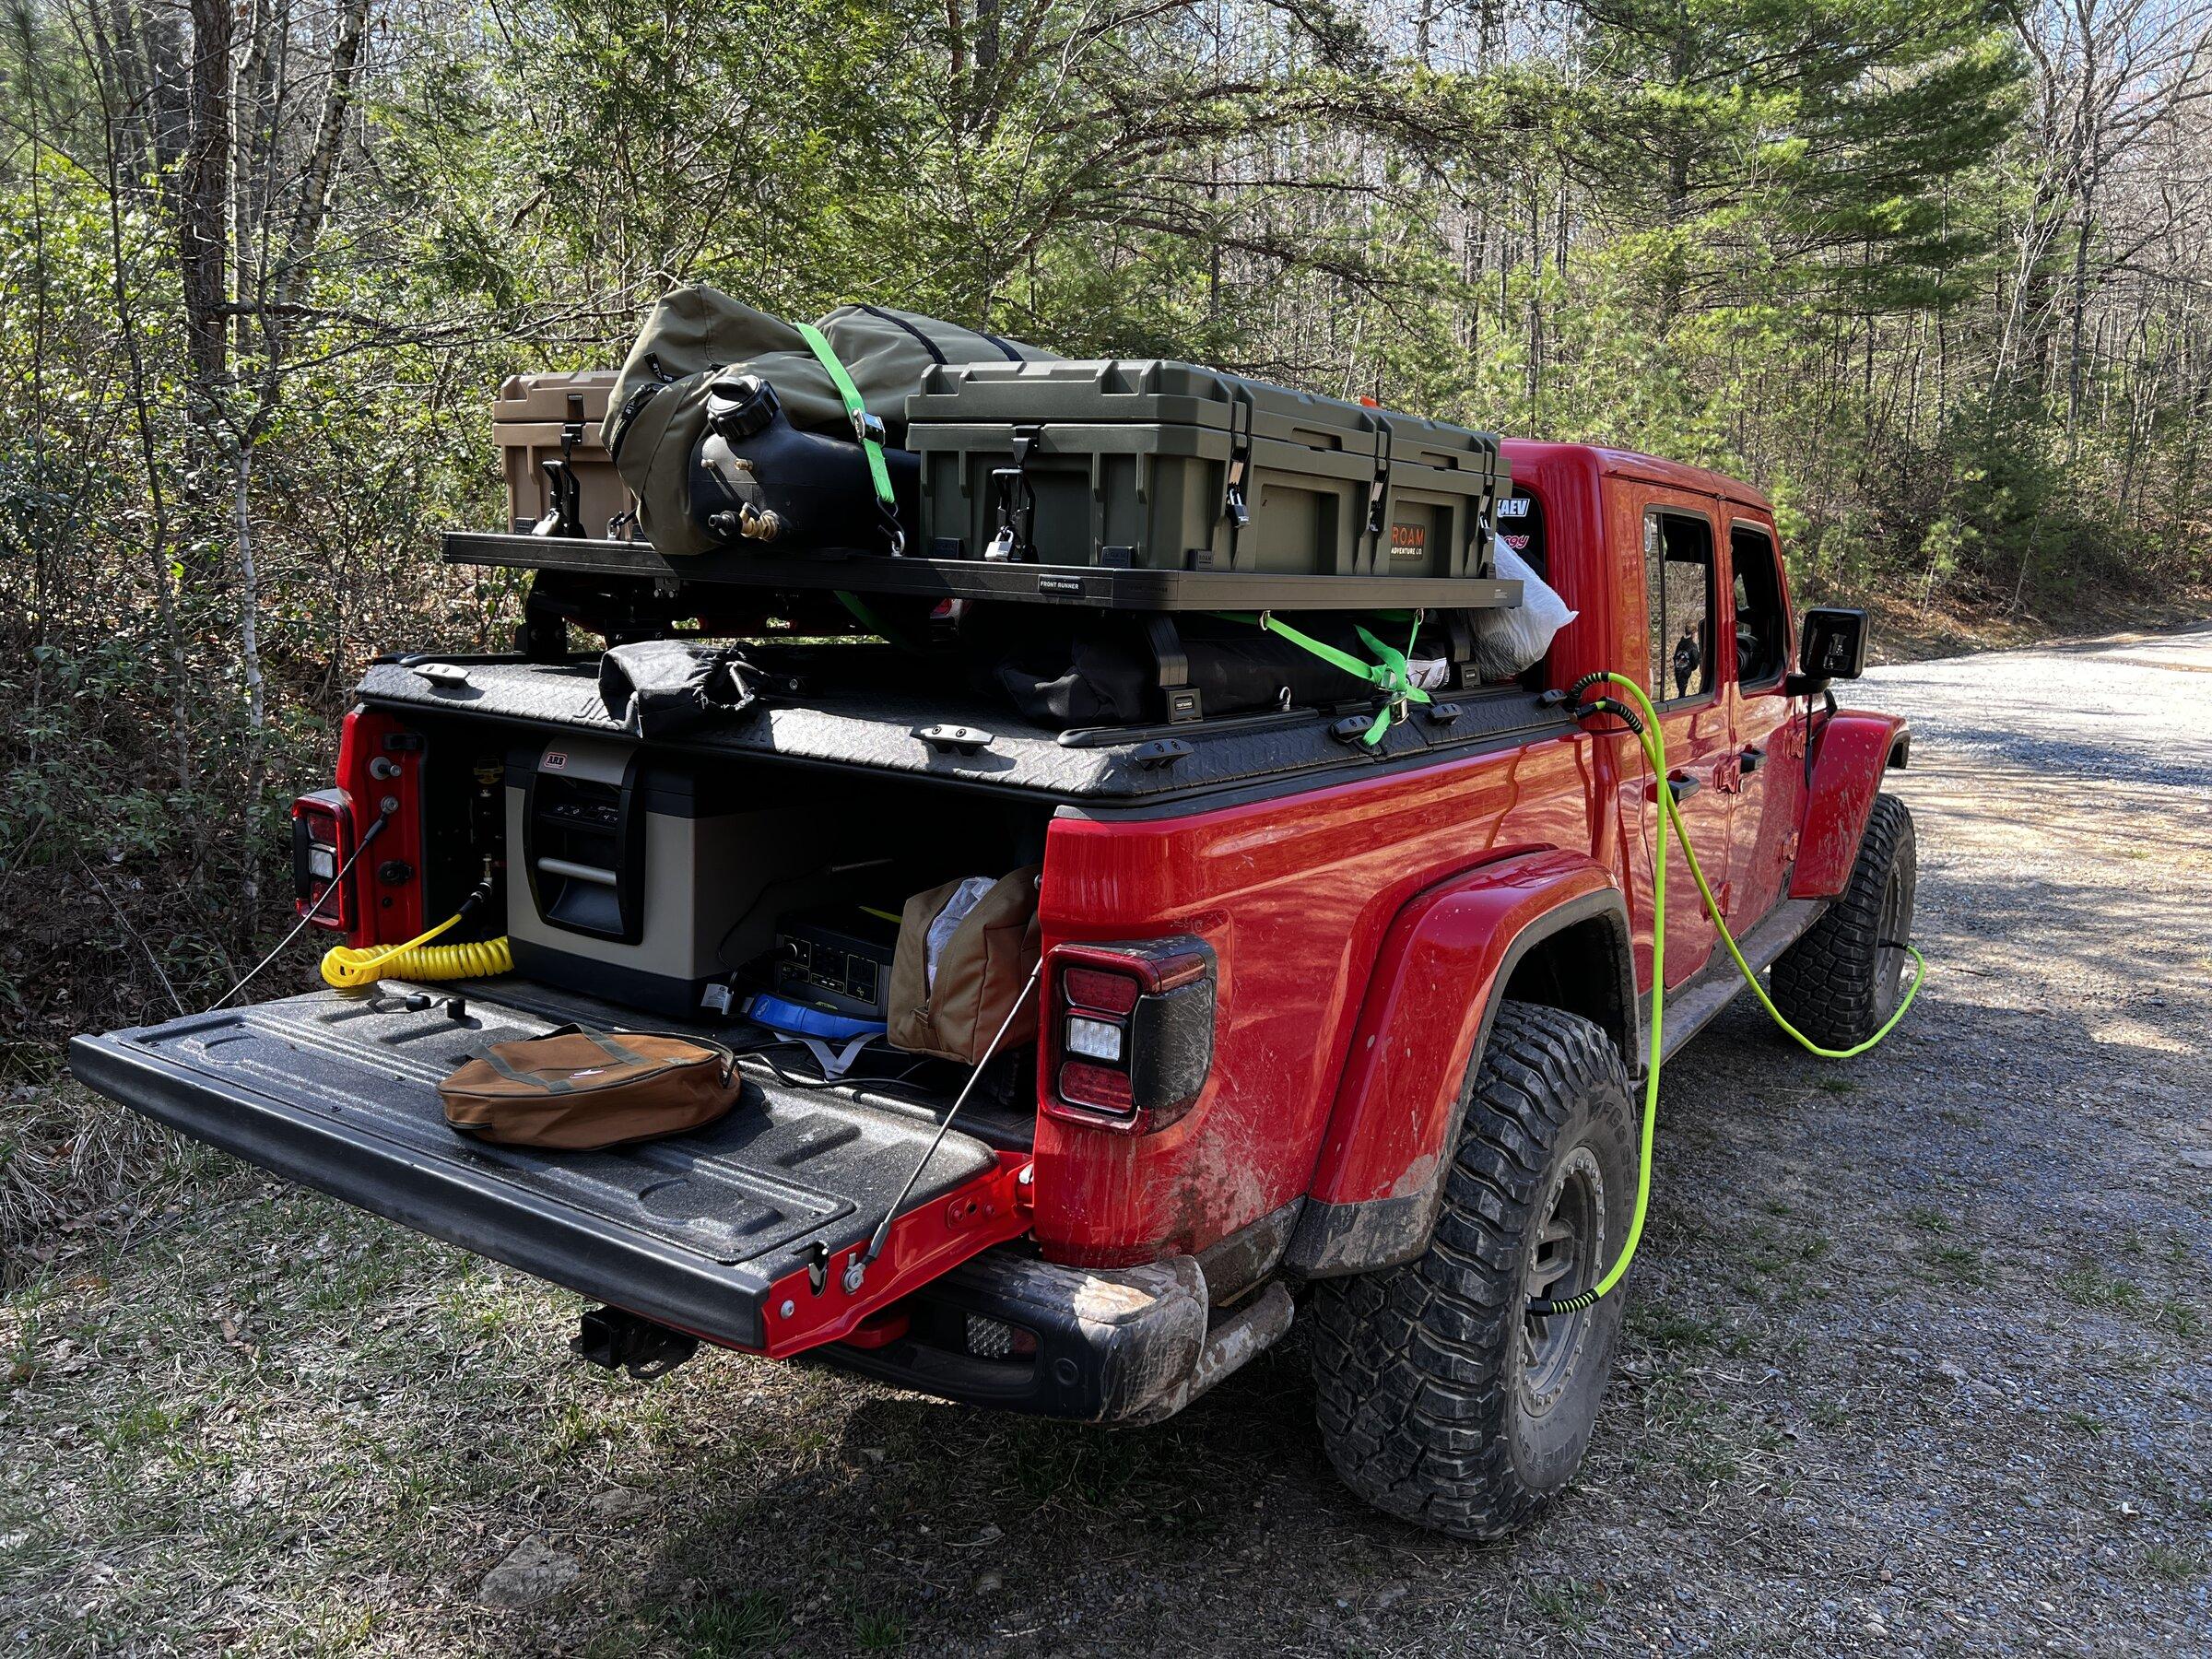
I really debated the Pros and Cons of both a PowerTank and a Compressor based air system for a while. I ended up choosing the PowerTank route because of the simplicity, time to air up and the convenience of a local CO2 fill station. I started some research on buying a 4 tire system from Morrflate or Speedflate, there might have been a few others. I decided quickly that I could build my own system to perfectly fit my application and save a few bucks. What I ended up with exceeded my expectations, a system rated to 300 PSI, Deflates all tires in 3 mins and 30 seconds, Inflates tires in about 45 seconds.


Here is what I used:
- 10lb PowerTank and Standard Mount https://powertank.com/collections/pow...
- Flexilla 3/8" Air Hose 24 x QTY 2 https://www.amazon.com/gp/product/B00...
- Flexilla 3/8" Reusable Fittings Qty 14 https://www.amazon.com/dp/B007QV1F6E?...
- 4 way aluminum air manifold https://www.amazon.com/gp/product/B07...
- Digital Pressure Gauge https://www.amazon.com/gp/product/B07...
- 1/4" Ball valve https://www.amazon.com/gp/product/B08...
- Haltec Tire Chucks https://www.amazon.com/gp/product/B08...
- 1/4" FNPT Tee Qty 2 https://www.amazon.com/dp/B01L2Y4LAW?...
Sponsored

 
Last edited:

Wolf Island Diver

Well-Known Member
Joined
Apr 14, 2021
Threads
22
Messages
883
Reaction score
1,922
Location
Virginia
Vehicle(s)
2021 JT Rubicon EcoDiesel
Occupation
Software Engineer
Great setup. I’m building something similar for my PowerTank but mounted to my molle panels with a few other differences. I’m using brass wyes instead of tees and I want to protect the side of the truck. I’m trying to decide what I want to wrap them with. What is that you have wrapped around the tees? It looks like x-treme rubber tape or electrical tape?
 
OP
OP
JBahr

JBahr

Well-Known Member
First Name
Jonathan
Joined
Oct 24, 2020
Threads
10
Messages
84
Reaction score
135
Location
Denver Colorado
Vehicle(s)
2020 Gladiator Stingray Gray
Occupation
Sales
Great setup. I’m building something similar for my PowerTank but mounted to my molle panels with a few other differences. I’m using brass wyes instead of tees and I want to protect the side of the truck. I’m trying to decide what I want to wrap them with. What is that you have wrapped around the tees? It looks like x-treme rubber tape or electrical tape?
So I started with brass wyes and hose clamps too... they busted under high pressure so I went to the Flexilla fittings with a threaded Tee. I used heat shrink on the fittings to keep them from marring the paint on the side of the truck.
 

Wolf Island Diver

Well-Known Member
Joined
Apr 14, 2021
Threads
22
Messages
883
Reaction score
1,922
Location
Virginia
Vehicle(s)
2021 JT Rubicon EcoDiesel
Occupation
Software Engineer
So I started with brass wyes and hose clamps too... they busted under high pressure so I went to the Flexilla fittings with a threaded Tee. I used heat shrink on the fittings to keep them from marring the paint on the side of the truck.
I went back and forth about using airline tubing but decided I’m going the flexzilla route too starting with the parts you listed. Both are mechanical fittings and I trust the flexzilla more than air line tubing and push to connect fittings of questionable origin that are out there. The threaded brass wyes I found have a 1200psi working pressure so I’m not worried about those. I’m using the wyes on the whips in lieu of tees, just to make them roll up a little easier.

I found a quality manifold block similar to the one PowerTank sells but 4 port, that I’m mounting on my molle panels near the tailgate. That’s where the PowerTank is mounted. I’m running bulkhead fittings through the lower unthreaded, and now enlarged, lower tonneau cover mounting holes. I’m mounting brass quick disconnects in the space between the cab and bed on either side of the truck. I have a Diamondback Cover, so the bed will be inaccessible when I’m running a RTT. Some of the flexzilla will run to those behind the molle panel.

I was going to just use my new PowerTank inflator plugged into the manifold as the gauge and valve, but I went ahead and ordered a dedicated valve and PowerTank gauge for the manifold.

Thanks for the heat shrink idea. I’ve got tons of it and it hadn’t yet occurred to me to use it for this.
 

Wolf Island Diver

Well-Known Member
Joined
Apr 14, 2021
Threads
22
Messages
883
Reaction score
1,922
Location
Virginia
Vehicle(s)
2021 JT Rubicon EcoDiesel
Occupation
Software Engineer
Finally got around to finishing and testing mine:

Here are the special parts:

For the bulkhead penetration:
Legines 1/4" NPT Female Brass Bulkhead Coupling Tank Fitting, 1-1/2" Length (Pack of 2) https://www.amazon.com/dp/B076MQ59MH/ref=cm_sw_r_cp_api_i_DR12710Q5BKWEVDY71J0?_encoding=UTF8&psc=1

The elbows used in various places:
transkoot 5pcs Brass Fitting,1/4" NPT Male Pipe, 1/4" NPT Female 90 Degree Barstock Street Elbow https://www.amazon.com/dp/B077RZ4677/ref=cm_sw_r_cp_api_i_ZA8QPWSM2Q9P7K5XEGJY?_encoding=UTF8&psc=1

I used this wye fitting for the whips:
EDGE INDUSTRIAL Brass 1/4" WYE Pipe, 1/4" MNPT x 1/4" FNPT, Fuel/AIR/Water/Oil/Gas WOG (Qty 01) https://www.amazon.com/dp/B07DP4TR78/ref=cm_sw_r_cp_api_i_WKJXK8NJG5RT2J6CNRRT?_encoding=UTF8&psc=1

The chucks:
Haltec 4 (Four) H-5265 Standard Bore Grip Lock On Air Chuck 0-300 psi 1/4" NPT https://www.amazon.com/dp/B08BTPG6J8/ref=cm_sw_r_cp_api_i_9TXJGQVDKXR4M41AEPCE?_encoding=UTF8&psc=1

The manifold:
PNEUMADYNE M20-250-4 Manifold, 2 X 3/8 Input, 4 X 1/4 Output https://www.amazon.com/dp/B0078RVNEK/ref=cm_sw_r_cp_api_i_FYR175Y7JZC9ZTKW2Y8M?_encoding=UTF8&psc=1

The couplers:
Milton S-217 1/4" NPT V Style Coupler and Plug Kit - 6 Piece https://www.amazon.com/dp/B001O2ZGQ6/ref=cm_sw_r_cp_api_i_ED7TBTXFFFMAADC9GHTS?_encoding=UTF8&psc=1

plus some brass adapters, some brass plugs, 50’ of Flexzilla hose, a BucketBoss bag, a digital PowerTank gauge, some plastic caps for the couplers, 2 1/2 inch brass nipples, some Flexzilla ends and a ball valve.

All of the internal hose is Flexzilla. I didn’t trust a lot of the push-to-connect fittings and tubing I saw out there. Everything runs behind my molle panels except at the bulkhead so it’s very clean. I fabricated some hangers that attach to the bulkhead using the bolts for the trail rail for the section of hose that runs to the passenger side. I can control everything from the tailgate either with an air compressor or the PowerTank with the Diamondback cover closed. It works perfectly without leaks.


Jeep Gladiator 4 Tire Air Up/Down System with PowerTank F1B60872-36C1-491D-8251-844271F98700
Jeep Gladiator 4 Tire Air Up/Down System with PowerTank C5ED2FC1-DF1C-4791-805C-A8522FB4F5F0
Jeep Gladiator 4 Tire Air Up/Down System with PowerTank B4490236-A2F1-4AFA-86C5-FF8CA01BD644
Jeep Gladiator 4 Tire Air Up/Down System with PowerTank 5E5C698B-2B53-4E60-9283-ADA86AA71EC4
Jeep Gladiator 4 Tire Air Up/Down System with PowerTank 156CE1E7-2CD2-4C6E-ACB7-3C6A8C2847A4
 

Sponsored

OP
OP
JBahr

JBahr

Well-Known Member
First Name
Jonathan
Joined
Oct 24, 2020
Threads
10
Messages
84
Reaction score
135
Location
Denver Colorado
Vehicle(s)
2020 Gladiator Stingray Gray
Occupation
Sales
I like the mounts behind the cab. Do you have more detail on the mounting method?

Interested in the clearance there and if you will have contact with off-road conditions. If ditch the cap for a period of time I am stuck with a single tire setup.
 

Wolf Island Diver

Well-Known Member
Joined
Apr 14, 2021
Threads
22
Messages
883
Reaction score
1,922
Location
Virginia
Vehicle(s)
2021 JT Rubicon EcoDiesel
Occupation
Software Engineer
There’s about 3/8 - 1/2 inch of clearance between the cab and the fitting. I could have achieved more but I balanced them between the cab and bed for easy finger access. I haven’t seen any rubbing. I’m taking it off road this weekend so I’ll see how it will be when flexing all over the place. I’m not sure I care if it rubs a little as long as I take care of it if the paint is rubbed raw. The clearance is between the quick disconnect and the cab so conceivably you could use another nipple to get up from between the cab and bed before the disconnect is threaded on. That would give you more room but it would stick out. I wanted these recessed and out of the way. You can also bias the disconnect towards the bed since it only will move relative to the cab.

The penetrations go through the alignment holes for the tonneau cover. The threaded holes are left alone. The fittings have to go from the outside and are tightened from the inside. You can’t get a wrench on the nut if it’s on the outside. This means that the penetration goes into the interior of the bed about an inch which is not a big deal. I enlarged the holes with a step drill. I use the drivers side threaded hole for a hanger for the two hoses.

I created an assembly consisting of the disconnect, elbow and nipple and then mated it up blindly to the penetration coupling. Then I tightenthe penetration coupling onto the nipple from the inside holding the quick disconnect to keep it all from rotating. Once you’re confident that the nipple is sufficiently tight in the penetration coupling, continue holding the quick disconnect assembly while you tighten down the nut on the penetration

I fabricated a backing plate for the manifold out of aluminum and bolted it through my JCR side molle panel with SS bolts and nylar nuts.

The hangers that run along the bulkhead under the trail rail are just plastic hose/wire clips pop riveted to some 1/16 aluminum pieces that slide up behind the trail rail.

Both sides are home runs to the manifold. This uses more hose but I think it’s more balanced and cleaner. I only used 1 50’ hose for the whole thing. Of course this also means that I used 12 Flexzilla ends in total.

Some things to watch out for:

1. I had to play with different lengths of nipples to get this right. I settled on 2.5 inches. You will want to check the length of the whole thing first taking into account how far the fittings will go together with tape on them and check the clearances.

2. Deburr the hole in the bed or it will gall the threads of the penetration. Obviously paint the hole.

3. I would not recommend attempting to cut and thread longer nipples to get them to the correct size.

4. Be aware that most of the stuff on Amazon is junk. Especially any aluminum fittings like manifolds. The one I used is okay, but I’d go easy on torque. The only leak I had was in the interface between the PowerTank gauge and the reducer. The threads on the gauge were the issue.

5. I only used Flexzilla ends for the hose. This is an expensive way to go but they’re really forgiving and repairable.

6. I notice about a .1 - .3 PSI delta between the gauge reading when filling and what TPMS says for all 4 tires after rolling around the block to get them to update.

7. There’s not much room between the manifold with the gauge and valve and bed so I used a 90 elbow for the intake port on the whole system.

8. The chucks are difficult to get on and off of my AEV wheels because of the recessed valve stems, but all latch-on chucks are.
 

Wolf Island Diver

Well-Known Member
Joined
Apr 14, 2021
Threads
22
Messages
883
Reaction score
1,922
Location
Virginia
Vehicle(s)
2021 JT Rubicon EcoDiesel
Occupation
Software Engineer
I had a chance to test this out on the trail this weekend with a fully loaded bed and on some fairly gnarly off camber washed out trails that should have maximized body twisting. I didn’t see any rubbing and my clearances are closer to 1/4 inch. The driver side has a huge weld right where the penetration comes through so it’s worse.

As for performance, these worked really well. I couldn’t see the output gauge on my PowerTank so I just cracked it open and to fill 4 37s from 15 psi to 30 psi (I ran 3 psi high on the interstate back home) took about a minute. All were dead on equal.

Many thanks to @JBahr to this original POC and video. I think this is the best set up, DIY or commercial. I was about to pull the trigger on UpDownAir but read about the shrader valve issues and having all these connections down where the mud is turned me off. Most of the other solutions are just the DIY version for more money and you have to drag 4 long hoses from the same location. This is a cleaner setup. Whether you mount this through a cap or adventure rack or through the bulkhead like I did I don’t think you can go wrong with this enjoyable project. This upper front of bed location is also ideal for air tool ports and I keep all my whips out of the dirt when filling and setting up.

Jeep Gladiator 4 Tire Air Up/Down System with PowerTank DE1632F9-42E0-4FA4-B3A6-442DA709C339
Jeep Gladiator 4 Tire Air Up/Down System with PowerTank 615BCB89-E272-44D5-BB2F-F62EDAEC16E9
Jeep Gladiator 4 Tire Air Up/Down System with PowerTank ABE7B282-59DA-495A-98E1-D1344BB1F64F
Sponsored


Top