PabstBleuRibbon
Well-Known Member
- First Name
- Ryan
- Joined
- Aug 5, 2020
- Threads
- 7
- Messages
- 75
- Reaction score
- 158
- Location
- Oakland, CA
- Vehicle(s)
- 2020 Gladiator Mojave
- Thread starter
- #1
Hi all,
By a combination of bad timing, impatience, a time deadline, and perpetual backorder on everything, I cobbled together some options for lifting my Mojave. Here's what I ended up doing:
* Clayton 2.5" springs f/r
* AEV Geometry correction brackets
* Clayton front/rear track arms
* Clayton front bumpstops
* Teraflex 2" front shock extensions
* EVO 2.5 rear shock extensions
* EVO 2.5 rear bumptops
* Air lift 1000 air springs
* Apex swaybar disconnects
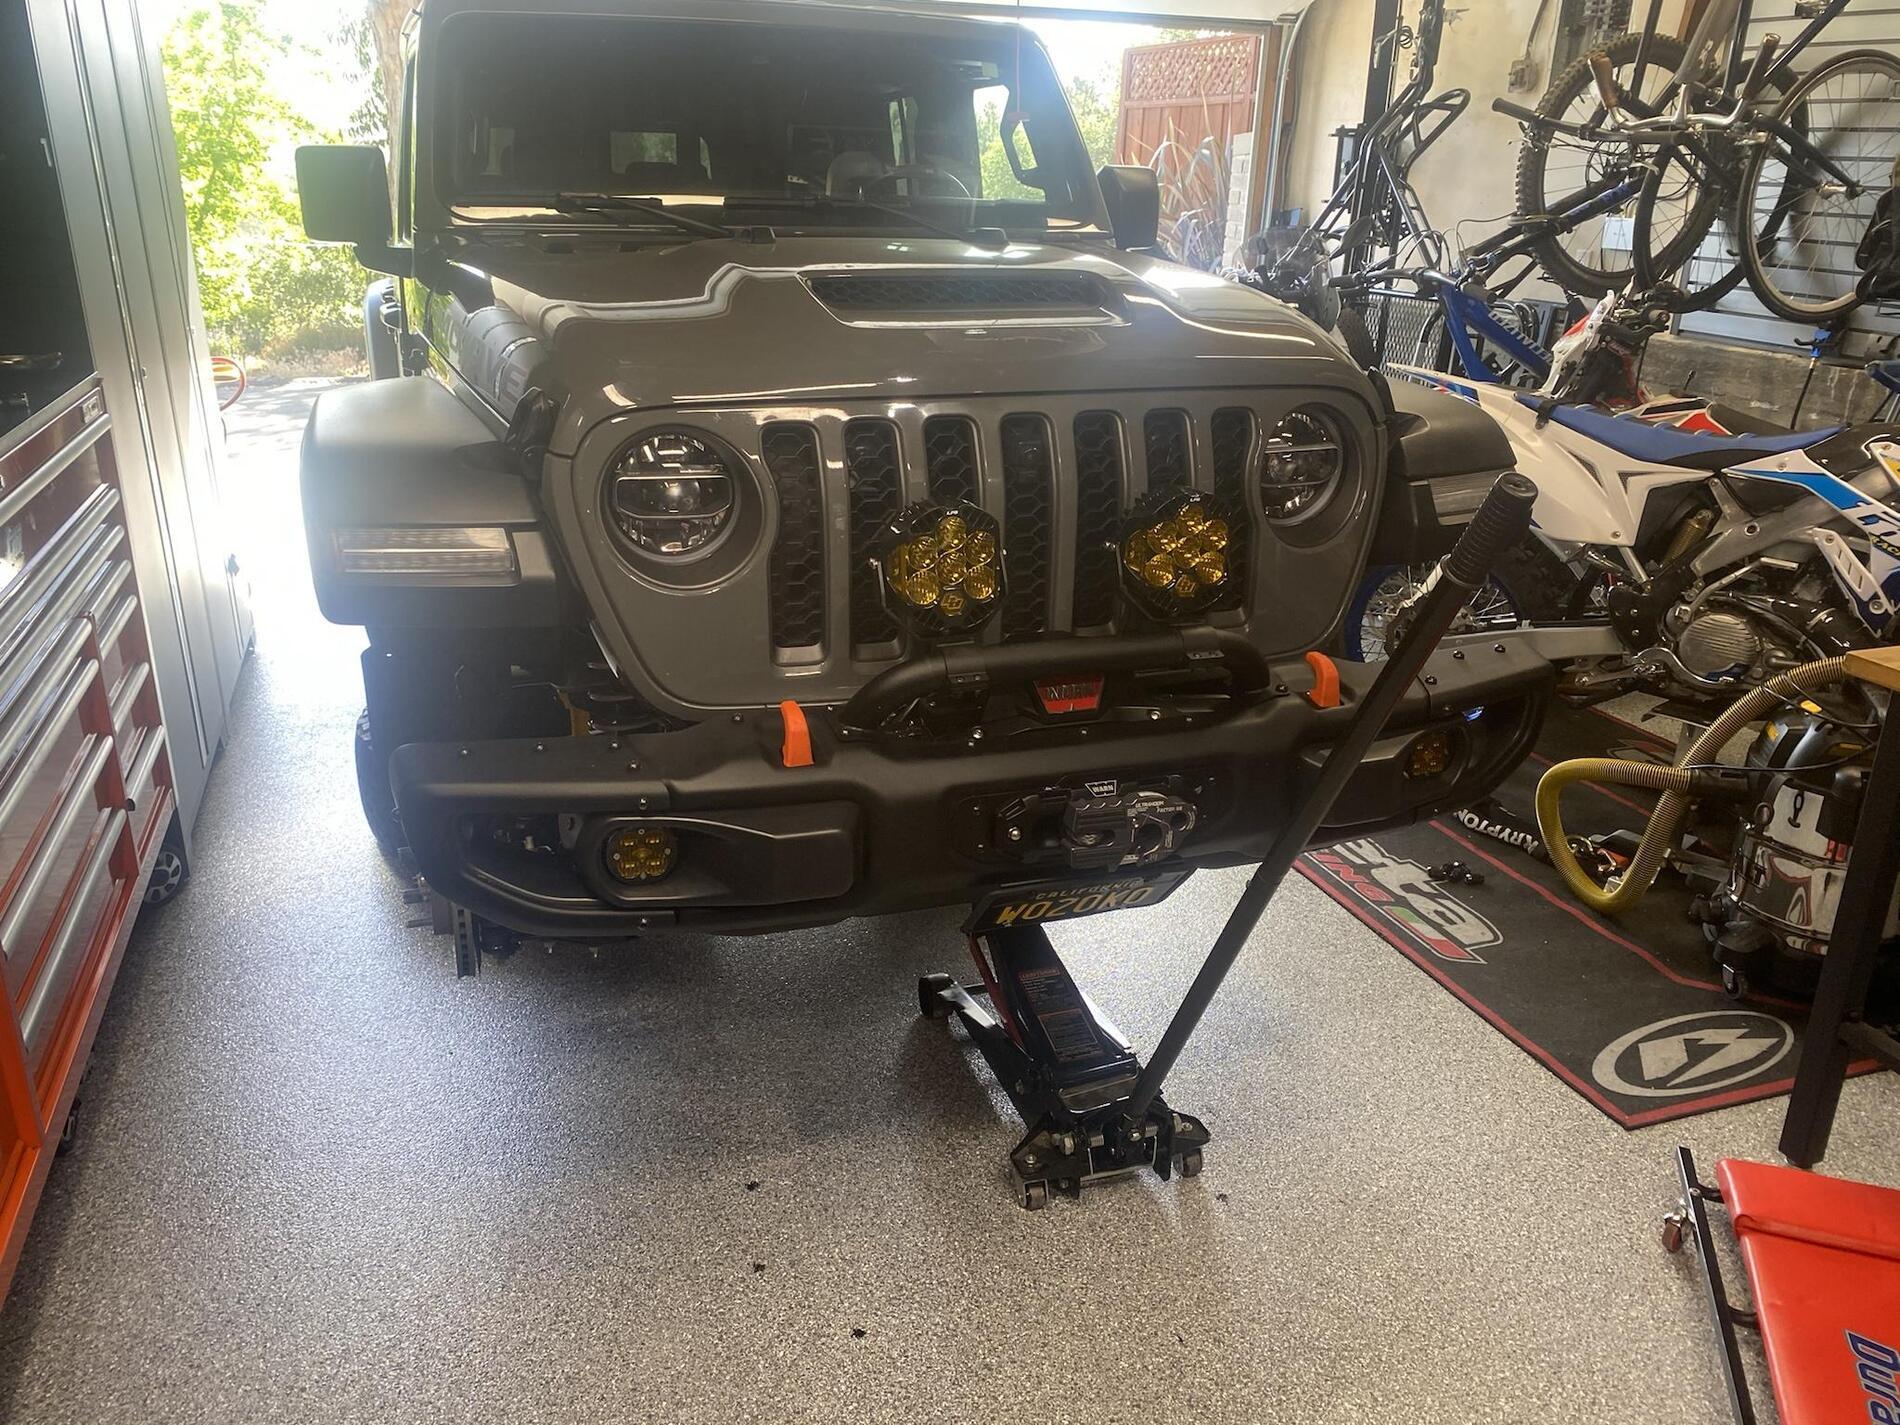
I managed to get it all done yesterday for the most part, it only took about 14 hours ? This is definitely a weekend project for a solo mechanic working from the ground. Impact gun and a good selection of 1/2" sockets and wrenches are absolutely required. I used a floor jack, jack stands, and a small older floor jack that proved to be invaluable when tweaking axle position to get everything bolted up.
here we go

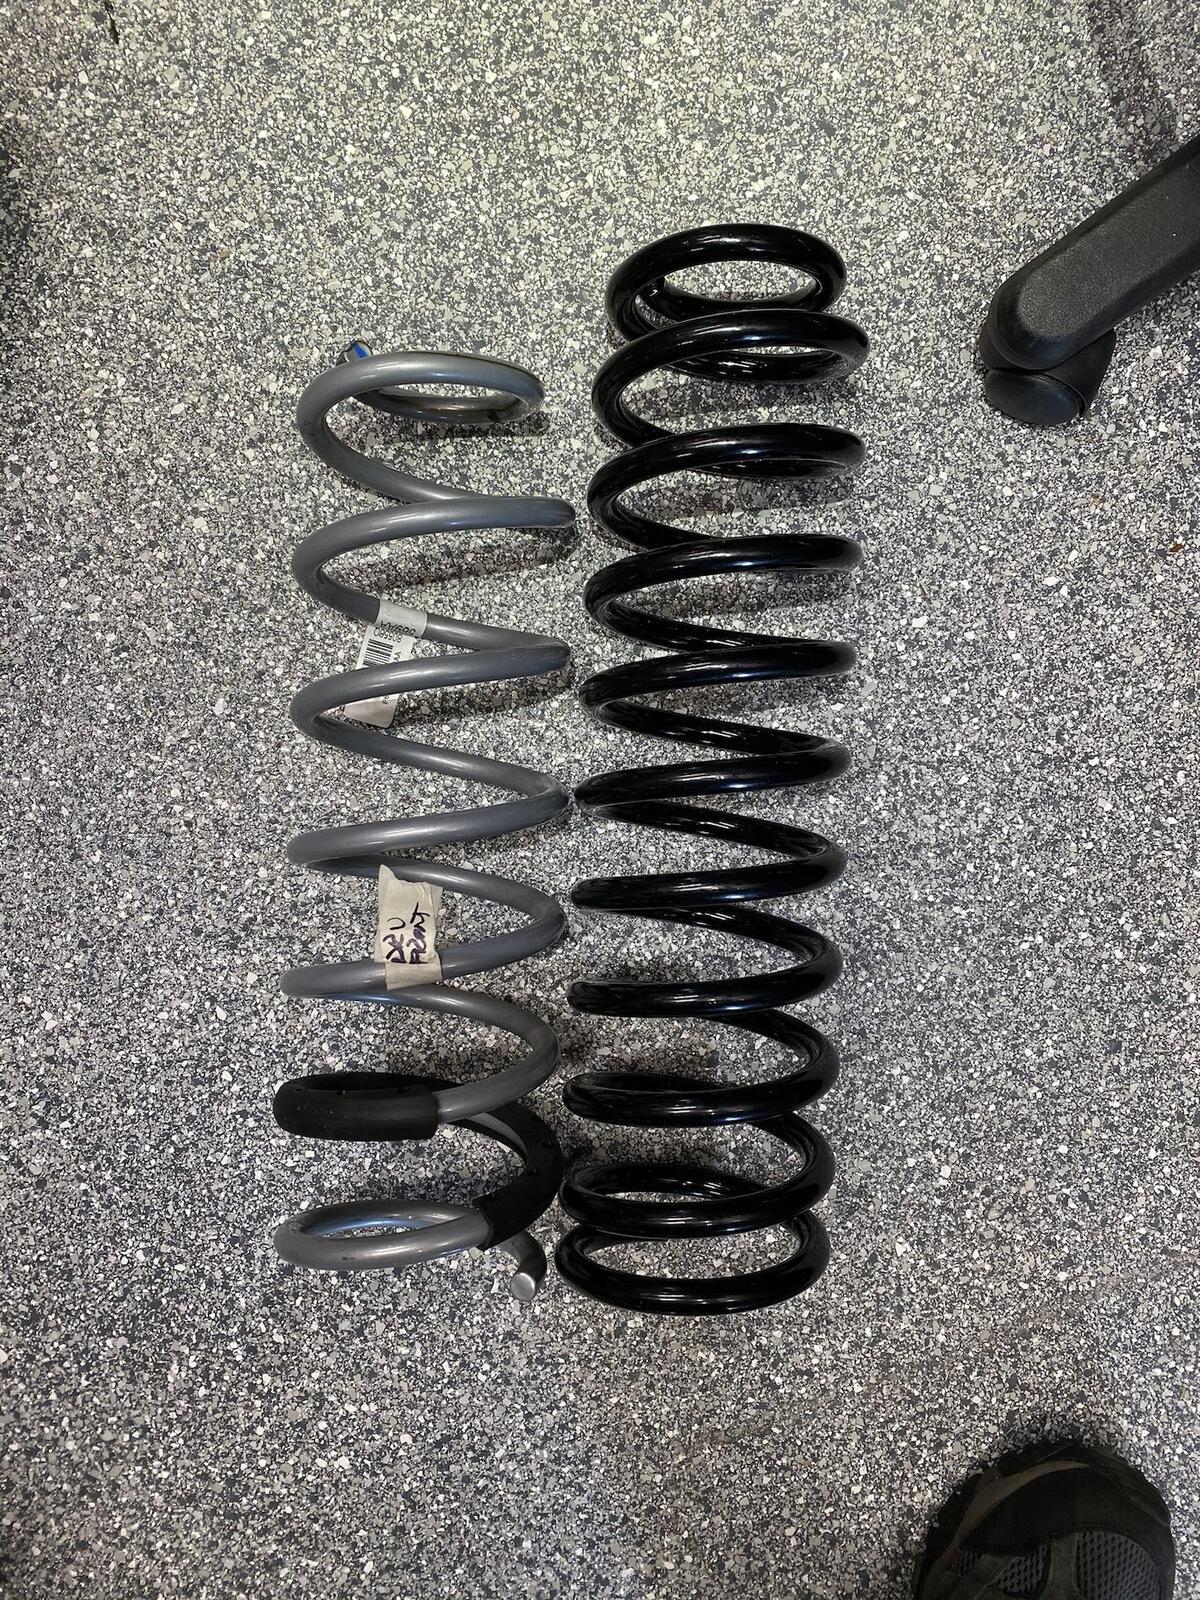
Front end dropped, springs out. A comparison of the Mojave front spring and a Clayton 2.5+ (more like 3" but I'll share my lift numbers at the end of this post)

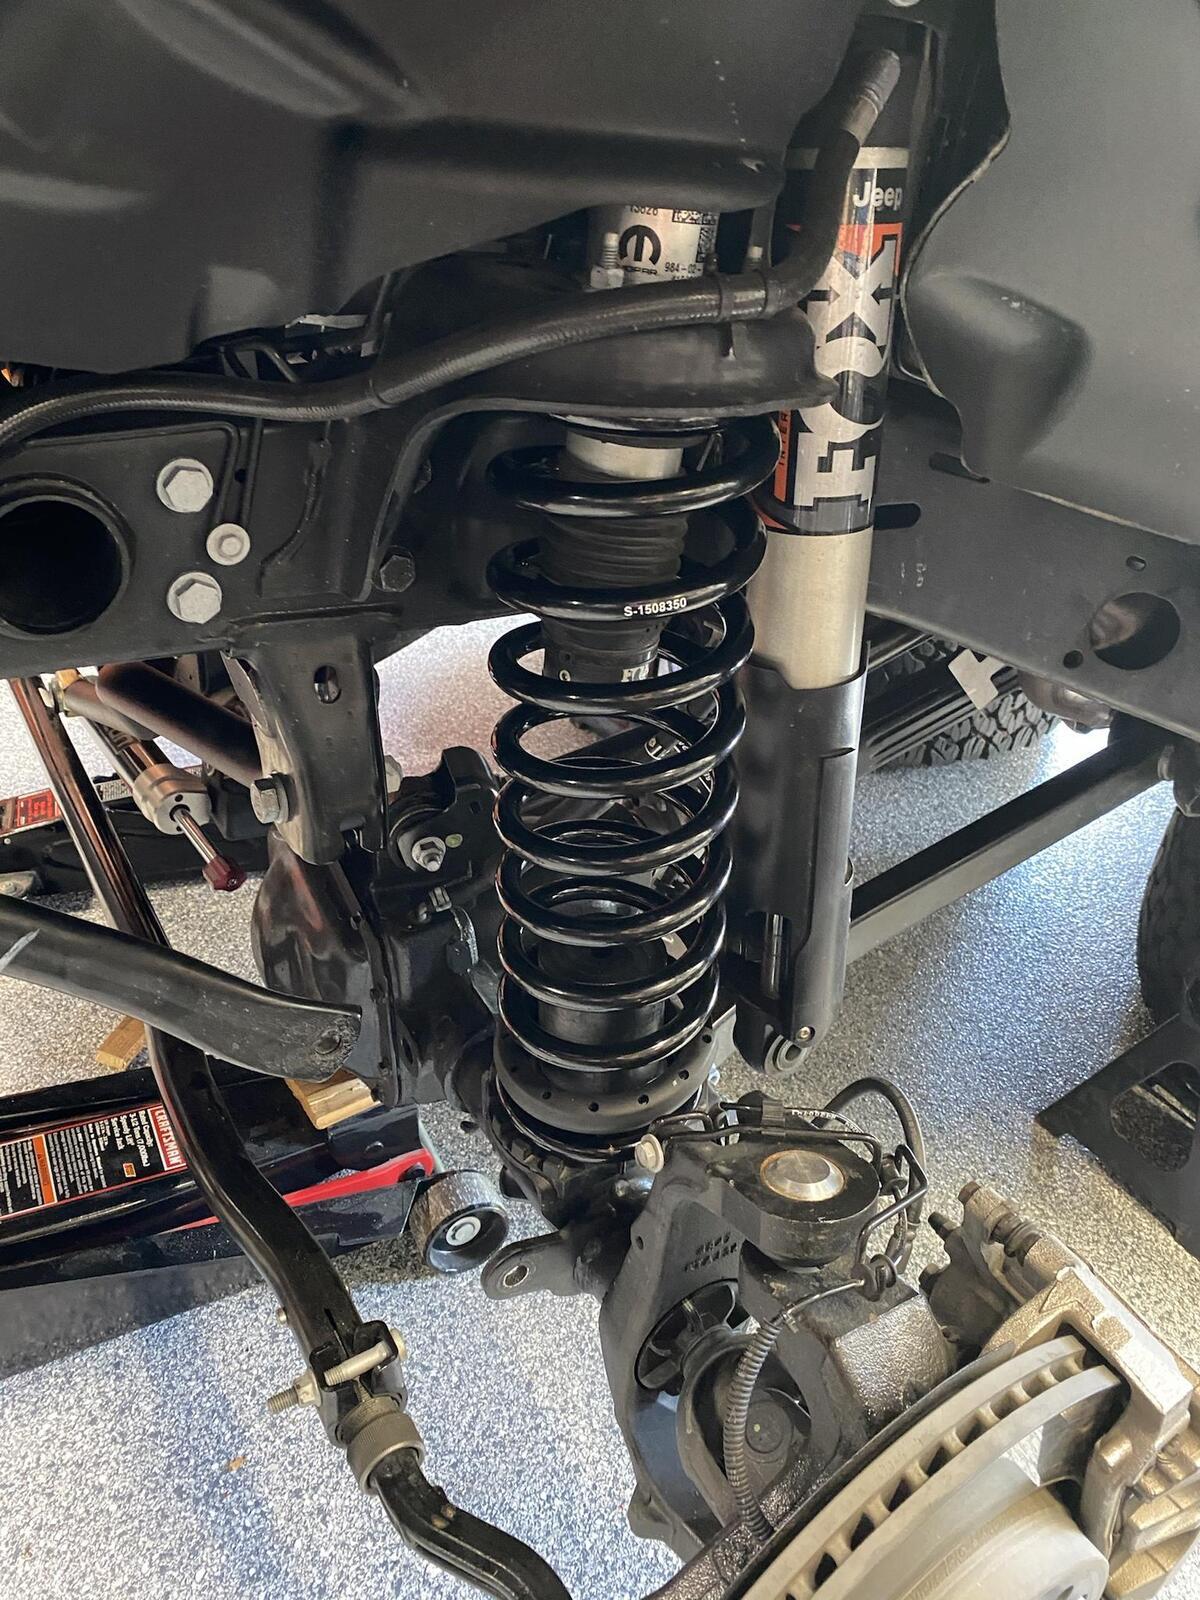
Clayton springs and bump stops are in. These weren't too bad to get in place, but you do have to drop the axle nearly as far as it'll go without stressing brake lines/cables.
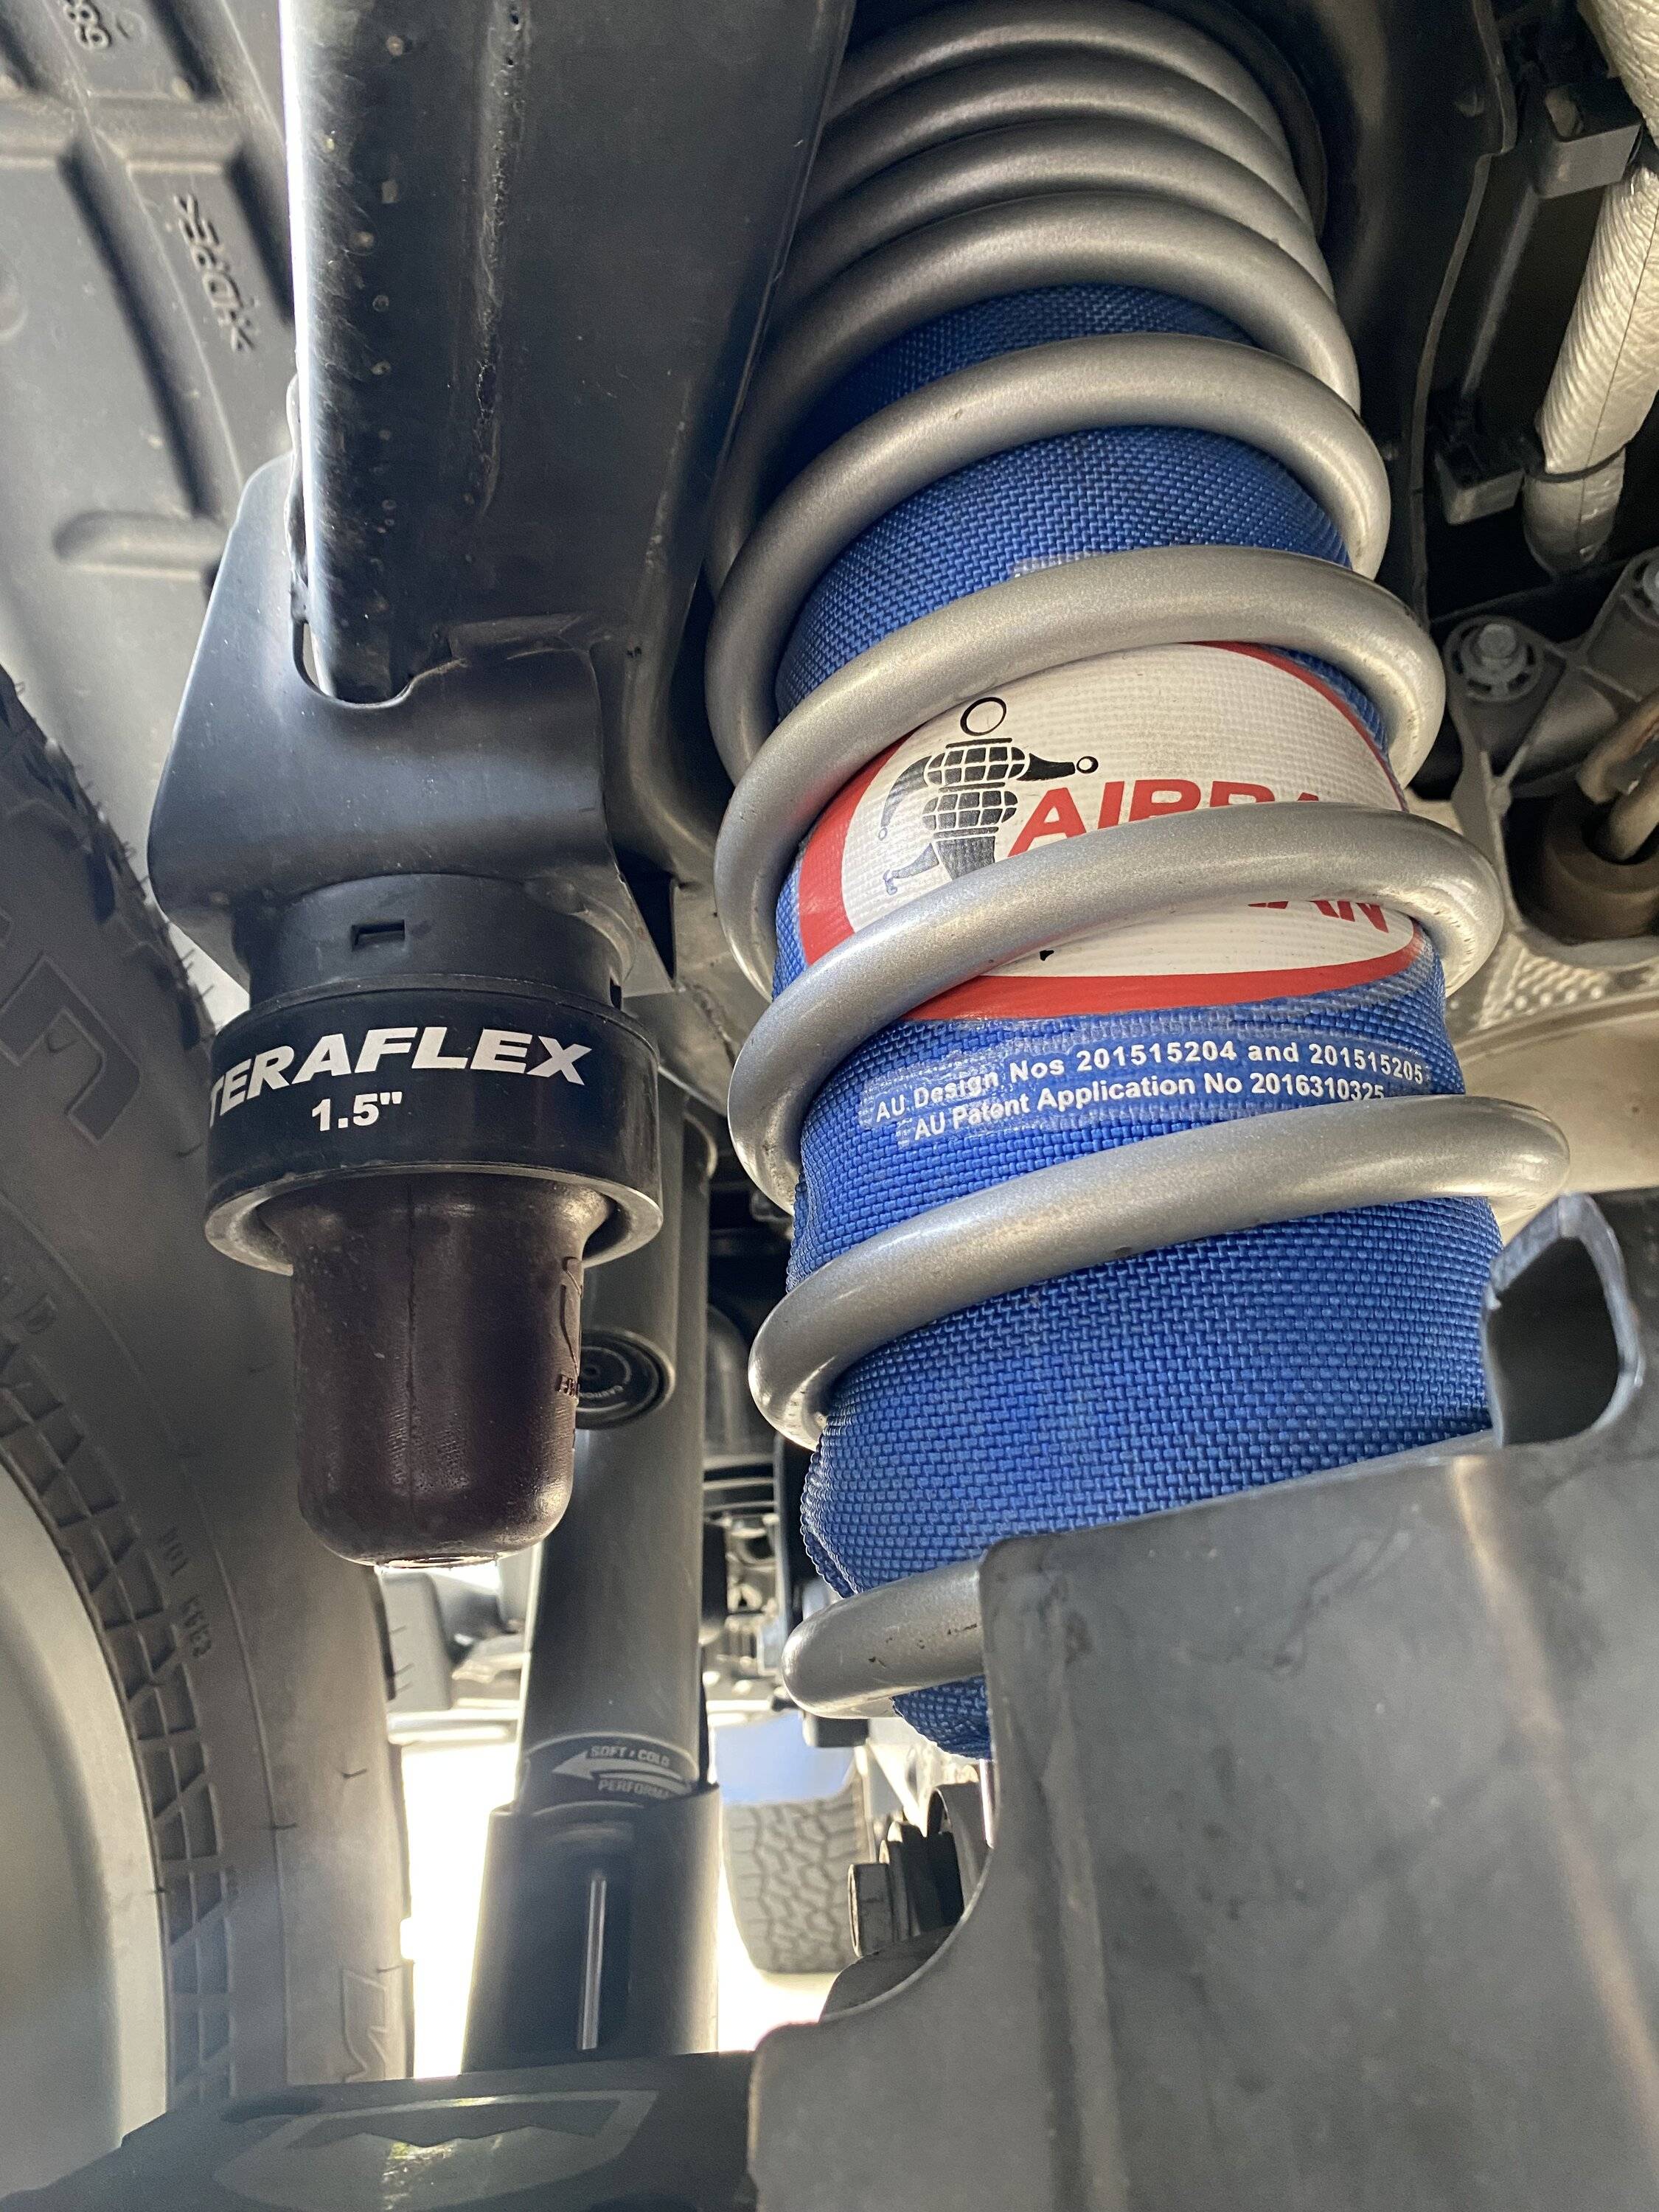
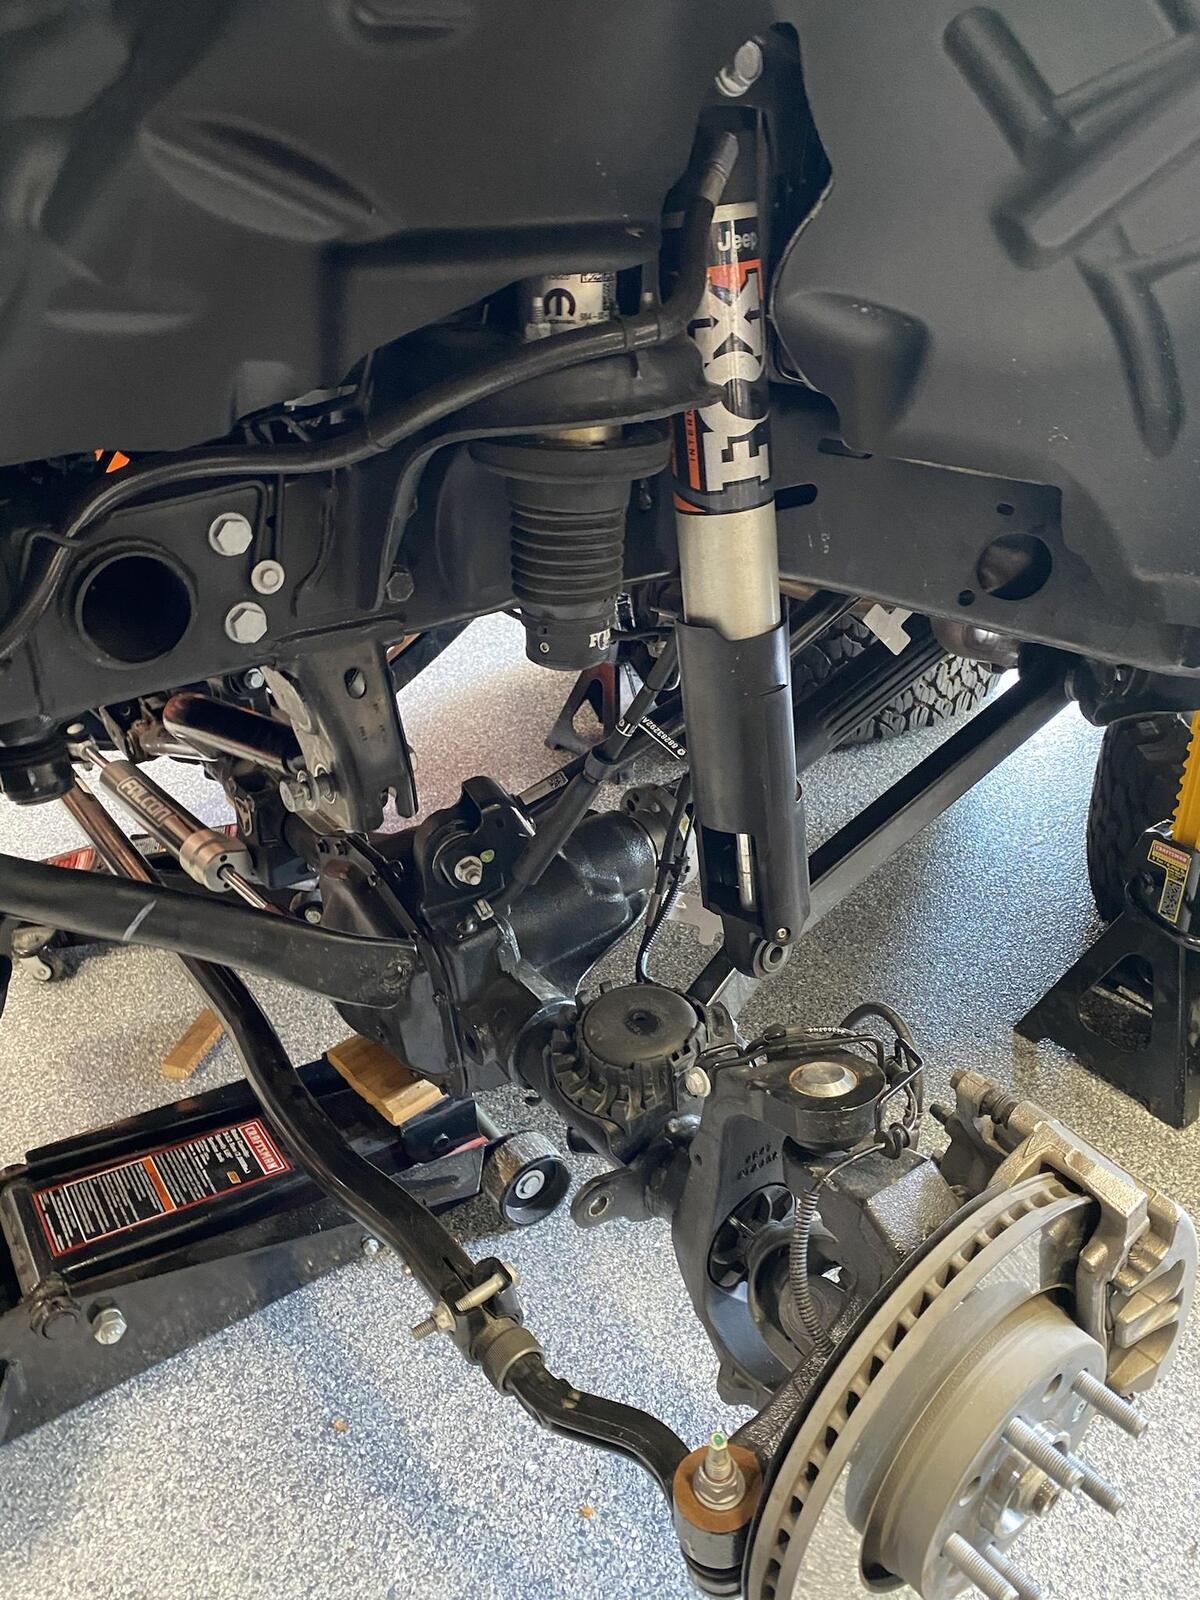
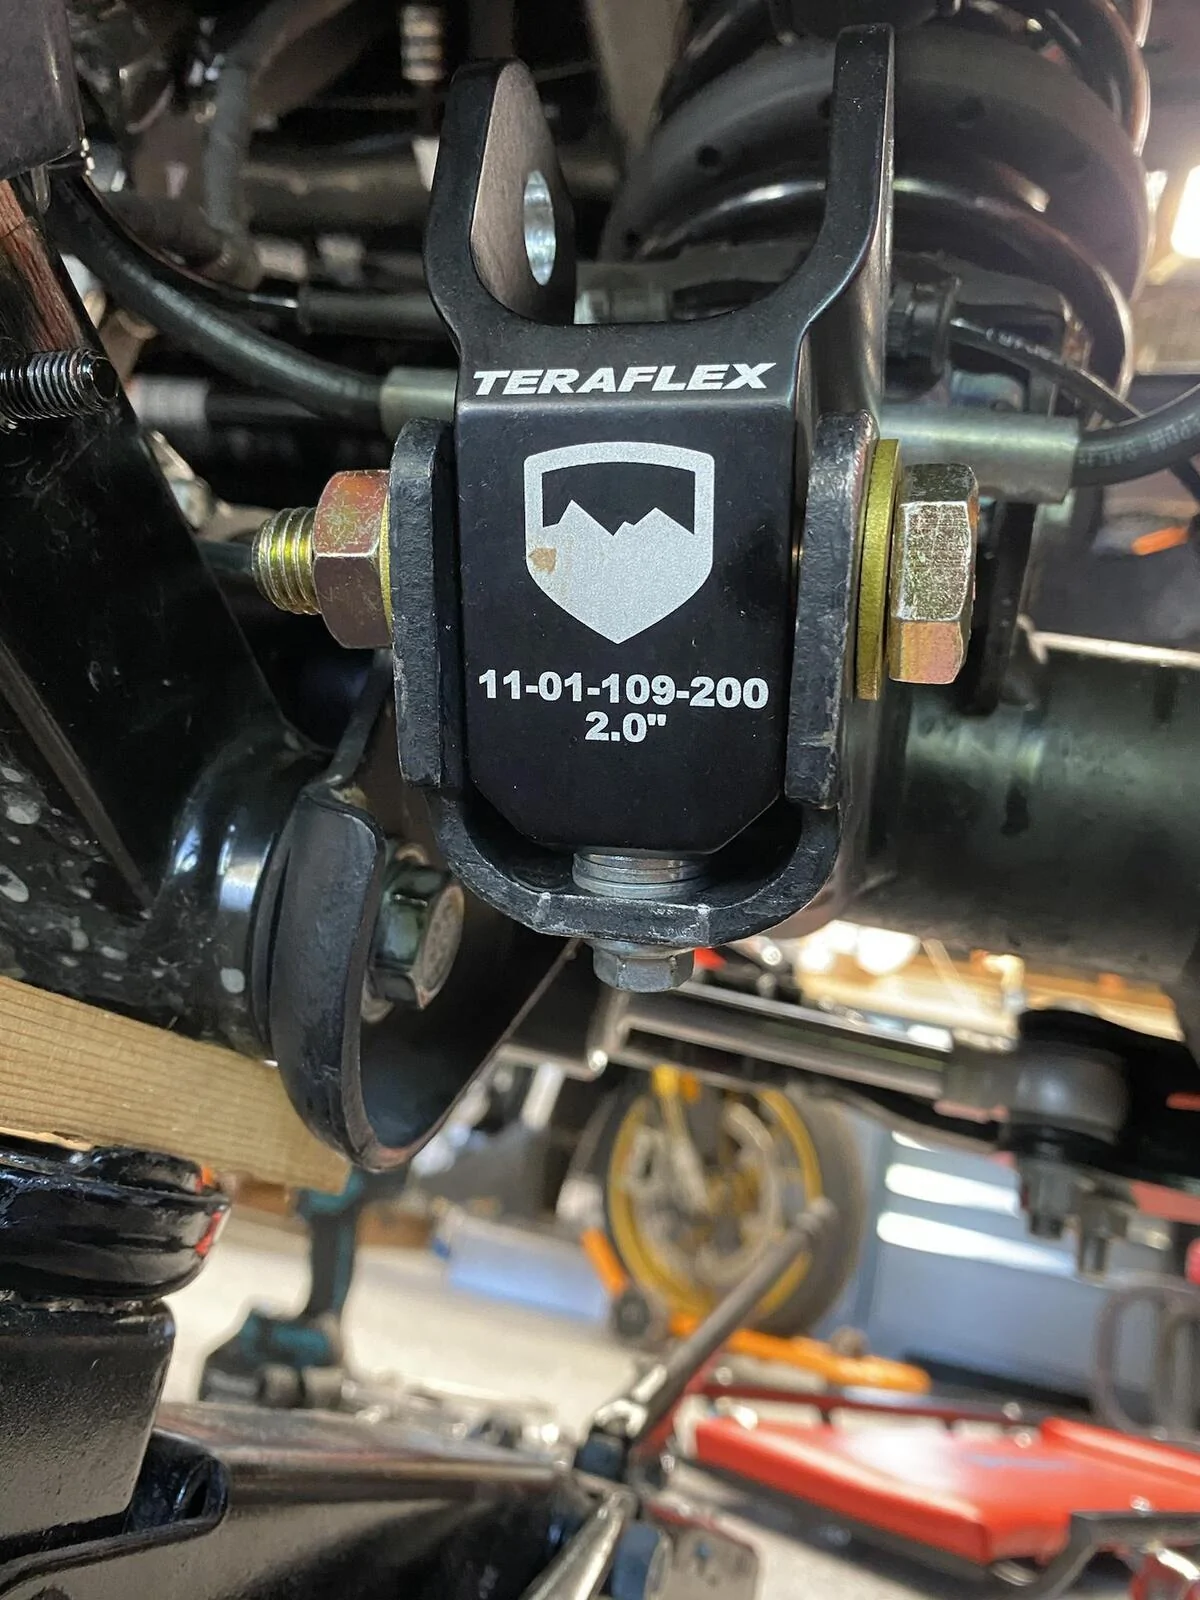
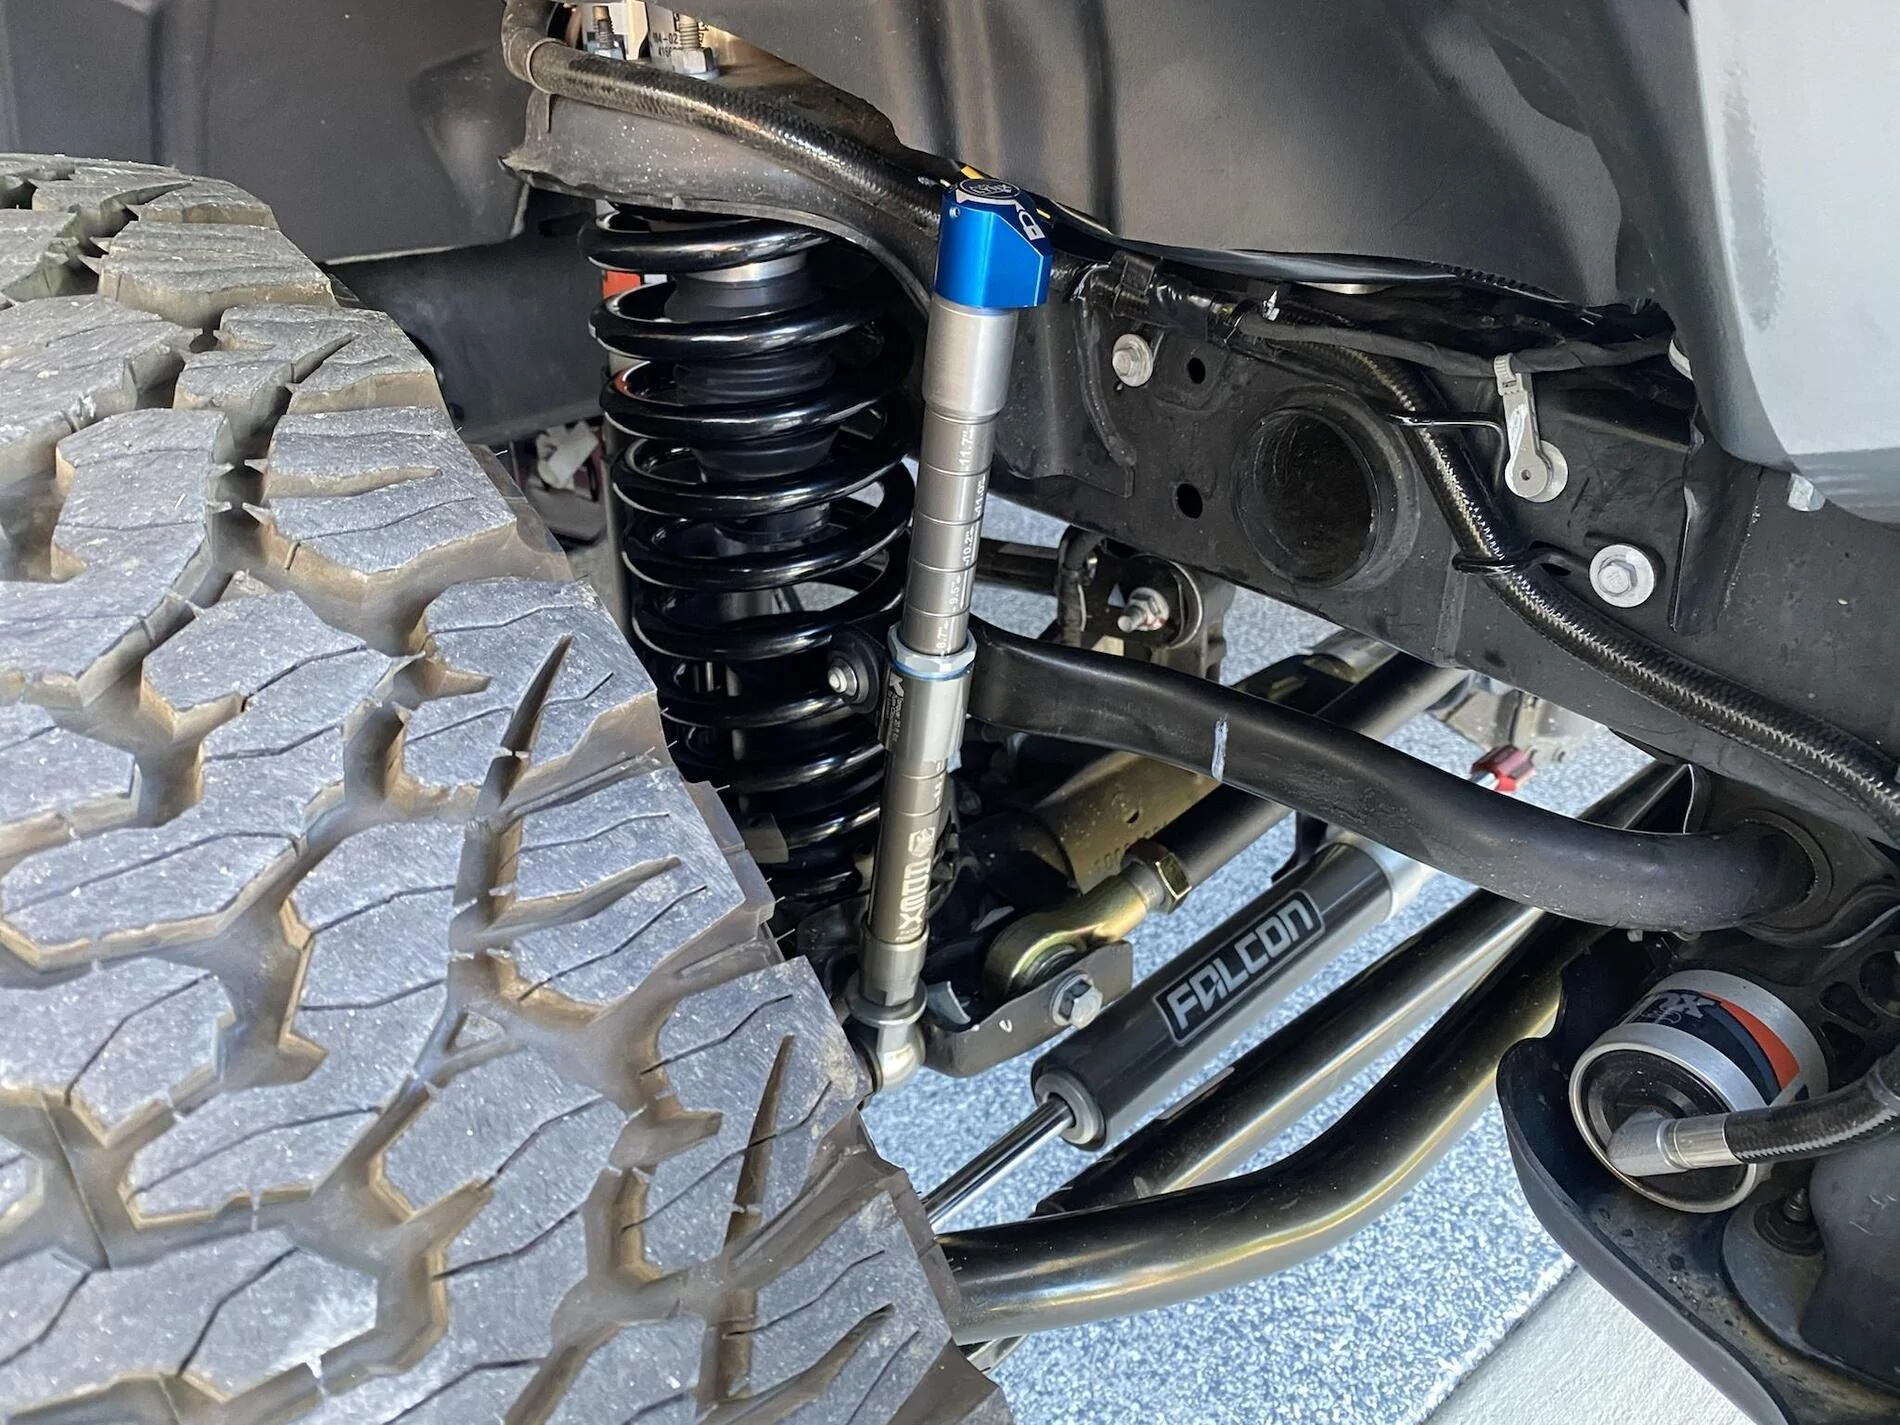
Teraflex 2" front shock extensions. These need to be drilled out to fit the Mojave shock bolts, and you'll need to source a longer bottom bolt and shim it with washers to get the extension properly mounted. Also another pair of Mojave front shock bolts/nuts, or a correctly sized equivalent. If Teraflex ever releases Mojave-specific extensions I'll replace them, the quality of these extensions was nice. After that a Clayton trackbar, adjusted to the length they recommended on their site.
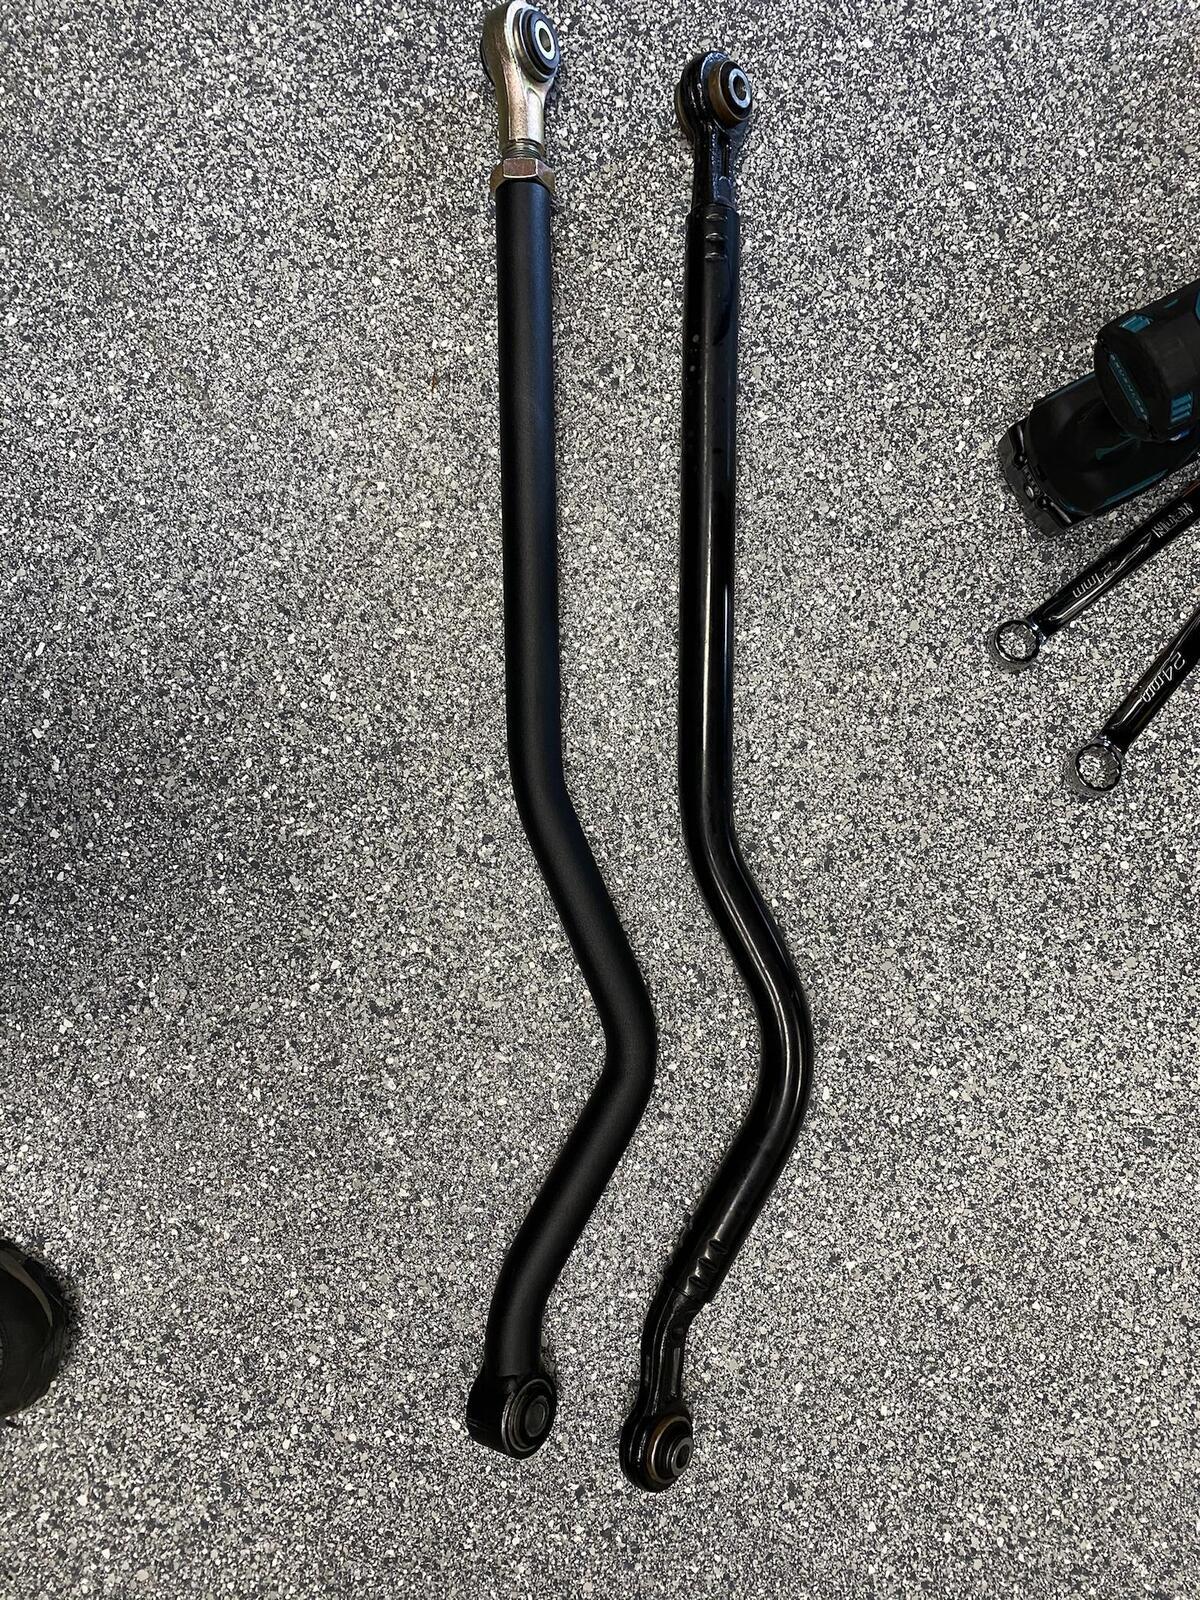
Clayton trackbar vs oem, this thing is STOUT:
Up until now everything has been going relatively smoothly. Springs, bumpstops, extensions, front trackbar, all went in without issues. Put the front tires back on and put the truck on the ground.
Just a little nose high for now
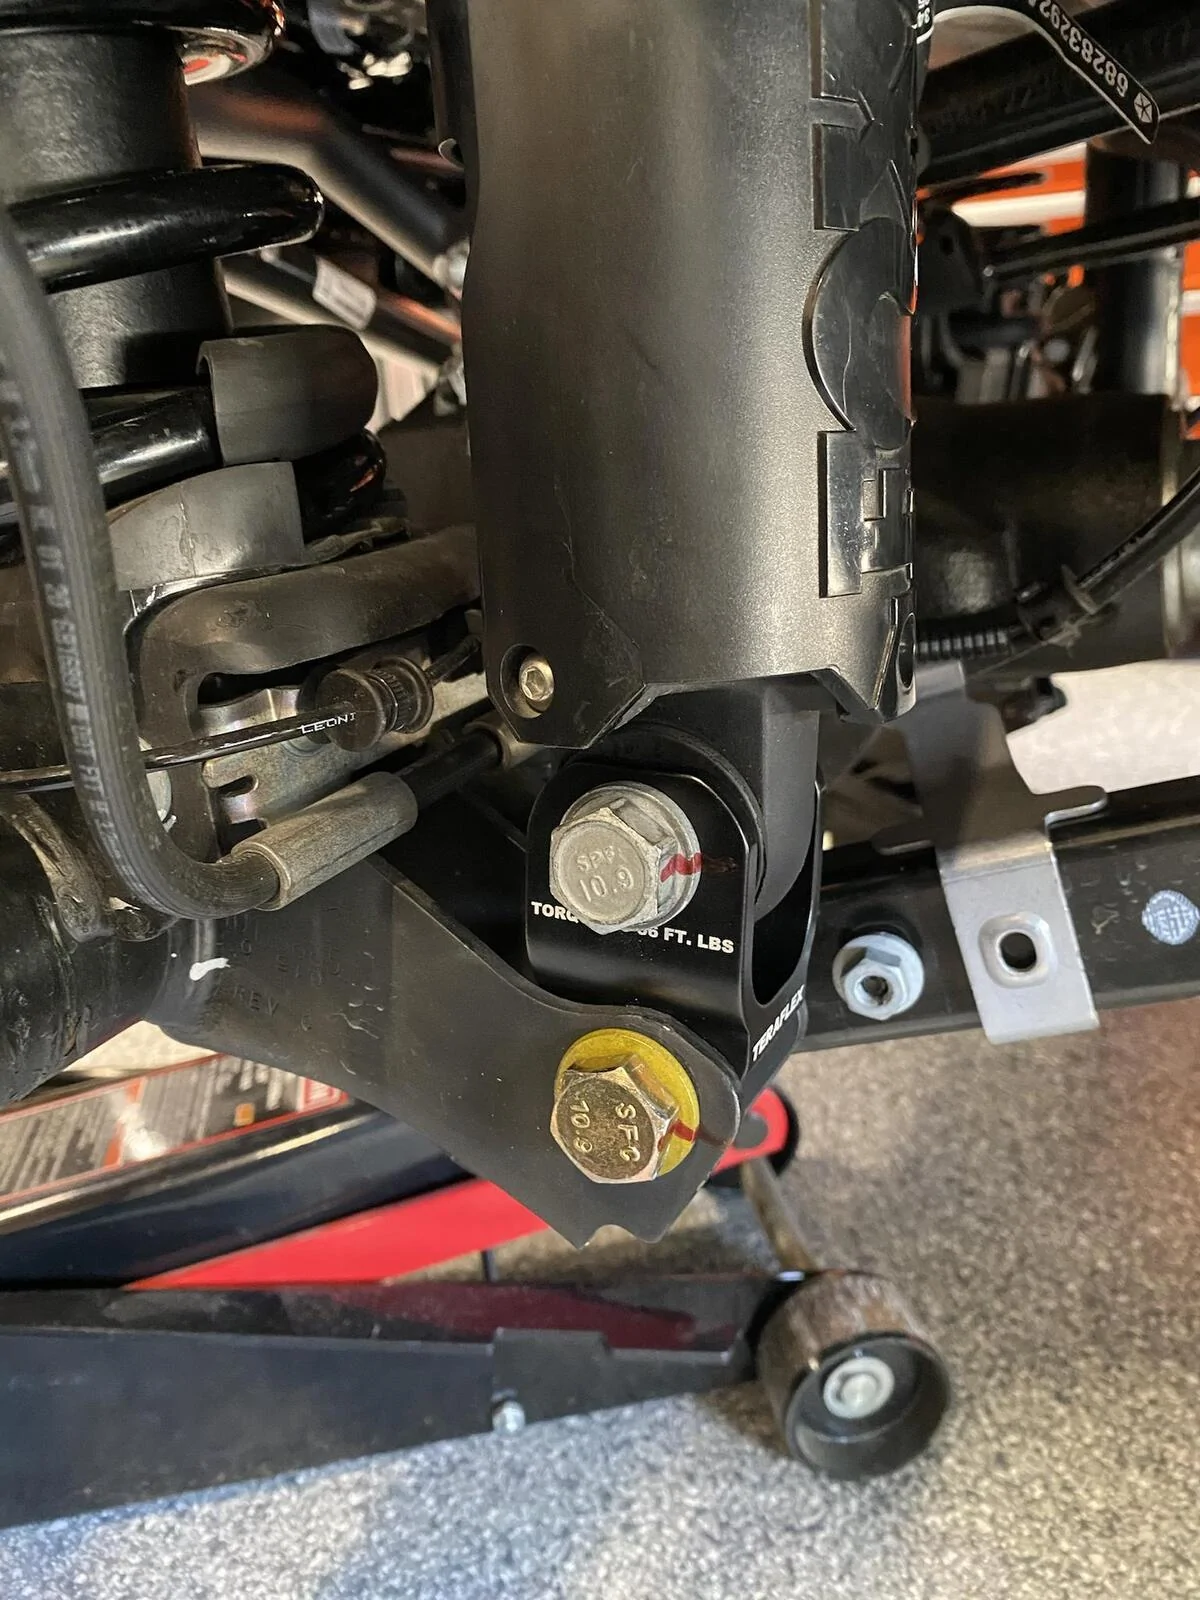
Now we move on to the AEV Geometry correction brackets. These are kind of a pain in the ass. You'll need a combination of ratchet straps, jack positioning, and brute strength to get the control arms back in after you mount the bracket. Also the adjustment washers like to fall out of place when you are trying to get the upper control arms bolted back in. Triple check the alignment of those spacers as it's really easy to get them out of place. I did the driver side first, then the passenger side. The passenger side was slightly easier as I could rock the axle into position by moving the tire. Only one pic here because I was not in the best mood:
Once that was in, wheels on/dropped the truck to the ground/torqued everything to spec and 190 ft/lbs on the lower control arms is ... very difficult.
Next up was some nifty Apex quick disconnect (or quick extend?) sway bar end links. I'm a sucker for stupid shit like this. Once you figure out their instructions and alignment, it's a pretty straightforward install. By now I'm just tired and my truck is only halfway lifted. Also whoever thought of the sway bar link bolt that requires a hex key and an open ended wrench needs to jump off a cliff. You can't use an impact because you might strip the hex key, and its just a tedious process to get it bolted up. Anyhow they look neat:
Turned the truck around in the garage to get started on the rear. It's about 3pm now:
Up on jackstands, wheels off, love these Mojave rear shocks
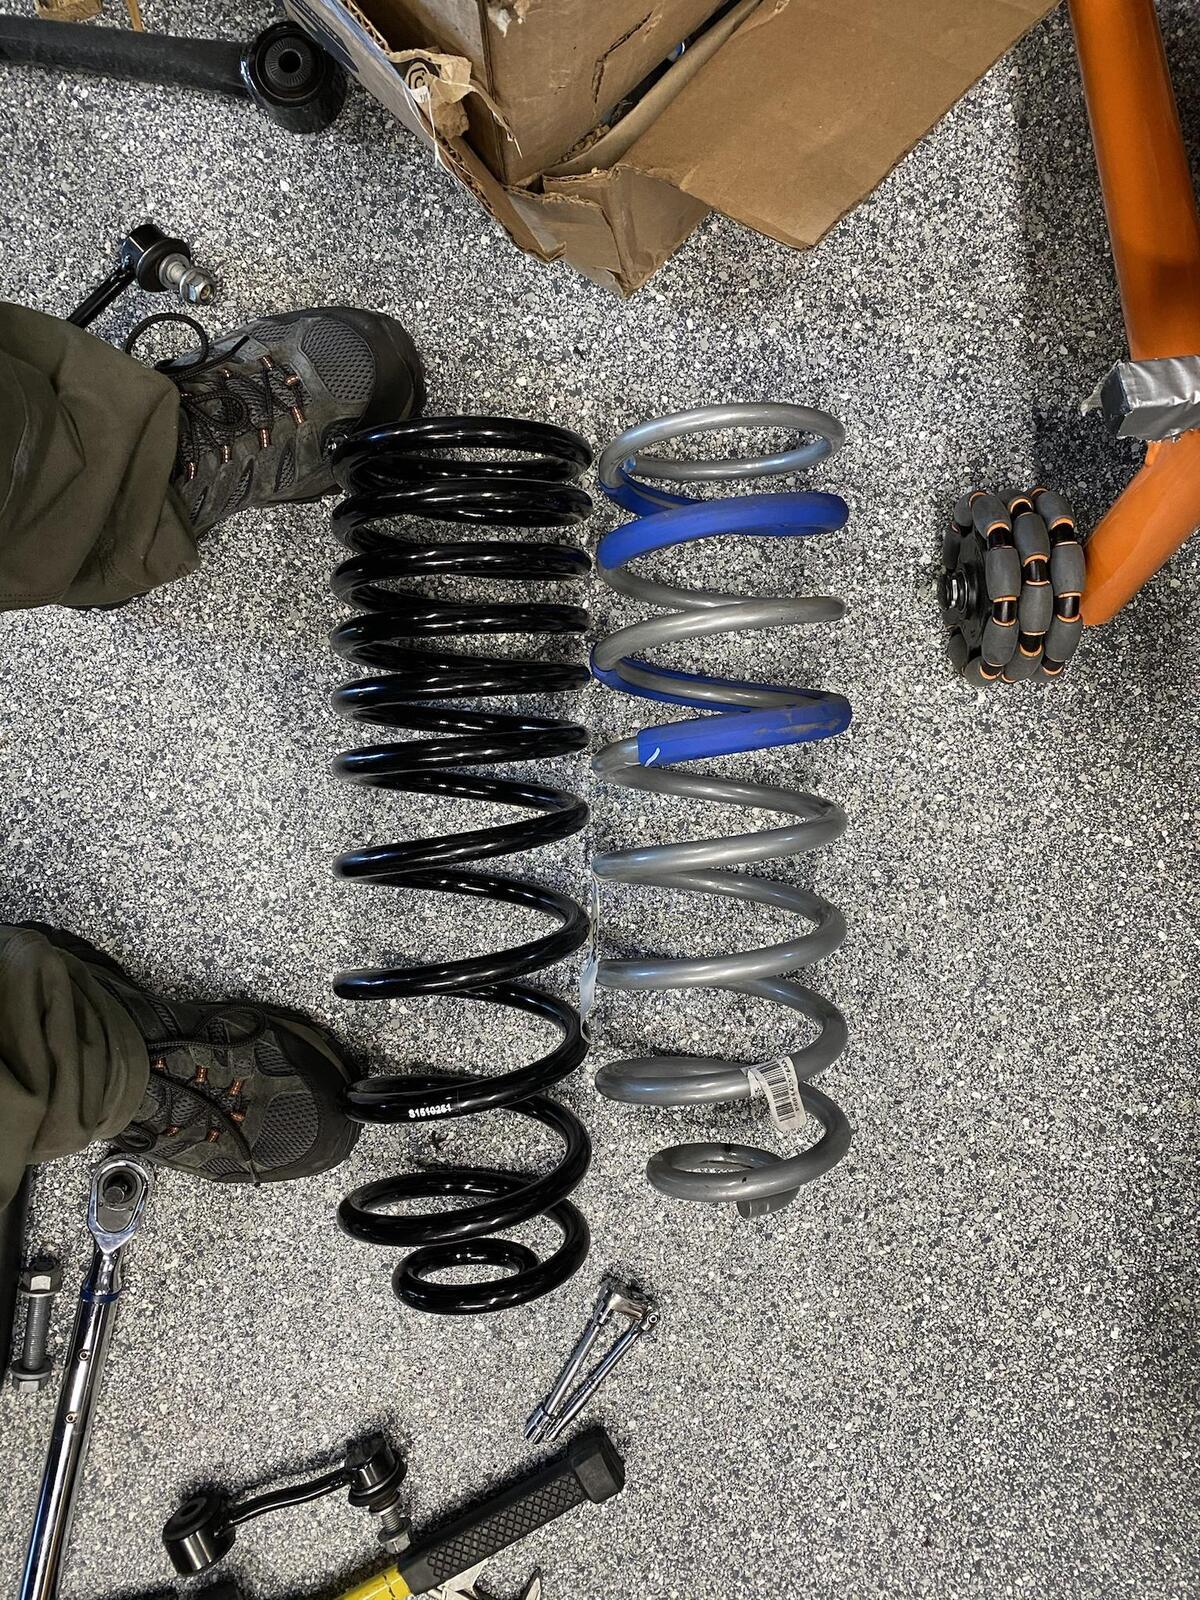
Clayton triple-rate rear compared to Mojave
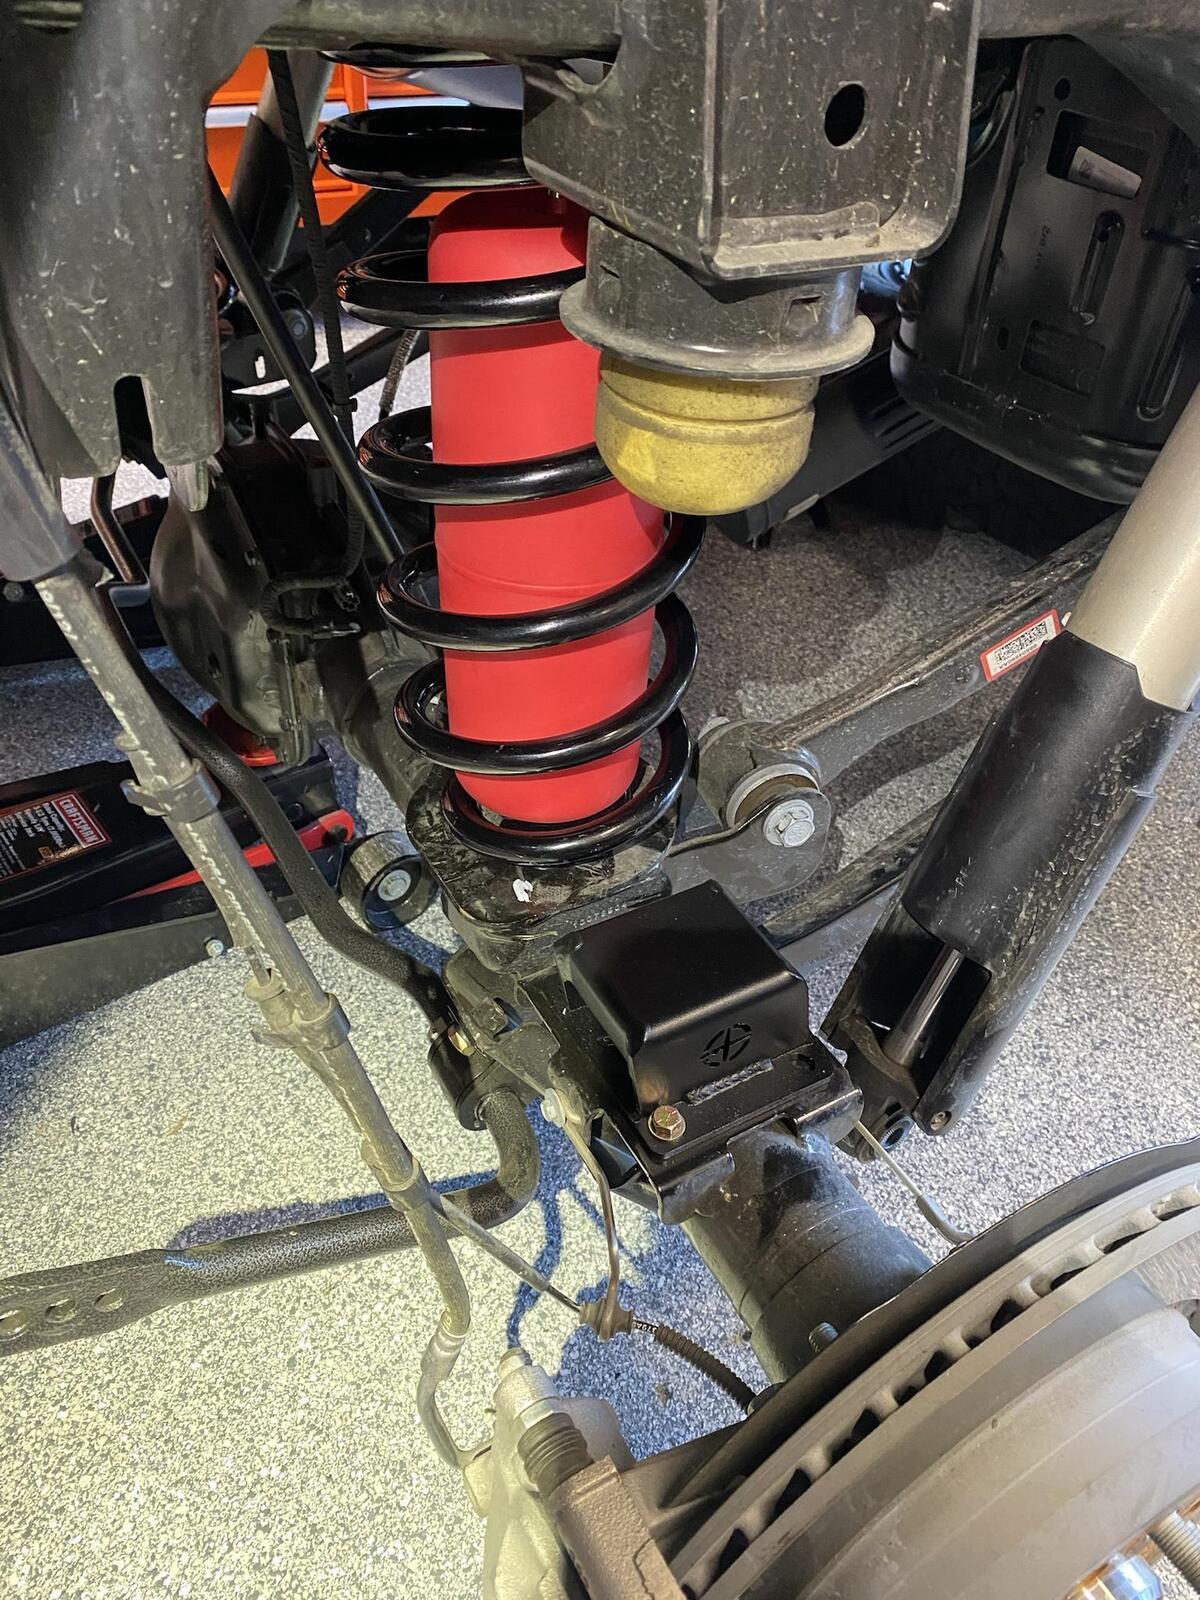
Getting these installed was much more difficult than the fronts. There's just not much slack in the rear brake lines to get the axle down enough to make it an easy swap. I was able to get the spring on the axle pad, but had to use a large screwdriver to lever it up and over the retaining lip. That, and the upper spring pad does not want to stay in place. It really sucked. Also installed the airbags, and the EVO 2.5 bumpstops.
Next up were the 2.5" EVO rear shock extensions. These were by far the biggest fucking pain in the ass to get installed, out of every component I've listed. Tight tolerances do not seem to be a priority for EVO, also their website was down for the instructions (the only place to get them).
The issue is the "inside" portion does not sit flush with the shock mount. You have to bolt the two halves together, then temporarily run the bottom bolt tight to "clamp" the inside bracket flush with the inside of the shock mount. If you don't do this, nothing will fit at all as it'll about about 1/4" misaligned. The bottom clamp bolt pokes out just below the rear axle mount, so there is no space at all to fish the nut in to thread it. You have to do it temporarily because without the inside mount flush, there's not even enough room to install the washer under the nut and still get it to thread. I did this with a combination of a small magnet stick, much swearing, and an absolute resolve to get these things mounted. To summarize:
- bolt halves together on the shock mount with the main lower bolt, tight but enough that the two halves can swivel by hand.
- use the small underside bolt to clamp the inside half flush with the shock mount. This is an amazing pain in the ass and I wish you well to figure out a method that works for you. If you can get the full assembly (nut - washer - washer - bolt) threaded and tight, good, you're done and can move on. Otherwise:
- once the inside half is wedged in place, torque the main lower bolt to spec so the assembly wont move. Then you can remove the small bottom bolt and assemble/tighten it normally. I had to remove the washers to get enough thread exposed to clamp it initially, so now I'm going back and fixing that.
For what its worth, they are very stout once assembled. Here's a photo of where my soul died:
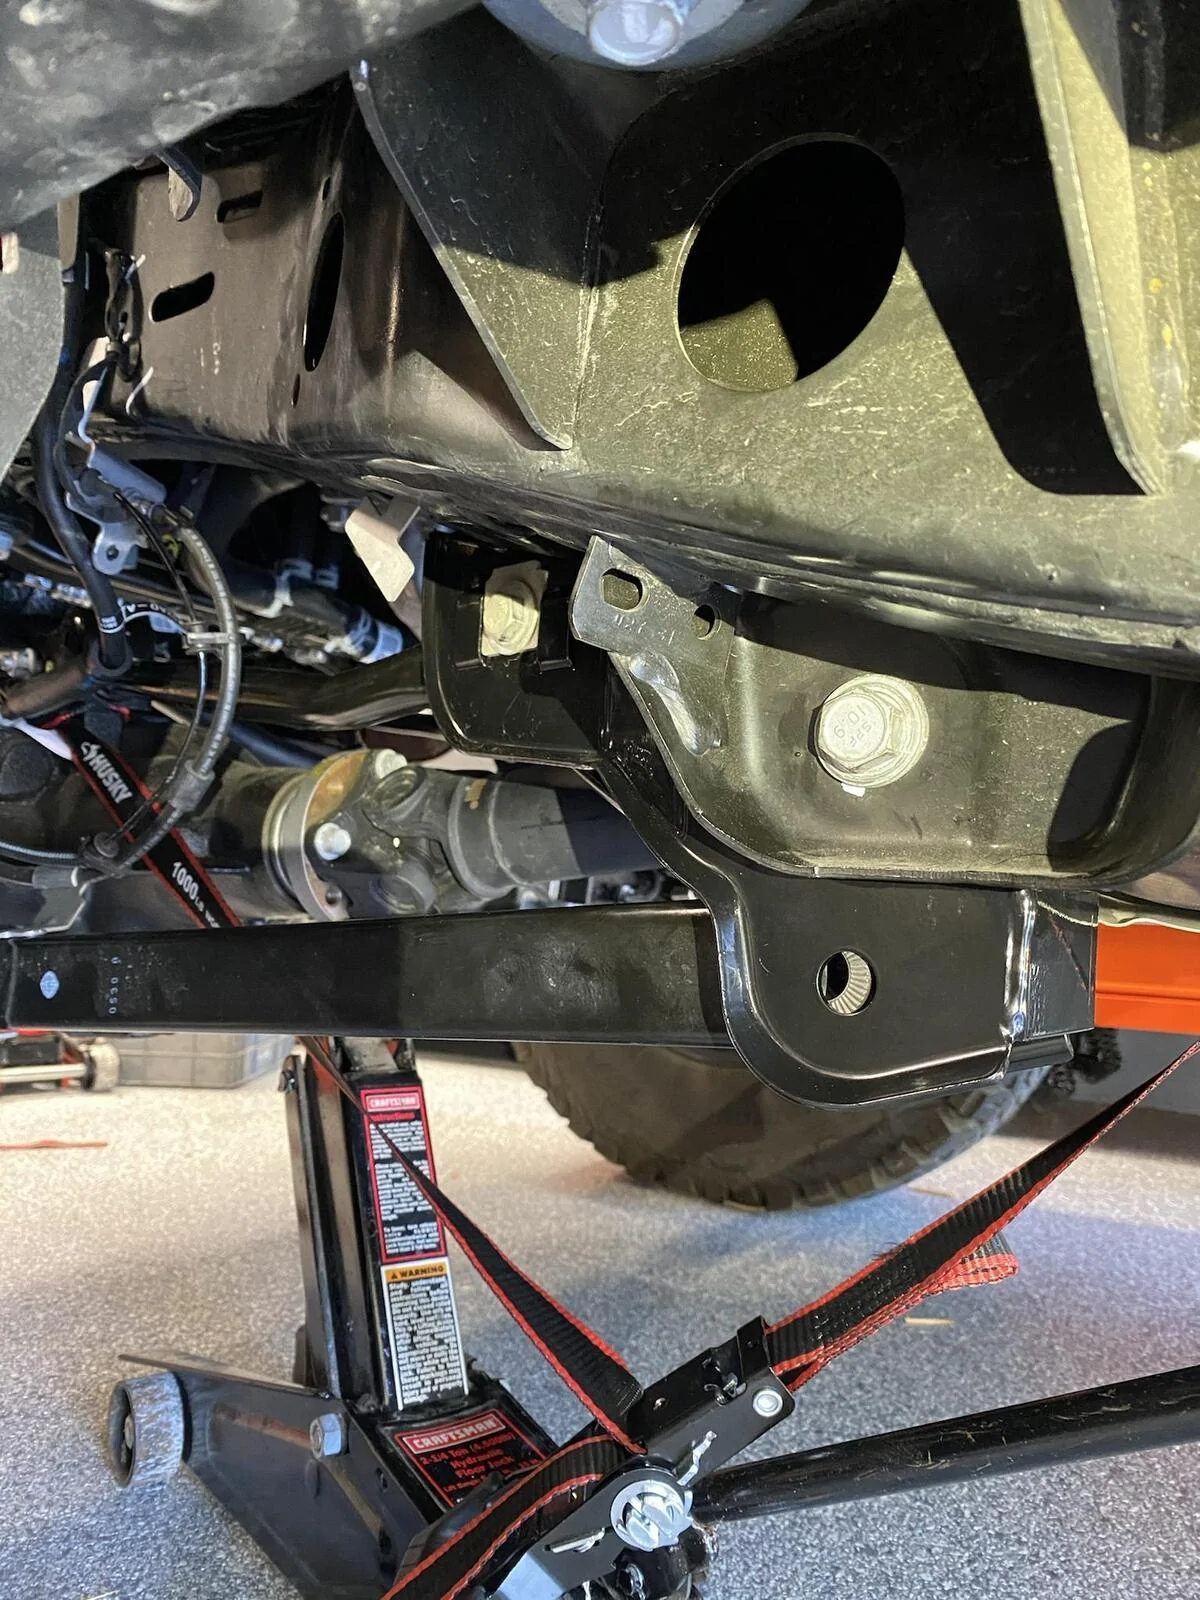
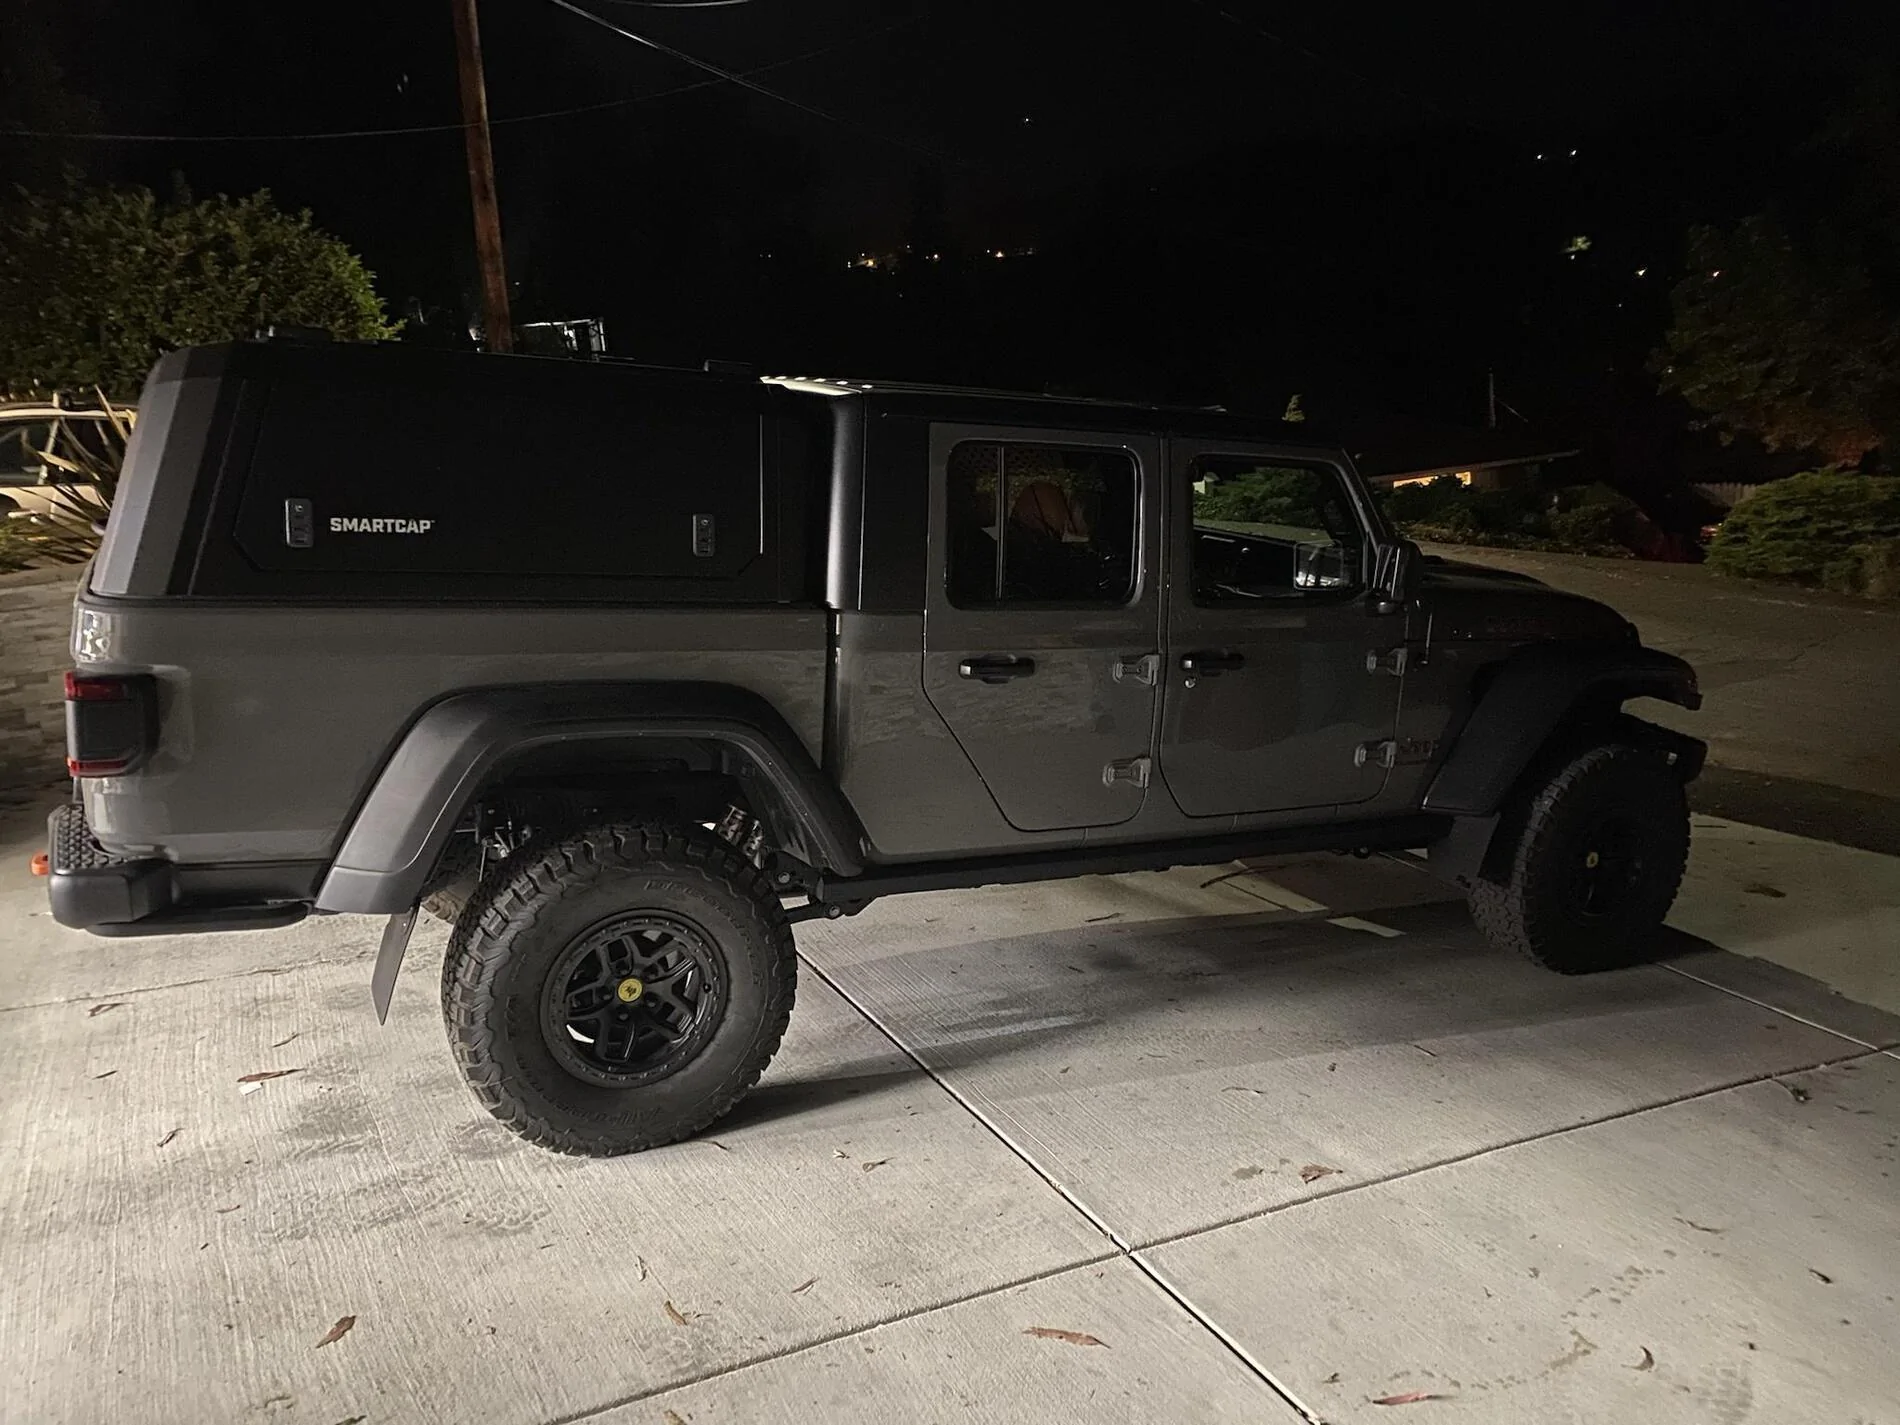
And with that done, I put the rear Clayton trackbar on, shocks/wheels back, and dropped the truck. Too tired to do final torques/checks here's where it sat last night:
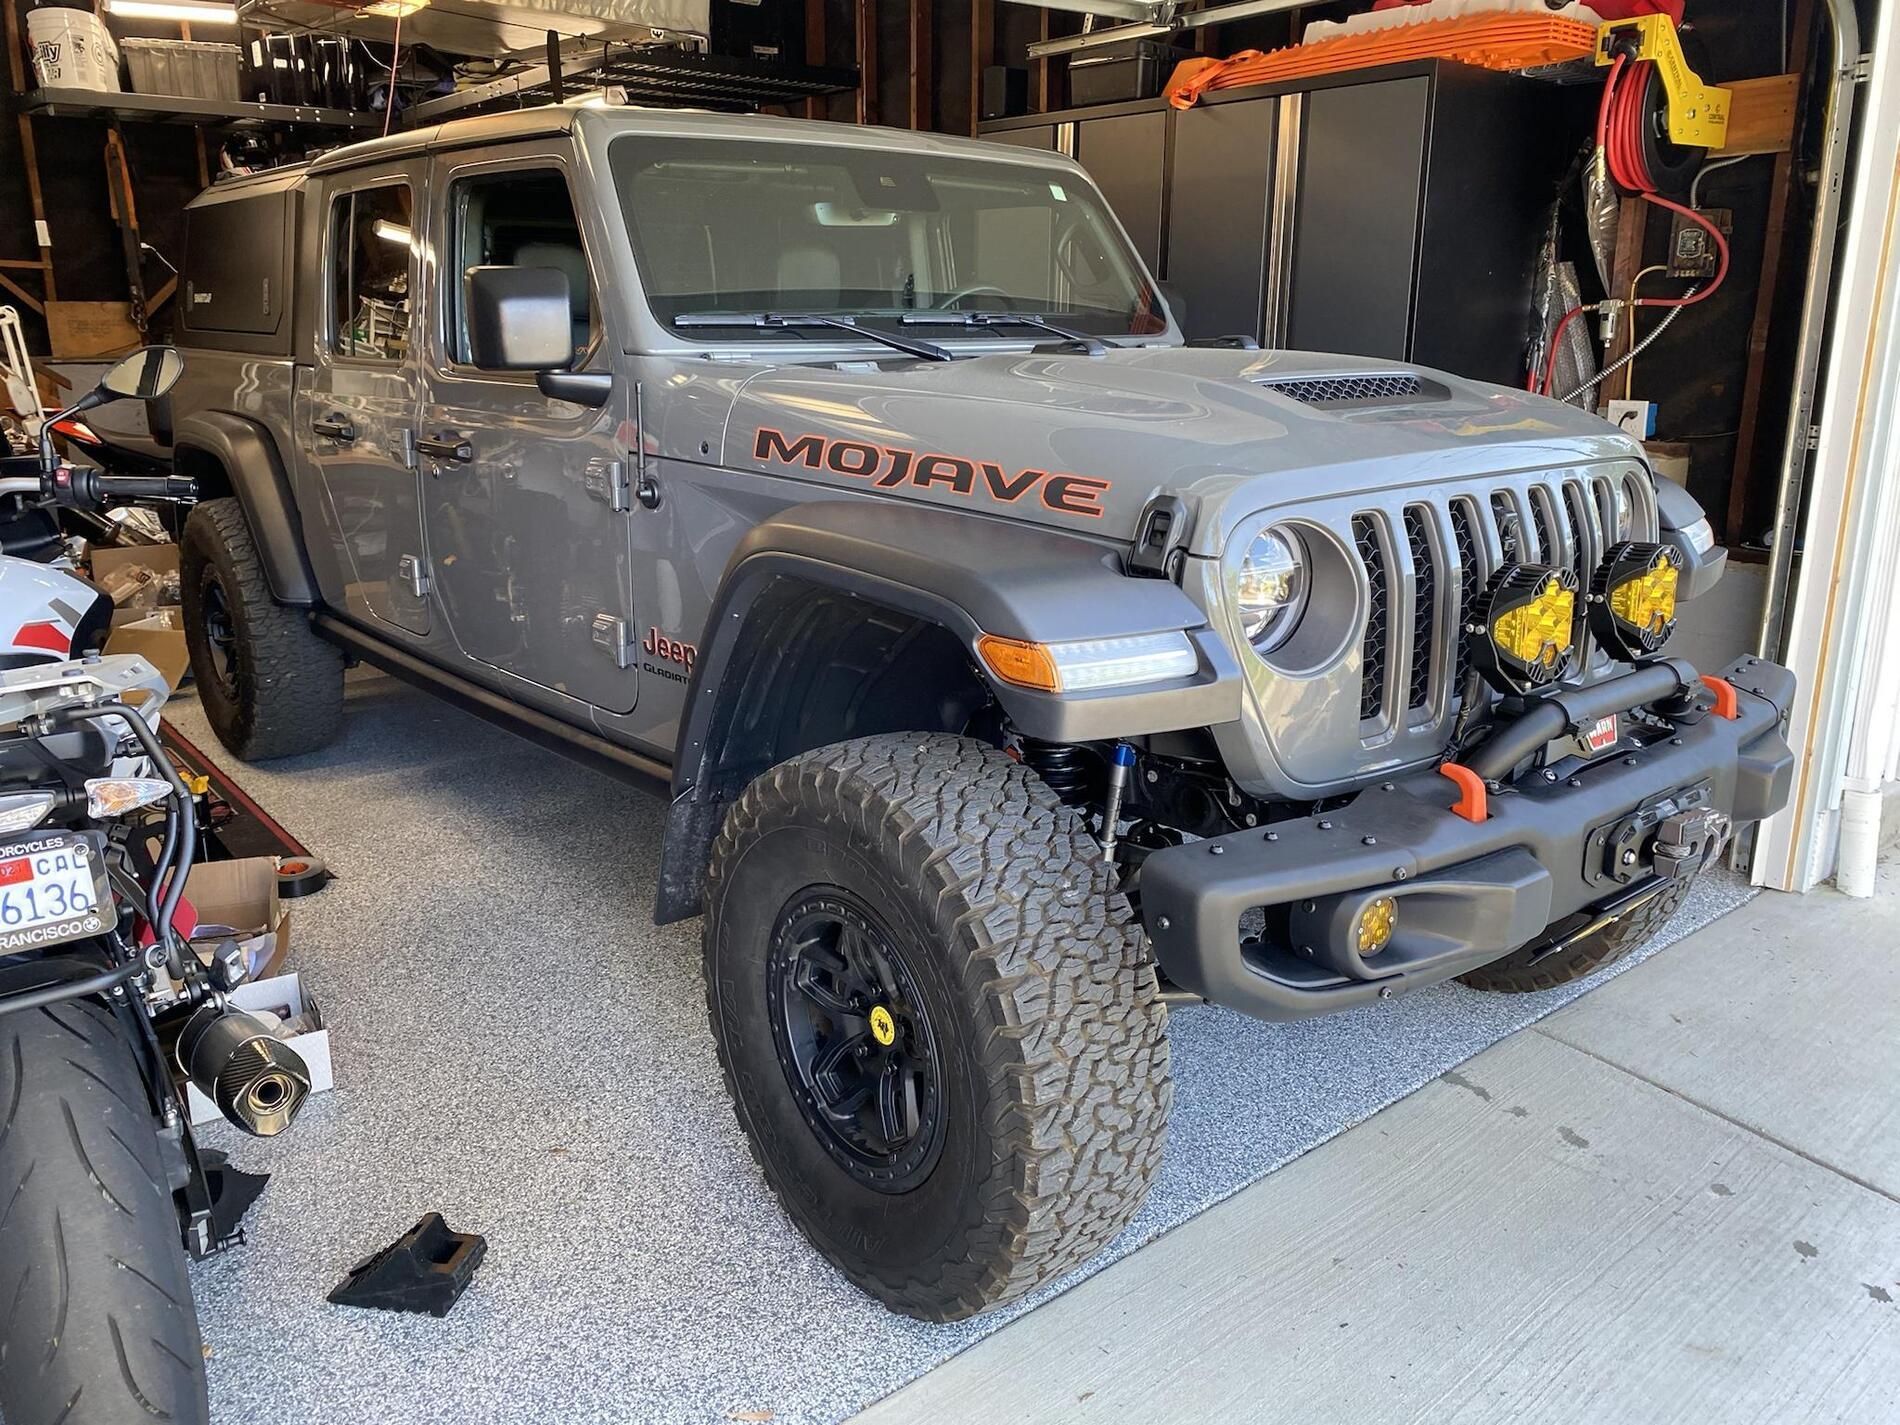
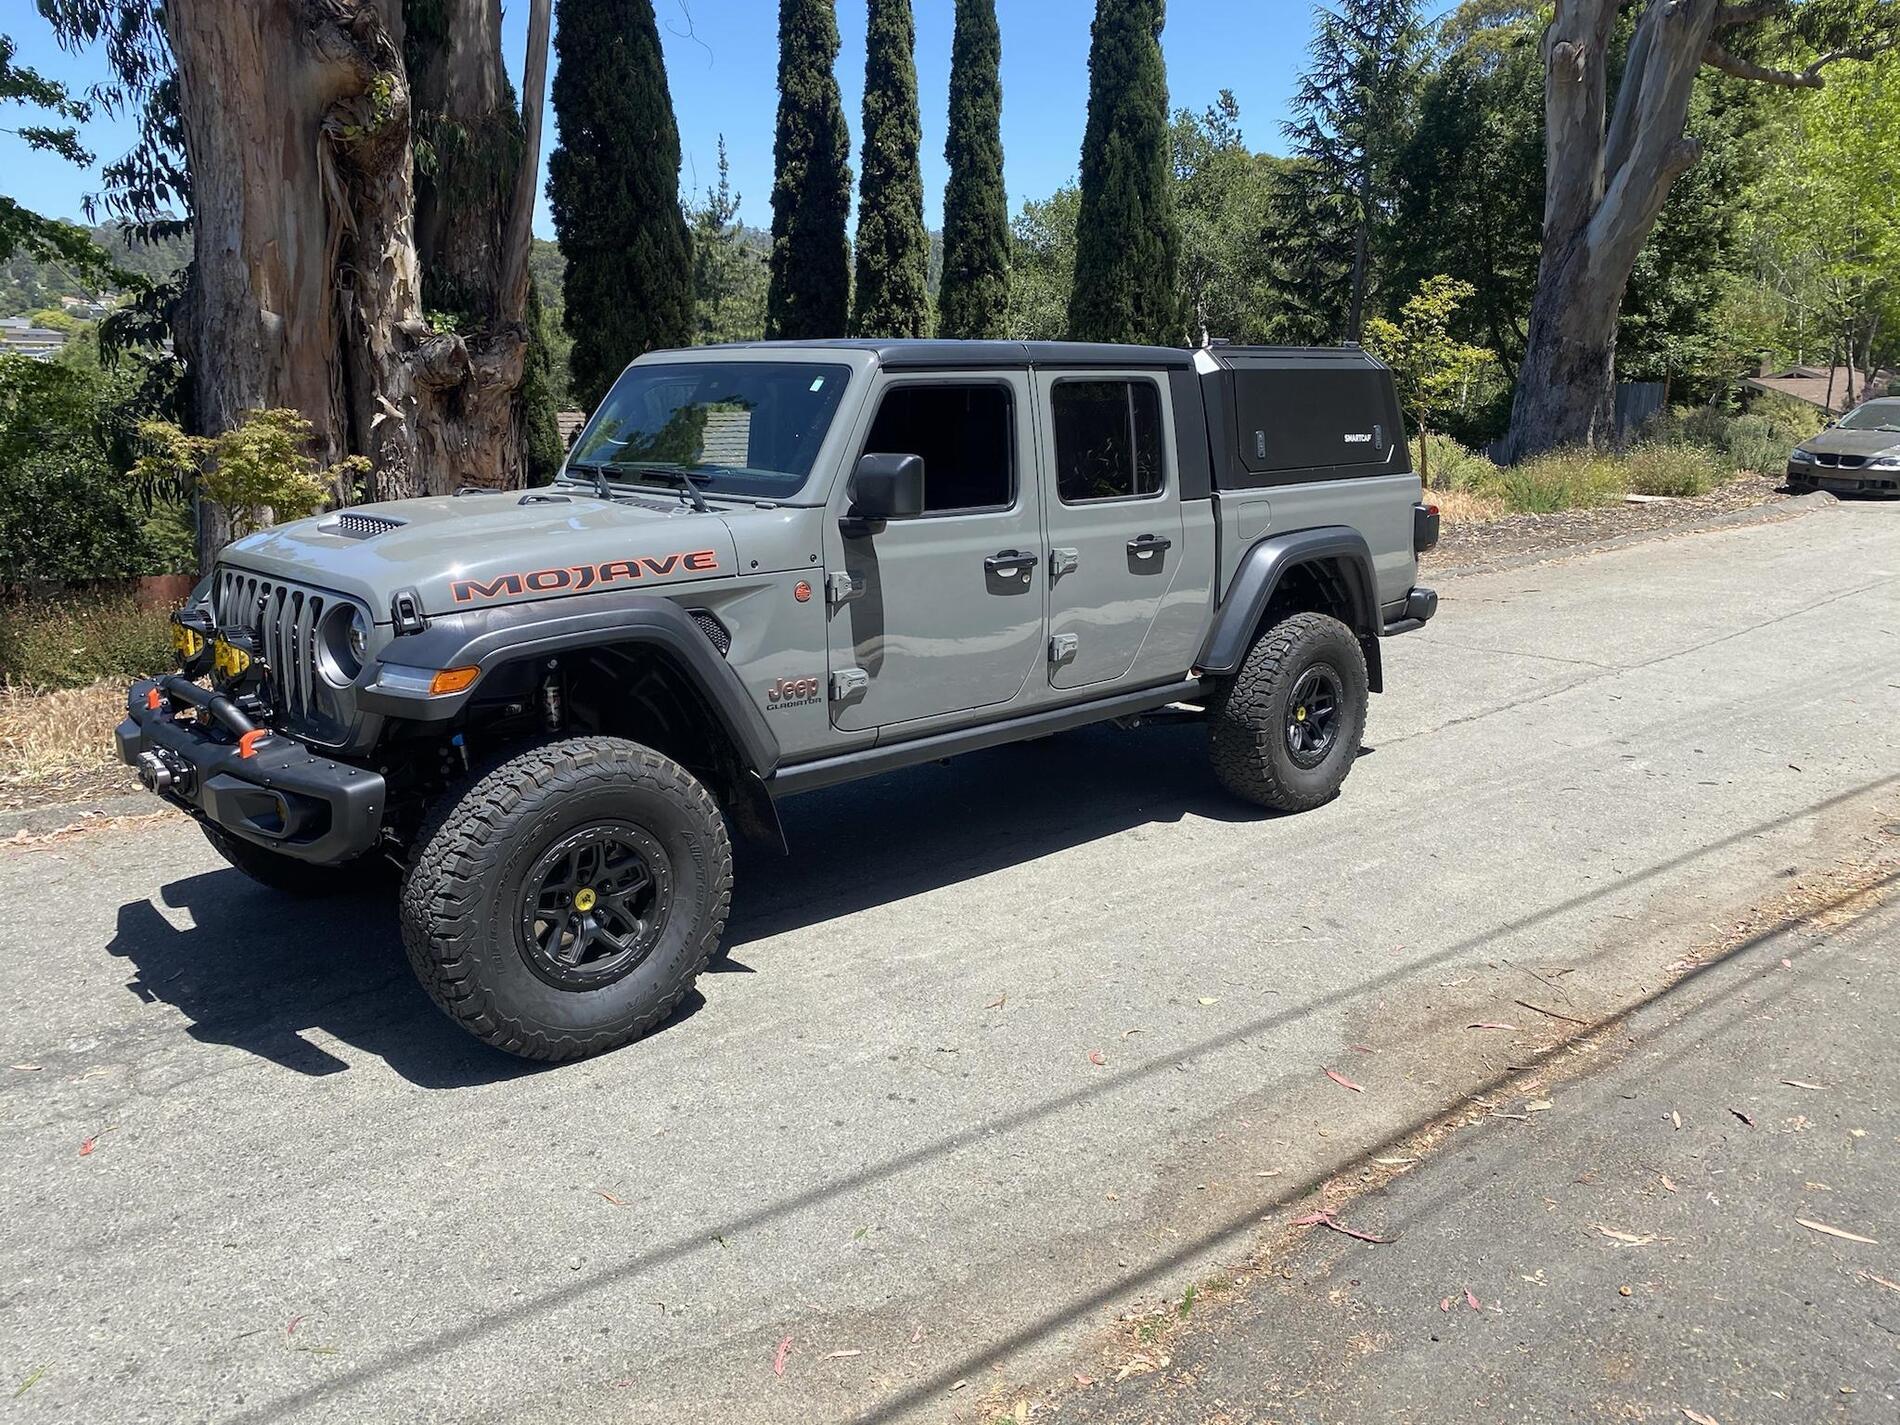
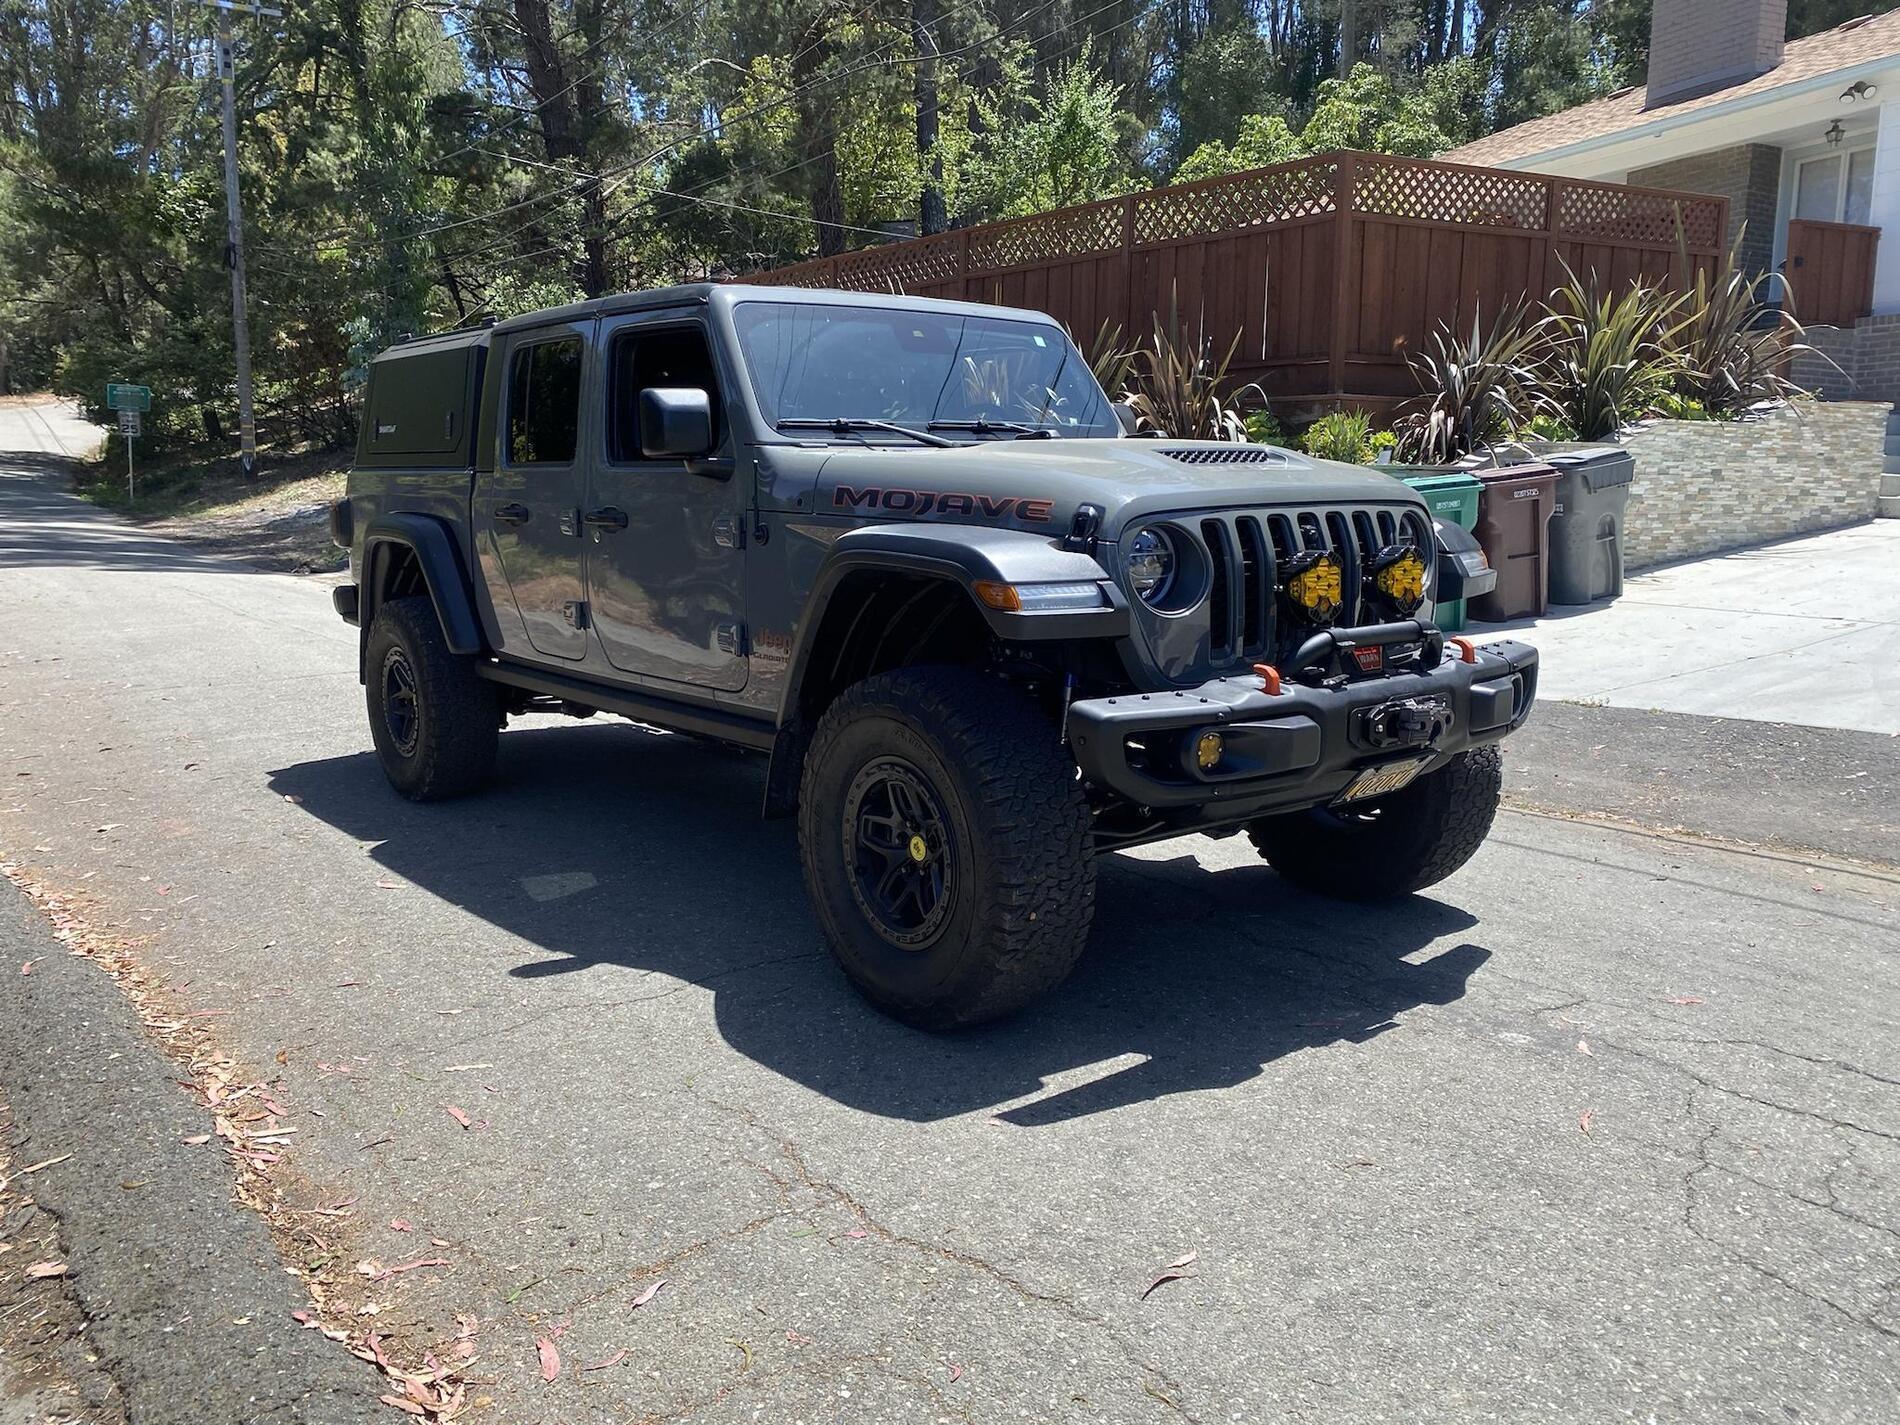
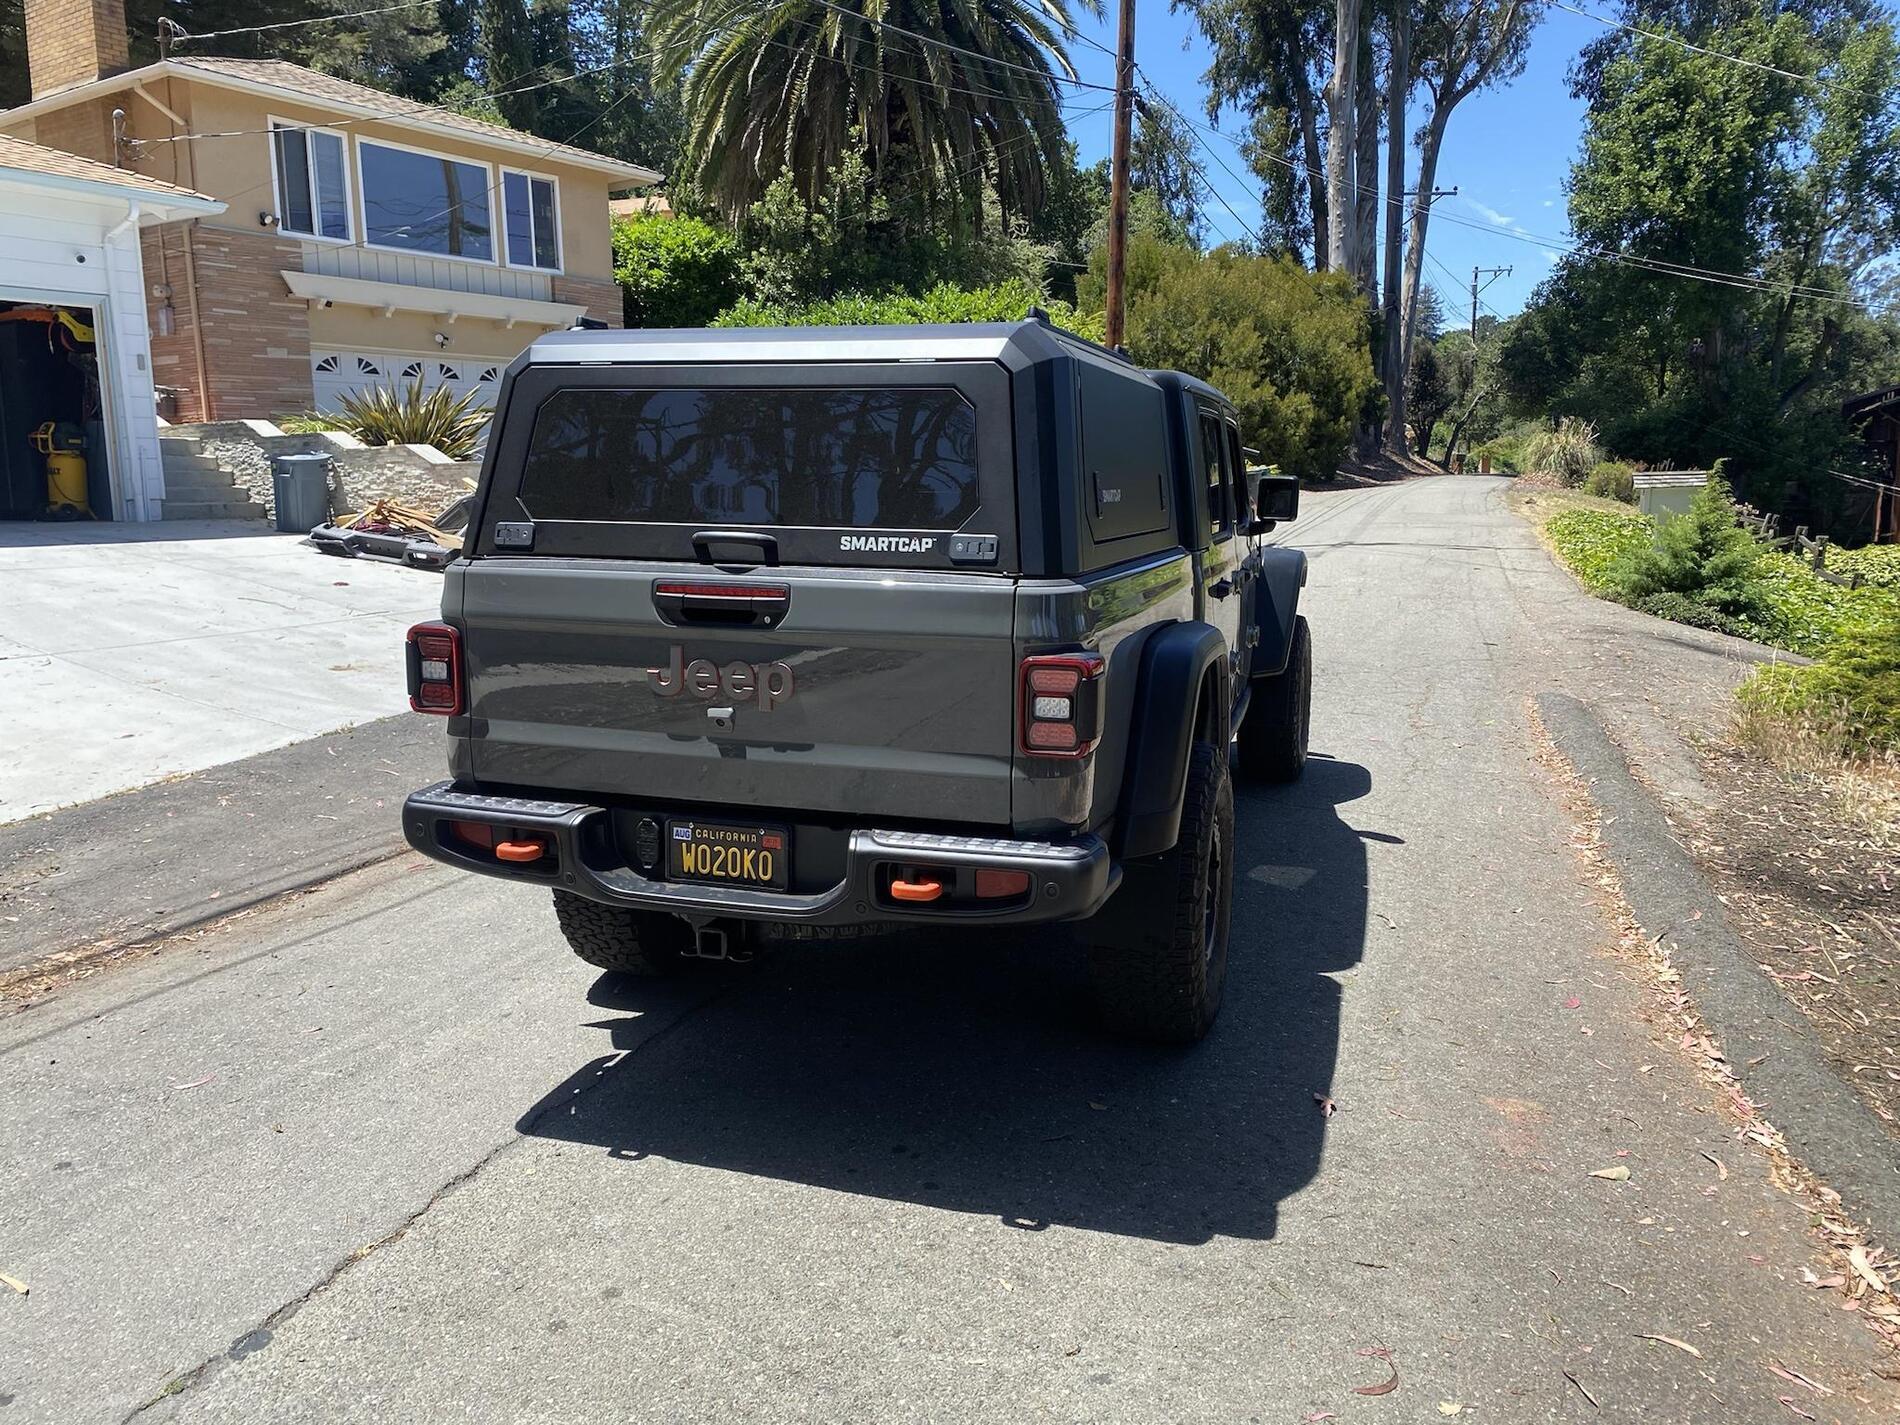
Today gave it a once over underneath, and realized I had misread the front trackbar/rear trackbar instructions. So the rear was backwards/upside down lol. Easy fix and now it looks correct. That small step, and torquing all the control arms back to spec and I was done. Here's how it looks:
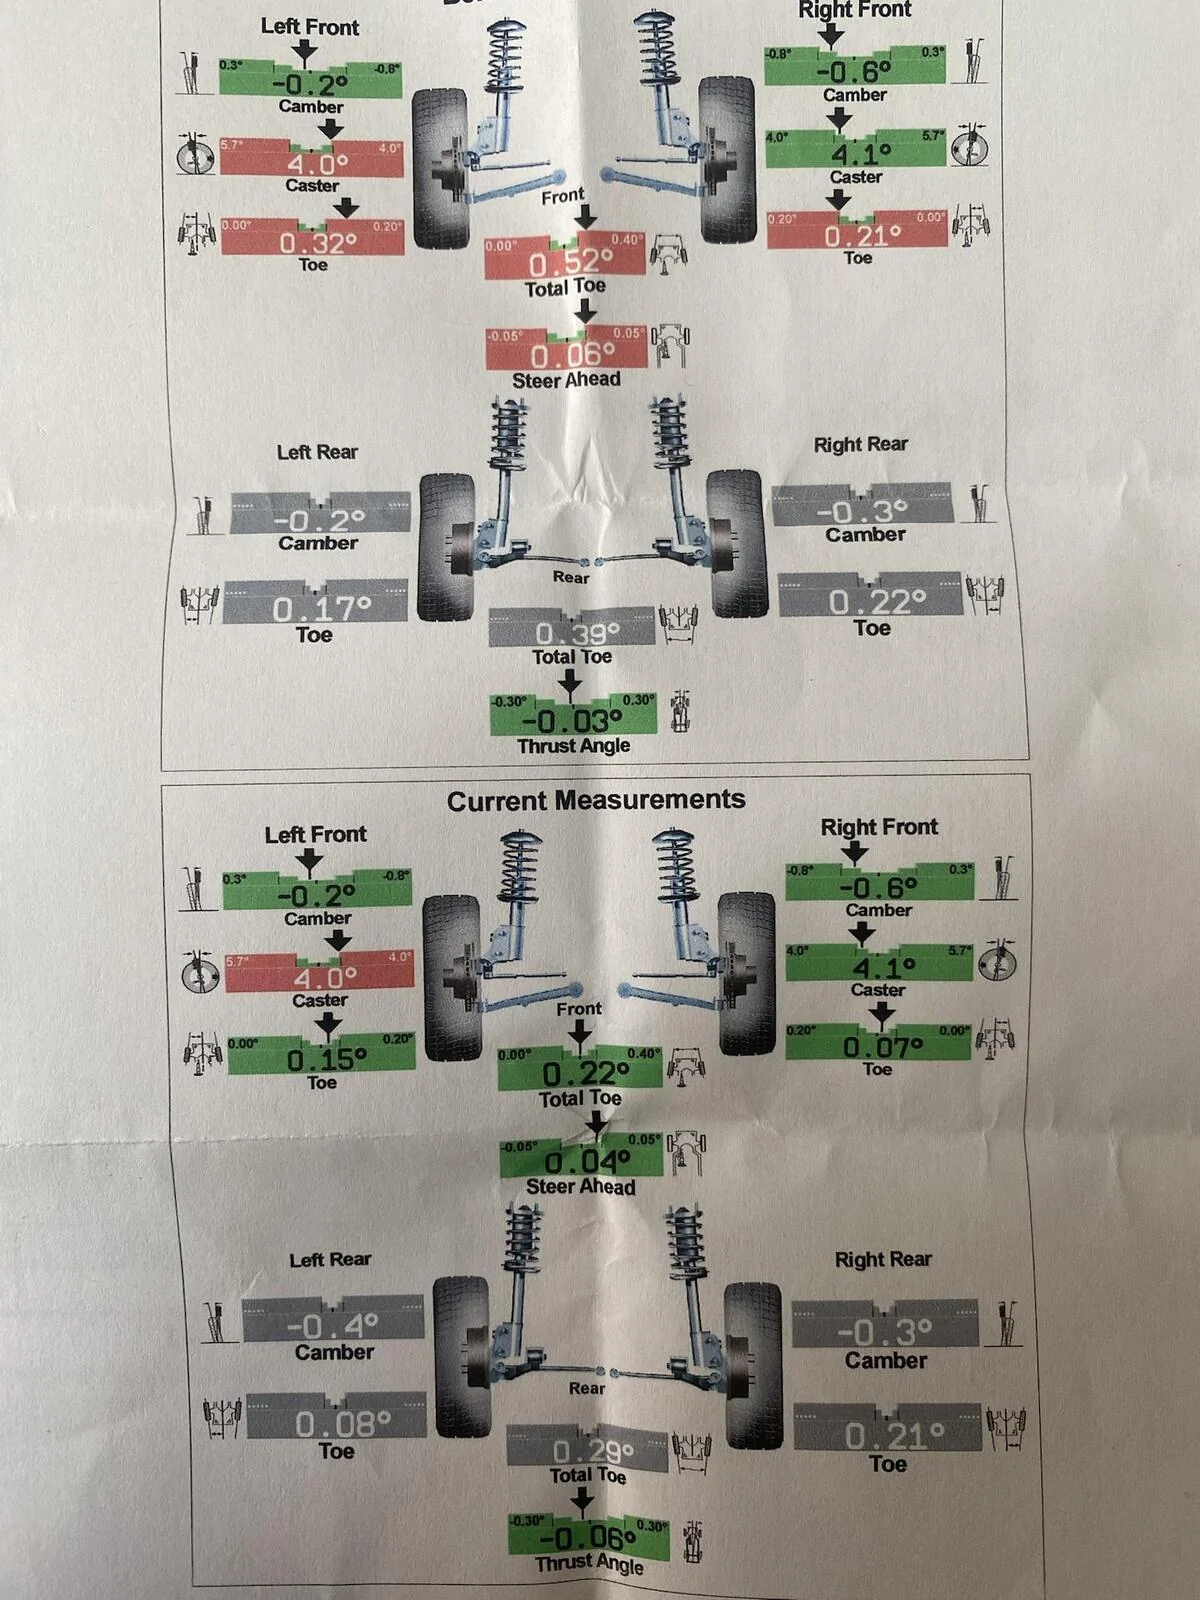
I think it's juuuust about level, but looks maybe a bit nose high. Hard to tell because there aren't really any perfectly flat spots out front of the house. The Clayton triple-rate rear springs are soft in the first part of the spring, so I'm thinking the ~200lb static load I have (cap, molle panels/mounts) might be compressing them a bit. I've got the airbags in but un-inflated, so I'll see if I can't get that done tonight and see if there's a change. I don't mind how the tires look (315/70 C rated ko2s) but the budget is busted for a while anyhow, so they are what I'm going with for now. Alignment scheduled for Wednesday.
My brief 10 minute test drive including some quick dirt road: Rides great, better than stock IMO. My shocks were too low in the stroke after adding all the stuff on the truck, and this is a noticeable improvement. Steers great, no clunks/noises so hopefully I put it all on correctly. Going to let the alignment shop measure axle alignment but by my eye the trackbars look very even.
Overall, I'm pretty happy with how it turned out, and can't wait to hit the road. If you see me stopped on the Utah BDR route or somewhere in the Tetons/Yellowtone, please stop and say hi as I'm probably trying to fix something I didn't install right.
-R
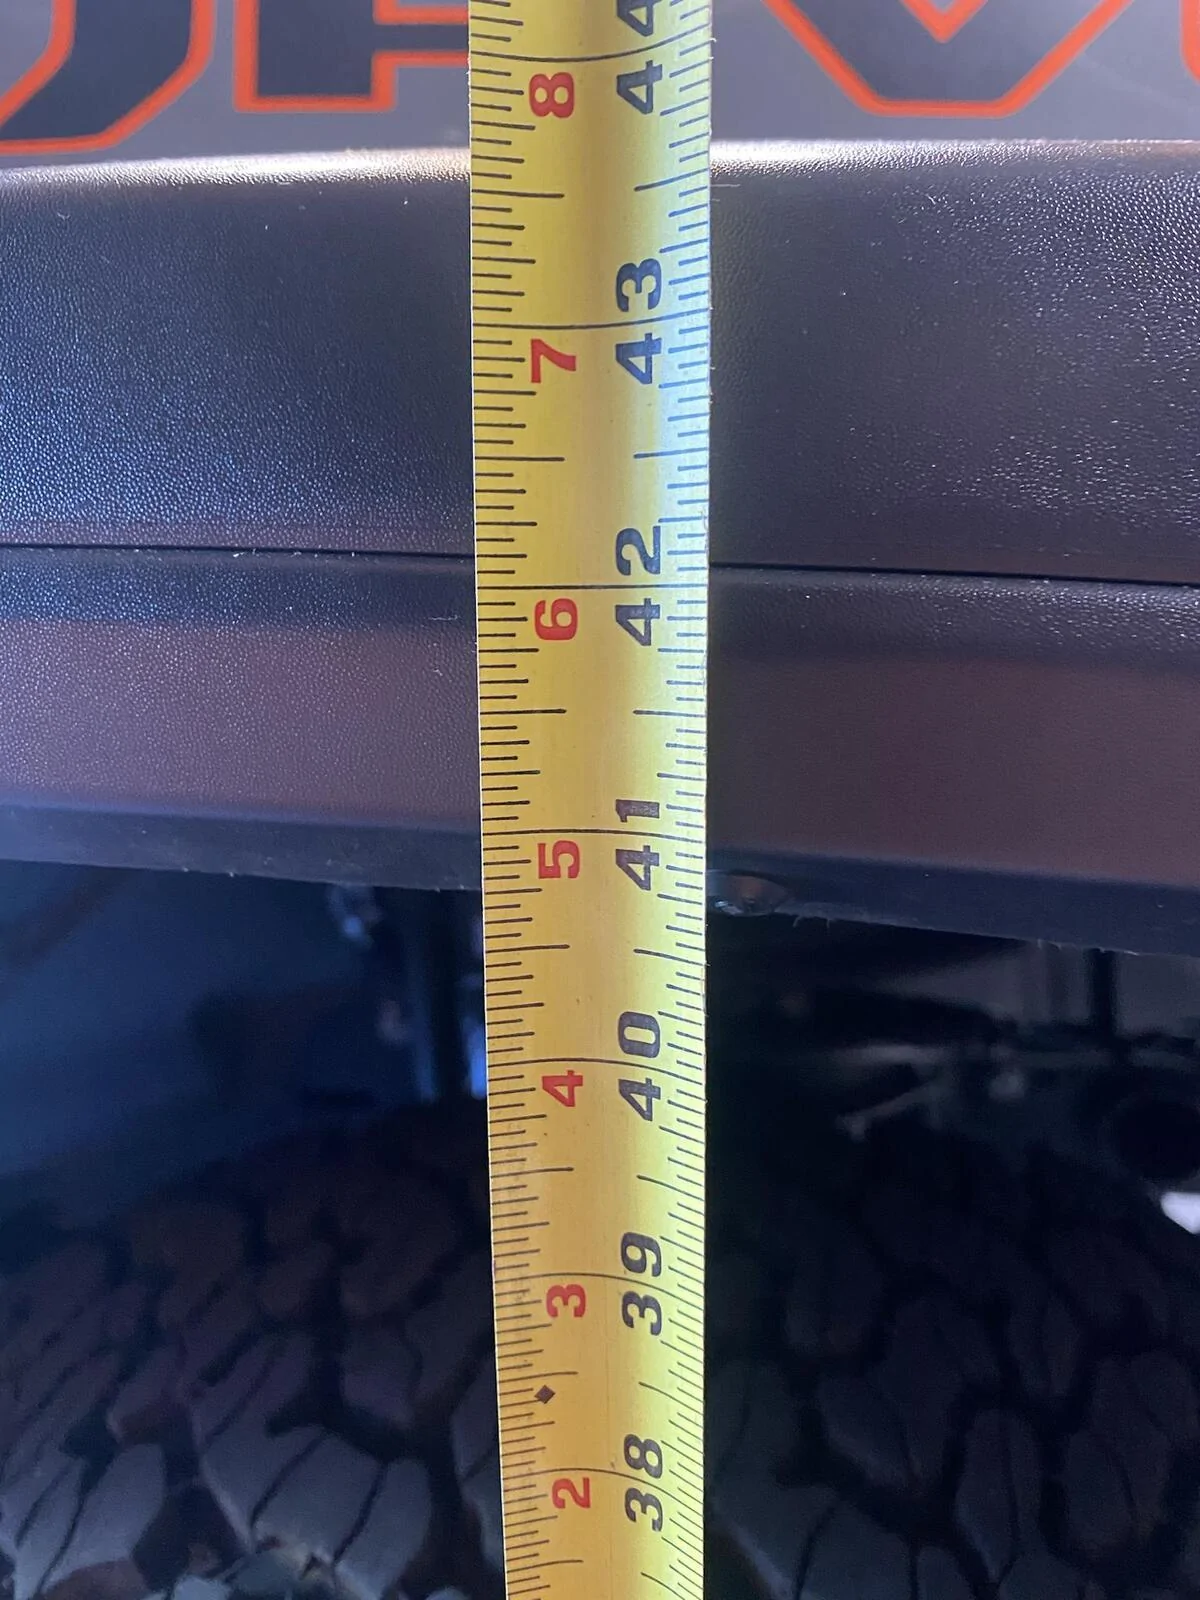
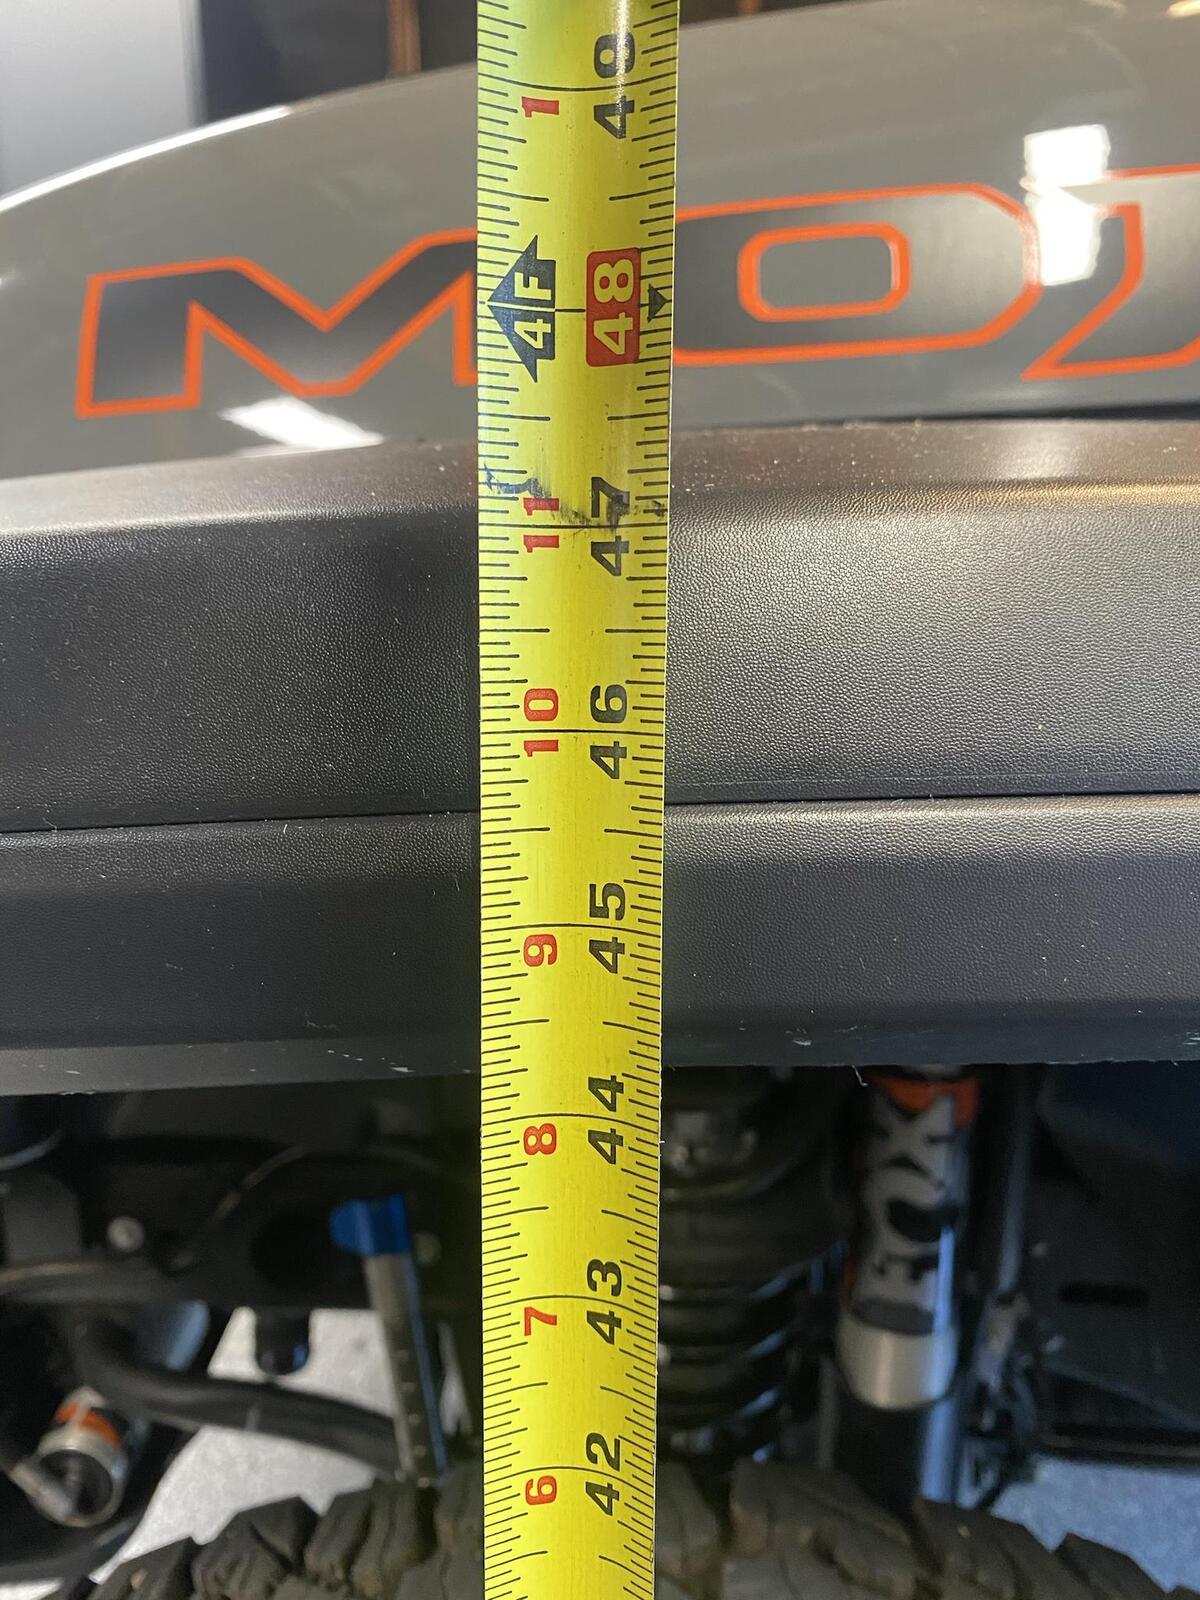
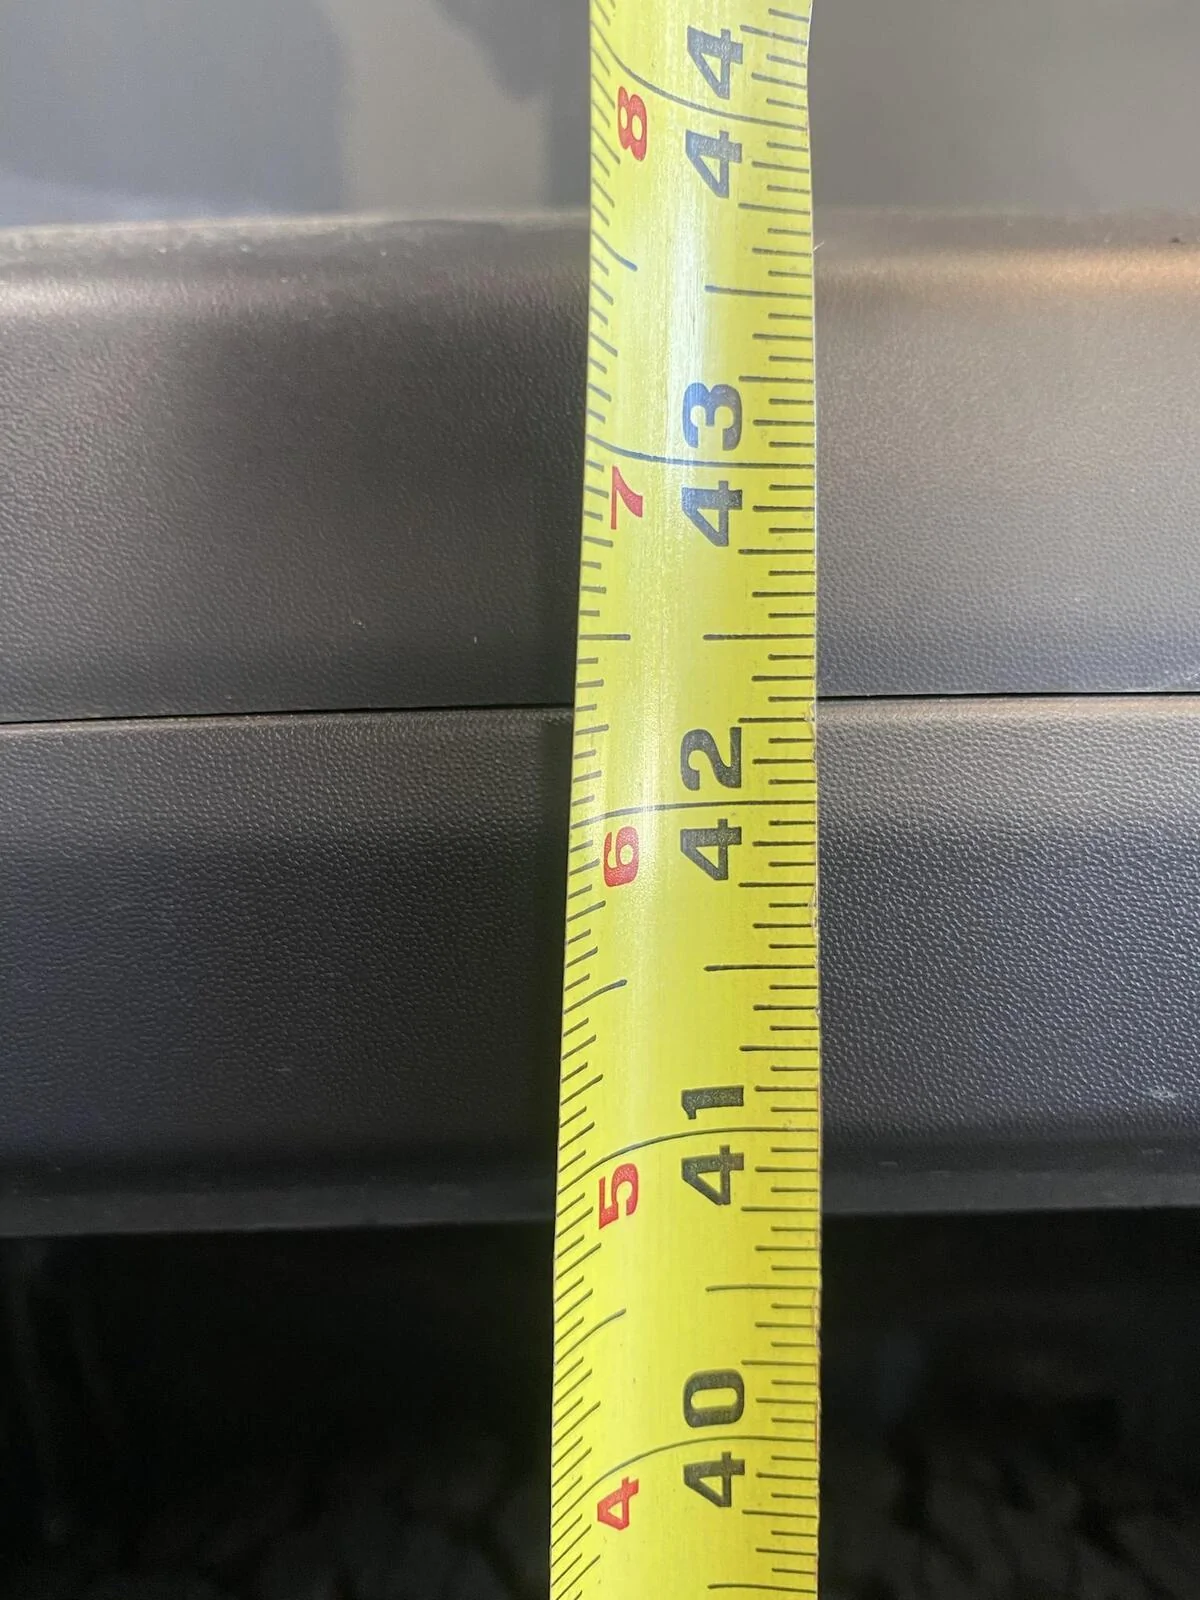
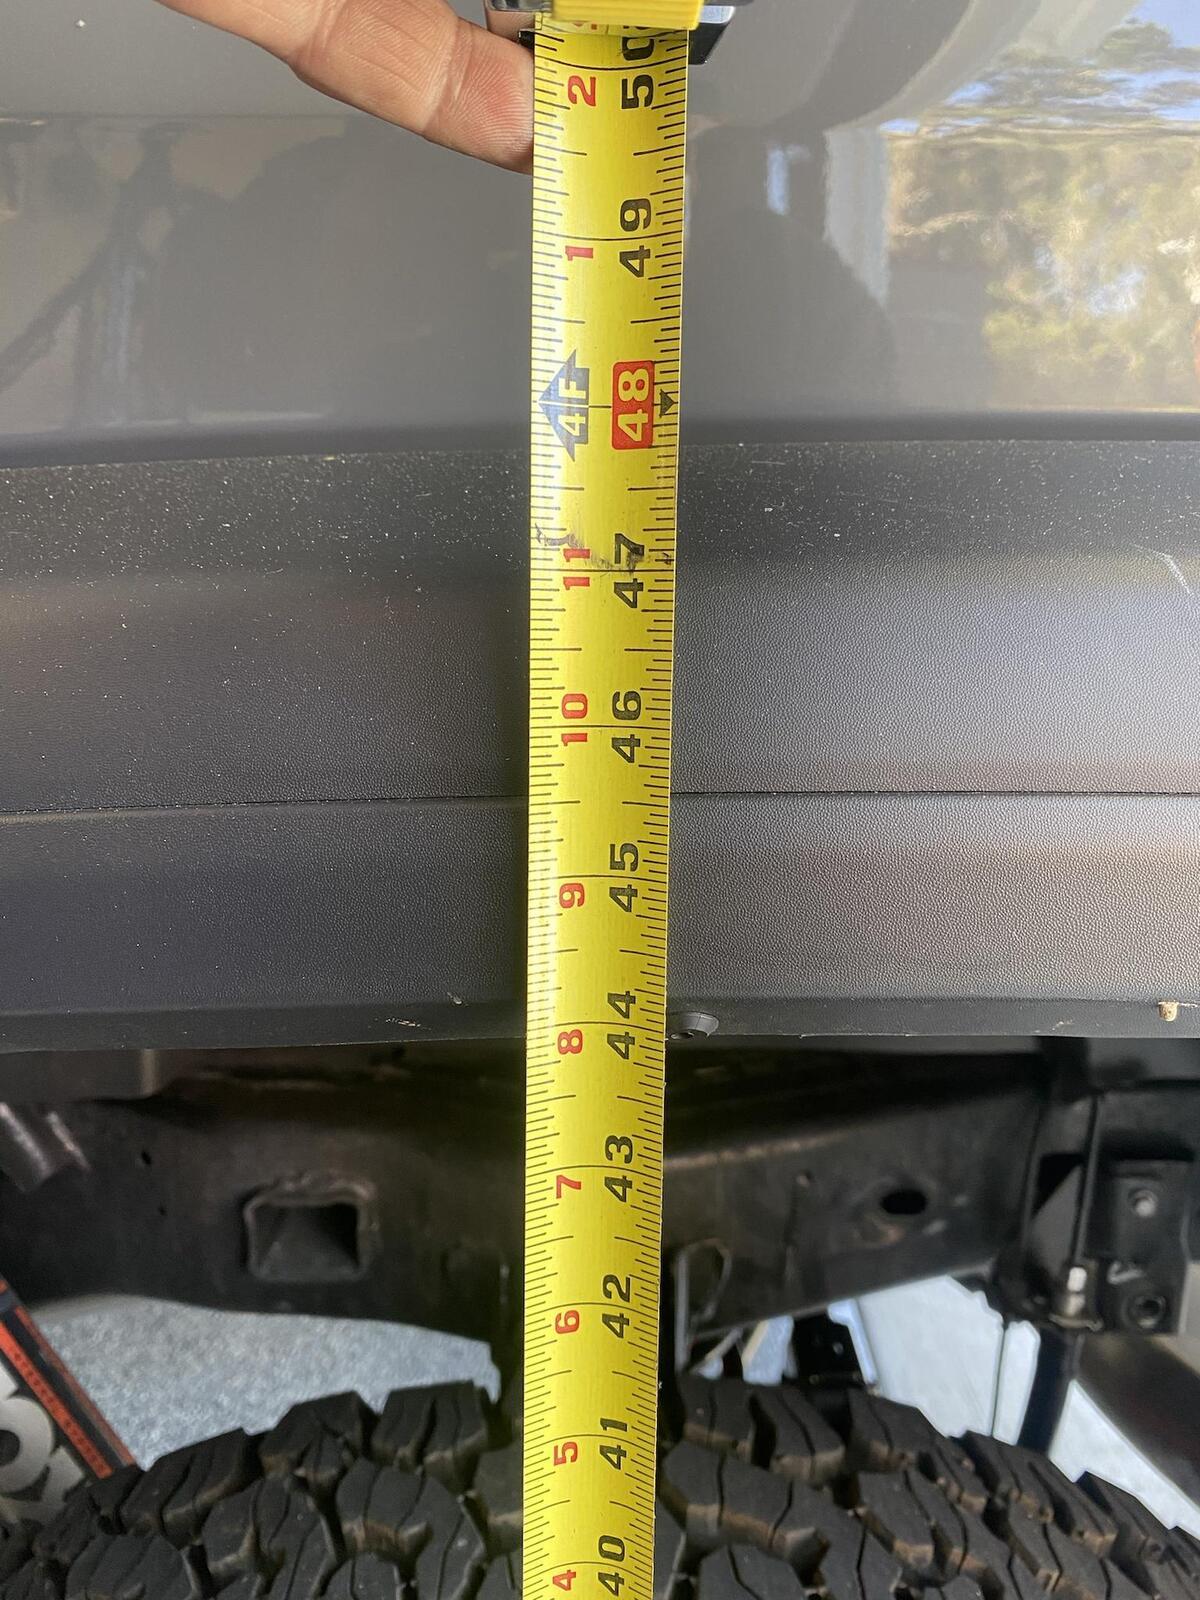
ps: final lift measurements
front before/after
Looks to be about a 3.5 lift in front
rear before/after
just about 3.1".
By a combination of bad timing, impatience, a time deadline, and perpetual backorder on everything, I cobbled together some options for lifting my Mojave. Here's what I ended up doing:
* Clayton 2.5" springs f/r
* AEV Geometry correction brackets
* Clayton front/rear track arms
* Clayton front bumpstops
* Teraflex 2" front shock extensions
* EVO 2.5 rear shock extensions
* EVO 2.5 rear bumptops
* Air lift 1000 air springs
* Apex swaybar disconnects
I managed to get it all done yesterday for the most part, it only took about 14 hours ? This is definitely a weekend project for a solo mechanic working from the ground. Impact gun and a good selection of 1/2" sockets and wrenches are absolutely required. I used a floor jack, jack stands, and a small older floor jack that proved to be invaluable when tweaking axle position to get everything bolted up.
here we go
Front end dropped, springs out. A comparison of the Mojave front spring and a Clayton 2.5+ (more like 3" but I'll share my lift numbers at the end of this post)
Clayton springs and bump stops are in. These weren't too bad to get in place, but you do have to drop the axle nearly as far as it'll go without stressing brake lines/cables.
Teraflex 2" front shock extensions. These need to be drilled out to fit the Mojave shock bolts, and you'll need to source a longer bottom bolt and shim it with washers to get the extension properly mounted. Also another pair of Mojave front shock bolts/nuts, or a correctly sized equivalent. If Teraflex ever releases Mojave-specific extensions I'll replace them, the quality of these extensions was nice. After that a Clayton trackbar, adjusted to the length they recommended on their site.

Clayton trackbar vs oem, this thing is STOUT:
Up until now everything has been going relatively smoothly. Springs, bumpstops, extensions, front trackbar, all went in without issues. Put the front tires back on and put the truck on the ground.
Just a little nose high for now

Now we move on to the AEV Geometry correction brackets. These are kind of a pain in the ass. You'll need a combination of ratchet straps, jack positioning, and brute strength to get the control arms back in after you mount the bracket. Also the adjustment washers like to fall out of place when you are trying to get the upper control arms bolted back in. Triple check the alignment of those spacers as it's really easy to get them out of place. I did the driver side first, then the passenger side. The passenger side was slightly easier as I could rock the axle into position by moving the tire. Only one pic here because I was not in the best mood:
Once that was in, wheels on/dropped the truck to the ground/torqued everything to spec and 190 ft/lbs on the lower control arms is ... very difficult.
Next up was some nifty Apex quick disconnect (or quick extend?) sway bar end links. I'm a sucker for stupid shit like this. Once you figure out their instructions and alignment, it's a pretty straightforward install. By now I'm just tired and my truck is only halfway lifted. Also whoever thought of the sway bar link bolt that requires a hex key and an open ended wrench needs to jump off a cliff. You can't use an impact because you might strip the hex key, and its just a tedious process to get it bolted up. Anyhow they look neat:

Turned the truck around in the garage to get started on the rear. It's about 3pm now:
Up on jackstands, wheels off, love these Mojave rear shocks

Clayton triple-rate rear compared to Mojave
Getting these installed was much more difficult than the fronts. There's just not much slack in the rear brake lines to get the axle down enough to make it an easy swap. I was able to get the spring on the axle pad, but had to use a large screwdriver to lever it up and over the retaining lip. That, and the upper spring pad does not want to stay in place. It really sucked. Also installed the airbags, and the EVO 2.5 bumpstops.
Next up were the 2.5" EVO rear shock extensions. These were by far the biggest fucking pain in the ass to get installed, out of every component I've listed. Tight tolerances do not seem to be a priority for EVO, also their website was down for the instructions (the only place to get them).
The issue is the "inside" portion does not sit flush with the shock mount. You have to bolt the two halves together, then temporarily run the bottom bolt tight to "clamp" the inside bracket flush with the inside of the shock mount. If you don't do this, nothing will fit at all as it'll about about 1/4" misaligned. The bottom clamp bolt pokes out just below the rear axle mount, so there is no space at all to fish the nut in to thread it. You have to do it temporarily because without the inside mount flush, there's not even enough room to install the washer under the nut and still get it to thread. I did this with a combination of a small magnet stick, much swearing, and an absolute resolve to get these things mounted. To summarize:
- bolt halves together on the shock mount with the main lower bolt, tight but enough that the two halves can swivel by hand.
- use the small underside bolt to clamp the inside half flush with the shock mount. This is an amazing pain in the ass and I wish you well to figure out a method that works for you. If you can get the full assembly (nut - washer - washer - bolt) threaded and tight, good, you're done and can move on. Otherwise:
- once the inside half is wedged in place, torque the main lower bolt to spec so the assembly wont move. Then you can remove the small bottom bolt and assemble/tighten it normally. I had to remove the washers to get enough thread exposed to clamp it initially, so now I'm going back and fixing that.
For what its worth, they are very stout once assembled. Here's a photo of where my soul died:

And with that done, I put the rear Clayton trackbar on, shocks/wheels back, and dropped the truck. Too tired to do final torques/checks here's where it sat last night:
Today gave it a once over underneath, and realized I had misread the front trackbar/rear trackbar instructions. So the rear was backwards/upside down lol. Easy fix and now it looks correct. That small step, and torquing all the control arms back to spec and I was done. Here's how it looks:

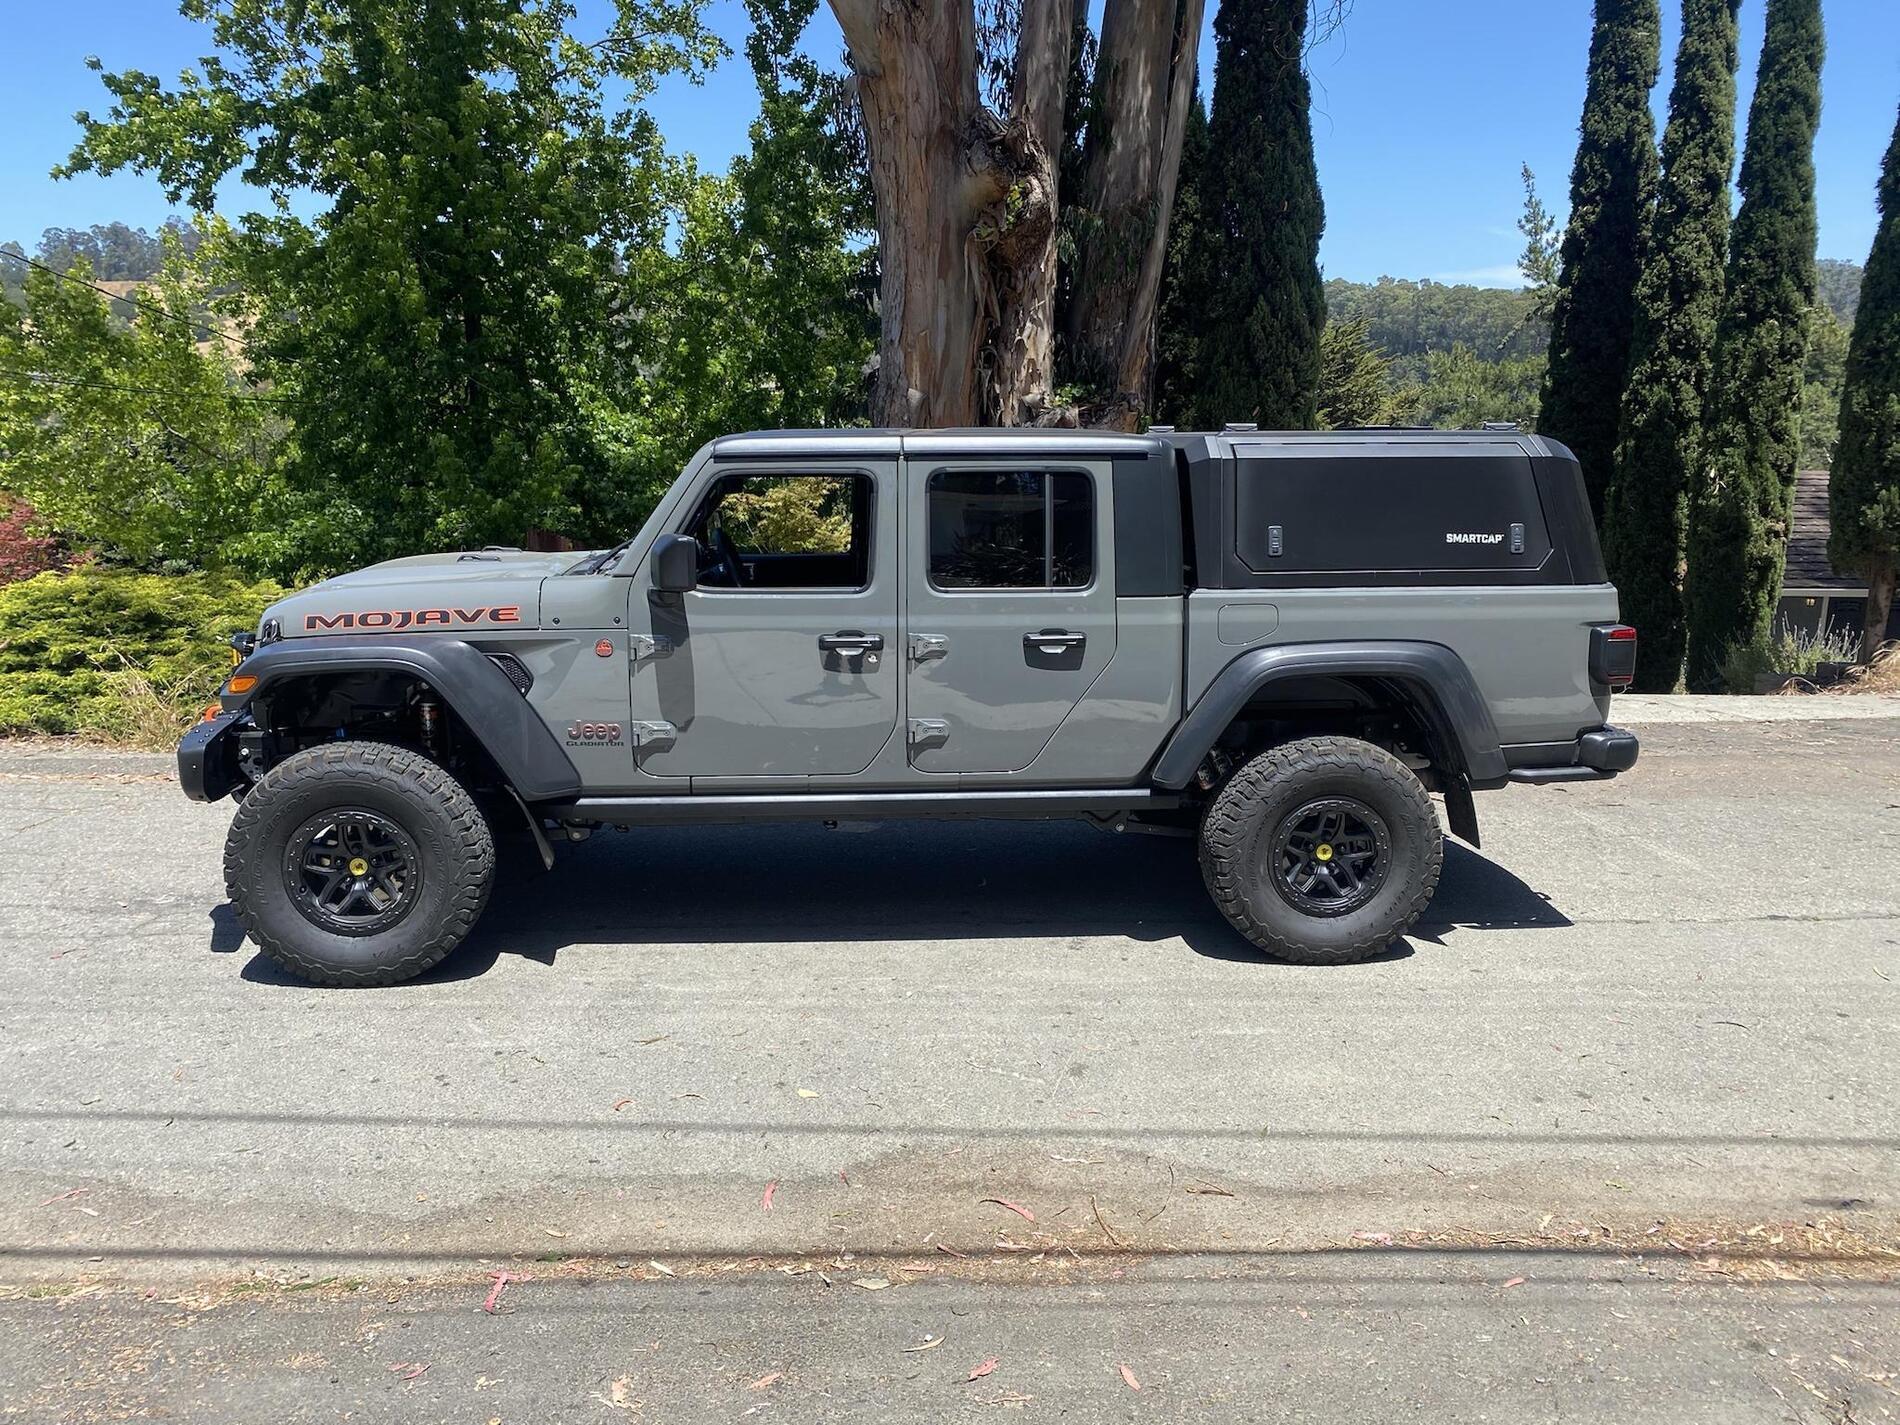
I think it's juuuust about level, but looks maybe a bit nose high. Hard to tell because there aren't really any perfectly flat spots out front of the house. The Clayton triple-rate rear springs are soft in the first part of the spring, so I'm thinking the ~200lb static load I have (cap, molle panels/mounts) might be compressing them a bit. I've got the airbags in but un-inflated, so I'll see if I can't get that done tonight and see if there's a change. I don't mind how the tires look (315/70 C rated ko2s) but the budget is busted for a while anyhow, so they are what I'm going with for now. Alignment scheduled for Wednesday.
My brief 10 minute test drive including some quick dirt road: Rides great, better than stock IMO. My shocks were too low in the stroke after adding all the stuff on the truck, and this is a noticeable improvement. Steers great, no clunks/noises so hopefully I put it all on correctly. Going to let the alignment shop measure axle alignment but by my eye the trackbars look very even.
Overall, I'm pretty happy with how it turned out, and can't wait to hit the road. If you see me stopped on the Utah BDR route or somewhere in the Tetons/Yellowtone, please stop and say hi as I'm probably trying to fix something I didn't install right.
-R
ps: final lift measurements
front before/after
Looks to be about a 3.5 lift in front
rear before/after
just about 3.1".
Sponsored
Last edited: