My Jeep Story
Member
- First Name
- Casey
- Joined
- Nov 30, 2017
- Threads
- 2
- Messages
- 20
- Reaction score
- 53
- Location
- Boston, MA
- Website
- www.youtube.com
- Vehicle(s)
- 2005 Jeep WK
- Thread starter
- #1
The other week, I was reminded of why the Jeep community can't be topped by any other. I was working on my Jeep WK, and at the time, my neighbor was having construction done to his home. An employee walked over and asked me who painted my Jeep and I told him that I had done it a few years back and explained to him what type of paint it was. We spoke for a while and he mentioned that he had a brand new JT ordered that was in a shop getting a Mopar lift installed alongside new wheels and tires. By the end of the conversation, he trusted me enough to ask me if I would be willing to paint his brand new Gladiator and I was more than happy to accept! Less than a week later, it was in my driveway with 150 miles on it and ready for its overhaul! 
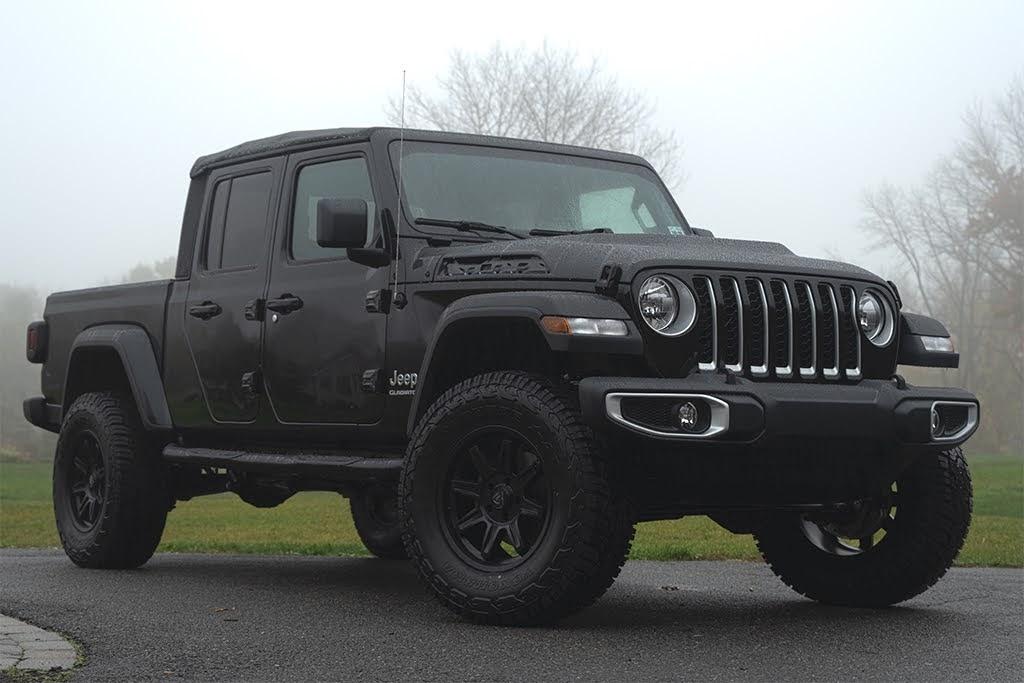
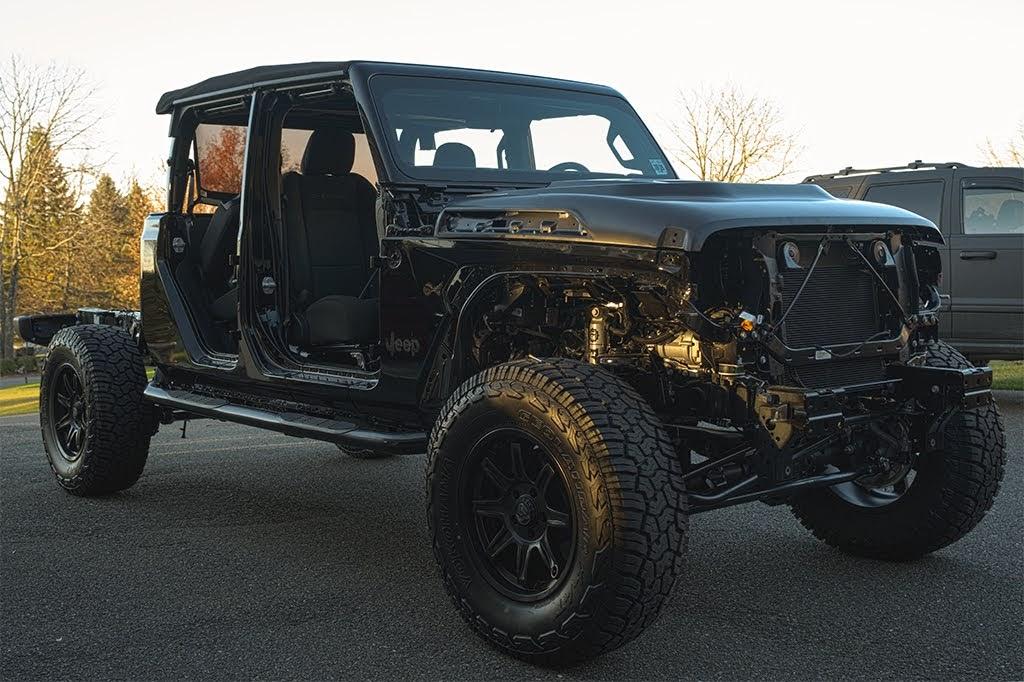
Here she was the day I got it!

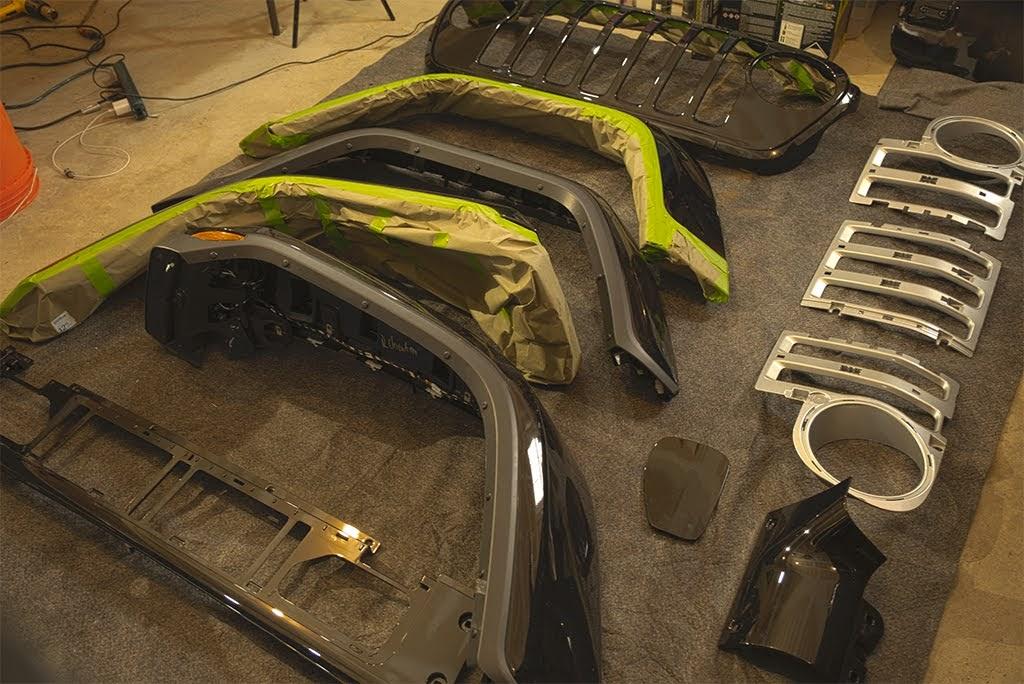
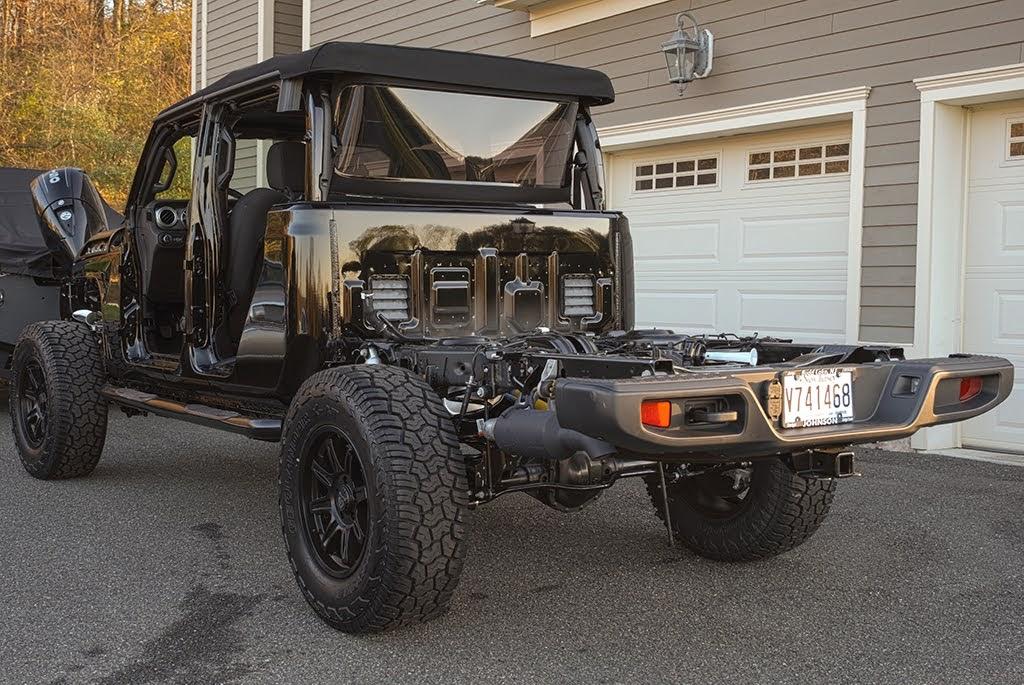
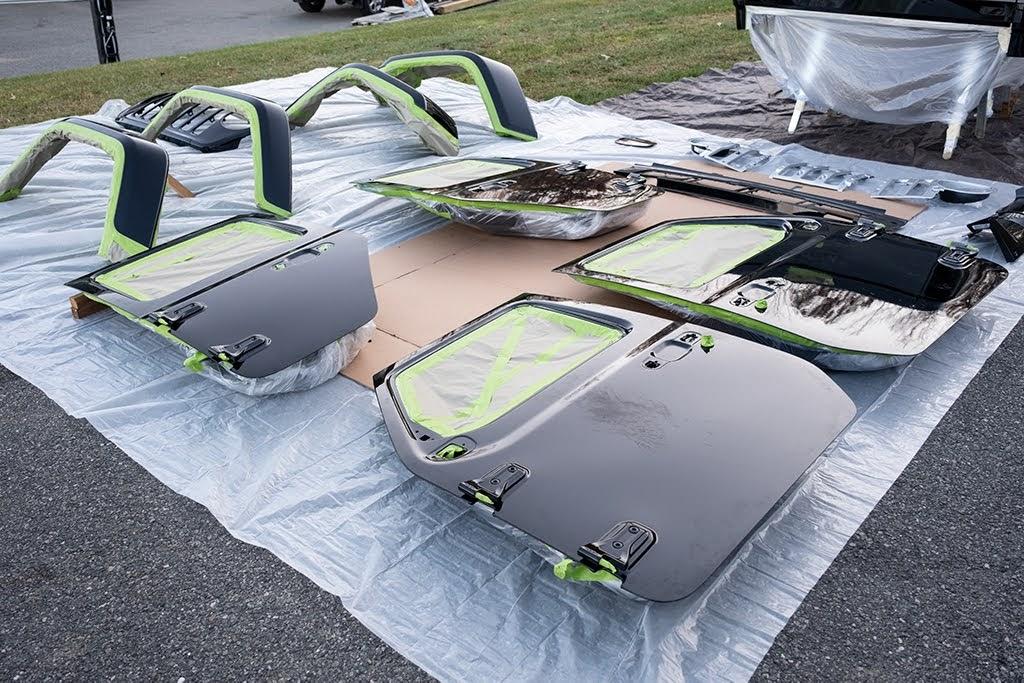
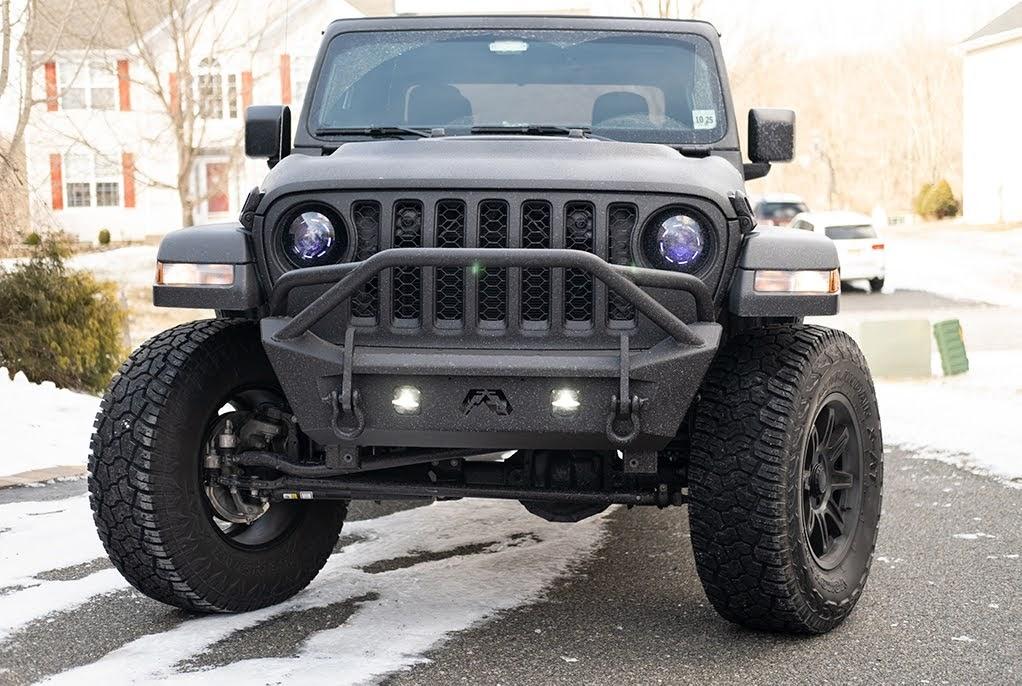
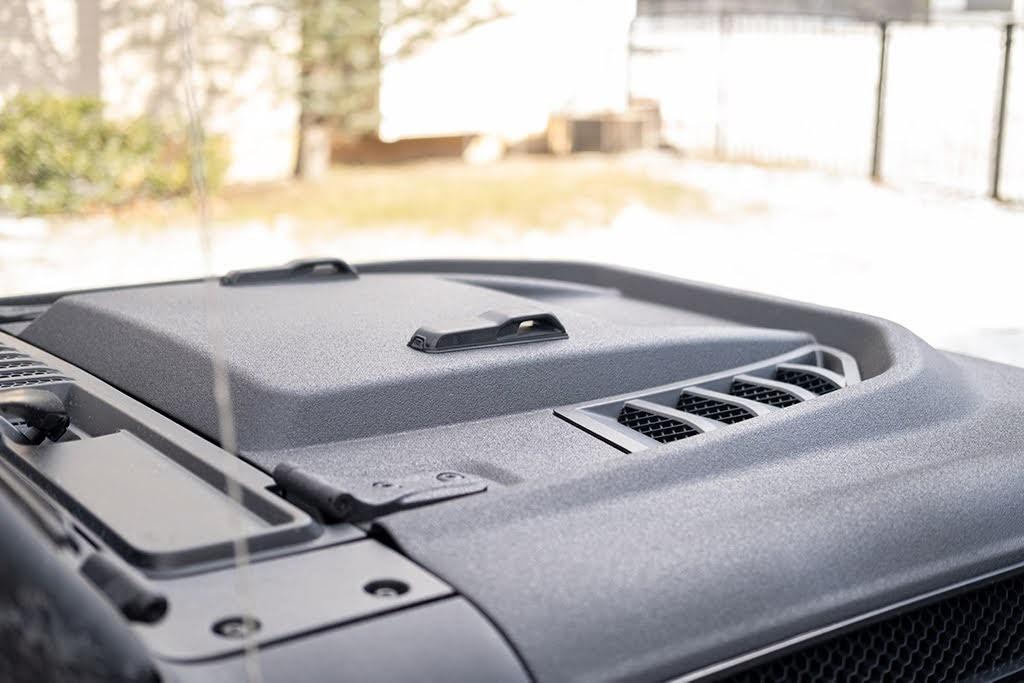
Lining the rig wasn't the only thing he wanted to be done since he had ordered a new bumper that was sitting in the bed of the truck that I told him I would be happy to install. You can also see that he has an aftermarket hood and I had requested that when he installed it to leave the plastic inserts out to save me some time. Not only that, but I was also going to do a projector retrofit to his OEM halogen headlights since I have been doing headlights for the better part of five years. ?
I'm no stranger to Raptor Lining and have been doing it to entire vehicles and truck beds for years and I even worked with U-POL for the original video that I released on my channel covering how I lined my WK. In between years at college, I worked at Line-X and it was there that I decided to Raptor my vehicle since I quickly found that if you want something done right, the only way to ensure it's done so is to do it yourself! I've learned a lot by doing many projects over the years and I didn't cut any corners here treating the rig as if it were my own and began by removing everything off of the JT. Raptor Liner is a thick paint and it is paramount that everything is removed to achieve the best results and that includes weather stripping around the doors! The details are all in my video linked at the bottom.


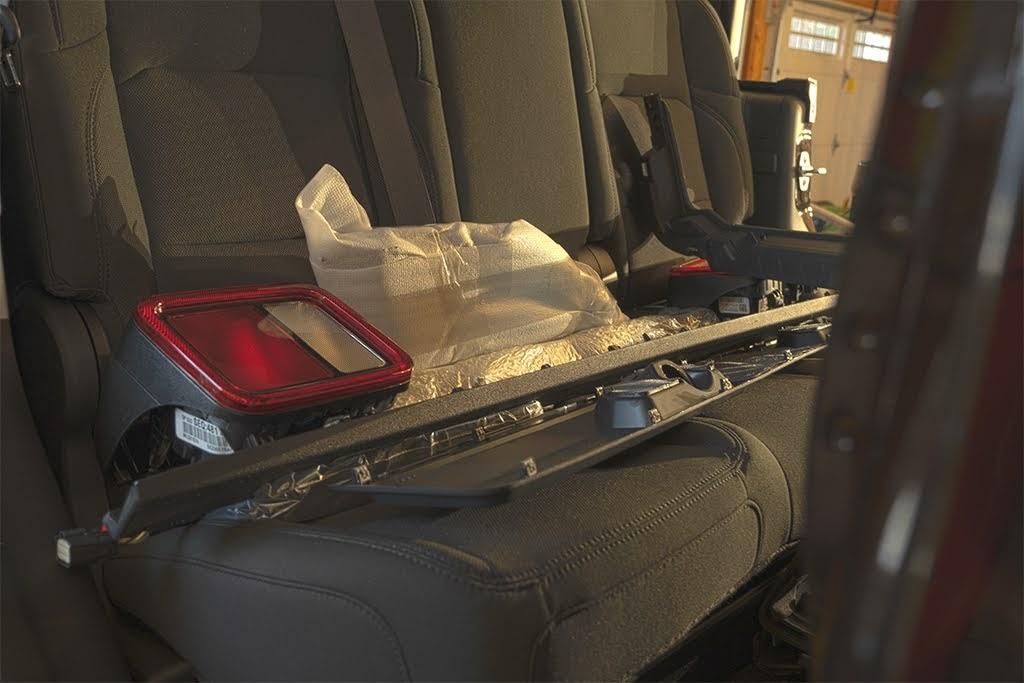
Everything that wasn't being painted was placed back into the cabin awaiting reinstallation.
There are a lot of methods that help you keep yourself organized when disassembling vehicles and I opted to use plastic bags and labeled them. Something I've done over the years is to place even the clips I break into these bags so that when I order replacements, I know where the original clip broke from. This was particularly useful on the clips that hold the flares to the fenders.
You can see in that picture the compressor that I use and for reference, it's a 30-gallon Industrial Air unit. A 30-gallon is the minimum capacity for a compressor that I would recommend you use to line a vehicle, but any 6 HP compressor that generates 150 PSI line pressure should provide sufficient air supply, but is dependent on the application equipment/gun (Shultz type or gravity feed HVLP) used to apply the Raptor.
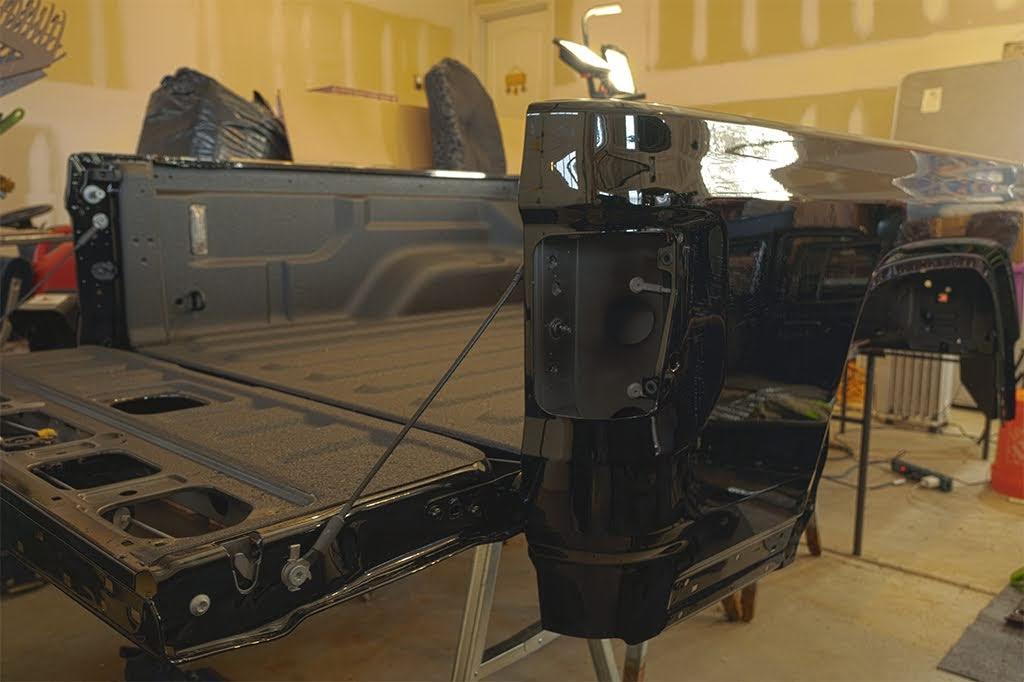
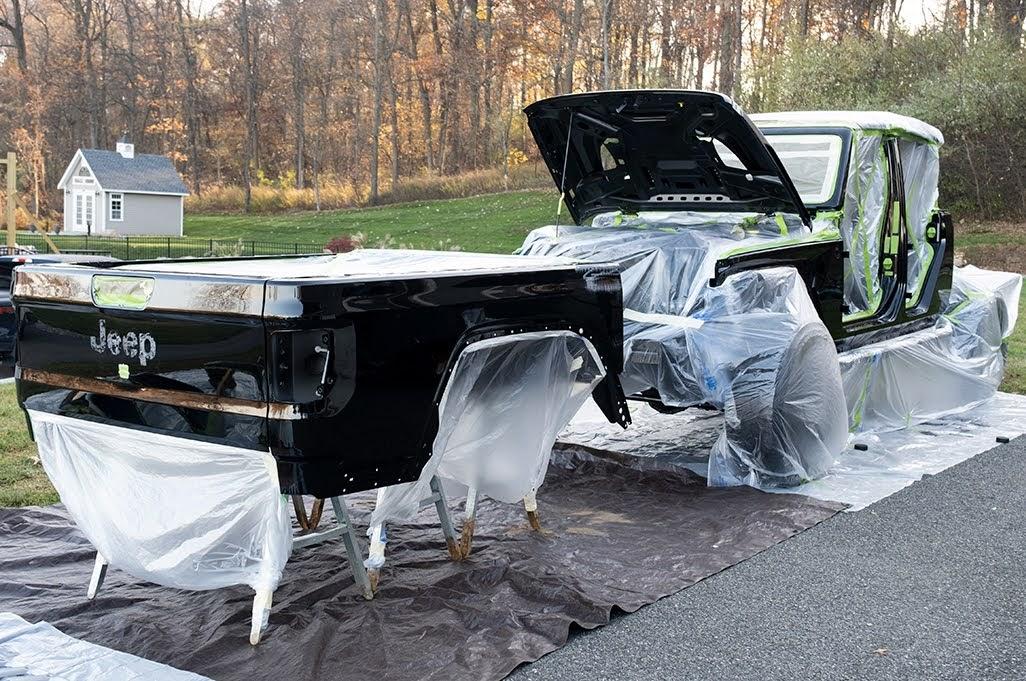
Here's the rig with everything removed!

After everything was removed, I painfully masked off every surface. Anywhere that I could, I used the rolls of plastic to cover large areas, but be sure not to tear them during the process. I like to buy rolls of FrogTape in various thicknesses to ensure I have tape for straight lines and curves. Using high-quality tape is another easy way to avoid choppy lines just like removing weather stripping.

We're almost there! Now we have to prepare the surface for Raptor's epoxy primer. This is typically a pretty brutal process in itself and I have done previous projects with an orbital sander but found that I'd go through so much sandpaper and the tool would let me down on any curved surface which happens to be many areas on most vehicles. I'd end up just sanding so many areas by hand and taking a ton of additional time for this step. For this project, I got my hands on an Eastwood SCT and I can't begin to explain how much I regret not getting one sooner. The SCT, or surface conditioning tool, made quick work of the entire Jeep with their drums that conform to and uniformly sand any surface. You can swap out drums quickly depending on the surface that you're working on including wire brushes for rust, buffing drums for polishing, thinner drums for tighter areas, etc. I can't recommend this tool enough if you plan on lining your bed or vehicle or if you just need to prep a surface for painting in general. I will say that if you do use it, it does go through paint leaving bare metal and I would not do this if you don't plan on using the epoxy primer prior to Raptor Liner as Raptor does not do as well adhering to bare metal.
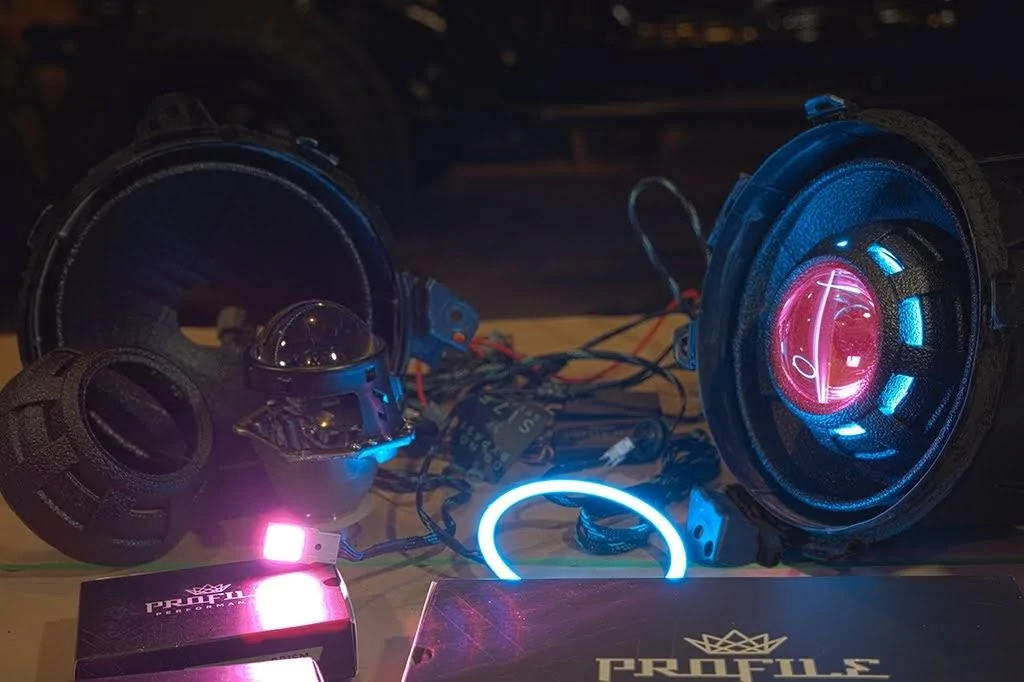
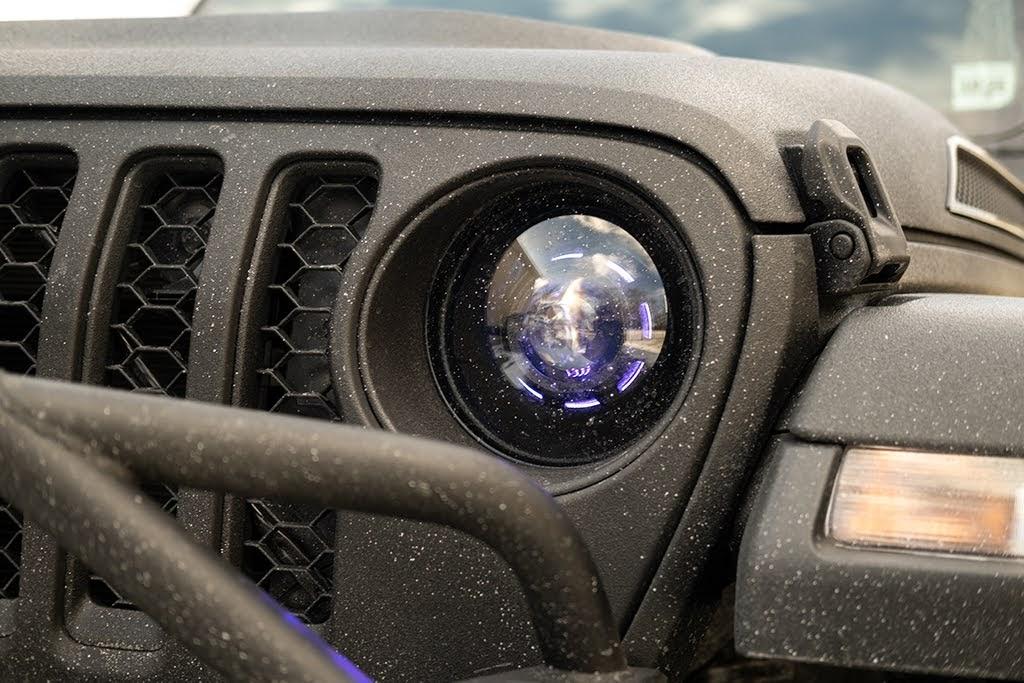
While the primer dried, I worked on the headlights! I will create another post on this and won't go over all of the details here, but for anyone interested, I could not bake the headlights open and had to cut them contrary to some other posts that I have seen floating around. I installed a set of Morimoto Mini D2s 4.0s which are 3" projectors to better fill out the large area of the JT's headlight housings. These are bi-xenon as many projectors are meaning that they remain the low and high-beam as the OEM setup was with the halogen bulbs. I installed Profile Pivot halos and demon eyes that were all controllable with the Morimoto Bluetooth controller via a phone! And yes, that is Raptor inside of the headlights! It's important to understand that Raptor softens at 212 degrees Fahrenheit, so I installed bolt-on vents in the rear and tested the temps when I sealed them back up. Using a 35W ballast, temps stayed well below the threshold and I was comfortable that the Raptor would last.
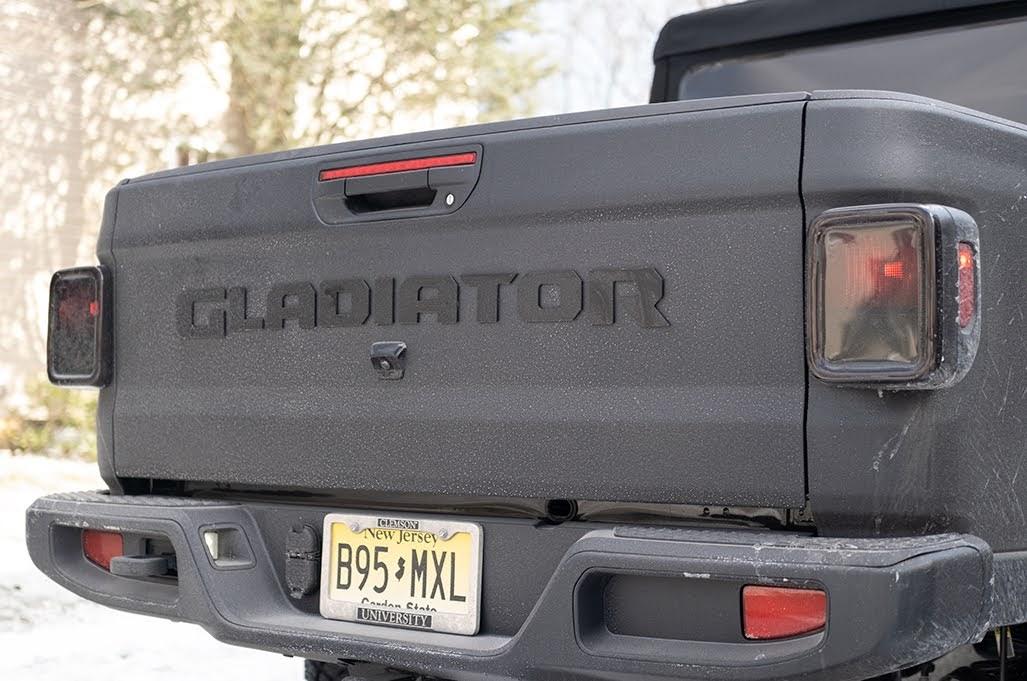
I had unfortunately knocked over my Fujifilm X-T4 while filming the application of the last coat of Raptor and broke the only lens that I had for it since I just got it at the time. I ended up having to meet back up with the owner a few weeks after and the pictures that are shown below so it's a little covered in salt, but it still looks badass!


The process from start to finish took me two and a half weeks to complete, but that includes the projector retrofit. I used 16 liters to complete the job equaling four gallons if you're looking at the kits although I did not line the bed as the owner had Line-X installed before I got it. If you're interested in any other details and seeing the complete job done from beginning to end, I filmed the process and ended up taking the 20+ hours of footage and put it together into a 20-minute video on my channel. I would love to hear any feedback on the video and see what you guys think! Would you do this to your rig?
Here she was the day I got it!
Lining the rig wasn't the only thing he wanted to be done since he had ordered a new bumper that was sitting in the bed of the truck that I told him I would be happy to install. You can also see that he has an aftermarket hood and I had requested that when he installed it to leave the plastic inserts out to save me some time. Not only that, but I was also going to do a projector retrofit to his OEM halogen headlights since I have been doing headlights for the better part of five years. ?
I'm no stranger to Raptor Lining and have been doing it to entire vehicles and truck beds for years and I even worked with U-POL for the original video that I released on my channel covering how I lined my WK. In between years at college, I worked at Line-X and it was there that I decided to Raptor my vehicle since I quickly found that if you want something done right, the only way to ensure it's done so is to do it yourself! I've learned a lot by doing many projects over the years and I didn't cut any corners here treating the rig as if it were my own and began by removing everything off of the JT. Raptor Liner is a thick paint and it is paramount that everything is removed to achieve the best results and that includes weather stripping around the doors! The details are all in my video linked at the bottom.
Everything that wasn't being painted was placed back into the cabin awaiting reinstallation.
There are a lot of methods that help you keep yourself organized when disassembling vehicles and I opted to use plastic bags and labeled them. Something I've done over the years is to place even the clips I break into these bags so that when I order replacements, I know where the original clip broke from. This was particularly useful on the clips that hold the flares to the fenders.
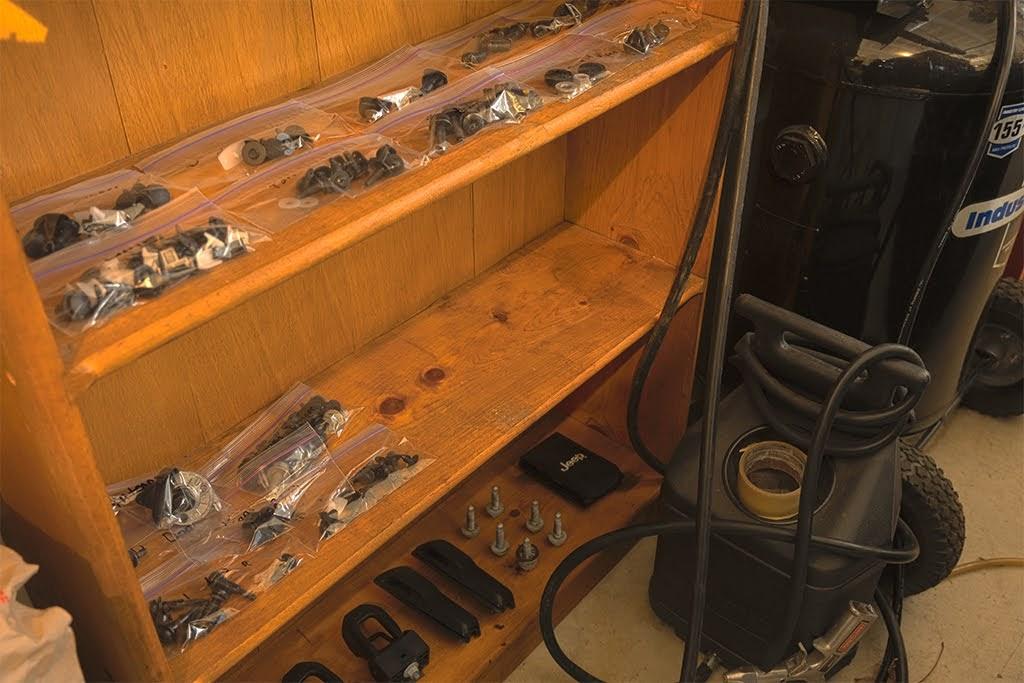
You can see in that picture the compressor that I use and for reference, it's a 30-gallon Industrial Air unit. A 30-gallon is the minimum capacity for a compressor that I would recommend you use to line a vehicle, but any 6 HP compressor that generates 150 PSI line pressure should provide sufficient air supply, but is dependent on the application equipment/gun (Shultz type or gravity feed HVLP) used to apply the Raptor.
Here's the rig with everything removed!
After everything was removed, I painfully masked off every surface. Anywhere that I could, I used the rolls of plastic to cover large areas, but be sure not to tear them during the process. I like to buy rolls of FrogTape in various thicknesses to ensure I have tape for straight lines and curves. Using high-quality tape is another easy way to avoid choppy lines just like removing weather stripping.
We're almost there! Now we have to prepare the surface for Raptor's epoxy primer. This is typically a pretty brutal process in itself and I have done previous projects with an orbital sander but found that I'd go through so much sandpaper and the tool would let me down on any curved surface which happens to be many areas on most vehicles.
I'd end up just sanding so many areas by hand and taking a ton of additional time for this step. For this project, I got my hands on an Eastwood SCT and I can't begin to explain how much I regret not getting one sooner. The SCT, or surface conditioning tool, made quick work of the entire Jeep with their drums that conform to and uniformly sand any surface. You can swap out drums quickly depending on the surface that you're working on including wire brushes for rust, buffing drums for polishing, thinner drums for tighter areas, etc. I can't recommend this tool enough if you plan on lining your bed or vehicle or if you just need to prep a surface for painting in general. I will say that if you do use it, it does go through paint leaving bare metal and I would not do this if you don't plan on using the epoxy primer prior to Raptor Liner as Raptor does not do as well adhering to bare metal.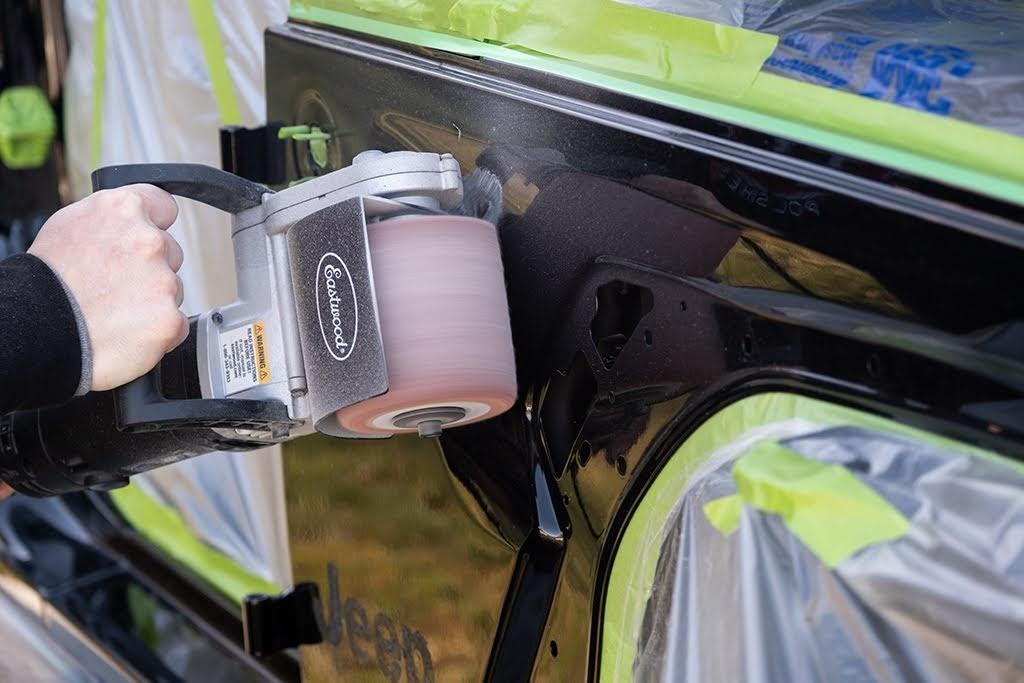
While the primer dried, I worked on the headlights! I will create another post on this and won't go over all of the details here, but for anyone interested, I could not bake the headlights open and had to cut them contrary to some other posts that I have seen floating around. I installed a set of Morimoto Mini D2s 4.0s which are 3" projectors to better fill out the large area of the JT's headlight housings. These are bi-xenon as many projectors are meaning that they remain the low and high-beam as the OEM setup was with the halogen bulbs. I installed Profile Pivot halos and demon eyes that were all controllable with the Morimoto Bluetooth controller via a phone! And yes, that is Raptor inside of the headlights! It's important to understand that Raptor softens at 212 degrees Fahrenheit, so I installed bolt-on vents in the rear and tested the temps when I sealed them back up. Using a 35W ballast, temps stayed well below the threshold and I was comfortable that the Raptor would last.
I had unfortunately knocked over my Fujifilm X-T4 while filming the application of the last coat of Raptor and broke the only lens that I had for it since I just got it at the time. I ended up having to meet back up with the owner a few weeks after and the pictures that are shown below so it's a little covered in salt, but it still looks badass!
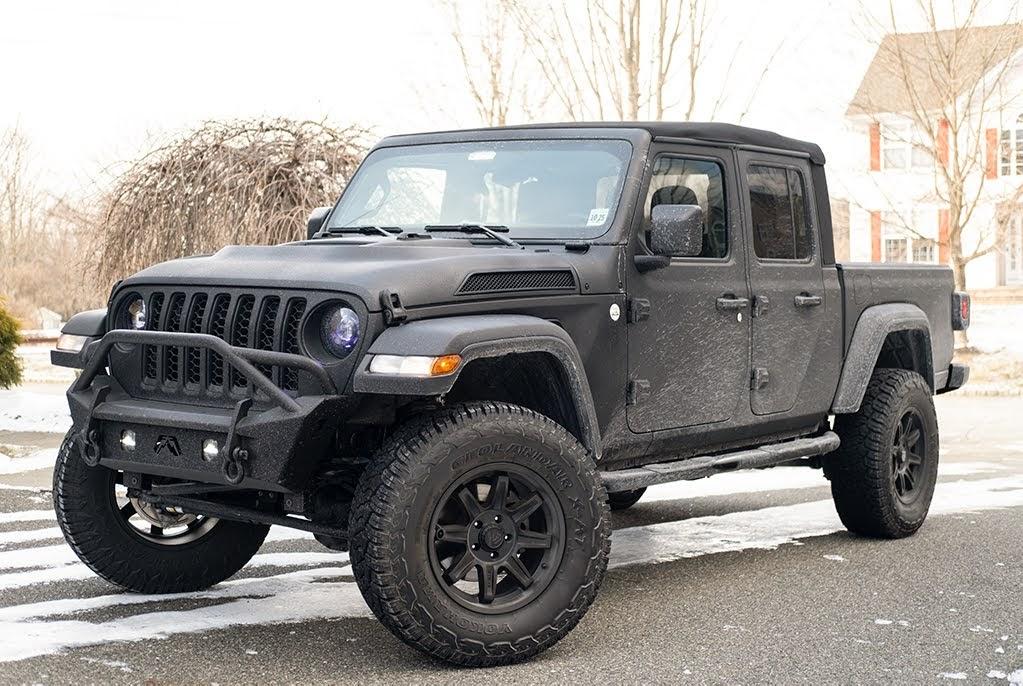
The process from start to finish took me two and a half weeks to complete, but that includes the projector retrofit. I used 16 liters to complete the job equaling four gallons if you're looking at the kits although I did not line the bed as the owner had Line-X installed before I got it. If you're interested in any other details and seeing the complete job done from beginning to end, I filmed the process and ended up taking the 20+ hours of footage and put it together into a 20-minute video on my channel. I would love to hear any feedback on the video and see what you guys think! Would you do this to your rig?
Sponsored
Last edited:
") this is def something my JT could be interested in
this is def something my JT could be interested in