jonaandcaleb
Well-Known Member
- Thread starter
- #1
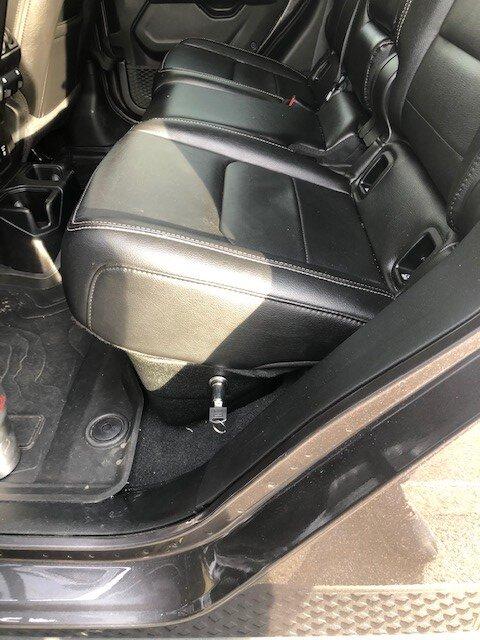
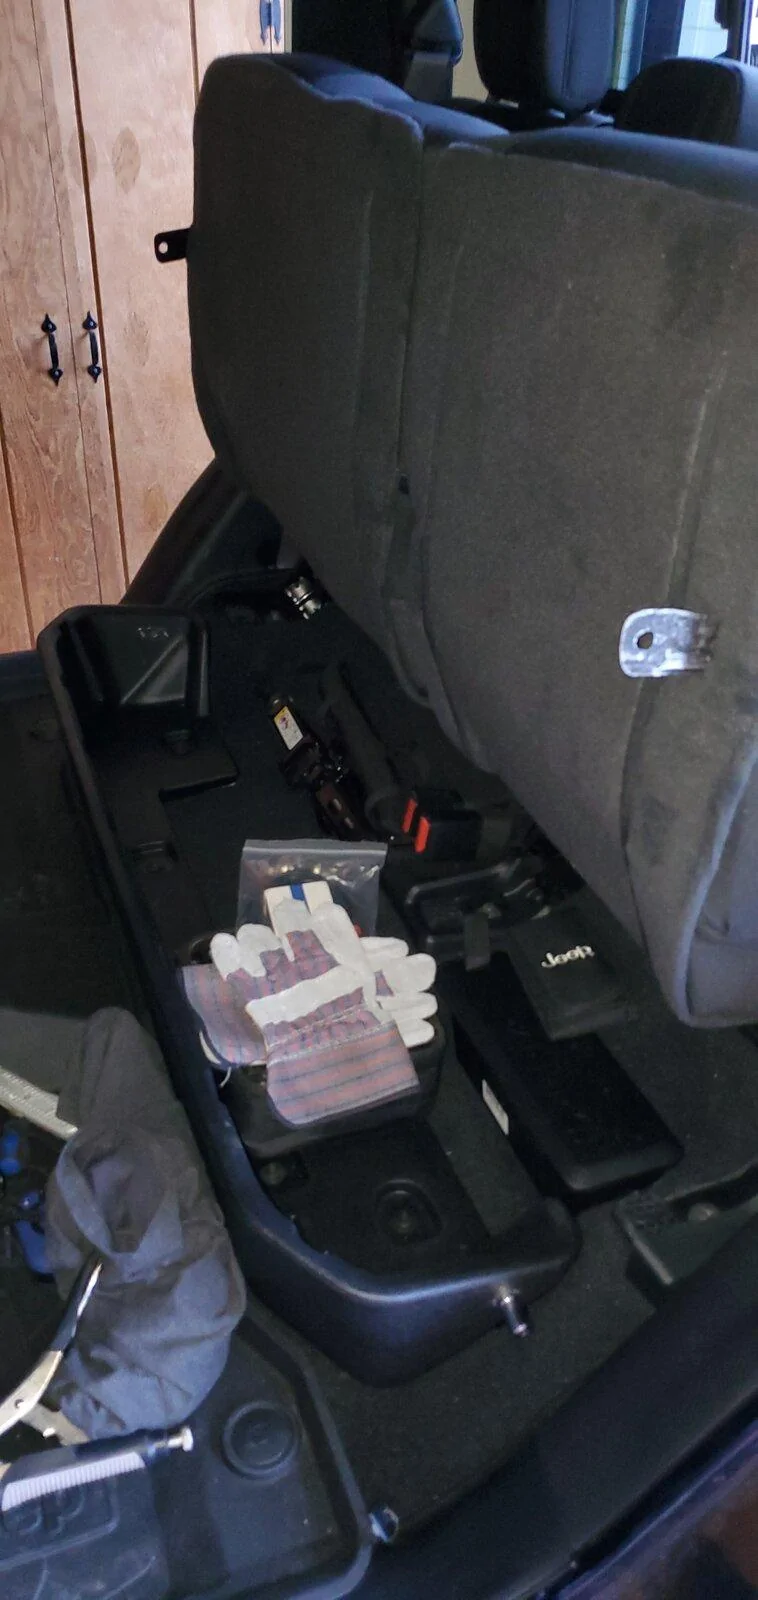
Last year when going topless and doorless, I was always puzzled that the [bottom] rear seats didn't lock down. I didn't keep anything in plain view and kept all 4 locking compartments locked (glovebox/dash/2 rear seat backs). It always worried that if someone would simply lift up the rear seats they would have access to all that air that I kept in there when topless/doorless. When topped and doored, I kept some towing accessories, straps, and some other things. I emptied it when doorless/topless but seems like I always needed something I left behind when it was emptied. I always thought there was a way to lock this and after combing through some pictures and forums I came up with an idea.
Here's what you need:
-2 Plunger locks. $11 & and keyed alike. These are what you see in wood/glass cases at stores. I bought them from Amazon: https://www.amazon.com/gp/product/B07PPPQ4XZ/ref=ppx_yo_dt_b_asin_title_o01_s00?ie=UTF8&psc=1
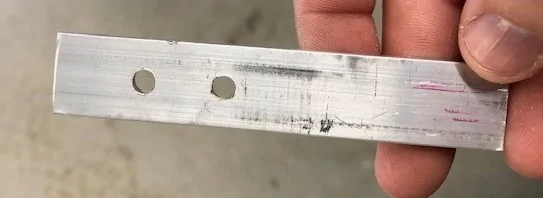
-Metal strip around a foot long. I used a 3ft aluminum piece I bought from Lowes for $8
-bolts/washers/nuts (I some laying around but at Lowe's they are around $2 a bag)
Thanks to @dparker1901 for some pictures which helped me get to the seat bracket of the bottom of the backseats.
https://www.jeepgladiatorforum.com/...t-bottom-or-locking-under-seat-storage.37234/
Some instructions:
1) Take the seat cover apart based on dparker1901's instructions.
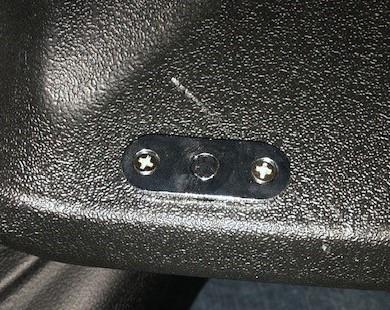
2) Make some metal strips. I did mine at 5" long.
3) You will need to drill 2 holes into this strip and the seat bracket in the seat. These will need to be somewhat close together to get to the flat part of the seat bracket. I placed washers on the bolt, put the bolt through the bracket I just made, then 2-3 washers on the bolt, then placed it through the seat bracket with a final washer and nut on the end. The 2-3 washers was to fill the void between the raised part of the seat bracket. Make sure you tighten this down firmly.
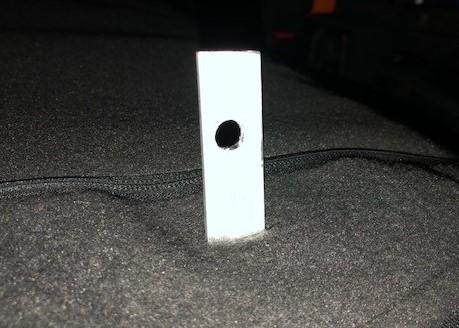
4) Put seat cover back together making a hole for the bracket to come out.
5) Carefully lay the seat down. More than likely it will touch and you will have to bend it towards the center of the truck. This helps the angle of the storage tray below.
6) Put some tape down where the strap is going to lay on the tray. I put some outside of the tray, then back inside. and then going to the other side to check to make sure the tape was in alignment with the bracket. I did this by putting a light inside the storage tray and opening the other seat up and looking through. Kept adjusting this until I got it exactly the way I wanted it.
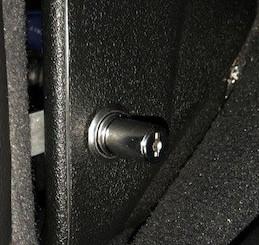
7) Drill the hole for the pin lock based on the centring it on tape you just placed. I drilled an 1/2" hole then sanded it out with a Dremel. I wanted it to be as tight as possible to help hold it, as I know the screws wouldn't be holding much. Put in the pin lock.
8) Now you need to drill the hole for the pin into the bracket. A little trick I did was put toothpaste on the pin, put the seat down, push the pin until it hit the bracket. Then when you lift up the seat a dab of toothpaste is left exactly where to drill the hole. I did drill mine a little bigger so it would slide easier and not bind.
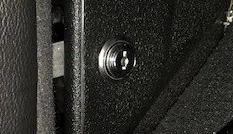
9) Test it out to make sure it works. If it doesn't, you can again go to the otherside of the truck and look to see what's wrong. Most of the time you can just make the hole slightly bigger.
Pretty please with how it turned out. Pictures attached.


Here's what you need:
-2 Plunger locks. $11 & and keyed alike. These are what you see in wood/glass cases at stores. I bought them from Amazon: https://www.amazon.com/gp/product/B07PPPQ4XZ/ref=ppx_yo_dt_b_asin_title_o01_s00?ie=UTF8&psc=1
-Metal strip around a foot long. I used a 3ft aluminum piece I bought from Lowes for $8
-bolts/washers/nuts (I some laying around but at Lowe's they are around $2 a bag)
Thanks to @dparker1901 for some pictures which helped me get to the seat bracket of the bottom of the backseats.
https://www.jeepgladiatorforum.com/...t-bottom-or-locking-under-seat-storage.37234/
Some instructions:
1) Take the seat cover apart based on dparker1901's instructions.
2) Make some metal strips. I did mine at 5" long.
3) You will need to drill 2 holes into this strip and the seat bracket in the seat. These will need to be somewhat close together to get to the flat part of the seat bracket. I placed washers on the bolt, put the bolt through the bracket I just made, then 2-3 washers on the bolt, then placed it through the seat bracket with a final washer and nut on the end. The 2-3 washers was to fill the void between the raised part of the seat bracket. Make sure you tighten this down firmly.
4) Put seat cover back together making a hole for the bracket to come out.
5) Carefully lay the seat down. More than likely it will touch and you will have to bend it towards the center of the truck. This helps the angle of the storage tray below.
6) Put some tape down where the strap is going to lay on the tray. I put some outside of the tray, then back inside. and then going to the other side to check to make sure the tape was in alignment with the bracket. I did this by putting a light inside the storage tray and opening the other seat up and looking through. Kept adjusting this until I got it exactly the way I wanted it.
7) Drill the hole for the pin lock based on the centring it on tape you just placed. I drilled an 1/2" hole then sanded it out with a Dremel. I wanted it to be as tight as possible to help hold it, as I know the screws wouldn't be holding much. Put in the pin lock.
8) Now you need to drill the hole for the pin into the bracket. A little trick I did was put toothpaste on the pin, put the seat down, push the pin until it hit the bracket. Then when you lift up the seat a dab of toothpaste is left exactly where to drill the hole. I did drill mine a little bigger so it would slide easier and not bind.
9) Test it out to make sure it works. If it doesn't, you can again go to the otherside of the truck and look to see what's wrong. Most of the time you can just make the hole slightly bigger.
Pretty please with how it turned out. Pictures attached.
Sponsored
")