Sponsored

RLD designs pic request

LostWoods

Well-Known Member
Joined
Mar 13, 2020
Threads
15
Messages
1,921
Reaction score
2,171
Location
Gilbert, AZ
Vehicle(s)
2024 4Runner / 1995 YJ
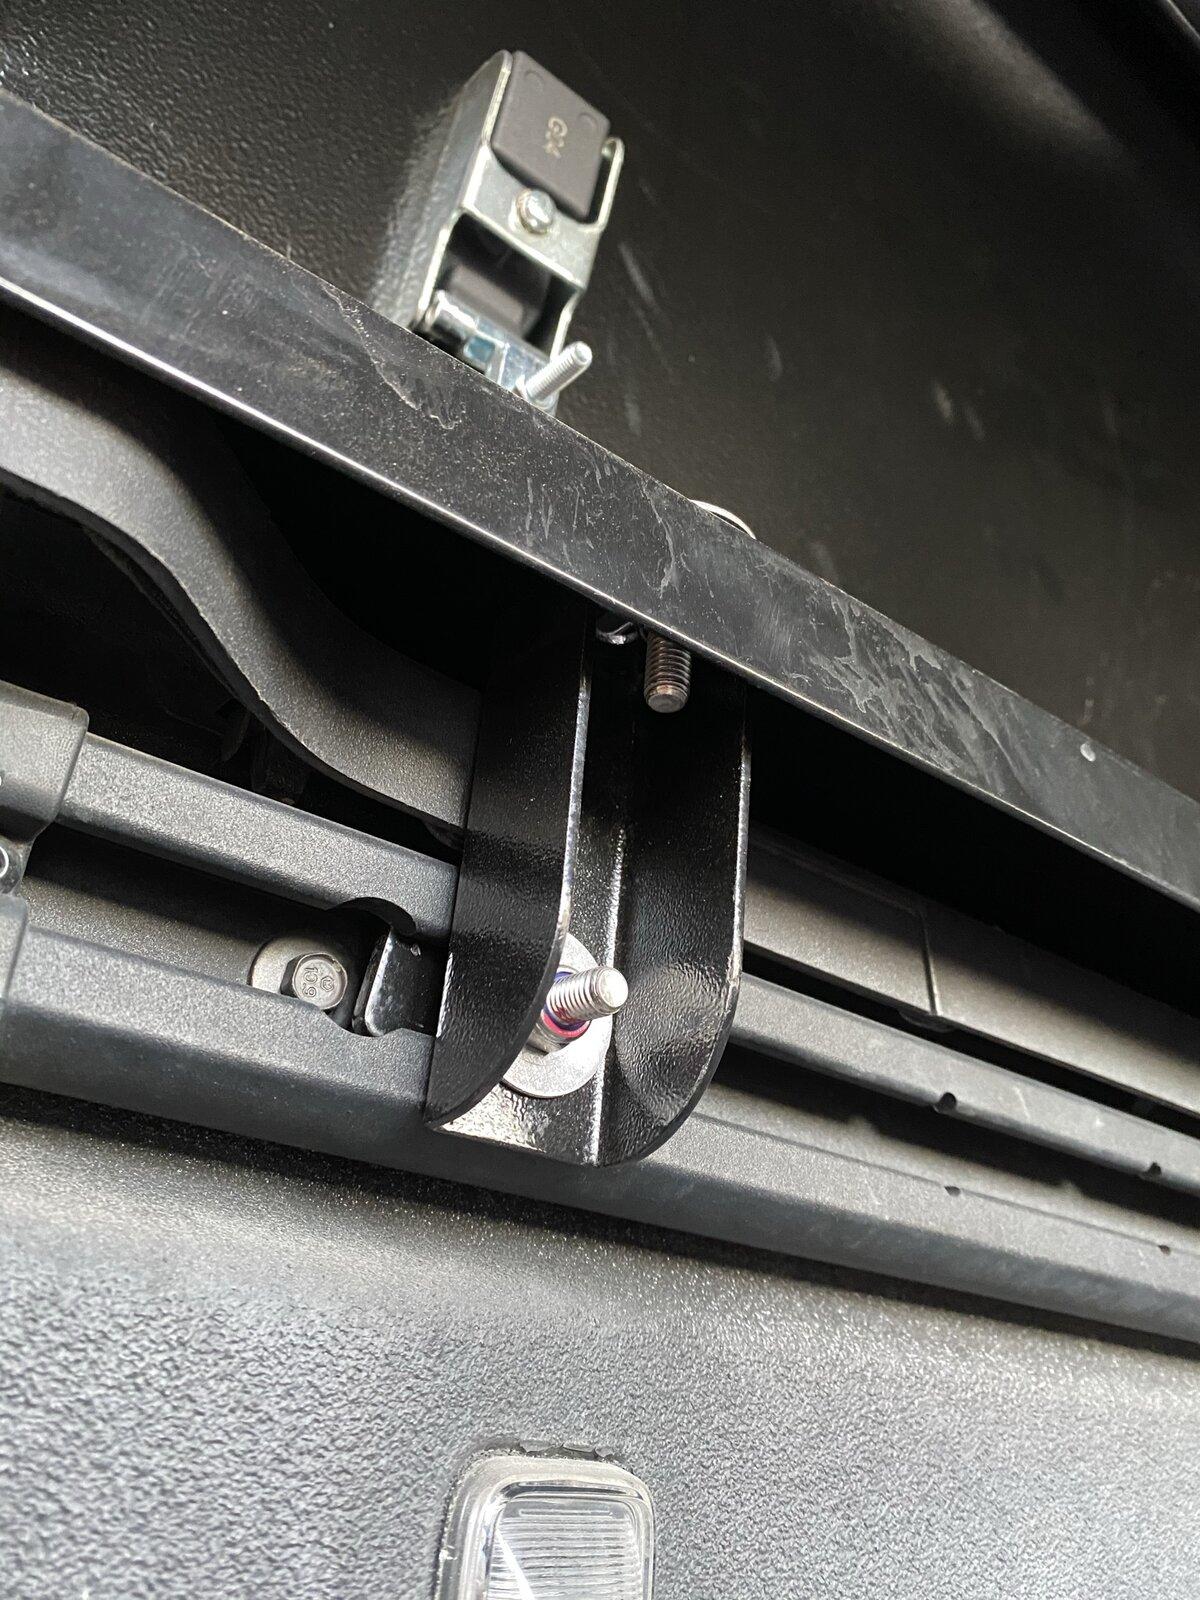
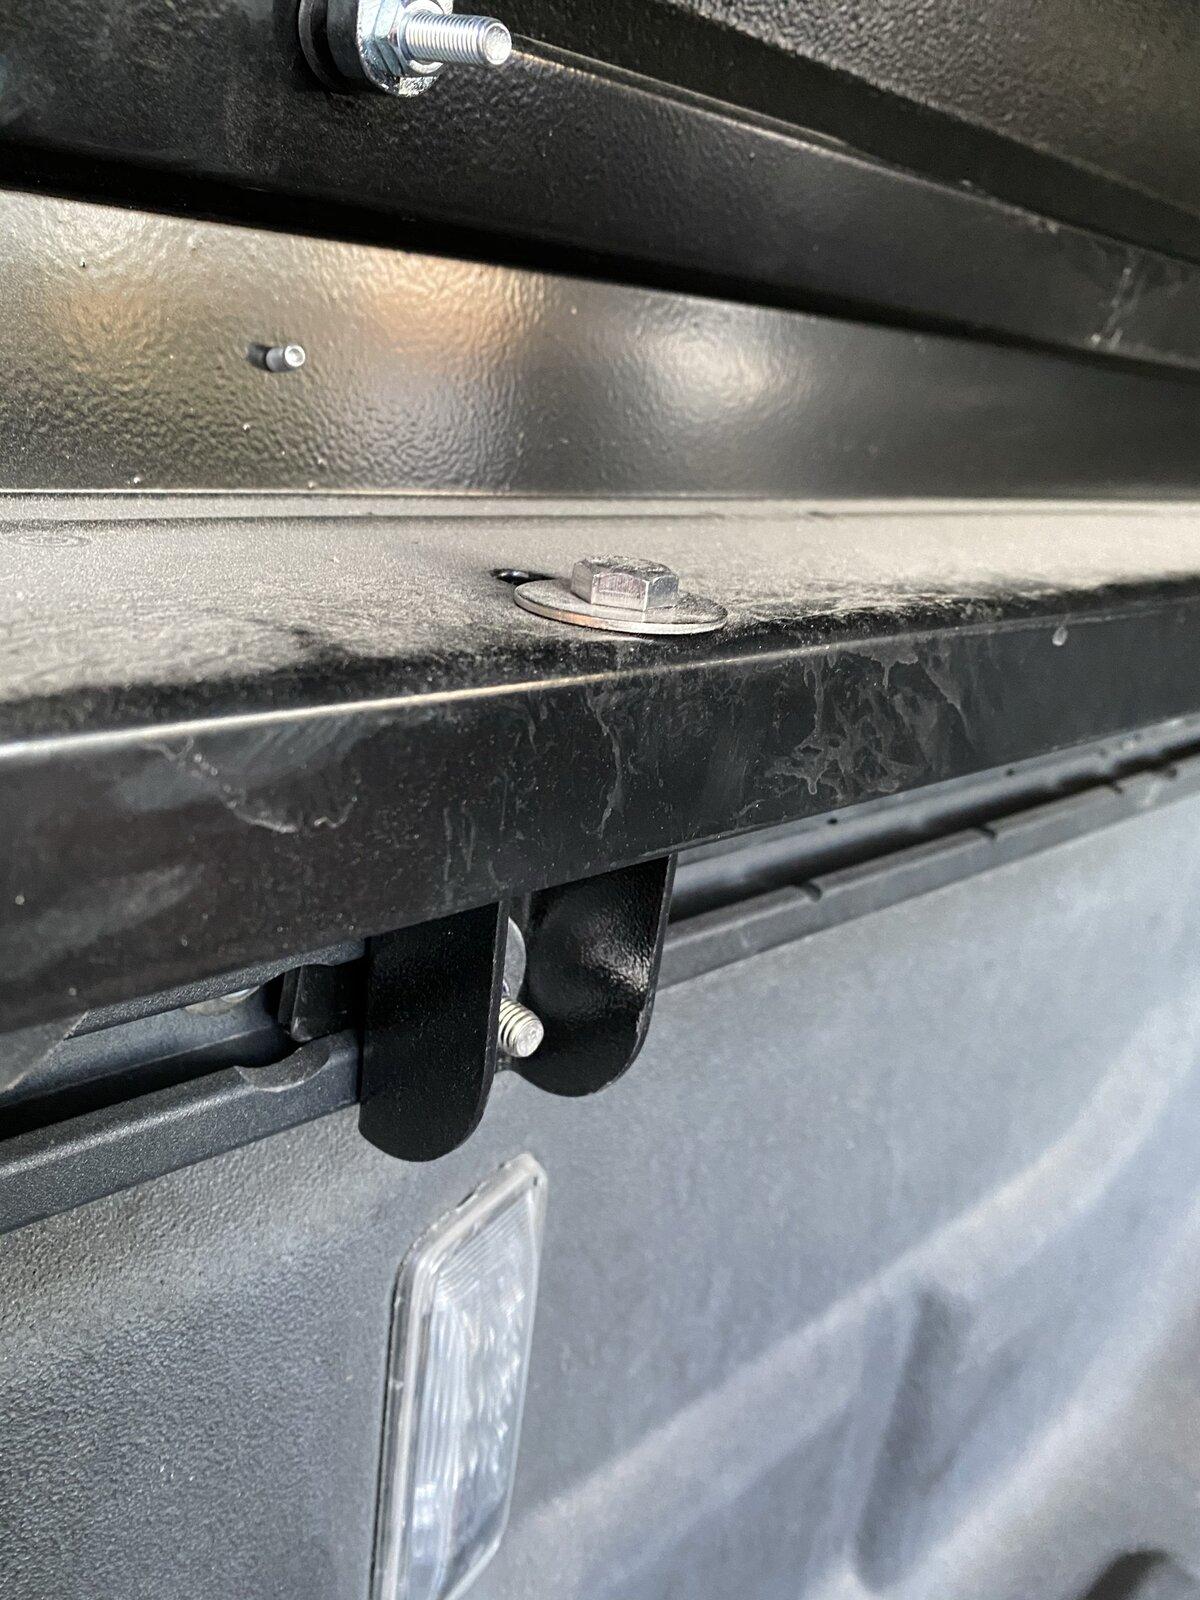
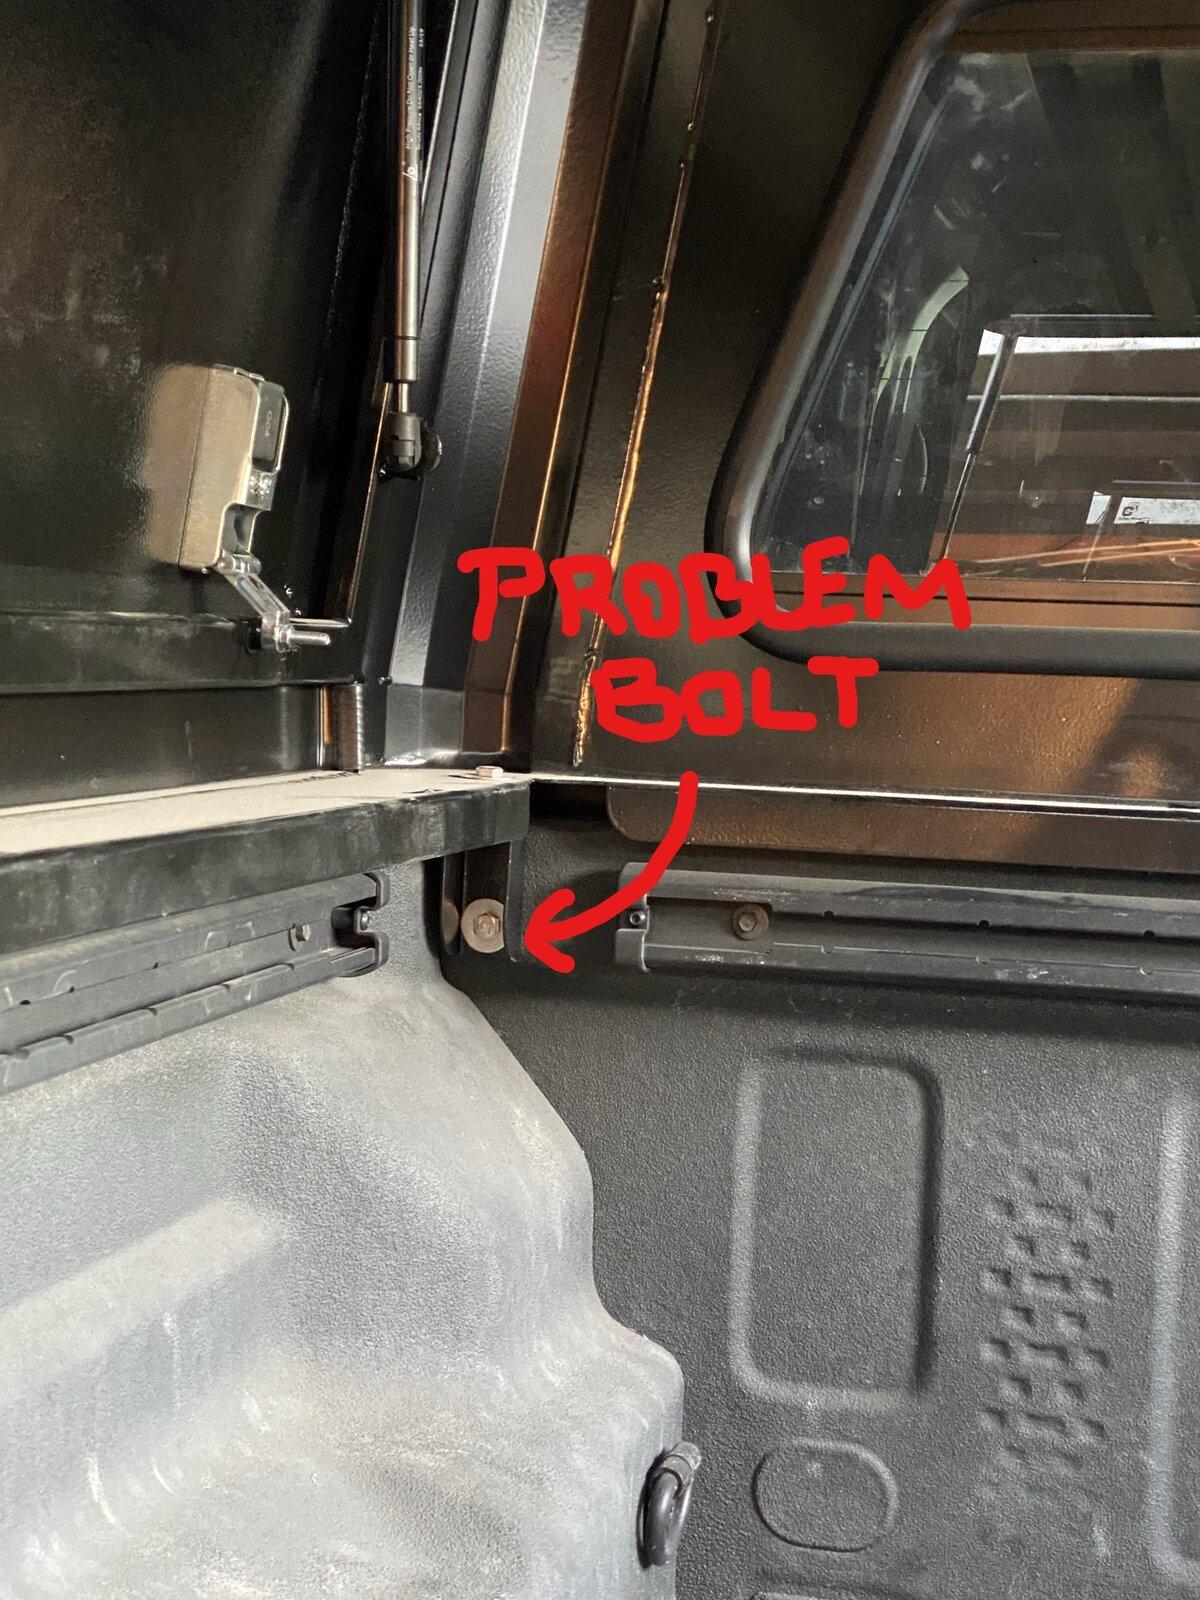
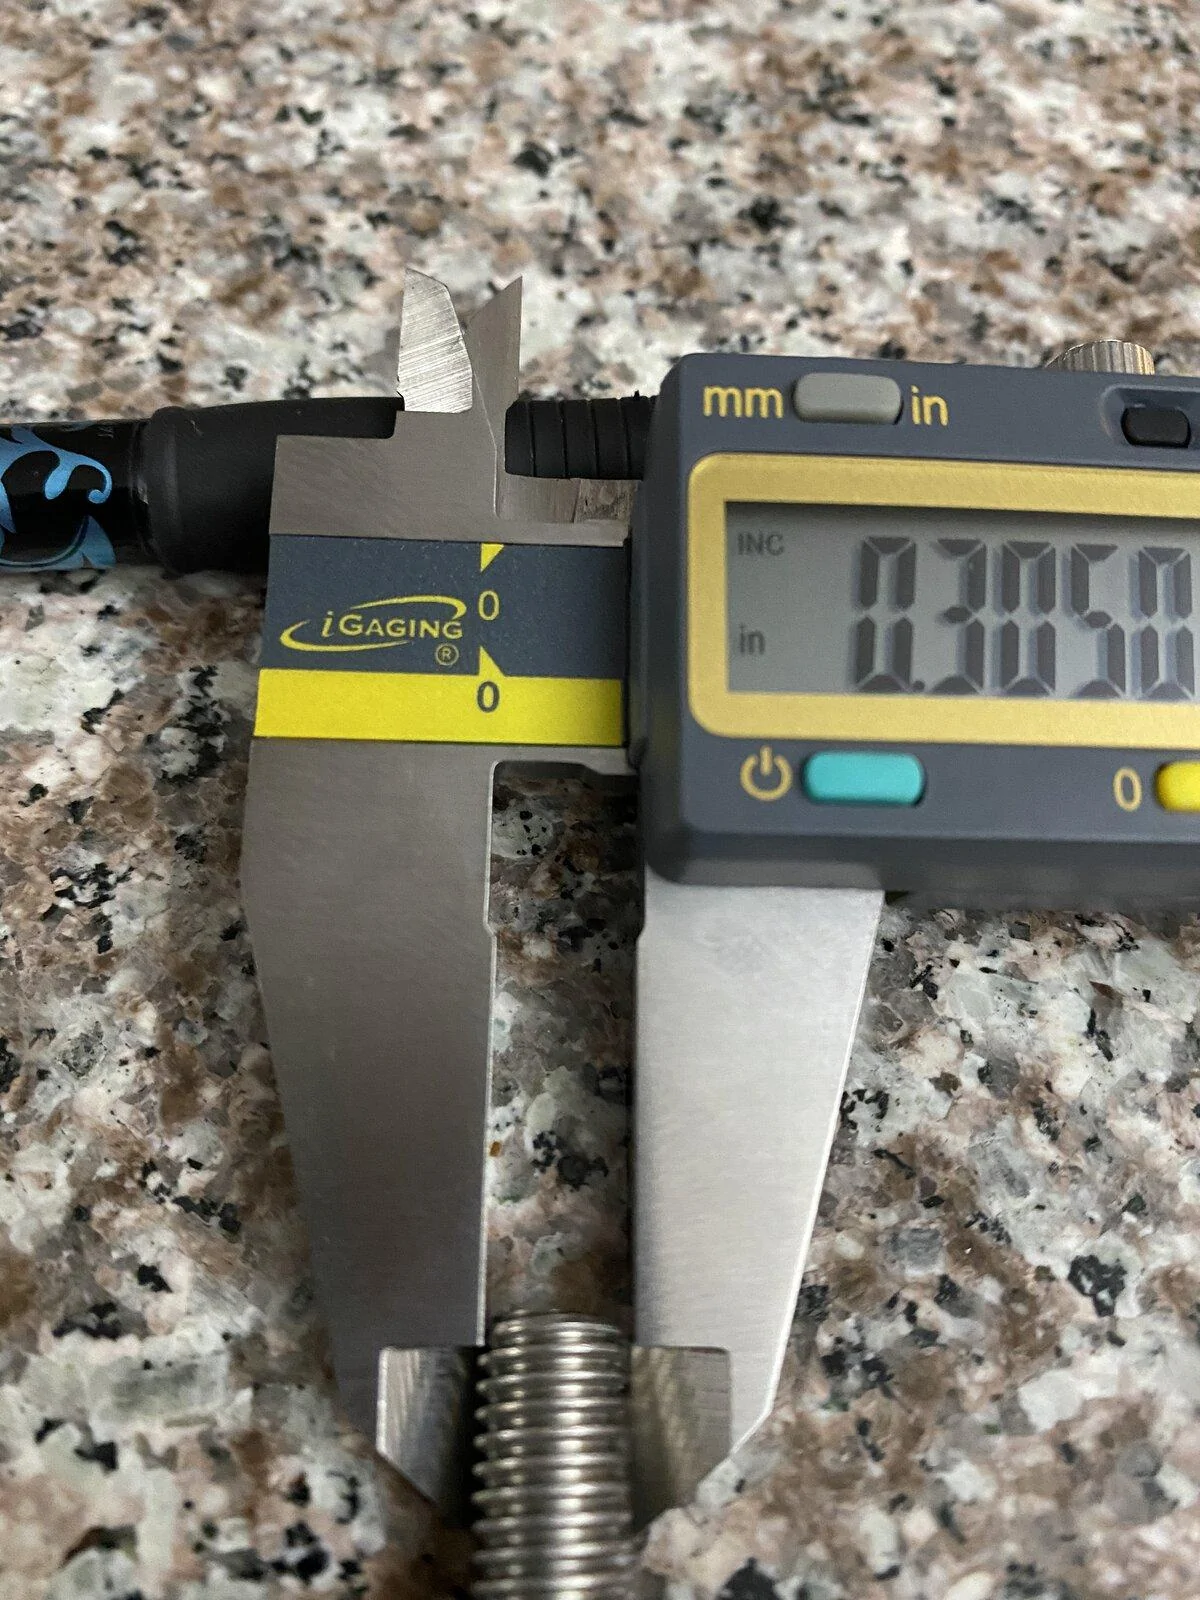
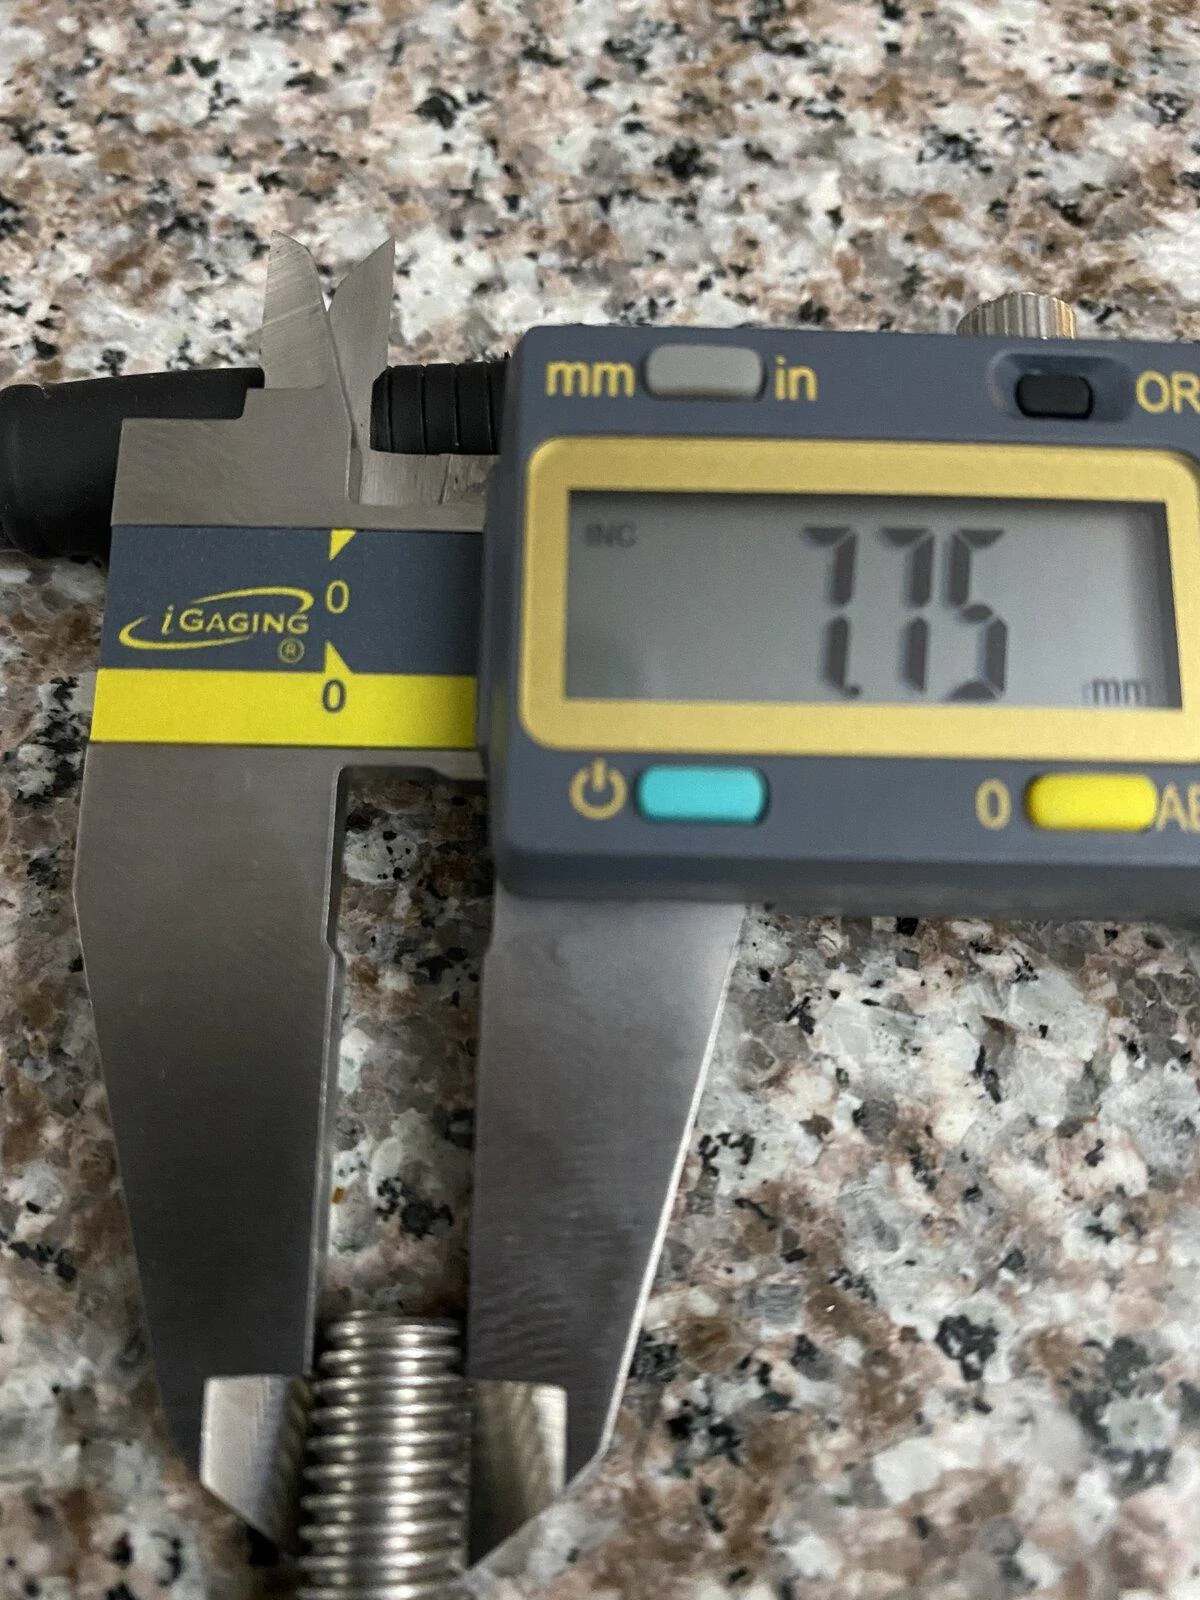
Which is really odd to me beacuse a 1/2" bolt barely fit and 1/2" ~~ 12.7mm or so which is a really common 12mm washer ID. I guess I should probably get some new square nuts cut so I can do them at the right size... I'd rather not have the risk of my rack sliding and wearing through the finish.
Sponsored


Hog1450

Active Member
First Name
Keith
Joined
Dec 25, 2019
Threads
0
Messages
36
Reaction score
23
Location
KHRT
Vehicle(s)
2020 JT Overland, Rubicon axles and suspension
I almost want to drill and add some more bolts for retention and security.
I have not driven it yet with everything installed. More to come.
 

Jaxmax

Well-Known Member
First Name
Jack
Joined
Jun 28, 2020
Threads
34
Messages
1,906
Reaction score
2,709
Location
Bally, Pa.
Vehicle(s)
Jeeps....... 2021 Mojave , 2019 Wrangler
Occupation
Electrical Manager
Nice looking caps boys, 1/2" bolts are huge, you need a 3/4" socket to tighten that, do you mean the wrench size is 1/2"?
I have an RSI, it seems all the cap companies take a bit of time to get it dialed in where they all fit easily. The latches are I think the the same on the RSI, RLD and Alumcab, all come from the same neck of the "woods"
 

LostWoods

Well-Known Member
Joined
Mar 13, 2020
Threads
15
Messages
1,921
Reaction score
2,171
Location
Gilbert, AZ
Vehicle(s)
2024 4Runner / 1995 YJ
Nice looking caps boys, 1/2" bolts are huge, you need a 3/4" socket to tighten that, do you mean the wrench size is 1/2"?
Very valid question actually... curious if you're right but then that's like an 8mm bolt which I think would be way too small... I feel nervous about mine with a 10mm.
 

Hog1450

Active Member
First Name
Keith
Joined
Dec 25, 2019
Threads
0
Messages
36
Reaction score
23
Location
KHRT
Vehicle(s)
2020 JT Overland, Rubicon axles and suspension
Good point. And you are correct. 1/2" socket used. Meow I need to measure the diameter of the bolt.
 

Sponsored

Jaxmax

Well-Known Member
First Name
Jack
Joined
Jun 28, 2020
Threads
34
Messages
1,906
Reaction score
2,709
Location
Bally, Pa.
Vehicle(s)
Jeeps....... 2021 Mojave , 2019 Wrangler
Occupation
Electrical Manager
I think it will be 1/4", the square nuts that fit in the RSI channel are M8, which is a little bigger then 1/4", I had to drill my Yakima rail mounts out to fit the socket head bolts in, just get them tight and use lock washers or locknuts. You get your Beer Koozie yet, winner winner!
 

LostWoods

Well-Known Member
Joined
Mar 13, 2020
Threads
15
Messages
1,921
Reaction score
2,171
Location
Gilbert, AZ
Vehicle(s)
2024 4Runner / 1995 YJ
Wow that's a lot of wiggle room in that hole then. Feeling a lot better about my setup now.
 
First Name
Nathan
Joined
Mar 3, 2020
Threads
3
Messages
13
Reaction score
14
Location
Utah
Vehicle(s)
Jeep Gladiator
Some tips for those who plan on installing themselves

Jeep Gladiator RLD designs pic request Inked20210111_112256_LI


This thin metal bar is meant to fit between the bin and the canopy on the front side pictured below. There was no included hardware to install it, and no where on the included instructions is the bar ever mentioned. You can see I didn't figure out what that piece was for until after the canopy was installed, leaving a slight gap where the lip of the bin dips down. I don't plan on going back to install the bar now, the seal is tight enough for me right now.

Jeep Gladiator RLD designs pic request Inkedd315c91a-6166-4f5d-89ec-560b13ff2c01_LI


My canopy came with two sets of brackets. One set installed into the trail rail system on the sides, very easy.

Jeep Gladiator RLD designs pic request 2599fae9-ad75-4dfa-ab5d-784868e27e3e
Jeep Gladiator RLD designs pic request 919e44ba-feb2-4e84-87f1-38af3bc6c082


The second set however, installed into the bin itself towards the front, proving to be a pain in the ass for me.

Jeep Gladiator RLD designs pic request Inked921f39a2-9b3c-48d4-9b93-837c040da75b_LI


First, there are two holes you can insert the above bolt through, use the bottom hole. But first, you'll need to drill the threads out of the flanged nut on the backside (which you can do so from the front). You can see a backside view below. I used a flexible borescope to help see, came in handy later.

Jeep Gladiator RLD designs pic request Inked0193d5f0-034b-4614-b995-7e38313b2dc2_LI
Jeep Gladiator RLD designs pic request Inked17d9dbd2-f1db-4b97-9453-ef5b27ec3d308_LI


Now, the hardest part of this whole installation was threading the nut onto the bolt from the backside. Some of you might have easier methods of doing so, but I used a socket extension to reach the nut from the bottom of the truck, while a friend torqued from inside the bin.

Jeep Gladiator RLD designs pic request Inked355cb78c-167a-4633-bf96-3830abfffabe_LI


Be mindful, between the bin and canopy where you'll thread the nut onto the bolt, there is a gap towards the side of the bin that drops into the side of the vehicle. I broke the flanged nut off the bin which dropped with the installation nut and my socket into the paneling of the truck bed. HUGE pain in the ass to get out. Don't be me.

Jeep Gladiator RLD designs pic request Inkedd2b702c4-c344-469b-9727-be3c8ca32a7e_LI


This is where the borescope came in handy, two ours later I fished all the pieces out of the vehicle. And then I dropped the nut in the gap...again. FML. But at least I was practiced enough to fish it out a lot quicker.

The pieces drop right behind this rubber trimming

Jeep Gladiator RLD designs pic request Inked84d980cd-be98-4aeb-a243-4c9dc2a5914c_LI


I broke a few bolts in the process as well, so I replaced with the closest standard size bolt at home depot with a matching locking nut (5/16).

Also be mindful, if using a socket wrench between the bin and cab, as you twist the bolt into place, it will push the socket wrench back and may jam it between the bolt and the cab, it was difficult for me to find the right size socket that was deep enough for the bolt but not so deep it would jam.

In the future I could add two more brackets for more security as I keep a 170lb tent on top at all times (I mounted an iKamper Skycamp 2.0 directly to the canopy, which I can share how if anyone's interested). Someone here on the forum put together these that I like.

Jeep Gladiator RLD designs pic request 052B4967-713A-40D0-BA03-29854F2CD02B


Hope this helps someone in the future.
 

NH-JT

Well-Known Member
First Name
Krister
Joined
Sep 6, 2019
Threads
7
Messages
50
Reaction score
157
Location
New Hampshire
Vehicle(s)
2020 JT
Someone owes me a koozie!

Jeep Gladiator RLD designs pic request 052B4967-713A-40D0-BA03-29854F2CD02B
Congrats! PM me your address and I'll send your prize. Mine is due to arrive at the house on Tuesday. That's a pretty close race considering the boats were somewhere in Asia when we made the bet. The red on red looks good!
 

Hog1450

Active Member
First Name
Keith
Joined
Dec 25, 2019
Threads
0
Messages
36
Reaction score
23
Location
KHRT
Vehicle(s)
2020 JT Overland, Rubicon axles and suspension
For mine... the two front brackets I cleaned all the bed liner out of the factory flange nuts and the hardware that came with the brackets simply threaded in.
 

Sponsored

Hog1450

Active Member
First Name
Keith
Joined
Dec 25, 2019
Threads
0
Messages
36
Reaction score
23
Location
KHRT
Vehicle(s)
2020 JT Overland, Rubicon axles and suspension
Diameter of hardware for the rack.

FF006D81-35D4-496D-A93E-A6ADE998C8A5.jpeg


AB5BD4BB-AAFD-4964-B2F8-7A86F3EB4947.jpeg
 

Vladiator

Active Member
Joined
Nov 17, 2020
Threads
7
Messages
36
Reaction score
34
Location
Bay Area
Vehicle(s)
Vladiator
Some tips for those who plan on installing themselves

Jeep Gladiator RLD designs pic request AB5BD4BB-AAFD-4964-B2F8-7A86F3EB4947


This thin metal bar is meant to fit between the bin and the canopy on the front side pictured below. There was no included hardware to install it, and no where on the included instructions is the bar ever mentioned. You can see I didn't figure out what that piece was for until after the canopy was installed, leaving a slight gap where the lip of the bin dips down. I don't plan on going back to install the bar now, the seal is tight enough for me right now.

Jeep Gladiator RLD designs pic request AB5BD4BB-AAFD-4964-B2F8-7A86F3EB4947


My canopy came with two sets of brackets. One set installed into the trail rail system on the sides, very easy.

Jeep Gladiator RLD designs pic request AB5BD4BB-AAFD-4964-B2F8-7A86F3EB4947


The second set however, installed into the bin itself towards the front, proving to be a pain in the ass for me.

Jeep Gladiator RLD designs pic request AB5BD4BB-AAFD-4964-B2F8-7A86F3EB4947


First, there are two holes you can insert the above bolt through, use the bottom hole. But first, you'll need to drill the threads out of the flanged nut on the backside (which you can do so from the front). You can see a backside view below. I used a flexible borescope to help see, came in handy later.

Jeep Gladiator RLD designs pic request AB5BD4BB-AAFD-4964-B2F8-7A86F3EB4947


Now, the hardest part of this whole installation was threading the nut onto the bolt from the backside. Some of you might have easier methods of doing so, but I used a socket extension to reach the nut from the bottom of the truck, while a friend torqued from inside the bin.

Jeep Gladiator RLD designs pic request AB5BD4BB-AAFD-4964-B2F8-7A86F3EB4947


Be mindful, between the bin and canopy where you'll thread the nut onto the bolt, there is a gap towards the side of the bin that drops into the side of the vehicle. I broke the flanged nut off the bin which dropped with the installation nut and my socket into the paneling of the truck bed. HUGE pain in the ass to get out. Don't be me.

Jeep Gladiator RLD designs pic request AB5BD4BB-AAFD-4964-B2F8-7A86F3EB4947


This is where the borescope came in handy, two ours later I fished all the pieces out of the vehicle. And then I dropped the nut in the gap...again. FML. But at least I was practiced enough to fish it out a lot quicker.

The pieces drop right behind this rubber trimming

Jeep Gladiator RLD designs pic request AB5BD4BB-AAFD-4964-B2F8-7A86F3EB4947


I broke a few bolts in the process as well, so I replaced with the closest standard size bolt at home depot with a matching locking nut (5/16).

Also be mindful, if using a socket wrench between the bin and cab, as you twist the bolt into place, it will push the socket wrench back and may jam it between the bolt and the cab, it was difficult for me to find the right size socket that was deep enough for the bolt but not so deep it would jam.

In the future I could add two more brackets for more security as I keep a 170lb tent on top at all times (I mounted an iKamper Skycamp 2.0 directly to the canopy, which I can share how if anyone's interested). Someone here on the forum put together these that I like.

Jeep Gladiator RLD designs pic request AB5BD4BB-AAFD-4964-B2F8-7A86F3EB4947


Hope this helps someone in the future.
This is very helpful. Can you also speak to mounting the ikamper to the canopy directly. I’m considering the same setup vs adding a canopy roof rack. Much appreciated.
 

salvino

Well-Known Member
First Name
Sam
Joined
Jun 5, 2019
Threads
11
Messages
320
Reaction score
359
Location
San Juan Island, WA
Vehicle(s)
2022 GC Trailhawk/ 2020 Gladiator Rubicon LE
Occupation
Finance Guy
Vehicle Showcase
1
I bought on of these racks and decided not to use it. Anyone want it?
 

Blade1668

Well-Known Member
First Name
Darrell
Joined
Jan 7, 2020
Threads
11
Messages
2,344
Reaction score
2,119
Location
N. AL.
Vehicle(s)
90XJ, 91XJ, 91MJ, 05 LJ, 20 JT
Build Thread
Link
Vehicle Showcase
1
I bought on of these racks and decided not to use it. Anyone want it?
I might be interested depending on my delivery. I should have it by end of week.


Top