OP
OP
tampahoosier
Well-Known Member
- Thread starter
- #46
** Edited the guide 3/10.
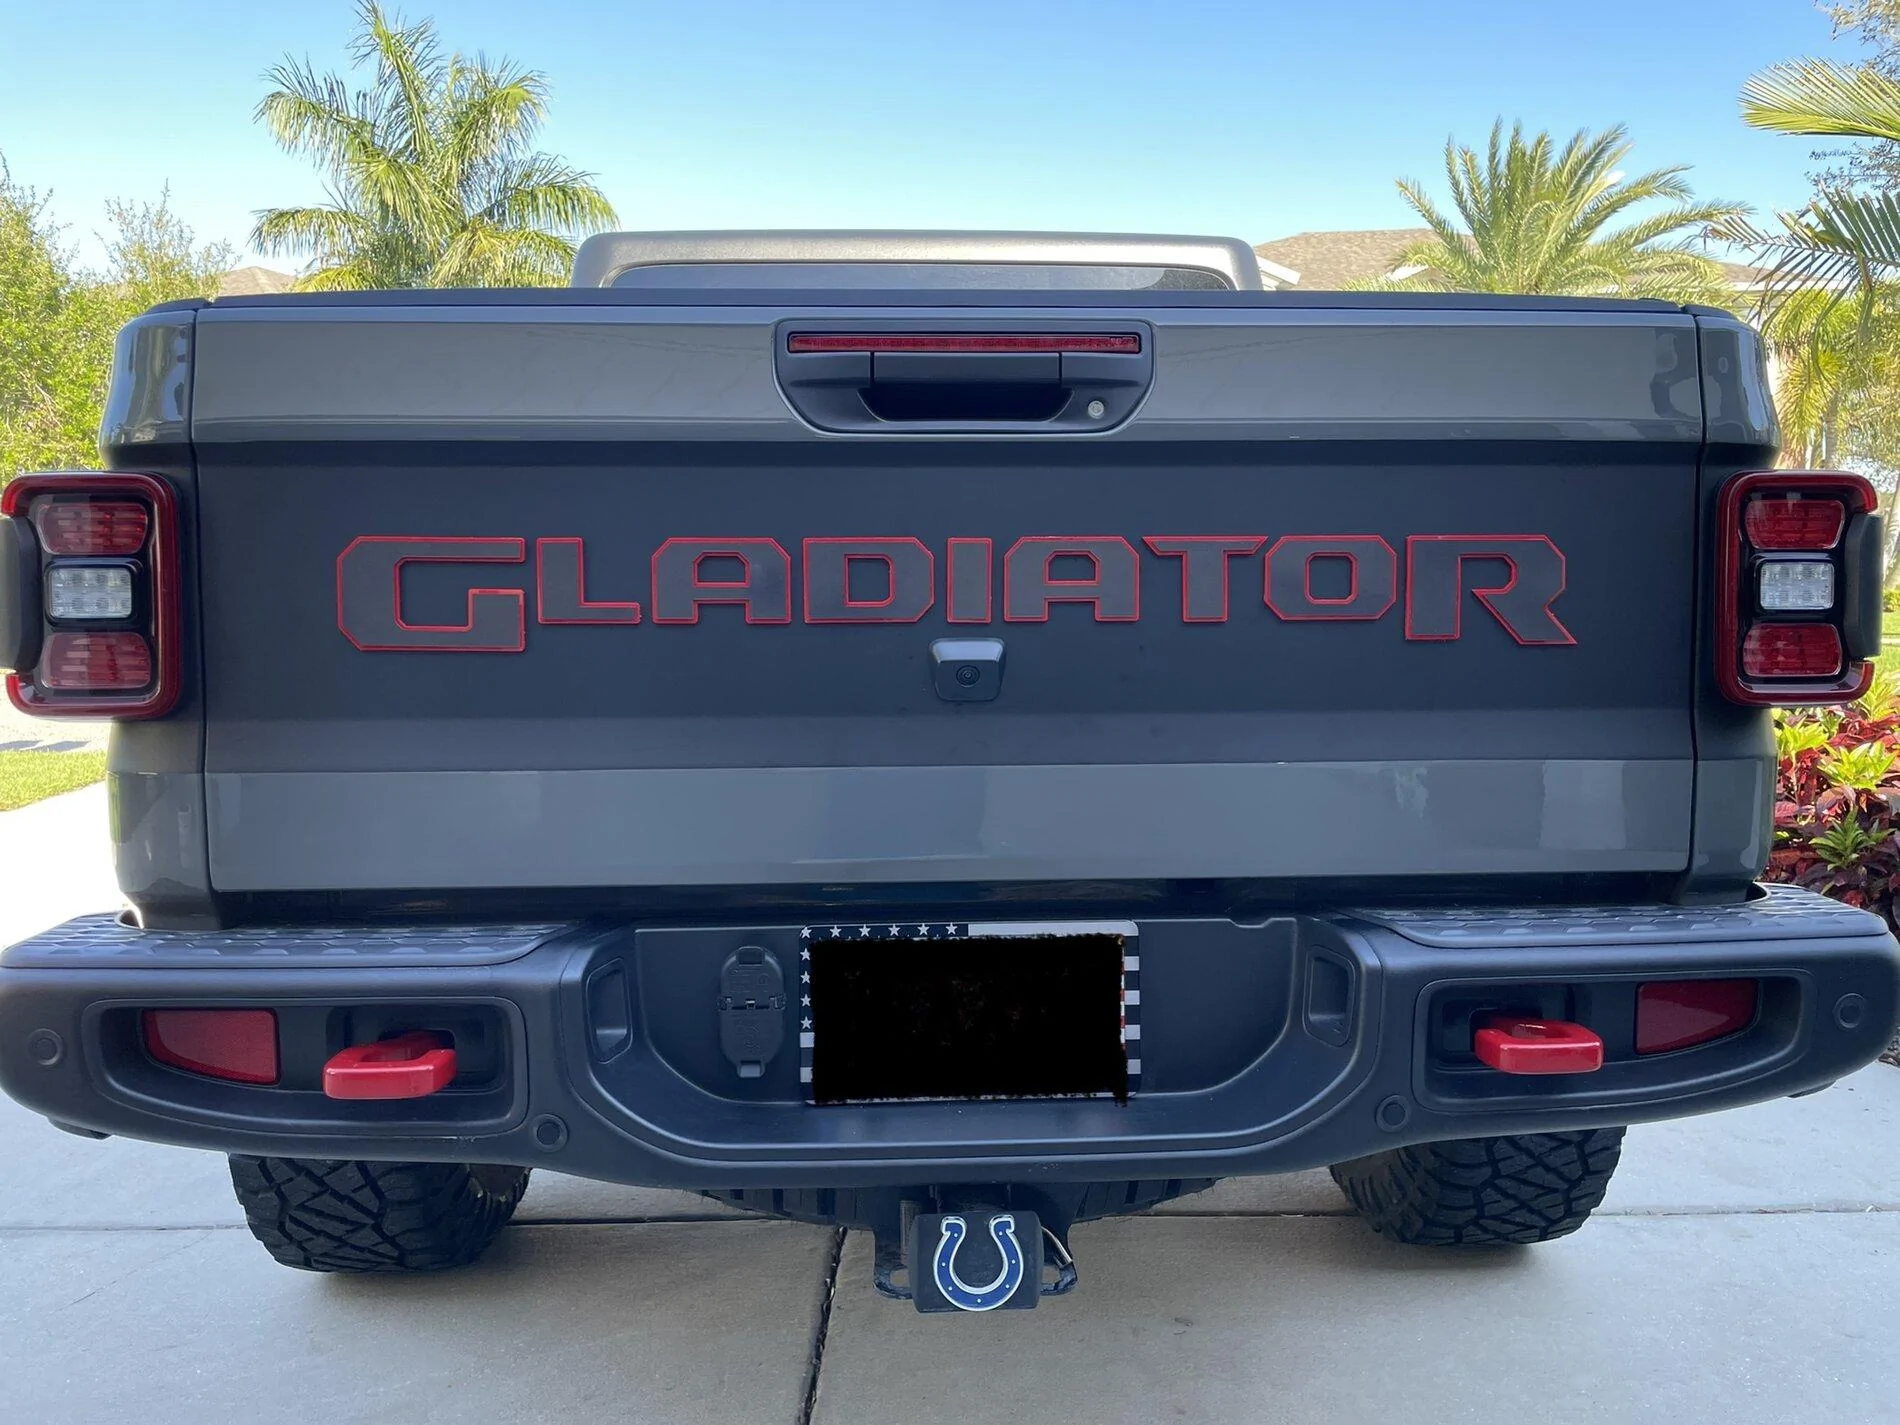
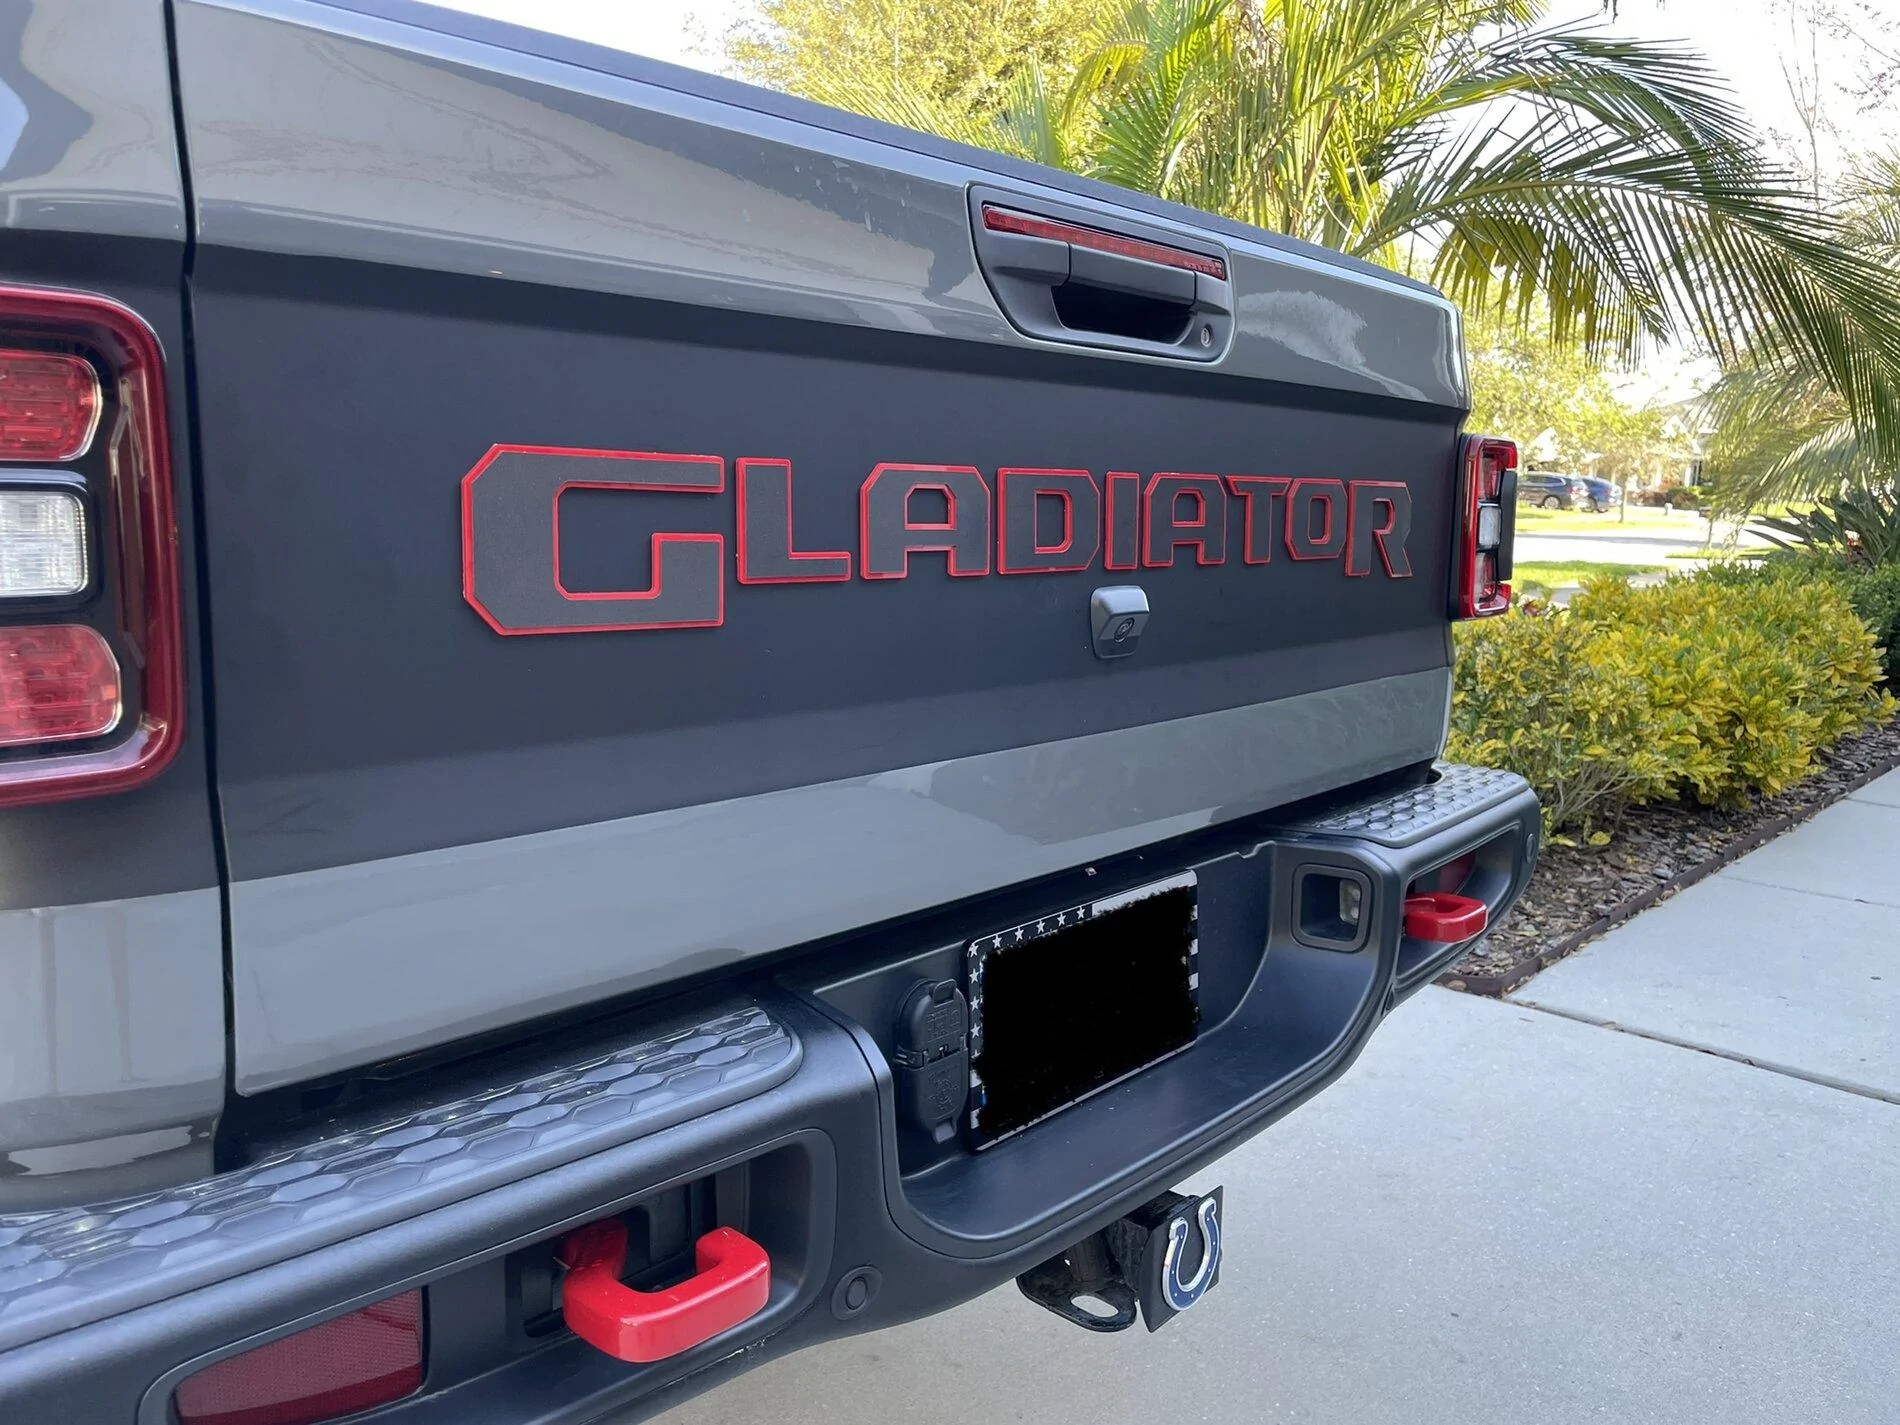
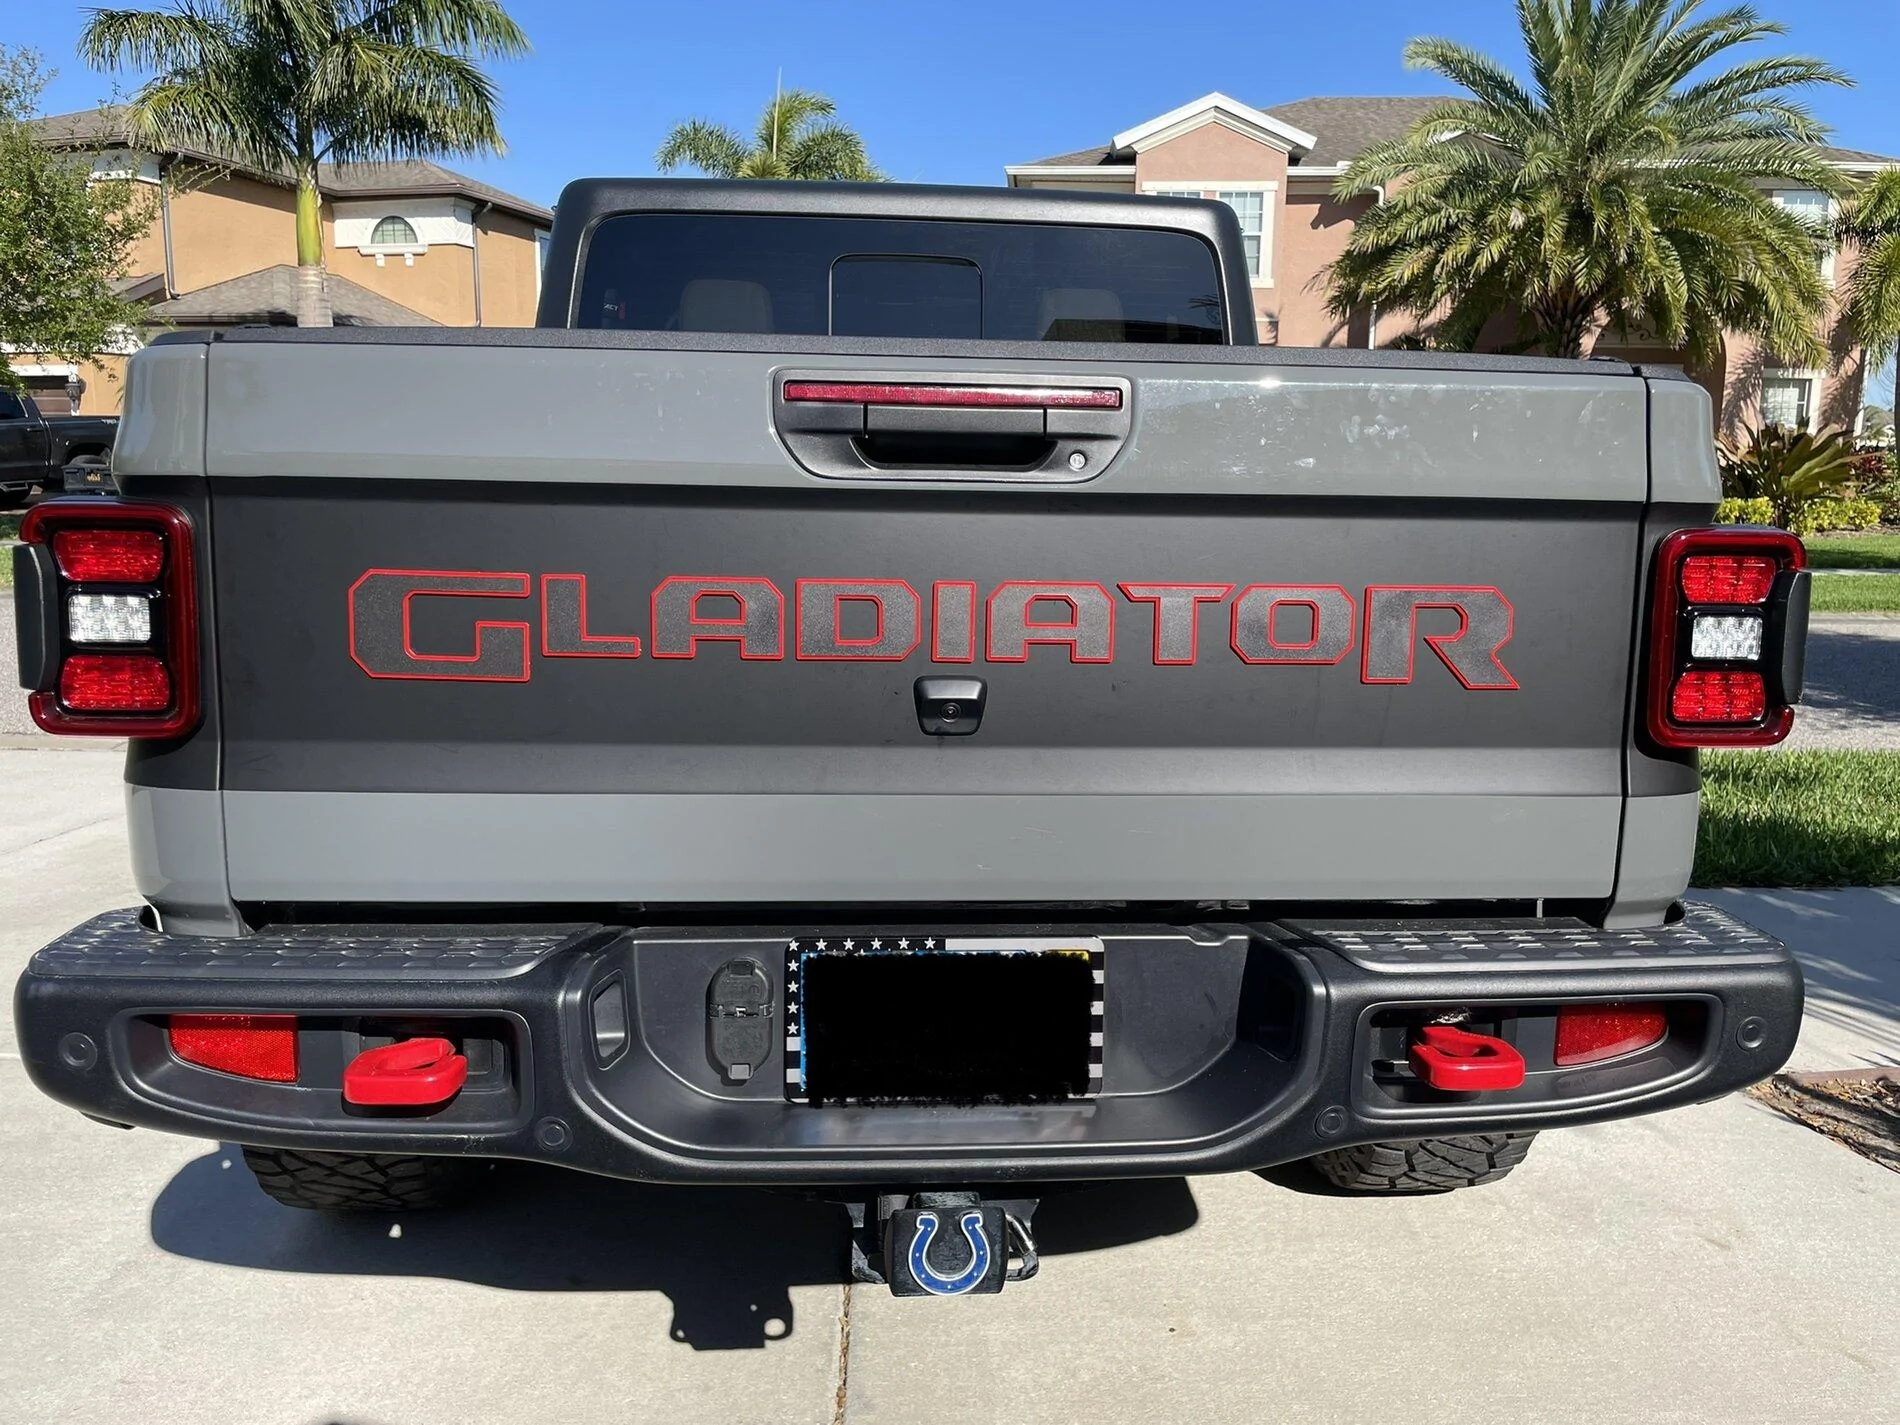
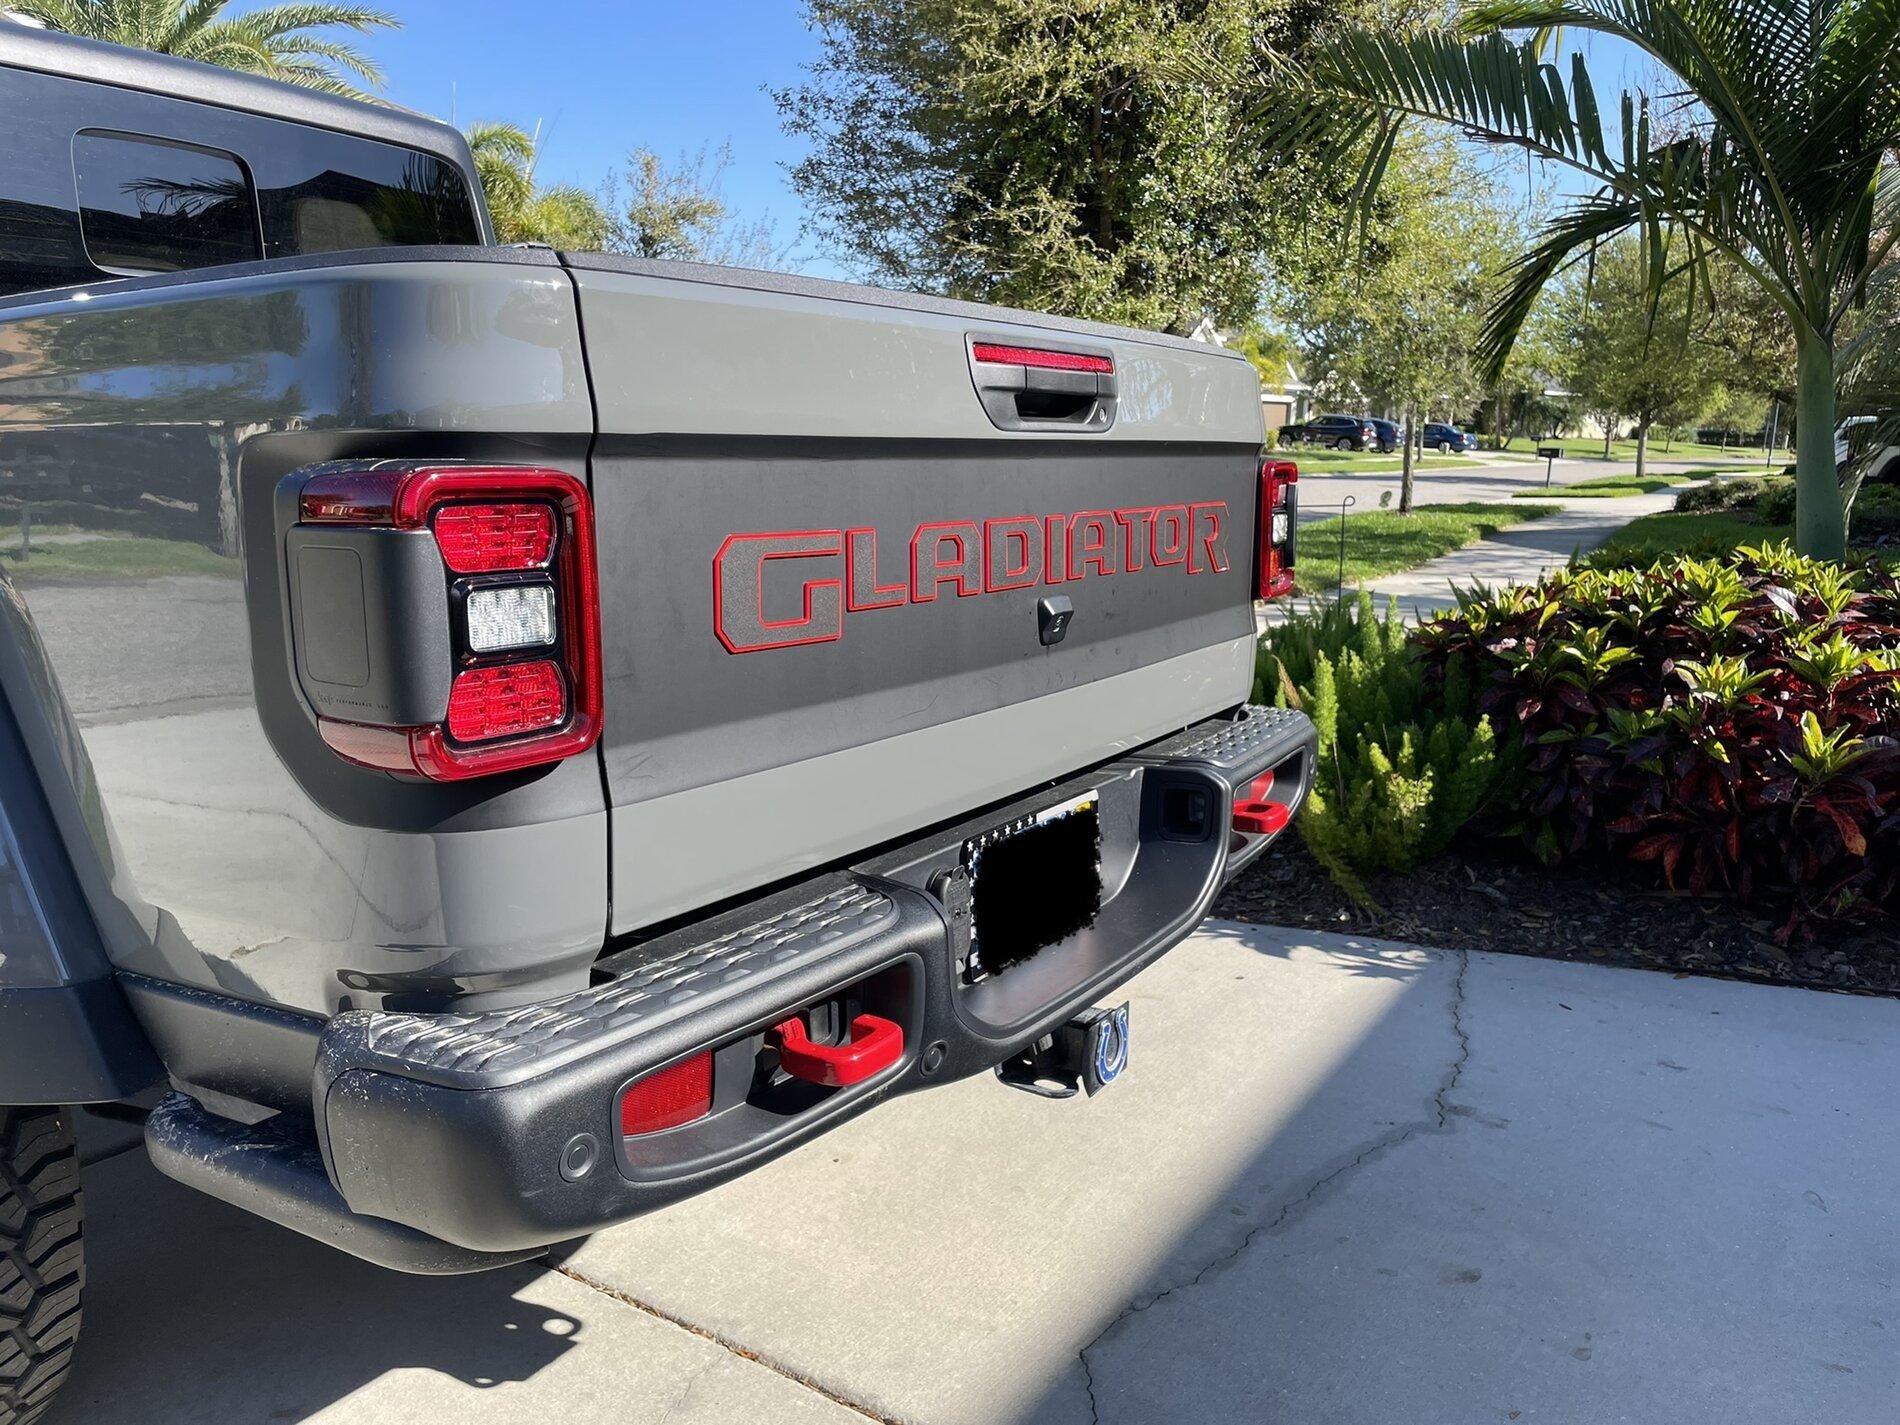
For those wondering about a template/stencil, I figured I would share my experience and process the best I can. It was a little trial and error (a v1 and v2 and v3) but ultimately I ended up with a great stencil that worked well for me. This should save you a lot of hours (I spent almost 12hrs trying to perfect) and a bit of sanity. It's detailed but that's because I wanted to dumb it down and remove any ambiguity. If something doesn't make sense feel free to ask and I'll update as necessary. For what it's worth, there are several corners you could cut on this to shorten the time, but I wanted to be 100% sure everything was lined up and tried hard to remove any pain points that could introduce error.
Two options now: Option one, download the PDF template and take it to a shop that can print it out
Option 1:
Download the 44inch badge.pdf template and take it to a printing place that can print the PDF out as one banner. Put that on a piece of cardboard and trace it out, then cut out each letter. You should have a piece of cardboard with all the letters cut out so that you can stick the badge letters into them. All you'll need to do is make sure the top of the cardboard stencil has a perfectly level top matching the letters. That way you can put the cardboard up on the tailgate and level it out. Then, just start sticking the letters in!
https://www.jeepgladiatorforum.com/...139727/?hash=53db9afb24b2799f724df3c8476879ca
Option 2:
Supplies needed:
1) Painters tape
2) X-acto knife with a new blade
3) GOOD, STIFF, RIGID, STURDY cardboard that you can cut out a 53" x 12" section. You want the section cut from one whole side section, not something like a side and flap that add up to 53". Skip that side/flap combo because the has a crease and the crease isn't rigid.
4) Tape measure
5) Pen or pencil
6) A level - 4FT level is ideal but smaller will do. You will need to draw a 48" STRAIGHT line that has been leveled out.
Steps:
1) Start with cutting a section of cardboard 53" L x 11" high. It is important to get the lines and cuts straight here, so make sure the measurements are good and lines are straight. The indented area of the tail gate is 53" wide (edge to edge) by 8.75" tall. Later you will be trimming that 11" height down to 8.75". I found that having a piece of cardboard fit into this section really helped with lining everything up.
2) Take your piece of cardboard and place it on a wall, use a level to make sure it's level. On the left side of the cardboard make a mark .5" front the top. Move to the center of the cardboard (26.5") and make another mark .5" from top, then move to the right side of the cardboard and repeat. Now, use your 4ft level and place it over top of the three marks.
3) Use the level to draw a straight line through all three marks (the entire 53" width). Confirm with the level the line you just drew is LEVEL. Take down the cardboard and use the Xacto knife to cut along the line and trim off the .5" section. Congrats, you now have a flat/straight top for reference.
4) Now to trim off the remainder of the bottom to leave you with the 8.75" width. Put the cardboard back on the wall. Before you tape it up use your level to confirm it is 100% level! This is important as you need the bottom to be as level as the top. You will again make three markings left, center and right) but this time use the tape measure from the top and measure down 8.75". You should now have 3 marks at the bottom of the cardboard, all measuring 8.75" from the top.
5) Follow the same procedure as in step 3. If the line is level... ya screwed up. Stop drinking, put your glasses on and repeat back at step 1! If the line is level take the cardboard down and cut along the line. You'll be left with a 53" L x 8.75" H piece of cardboard.
6) For this step you can leave the cardboard off the wall (I chose to leave it up to make sure the line was level). The line you draw next is the top reference point for the letters. That is, the top of each letter will sit on this line. Using your tape make make another mark on the left, center and right 2.55" down from the top. Use the level to draw a straight line across the 53" length.
***NOTE: You can play with this 2.55" depth later on once the stencil is cut. This 2.55" SHOULD be just enough to cover both holes on the tailgate, If it doesn't there will be an opportunity I will call out in a later step to very easily bring the entire badge down closer to the camera, and to cover the holes.
7) Next is to mark the left and right outer edges of the badge. The length of the badge with .5" spacing measures a perfect 44" (that wasn't an accident). Make a mark 4.5" in from the left and right sides along the line you just drew in step 6. Go to the bottom of the cardboard and again make marks 4.5" in on the left and right. Use your level and draw a vertical line between the top and bottom points on the left and right sides. This now gives you the left and right borders.
At this point you have created a giant 53" L x 8.75" H square that should fit nicely within the indented section of the tailgate. You have marked the top line that all the letters will bump up against and marked the left/right outer boarders that the badge should sit within. Now the fun begins.
8) Put the G down on the cardboard. Butt the left side of the G to the left boarder line from step 7, and also butt the top of the G to the line drawn in step 6. Now tape it in place.
9) Put the .5" back space piece flush along the right side of the G, then place the L letter up flush against the spacing, and also line it up flush to the top line. Tape the L down once you have it snug in place (I went tape crazy here FYI). You should now have the G and L taped to the board with the tops of both letters lined up with the top line and .5" spacing between them. Repeat this process over and over until you finish.
***NOTE: After you add each letter I took the level and made sure that the tops were flush with the level. Just extra pre-cautions.
You SHOULD have the entire badge taped in place at this point with .5" spacing between each letter and the word should fit perfectly between your left and right vertical lines giving you an overall 44" length badge. If you don't, I probably F*^*&Ked up the instructions, so feel from to reach out and ask Whiskey Tango Foxtrot. I'll figure it out, apologize, and send you on your merry way with the right info!
10) Use a pen to trace around the BOTTOM HALF of each letter. You do not need to trace the top half.
***NOTE: You are not worrying about tracing the insides of any letters (i.e. inside of the O or the A). The object of this trace is just to get the outside area of each letter.
11) Using your X-acto knife, with the letters still taped on, run the knife over the lines you just drew. You will start slicing through tape and that is fine. Just make sure to put more tape back down after you cut threw it. You need to make sure all the letters stay on the cardboard.
***NOTE: Don't bother trying to run the knife all the way through the cardboard. You will need to make several passes with the knife to get through the cardboard so you're aim here is to get the first cut into the cardboard with the letters up. After you've gone through all the letters, you will take down the letters and do deeper cuts.
12) After you have ran the knife through the lines with the letters up you can now remove the letters and finish the cuts.
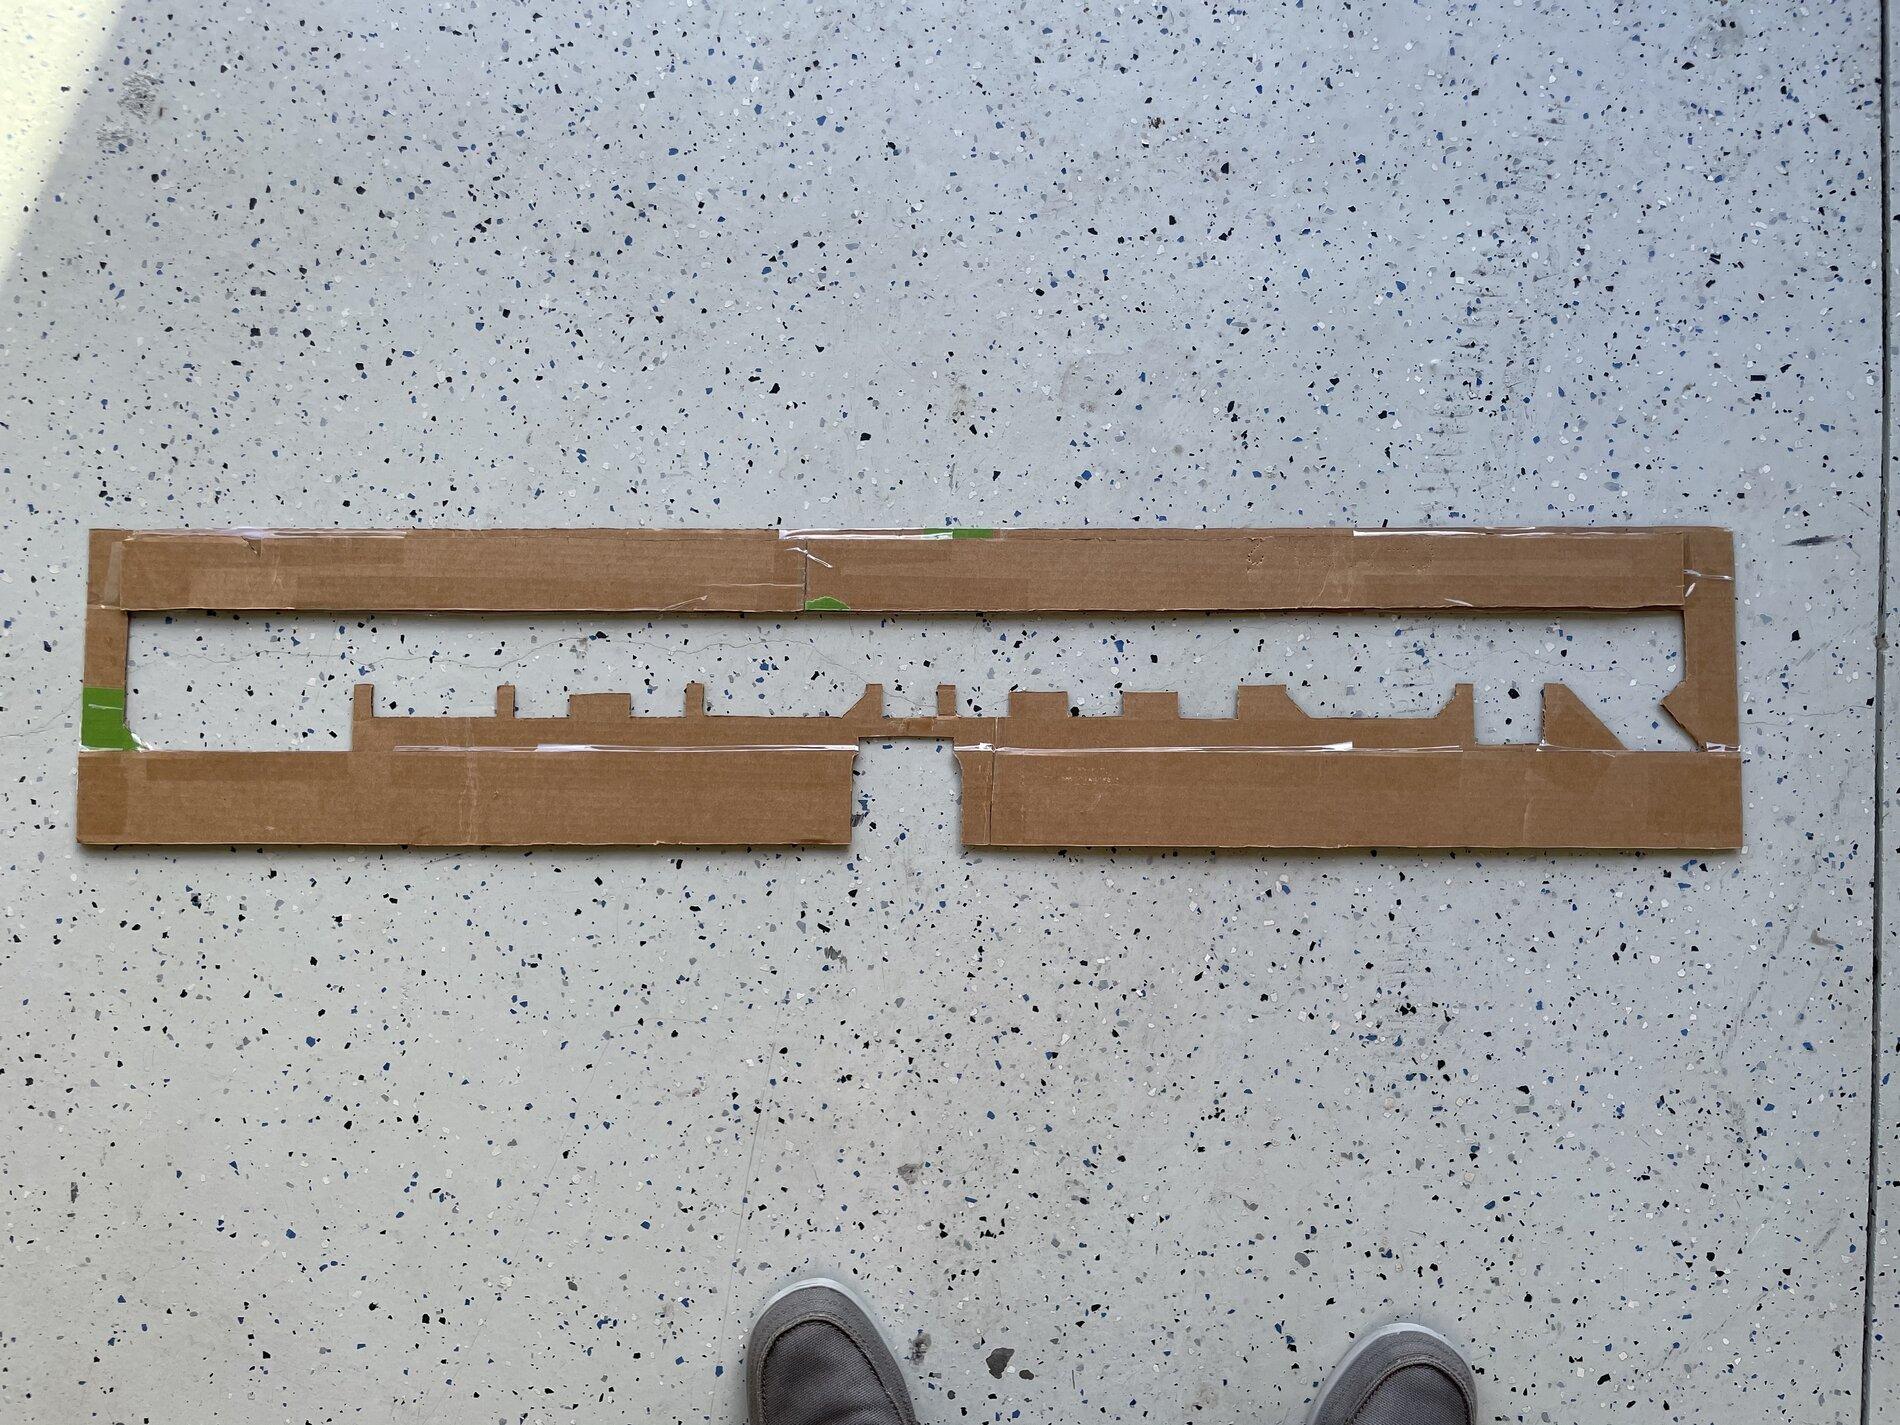
13) With the letter cuts down, you will now cut out the entire middle portion of the stencil. You will make two cuts. Purple Lines: Run the knife down the left and right vertical outer boarder lines. Start from the top line the letters butt up against and run the knife down the sides of the G and R. Blue Line: Next you will run a horizontal cut that intersects through the bottom of the As and O. After making these cuts you should be able to remove the entire center section.
Purple and Blue lines to cut:

Your finished stencil:

14) The final step involves making a cutout for the camera. That way your stencil will fit flush on the tailgate. Measure in from the top 26.5", this is your center point. Then measure down 6 1/8". This is the top of the camera. Cut a horizontal line about 2" wide (1" to left and right of the 26.5" middle mark). Then just cut down a few inches (3" is enough) on the left and right. Finish it off by cutting a bottom line and remove the square section. The length you cut down left and right is not important, nor do they need to be perfectly straight.
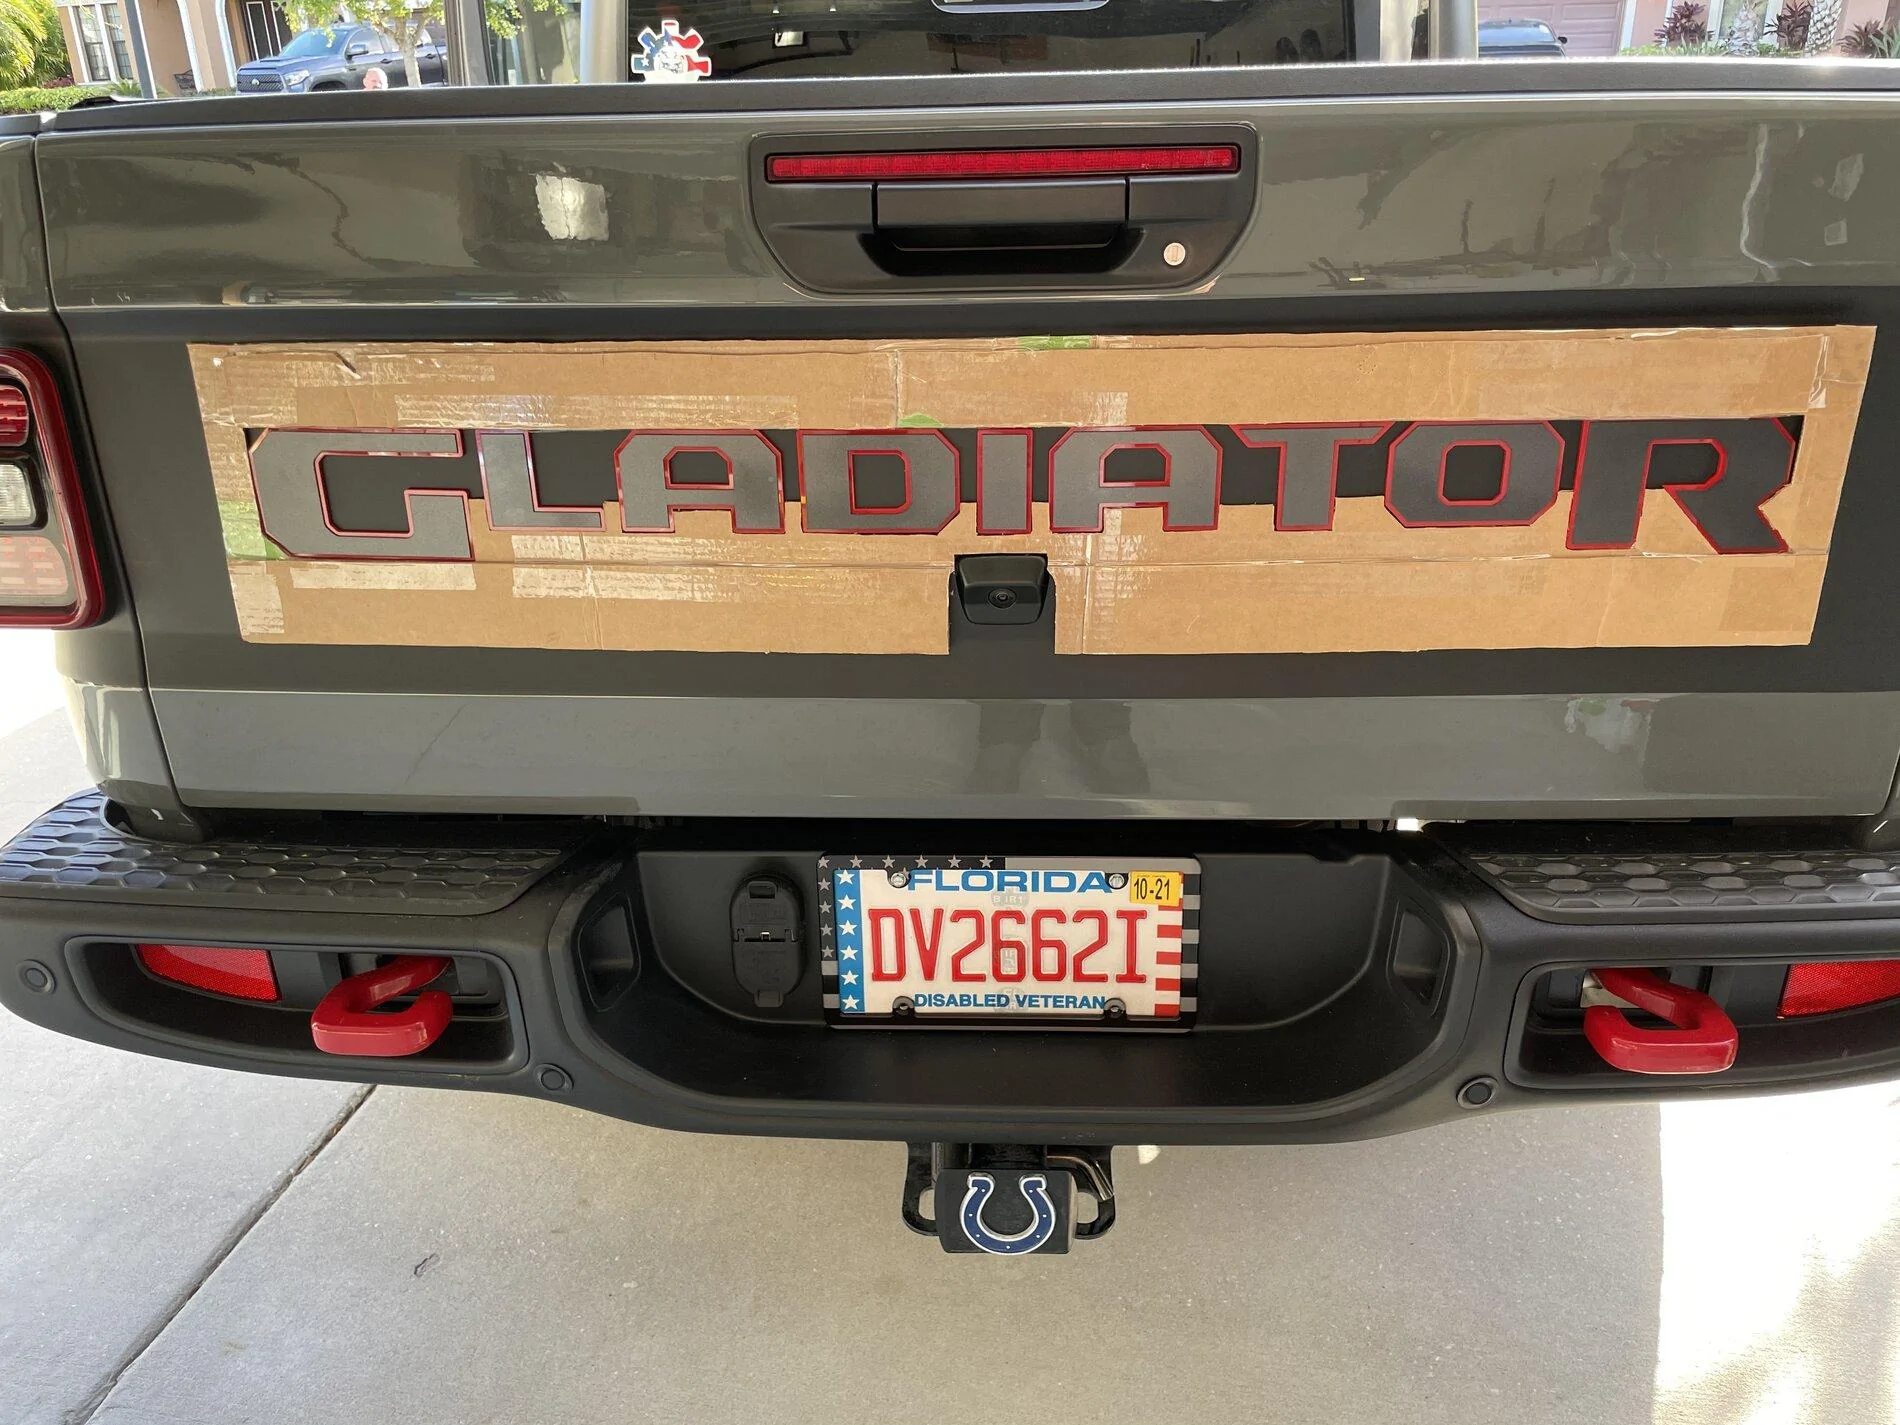
15) You should now have a functional stencil. Place it on the tailgate, tape it up with plenty of tape then put the letters up (LEAVE THE BACKING ON) and see how they look. If the letters are sitting too high and not fully covering the holes in the tailgate go back to step 14 and trim out a little more from the top of the camera square cutout. The aim is to trim tiny bits out so that you bring the entire stencil lower on the tailgate, which will bring the badge down enough to fully cover the holes.
16) At this point I would advise you take some measurements to make sure everything is squared. With the stencil taped up and the letters still up, make sure the tops of the letters are all level and the distance from each letter and the top ridge of the indent is the same. Also check that the distance from the left and right sides is equal. If you make any adjustments make sure you double check that the letters are still level and still covering the tailgate holes.
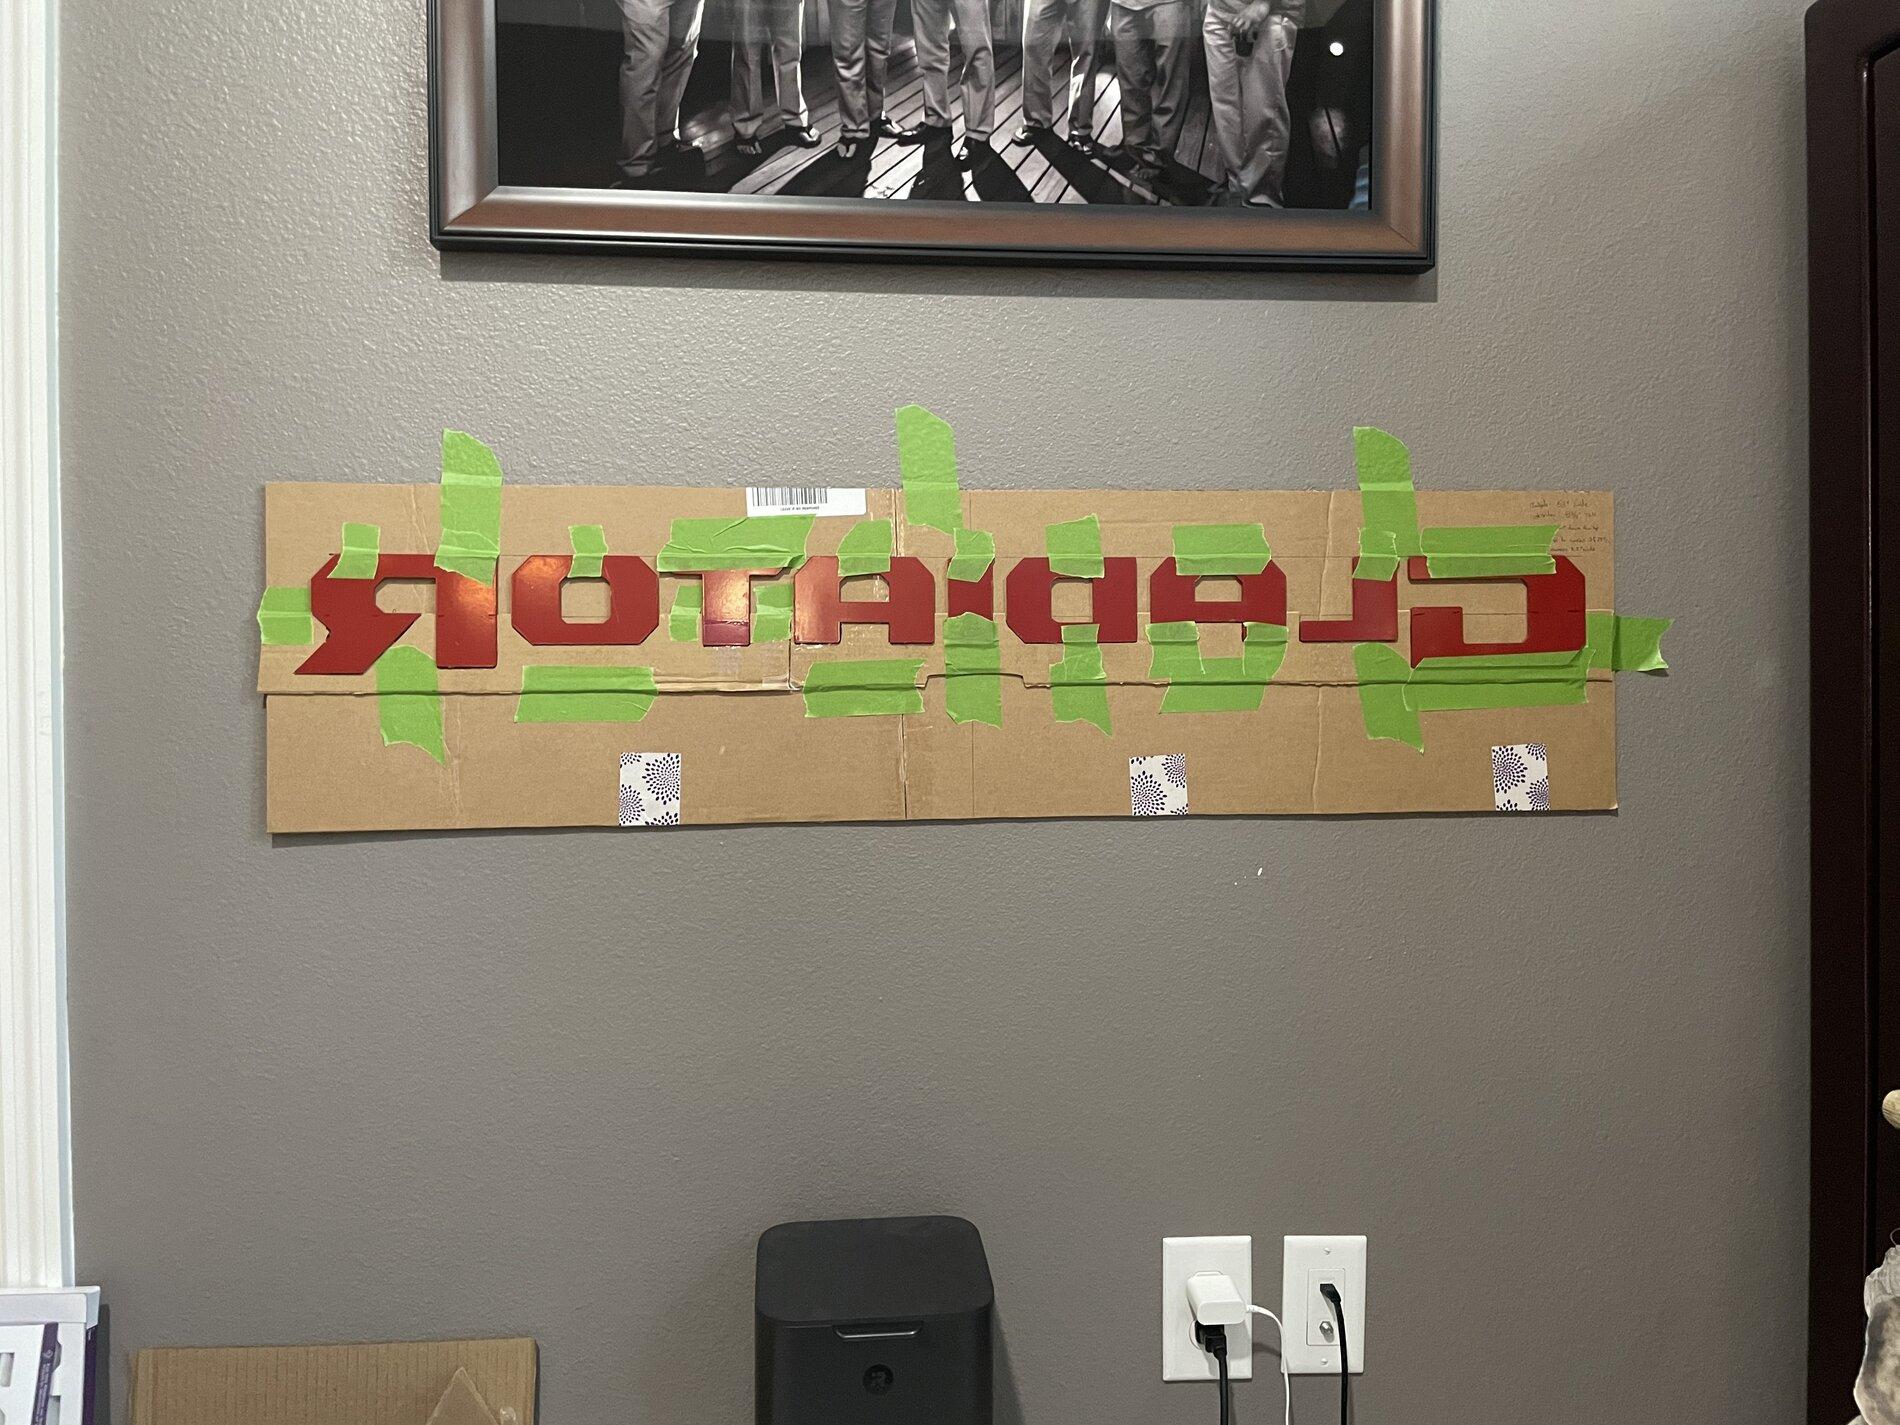
17) You're now cleared to start removing the backing from each letter and sticking them in. My preference is to leave all the letters sitting in the stencil and only take out the one you are peeling the backing off of. It will be easier to make sure you are sticking it up perfect if you have a letter to the left and right to reference.
Good Luck!
***Disclaimer*** My pics of stencil and mounting below will look different than yours. I cut my cardboard to 46” wide as opposed to 53” wide. 46” will work and leaves you with a 1” spacing on each side. Looking back the 53” full width of cardboard would have been easier since you can line it up left/right and top/bottom. I also put my letters on backwards/facedown because I was worried about cutting them up. I discover the tracing and knife cutting wasn’t as precise this way, hence my recommendation to lay the lettering down normal (face up left to right).

For those wondering about a template/stencil, I figured I would share my experience and process the best I can. It was a little trial and error (a v1 and v2 and v3) but ultimately I ended up with a great stencil that worked well for me. This should save you a lot of hours (I spent almost 12hrs trying to perfect) and a bit of sanity. It's detailed but that's because I wanted to dumb it down and remove any ambiguity. If something doesn't make sense feel free to ask and I'll update as necessary. For what it's worth, there are several corners you could cut on this to shorten the time, but I wanted to be 100% sure everything was lined up and tried hard to remove any pain points that could introduce error.
Two options now: Option one, download the PDF template and take it to a shop that can print it out
Option 1:
Download the 44inch badge.pdf template and take it to a printing place that can print the PDF out as one banner. Put that on a piece of cardboard and trace it out, then cut out each letter. You should have a piece of cardboard with all the letters cut out so that you can stick the badge letters into them. All you'll need to do is make sure the top of the cardboard stencil has a perfectly level top matching the letters. That way you can put the cardboard up on the tailgate and level it out. Then, just start sticking the letters in!
https://www.jeepgladiatorforum.com/...139727/?hash=53db9afb24b2799f724df3c8476879ca
Option 2:
Supplies needed:
1) Painters tape
2) X-acto knife with a new blade
3) GOOD, STIFF, RIGID, STURDY cardboard that you can cut out a 53" x 12" section. You want the section cut from one whole side section, not something like a side and flap that add up to 53". Skip that side/flap combo because the has a crease and the crease isn't rigid.
4) Tape measure
5) Pen or pencil
6) A level - 4FT level is ideal but smaller will do. You will need to draw a 48" STRAIGHT line that has been leveled out.
Steps:
1) Start with cutting a section of cardboard 53" L x 11" high. It is important to get the lines and cuts straight here, so make sure the measurements are good and lines are straight. The indented area of the tail gate is 53" wide (edge to edge) by 8.75" tall. Later you will be trimming that 11" height down to 8.75". I found that having a piece of cardboard fit into this section really helped with lining everything up.
2) Take your piece of cardboard and place it on a wall, use a level to make sure it's level. On the left side of the cardboard make a mark .5" front the top. Move to the center of the cardboard (26.5") and make another mark .5" from top, then move to the right side of the cardboard and repeat. Now, use your 4ft level and place it over top of the three marks.
3) Use the level to draw a straight line through all three marks (the entire 53" width). Confirm with the level the line you just drew is LEVEL. Take down the cardboard and use the Xacto knife to cut along the line and trim off the .5" section. Congrats, you now have a flat/straight top for reference.
4) Now to trim off the remainder of the bottom to leave you with the 8.75" width. Put the cardboard back on the wall. Before you tape it up use your level to confirm it is 100% level! This is important as you need the bottom to be as level as the top. You will again make three markings left, center and right) but this time use the tape measure from the top and measure down 8.75". You should now have 3 marks at the bottom of the cardboard, all measuring 8.75" from the top.
5) Follow the same procedure as in step 3. If the line is level... ya screwed up. Stop drinking, put your glasses on and repeat back at step 1! If the line is level take the cardboard down and cut along the line. You'll be left with a 53" L x 8.75" H piece of cardboard.
6) For this step you can leave the cardboard off the wall (I chose to leave it up to make sure the line was level). The line you draw next is the top reference point for the letters. That is, the top of each letter will sit on this line. Using your tape make make another mark on the left, center and right 2.55" down from the top. Use the level to draw a straight line across the 53" length.
***NOTE: You can play with this 2.55" depth later on once the stencil is cut. This 2.55" SHOULD be just enough to cover both holes on the tailgate, If it doesn't there will be an opportunity I will call out in a later step to very easily bring the entire badge down closer to the camera, and to cover the holes.
7) Next is to mark the left and right outer edges of the badge. The length of the badge with .5" spacing measures a perfect 44" (that wasn't an accident). Make a mark 4.5" in from the left and right sides along the line you just drew in step 6. Go to the bottom of the cardboard and again make marks 4.5" in on the left and right. Use your level and draw a vertical line between the top and bottom points on the left and right sides. This now gives you the left and right borders.
At this point you have created a giant 53" L x 8.75" H square that should fit nicely within the indented section of the tailgate. You have marked the top line that all the letters will bump up against and marked the left/right outer boarders that the badge should sit within. Now the fun begins.
8) Put the G down on the cardboard. Butt the left side of the G to the left boarder line from step 7, and also butt the top of the G to the line drawn in step 6. Now tape it in place.
9) Put the .5" back space piece flush along the right side of the G, then place the L letter up flush against the spacing, and also line it up flush to the top line. Tape the L down once you have it snug in place (I went tape crazy here FYI). You should now have the G and L taped to the board with the tops of both letters lined up with the top line and .5" spacing between them. Repeat this process over and over until you finish.
***NOTE: After you add each letter I took the level and made sure that the tops were flush with the level. Just extra pre-cautions.
You SHOULD have the entire badge taped in place at this point with .5" spacing between each letter and the word should fit perfectly between your left and right vertical lines giving you an overall 44" length badge. If you don't, I probably F*^*&Ked up the instructions, so feel from to reach out and ask Whiskey Tango Foxtrot. I'll figure it out, apologize, and send you on your merry way with the right info!
10) Use a pen to trace around the BOTTOM HALF of each letter. You do not need to trace the top half.
***NOTE: You are not worrying about tracing the insides of any letters (i.e. inside of the O or the A). The object of this trace is just to get the outside area of each letter.
11) Using your X-acto knife, with the letters still taped on, run the knife over the lines you just drew. You will start slicing through tape and that is fine. Just make sure to put more tape back down after you cut threw it. You need to make sure all the letters stay on the cardboard.
***NOTE: Don't bother trying to run the knife all the way through the cardboard. You will need to make several passes with the knife to get through the cardboard so you're aim here is to get the first cut into the cardboard with the letters up. After you've gone through all the letters, you will take down the letters and do deeper cuts.
12) After you have ran the knife through the lines with the letters up you can now remove the letters and finish the cuts.
13) With the letter cuts down, you will now cut out the entire middle portion of the stencil. You will make two cuts. Purple Lines: Run the knife down the left and right vertical outer boarder lines. Start from the top line the letters butt up against and run the knife down the sides of the G and R. Blue Line: Next you will run a horizontal cut that intersects through the bottom of the As and O. After making these cuts you should be able to remove the entire center section.
Purple and Blue lines to cut:

Your finished stencil:
14) The final step involves making a cutout for the camera. That way your stencil will fit flush on the tailgate. Measure in from the top 26.5", this is your center point. Then measure down 6 1/8". This is the top of the camera. Cut a horizontal line about 2" wide (1" to left and right of the 26.5" middle mark). Then just cut down a few inches (3" is enough) on the left and right. Finish it off by cutting a bottom line and remove the square section. The length you cut down left and right is not important, nor do they need to be perfectly straight.
15) You should now have a functional stencil. Place it on the tailgate, tape it up with plenty of tape then put the letters up (LEAVE THE BACKING ON) and see how they look. If the letters are sitting too high and not fully covering the holes in the tailgate go back to step 14 and trim out a little more from the top of the camera square cutout. The aim is to trim tiny bits out so that you bring the entire stencil lower on the tailgate, which will bring the badge down enough to fully cover the holes.
16) At this point I would advise you take some measurements to make sure everything is squared. With the stencil taped up and the letters still up, make sure the tops of the letters are all level and the distance from each letter and the top ridge of the indent is the same. Also check that the distance from the left and right sides is equal. If you make any adjustments make sure you double check that the letters are still level and still covering the tailgate holes.
17) You're now cleared to start removing the backing from each letter and sticking them in. My preference is to leave all the letters sitting in the stencil and only take out the one you are peeling the backing off of. It will be easier to make sure you are sticking it up perfect if you have a letter to the left and right to reference.
Good Luck!
***Disclaimer*** My pics of stencil and mounting below will look different than yours. I cut my cardboard to 46” wide as opposed to 53” wide. 46” will work and leaves you with a 1” spacing on each side. Looking back the 53” full width of cardboard would have been easier since you can line it up left/right and top/bottom. I also put my letters on backwards/facedown because I was worried about cutting them up. I discover the tracing and knife cutting wasn’t as precise this way, hence my recommendation to lay the lettering down normal (face up left to right).
Sponsored
Attachments
-
8.7 KB Views: 978
Last edited:


")