Sponsored

A new hope ... (build journal and component reviews)

OP
OP
cug

cug

Well-Known Member
First Name
Guido
Joined
Apr 1, 2023
Threads
13
Messages
602
Reaction score
664
Location
Christchurch, New Zealand
Vehicle(s)
JTR EcoDiesel, Land Cruiser 79, BMW R1250GS
Build Thread
Link
Occupation
Just keeping busy
Tomorrow we should get this done
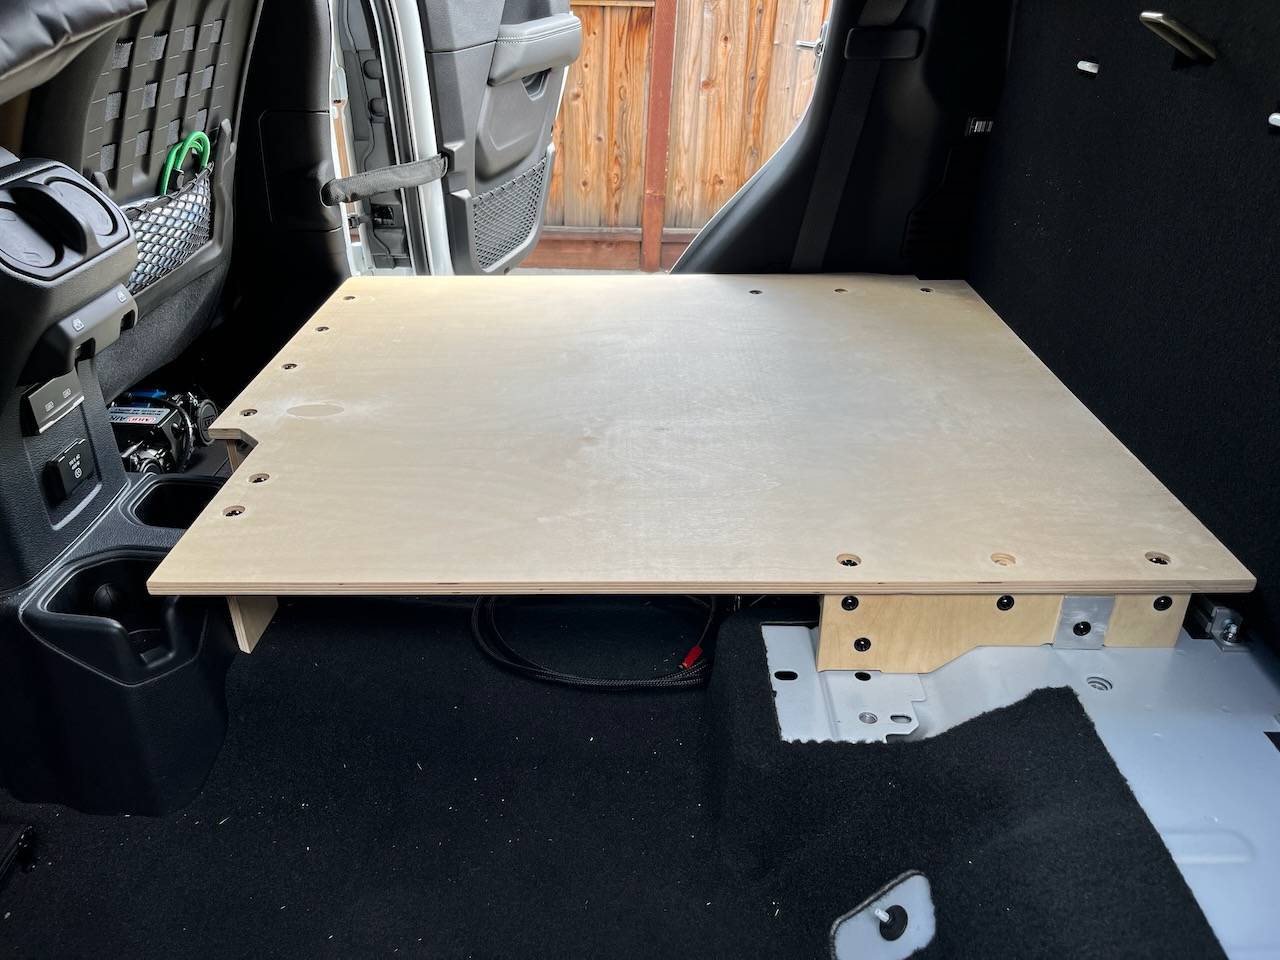
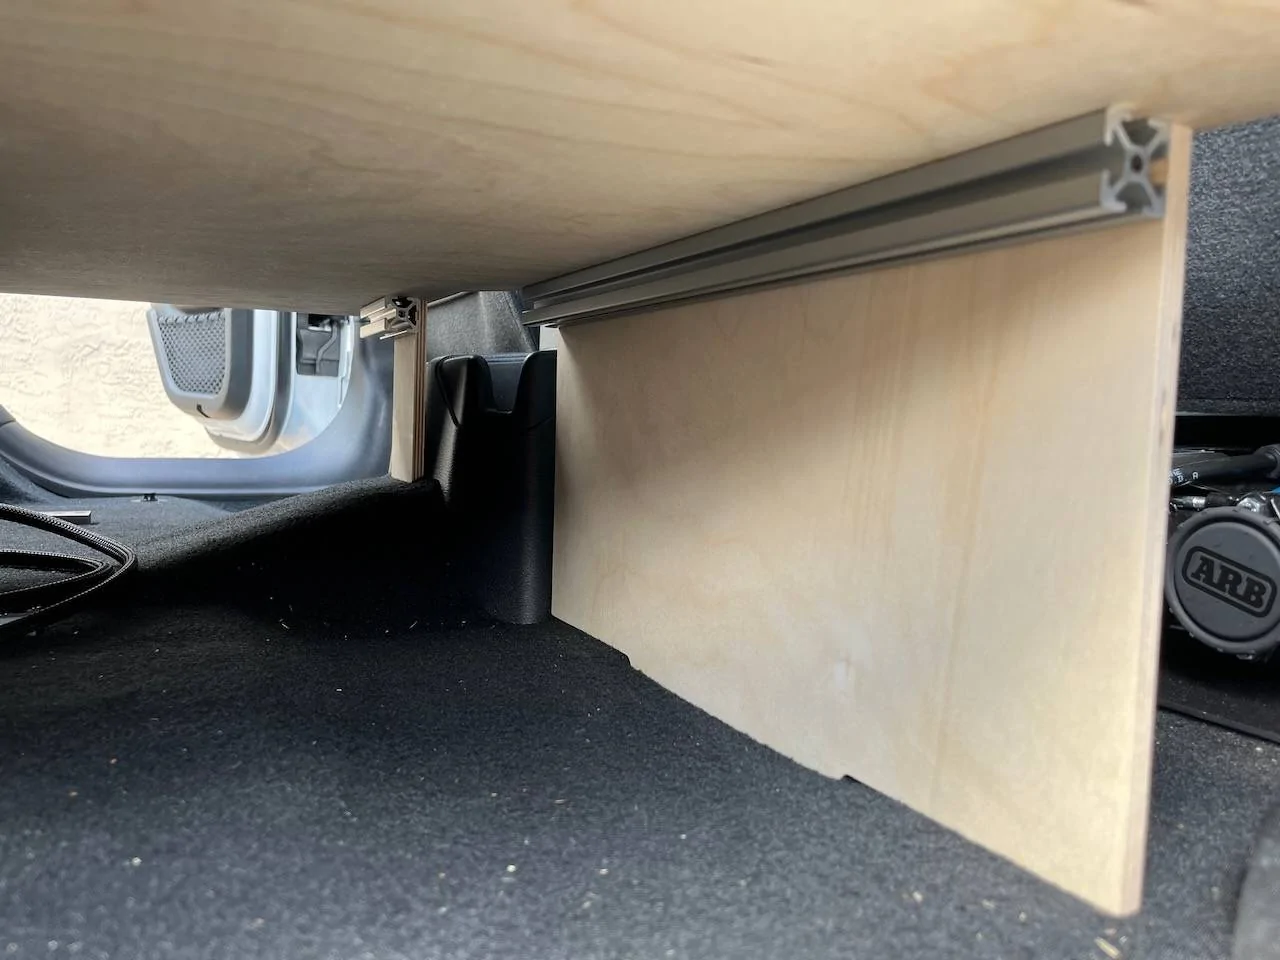
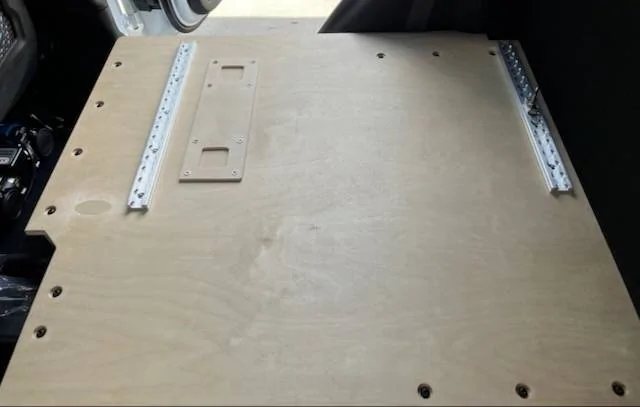
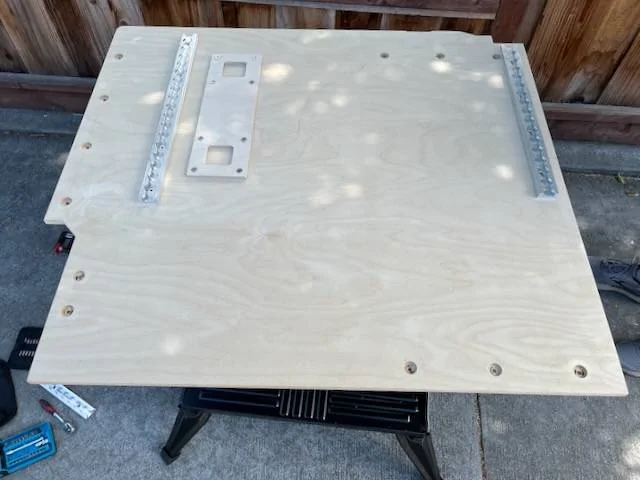
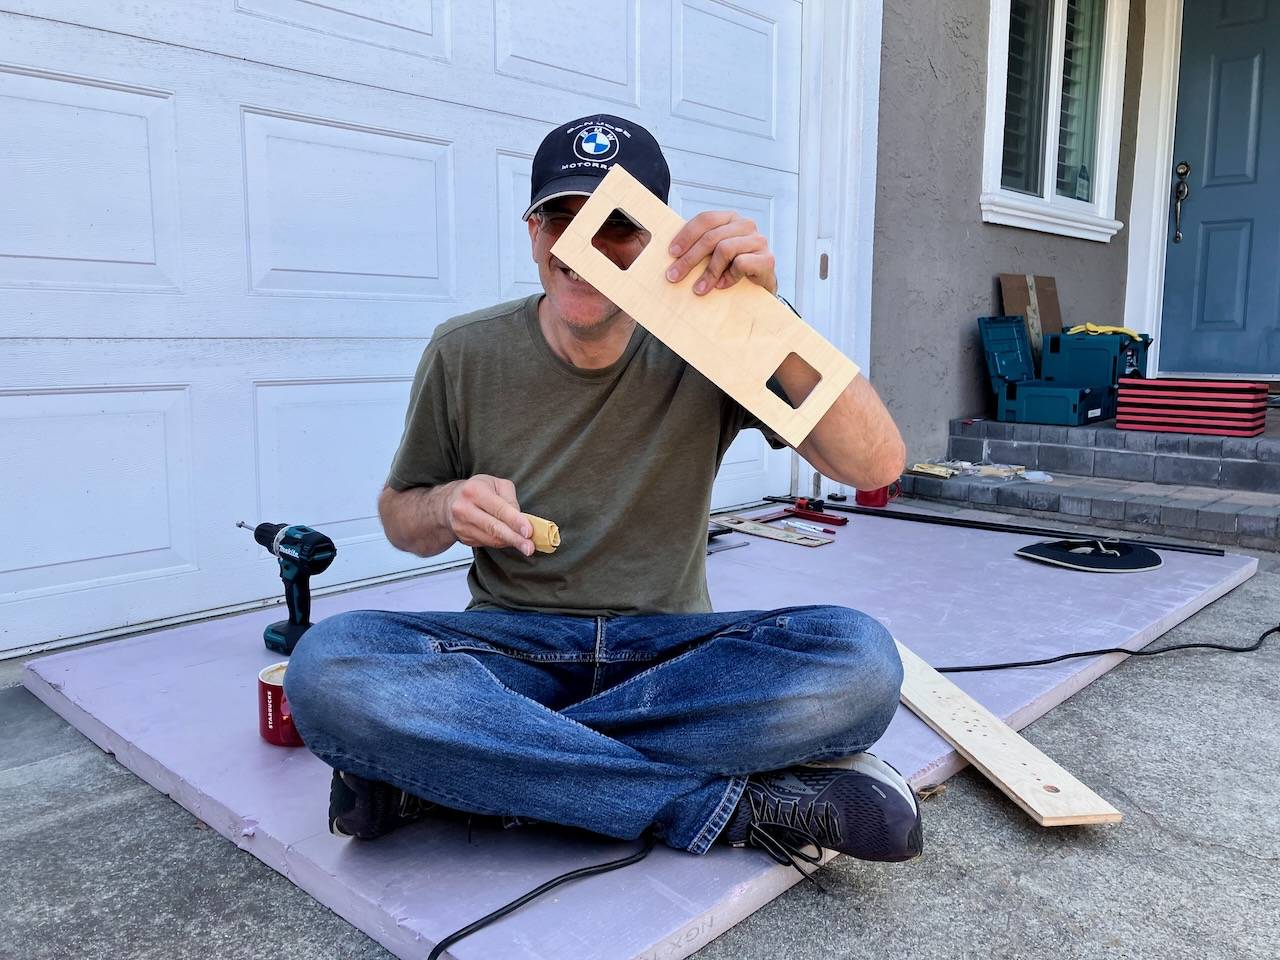
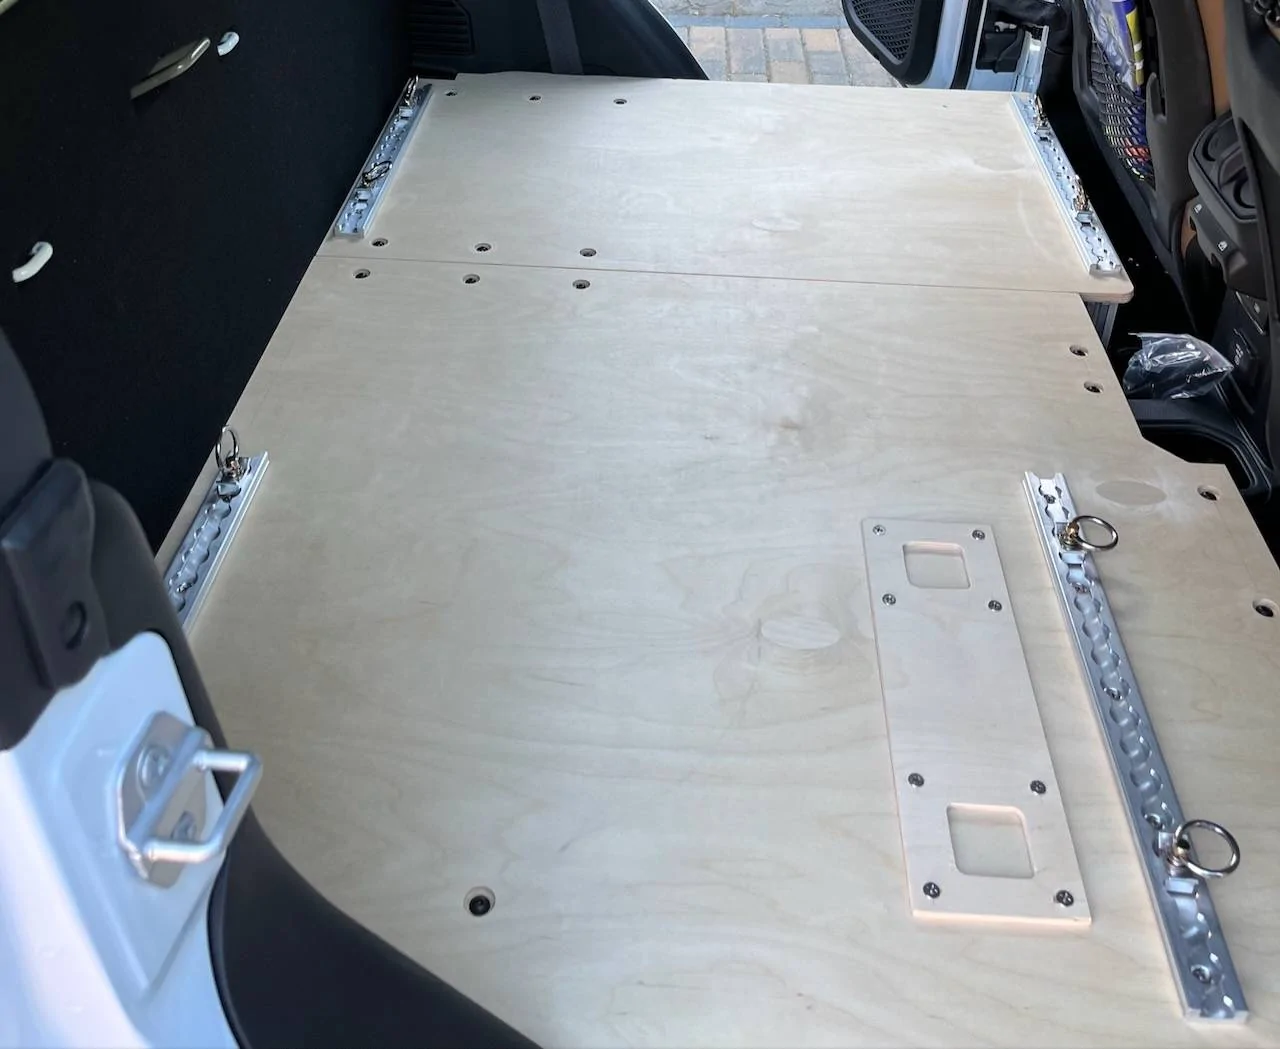
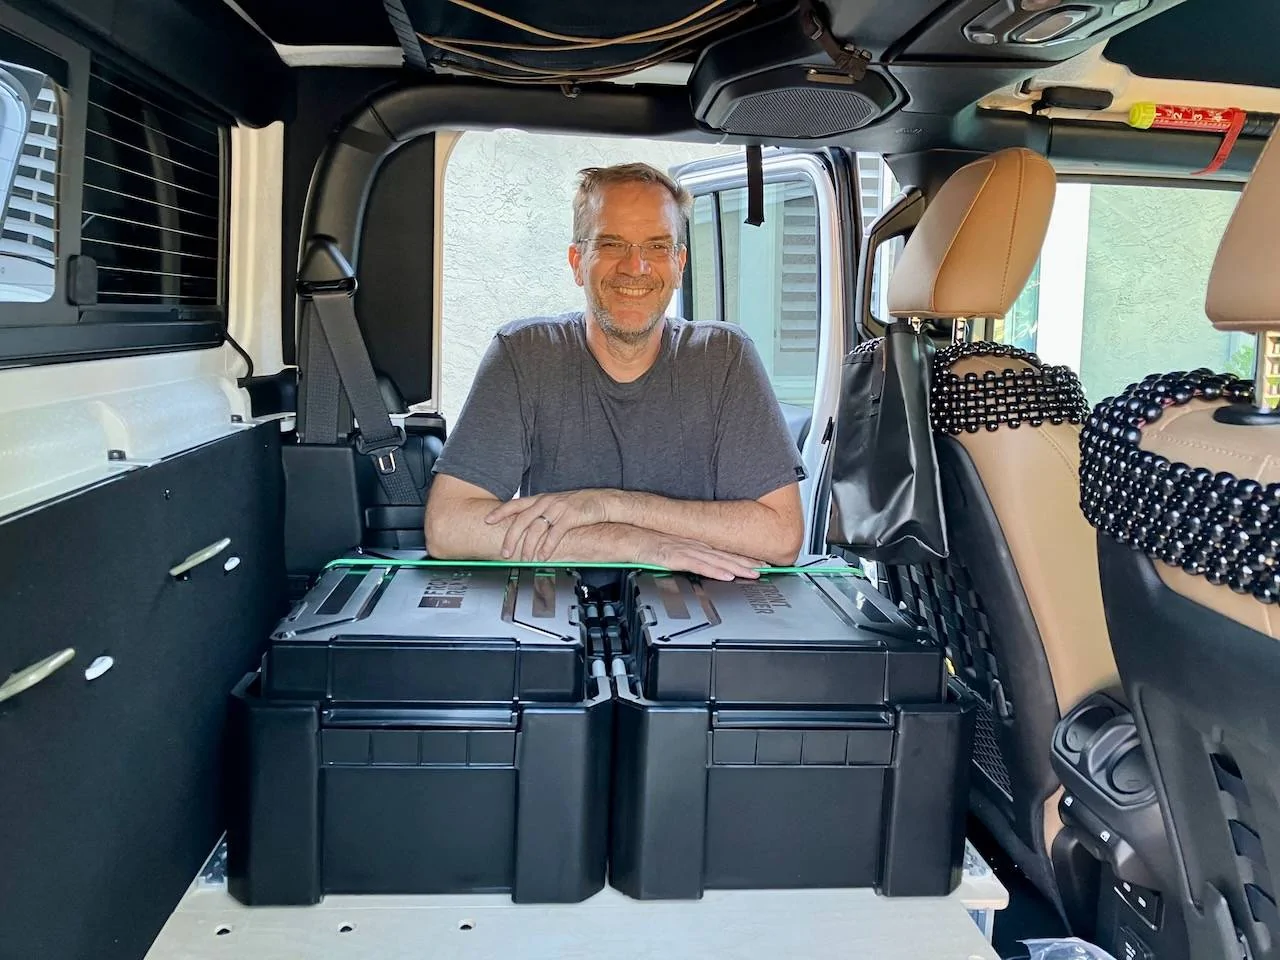
Famous last words ... the large platform is actually done (except fridge mounting points and paint), but I ran out of 80/20 hardware (M6 slide in nuts) to finish it completely. Damn. Beginners mistake ...

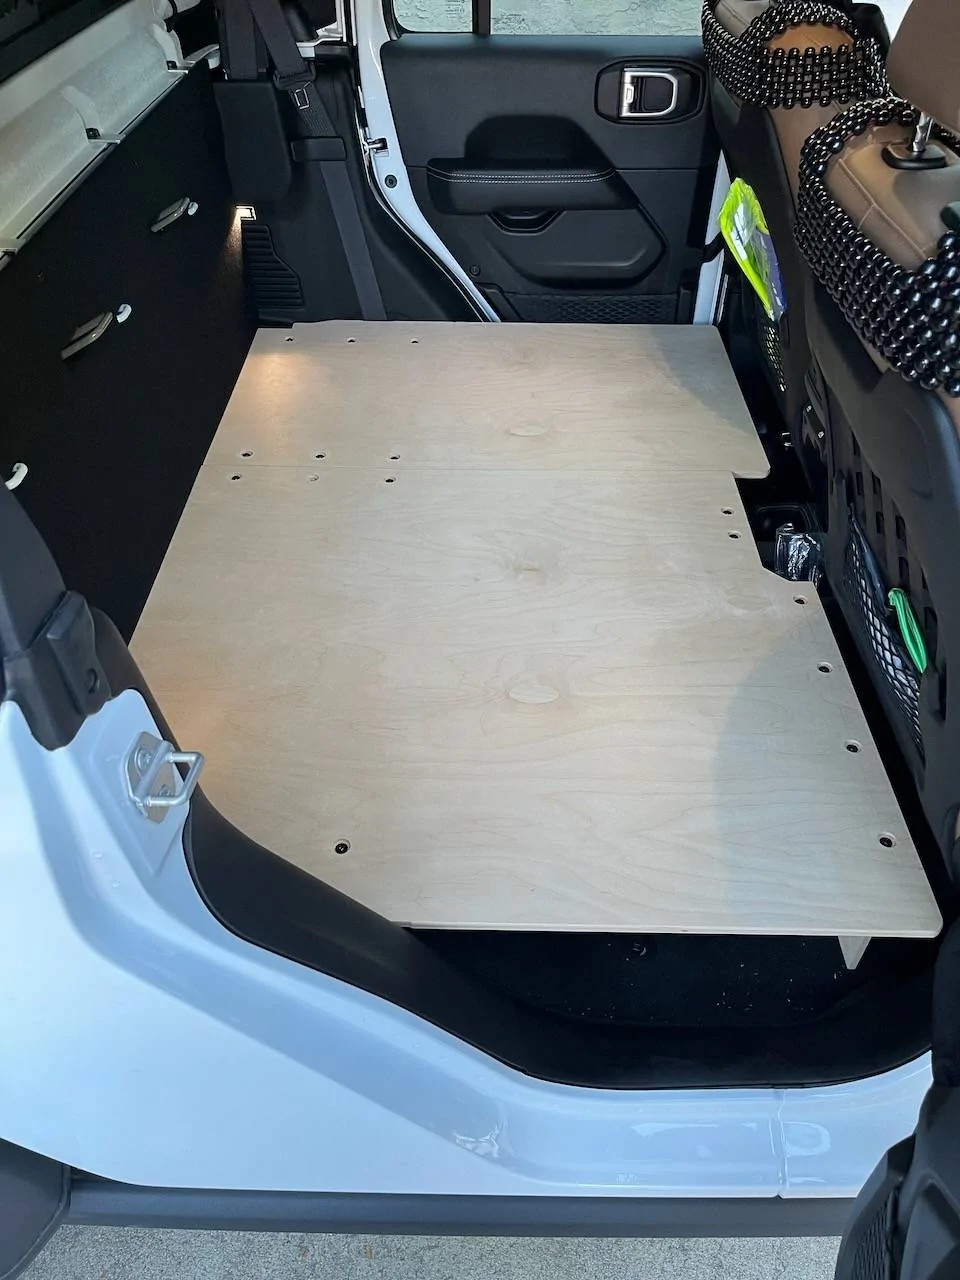
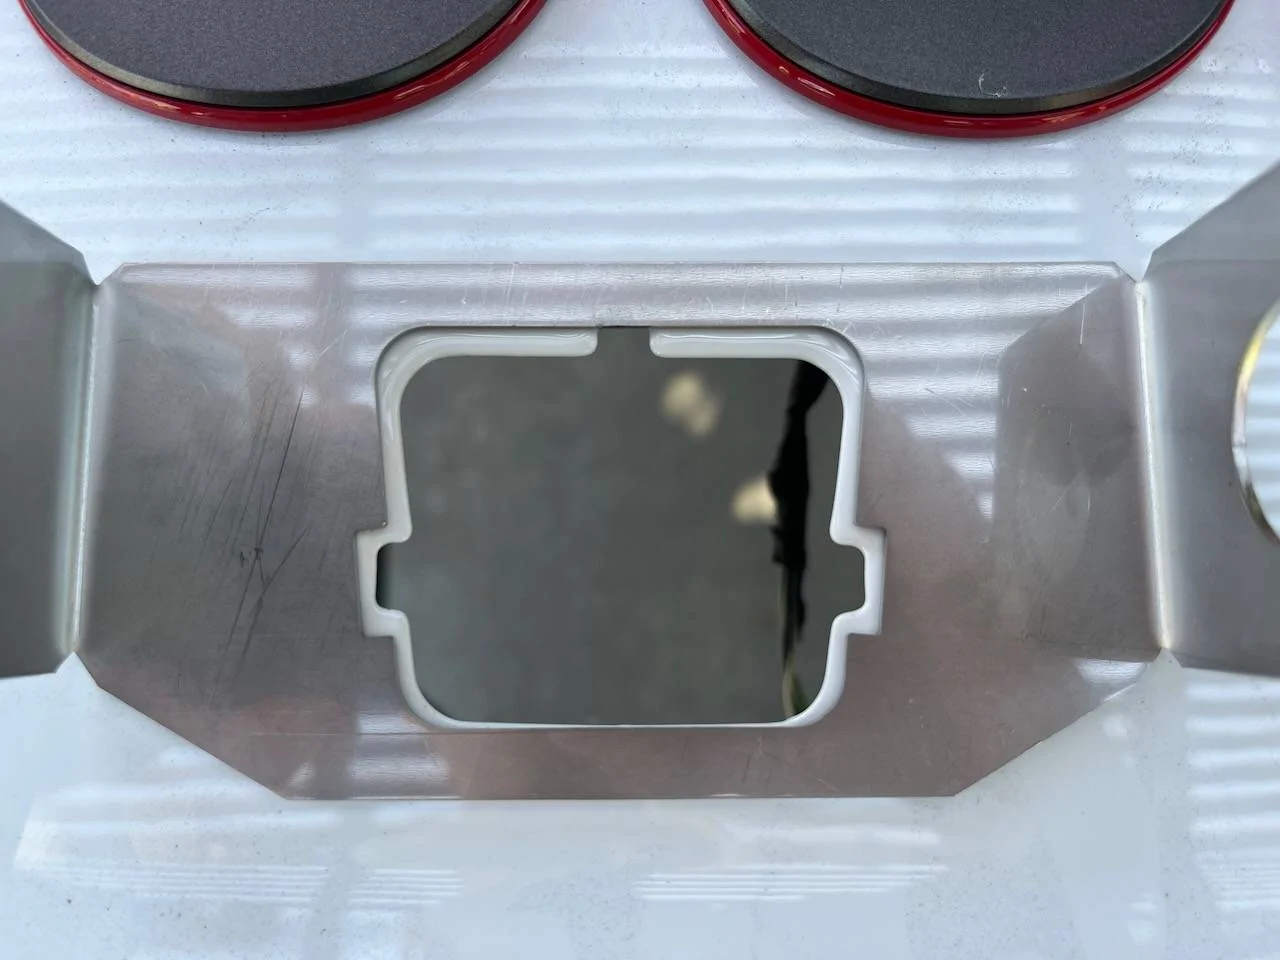
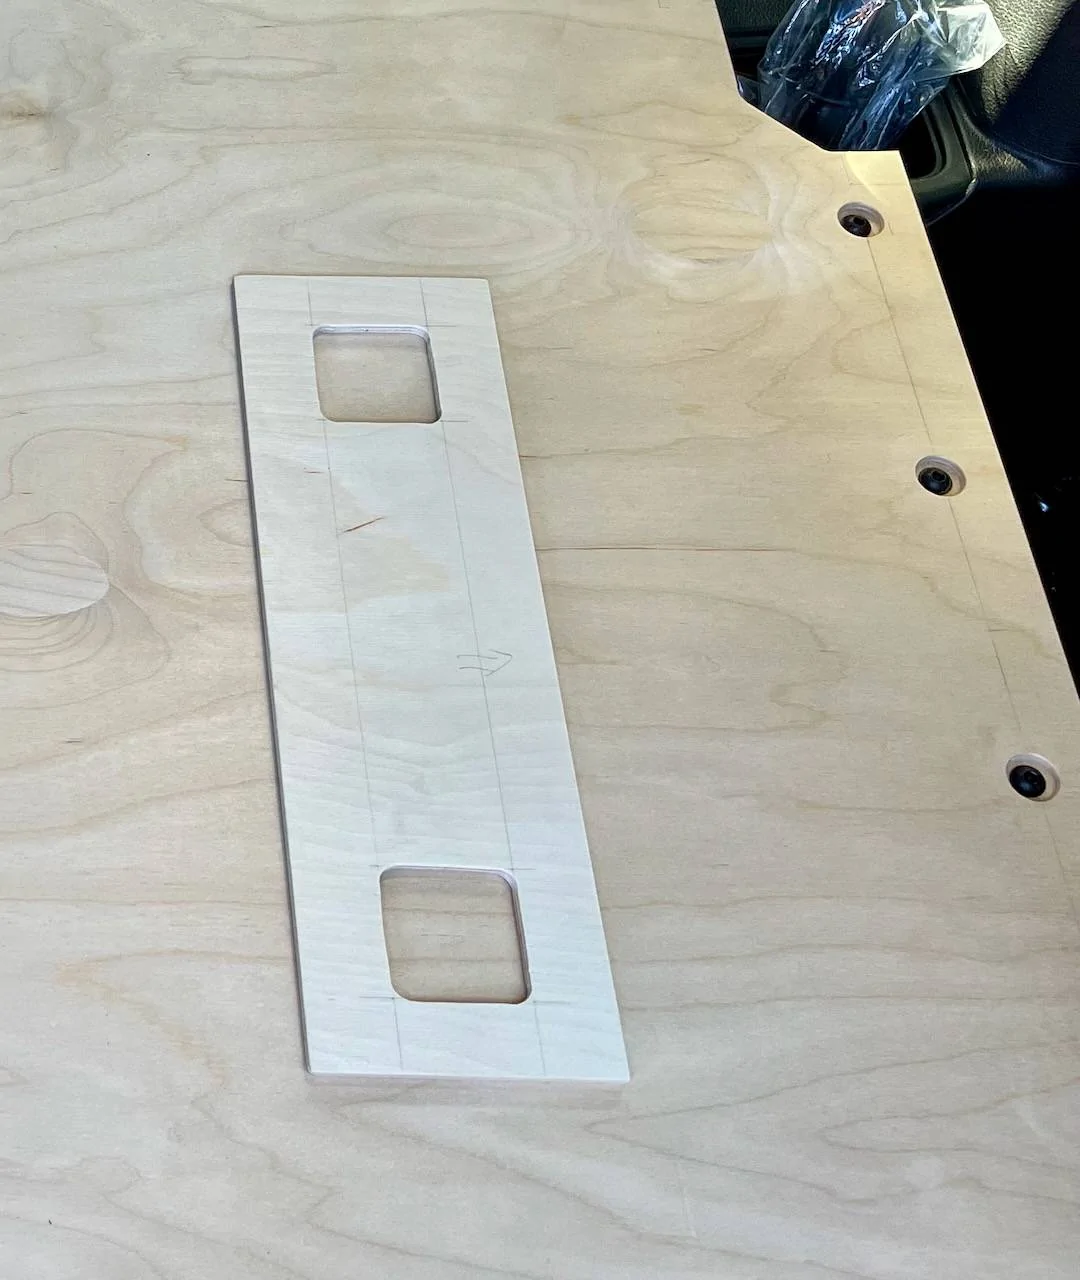
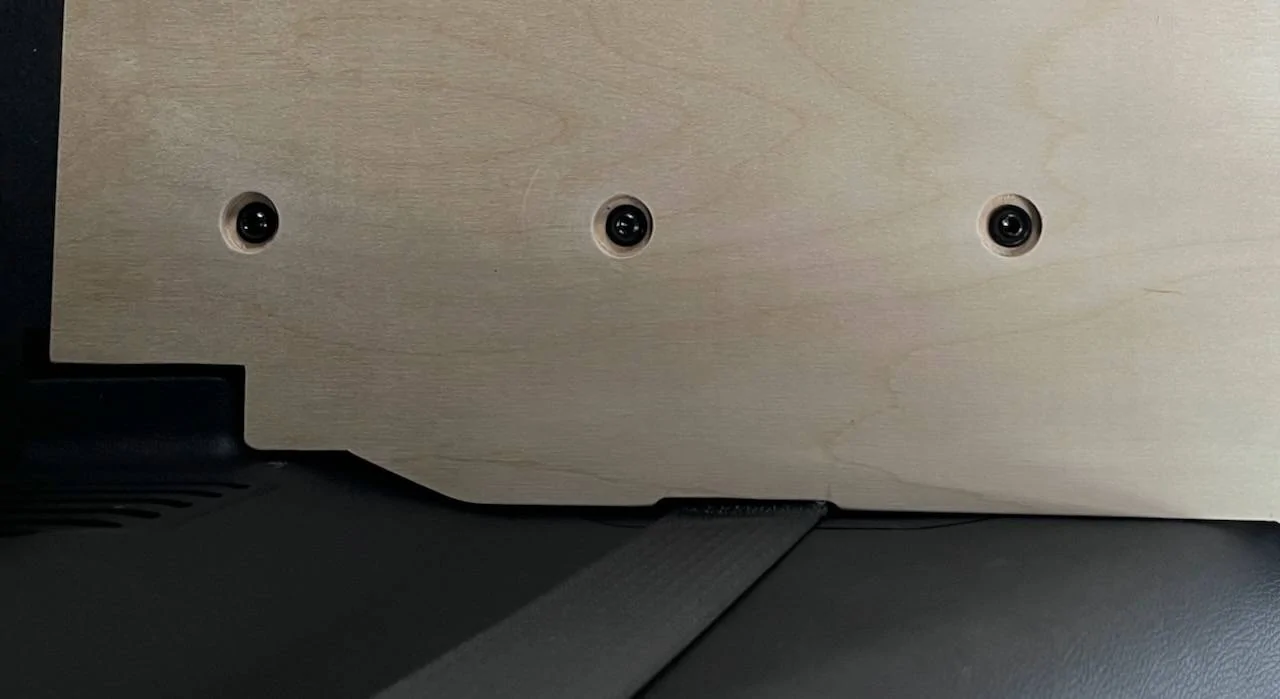
Just in case you ever want to build such a platform more or less form fitting to the rear, it's a pain in the ass to get all the little cut-outs and uneven surfaces properly done:

Jeep Gladiator A new hope ... (build journal and component reviews) IMG_5741


Lots of fun, the panel has been in and out of the car probably 10 times or so by now.

On a positive note, when the base panel for the platform is in and moved all the way back against the rear panel there is ZERO rattle left. There isn't any without that in normal driving, but washboard would have likely provoked some. But now it won't. Happy with that.
Sponsored

 
OP
OP
cug

cug

Well-Known Member
First Name
Guido
Joined
Apr 1, 2023
Threads
13
Messages
602
Reaction score
664
Location
Christchurch, New Zealand
Vehicle(s)
JTR EcoDiesel, Land Cruiser 79, BMW R1250GS
Build Thread
Link
Occupation
Just keeping busy
Mostly finished 60% platform. Fridge mounting points and obviously surface treatment still missing. The 40% is also mostly done, just waiting for 80/20 hardware to be able to mount it properly.

Jeep Gladiator A new hope ... (build journal and component reviews) IMG_5750 (1)


Underneath:

Jeep Gladiator A new hope ... (build journal and component reviews) IMG_5751


Will probably cut some slots into the leg panel to save a tiny amount of weight without removing the barrier to the area under the seat. Driver side will get just 80/20 legs, since we want to be able to access the space under the seat without having to move the seat forward.
 
OP
OP
cug

cug

Well-Known Member
First Name
Guido
Joined
Apr 1, 2023
Threads
13
Messages
602
Reaction score
664
Location
Christchurch, New Zealand
Vehicle(s)
JTR EcoDiesel, Land Cruiser 79, BMW R1250GS
Build Thread
Link
Occupation
Just keeping busy
Driver side will get just 80/20 legs, since we want to be able to access the space under the seat without having to move the seat forward.
Actually decided against this after trying with the things we want to stash there. They are too heavy and awkward to get under the seat from the side. So it'll be just a wood panel, like on the passenger side. Haven't cut that yet, and haven't done the fridge mounting points since we ran out of hardware.

But, here we go:

Jeep Gladiator A new hope ... (build journal and component reviews) IMG_5787


Is anyone actually interested in the template? I haven't made one yet, but could do so, when I take the platform out for fridge mount drilling and bedliner coating. I might make one anyways just for my own records, but might not invest as much time/effort as with the last ones, if there's no interest.

This one may also be slightly less helpful, because at least for the rear holes, and the legs, a lot will need to be done right in the car and one piece based on the last etc.
 
OP
OP
cug

cug

Well-Known Member
First Name
Guido
Joined
Apr 1, 2023
Threads
13
Messages
602
Reaction score
664
Location
Christchurch, New Zealand
Vehicle(s)
JTR EcoDiesel, Land Cruiser 79, BMW R1250GS
Build Thread
Link
Occupation
Just keeping busy
Also went over most of the truck to check all nuts and bolts, but especially these for the Terraflex suspension, wheel lug nuts, as well as the whole Alu-Cab camper. Found a few (very few) on the camper that weren't as tight as I wanted them, also found one allen bolt that was rounded by the Alu-Cab installer.

Marked all the ones I checked with paint marks, so next time it's just about checking paint marks.

Now I need to trim down the toolkit:

Jeep Gladiator A new hope ... (build journal and component reviews) IMG_5785


I won't take the 3/8" kit (the one on the right) with me, but the 1/2" and the 1/4" are normally in the car, as well as the tool roll. Need to pare this down though as there will be a lot of unneccessary weight in there, that isn't strictly needed. Not urgent though, just took the photo in the driveway today and thought about this ...
 
OP
OP
cug

cug

Well-Known Member
First Name
Guido
Joined
Apr 1, 2023
Threads
13
Messages
602
Reaction score
664
Location
Christchurch, New Zealand
Vehicle(s)
JTR EcoDiesel, Land Cruiser 79, BMW R1250GS
Build Thread
Link
Occupation
Just keeping busy
Hmpf. More measurements show that these are too high - the fridge wouldn't open fully, making it inconvenient to get stuff in/out.

Somehow I must have mis-calculated this. Luckily we checked again before proceeding. Need to cut these shorter by about 30mm, this will make mounting the whole platform harder though. I will have to mount the base angle bracket to the truck floor first, then mount the leg board to it, then get the storage platform panel on top. Bummer.
Argl. Have to eat my words ... again ... what a shitshow. I have no idea what I measured (what we measured, at least it's not just only my mistake, wife was also measuring and confirming). There is about 30mm clearance on top of the opened fridge. It would have fit with the higher brackets AND it would have likely fit with the Goose Gear high platform.

I could have left the height alone and there would have been ~10mm clearance. Okay. We'll live with it as it is, it gives a little bit easier access to the fridge.
 

Sponsored

OP
OP
cug

cug

Well-Known Member
First Name
Guido
Joined
Apr 1, 2023
Threads
13
Messages
602
Reaction score
664
Location
Christchurch, New Zealand
Vehicle(s)
JTR EcoDiesel, Land Cruiser 79, BMW R1250GS
Build Thread
Link
Occupation
Just keeping busy
Some more progress today:

Awning Leg

We installed a second leg to our awning to support the moskito tent we are planning to make ourselves. This is low priority, so the moskito tent will probably only come around over winter, but the awning leg is installed now.

Installation process is super straight forward and takes about 10 minutes, most of that is finding the rivet tool in the overcrowded garage which looks like an overland workshop right now ... One bolt, four rivets, done. Super easy.

Backup Camera

Finally got around removing the camera from the tailgate. We bought a bracket from Mule Expedition Outfitters and wanted to use that to install the camera between camper and truck bumper – the problem is that the camera doesn't fit in the cutout on the Mule bracket. The cutout is way too large, the camera just rattles around in it and while it wouldn't fall out, it just doesn't sit properly. Assumption from the Mule sales rep at this point is, that Jeep uses different cameras, some larger, some smaller. This is weird because if I put the part number into the parts catalog, there is no mention of fitment problems, it's listed for all model years.

Here's the issue:

Jeep Gladiator A new hope ... (build journal and component reviews) IMG_5790


So, waiting for a response from Mule what they suggest I should do.

Until then, I'm exploring options and there are some I'm looking into. I want to mount the camera low and not route any cables through the camper, so some options are out right away.

One idea is, to just take a piece of aluminum, cut the required shape, bent it in the vise to the desired angle, grind off any sharp edges and mount it to the c-channel undernath the camper door. This would be ugly and not even close to as nice a cutout as above, but at least I can make it fit properly ...

So, this is on hold until I know more.

Fridge Mount

Decided on how to mount the fridge to the storage platform. The challenges to solve here are to prevent movement. Up and down is relatively easy, some tie down straps attached to L-track in the platform and all is well. Forward and back as well as left right just a bit harder due to the stupid shape of the Dometic fridge with all rounded edges at the bottom, but here's what we came up with.

The fridge has some "feet" molded into the plastic bottom and we made a plywood fitting for these:

Jeep Gladiator A new hope ... (build journal and component reviews) IMG_5794


This piece will get bolted to the platform and the fridge feet will go into the holes, preventing left/right and forward/back movement as long as it can't go up and out of the fitting. That will be prevented by the tie downs. The cutouts were cut slightly small and we sanded until they fit REALLY well and are able to prevent any kind of movement. Yes, the feet are round, but I have no good way of cutting a round hole that small and as precise as I wanted. So, had to go with these.

Need the L-track and tie down straps (supposed to arrive tomorrow) then get it all bolted to the platform and the fridge is mounting is done. Once that is done, we are going to test it all for a while before putting bedliner on, since I don't want to do this and then find out that I have to drill more holes or cut access doors or whatever ...
 
OP
OP
cug

cug

Well-Known Member
First Name
Guido
Joined
Apr 1, 2023
Threads
13
Messages
602
Reaction score
664
Location
Christchurch, New Zealand
Vehicle(s)
JTR EcoDiesel, Land Cruiser 79, BMW R1250GS
Build Thread
Link
Occupation
Just keeping busy
So, large platform is now going into some "livability testing" before getting final treatment with a few coats of bedliner.

Jeep Gladiator A new hope ... (build journal and component reviews) IMG_5812


Does it reflect an OCD tendency that I aligned all the teenuts the same way before hammering them in? I actually wanted to have all the Philips head screws oriented the same as well, but "correct tightness fanatism" got in the way.

Also made the "front leg" height adjustable so I can deal better with any give in the carpet. We ran out of time since friends are coming over for BBQ soon, therefore didn't install the fridge again. But that's a straightforward process now.

Better view, not in the car:

Jeep Gladiator A new hope ... (build journal and component reviews) IMG_5811
 
OP
OP
cug

cug

Well-Known Member
First Name
Guido
Joined
Apr 1, 2023
Threads
13
Messages
602
Reaction score
664
Location
Christchurch, New Zealand
Vehicle(s)
JTR EcoDiesel, Land Cruiser 79, BMW R1250GS
Build Thread
Link
Occupation
Just keeping busy
And a behind the scenes shot ...

Jeep Gladiator A new hope ... (build journal and component reviews) IMG_5763
 
OP
OP
cug

cug

Well-Known Member
First Name
Guido
Joined
Apr 1, 2023
Threads
13
Messages
602
Reaction score
664
Location
Christchurch, New Zealand
Vehicle(s)
JTR EcoDiesel, Land Cruiser 79, BMW R1250GS
Build Thread
Link
Occupation
Just keeping busy
Nice work buddy ! Keep up the good work
Thank you!

The work we’ve done so far was mostly to practice for the big challenge of building out the interior of the camper. Try and get to know new tools, get into the thinking of how to approach certain aspects, and reduce the apprehension when starting more difficult parts of the project. It’s our first time building things like this ourselves. We know to a degree what we want the result to be, but how to get there is still a challenge.
 

Sponsored

fourfa

Well-Known Member
Joined
Dec 12, 2021
Threads
14
Messages
1,107
Reaction score
1,403
Location
CA
Vehicle(s)
22 JTRD + ACCC
Build Thread
Link
We bought a bracket from Mule Expedition Outfitters and wanted to use that to install the camera between camper and truck bumper – the problem is that the camera doesn't fit in the cutout on the Mule bracket. The cutout is way too large, the camera just rattles around in it and while it wouldn't fall out, it just doesn't sit properly. Assumption from the Mule sales rep at this point is, that Jeep uses different cameras, some larger, some smaller. This is weird because if I put the part number into the parts catalog, there is no mention of fitment problems, it's listed for all model years
Odd, I have the same bracket (installed at Mule) and the fit was just fine when I removed it to paint it to match my truck. I can snap some pics if it matters

Just found this thread! It's fun to see another ACCC build thread. I share your frustration with the rear door gas strut design - the bracket is crap, the aluminum rivets are nowhere near adequate to hold it, the gas strut force is too great (nearly took out a kid's face when mine was brand new and I was showing it off). Mine broke all the rivets out. I just removed the whole mess and strap the door open 180° (or 175° or whatever) with a bumpstop and a rubber strap to the rear side corner. We've found we GREATLY prefer having it open 180 for the extra workspace. (I don't have any external plates on the back or door)

If you're still struggling with the lift struts, we've also found that ours softened up over the first year and it's getting easier

Also, I did relocate the interior door grab handle to over the door (my stove didn't fit under the handle with my table build, so I replaced it with a webbing pull). We love having that grab handle available while the tent is up. I might swap the short one (from the door) to the lid, and put the long one over the door. Or remove the one on the lid entirely... Anyway, +1 that the handle is very useful, so high mounting the camera is a no-go for me
 
Last edited:
OP
OP
cug

cug

Well-Known Member
First Name
Guido
Joined
Apr 1, 2023
Threads
13
Messages
602
Reaction score
664
Location
Christchurch, New Zealand
Vehicle(s)
JTR EcoDiesel, Land Cruiser 79, BMW R1250GS
Build Thread
Link
Occupation
Just keeping busy
Odd, I have the same bracket (installed at Mule) and the fit was just fine when I removed it to paint it to match my truck. I can snap some pics if it matters
The sales rep at Mule told me last week that there might be different cameras and when I search for this in the parts catalogue, I can find different part numbers – although that might just be the ones with different colors. I just don't know. When I try to install mine, it just rattles around and there is no way with just the bracket and the camera parts to make it fit in any way that wouldn't rattle loose within minutes.

I'm still waiting for them to get back to me with more information, might have to call again today. I'm probably low on their priority list given that it's just about a low price item that doesn't seem to work as expected. But from all I can see, that cutout is just plain wrong. They do show a different looking camera on their website, mine looks like this:

Jeep Gladiator A new hope ... (build journal and component reviews) IMG_5833


Sorry, the screws are out right now for experiments regarding mounting this myself.

The camera they have in their bracket on the website looks different:

Jeep Gladiator A new hope ... (build journal and component reviews) MUL-JP-JT-CAM-BKT_-3_1702x1702


It might well be that there are different iterations out there, although when I check the part number of mine, it shows it to be for all Gladiator years from 2020:

https://www.moparfactoryparts.com/oem-parts/mopar-with-bezel-camera-assembly-6ly71gw7ad

So, I don't know how different they can be given that. Especially when I see how far the bracket is off:

Jeep Gladiator A new hope ... (build journal and component reviews) IMG_5790


That notch the OEM cutout has is so that the plastic doesn't "ride" on a small plastic ridge when the camera is mounted. Their bracket not only has too big a hole, it als has the wrong shape, at least for the camera that is in my truck, which Mopar claims isn't something very special.
 
OP
OP
cug

cug

Well-Known Member
First Name
Guido
Joined
Apr 1, 2023
Threads
13
Messages
602
Reaction score
664
Location
Christchurch, New Zealand
Vehicle(s)
JTR EcoDiesel, Land Cruiser 79, BMW R1250GS
Build Thread
Link
Occupation
Just keeping busy
Just found this thread! It's fun to see another ACCC build thread. I share your frustration with the rear door gas strut design - the bracket is crap, the aluminum rivets are nowhere near adequate to hold it, the gas strut force is too great (nearly took out a kid's face when mine was brand new and I was showing it off). Mine broke all the rivets out. I just removed the whole mess and strap the door open 180° (or 175° or whatever) with a bumpstop and a rubber strap to the rear side corner. We've found we GREATLY prefer having it open 180 for the extra workspace. (I don't have any external plates on the back or door)
I found that the @813 Fabrication & Design strap holder is a great help. It works much better than the strap attached to the strut holder. Right now, we keep the door at ~90 degree opening by limiting it from the inside with a longer strap and on the outside with a simple bungee to the molle panel. That works better than the OEM mechanism for us.


If you're still struggling with the lift struts, we've also found that ours softened up over the first year and it's getting easier
We'll have to see how it turns out after some use and when we have solar on the roof. That isn't done yet and will add some weight once installed. Still undecided whether I'll go for hard panels or whether I'm splurging for some fancy CIGS panel taped directly to the roof. Might go with a single CIGS panel to try it out and save some weight.

Also, I did relocate the interior door grab handle to over the door
Ah, that was you ... ;-) I saw that at some point in my browsing through ideas, but didn't recall who did that. I'm thinking of doing the same, I don't really need the relatively massive handle inside the door, it might get in the way of other things, and when I do the table built, I might want to have it out of the way. Still TBD, but it's likely that the handle will move to the outside and be replaced with "something", whatever that something might be.
 
OP
OP
cug

cug

Well-Known Member
First Name
Guido
Joined
Apr 1, 2023
Threads
13
Messages
602
Reaction score
664
Location
Christchurch, New Zealand
Vehicle(s)
JTR EcoDiesel, Land Cruiser 79, BMW R1250GS
Build Thread
Link
Occupation
Just keeping busy
and save some weight
On that note: I was surprised when I calculated all the weight of the storage platform and compared to the Goose Gear data they give on their website. I still have to paint it, but that will not add all that much weight, even if we put bedliner on, but right now, the weight of our platform is less than 56% of the weight of the GG high platform and after bumping around on top of it myself, I'd say it's more than solid enough. Way more.

I'm surprised since I don't see how we saved this much weight: the latches and hardware for the access doors don't add all that much, the bedliner shouldn't be in the multiple kilogram either, they do use more extrusion profiles underneath, but we use l-track on top, so that should be a wash. Their down supports go all the way around creating an enclosed space, while our design is open, that explains some of the difference, I just don't see how ours can be that much lighter. I really need to get an accurate weight measured when I take them out for final surface treatment. Maybe I'm off with my calculations, although I don't think I can be that far off.

GG does not give a weight (that I have found) for their rear trim panel. I still believe that ours is probably also in the 50 to 60% of that weight, given the light material we used (and the slight pain we went through to get it rattle free).
 
OP
OP
cug

cug

Well-Known Member
First Name
Guido
Joined
Apr 1, 2023
Threads
13
Messages
602
Reaction score
664
Location
Christchurch, New Zealand
Vehicle(s)
JTR EcoDiesel, Land Cruiser 79, BMW R1250GS
Build Thread
Link
Occupation
Just keeping busy
Finally the remaining L-track arrived and I bolted it in – the holes and teenuts were already in the platform.

Jeep Gladiator A new hope ... (build journal and component reviews) IMG_5836


And with that, the final piece of the 3D-puzzle also fell into place. It fits:

Jeep Gladiator A new hope ... (build journal and component reviews) IMG_5780


Something that came together exactly as planned. A rare occurrence on this project ...

This reminds me:

Now that the rear seats are out build a platform. I did a write up here and was able to build it for less than $100. We stack Front Runner boxes on plant of the platform that carry our clothes and kitchen stuff and works remarkably well.
Thanks for the hint with the FrontRunner boxes, they fit really well. So far, they are empty, but will provide a very handy storage space.
Sponsored

 
Last edited:


Top