Sponsored

A new hope ... (build journal and component reviews)

OP
OP
cug

cug

Well-Known Member
First Name
Guido
Joined
Apr 1, 2023
Threads
13
Messages
602
Reaction score
664
Location
Christchurch, New Zealand
Vehicle(s)
JTR EcoDiesel, Land Cruiser 79, BMW R1250GS
Build Thread
Link
Occupation
Just keeping busy
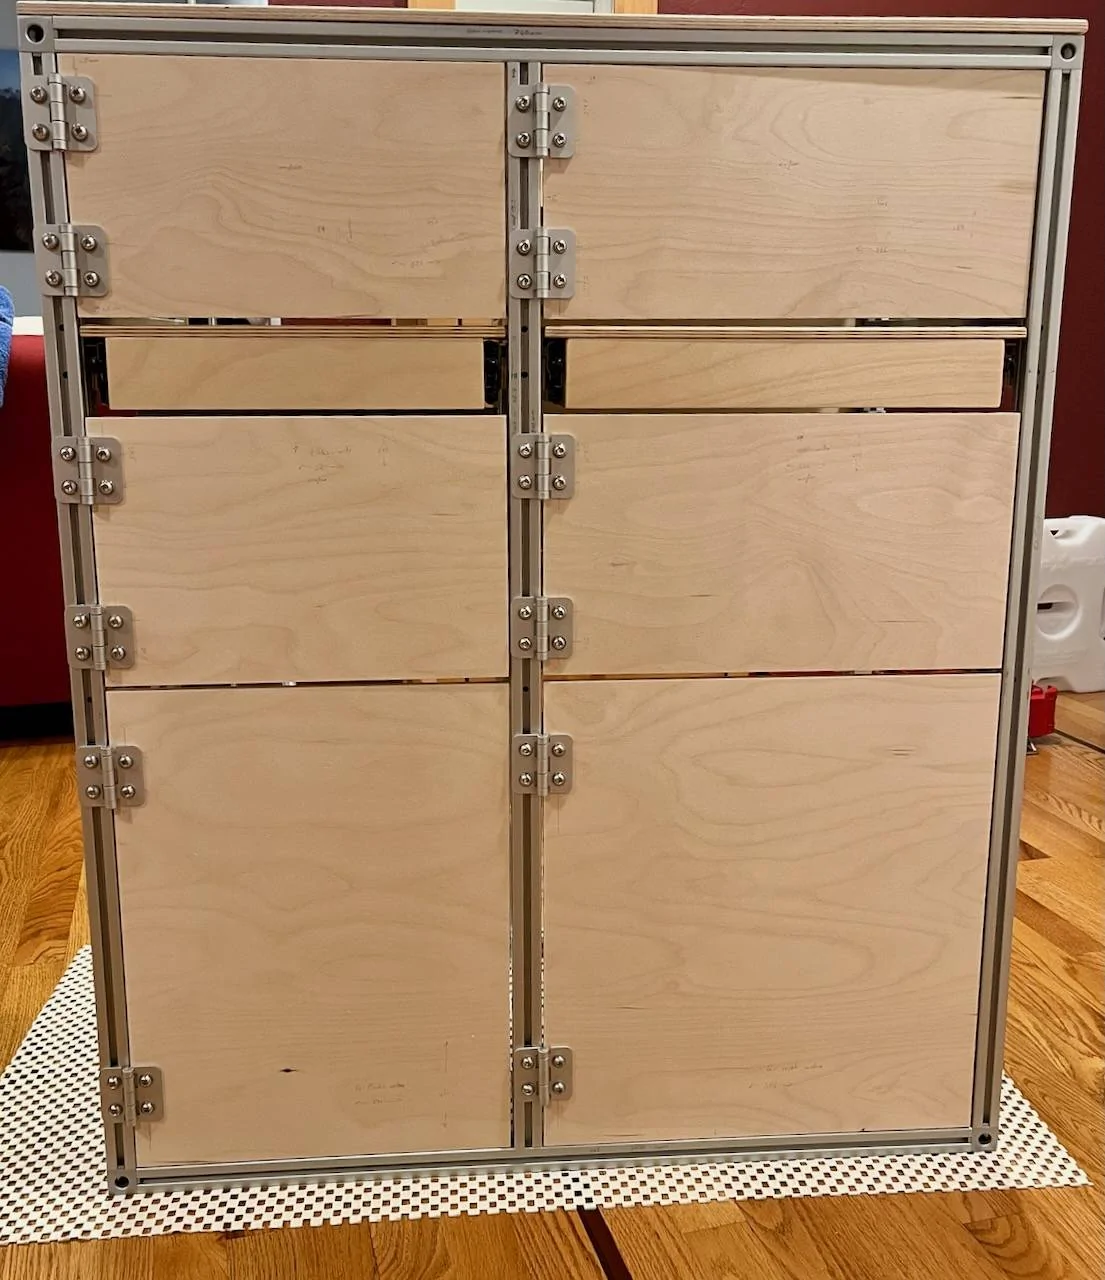
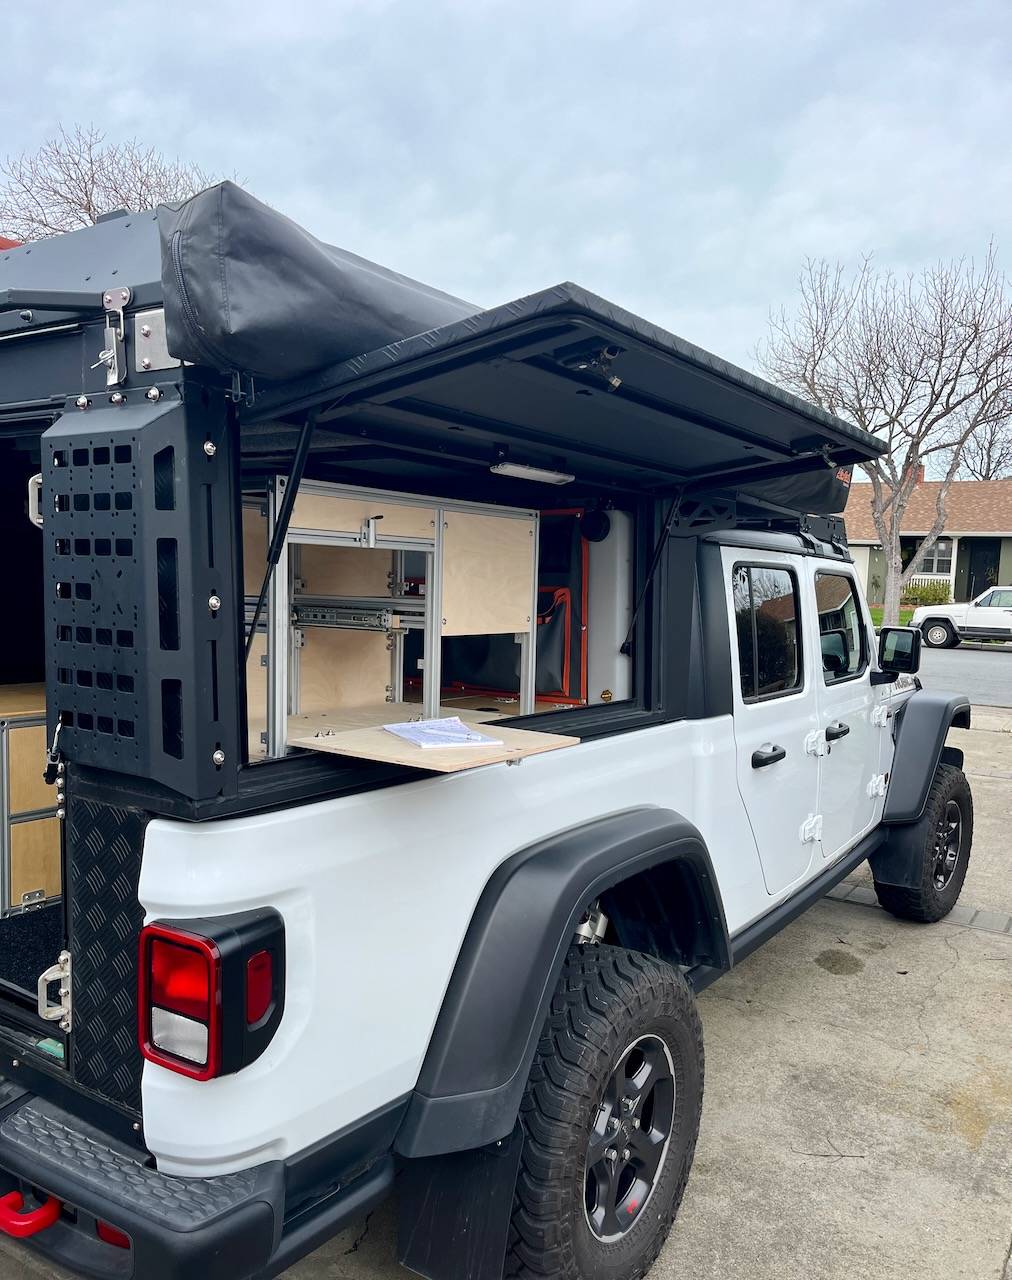
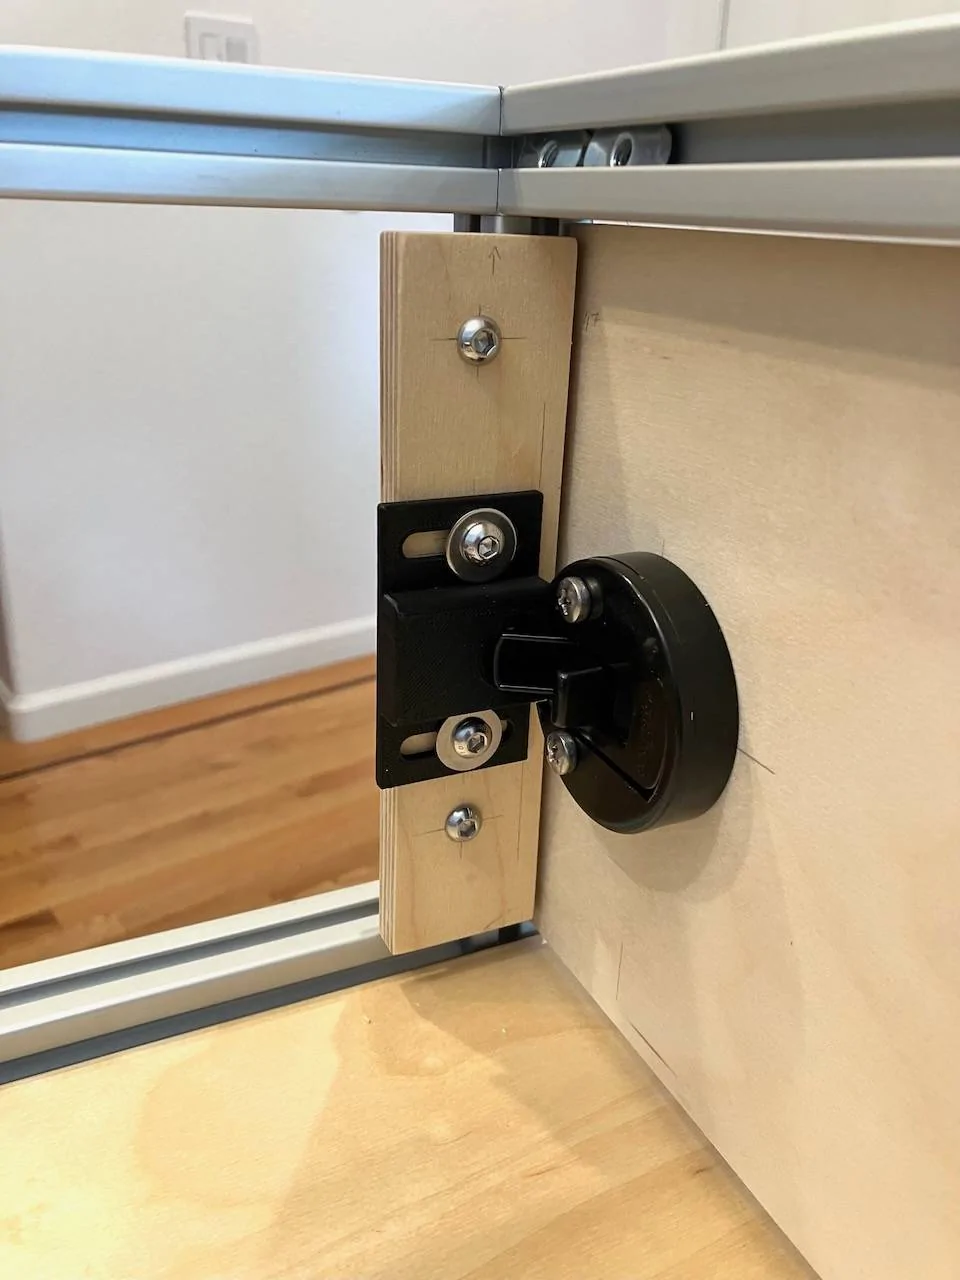
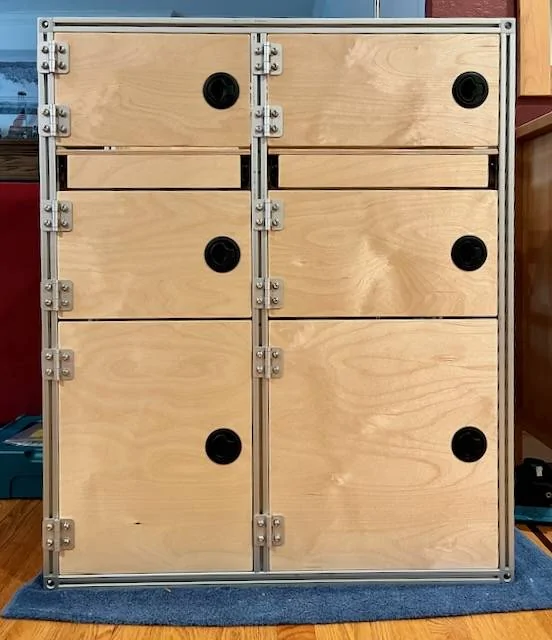
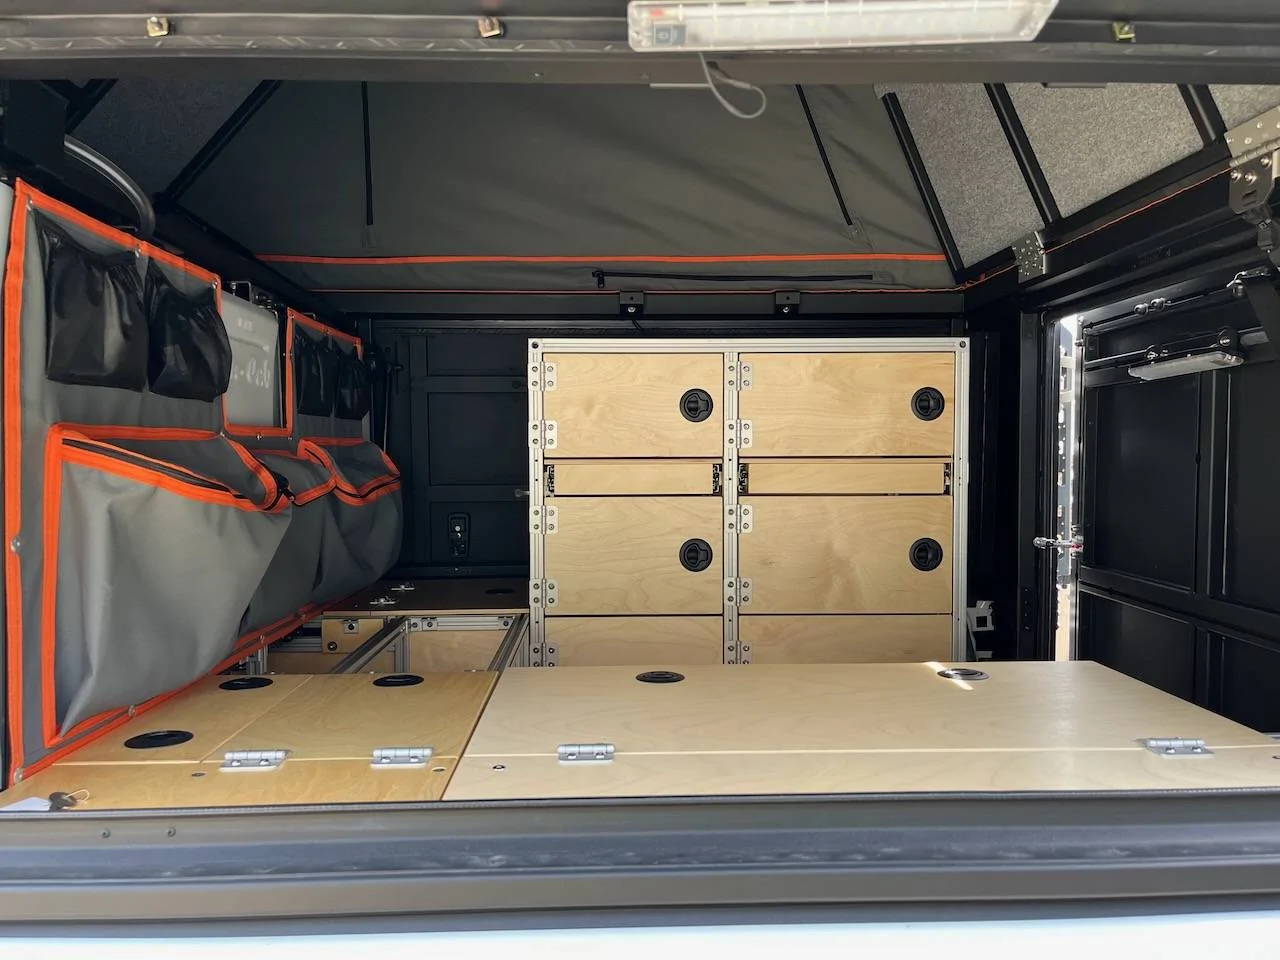
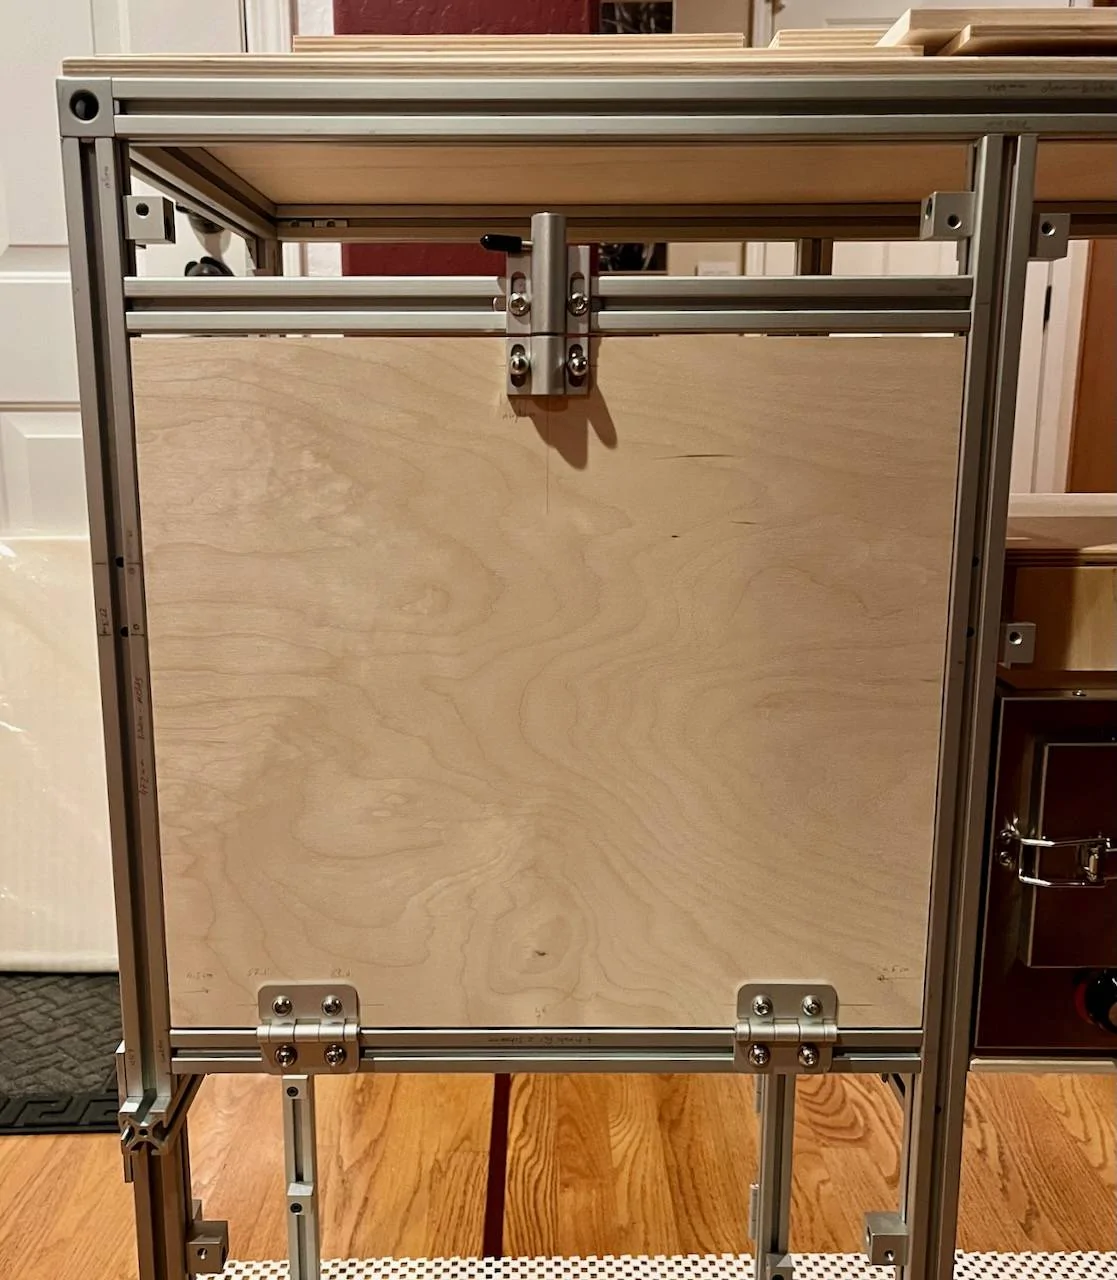
And due to rain, not much got done today. At least we got all the measurements for the doors and built one as a proof of concept, although with a different latch:

Jeep Gladiator A new hope ... (build journal and component reviews) IMG_6229


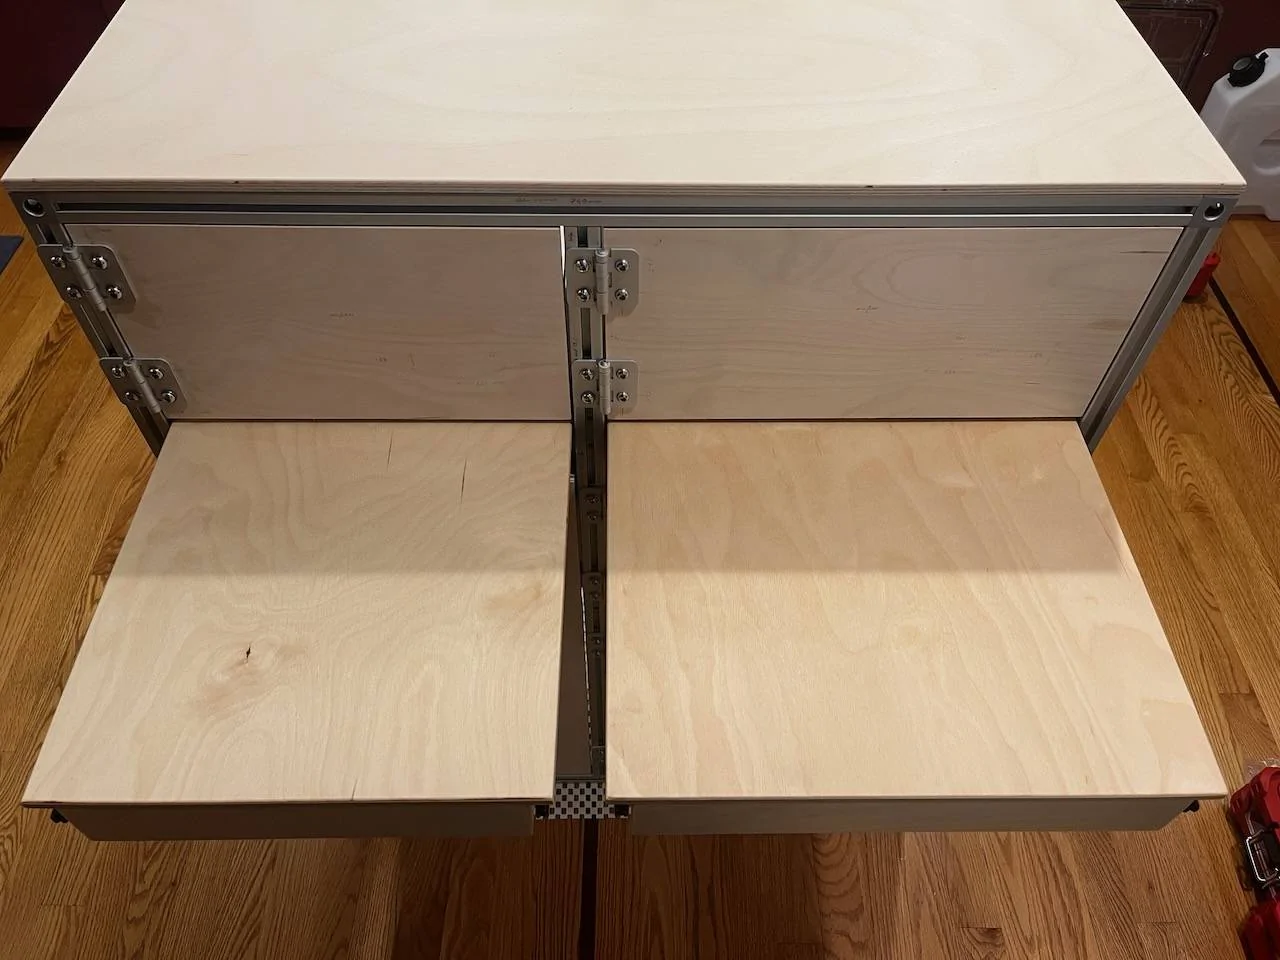
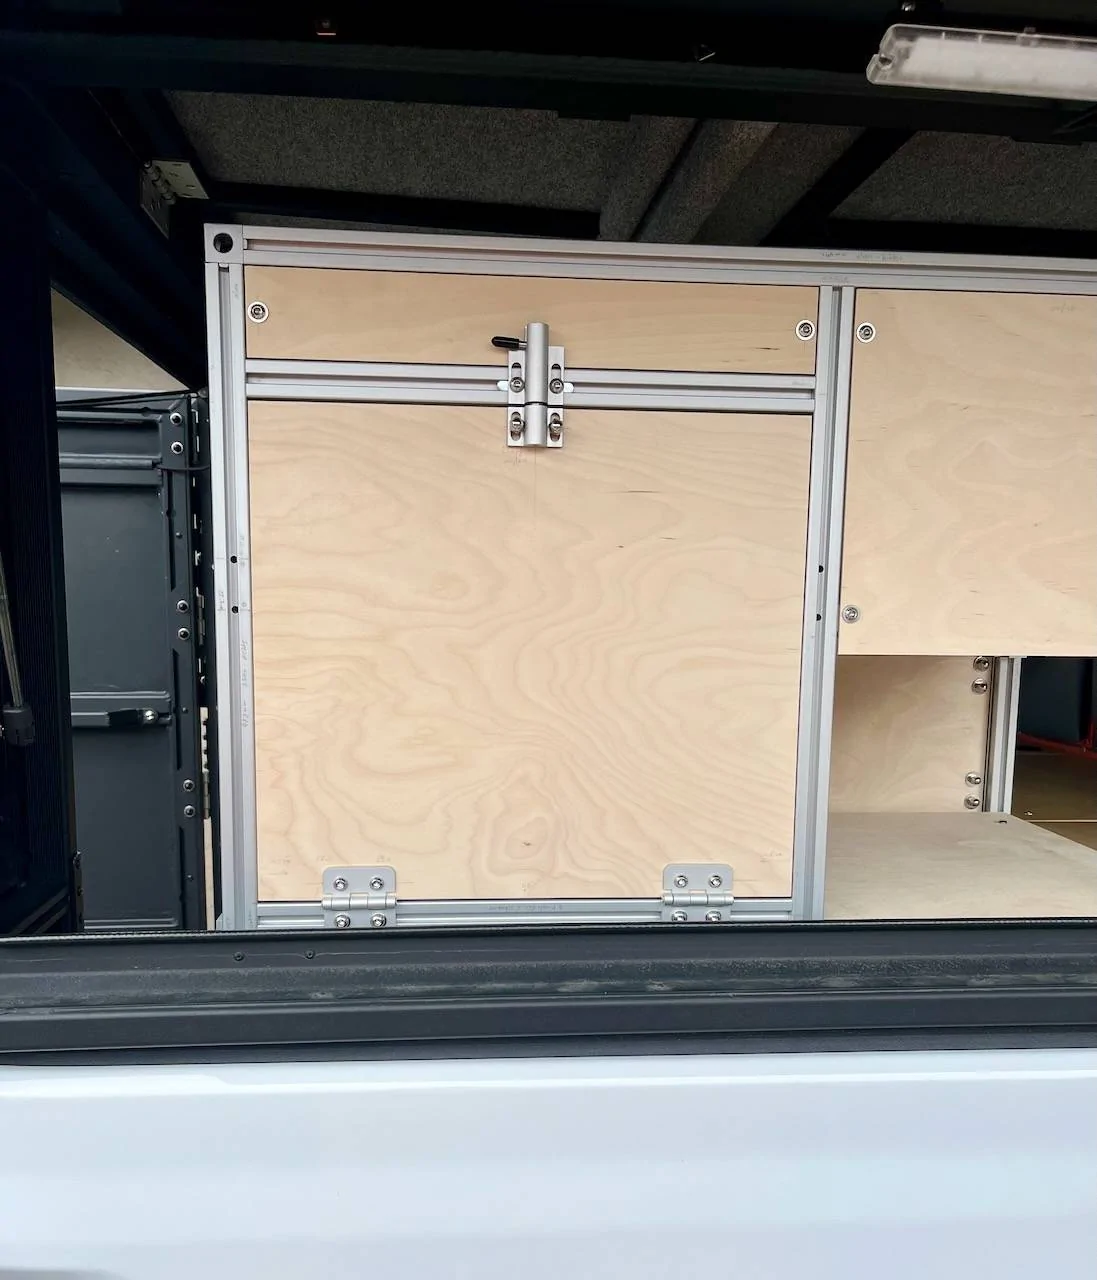
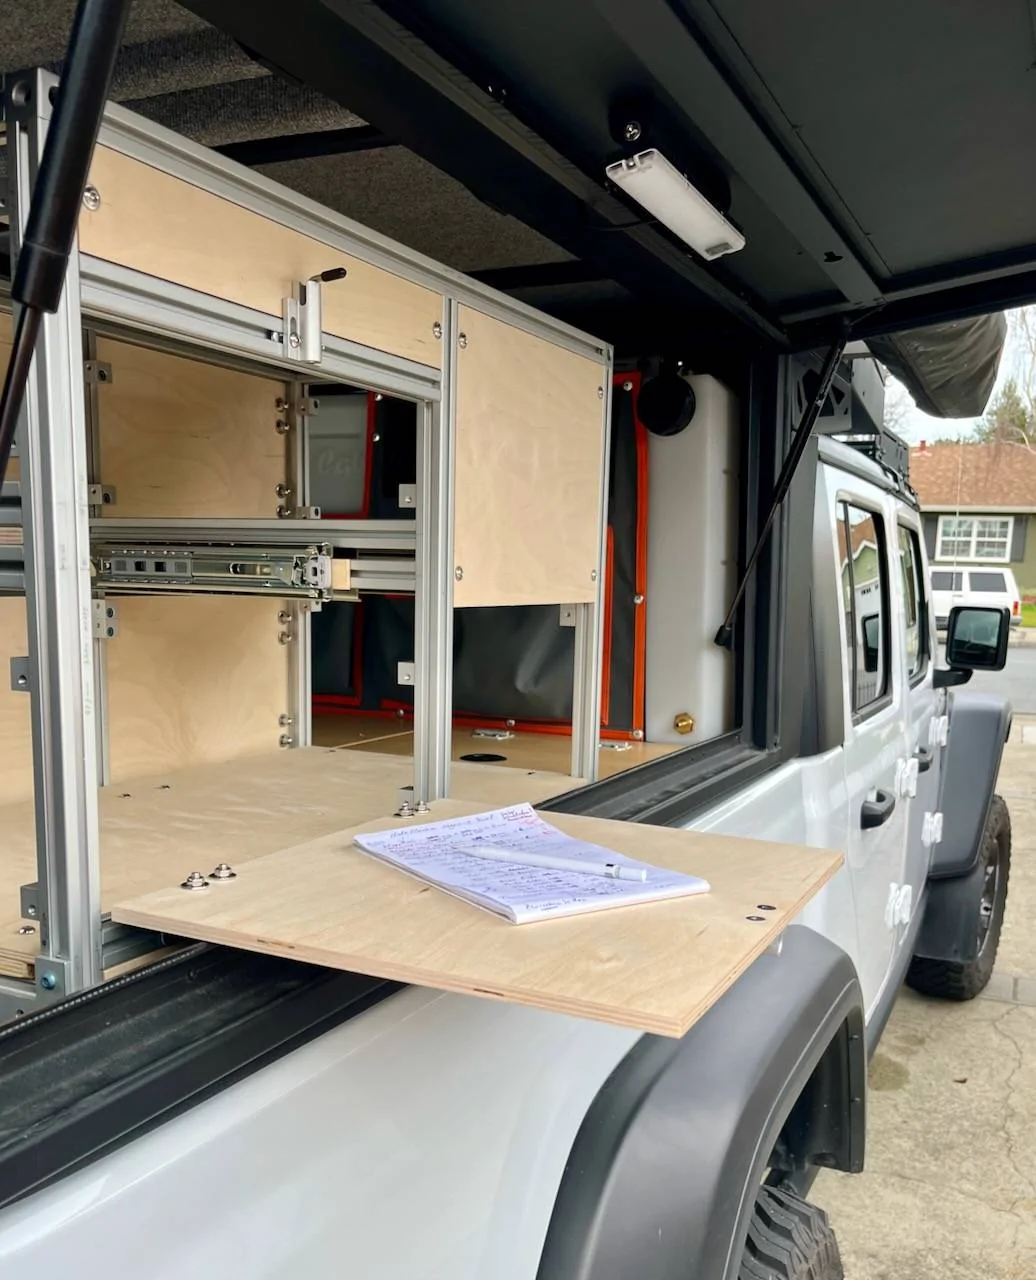
This will open to the outside on the passenger side door of the camper. The height of the hinges is exactly the height of the lower lip of the side window opening and therefore it can act as a small table on the side.

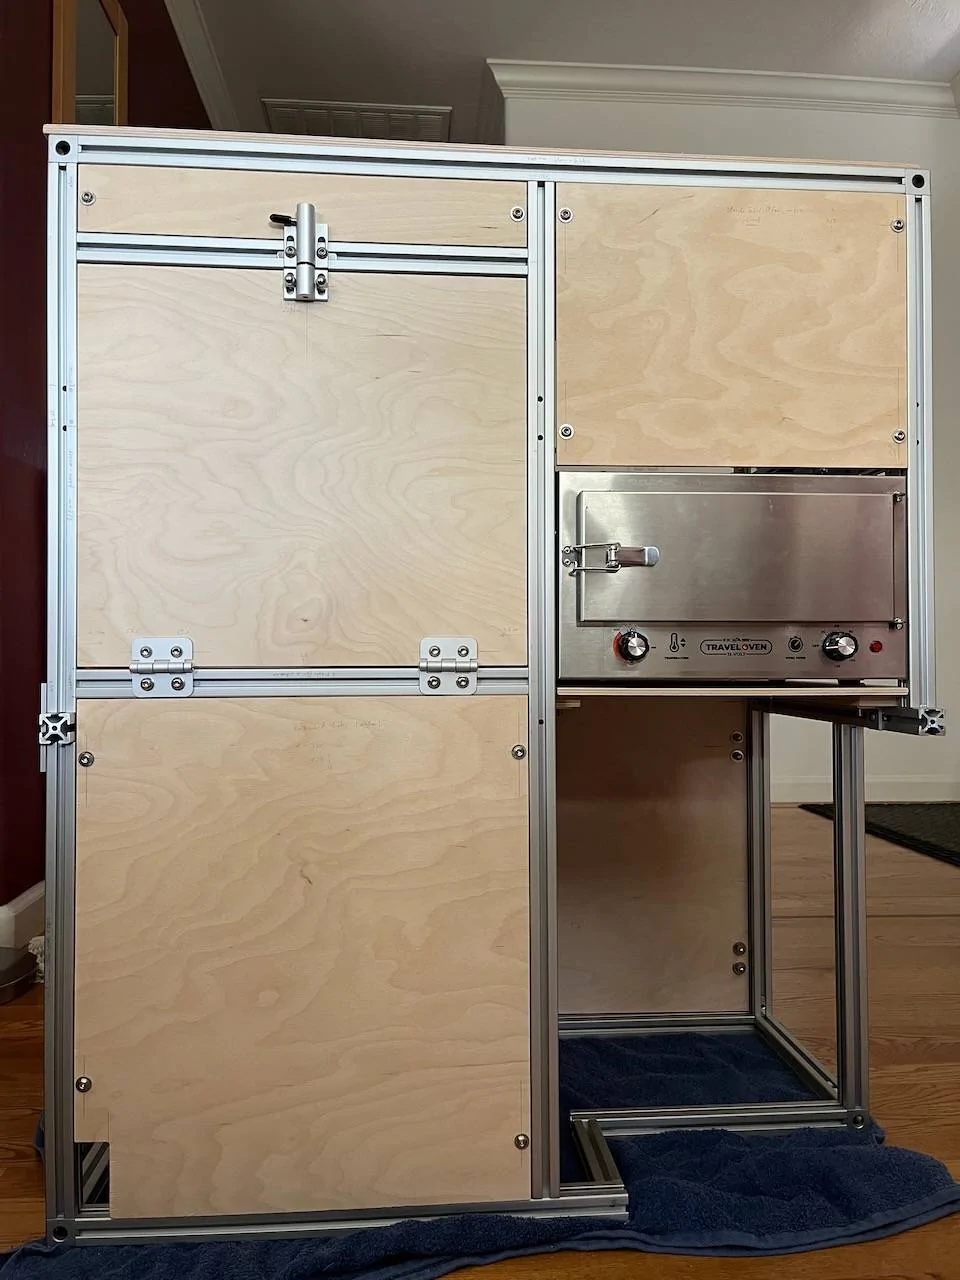
Perfect as a small work surface when we use the Travel Oven, which sits to the right of it.
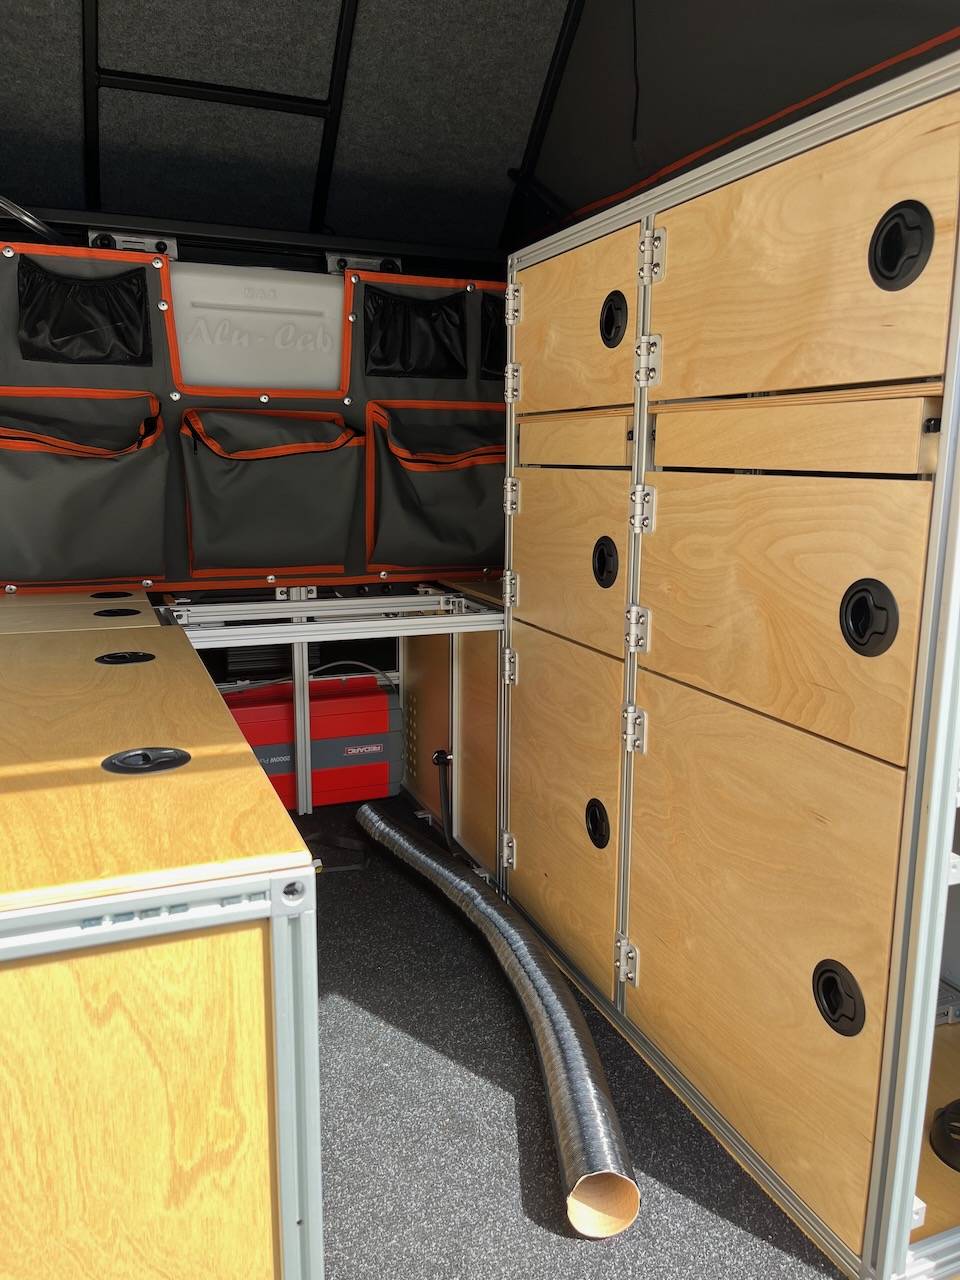
Sponsored

 
OP
OP
cug

cug

Well-Known Member
First Name
Guido
Joined
Apr 1, 2023
Threads
13
Messages
602
Reaction score
664
Location
Christchurch, New Zealand
Vehicle(s)
JTR EcoDiesel, Land Cruiser 79, BMW R1250GS
Build Thread
Link
Occupation
Just keeping busy
Progress:

Jeep Gladiator A new hope ... (build journal and component reviews) IMG_6232


Tables extended:

Jeep Gladiator A new hope ... (build journal and component reviews) IMG_6231


That'll give us a very nice interior table surface.

Next step will be to find out how to make the doors with the Southco latches we already have washboard proof ... it might not be a problem, but I'd rather think about this now while we still have time.

Would be an option to install an additional very simple push/pull latch that'll add vertical support on the latch side. Nothing fancy, just enough to hold the door a bit on that side as well, since the latches we have don't provide ANY vertical support (and we'd like to keep them).
 
OP
OP
cug

cug

Well-Known Member
First Name
Guido
Joined
Apr 1, 2023
Threads
13
Messages
602
Reaction score
664
Location
Christchurch, New Zealand
Vehicle(s)
JTR EcoDiesel, Land Cruiser 79, BMW R1250GS
Build Thread
Link
Occupation
Just keeping busy
We now have a plan for the Southco latches. They aren't optimal for our usecase, but we have them now and we are using them. Plan is to fabricate our own latch keepers.

Also found a better way of drilling the 2" (~51mm) holes for the latches: Using a template and the router works much better and cleaner than the hole saw. And is faster and easier.

So far so good.

Getting there. Backside towards the side window:

Jeep Gladiator A new hope ... (build journal and component reviews) IMG_6233
 
OP
OP
cug

cug

Well-Known Member
First Name
Guido
Joined
Apr 1, 2023
Threads
13
Messages
602
Reaction score
664
Location
Christchurch, New Zealand
Vehicle(s)
JTR EcoDiesel, Land Cruiser 79, BMW R1250GS
Build Thread
Link
Occupation
Just keeping busy
Currently it seems like everything is getting worse before it hopefully gets better. This build is driving me completely crazy, I want to be done with the main part and be able to use it ... it's so frustrating.
  • Diesel heater installation is blocked by the fact that I don't have one here. It's ordered now, but I don't have a delivery date yet.
  • [unblocked] Galley module is blocked by the need to 3D print some custom latch keepers to prevent the doors from rattling themselves to death on washboard roads.
  • We took out the "rear seat delete" platform today to finish the wood with Osmo and found that the panels had warped a bit, which was probably the reason why the fridge rattled a bit ... bummer. Now working on a solution to prevent this from happening again.
  • Couldn't finish the installation of the toilet due to being caught up with the shit above.
  • Ordered load bars for the rear door, estimate is this coming Friday. We need them to know where the mounting bolts go before we can move forward installing the table in the rear door.
  • The faucet we ordered is part of a larger shipment to our supplier, so was delayed due to shipping ... now only being shipped out from Germany on Monday. I don't want to put in the sink before I can place the faucet nicely ...
Hmpf. It's that part of the project where everything goes wrong until it hopefully and miraculously comes together ...

We are still waiting for that miracle though.

Jeep Gladiator A new hope ... (build journal and component reviews) Miracle-Occurs-4213401575


Also, there are so many ideas floating around how to install the diesel heater, this will get interesting. I probably won't find "the best" solution, but one that'll work for our planned trip to Alaska in fall.

Oh, and I'm sick and tired of my to-do list growing instead of shrinking. We've checked off more than 150 items on the list, and there are still 190 to go ... it's pretty detailed now, but still insanely frustrating when you plan to check off about ten in a particular day and all that happens is that you add ten ...

Mid March will be another shake down trip, we need to get stuff ready to test.
 
Last edited:

Sponsored

OP
OP
cug

cug

Well-Known Member
First Name
Guido
Joined
Apr 1, 2023
Threads
13
Messages
602
Reaction score
664
Location
Christchurch, New Zealand
Vehicle(s)
JTR EcoDiesel, Land Cruiser 79, BMW R1250GS
Build Thread
Link
Occupation
Just keeping busy
So, just to document this here as well (I've mentioned it on the ACCC thread):

The truck fits a standard 20' container.

Limiting factor with the containers is the door and on a standard container that door is 228cm high. The truck is 231cm, so 3cm higher. Not a problem, we can let air out of the tires, get the truck in, air back up for transport.

This is super nice since it gives us options that would otherwise be more complicated and/or much more expensive.
 
OP
OP
cug

cug

Well-Known Member
First Name
Guido
Joined
Apr 1, 2023
Threads
13
Messages
602
Reaction score
664
Location
Christchurch, New Zealand
Vehicle(s)
JTR EcoDiesel, Land Cruiser 79, BMW R1250GS
Build Thread
Link
Occupation
Just keeping busy
Since I'm blocked on a bunch of other, larger, items, I finally re-installed the Redarc BCDC as a secondary charger (the small Redarc device above the red inverter):

Jeep Gladiator A new hope ... (build journal and component reviews) IMG_6241


This will do the following:
  • Boost DC charging from 30A (Manager 30) to a total of 55A. That means, if I ever completely emtpy the 200Ah battery capacity, it can be recharged by four hours of driving. Not short, but certainly not long for this capacity.
  • The yellow lead in the picture will get attached somewhere, together with a ground connection of course, and provide a secondary solar input for a solar blanket or folding panel.
  • I still need to clean up the wiring a little bit, but it's 90% done and clean enough for my personal taste. E.g. I'm not wrapping each and every wire in protective sleeve, since this is 99% for looks anyways.
Now I'm cleaning up the DC power distribution as well:
  • I'm using a two way battery switch from Bluesea to switch DC charging to either Manager 30 only, BCDC25 only, or both together. Of course, it can also completely disconnect the truck 12V system.
  • The switch will be located conveniently in a panel next to the door, together with the exhaust fan switch for the toilet and some 115V outlets.
  • Both chargers are triggered via ignition.
  • Then I'll route a cable from the Redvision to the other side of the camper to a secondary fused switch panel to power the heater, water system, and travel oven.
So far so good. Moving slowly, but moving.
 
OP
OP
cug

cug

Well-Known Member
First Name
Guido
Joined
Apr 1, 2023
Threads
13
Messages
602
Reaction score
664
Location
Christchurch, New Zealand
Vehicle(s)
JTR EcoDiesel, Land Cruiser 79, BMW R1250GS
Build Thread
Link
Occupation
Just keeping busy
Okay, unblocked on working on the galley cabinet doors. Got this here 3D printed by a friend:

Jeep Gladiator A new hope ... (build journal and component reviews) Screenshot 2024-02-29 at 14.06.06


Going to try it out on one door to see whether it gives the needed vertical support to the door. From just holding it on and rattling on the door, it seems to work rather nicely. If it works out I'll get another six (I have two, four for the other four doors, two as spares) printed.

So, as soon as it stops raining here (hmpfgrmbl), I can work on this. Using the router indoors is a no go, that thing makes just too much of a mess.

Yesterday I did some work improving the existing wiring and boxing up the area underneath the Redarc panel in the camper corner:

Jeep Gladiator A new hope ... (build journal and component reviews) IMG_6242


Reminded me of the fact that there is not a single frigging square angle in this camper. Not a big deal, I basically cut it to fit and it worked out well.

Now onto installing a charge selector switch, a 120V power outlet, and the switch for the toilet fan – anybody in the Bay Area I can borrow a 20mm Forstner bit from? The 3/4" hole is too damn small (19mm) and the test plywood just started splintering when I tried to enlarge the hole ...

Also, if someone has a recommendation for a high quality 120V outlet, I'm all ears (until the one I have is installed).

And given the snail’s pace this build is progressing, we now have the official motto and logo for the build:

Jeep Gladiator A new hope ... (build journal and component reviews) PNG imag


Yeah, a furlong per fortnight is roughly about a snails pace ... ;-)
 
Last edited:
OP
OP
cug

cug

Well-Known Member
First Name
Guido
Joined
Apr 1, 2023
Threads
13
Messages
602
Reaction score
664
Location
Christchurch, New Zealand
Vehicle(s)
JTR EcoDiesel, Land Cruiser 79, BMW R1250GS
Build Thread
Link
Occupation
Just keeping busy
Oh, and YES, I'm going to get stickers printed with that logo ... :CWL:
 
OP
OP
cug

cug

Well-Known Member
First Name
Guido
Joined
Apr 1, 2023
Threads
13
Messages
602
Reaction score
664
Location
Christchurch, New Zealand
Vehicle(s)
JTR EcoDiesel, Land Cruiser 79, BMW R1250GS
Build Thread
Link
Occupation
Just keeping busy
Today we had some breaks in the rain and were able to cut the holes for the Southco latches and test out our 3D printed latch keeper prototype:

Jeep Gladiator A new hope ... (build journal and component reviews) IMG_6151


It works perfectly! There is zero rattle with the cabinet door closed, two silicone bumpers to prevent wood on wood rattle and the new latch keeper preventing vertical as well as horizontal movement.

We used the slightly less rainy times of the day to cut all the holes for the latches as well as more for the electrical compartment cover. Now waiting for the ordered 20mm Forstner bit which should arrive tomorrow to finish the electrical compartment, get everything wired up properly and we can check off one more task (actually quite a few more since it's a very detailed list) ...

And I took the liberty of ordering some sample stickers with the "Furlongs per Fortnight" snail ... but only after checking that I could get an Instagram account with the motto.
 

Sponsored

OP
OP
cug

cug

Well-Known Member
First Name
Guido
Joined
Apr 1, 2023
Threads
13
Messages
602
Reaction score
664
Location
Christchurch, New Zealand
Vehicle(s)
JTR EcoDiesel, Land Cruiser 79, BMW R1250GS
Build Thread
Link
Occupation
Just keeping busy
It's slow going these days. Since we had tested the new latch keepers, we've been busy cutting the holes for the latches into the doors, cutting and drilling the counter pieces to mount the latch keepers, and then ... lots and lots of wood finishing. Our whole house looks like a wood shop right now with parts drying everywhere.

At least the doors are done now and here's the front view of our galley module:

Jeep Gladiator A new hope ... (build journal and component reviews) IMG_6248


Large wood pieces drying in the garage, these are the rear seat delete wood panels, waiting for the second coat of Osmo:

Jeep Gladiator A new hope ... (build journal and component reviews) IMG_6249


And smaller parts drying all over the house:

Jeep Gladiator A new hope ... (build journal and component reviews) IMG_6250


These two are actually ready to be installed, once the torrential rains here in the area are over.

Electrical Improvements

When the above panels get installed, the final touches to the main electrics will also get done. A power distribution switch (large hole in the middle), a 120V outlet (medium hole at the bottom) and the switch for the toilet fan (small hole at the top) will go there. Then the only remaining pieces on that side are to cut two holes into the camper itself: shore power and toilet vent. All in good time.

GMRS radio

Also found a good place to mount the GMRS radio base unit (Midland MXT275 which I've already had for some years). Now need to explore ways to get the antenna cable out of the cabin and also a way to mount it somewhere in the hood area.

The main unit will get mounted to the front support of the seat delete platform, together with a small fuse block and negative busbar to supply the various 12V appliances in the truck cabin (fridge, radio, flashlight charger).

Again, it feels like everything is moving at a snail's pace and in reality it unfortunately is. I'd love to do more, but we are limited in what we can do indoors without having dry access to the truck. So, more to come when the weather clears.
 
OP
OP
cug

cug

Well-Known Member
First Name
Guido
Joined
Apr 1, 2023
Threads
13
Messages
602
Reaction score
664
Location
Christchurch, New Zealand
Vehicle(s)
JTR EcoDiesel, Land Cruiser 79, BMW R1250GS
Build Thread
Link
Occupation
Just keeping busy
A power distribution switch (large hole in the middle), a 120V outlet (medium hole at the bottom) and the switch for the toilet fan (small hole at the top) will go there.
And this is how this looks like:

Jeep Gladiator A new hope ... (build journal and component reviews) IMG_6251


The selector switch lets me switch my DCDC charging connections. Either completely cut of the connection from the alternator to the house batteries (OFF), Manager 30 charging (1 – 30A), BCDC25 charging (2 - 25A), or Manager 30 + BCDC25 (1+2, 55A).

Normally, we'll leave this on 1, to not strain the alternator/battery unneccessarily, but in case we need to re-charge a lot fast, we can switch over to "full power" ...
 
OP
OP
cug

cug

Well-Known Member
First Name
Guido
Joined
Apr 1, 2023
Threads
13
Messages
602
Reaction score
664
Location
Christchurch, New Zealand
Vehicle(s)
JTR EcoDiesel, Land Cruiser 79, BMW R1250GS
Build Thread
Link
Occupation
Just keeping busy
Argl. Again, one of these days where you could have learned quite a few German choice words ...

Had these made:

Jeep Gladiator A new hope ... (build journal and component reviews) IMG_6255


And then these a-holes at F***book decided that the account is "not according to our guidelines" and completely blocked it. Yeah, they asked a few questions, I answered all, I gave them all the identifying crap they asked for (and hated every moment of it) and then they still decided to block it. F****** ...

Okay. New plan. Domain reserved and will just do my own website for it. Maybe I'll post some stuff on my personal Instagram account, but I don't think I'll keep it up. Eff 'em.
 
OP
OP
cug

cug

Well-Known Member
First Name
Guido
Joined
Apr 1, 2023
Threads
13
Messages
602
Reaction score
664
Location
Christchurch, New Zealand
Vehicle(s)
JTR EcoDiesel, Land Cruiser 79, BMW R1250GS
Build Thread
Link
Occupation
Just keeping busy
Another test fit in the truck ... figuring out how to mount the ducting for the heater as well as the heater unit itself.

Jeep Gladiator A new hope ... (build journal and component reviews) IMG_6263


Jeep Gladiator A new hope ... (build journal and component reviews) IMG_6264


Oh, and regarding the color variation of th wood: I have no idea why this looks so different. It's all Baltic Birch, but from different batches. And depending on the grain direction it also looks different from different viewing angles.
 
OP
OP
cug

cug

Well-Known Member
First Name
Guido
Joined
Apr 1, 2023
Threads
13
Messages
602
Reaction score
664
Location
Christchurch, New Zealand
Vehicle(s)
JTR EcoDiesel, Land Cruiser 79, BMW R1250GS
Build Thread
Link
Occupation
Just keeping busy
Today we could finally put the seat delete storage platform back in. Quite a few more bolts and a more solid foundation should now keep it exactly as it's supposed to be.

Jeep Gladiator A new hope ... (build journal and component reviews) IMG_6266


We lengthened the foundation 80/20 to nearly the full length of the boards, then put another crossbrace in the middle. All wood parts treated with Osmo as well.

There will be rubber backed carpet on top of the wood, so things don't slide around. Also replaced the nasty black hardware (cheap Amazon crap that left black residue on surfaces and was just overall total crap) with proper stainless hardware. Much better now.

Then dry installed the in-car 12V subsystem and the Midland MXT275:

Jeep Gladiator A new hope ... (build journal and component reviews) IMG_6267


The above is the top view on the rear passenger side footwell. The ARB compressor is under the seat, there is a small fuse block, a negative busbar and the radio main unit. Cabling will be done in the next few days.

The fuse block will be used for the fridge, radio, as well as the charger for the Maglite.
Sponsored


Top