RodRecket
Well-Known Member
- Thread starter
- #1
For what it's worth, this will be a long read and have a lot of specific use-case for my Gladiator. Hopefully someone finds it useful, but it won't work for everyone.
Why did I do this?
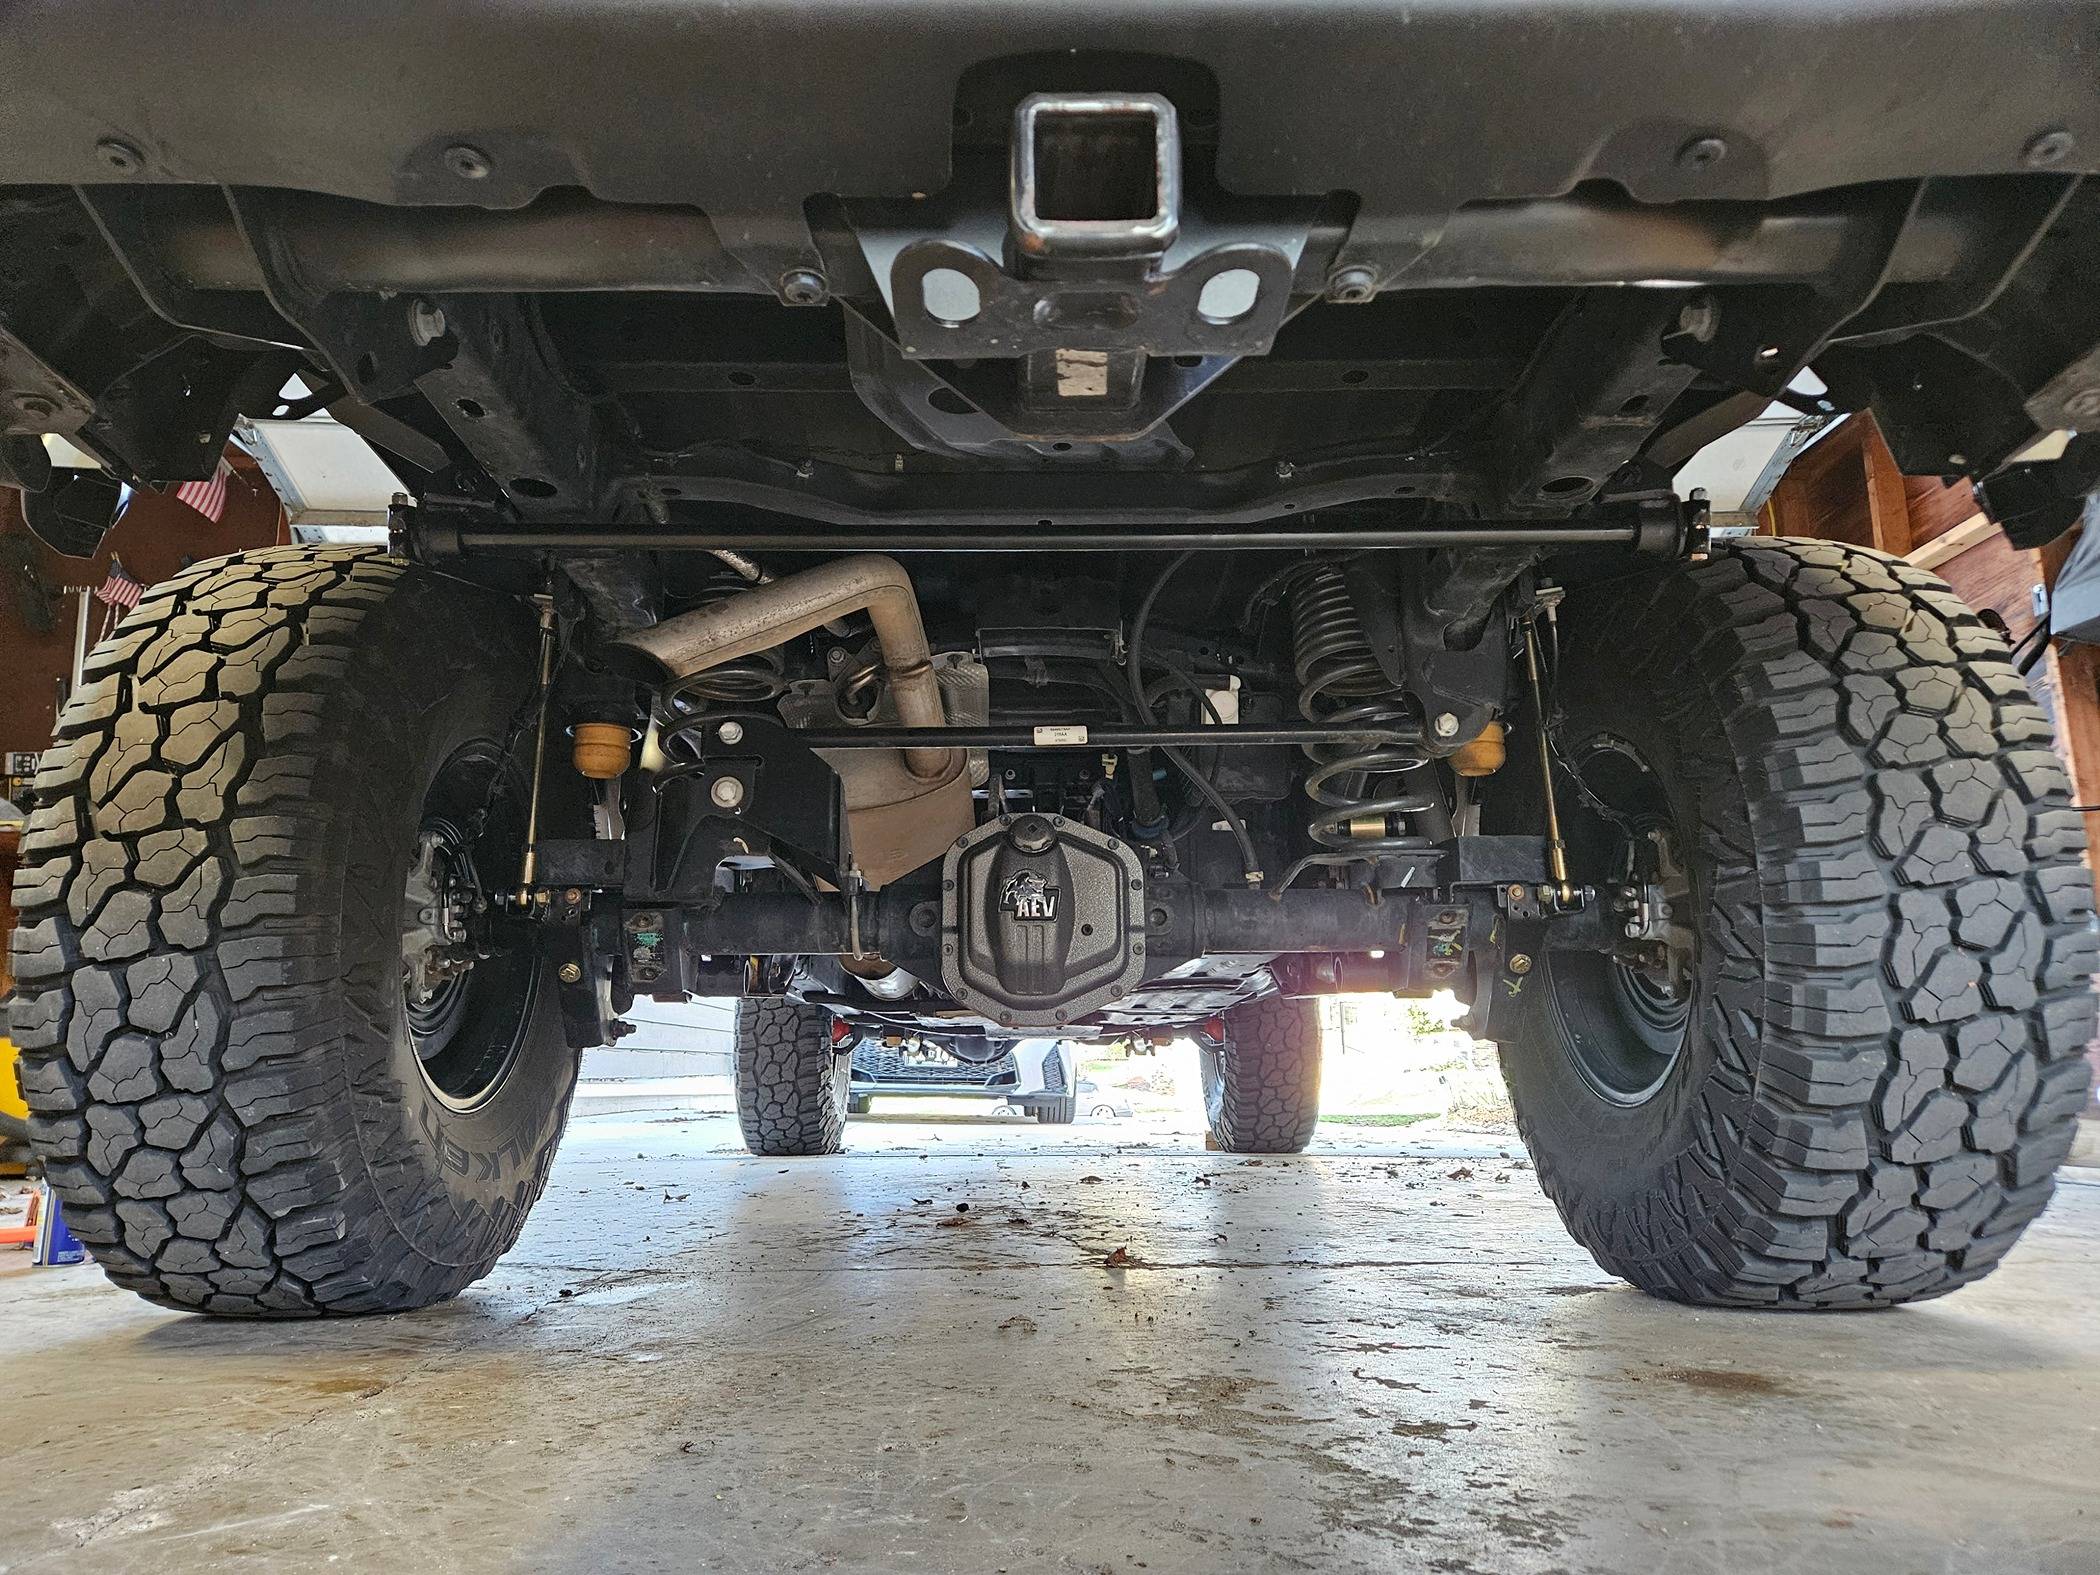
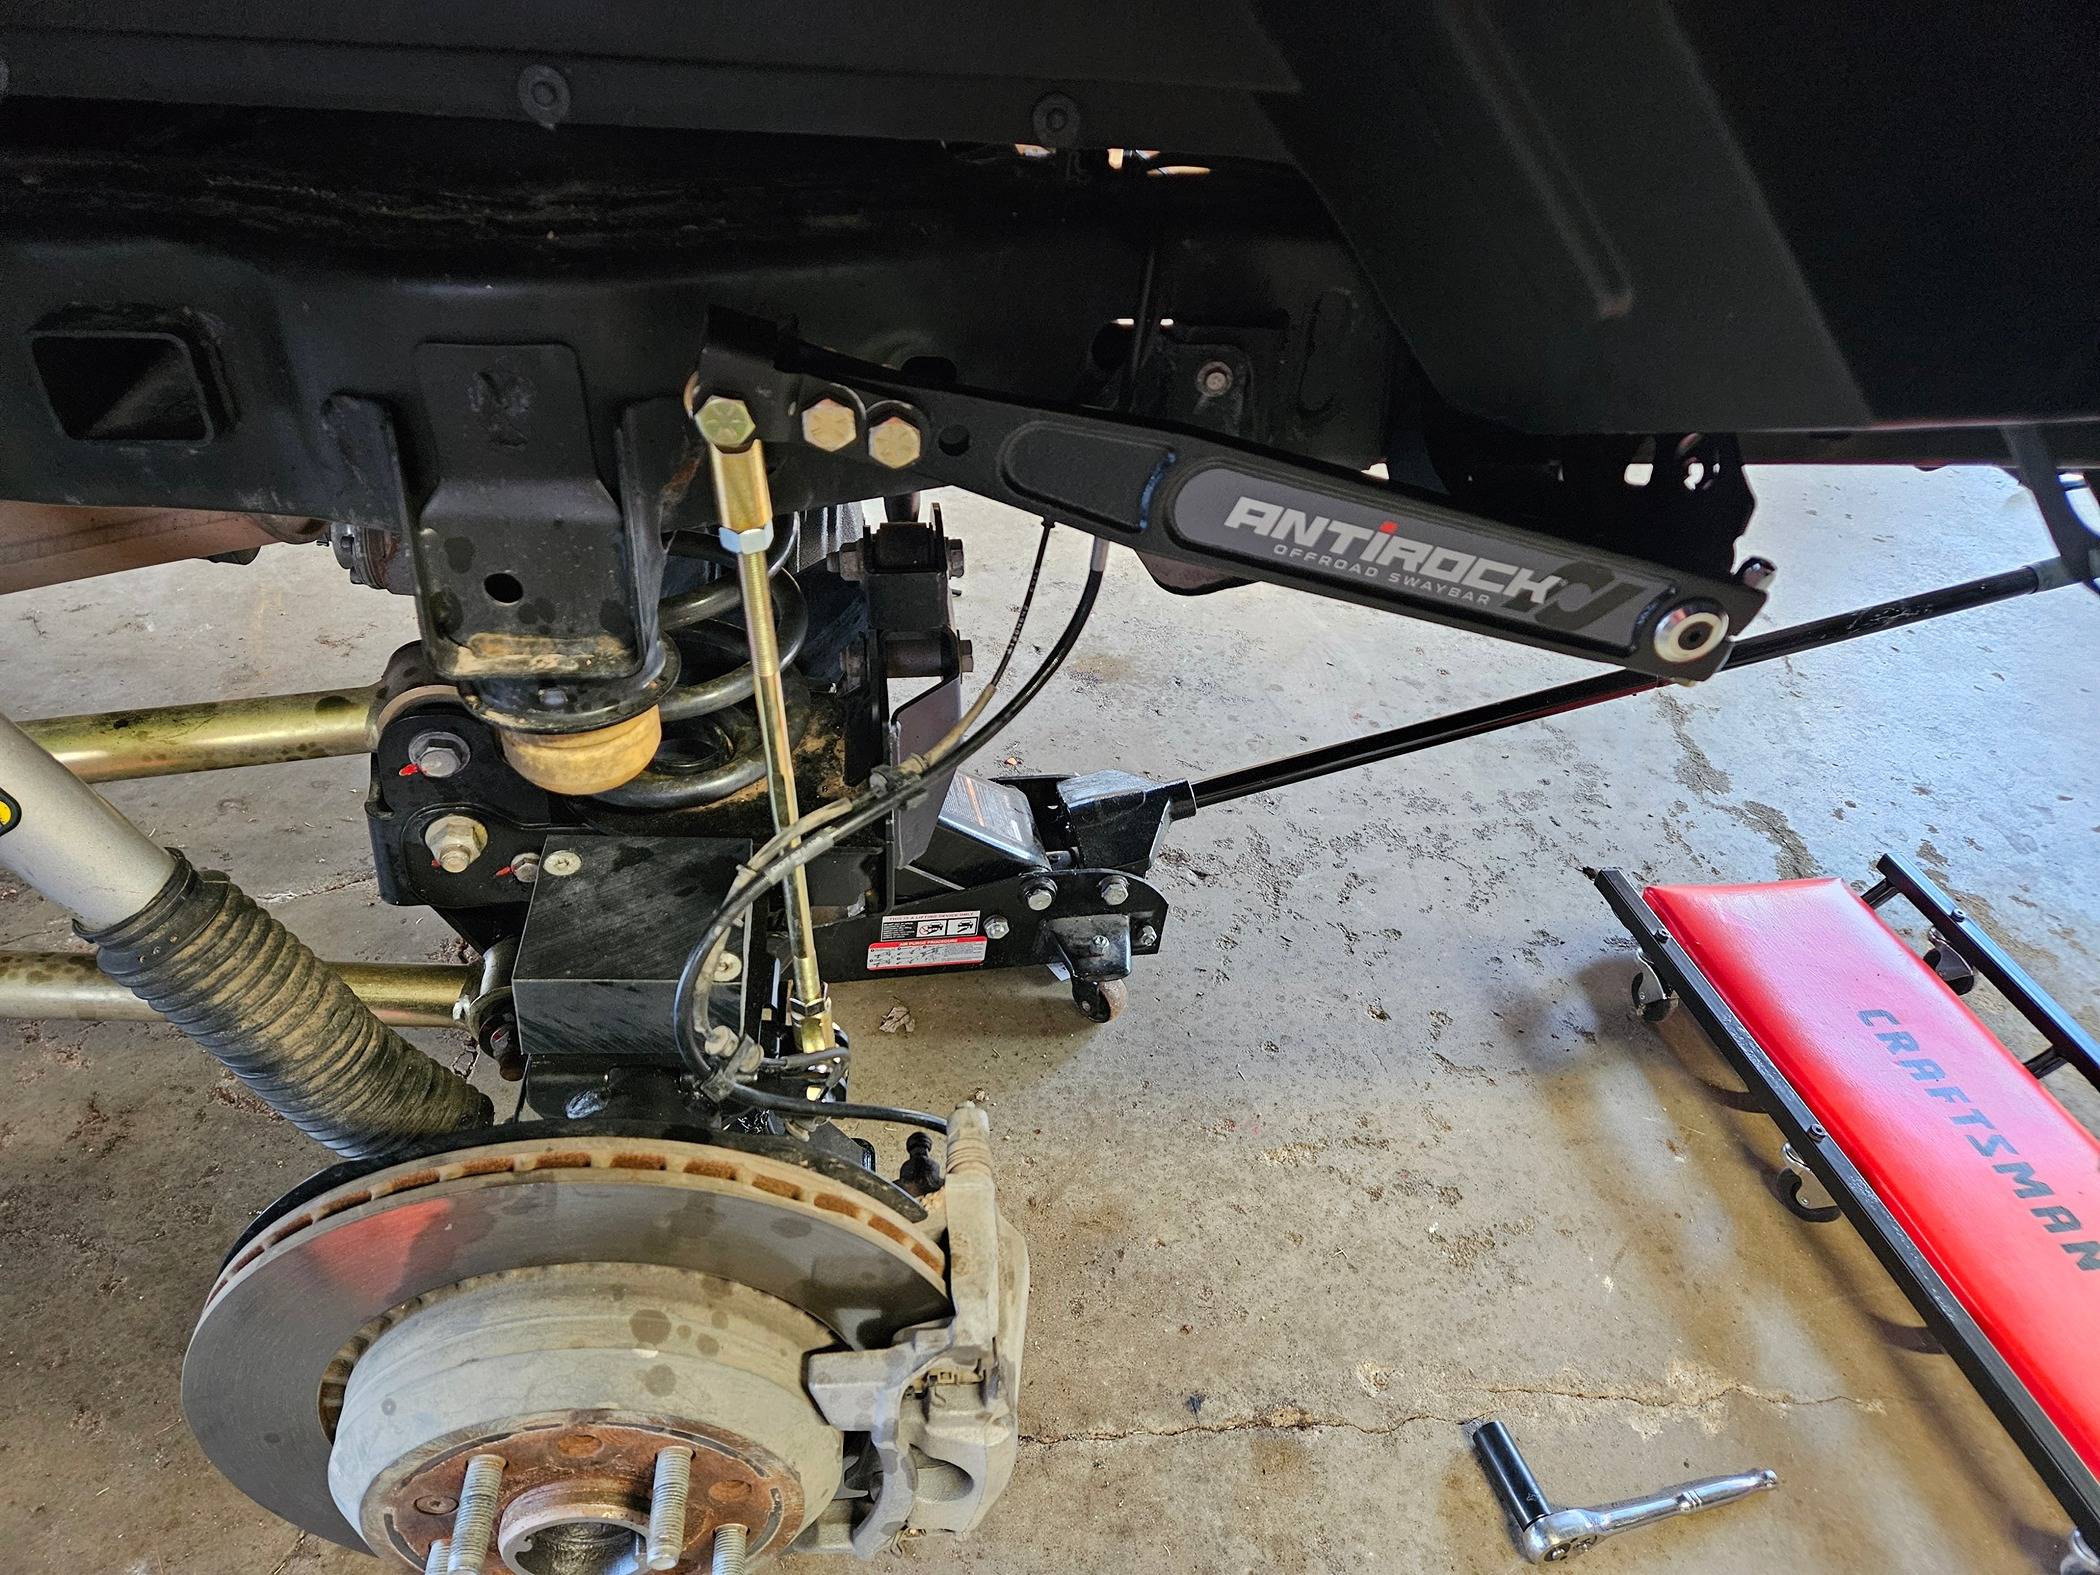
I hit up a trail run with Artec in Moab and was scoping out their badass JT. I noticed they were running normal antirock arms and the torsion bar running under the frame using their own brackets. I thought was pretty dang slick. The rear antirock has been on my list for quite a while but it is so expensive. I thought this solution might be a way to run a more streamline antirock while saving a couple bucks. So, when I got home I ordered up the brackets and all the parts from rockjock per Artecs recommendations. I got all the parts and started to try to figure it out. To my bewilderment there was no accommodation for attaching the endlinks to the axle. I called artec and they said they just welded a tab to the diff. That is not a solution for me so it was back to the drawing board. I basically ordered the axle side of the rockjock antirock kit and the frame side of the artec bracket/antirock kit and made it into one complete kit for me.
By the time you add up all the parts it is not very different in cost compared to rockjocks kit. However, this way of building the antirock does not require you to move any wiring or connections or grind the frame tabs.
All said, I'm very happy with the results. It worked out but it took quite a bit of extra research and trial/error.
For this set up to work you will need to have the following modifications:
- chopped exhaust (I cut the back resonator off just after the over axle bend)
- spare tire relocation (I run 38s that don't fit in the under bed location and have relocated it using an AEV tie down in the bed)
Here is a parts list:
RJ-255200-101
Antirock Hardware; for JT Rear; Incl. All Kit Hardware Except
RJ-253202-101
1 RJ-201000-101
Antirock Double Shear End Link Bracket Kit; Extends Arm Length
1 1/2 in. (*spacer should be set on either side of the arm to center the heim joint/end link*)
1 RJ-251201-1
Bracket; Axle; Steel; Antirock Sway Bar; JT Right Rear; Semi-Gloss
Black PC Finish (*to reuse my bumpstop pads/hardware I cut the welded nut off of this bracket*)
1 RJ-251201-2
Bracket; Axle; Steel; Antirock Sway Bar; JT Left Rear; Semi-Gloss
Black PC Finish (*to reuse my bumpstop pads/hardware I cut the welded nut off of this bracket*)
CE-9901D
Bushing; Antirock Sway Bar; UHMW; 1.560 in. OD x 1.780 in. ID
(press surface; w/o 1/4 in. flange)
1 CE-99002RD2
End Links; Antirock; 14 in. Rods x 1/2in.-20 RH/LH Threads;
Adjustable; Incl. RH/LH Heim Joints
1 CE-9900JR4-BAR
Antirock Sway Bar; 50 in. Long x 1 in. Dia.; Semi-Gloss Black
Finish; Each
1 CE-99005A
HARDWARE KIT - FOR ANTIROCK ARMS
1 RJ-202003-101
Antirock Arms; Forged 4340 Chromoly; 18 in. Long; Flat; (3) 1/2
in. Holes; Semi-Gloss Black PC Finish; Pair
ARTEC INDUSTRIES REAR SWAY BAR BRACKETS

Why did I do this?
I hit up a trail run with Artec in Moab and was scoping out their badass JT. I noticed they were running normal antirock arms and the torsion bar running under the frame using their own brackets. I thought was pretty dang slick. The rear antirock has been on my list for quite a while but it is so expensive. I thought this solution might be a way to run a more streamline antirock while saving a couple bucks. So, when I got home I ordered up the brackets and all the parts from rockjock per Artecs recommendations. I got all the parts and started to try to figure it out. To my bewilderment there was no accommodation for attaching the endlinks to the axle. I called artec and they said they just welded a tab to the diff. That is not a solution for me so it was back to the drawing board. I basically ordered the axle side of the rockjock antirock kit and the frame side of the artec bracket/antirock kit and made it into one complete kit for me.
By the time you add up all the parts it is not very different in cost compared to rockjocks kit. However, this way of building the antirock does not require you to move any wiring or connections or grind the frame tabs.
All said, I'm very happy with the results. It worked out but it took quite a bit of extra research and trial/error.
For this set up to work you will need to have the following modifications:
- chopped exhaust (I cut the back resonator off just after the over axle bend)
- spare tire relocation (I run 38s that don't fit in the under bed location and have relocated it using an AEV tie down in the bed)
Here is a parts list:
RJ-255200-101
Antirock Hardware; for JT Rear; Incl. All Kit Hardware Except
RJ-253202-101
1 RJ-201000-101
Antirock Double Shear End Link Bracket Kit; Extends Arm Length
1 1/2 in. (*spacer should be set on either side of the arm to center the heim joint/end link*)
1 RJ-251201-1
Bracket; Axle; Steel; Antirock Sway Bar; JT Right Rear; Semi-Gloss
Black PC Finish (*to reuse my bumpstop pads/hardware I cut the welded nut off of this bracket*)
1 RJ-251201-2
Bracket; Axle; Steel; Antirock Sway Bar; JT Left Rear; Semi-Gloss
Black PC Finish (*to reuse my bumpstop pads/hardware I cut the welded nut off of this bracket*)
CE-9901D
Bushing; Antirock Sway Bar; UHMW; 1.560 in. OD x 1.780 in. ID
(press surface; w/o 1/4 in. flange)
1 CE-99002RD2
End Links; Antirock; 14 in. Rods x 1/2in.-20 RH/LH Threads;
Adjustable; Incl. RH/LH Heim Joints
1 CE-9900JR4-BAR
Antirock Sway Bar; 50 in. Long x 1 in. Dia.; Semi-Gloss Black
Finish; Each
1 CE-99005A
HARDWARE KIT - FOR ANTIROCK ARMS
1 RJ-202003-101
Antirock Arms; Forged 4340 Chromoly; 18 in. Long; Flat; (3) 1/2
in. Holes; Semi-Gloss Black PC Finish; Pair
ARTEC INDUSTRIES REAR SWAY BAR BRACKETS

Sponsored
Last edited: