Michael@WeGo4WhlLow
Active Member
- First Name
- Michael
- Joined
- Jul 6, 2020
- Threads
- 3
- Messages
- 42
- Reaction score
- 126
- Location
- Ovilla TX.
- Vehicle(s)
- 2020 Gladiator Overland
- Occupation
- Area Director
- Thread starter
- #1
Hello all, new to forum… Not new to Jeeping!!!
Just picked up my Gladiator a few weeks ago and have already started some work on it.
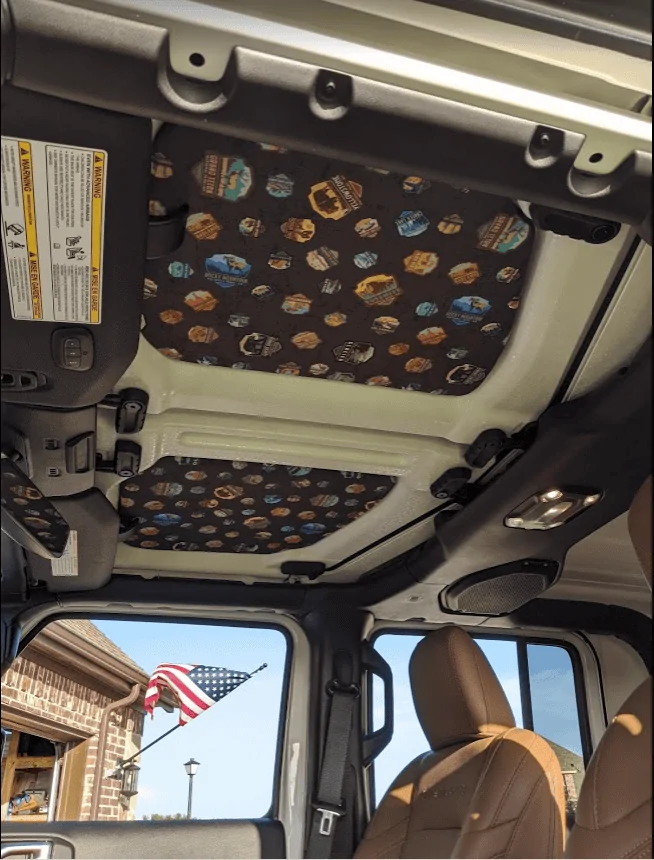
I’m a big fan doing all my MOD’s myself and off-road function over being a Mall Crawler, but my pockets are not the deep. It has taken me 8 years to get my JK set up right (I did not install the lockers and 4.88’s)… With that being said one of my very first MOD’s to the JK was Headliners. We lived in Phoenix at the time and the 110 degree heat was a killer in the hard top. Hothead liners and Mopar are great, just can’t afford them and pricey for just some foam/fabric!! The 8 year old headliners I made are still holding up well after 154,000 miles, so I thought I would make some up for the Gladiator….
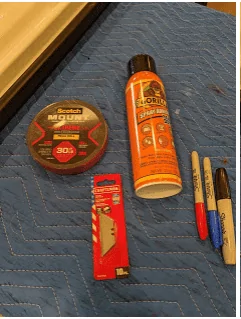
DIY head liner Parts List:

Just picked up my Gladiator a few weeks ago and have already started some work on it.
I’m a big fan doing all my MOD’s myself and off-road function over being a Mall Crawler, but my pockets are not the deep. It has taken me 8 years to get my JK set up right (I did not install the lockers and 4.88’s)… With that being said one of my very first MOD’s to the JK was Headliners. We lived in Phoenix at the time and the 110 degree heat was a killer in the hard top. Hothead liners and Mopar are great, just can’t afford them and pricey for just some foam/fabric!! The 8 year old headliners I made are still holding up well after 154,000 miles, so I thought I would make some up for the Gladiator….
DIY head liner Parts List:
- Scotch 1 in. x 11.1 yds. Permanent Double Sided Extreme Mounting Tape
- https://www.homedepot.com/p/3M-Scot...ed-Extreme-Mounting-Tape-414-LONGDC/205507375
- Spray Adhesive Gorilla
- https://www.homedepot.com/p/Gorilla-14-oz-Spray-Adhesive-6301502/303508262
- Poly Rigid Foam Insulation Board.
- https://www.homedepot.com/p/R-Matte...-Rigid-Foam-Insulation-Board-754404/100572981
- Double Reflective insulation roll (optional)
- https://www.homedepot.com/p/Everbil...sulation-Staple-Tab-ADD04-610x7-5ST/307281309
- Project fleece polyester batting
- https://www.joann.com/fairfield-project-fleece-polyester-90in-batting-by-the-yard/16838559.html
- Fabric, I bought 3 yard to do front and back… 2 yard could be close!! Etsy.com
- https://www.etsy.com/market/national_park_fabric
- Poster Board, New razor blades, Rubbing Alcohol, 150 grit sand paper and markers…
-

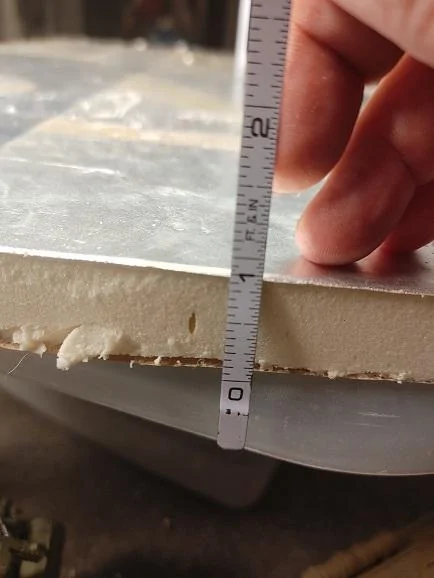
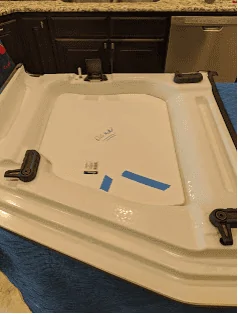
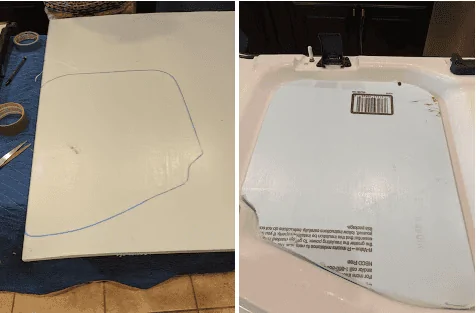
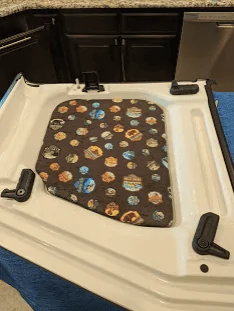
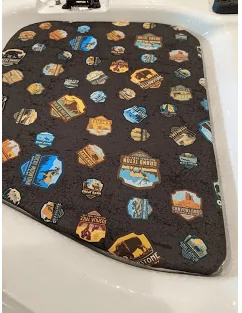
Step #1. Make template out of poster board of your freedom top panels. Leave about 1/8” clearance all around for the width of fabric and foam.
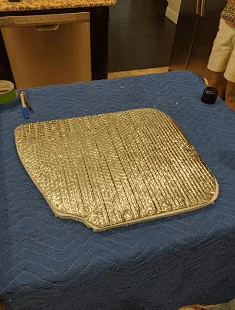
Step #2. Set template on foam board and trace around edge to outline. Cut foam slowly with razor blade. I used 150 grit paper to smooth the edges out and to round the corners better. (Some other forums people are using X-Acto Knife, Jig saw, Molding saw) use whatever works for you….

Step #3. Use template again to cut out Double Reflective insulation and glue to foam board. Use the spray adhesive on both the foam board and insulation, let sit apart for 1-2 minutes and then press together. (Follow directions on Can)

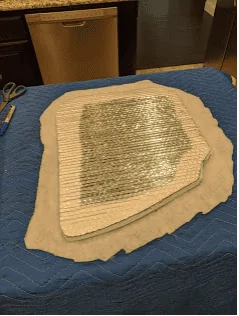
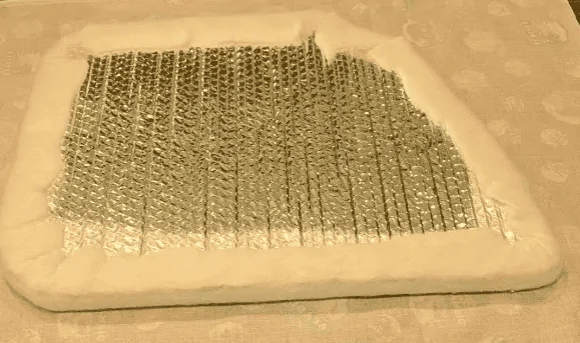
Step #4. Lay fleece batting on table and place foam cut out on it. Cut the batting out leaving a 2-3 inch over hang to fold around the foam cut out. Spray adhesive on the foam side of the panel (the side that would face the driver/passenger) The Double Reflective insulation side faces up!!! Spray Adhesive on the batting, wait 1-2 minutes and press together.

Step #5. Spray adhesive on the panel around the edge. 2-3 inches around panel will do, also spray the batting and sides of the foam all the way around. Let sit 1-2 minutes and then pull batting around the edge. Do it slowly and make sure the corners do not bunch up. On the corners cut extra material out to get everything to lay flat.

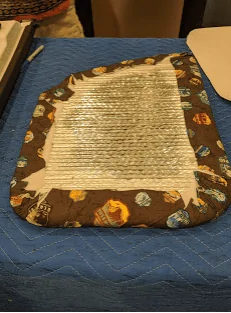
Step #6. Lay fabric down on table and place panel on top. Cut out leaving 2-3 inches all the way around. Spray adhesive on batting side of panel and upside of fabric. Let sit 1-2 minutes and press together. Spray the adhesive around the panel sides and top leaving a 2-4 inch edge all the way around (Spray on top of batting). Let sit 1-2 minutes and then pull up around edge making sure the corners are not bunched up. Cut extra fabric out to make the corners ley flat and smooth.

Step #7. Clean freedom panel on the inside were the double sided tape will go using rubbing alcohol and dry with paper towel. I laid down 4 strips of double side tape for each panel. Press new headliner into freedom panel. (Sorry no pics)


Step #8. Install panel an enjoy the better sound and less heat!!!

I have not done the back yet, will update in the next few weeks when done. Please PM if I can help you get this done. I live south of Dallas and anyone can swing by my house to help get this done or any other great wrenching!!!
Thanks, safe travel and remember “Getting lost is just bonus miles”.
Michael G.
Thanks -


Sponsored