Sponsored

Export Tail lights on NA Spec Gladiator

YAABUGGN

Active Member
First Name
Erik
Joined
May 20, 2020
Threads
0
Messages
42
Reaction score
21
Location
Long Island, NY
Vehicle(s)
2017 Ram 2500, 2001 Audi TT
Occupation
Aeronautical Radio Operator
I bought two plugs, spent about $80 for them, and bought a standard bumper wiring harness to use as a mock up if I found the wires in the main harness. If I were to do it again, I'd just buy the rear license plate harness $24, splice in the extra length on the right and left side and save money as they're the right plug, just with a 90° bend in the plug. Let me check my post and I'll update the part number.

Edit: rear license plate harness part number 68349976AC
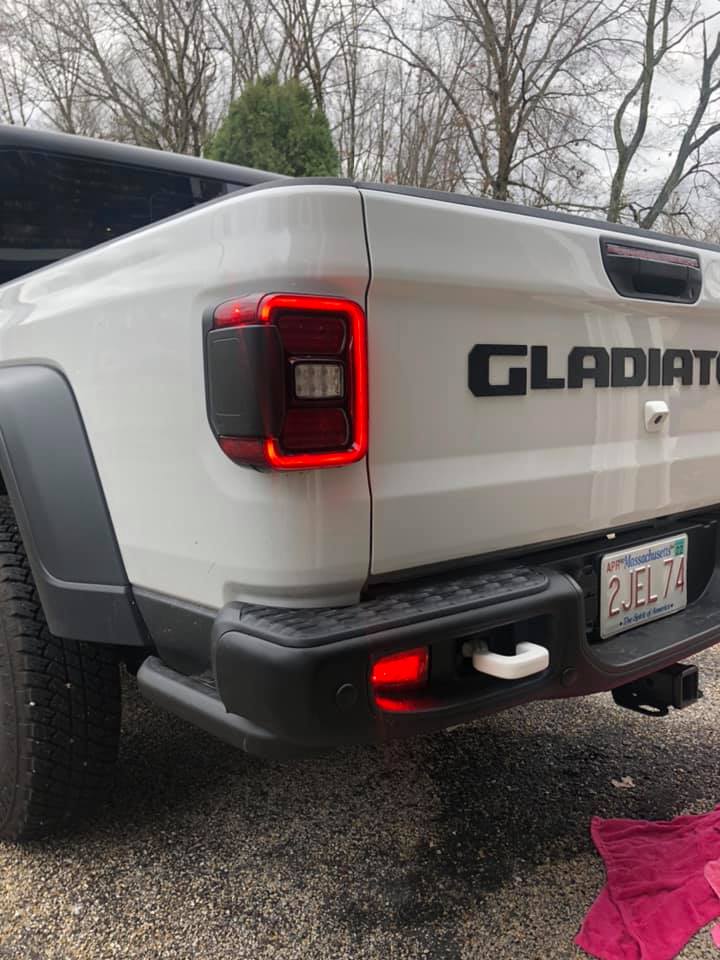
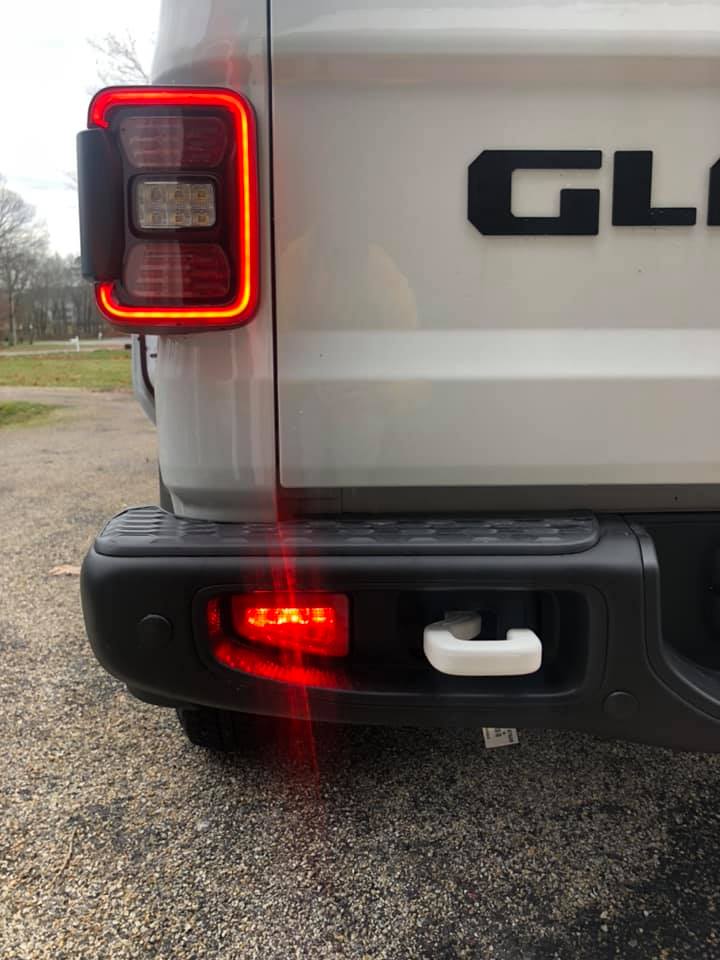
Thanks my man. I'm staying tuned. But I may follow your footsteps here and run the fogs through the AUX3 until you fine men/women figure out a way to get it to work using the Front/Rear Fog switch.
Sponsored


Jeepman_94

Member
First Name
Ben
Joined
Feb 3, 2018
Threads
0
Messages
7
Reaction score
9
Location
Grove City, Ohio
Vehicle(s)
Gladiator Rubicon
Vehicle Showcase
1
I have the rear fogs.. I see what you did for the wiring, but what I can't figure out is what did you do to plug into the rear fog unit? Did you have to buy a pigtail plug/kit and wire from that? (If so, do you have the Part Number?)
When I was installing my rear fog lights, I did some searches and found a picture of a plug that had a part number. Then looking at the Mopar Connecter Repair site which gave a drawing of the plug, I found that the plug used for the rear fog lamp is also a 2 pin auto camshaft solenoid valve plug wire connector used on some older Japanese motors. The part number on the plug is 872-857-561. I bought them on ebay from China and cost me $13 for 2. It took a while to get them but they are the same exact plug that is used from the factory. Hope this helps.
 

YAABUGGN

Active Member
First Name
Erik
Joined
May 20, 2020
Threads
0
Messages
42
Reaction score
21
Location
Long Island, NY
Vehicle(s)
2017 Ram 2500, 2001 Audi TT
Occupation
Aeronautical Radio Operator
When I was installing my rear fog lights, I did some searches and found a picture of a plug that had a part number. Then looking at the Mopar Connecter Repair site which gave a drawing of the plug, I found that the plug used for the rear fog lamp is also a 2 pin auto camshaft solenoid valve plug wire connector used on some older Japanese motors. The part number on the plug is 872-857-561. I bought them on ebay from China and cost me $13 for 2. It took a while to get them but they are the same exact plug that is used from the factory. Hope this helps.
I appreciate that. I'm just one of those guys that would stick to a "Mopar" provided part then order from China. I did look it up though, est delivery for those two plugs would be Dec 2nd lol. My patients won't last that long

I'm going with the spare 68349976AC options and cutting the plugs/harness up to make my own wire harness to the engine bay aux switches.
 
OP
OP
JTRUBI

JTRUBI

Well-Known Member
First Name
Chris
Joined
Nov 10, 2018
Threads
55
Messages
847
Reaction score
1,468
Location
Toronto
Vehicle(s)
Jk rubicon
Build Thread
Link
So I was planning to just hard wire it to my aux switch but I used the JSCAN app and was able to get the rear fog light switch to work off the dash. I need to figure out out to remove the rear fog light switch so that I can access it to run power but this is good new. A simple flash will make the North America fog light switch work like the Euro spec one and the light illuminates on the dash.

If anyone knows how the fog light switch is removed from the dash that would help.
Jeep Gladiator Export Tail lights on NA Spec Gladiator BF934A79-66C8-4236-93BE-BD817D932116
 

YAABUGGN

Active Member
First Name
Erik
Joined
May 20, 2020
Threads
0
Messages
42
Reaction score
21
Location
Long Island, NY
Vehicle(s)
2017 Ram 2500, 2001 Audi TT
Occupation
Aeronautical Radio Operator
So I was planning to just hard wire it to my aux switch but I used the JSCAN app and was able to get the rear fog light switch to work off the dash. I need to figure out out to remove the rear fog light switch so that I can access it to run power but this is good new. A simple flash will make the North America fog light switch work like the Euro spec one and the light illuminates on the dash.

If anyone knows how the fog light switch is removed from the dash that would help.
BF934A79-66C8-4236-93BE-BD817D932116.jpeg
This is beautiful news!
I wish I had more information on the removal.

But totally keep us posted on this! we'd be ecstatic to know
 

Sponsored

OP
OP
JTRUBI

JTRUBI

Well-Known Member
First Name
Chris
Joined
Nov 10, 2018
Threads
55
Messages
847
Reaction score
1,468
Location
Toronto
Vehicle(s)
Jk rubicon
Build Thread
Link
Will do. I think I found out how to remove the fog light switch from the JL forums, but I have a busy week at work, so hopefully next weekend I have the time and I can try and get this wired up.
This is beautiful news!
I wish I had more information on the removal.

But totally keep us posted on this! we'd be ecstatic to know
 

SPED1

Well-Known Member
First Name
Steve
Joined
Nov 10, 2020
Threads
5
Messages
242
Reaction score
323
Location
earth
Vehicle(s)
2020 gladiator sport 2005 tj wrangler
Occupation
service & parts supervisor
REMOVAL AND INSTALLATION
GC0182531.png
Courtesy of CHRYSLER GROUP, LLC​
REMOVAL
  1. Disconnect and isolate the negative battery cable(s). Refer to BATTERY DISCONNECT AND CONNECTION .
  2. Remove the driver side instrument panel cover, Refer to COVER, INSTRUMENT PANEL, REMOVAL AND INSTALLATION .
  3. Using a trim stick or equivalent tool, release the four tabs (1) that secure the head lamp switch (2) to the cover.
  4. Remove the head lamp switch from the cover.
INSTALLATION
  1. Snap the head lamp switch (2) into the instrument panel cover confirming that all four retainers (1) are seated fully.
  2. Install the driver side instrument panel cover, Refer to COVER, INSTRUMENT PANEL, REMOVAL AND INSTALLATION .
  3. Connect the negative battery cable(s). Refer to BATTERY DISCONNECT AND CONNECTION .
  4. Test the operation of the head lamp switch.
 

SPED1

Well-Known Member
First Name
Steve
Joined
Nov 10, 2020
Threads
5
Messages
242
Reaction score
323
Location
earth
Vehicle(s)
2020 gladiator sport 2005 tj wrangler
Occupation
service & parts supervisor
  1. Disconnect and isolate the negative battery cable(s). Refer to BATTERY DISCONNECT AND CONNECTION .
  2. Remove the A-pillar trim panel. Refer to PANEL, A-PILLAR TRIM, REMOVAL AND INSTALLATION.
  3. Using a trim stick or equivalent, remove the end cap.
  4. Remove the cluster bezel. Refer to BEZEL, INSTRUMENT CLUSTER, REMOVAL AND INSTALLATION.
  5. Remove the steering column opening cover. Refer to COVER, STEERING COLUMN OPENING, REMOVAL AND INSTALLATION.
  6. Remove the screws for the steering column gap hider and move slightly forward releasing it from retainers and positioning it away from IP cover.
    Jeep Gladiator Export Tail lights on NA Spec Gladiator GC0182531
    Courtesy of CHRYSLER GROUP, LLC​
  7. Remove the 10 screws (1) securing the cover to the IP reinforcement, disconnect the wire harness connector and remove the cover.
INSTALLATION

Jeep Gladiator Export Tail lights on NA Spec Gladiator GC0182531
Courtesy of CHRYSLER GROUP, LLC​
  1. Position the cover over the IP reinforcement, connect the wire harness connector and install the screws (1).
  2. Position gap hider back into place and install screws.
  3. Install steering column opening cover. Refer to COVER, STEERING COLUMN OPENING, REMOVAL AND INSTALLATION.
  4. Install the cluster bezel. Refer to BEZEL, INSTRUMENT CLUSTER, REMOVAL AND INSTALLATION.
  5. Position the end cap into place and seat fully.
  6. Install the A-pillar trim. Refer to PANEL, A-PILLAR TRIM, REMOVAL AND INSTALLATION.
  7. Connect the negative battery cable(s). Refer to BATTERY DISCONNECT AND CONNECTIO
 
OP
OP
JTRUBI

JTRUBI

Well-Known Member
First Name
Chris
Joined
Nov 10, 2018
Threads
55
Messages
847
Reaction score
1,468
Location
Toronto
Vehicle(s)
Jk rubicon
Build Thread
Link
  1. Disconnect and isolate the negative battery cable(s). Refer to BATTERY DISCONNECT AND CONNECTION .
  2. Remove the A-pillar trim panel. Refer to PANEL, A-PILLAR TRIM, REMOVAL AND INSTALLATION.
  3. Using a trim stick or equivalent, remove the end cap.
  4. Remove the cluster bezel. Refer to BEZEL, INSTRUMENT CLUSTER, REMOVAL AND INSTALLATION.
  5. Remove the steering column opening cover. Refer to COVER, STEERING COLUMN OPENING, REMOVAL AND INSTALLATION.
  6. Remove the screws for the steering column gap hider and move slightly forward releasing it from retainers and positioning it away from IP cover.
    Jeep Gladiator Export Tail lights on NA Spec Gladiator GC0182531
    Courtesy of CHRYSLER GROUP, LLC​
  7. Remove the 10 screws (1) securing the cover to the IP reinforcement, disconnect the wire harness connector and remove the cover.
INSTALLATION

Jeep Gladiator Export Tail lights on NA Spec Gladiator GC0182531
Courtesy of CHRYSLER GROUP, LLC​
  1. Position the cover over the IP reinforcement, connect the wire harness connector and install the screws (1).
  2. Position gap hider back into place and install screws.
  3. Install steering column opening cover. Refer to COVER, STEERING COLUMN OPENING, REMOVAL AND INSTALLATION.
  4. Install the cluster bezel. Refer to BEZEL, INSTRUMENT CLUSTER, REMOVAL AND INSTALLATION.
  5. Position the end cap into place and seat fully.
  6. Install the A-pillar trim. Refer to PANEL, A-PILLAR TRIM, REMOVAL AND INSTALLATION.
  7. Connect the negative battery cable(s). Refer to BATTERY DISCONNECT AND CONNECTIO
Thank you, Going to try to take a crack at it this weekend and see if I can get it to work.
 

Jimmij

Well-Known Member
First Name
Jimmij
Joined
Jan 31, 2020
Threads
6
Messages
306
Reaction score
208
Location
Lake worth fl
Vehicle(s)
2020 Jeep gladiator overland, 2004 Honda s2000
So is the switch different or do the front and rear fog go on and off together?
 

Sponsored

mjoneil

Well-Known Member
First Name
Matt
Joined
Sep 2, 2020
Threads
11
Messages
130
Reaction score
313
Location
MA
Vehicle(s)
'20 Gladiator Sport S, '17 Camaro SS, '10 BMW 328
Build Thread
Link
I got my steel bumper in finally so I did this all at once... currently tapped into the license plate lights. Standing behind them, they seem a little bright which I expected but don't want it to be annoying for other drivers. Gonna go for a drive tonight, have my girl drive it and I follow so I can see what its like.

Jeep Gladiator Export Tail lights on NA Spec Gladiator 127274664_10225996146797198_6063958629046172435_n
Jeep Gladiator Export Tail lights on NA Spec Gladiator 127790299_10225996147317211_1764601440692806100_n
Jeep Gladiator Export Tail lights on NA Spec Gladiator 127188274_10225996147037204_2965752994745983138_n
 

jurfie

Well-Known Member
Joined
Sep 4, 2019
Threads
7
Messages
1,433
Reaction score
1,988
Location
Vancouver, BC
Vehicle(s)
2014 Granite Crystal Metallic JKR; 2016 Daytona Grey Audi A5 Competition Package
I got my steel bumper in finally so I did this all at once... currently tapped into the license plate lights. Standing behind them, they seem a little bright which I expected but don't want it to be annoying for other drivers. Gonna go for a drive tonight, have my girl drive it and I follow so I can see what its like.
Yeah, they're fog lights. Don't use them unless needed as they will bother other drivers.

I have rear fogs on my Audi; they are great to make sure I don't get rear-ended in the fog, but some people run them all the time around here. Don't be one of those people.
 

mjoneil

Well-Known Member
First Name
Matt
Joined
Sep 2, 2020
Threads
11
Messages
130
Reaction score
313
Location
MA
Vehicle(s)
'20 Gladiator Sport S, '17 Camaro SS, '10 BMW 328
Build Thread
Link
Yeah, they're fog lights. Don't use them unless needed as they will bother other drivers.

I have rear fogs on my Audi; they are great to make sure I don't get rear-ended in the fog, but some people run them all the time around here. Don't be one of those people.
right, I'm pretty sure I always see Q7s with them on and they aren't bad at all, brighter then tails but not blinding/annoying. The only way you could run these full time would be if you added some sort of plastic/acrylic diffuser panel in front.
Sponsored


Top