Bonanza
Well-Known Member
- Joined
- Apr 22, 2020
- Threads
- 41
- Messages
- 829
- Reaction score
- 1,317
- Location
- Southern CA
- Vehicle(s)
- Sport S Max Tow Punk'n
Great thread. This is the exact type of content people need forums for. Thank you, OP.
Sponsored
Hey thanks for posting. I tried to install the front RokBlok mudflaps on our JT Overland, but found that the 2 higher holes on the flap didn't quite align with the mount holes. Did you put the flap completely behind the 2 mount holes (the 2 holes sorta on the fender)? It seems like no matter how I oriented the flaps, they don't seem to quite go high enough. Thinking maybe it's the fender on the Overland.Mud Flaps and Entry Guards
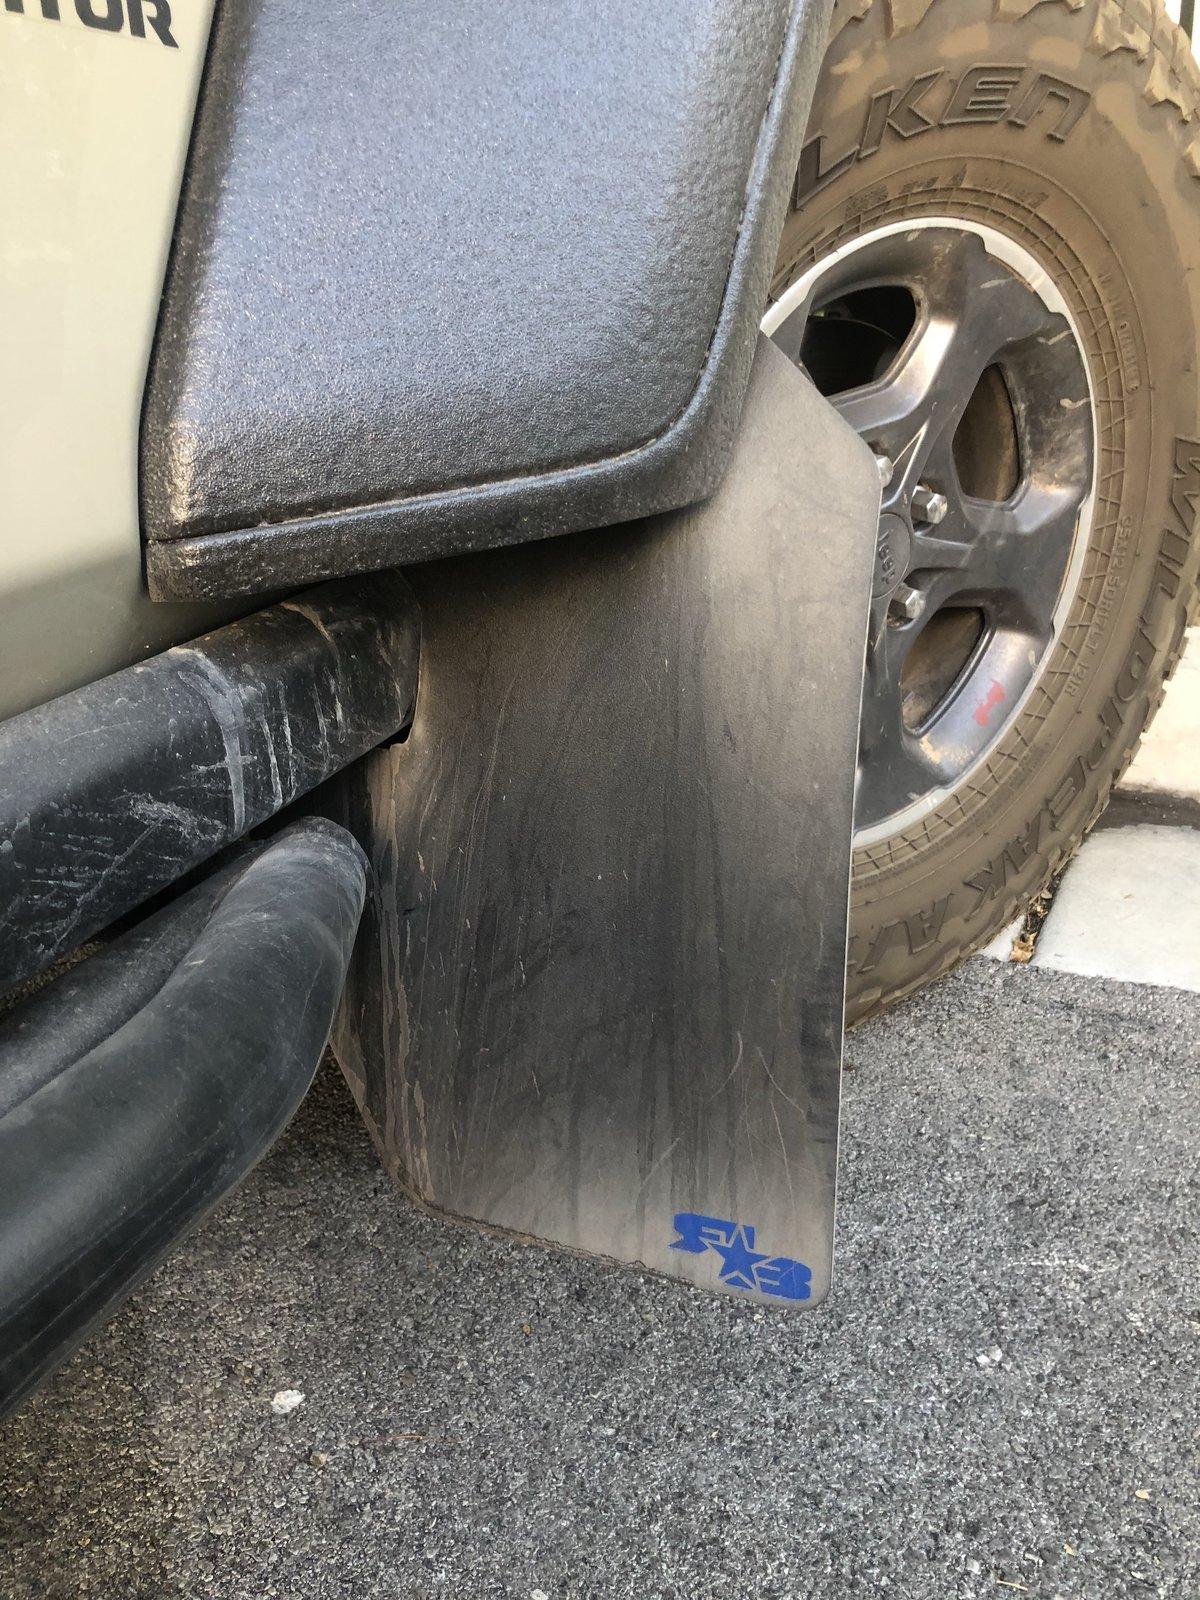
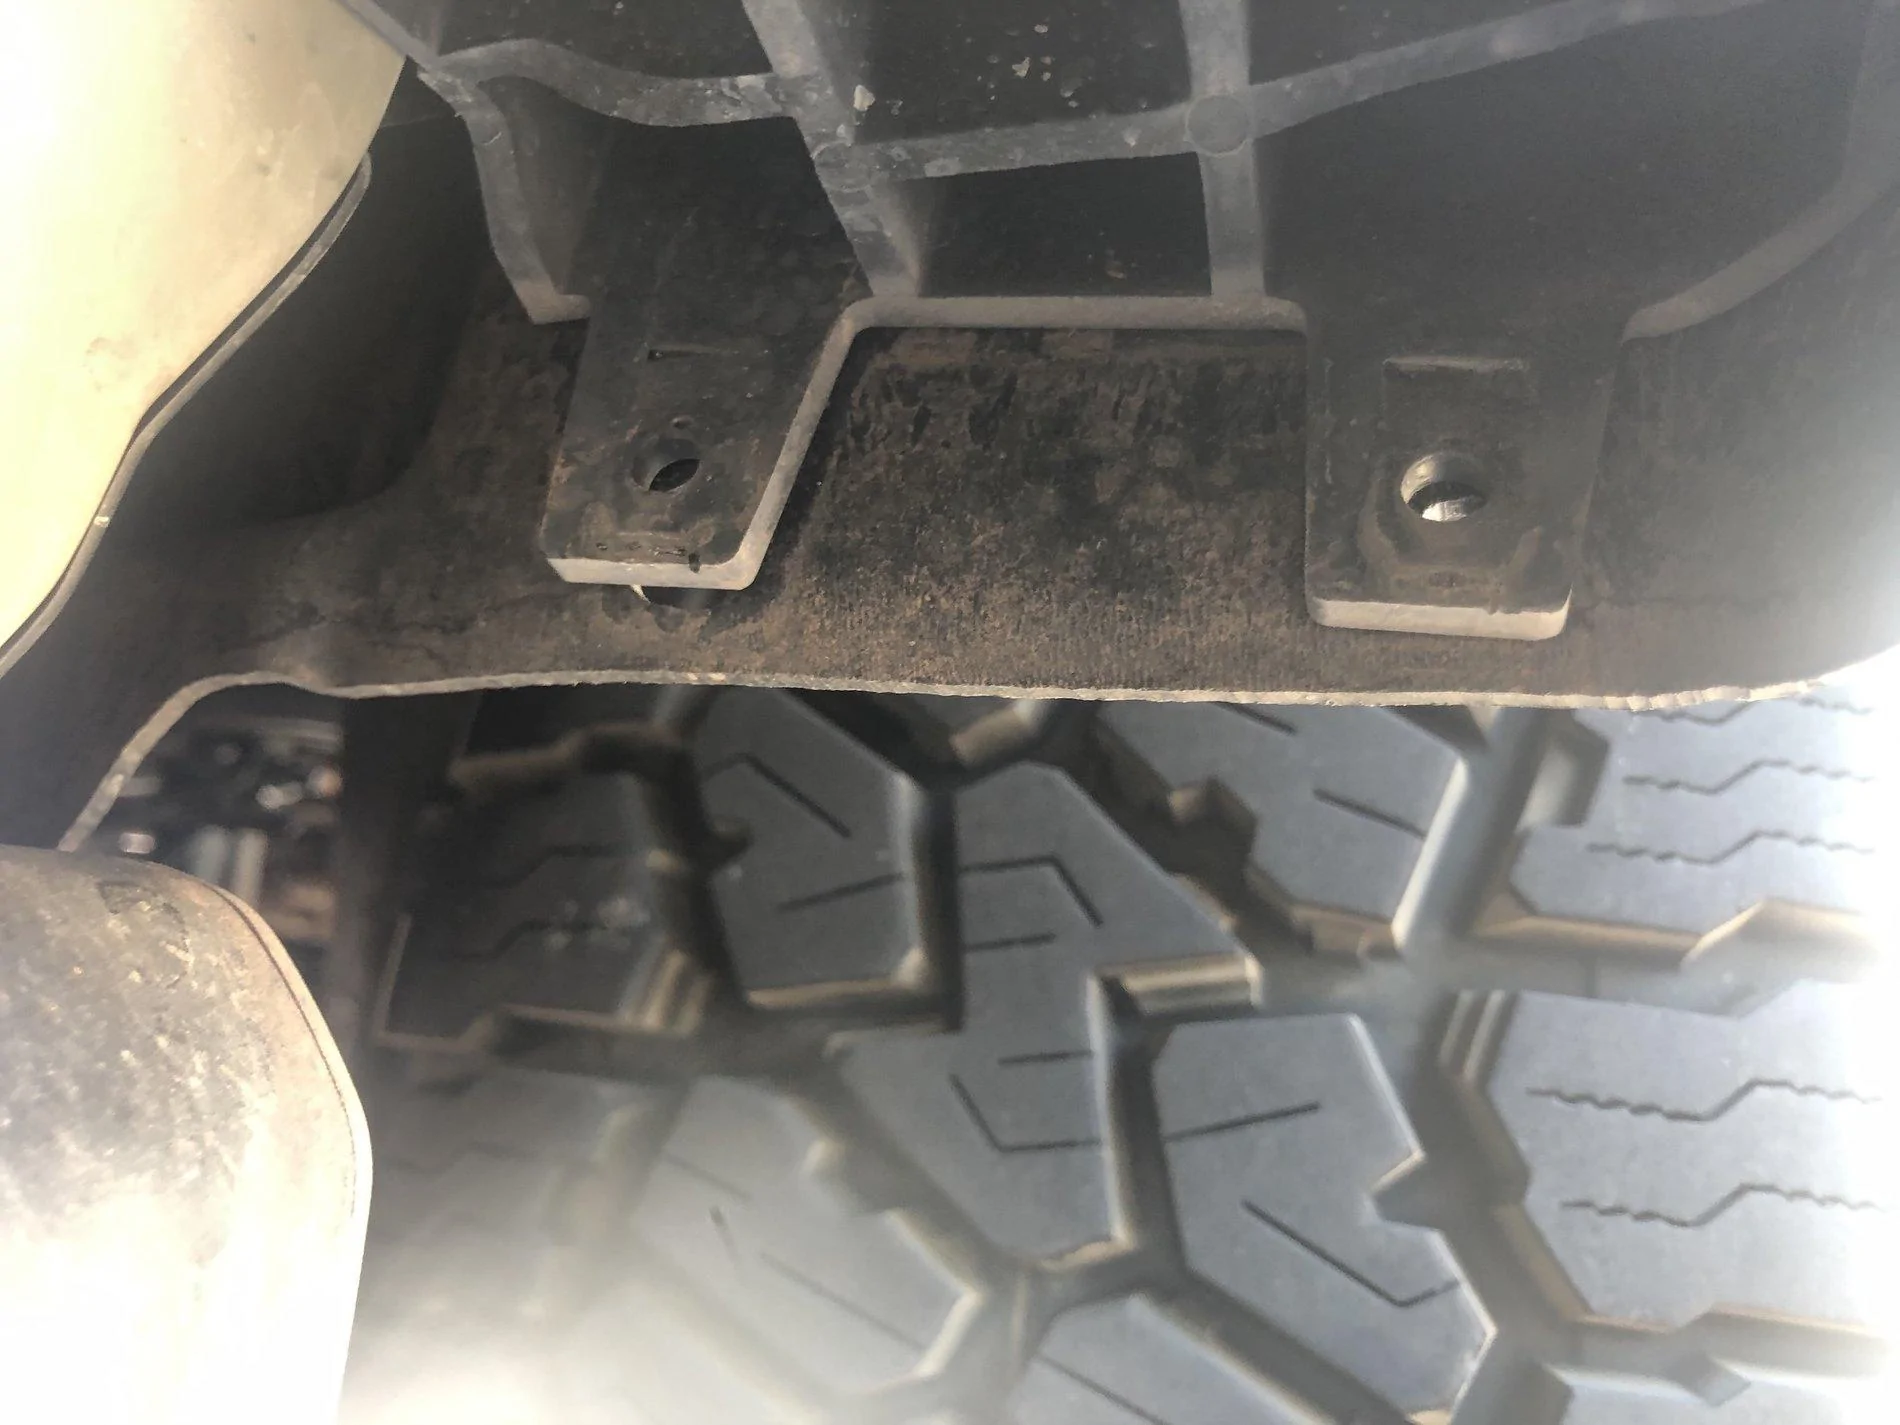
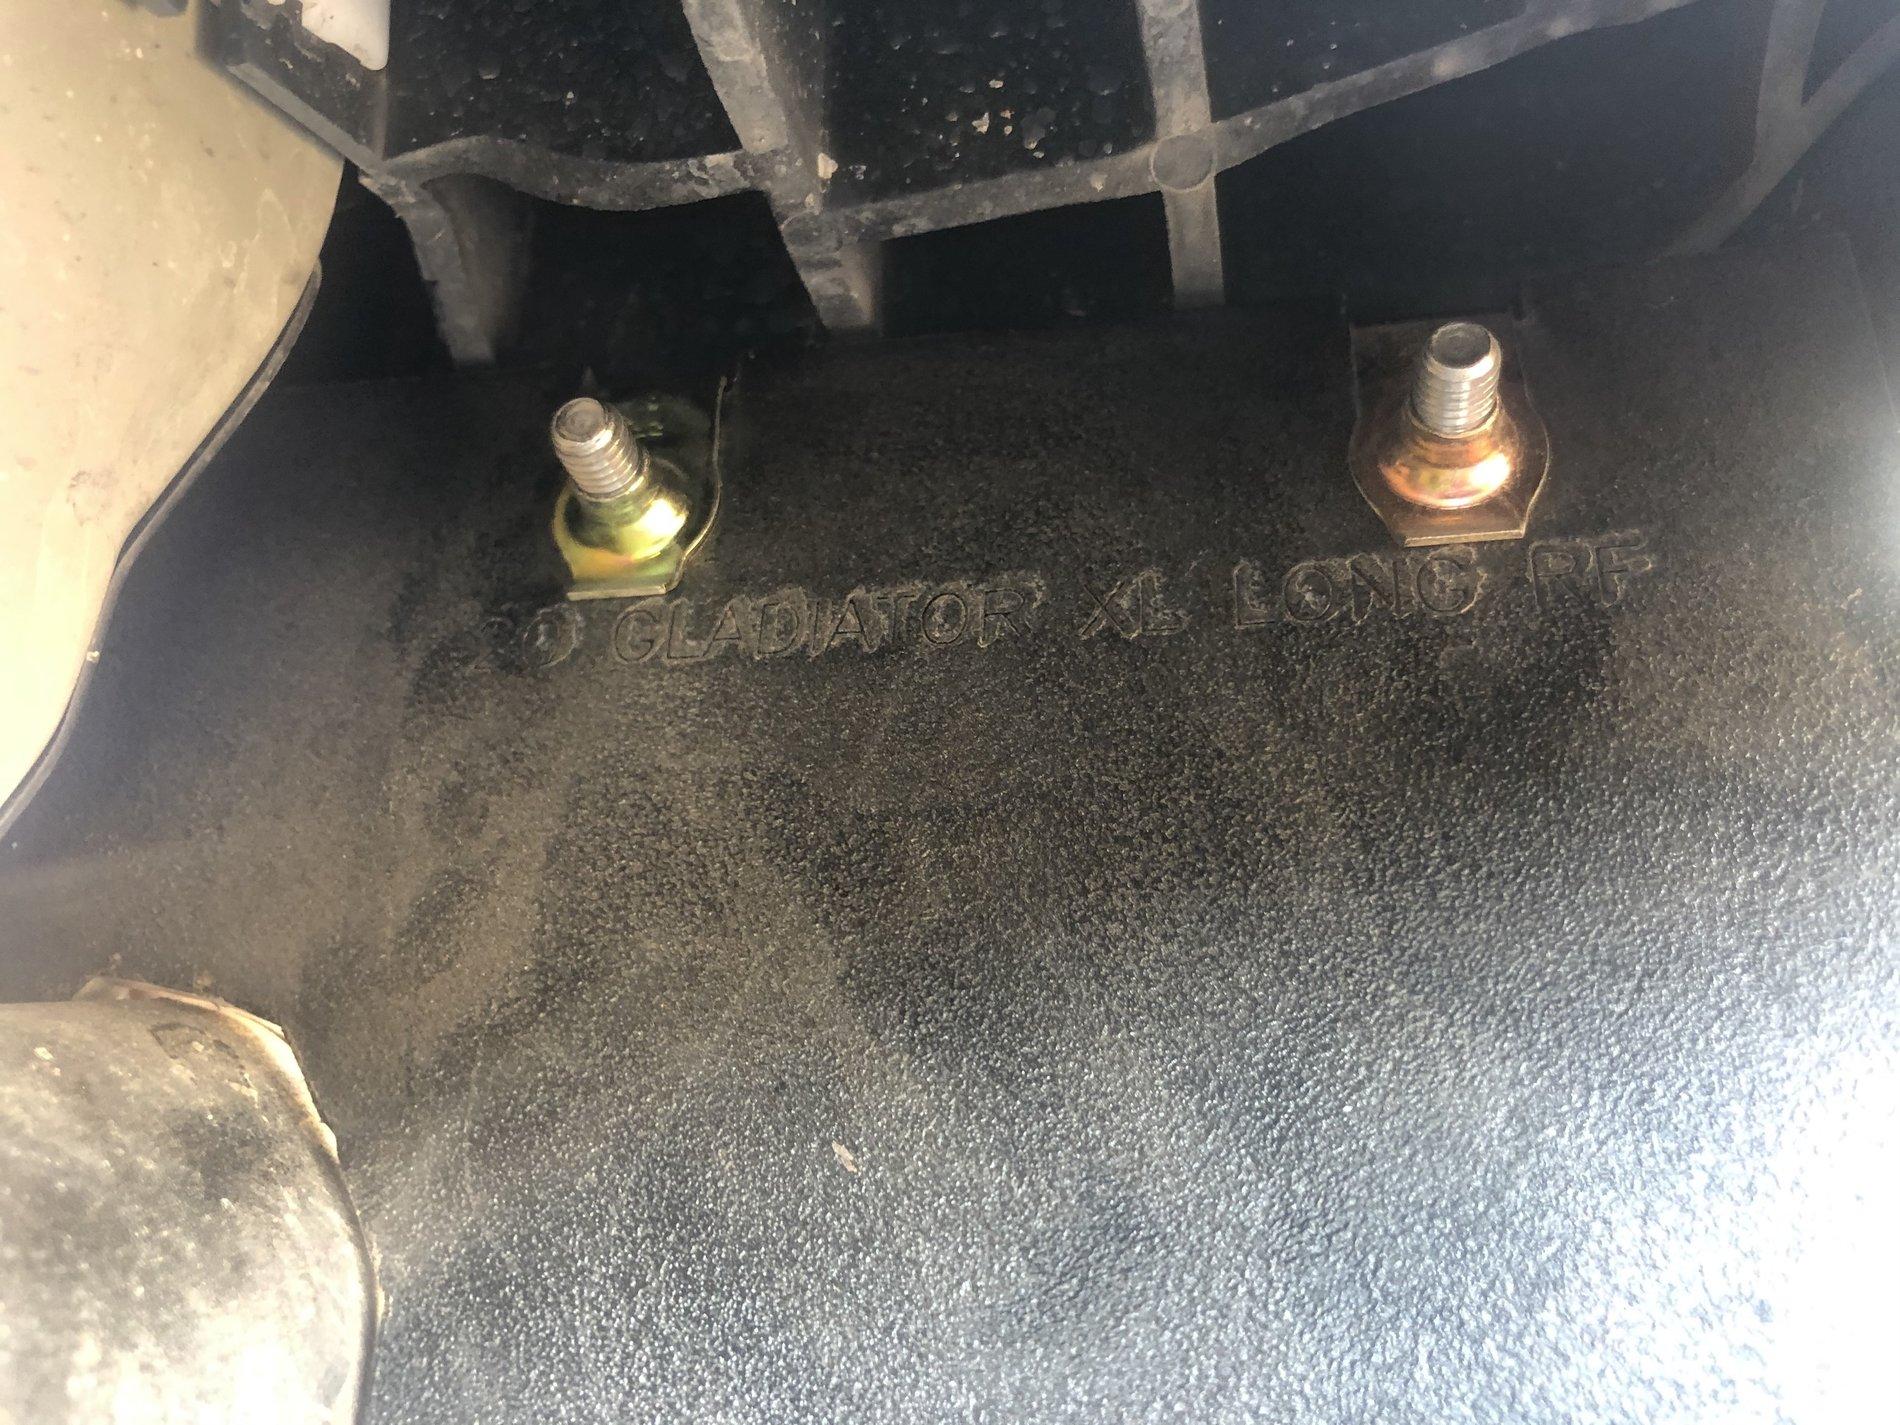
I'm bouncing through dust, dirt, and pebbles with razor-sharp edges, which kick up and tear up your paint. Enter RokBlokz Quick Release Mud Flaps (Front and Rear) ($185 for both in size XL Long), which are amazing. I got XL because of my 35" tires, and long because.... well why not? These things are thick and sturdy.

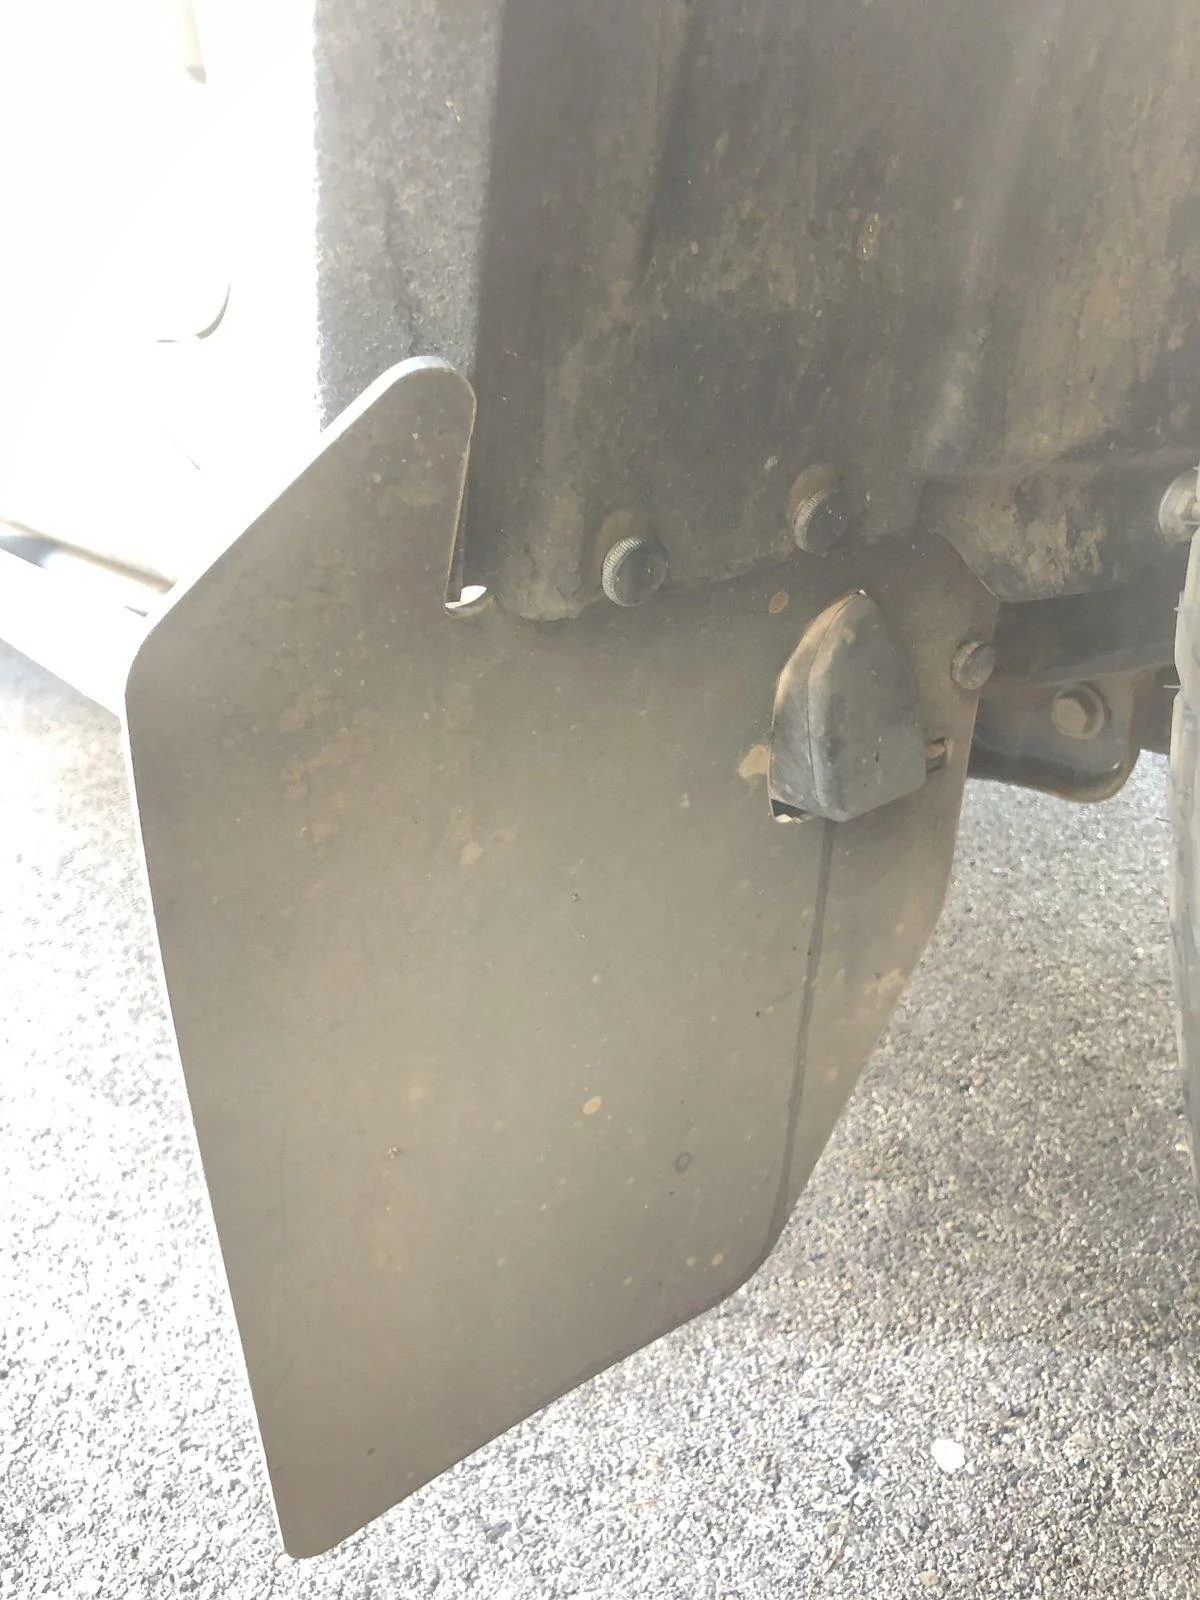
Rokbloks even cuts a hole in the front mud flaps so that they'll fit with a standard Rubicon rock rail. See that rock rail poking right through to say hi?
Note how that front mud flap fits on in the picture above, with the one high part inside the wheel well, and the rest behind the wheel well. That took me a minute or two to figure out.
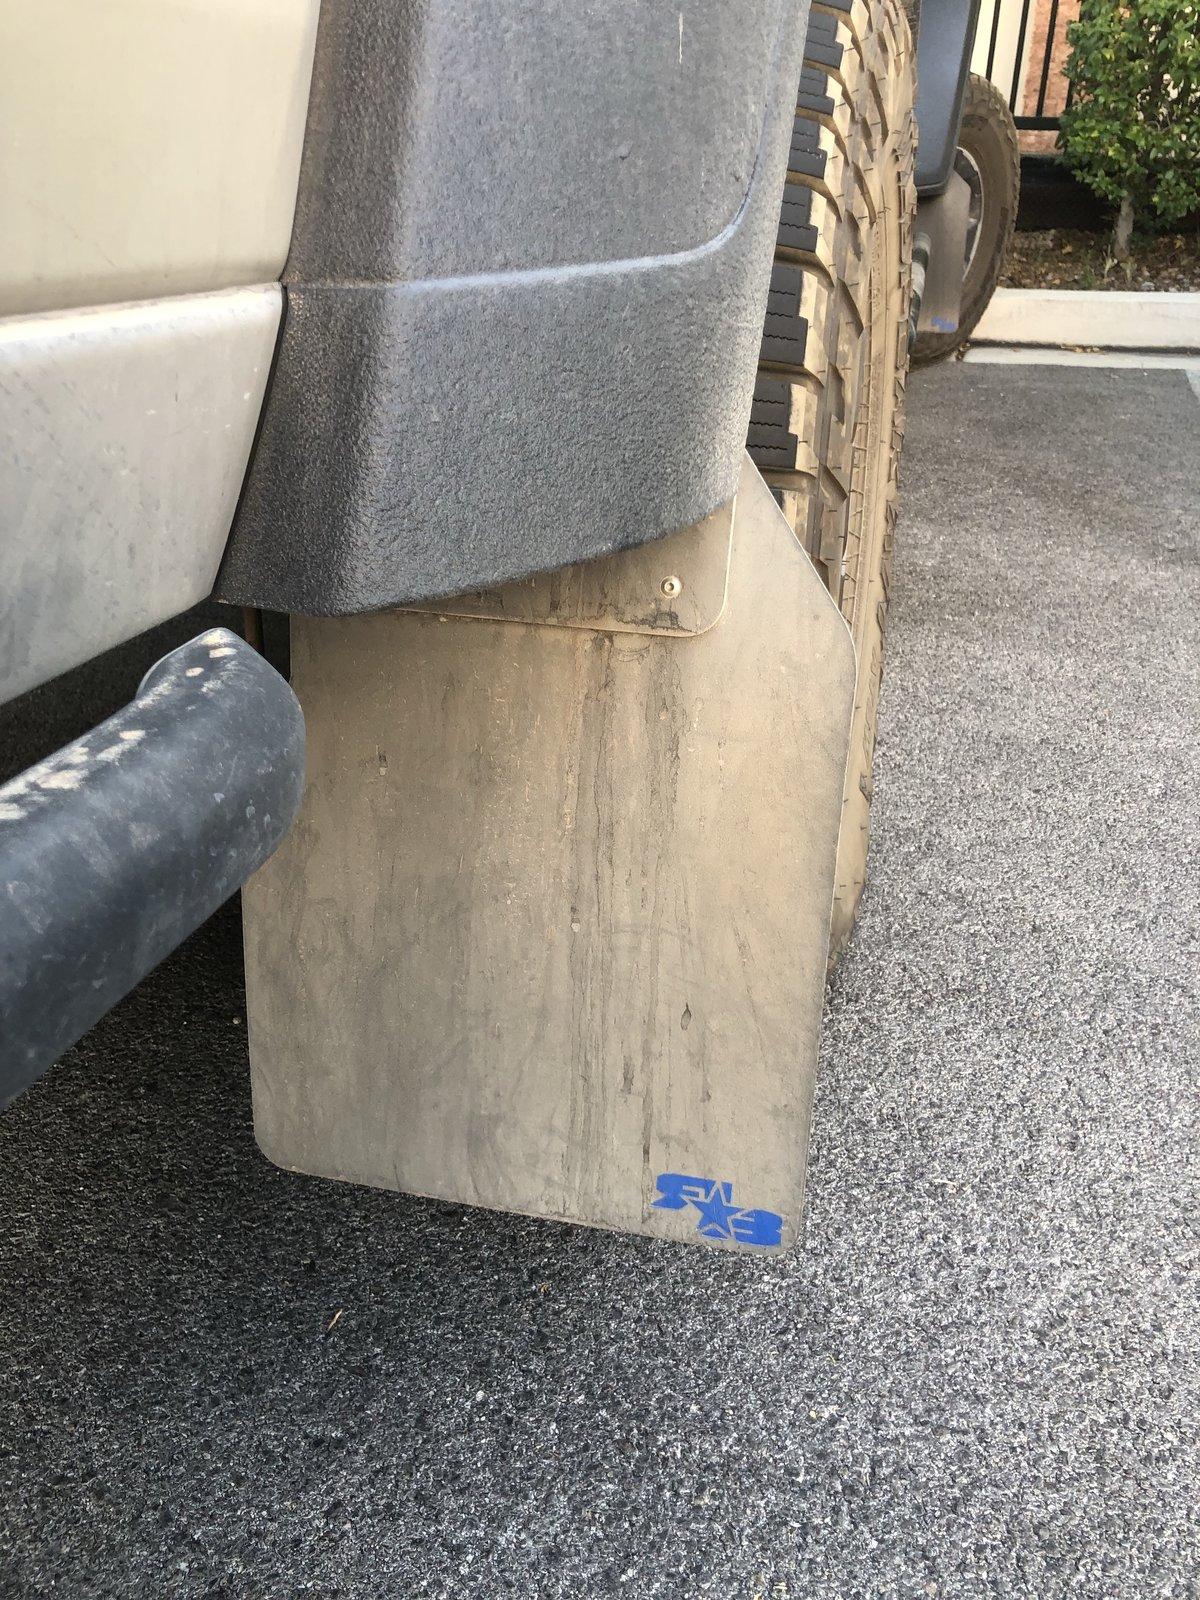
I drove without mud flaps, then drove with the mud flaps, and I can tell you that the sides of my truck seriously notice the difference.
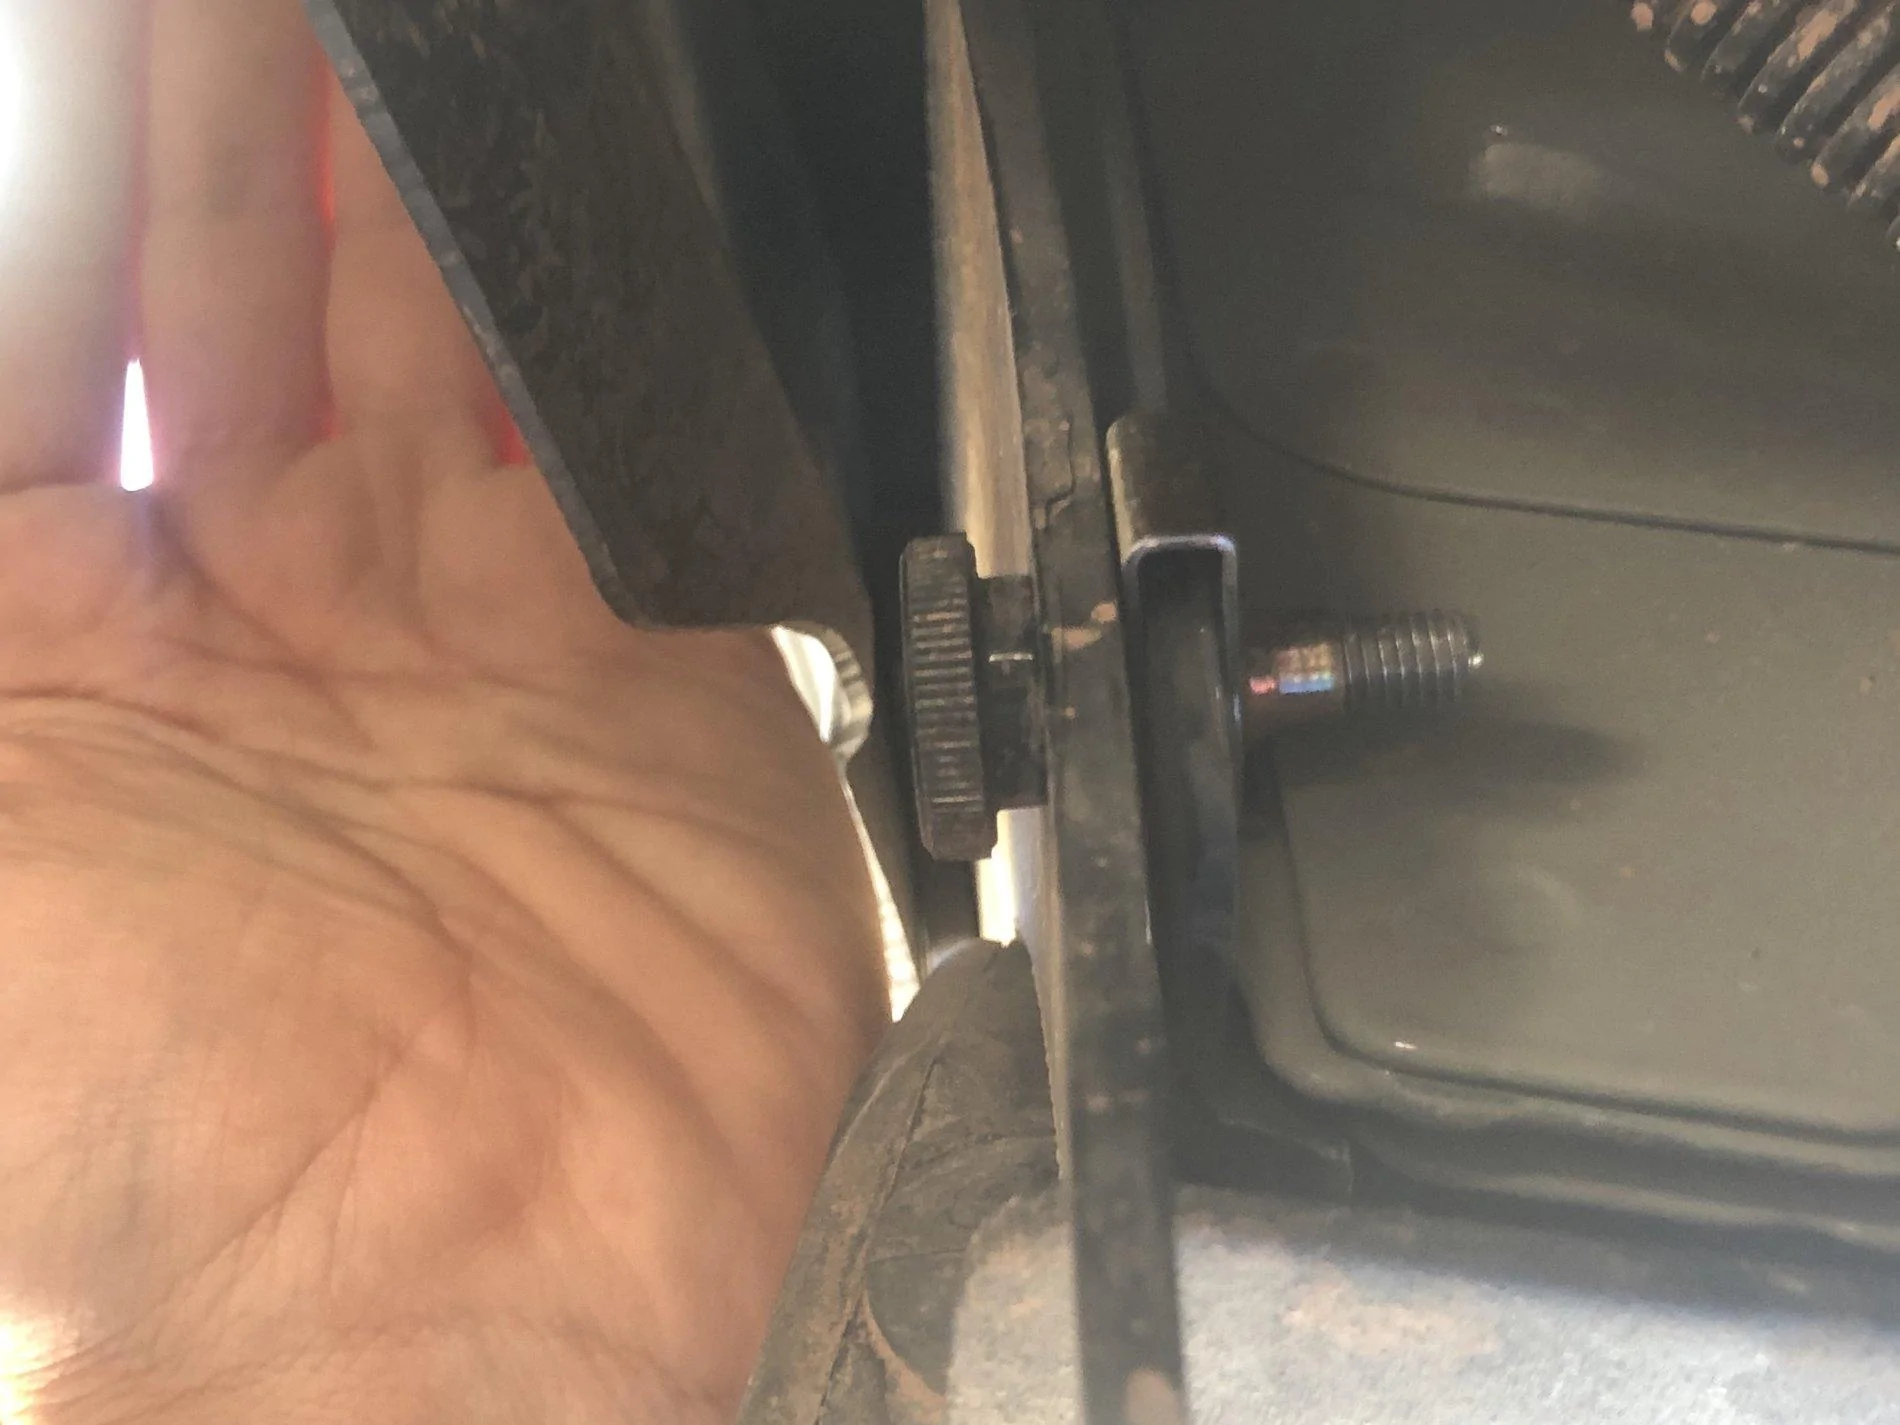
While I've never bothered to use the quick disconnect screws to remove them for cleaning, I HAVE needed to remove these mud flaps while I'm installing yet more fun stuff on the Jeep (like my on-board air), and so I still appreciate how easy they are to remove and re-install.
I also really like that you can adjust how far out the rear mud flaps stick, depending on the size of your tire and your wheel's offset. (Sorry, at the time I took these pictures they were DIRTY, but isn't that the whole point?)
ENTRY GUARDS
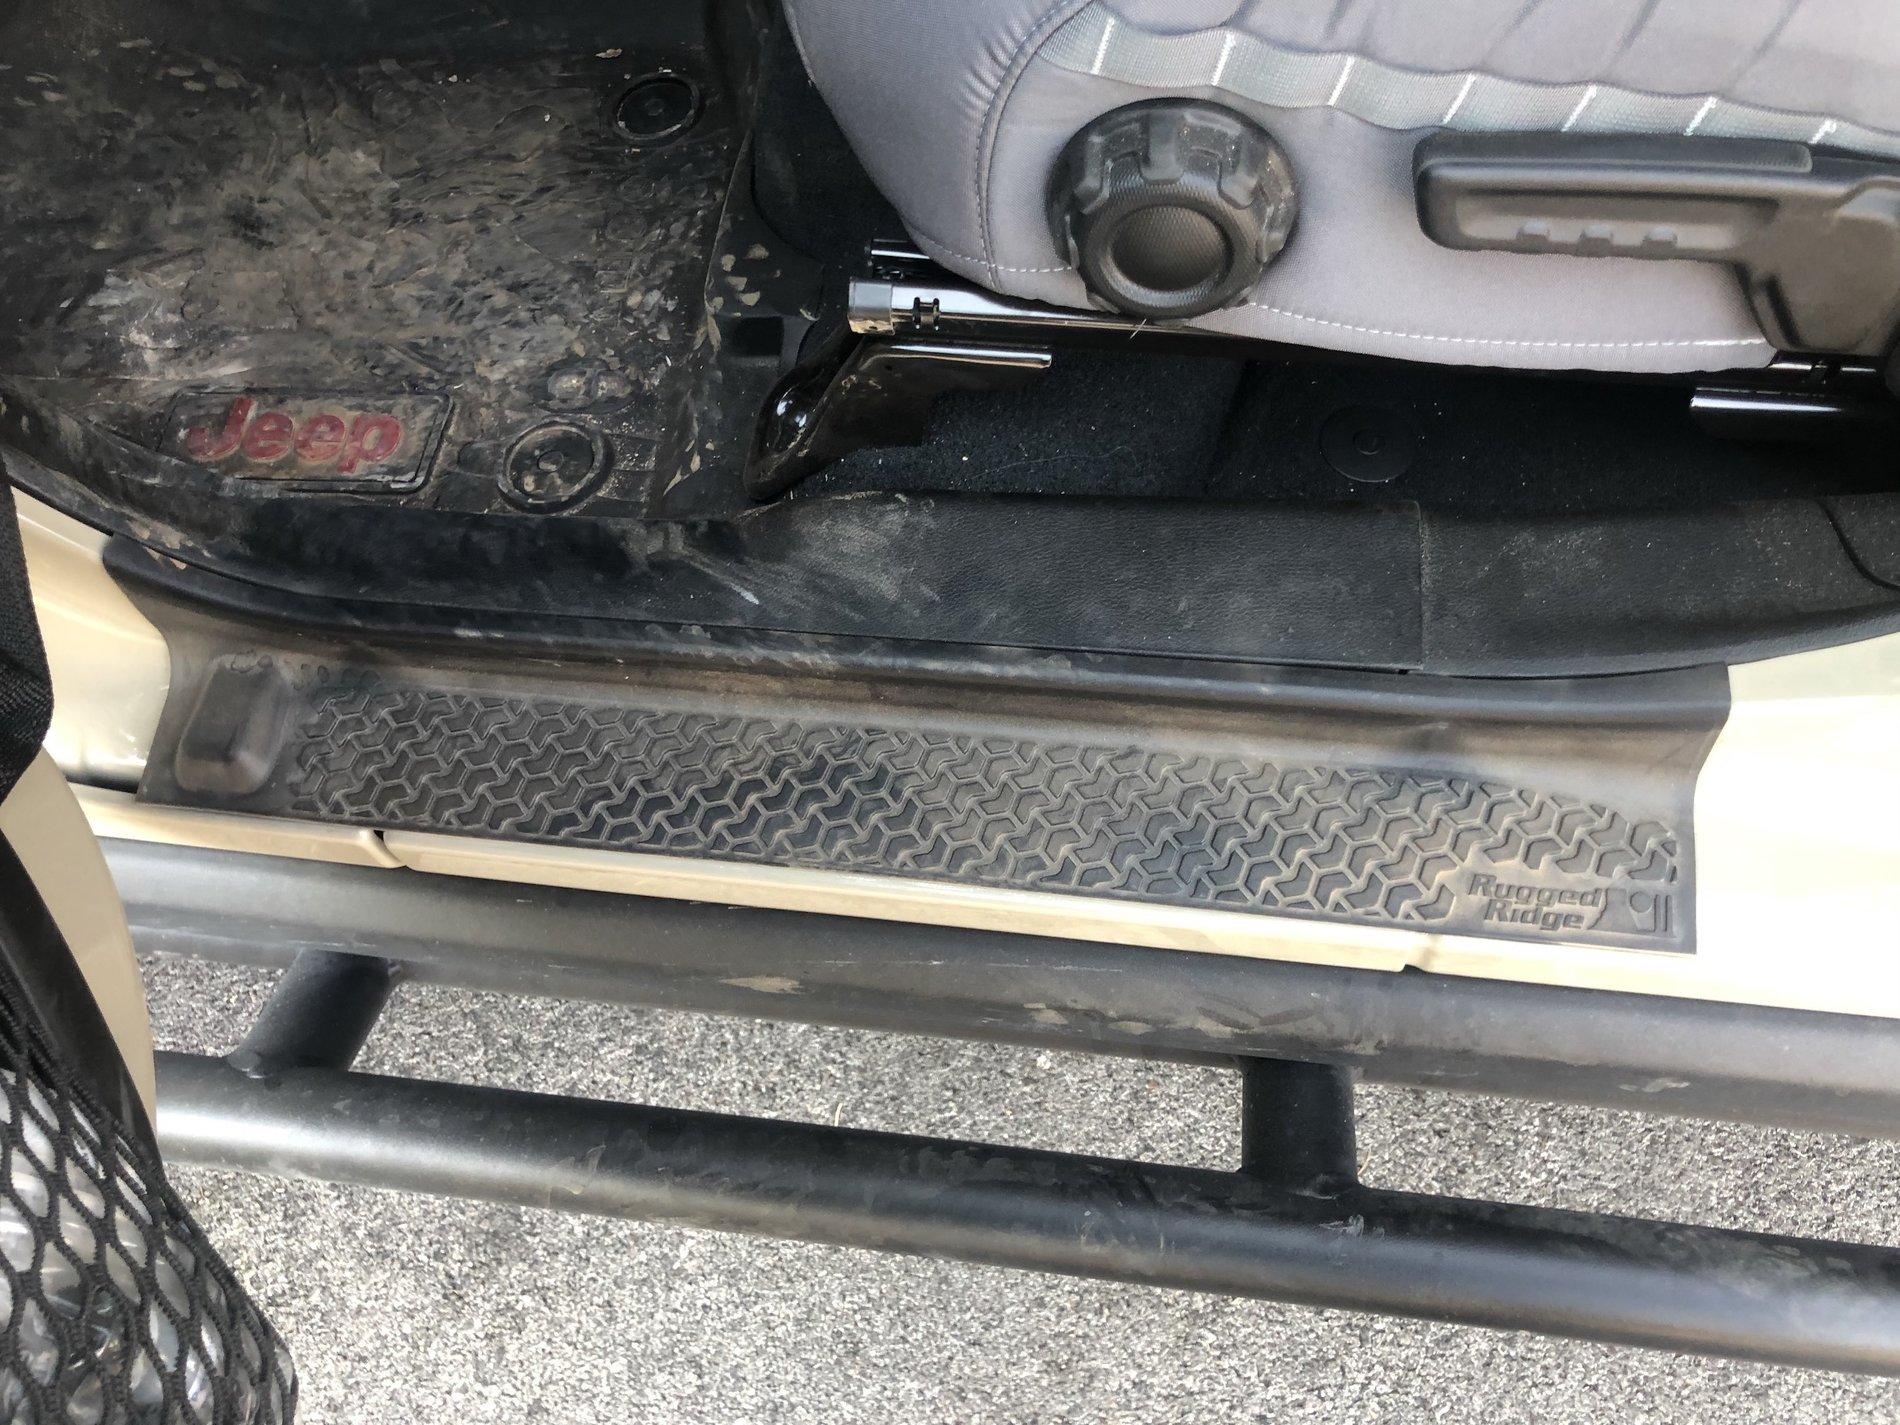
You're stepping in and out of your Jeep with dirty shoes. You're GOING to scratch the paint in the doorways. So you need Entry Guards.
I installed a set of Rugged Ridge Front & Rear Entry Guards ($45)

I looked at all the different Entry Guard options (and there are a bunch of them). But I think Rugged Ridge has the clear winner. Why? Because of the top lip.
See that top lip, the thin part that curves upwards then stretches a short distance across into the vehicle? Rugged Ridge is the only one who has a strip of tape up there. Every other brand only has tape on the large bottom platform, and just trusts you not to catch your feet on the lip. Seems like a design flaw, one Rugged Ridge wisely avoided.
Remember from the Headliner post, that I told you to purchase a pack of 3M Adhesion Promotor Liquid Primer wipes? Well, the downside to the Rugged Ridge Entry Guards is that they tell you to use this during the install process but they don't provide any. Aren't you glad you saved a couple?
You'll find all the details on this forum thread. Lots of discussion of how to contact Kent, how the process works, etc. I found e-mails worked best, car dealers rarely just sit at their desks waiting for phone calls.Fantastic thread. Thank you for sharing and providing usable information. I live in Salt Lake and would love to reach out to Kent in Idaho. Would you have contact information for him or the name of his dealership? Thanks again.
Thank you.You'll find all the details on this forum thread. Lots of discussion of how to contact Kent, how the process works, etc. I found e-mails worked best, car dealers rarely just sit at their desks waiting for phone calls.
RokBlok MudFlaps (Part 2)Hey thanks for posting. I tried to install the front RokBlok mudflaps on our JT Overland, but found that the 2 higher holes on the flap didn't quite align with the mount holes. Did you put the flap completely behind the 2 mount holes (the 2 holes sorta on the fender)? It seems like no matter how I oriented the flaps, they don't seem to quite go high enough. Thinking maybe it's the fender on the Overland.
Honestly... ehhh. It's neat, but I don't know that it's worth the $300 if your steering is already good. If you don't currently have any steering issues, I'd say wait 2-3 years, and if your steering starts getting a little loosey goosey, then, yeah, this might help and be well worth the expense.love these posts!! I'm the same as you, my steering is fine - do you like the addition of the adjustable steering stabilizer? Worth the $300?

Actually, I'm not sure I'm getting your drift. Talk it through. What I think you're saying is that you want to remove the ESS battery, then just move it and reuse it in the bed of the truck, so that the alternator can just handle charging it along with your solar panel arrays? How big is a JT ESS battery, is it really worth that? Or are you saying remove the ESS battery and use the wiring adapters that already exist in your Jeep for the ESS to charge your own, second battery, just with thicker wire since the distance and battery size would be greater?Impressively detailed write ups.any chance you have a diagram for your solar setup? I’ve been wondering if I could pull the stop start battery, disable ESS, increase the wire size and run it to the Same battery in the bed, thereby allowing the alternator to charge the new “ESS” battery.
im gonna run the full height Rebel off-road rack so I can run a 36 cell hard panel vertically and deploy them on both sides when parked with struts like you did on the hood, if that makes sense
Actually, I'm not sure I'm getting your drift. Talk it through. What I think you're saying is that you want to remove the ESS battery, then just move it and reuse it in the bed of the truck, so that the alternator can just handle charging it along with your solar panel arrays? How big is a JT ESS battery, is it really worth that? Or are you saying remove the ESS battery and use the wiring adapters that already exist in your Jeep for the ESS to charge your own, second battery, just with thicker wire since the distance and battery size would be greater?
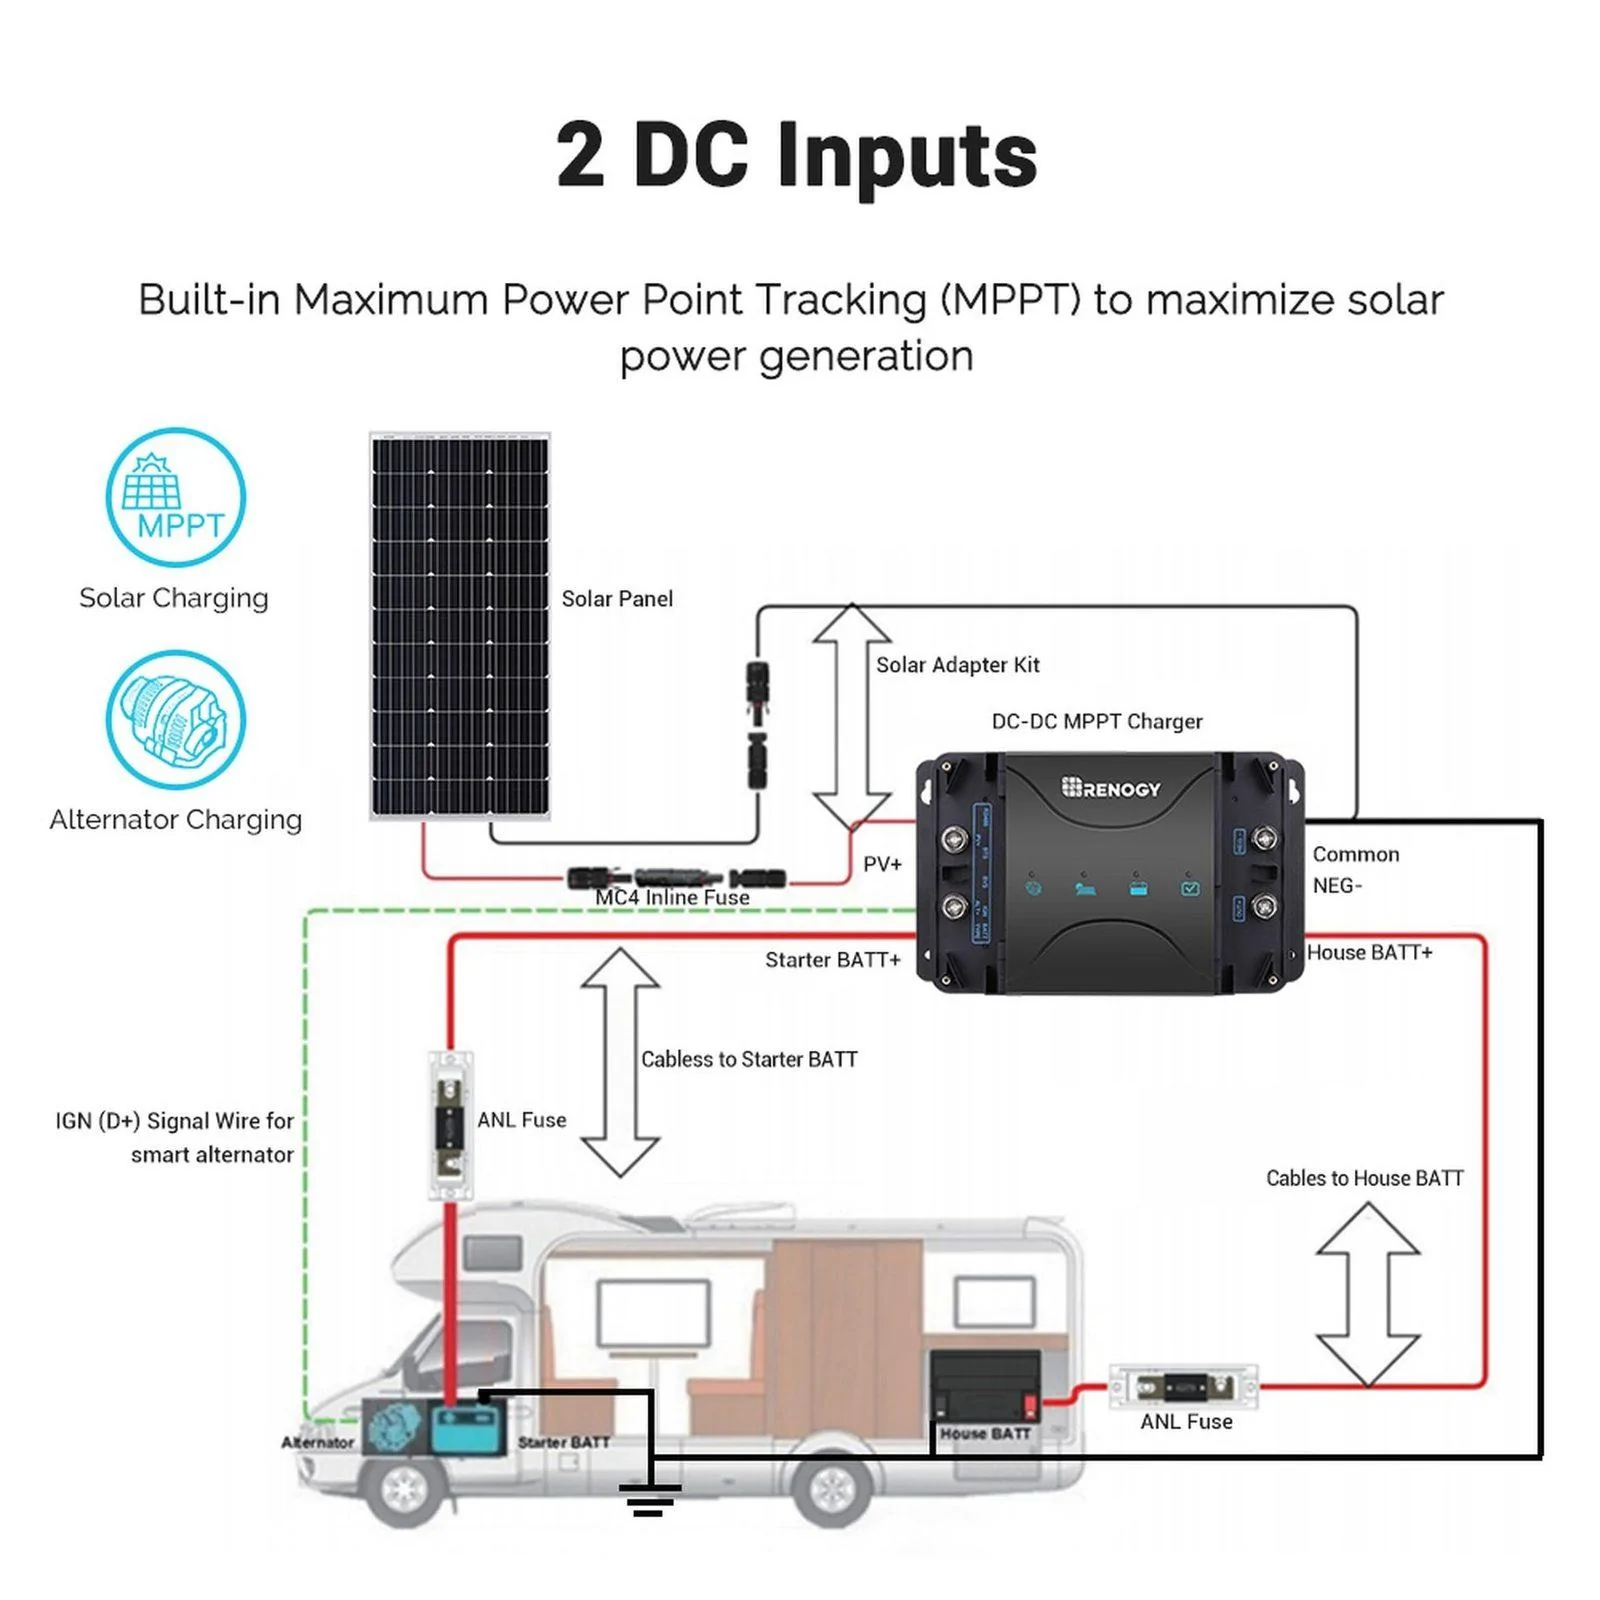
At that point, why not just get a second (third, really, if we're counting the ESS) battery for the bed of the truck and get a DC-DC MPPT charger that works with smart alternators and will charge your spare battery from either solar or the alternator AND will trickle charge your starter battery whenever it has extra juice to spare?
I feel like the JT alternator can definitely handle a third battery, especially if you got the Max Tow package, or any of the other packages that increased the alternator size. I don't think we'd need to remove the ESS to be able to add a second (third) one. And I love your idea of having solar wings that can raise up on the sides of bed rack.
Here's an example wiring of that sort of thing:

Like I started this with -- it might help to just talk it out. What's you goal cocerning removing the ESS? Why bother?
(Note - I have no inherent bias towards Renogy MPPT controllers, they just seemed to be the only ones making RV controllers that had the features I felt were important, and they're good examples to use. There are other companies with very similar products, but my research suggested that's many of them are just re-branded Renogy's)
I wanted to rib you for your thousands of ball mounts, but you sir, win the build thread contest.Ball Mounts
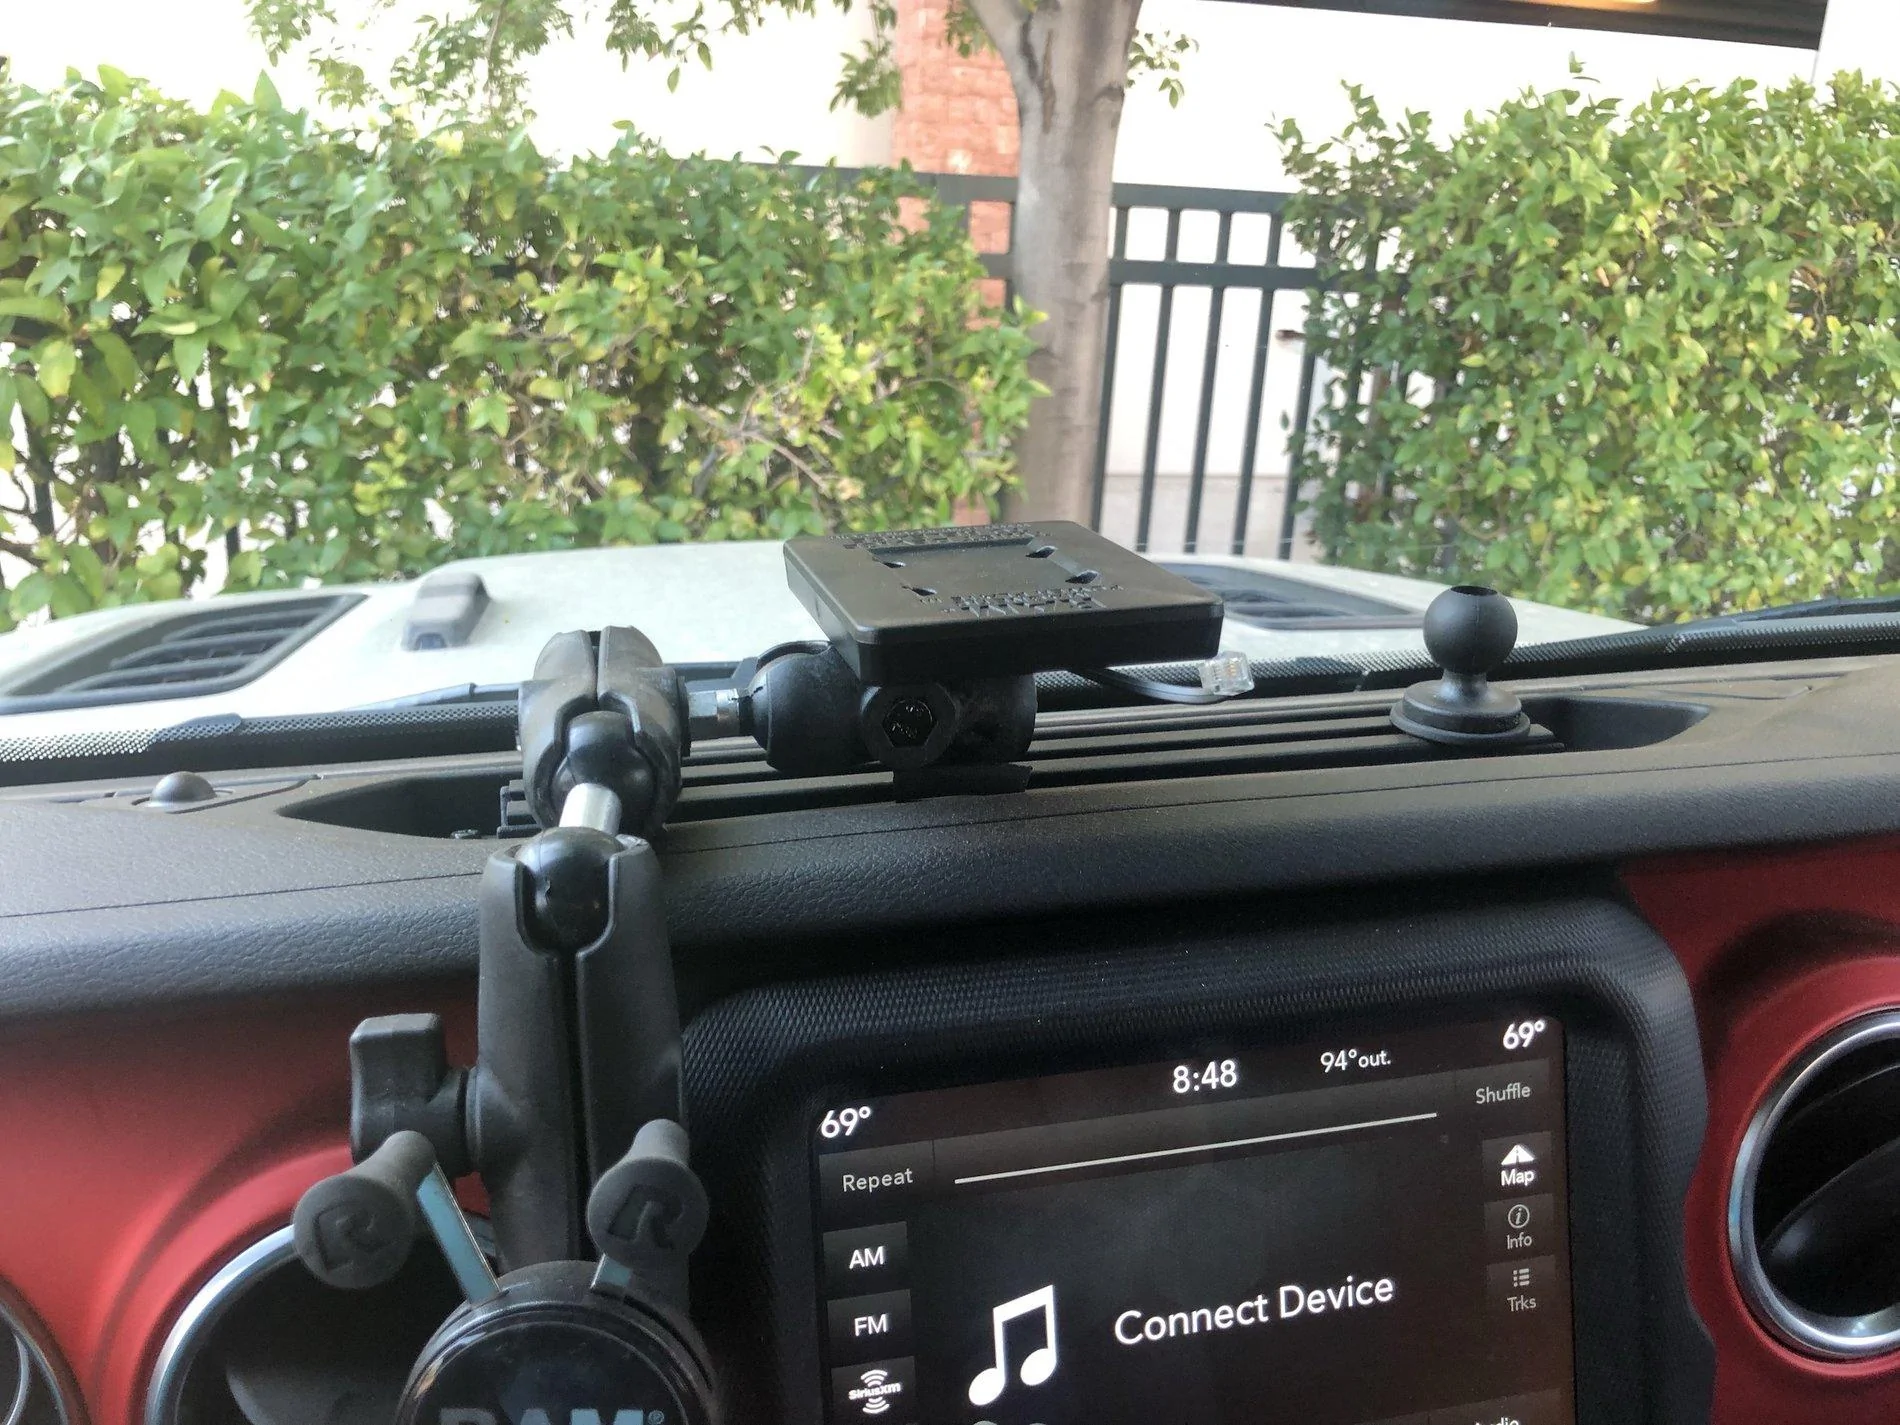
I needed balls. Lots of balls. Specifically, mounting balls for devices such as phone mounts.
I started with some stuff from Carolina Metal Masters.
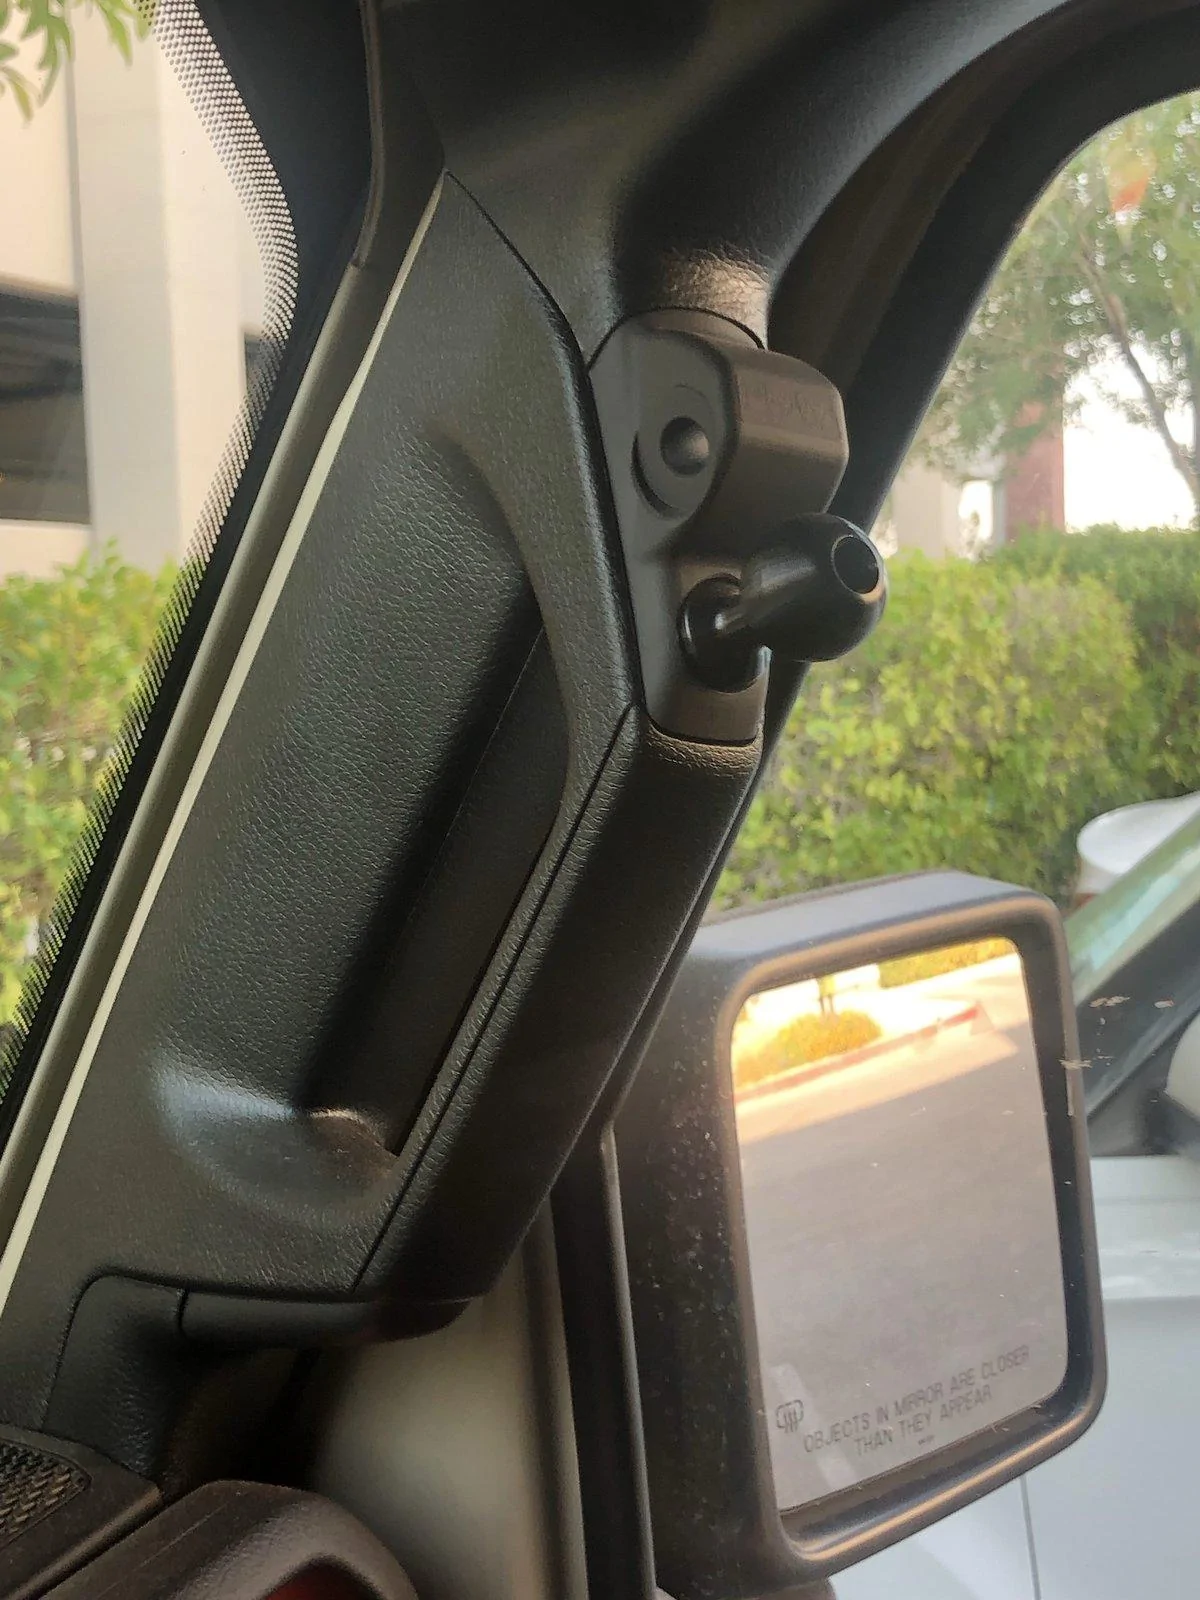
They offer a side mirror mount for each side with ball mounts. Side mirror mounts are so you can see behind you when you take the doors off your Jeep.
I picked up:
Carolina Metal Masters JT Side Mirrors w/ Mall Mount and
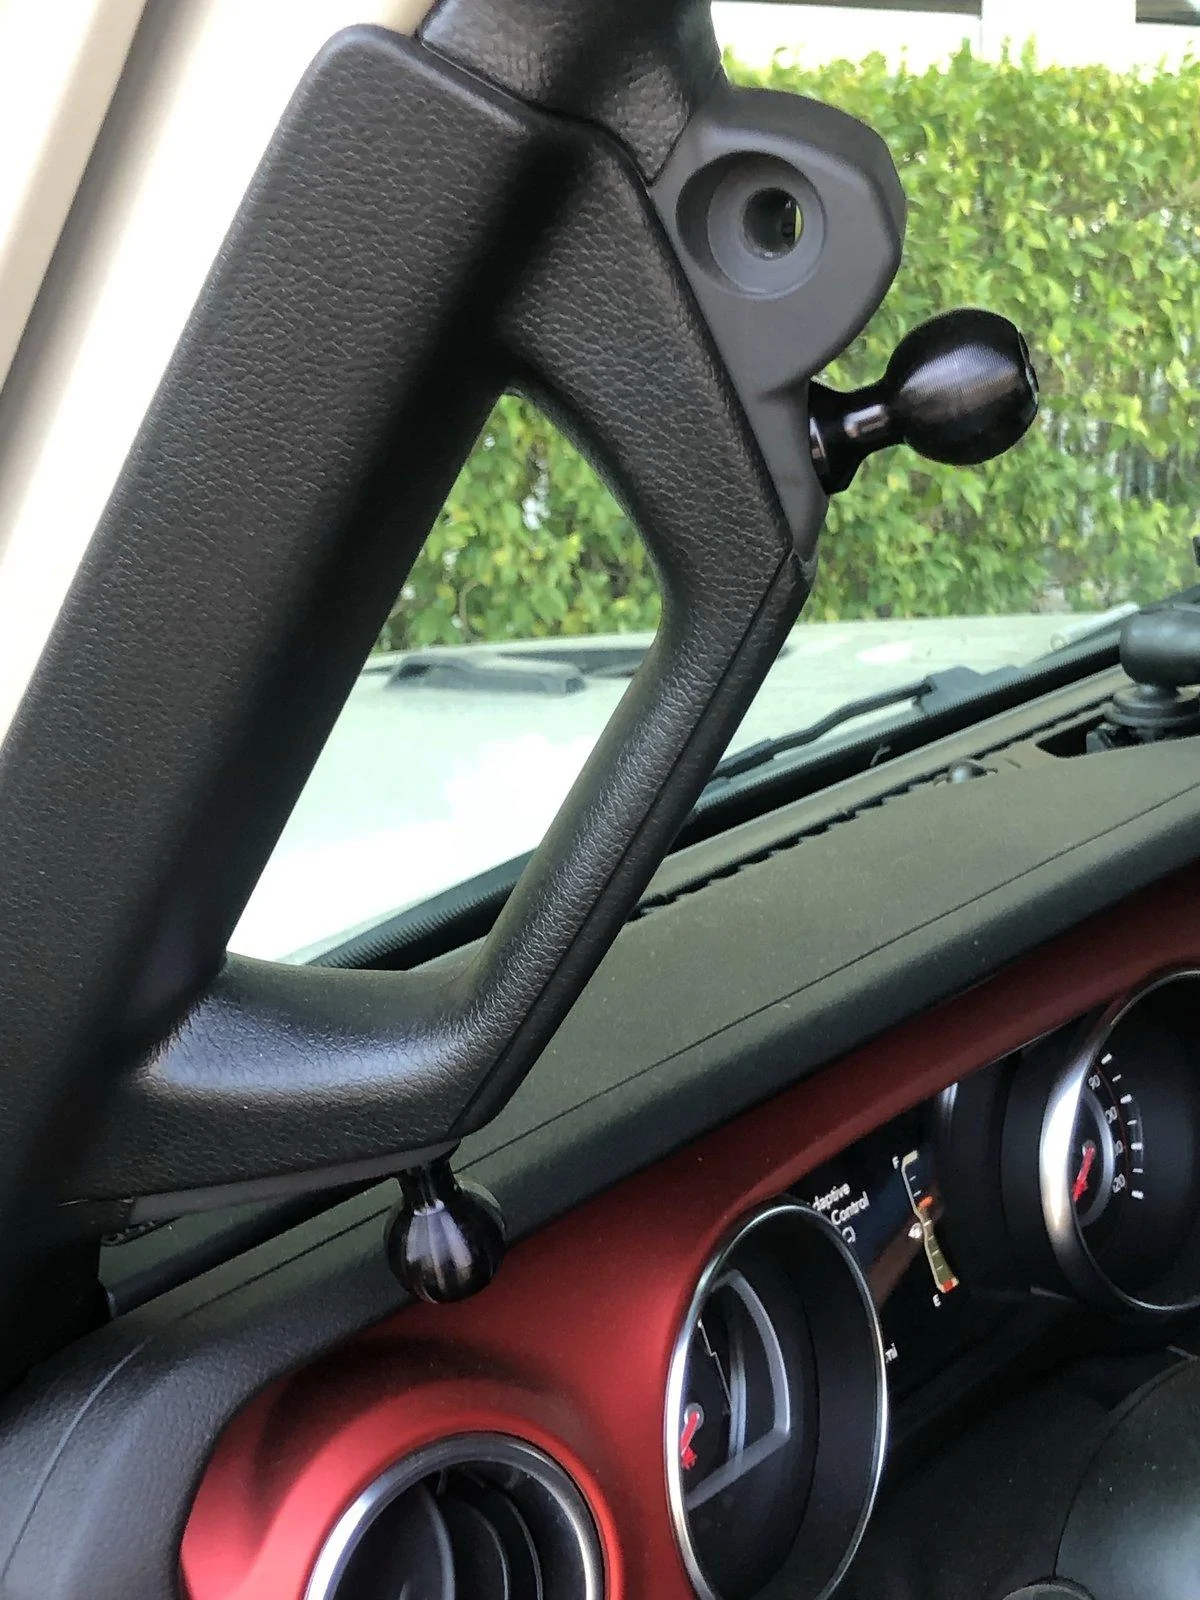
1x JT A-Pillar Ball Mount (for the drivers side)
and a JT Grab Bar Ball Mount
Total price: $352.
That's all pretty awesome, but it still wasn't enough balls.
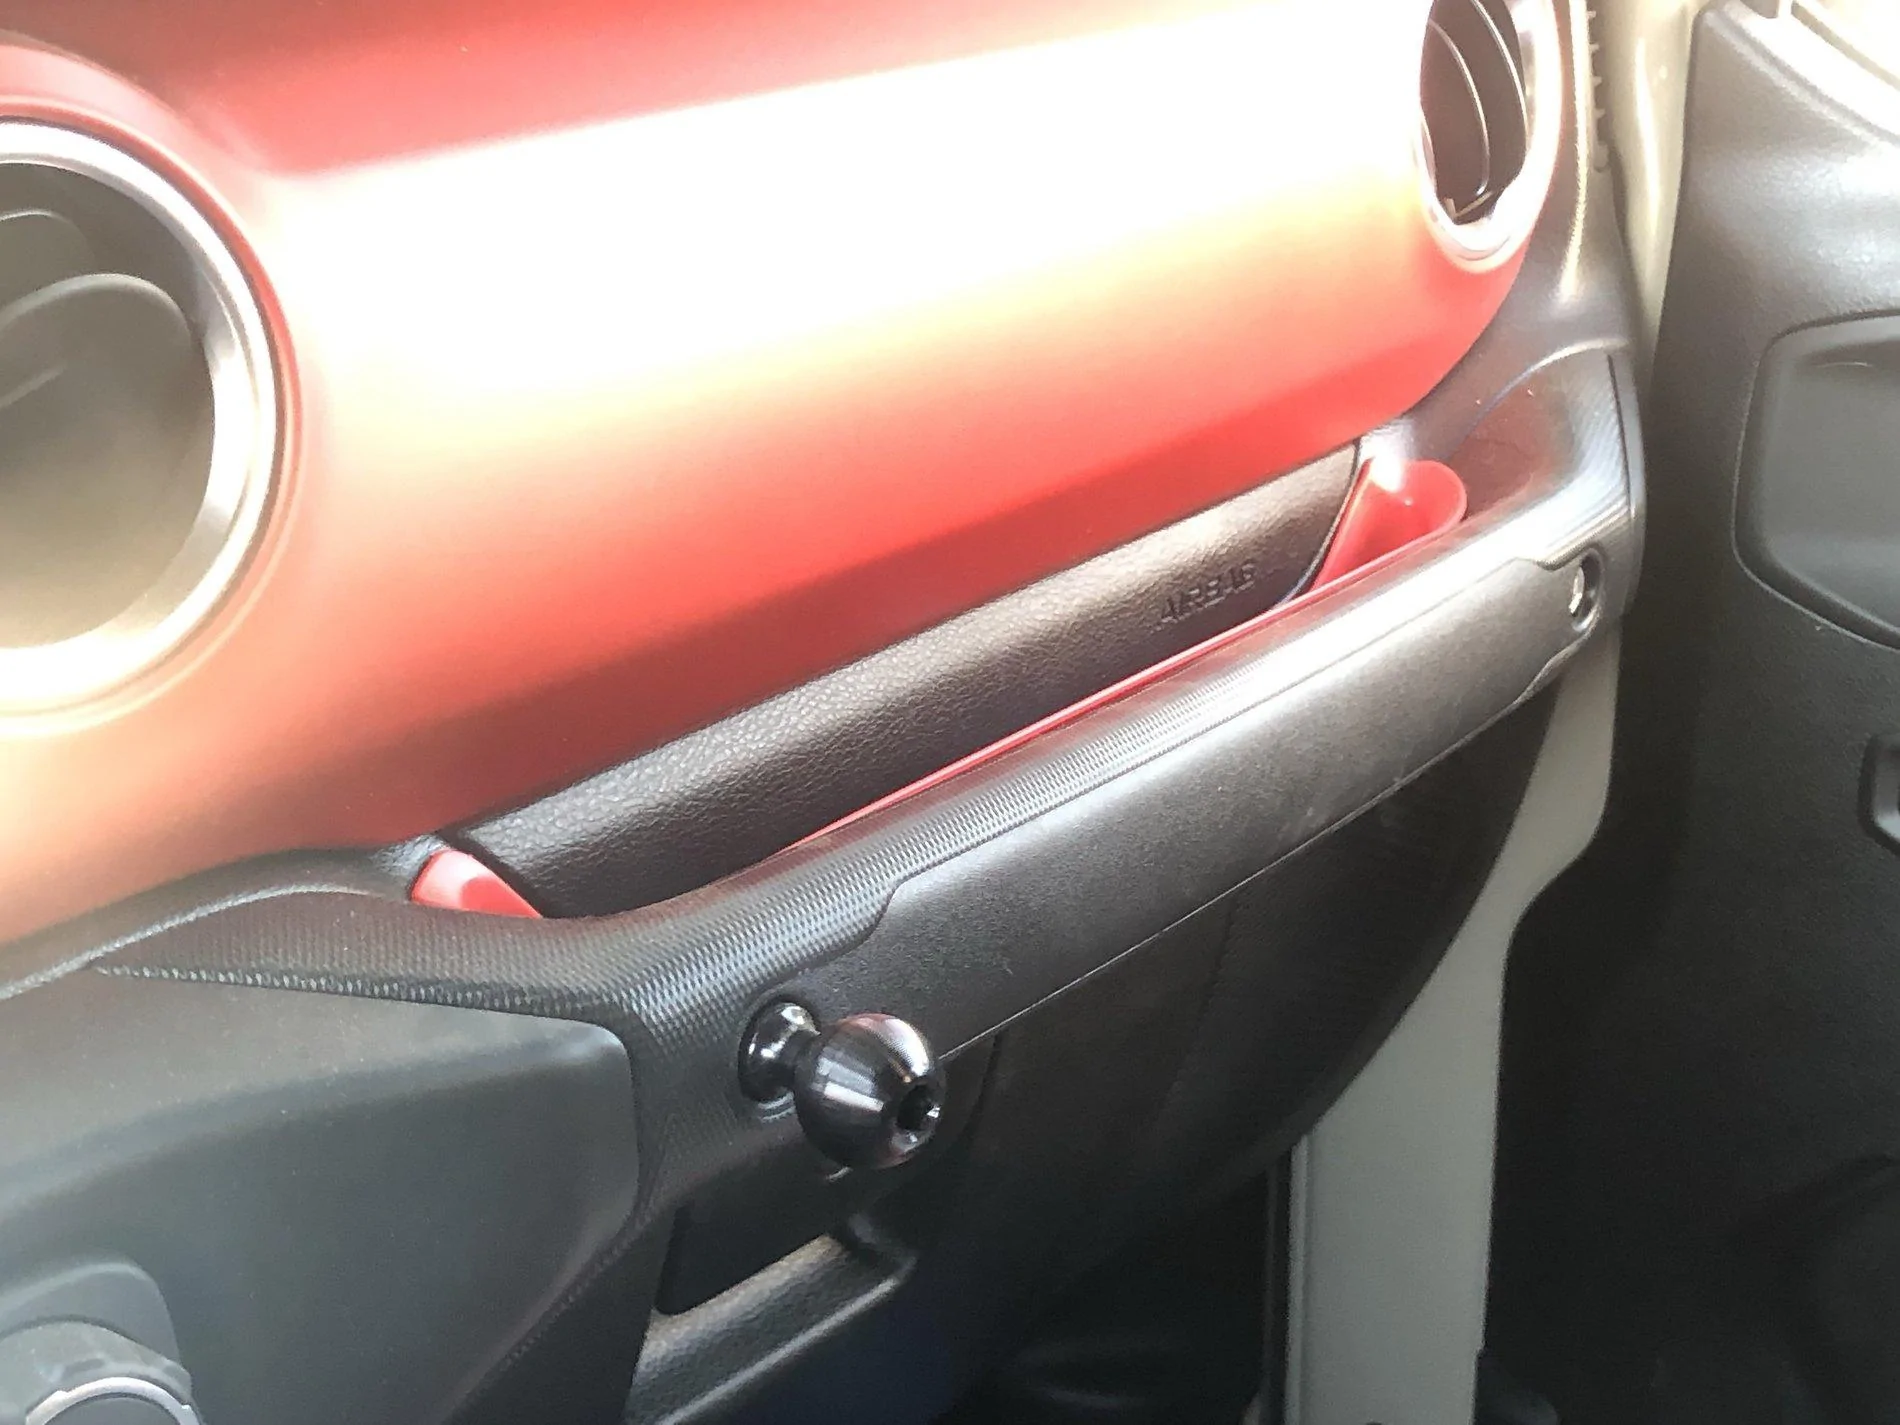
So I also added a 67 Designs Rail Mount Base in the middle of the dash for $89.
That rail became my main hub for electronics.
Trouble was, I'd made a mistake when purchasing my Carolina Metal Masters ball mounts, and had gone with 1" instead of 20mm because I didn't know any better. I wanted to keep the same size, but 67 Designs only sells 20mm ball mounts. So, I hopped on Amazon and purchased some RAM 1" ball mounts. Trouble again, the 67 Designs rail is shaped like a 'V', so the new RAM ball mounts with T-bolt attachment wouldn't fit. I used an angle grinder to just tear down the edges of the RAM T-track base plates a little until they slid into the 67 Designs rail.
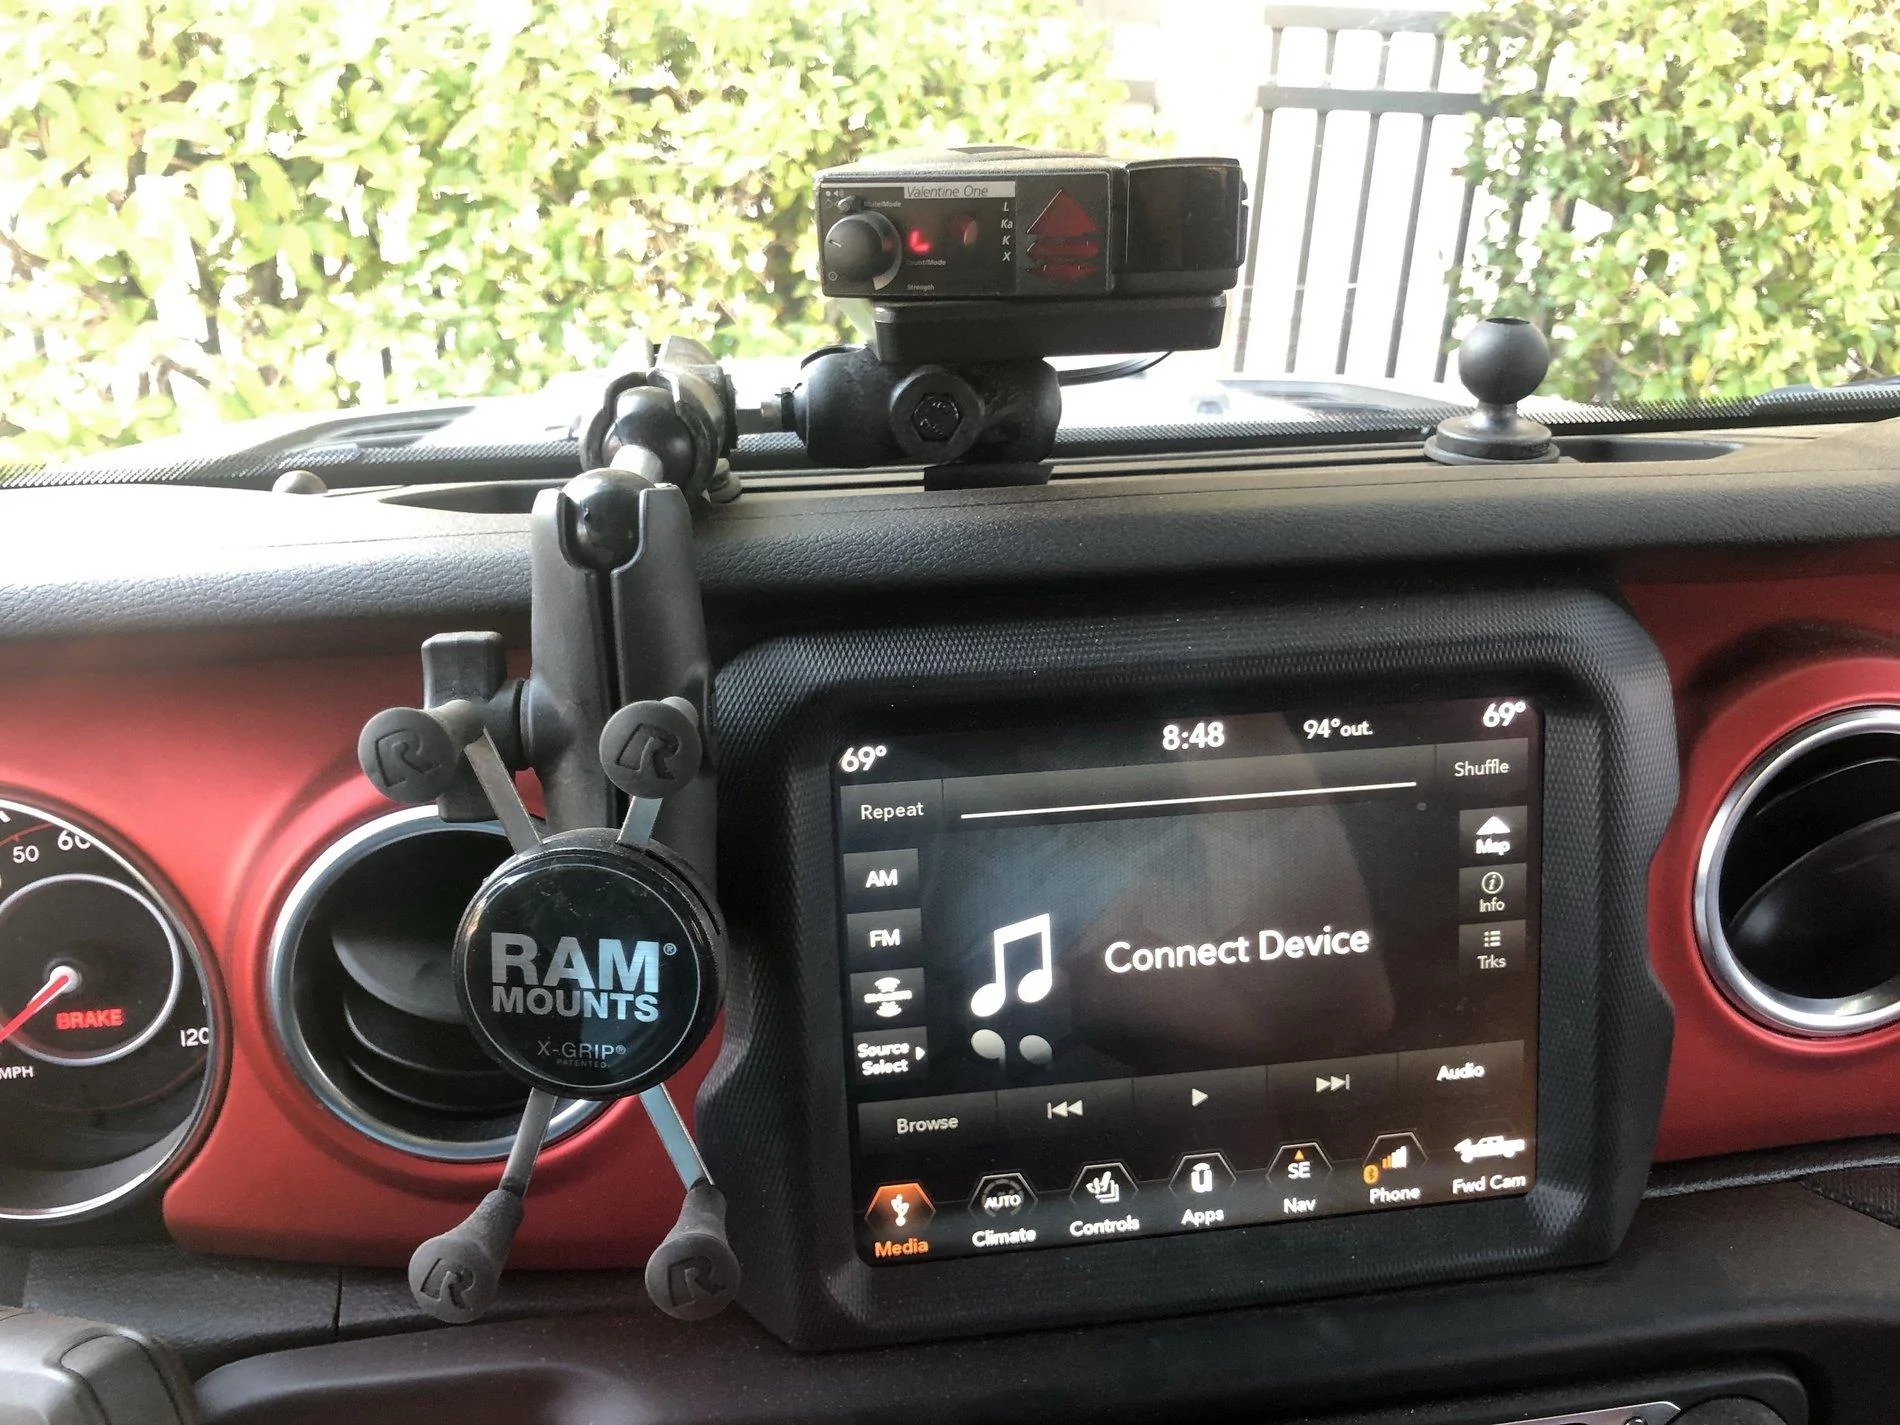
Now I needed a way to mount my iPhone and some way to mount my beloved Valentine One radar detector.
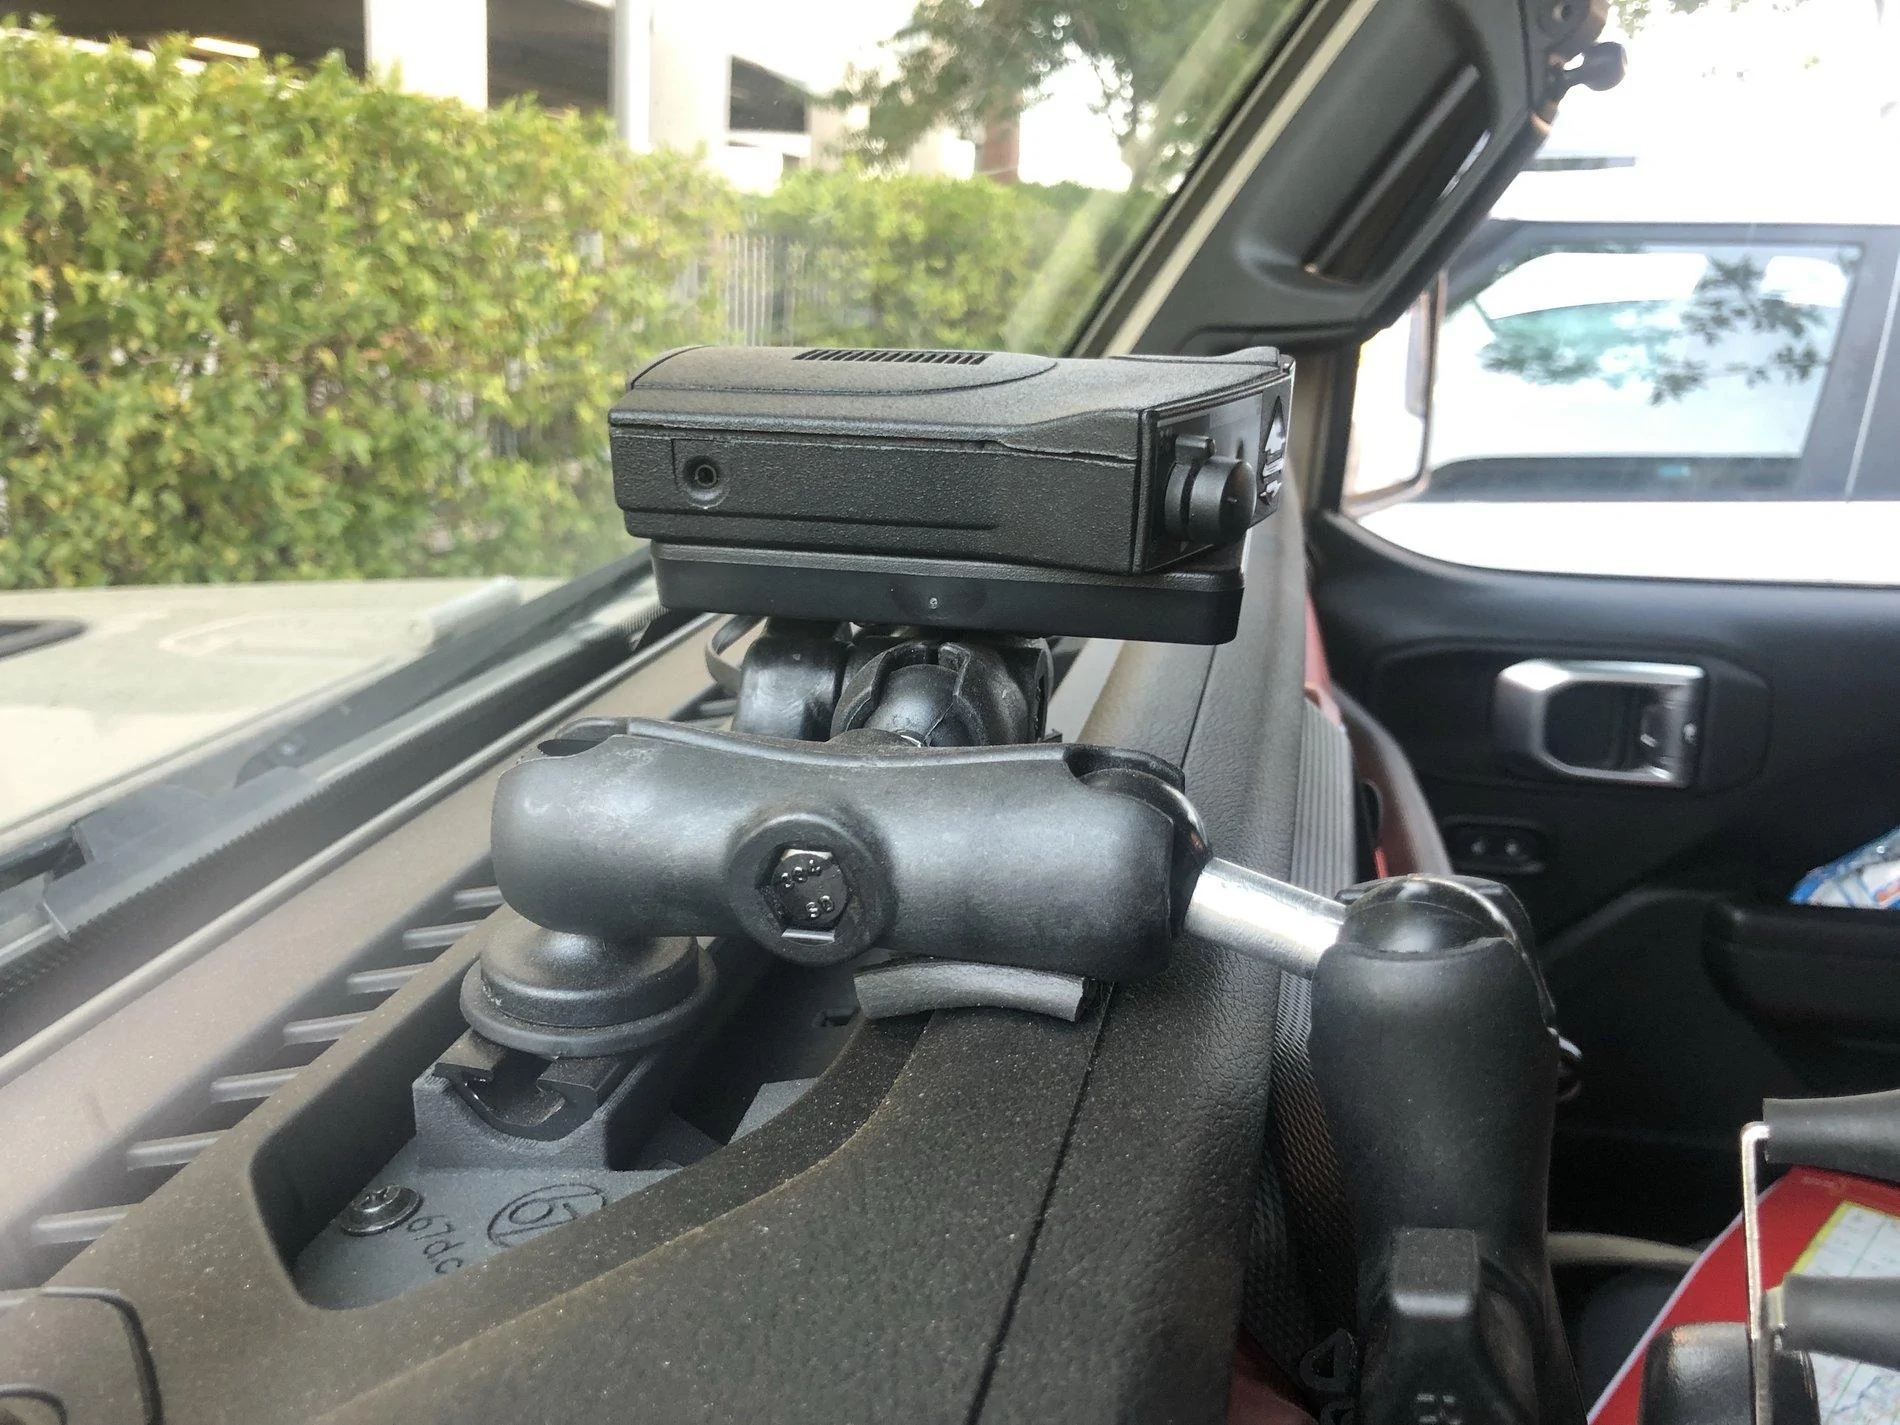
I started with simple RAM Track Balls with T-Bolt attachment. Then I added a short 3" RAM Double Socket Arm. That's what points towards the interior of the cab. Next I removed the RAM tightness adjustment knob and replaced it with a RAM Ball Adapter with 1/4"-20 Thread Hole and Hex Post. That allowed me to have yet another ball mount, this one facing sideway, low against the rail. Another ultra short RAM Double Socket Arm then a flat RAM Ball Adapter with AMPS Plate. That gave me a place to install a RAM Magnetic Plate for Radar Detectors. The final radar detector setup looked like this:
There's a small indentation in the middle of that dash opening that the rail is installed in. I drilled a small hole through that, and ran the power wire for the radar detector down through the dash and hardwired it to one of the accessory wires in the passenger foot well, so that it has power whenever the ignition is on. The power wire for a Valentine One is just a standard RJ-11 phone jack, so you can run the wire very easily and then install a phone jack on the end of it once it's through all the tight spots.
The radar detector is held in place by a magnet, so I just have to pull it out of the center console, toss it up there, and plug it in.
For my phone, I needed a RAM Double Ball Adapter, another short RAM Double Socket Arm, and then a RAM X-Grip Large Phone Holder with Ball.
I did not run power for my phone, and instead am just using a USB cable plugged into the center dash Media port. I just prefer it that way, so my phone can stay plugged in even when I'm parked and pull the phone into my lap to use.