HooliganActual
Well-Known Member
- First Name
- Robert
- Joined
- Jun 27, 2020
- Threads
- 9
- Messages
- 1,410
- Reaction score
- 3,601
- Location
- 10 miles from the Sun
- Vehicle(s)
- 2020 Gladiator Rubicon
- Occupation
- Retired
- Thread starter
- #1
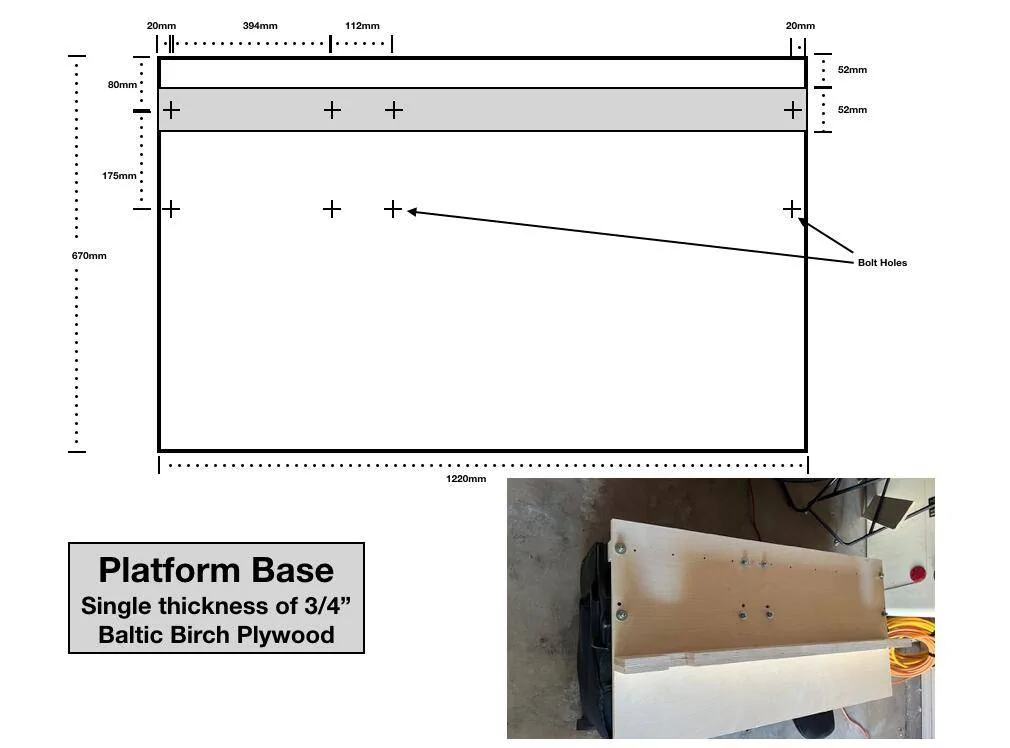
Yesterday I posted about building a "Couch" in my shop using the rear seats that I removed during my rear seat delete.
@RudeJeepin asked if I could share some of the dimensions.
Now I am a hobbyist woodworker and I'm not "smart" (experienced) enough to actually work from plans yet; so when I built it, it was basically a trial and error experiment. HOWEVER, with it now built I took it all back apart and "As-Built" some prints. I want to put a couple of disclaimers out here first:

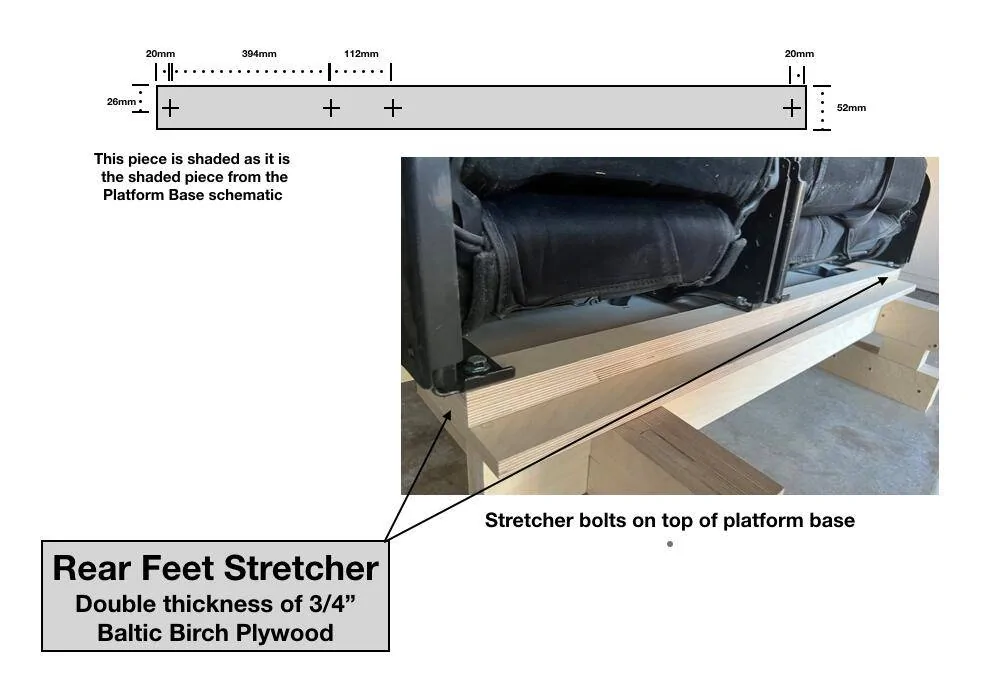
The Gladiator seat's front and rear feet are at different heights. For my build, I bolted the front feet directly to the platform base. This is the piece that is meant to take up the gap between the rear feet and the platform base.

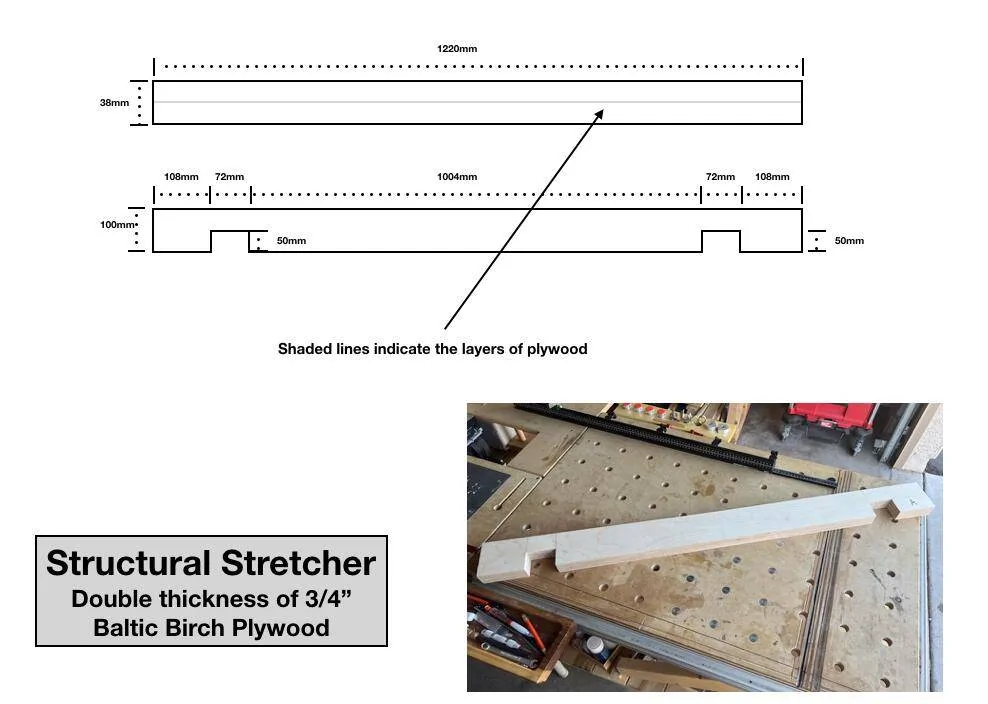
This next piece (there are 2) is a stretcher that runs under the platform base to provide structure to the platform base:

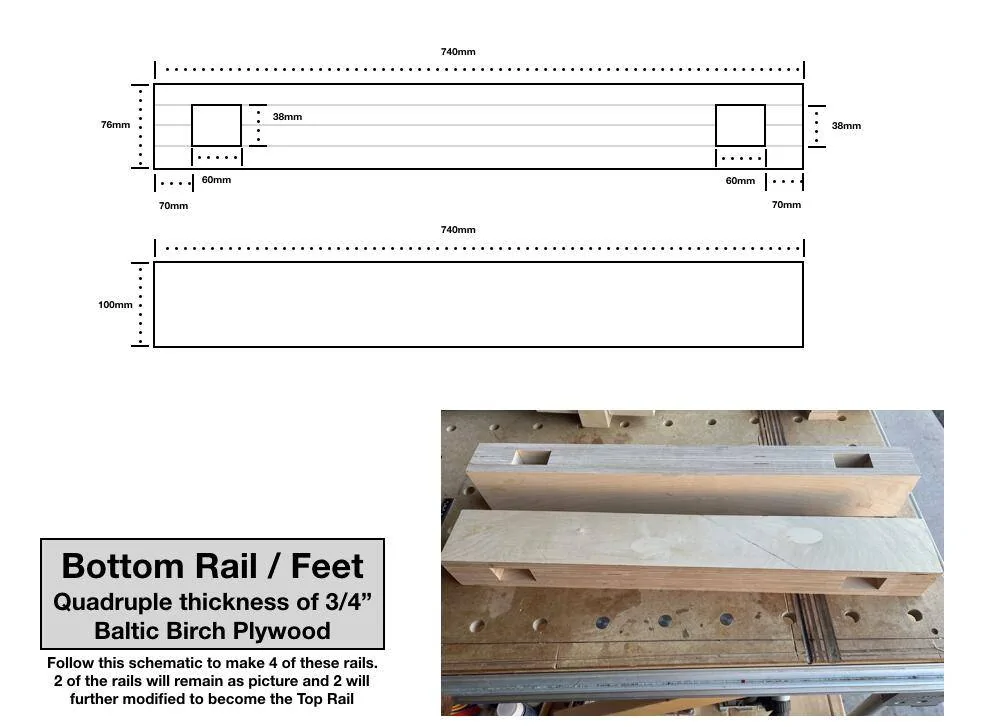
These are the rails that will become the base. The upper rails will connect the two stretchers together and the bottom rails will become the feet in contact with the floor. Essentially, you will build 4 of these. Two will remain as is, and the other two will be slightly modified in the next step:

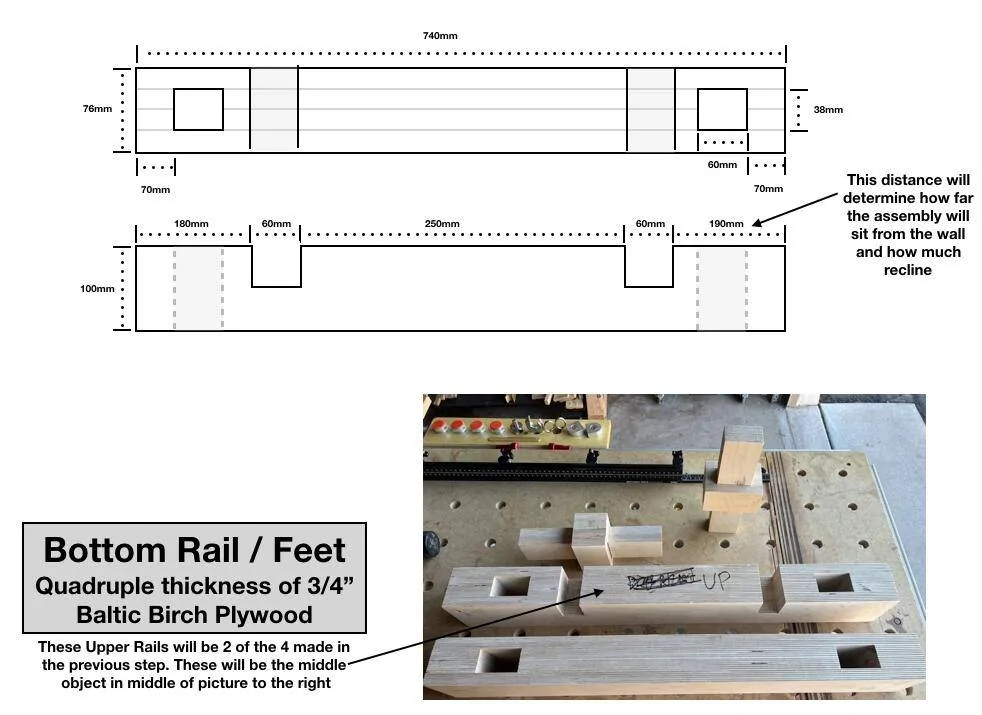
Using two of the rails built in the last step, this modification will be what locks the upper rail into the stretchers. As noted in the right side of this drawing, these pieces can be adjusted in length to set the distance from the wall and ultimately the amount of recline:

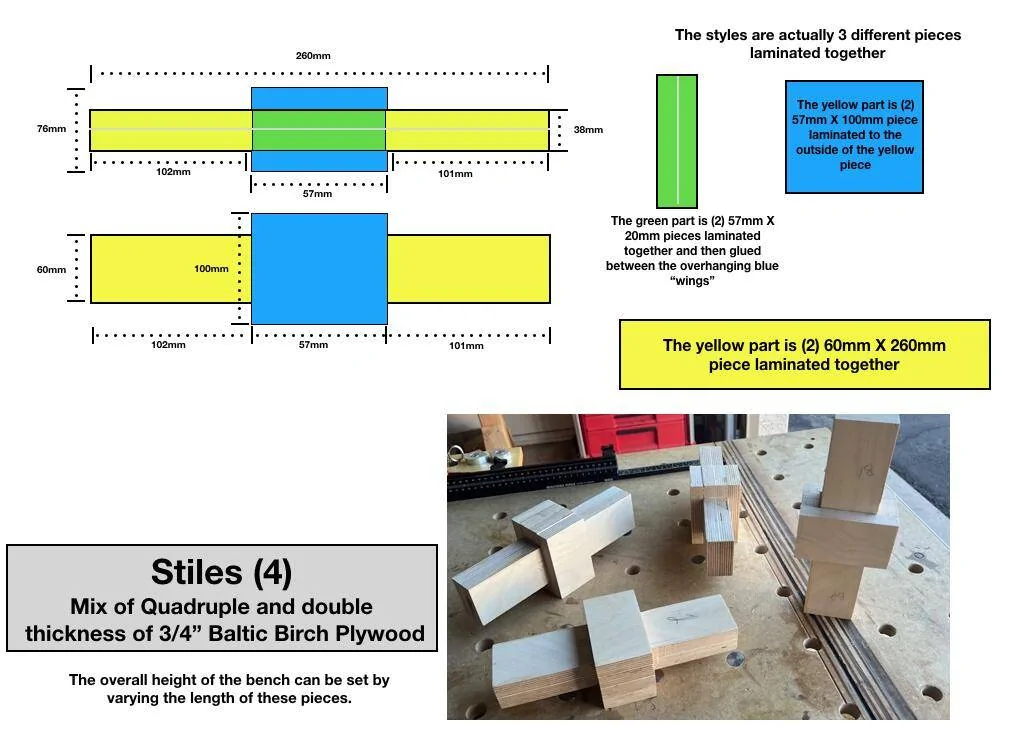
This is the final and most complicated piece. It is actually 3 different cut pieces that get glued together to form the stiles. This creates the tenons that lock everything together. These pieces can be shaped in order to get the final fit. Also, the length of these pieces can be used to change the overall height of your Jeep Couch:

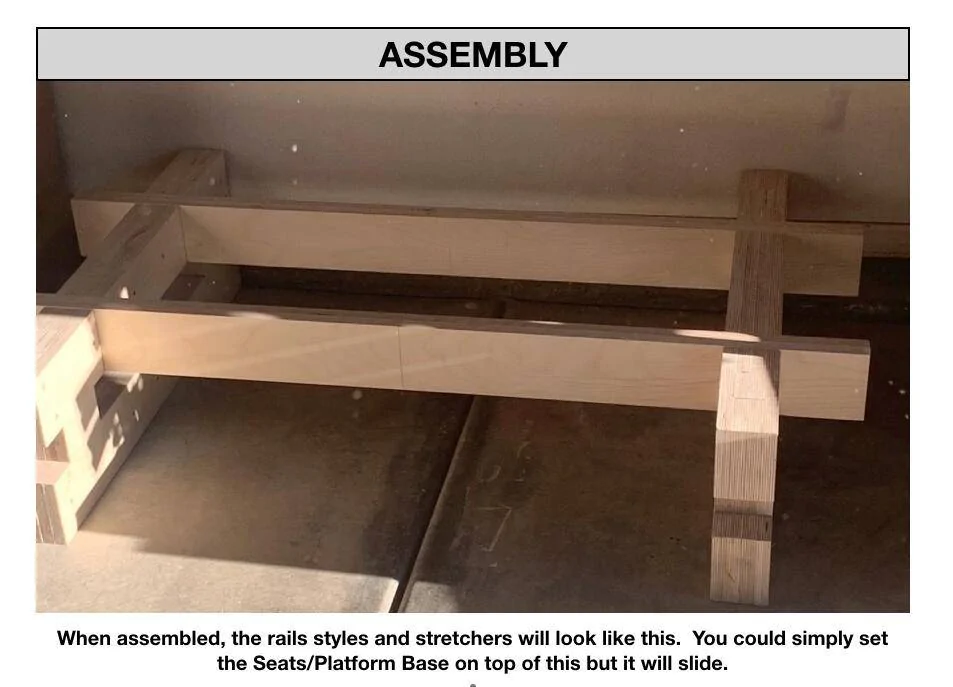
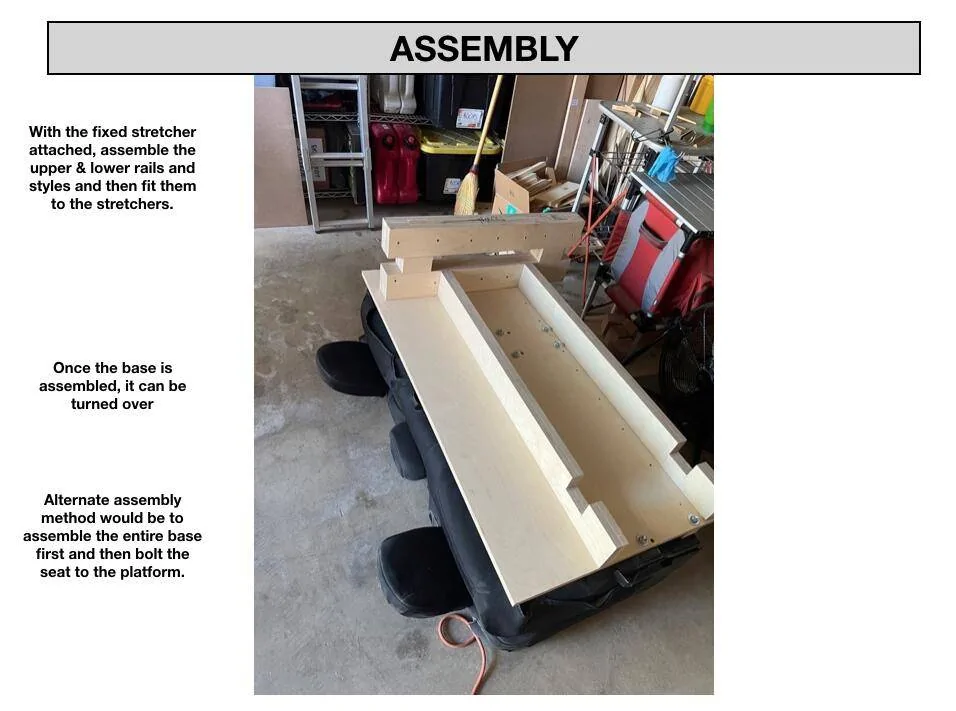
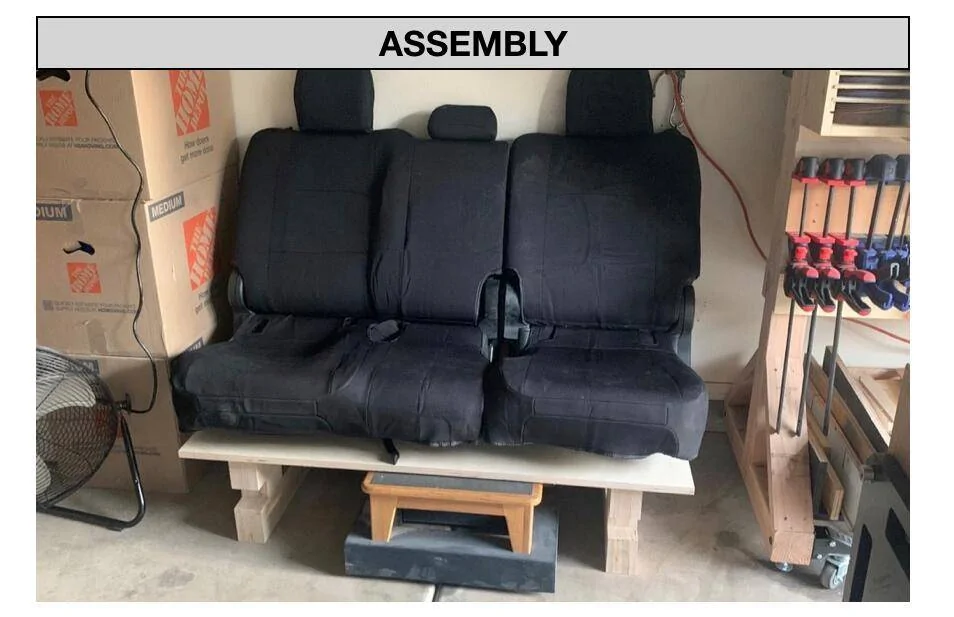
Here's some assembly steps:


@RudeJeepin asked if I could share some of the dimensions.
Now I am a hobbyist woodworker and I'm not "smart" (experienced) enough to actually work from plans yet; so when I built it, it was basically a trial and error experiment. HOWEVER, with it now built I took it all back apart and "As-Built" some prints. I want to put a couple of disclaimers out here first:
- I'm retired, have an old computer and don't have a proper CAD program. I built these plans in Keynote; so please forgive the crudeness of the plans. I've been as thorough as I could be but it's just not CAD. As I like to say, these plans are "directionally correct and precisely wrong."
- All of my measurements are in metric. My apologies to anyone who is metric-averse but as a woodworker it is much easier to work in millimeters than trying to figure what half of 1-5/32" is.
- Please verify measurements against your set of rear seats. I can't guarantee that all Jeep Gladiator rear seats are the same width, depth, bolt hole placement, etc. Additionally, you can change several of the dimensions to alter how high the base sits, how far from the wall, etc. and I have tried to call this out where applicable.
- Standard chair height typically ranges between 18"-23". For my build, I targeted 19".
- This build plan does not include any support structure for the seat backs. My build assumed setting it against the wall; so the distance this unit sits from the wall is what actually determines the amount of recline.
- For this build I used 2 4'x8' sheets of 3/4" Baltic Birch plywood. I suppose you could used other materials but I chose Baltic Birch because it is stable (won't warp, twist, expand with humidity changes), it is dimensionally consistent, it looks fairly nice and it is one of the stronger plywood options out there. DON’T use MDF. You could use dimensional lumber or a nice hardwood, but it will be more expensive and a lot more work.
- I built mine to be capable of being disassembled easily. I wanted it to be semi-permanent such that I could break it down and reassemble somewhere else if necessary. You could build this quite a bit differently if portability isn't important to you.
- I built it in the manner I did because I wanted it to be VERY stable. As you will see, the various lamination layers (glued together) simulate mortise and tenon construction. Why mortise and tenon? Strength and stability. They lock together and the shoulders that are created are what make it stable.
- Please be aware that anywhere that a dimension on the plans references a thickness of the plywood I am using the "dimensional" width of the sheet. This could vary. So if your plywood only measures 36mm instead of 38mm, then you should just account for that thickness difference where applicable.
The Gladiator seat's front and rear feet are at different heights. For my build, I bolted the front feet directly to the platform base. This is the piece that is meant to take up the gap between the rear feet and the platform base.
This next piece (there are 2) is a stretcher that runs under the platform base to provide structure to the platform base:
These are the rails that will become the base. The upper rails will connect the two stretchers together and the bottom rails will become the feet in contact with the floor. Essentially, you will build 4 of these. Two will remain as is, and the other two will be slightly modified in the next step:
Using two of the rails built in the last step, this modification will be what locks the upper rail into the stretchers. As noted in the right side of this drawing, these pieces can be adjusted in length to set the distance from the wall and ultimately the amount of recline:
This is the final and most complicated piece. It is actually 3 different cut pieces that get glued together to form the stiles. This creates the tenons that lock everything together. These pieces can be shaped in order to get the final fit. Also, the length of these pieces can be used to change the overall height of your Jeep Couch:
Here's some assembly steps:

Sponsored
Last edited: