Sponsored

A new hope ... (build journal and component reviews)

OP
OP
cug

cug

Well-Known Member
First Name
Guido
Joined
Apr 1, 2023
Threads
13
Messages
602
Reaction score
664
Location
Christchurch, New Zealand
Vehicle(s)
JTR EcoDiesel, Land Cruiser 79, BMW R1250GS
Build Thread
Link
Occupation
Just keeping busy
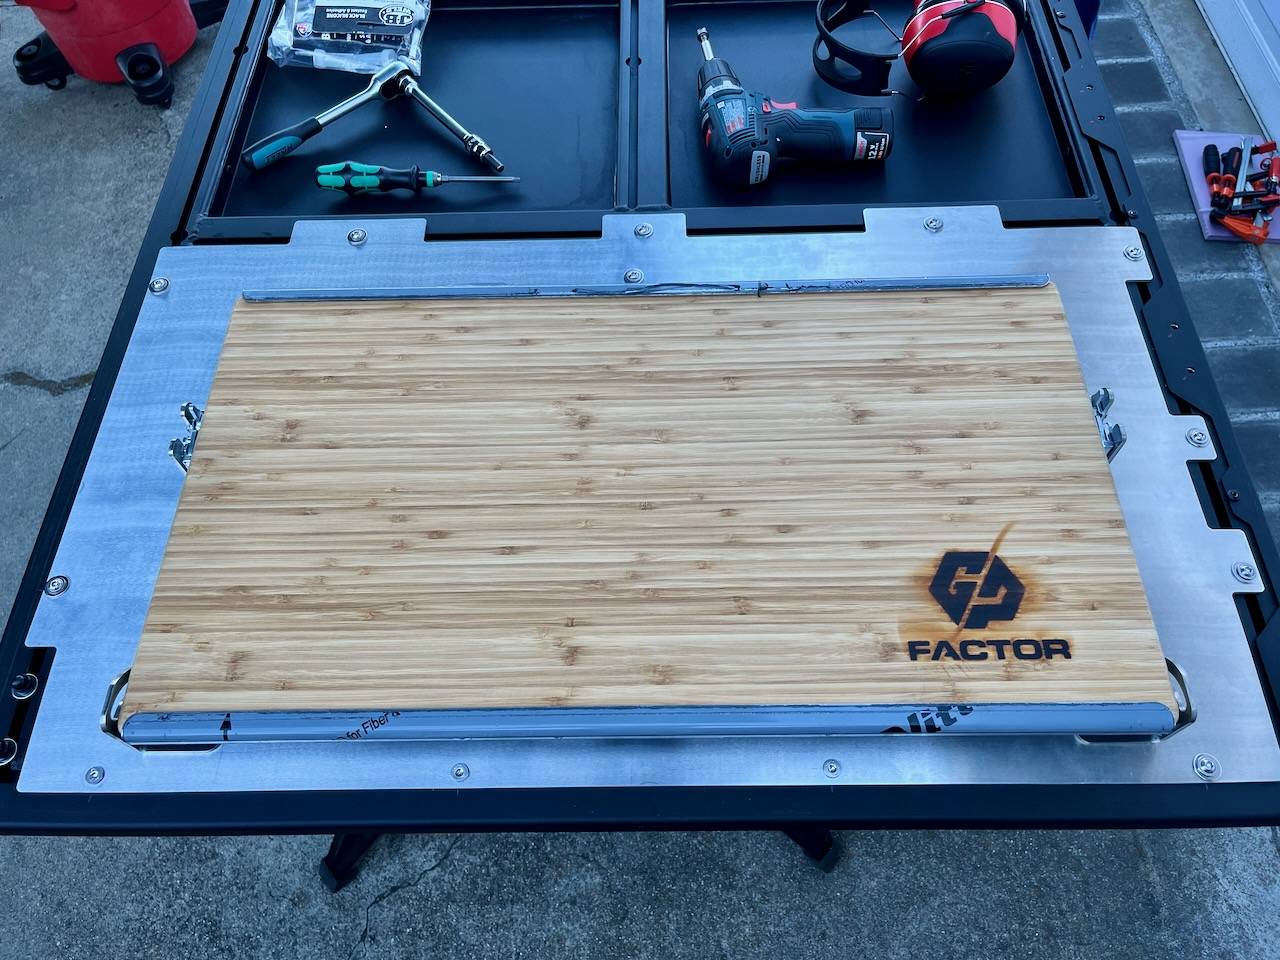
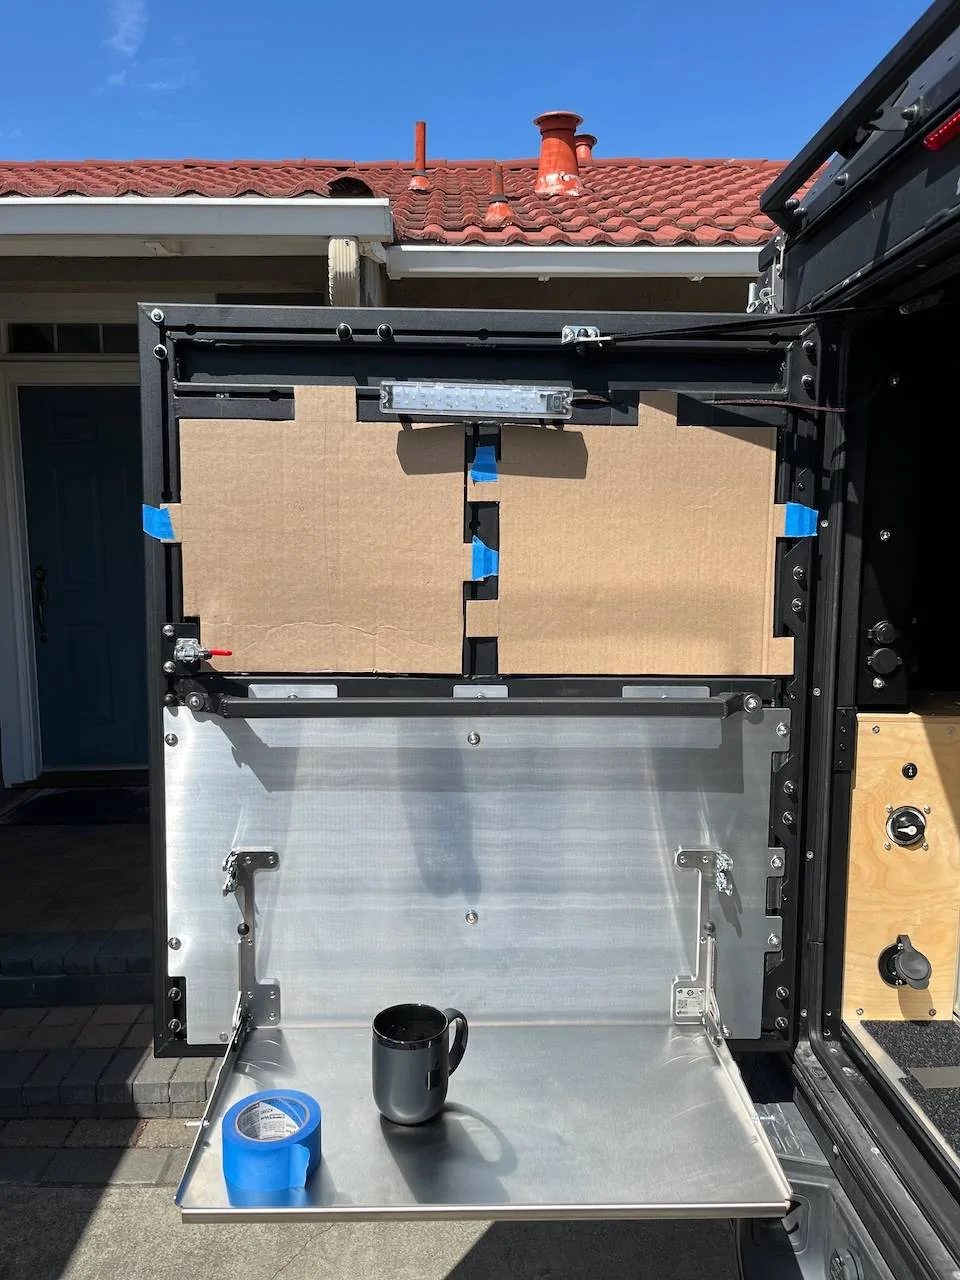
I'll definitely do a write up. My hope is, that this should be easy – the GP-Factor panel has wiring for solar already prepared and the roof has an Anderson plug which is wired to the corner in the camper.

We've connected this when installing the GP-Factor panel, so I certainly hope that the install will just be: stick it to the roof with tape and hook up the wiring to the provided plug on the camper roof.

Hope dies last ... ;-)
Sponsored

 
OP
OP
cug

cug

Well-Known Member
First Name
Guido
Joined
Apr 1, 2023
Threads
13
Messages
602
Reaction score
664
Location
Christchurch, New Zealand
Vehicle(s)
JTR EcoDiesel, Land Cruiser 79, BMW R1250GS
Build Thread
Link
Occupation
Just keeping busy
Good day working on the rear door, although disappointing, since we couldn't finish it. There is rain the forecast so, we put the door back on after removing the table for final details.

To do:
  • Three of the holes for the table bracket rivets are a fraction of a milimeter off, so have to widen these a bit to make rivets fit.
  • Mount the table hardware with rivets – I had to get a different rivet gun for that, the one I had doesn't fit into the space. Now we have an air powered one, makes the whole job easier anyways.
  • Fix a leak in the door. There was some water in there from recent rains and we have to find where that is coming in. Probably at the locking handle TinyRig installed differently to accomodate the turned around door. (Finding more and more disappointing details where they took shortcuts unfortunately.)
  • Mark and drill holes for RhinoRack load bars. We have them cut to 30" to fit the door nicely, will install three of them once we have a few rain free days so the silicone sealant can dry out properly.
  • Put insulation in the lower two quadrants, install load bars and table with thread locker and sealant.
  • Once I have measurements, start designing some mounting brackets to install on the loadbars. These will be used to hold two 2G Rotopax and maybe a Pelican case for "dirty diesel stuff".
  • Start thinking about a way to mount a Last US Bag Half Caddy to the top left area of the door.
  • Start thinking about how to move the Redarc screen to the door.
  • Move the door light to the final place where it can stay.
Other than the design stuff, probably a day of work. But it's supposed to rain tomorrow night, so not messing with sealant and holes in the door tomorrow, that'll be next week.

Other stuff to be done:
  • The damn heater box I designed doesn't go through the checks of the metal shop I used before. Trying to work that out. Maybe will design with less bends and instead turn the sides into mounting brackets that will get bolted to the top. Might make the whole thing actually simpler. Maybe.
  • Test the diesel heater, just general test in the driveway or so.
  • Test the water system components. Then get the tank out, test that it doesn't leak, re-install, install the water system.
  • Install the LED headlights once they arrive (ETA tomorrow). Re-program truck to recognize the LEDs.
  • Install leg fog lights once they arrive (no ETA, need to call Baja Designs tomorrow).
It's getting there, but still going slow. Very frustrating.

Table mounted to the door (we took it off to finish the riveting work tomorrow, therefore no photo of it mounted in the truck):

Jeep Gladiator A new hope ... (build journal and component reviews) IMG_6333
 
OP
OP
cug

cug

Well-Known Member
First Name
Guido
Joined
Apr 1, 2023
Threads
13
Messages
602
Reaction score
664
Location
Christchurch, New Zealand
Vehicle(s)
JTR EcoDiesel, Land Cruiser 79, BMW R1250GS
Build Thread
Link
Occupation
Just keeping busy
So, busy day. These are DONE:

  • Three of the holes for the table bracket rivets are a fraction of a milimeter off, so have to widen these a bit to make rivets fit.
  • Mount the table hardware with rivets – I had to get a different rivet gun for that, the one I had doesn't fit into the space. Now we have an air powered one, makes the whole job easier anyways.
  • Install the LED headlights once they arrive (ETA tomorrow). Re-program truck to recognize the LEDs.
Also drilled a hole behind the "rubber bumper" on the table brackets. For the headlights, seems like I'm missing a short four wire cable to make the passenger side halo work, and I consider these optional for now.

This has cost me quite some searching and comparing and thinking:

Jeep Gladiator A new hope ... (build journal and component reviews) IMG_6337


Jeep Gladiator A new hope ... (build journal and component reviews) IMG_6338


All good now, and also as it SHOULD be. Can't wait to take the door out again to finally install the table.
 

Sponsored

OP
OP
cug

cug

Well-Known Member
First Name
Guido
Joined
Apr 1, 2023
Threads
13
Messages
602
Reaction score
664
Location
Christchurch, New Zealand
Vehicle(s)
JTR EcoDiesel, Land Cruiser 79, BMW R1250GS
Build Thread
Link
Occupation
Just keeping busy
Install the LED headlights once they arrive (ETA tomorrow). Re-program truck to recognize the LEDs.
Some notes on this:
  • If you get Mopar LED headlights to replace halogen lights, make sure that your truck has four wires going to the lights (the plug going into the light has four wires). Otherwise Halos might not work.
  • JTs since about 2021 have most or all of the wiring already in. But ... see next point.
  • If you, like me, are missing a fourth wire on the passenger side, which seems to happen more often (Only? Don't know.) with diesel JTs, then this MIGHT (not tested yet) be the fix:
  • Getting the plugs out of the security gateway is a pain in the ass and the hands. My hands are banged up like crap right now. It's easier when you remove some of the trim panels, they aren't hard to remove, just annoying.
  • If the plugs aren't put back in or connected to an OBDII device, the infotainment system (center screen) doesn't turn on. So, do the programming, test the lights, plug the connectors back in or use a Tazer Mini or so.
Regarding the lights:
  • Low beams are excellent. Very good spread, reasonable cut-off with some scatter to illuminate signs etc. They are also quite easy to adjust.
  • High beams are soso. Don't seem super bright, but they do throw some light down the road. Long term it's likely that I'll add some more lights that come on with the high beams (but can be completely turned off).
  • Halos are okay, whatever, not super excited about them, but now that I have them, I want them to work. Right now, passenger side doesn't work due to the missing fourth wire (see above).
Overall, a good modification that would have taken about 30 minutes if it wasn't for that ^%*^&*% OBDII security gateway. Getting those connectors out was a pain. Made it a three hour job or so.

Current state: driving around with only driver's side halo ... ;-)

Jeep Gladiator A new hope ... (build journal and component reviews) images
 
Last edited:
OP
OP
cug

cug

Well-Known Member
First Name
Guido
Joined
Apr 1, 2023
Threads
13
Messages
602
Reaction score
664
Location
Christchurch, New Zealand
Vehicle(s)
JTR EcoDiesel, Land Cruiser 79, BMW R1250GS
Build Thread
Link
Occupation
Just keeping busy
Slowly we are getting somewhere.

In a nerve wracking session today we drilled the rear door for loadbars. We had to drill from the inside, since the nuts will be mounted in the extrusion channel, so needed to make sure to drill in the correct place. To get it drilled straight we used the 80/20 drill tool. It worked well enough, although we did break one of the drill bits halfway through the 12 mounting holes. To be fair, that bit had probably 60 or 70 holes done by now ...

These are Rhinorack loadbars, cut to 30" length:

Jeep Gladiator A new hope ... (build journal and component reviews) IMG_6340


Test fitting some of the stuff that will go on there:

Jeep Gladiator A new hope ... (build journal and component reviews) IMG_6343


The maximum we can fit are probably six Rotopax (three stacks of two) and a Pelican case (still need to find one that fits nicely).

The plan is to use only two 2G Rotopax and one Pelican case which will hold "stinky diesel accessories" and other assorted dirty stuff. The Rotopax will be empty most of the time to not carry unnesssary weight, but for longer distances between fillups we can use them for an additional 80 miles range or so. Or use them to easier fill the 1G Rotopax that holds the diesel for the Webasto heater.

And of course, something had to go wrong: I measured about three times, but still didn't get the length of the mounting bolts right. We need 30mm bolts and of course, that was the only size we had only two left (25mm and 35mm we had plenty) ... so, final mounting will be tomorrow. Then the table will also be mounted and the door goes back on.
 
Last edited:
OP
OP
cug

cug

Well-Known Member
First Name
Guido
Joined
Apr 1, 2023
Threads
13
Messages
602
Reaction score
664
Location
Christchurch, New Zealand
Vehicle(s)
JTR EcoDiesel, Land Cruiser 79, BMW R1250GS
Build Thread
Link
Occupation
Just keeping busy
So, finally the table is mounted and we can start the work on the rest of the interior door layout:

Jeep Gladiator A new hope ... (build journal and component reviews) IMG_6348 (1)


Jeep Gladiator A new hope ... (build journal and component reviews) IMG_6350
 
Last edited:
OP
OP
cug

cug

Well-Known Member
First Name
Guido
Joined
Apr 1, 2023
Threads
13
Messages
602
Reaction score
664
Location
Christchurch, New Zealand
Vehicle(s)
JTR EcoDiesel, Land Cruiser 79, BMW R1250GS
Build Thread
Link
Occupation
Just keeping busy
Not much to show, just stuff I'm working on and/or have on order.

A box for the outside components of our heater, this is on order and will replace the passenger side molle panel:

Jeep Gladiator A new hope ... (build journal and component reviews) Screenshot 2024-04-14 at 18.02.53


This will come in raw aluminum, we'll get it powder coated locally once all the other mounting holes are drilled.

Mounting panel for the rear door between the upper and middle outside loadbars, ready for a Rotopax and mimicking the Alu-Cab molle pattern to a degree. This is awaiting some measurement confirmation, then I'll order two:

Jeep Gladiator A new hope ... (build journal and component reviews) Screenshot 2024-04-14 at 18.03.22


Similar panel for between the lower and middle loadbars, also awaiting confirmation:

Jeep Gladiator A new hope ... (build journal and component reviews) Screenshot 2024-04-14 at 18.03.39


Since they share the middle loadbar and if mounted above each other, the one mounted on top needs a spacer for the other loadbar, so I modeled that as well. Not worth showing. Just a fancy washer ... ;-)

And this is what I spend part of my afternoon creating. A Fusion 360 sketch for the Redvision display cutout. Actually, took me maybe 45 minutes or so, the rest was spend with coffee, food, and other Sunday afternoon activities:

Jeep Gladiator A new hope ... (build journal and component reviews) Screenshot 2024-04-14 at 18.04.05


Luckily, Redarc provides all measurements in the manual, so it was reasonably easy to create. Need this since we are planning on mounting the display to the door, instead of the current location in the camper corner.

Still waiting for some parts, for example a paper towel holder, so I can create an overall layout and finalize the interior panels of the door. Fun ...
 
OP
OP
cug

cug

Well-Known Member
First Name
Guido
Joined
Apr 1, 2023
Threads
13
Messages
602
Reaction score
664
Location
Christchurch, New Zealand
Vehicle(s)
JTR EcoDiesel, Land Cruiser 79, BMW R1250GS
Build Thread
Link
Occupation
Just keeping busy
Easy one today: solar panel is installed.

Jeep Gladiator A new hope ... (build journal and component reviews) IMG_6359


The "sticky pad" placement drives me crazy, but it's probably temporary anyways since these don't have the best adhesive.
 

Sponsored

OP
OP
cug

cug

Well-Known Member
First Name
Guido
Joined
Apr 1, 2023
Threads
13
Messages
602
Reaction score
664
Location
Christchurch, New Zealand
Vehicle(s)
JTR EcoDiesel, Land Cruiser 79, BMW R1250GS
Build Thread
Link
Occupation
Just keeping busy
Today is CAD (Cardboard Aided Design) day. Need to get these panels designed and cut, so that the whole door can hold the thinsulate insulation.

Jeep Gladiator A new hope ... (build journal and component reviews) IMG_6369
 
First Name
Nic
Joined
Nov 13, 2023
Threads
0
Messages
11
Reaction score
12
Location
California
Vehicle(s)
Jeep Wrangler Sahara, Smittybilt Scout
Occupation
Photographer
Today is CAD (Cardboard Aided Design) day. Need to get these panels designed and cut, so that the whole door can hold the thinsulate insulation.

IMG_6369.jpeg
Awesome to see it coming together!
 
  • Like
Reactions: cug

DarthAWM

Well-Known Member
First Name
Mick
Joined
Jan 8, 2024
Threads
0
Messages
343
Reaction score
735
Location
Odessa Tx
Vehicle(s)
2021 Rubicon Gladiator
Occupation
Oilfield Service
Today is CAD (Cardboard Aided Design) day. Need to get these panels designed and cut, so that the whole door can hold the thinsulate insulation.

IMG_6369.jpeg
Paul Cox is that you?


Top