Tortooga Custom Works
Well-Known Member
- First Name
- Ralph
- Joined
- Nov 29, 2018
- Threads
- 80
- Messages
- 1,704
- Reaction score
- 1,623
- Location
- Central NJ
- Vehicle(s)
- 2020 Jeep Gladator Launch Edition | 2017 Jeep Grand Cherokee Limited
- Thread starter
- #1
The JL Kit fits perfectly in the Gladiator:
https://www.genesisoffroad.com/JeepJLDualBattery-p/185-jldbk.htm
Why this kit?
I wanted to just write something brief about why I chose this kit, why it works for my needs. You may find that it could work for yours.
I want to be able to run certain accessories while the vehicle is off. Some of these I want to run even while I am driving. This will require a battery of some kind, either a portable one, or a permanently installed one somewhere in the vehicle. I also would want that battery to charge while the vehicle is on.
Space is limited in the vehicle, so where might that additional battery go?
Also, wiring is always challenging. The battery won't fit under the hood, probably in the bed somewhere, so I'd need to make sure to get some nice sized wires from the batteries to the bed to keep that other battery charged up.
I chose this kit because I felt that, given it's price, the speed, and simplicity of the installation, it satisfied all my current wants and needs. I got the additional capacity from a second battery and,
Yes, I could just wire things to the stock battery. But that battery is not at all designed to power things with the vehicle off. I would need to replace it a lot sooner than intended if I was to do that regularly.
Note this quote: "If a starting battery is routinely deep cycled (discharged below 20%-50% of max capacity), it will generally fail after 30-150 cycles. The same starting battery will last for thousands of cycles if it is just used normally (2% - 5% discharge)."
Source: http://www.batteriesinaflash.com/deep-cycle-battery-faq
Out of the box, this kit also provides a battery isolator to protect that cranking battery. I can still use some of the cranking battery's capacity when the vehicle is off, but the isolator will protect it when it reaches a certain level and just run off of the auxiliary battery.
I need a cranking/starting battery, and also an auxiliary battery that can handle being deep cycled a good amount of times.
The kit can only hold two Group 25 size batteries.
While there are many good starting/cranking options at that size, there are not very many deep cycle batteries available in that size. Actually, I don't know if there are any...
For the price, the Odyssey batteries are a very good mix between a cranking battery and a deep cycle battery. They can be deep cycled a significant amount more than a starting/cranking battery, but not as much as a traditional deep cycle battery (I think that's because of the size). The big benefit is that they also serve very well as starting/cranking batteries.
A more technical explanation can be found here: https://www.odysseybatteries.com/design.htm
For my current needs the two Odyssey batteries seemed spot on, in addition, there are very many good reviews for them.
Cons
I realized I wrote a lot of benefits... but I will write some of the negatives, that's only fair, and it may help others determine if this particular setup is right for them.
[to be written]
The Future
In the next few months I'll be adding the following. I'll add details as that happens.
Could my needs in the future change? Possibly, and probably. At that time I'll look at what I have and possibly make some updates. Maybe I would get a third battery, true deep cycle and put it in an enclosure in the bed. I might then rewire some circuits around... but yea, not worth walking about at the moment because the kit and batteries as is are perfect for my needs right now.
Instructions
The JL instructions by Shane were spot on. That's what I followed. I transcribed all of it to help me wrap my head around what I was doing. I've attached that PDF - it may or may not help you, the video is extremely well laid out.
It took me about 1.5 hours. I was going slow and I still dropped a nut at the worst possible moment, into the worst possible cavity... I got it out, but lost about 10 minutes to that ordeal.
A few high level notes:
https://www.genesisoffroad.com/JeepJLDualBattery-p/185-jldbk.htm
Why this kit?
I wanted to just write something brief about why I chose this kit, why it works for my needs. You may find that it could work for yours.
I want to be able to run certain accessories while the vehicle is off. Some of these I want to run even while I am driving. This will require a battery of some kind, either a portable one, or a permanently installed one somewhere in the vehicle. I also would want that battery to charge while the vehicle is on.
Space is limited in the vehicle, so where might that additional battery go?
Also, wiring is always challenging. The battery won't fit under the hood, probably in the bed somewhere, so I'd need to make sure to get some nice sized wires from the batteries to the bed to keep that other battery charged up.
I chose this kit because I felt that, given it's price, the speed, and simplicity of the installation, it satisfied all my current wants and needs. I got the additional capacity from a second battery and,
- I didn't need to find a "good" (dry, safe, etc) location for another battery, and
- I didn't need to run any wires from the battery to the bed (although in some future I will need to do this anyway).
Yes, I could just wire things to the stock battery. But that battery is not at all designed to power things with the vehicle off. I would need to replace it a lot sooner than intended if I was to do that regularly.
Note this quote: "If a starting battery is routinely deep cycled (discharged below 20%-50% of max capacity), it will generally fail after 30-150 cycles. The same starting battery will last for thousands of cycles if it is just used normally (2% - 5% discharge)."
Source: http://www.batteriesinaflash.com/deep-cycle-battery-faq
Out of the box, this kit also provides a battery isolator to protect that cranking battery. I can still use some of the cranking battery's capacity when the vehicle is off, but the isolator will protect it when it reaches a certain level and just run off of the auxiliary battery.
Why I chose the two Odyssey Batteries?Here's how it works:
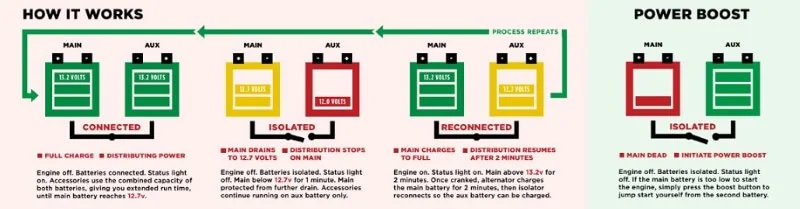
What if your cranking battery is somehow drained down too low to be able to start the vehicle? We have a solution for that.
- When both your batteries are fully charged at 13.2 volts, they are automatically connected and are charged at the same time.
- When you park and turn off the engine, but continue to use accessories such as lights or the stereo or a CB, both batteries begin to drain down.
- When your main cranking battery reaches 12.7 volts, the smart isolator separates the batteries, so that your cranking battery will have enough power to start the engine. The second battery continues to power your accessories for as long as it will last.
- After you crank the vehicle, your main cranking battery will be charged up to 13.2 volts first, and then the isolator will begin charging your accessory battery. By only charging one battery at a time, your alternator is protected from excessive strain.
- Press the Start Boost button and the isolator will connect both batteries together for 1 minute, acting like built-in jumper cables to jump start your engine off your accessory battery.
- As long as the accessory battery has enough power, you'll be able to start your vehicle instead of being stranded with a dead battery!
- The alternator will charge both batteries for 1 minute, then switches back over to automatic mode to reduce the strain on your alternator.

Source: https://www.genesisoffroad.com/JeepJLDualBattery-p/185-jldbk.htm
I need a cranking/starting battery, and also an auxiliary battery that can handle being deep cycled a good amount of times.
The kit can only hold two Group 25 size batteries.
While there are many good starting/cranking options at that size, there are not very many deep cycle batteries available in that size. Actually, I don't know if there are any...
For the price, the Odyssey batteries are a very good mix between a cranking battery and a deep cycle battery. They can be deep cycled a significant amount more than a starting/cranking battery, but not as much as a traditional deep cycle battery (I think that's because of the size). The big benefit is that they also serve very well as starting/cranking batteries.
A more technical explanation can be found here: https://www.odysseybatteries.com/design.htm
For my current needs the two Odyssey batteries seemed spot on, in addition, there are very many good reviews for them.
Cons
I realized I wrote a lot of benefits... but I will write some of the negatives, that's only fair, and it may help others determine if this particular setup is right for them.
[to be written]
The Future
In the next few months I'll be adding the following. I'll add details as that happens.
- Power Distribution - see detail thread
- Solar Charging Controller - Not settled on which just yet, but this is easily wired right to the main terminals provided on the kit. Again, simplicity of installation wins...
- 12V Plugs in the Cab wired directly to the kit (for charging phones and tablets)
- 12V Terminals in the bed wired directly to the kit (for lights, fridge, etc). I might just run one big set of wires and have some separate power distribution back there.
- New Inverter. Maybe just one with a new plug in the bed and in the cab, or one for the cab, and one for the bed. Not 100% sure yet. I'm planning to use the space behind the rear seats for this. More on that later.
Could my needs in the future change? Possibly, and probably. At that time I'll look at what I have and possibly make some updates. Maybe I would get a third battery, true deep cycle and put it in an enclosure in the bed. I might then rewire some circuits around... but yea, not worth walking about at the moment because the kit and batteries as is are perfect for my needs right now.
Instructions
The JL instructions by Shane were spot on. That's what I followed. I transcribed all of it to help me wrap my head around what I was doing. I've attached that PDF - it may or may not help you, the video is extremely well laid out.
It took me about 1.5 hours. I was going slow and I still dropped a nut at the worst possible moment, into the worst possible cavity... I got it out, but lost about 10 minutes to that ordeal.
A few high level notes:
- The number of terminals at your fuse box may vary. There may be 6, there may be less. Just make sure to put the ones you have back where they belong.
- I only had one wire going to the fender, the JL shane is working on had 2. Again, don't stress if you have more or less, just put them in the right spot.
- I had an issue where my backup camera, and trail cam, did not work when I first powered everything up. I think it was that I restored power with the tailgate down, and I did all my troubleshooting for several minutes with it down. The instant I closed it and turned the vehicle on, both cameras started working again.
- I spent the most time grooming the wires at the end, getting them in the right spot so they would screw down where they were supposed to. Be patient.
Sponsored
Attachments
-
127.5 KB Views: 712
Last edited:
 .
.
