Sponsored

A new hope ... (build journal and component reviews)

OP
OP
cug

cug

Well-Known Member
First Name
Guido
Joined
Apr 1, 2023
Threads
13
Messages
602
Reaction score
664
Location
Christchurch, New Zealand
Vehicle(s)
JTR EcoDiesel, Land Cruiser 79, BMW R1250GS
Build Thread
Link
Occupation
Just keeping busy
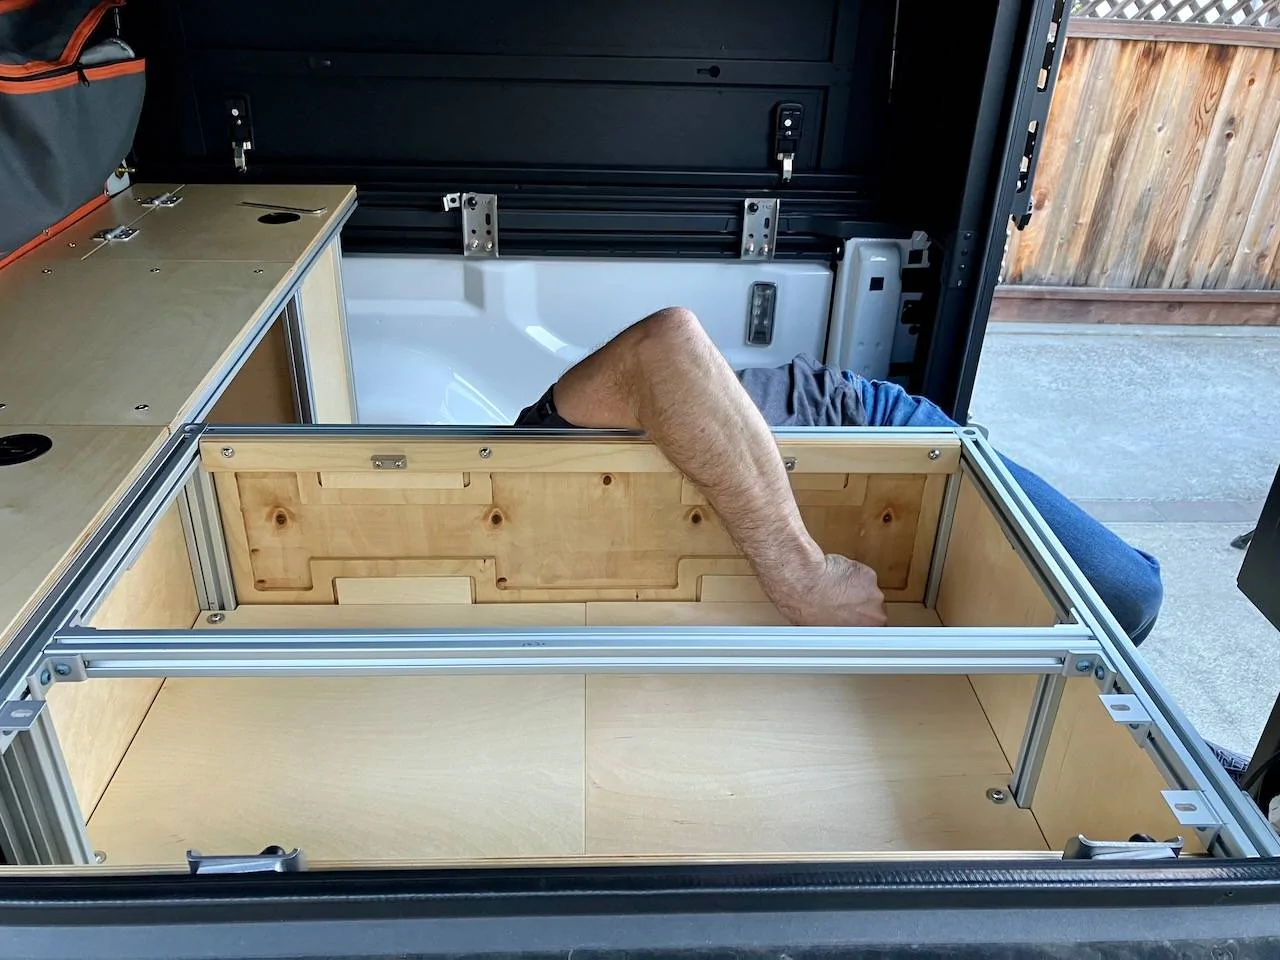
@antwon412 – regarding 80/20 it really depends on how complex you want a storage unit to be. If you can keep it very simple, 80/20 is quick and easy. It gets complicated very fast if you want to build "real furniture", one problem is the need to make accurate cuts.

What and how you build on a budget depends on what tools you have available. Have a circular saw and jigs or tracks to make precise cuts – e.g. plywood panel based furniture could be a great option. Have a miter saw or a band saw? 80/20 is good for a simple frame. A jig saw only and no desire to get something else? 2x2 (or other sizes, as needed) frame and cover panels – use a straight edge as a fence for straight cuts.

Of course any kind of mix and match will work. I've build stuff with 80/20 with a hand hacksaw and a miter box. For another project I could pre-calcuate all lengths and had 80/20 deliver cut-to-length pieces.

But the common content is from many people who do these that really is just so much work and not always worth it in their opinion.
That is very likely the case most of the time.

I don't know whether we've saved much compared to buying Goose Gear. I just don't like their very utiliatarian style and function for the Gladiator. They do some amazing stuff for the larger FiftyTen campers, but the Canopy Camper stuff is just a bit too basic for my taste.

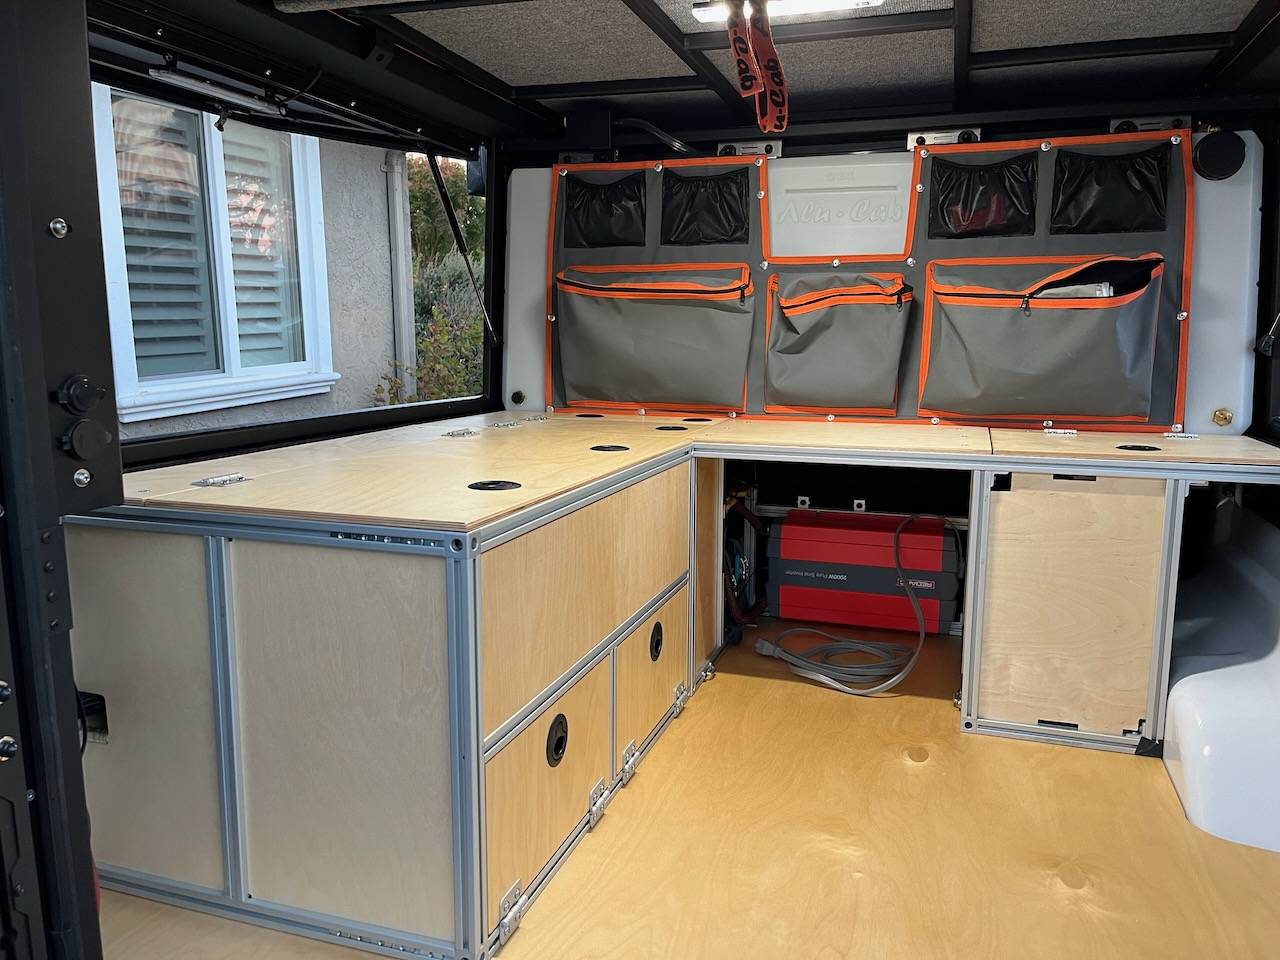
When the interior build is done, I'll do the math and figure out what the cost for all the parts was. As an estimate, we have about $2500 just in 80/20 parts and hardware. We save where it's reasonable, but we don't go out of our way to save money, we often pick the easy route (e.g. use very expensive 80/20 hardware or connectors when it makes our life easier).

If you mainly use the extrusion and a very limited number of connectors and hardware, you can build a lot cheaper though.
Sponsored

 
Last edited:
OP
OP
cug

cug

Well-Known Member
First Name
Guido
Joined
Apr 1, 2023
Threads
13
Messages
602
Reaction score
664
Location
Christchurch, New Zealand
Vehicle(s)
JTR EcoDiesel, Land Cruiser 79, BMW R1250GS
Build Thread
Link
Occupation
Just keeping busy
I really want to build a driver side storage unit in the gladiator.
Oh, and feel free to reach out if you have questions or if you want some input on plans or anything else I can help with.
 
OP
OP
cug

cug

Well-Known Member
First Name
Guido
Joined
Apr 1, 2023
Threads
13
Messages
602
Reaction score
664
Location
Christchurch, New Zealand
Vehicle(s)
JTR EcoDiesel, Land Cruiser 79, BMW R1250GS
Build Thread
Link
Occupation
Just keeping busy
It's coming together:

Jeep Gladiator A new hope ... (build journal and component reviews) IMG_5980


Final wiring and wire protection not quite done, but it's getting there. And it works, that's the best part.
 
OP
OP
cug

cug

Well-Known Member
First Name
Guido
Joined
Apr 1, 2023
Threads
13
Messages
602
Reaction score
664
Location
Christchurch, New Zealand
Vehicle(s)
JTR EcoDiesel, Land Cruiser 79, BMW R1250GS
Build Thread
Link
Occupation
Just keeping busy
Test coffee:

Jeep Gladiator A new hope ... (build journal and component reviews) IMG_5916


And the first piece of furniture is ready for testing ....

Jeep Gladiator A new hope ... (build journal and component reviews) IMG_5991


Missing in this part as of now:
  • Proper wiring from inverter to an outlet, the grey cable is temporary
  • The optional BCDC (missing some ring terminals to install it properly, ETA this weekend)
  • Cabling for all the consumers that will, at some point, be installed on the passenger side, wiring itself is done, we just haven't added it to the current wiring loom
I'll do some final checks tomorrow, then the driver's side bench piece goes in.

Anecdote on the side:

When using the electrics today, the system came up with an error message "battery sensor missing", some wiggling on the cabling on the Redarc shunt solved that – seems to be a broken cable or so.

Called Redarc – they were awesome! Replacement should be here next week.
 
OP
OP
cug

cug

Well-Known Member
First Name
Guido
Joined
Apr 1, 2023
Threads
13
Messages
602
Reaction score
664
Location
Christchurch, New Zealand
Vehicle(s)
JTR EcoDiesel, Land Cruiser 79, BMW R1250GS
Build Thread
Link
Occupation
Just keeping busy
And a fun photo series from the last two days.

Sorting out wiring:

Jeep Gladiator A new hope ... (build journal and component reviews) IMG_5908


In the truck:

Jeep Gladiator A new hope ... (build journal and component reviews) IMG_5911


Testing it:

Jeep Gladiator A new hope ... (build journal and component reviews) IMG_5916


Reasonably happy with the current state:

Jeep Gladiator A new hope ... (build journal and component reviews) IMG_5980


Putting the lid on:

Jeep Gladiator A new hope ... (build journal and component reviews) IMG_5918


And there it is:

Jeep Gladiator A new hope ... (build journal and component reviews) IMG_5991
 
Last edited:

Sponsored

OP
OP
cug

cug

Well-Known Member
First Name
Guido
Joined
Apr 1, 2023
Threads
13
Messages
602
Reaction score
664
Location
Christchurch, New Zealand
Vehicle(s)
JTR EcoDiesel, Land Cruiser 79, BMW R1250GS
Build Thread
Link
Occupation
Just keeping busy
So, finished part one of our build project:

Jeep Gladiator A new hope ... (build journal and component reviews) IMG_5927


Jeep Gladiator A new hope ... (build journal and component reviews) IMG_5931


Jeep Gladiator A new hope ... (build journal and component reviews) IMG_5994


And there were quite a few times when I wanted to shoot the designer of this furniture. It's certainly not IKEA-easy to put together.

Jeep Gladiator A new hope ... (build journal and component reviews) IMG_5923


Last photo is me trying to reach a bolt that we basically made "unreachable" once the whole thing is put together. Small mistakes. We got to it, but I nearly had to break my hand again to get there.
 

CoachA

Well-Known Member
First Name
Tom
Joined
Apr 17, 2022
Threads
5
Messages
179
Reaction score
356
Location
Damascus, MD
Vehicle(s)
2020 Jeep Gladiator Rubicon
Occupation
Teacher
Bravo! If it all functions as keenly as it looks, you are going to enjoy the heck out of your mods.
 
  • Like
Reactions: cug
OP
OP
cug

cug

Well-Known Member
First Name
Guido
Joined
Apr 1, 2023
Threads
13
Messages
602
Reaction score
664
Location
Christchurch, New Zealand
Vehicle(s)
JTR EcoDiesel, Land Cruiser 79, BMW R1250GS
Build Thread
Link
Occupation
Just keeping busy
Bravo! If it all functions as keenly as it looks, you are going to enjoy the heck out of your mods.
Thanks – we'll do our best to enjoy it.
 
OP
OP
cug

cug

Well-Known Member
First Name
Guido
Joined
Apr 1, 2023
Threads
13
Messages
602
Reaction score
664
Location
Christchurch, New Zealand
Vehicle(s)
JTR EcoDiesel, Land Cruiser 79, BMW R1250GS
Build Thread
Link
Occupation
Just keeping busy
Installed the @813 Fabrication & Design Camera holder and filler plate:

IMG_6012.jpeg


The Canopy Camper fit kit should actually come with this for the Gladiator. It's easy to install, I used the cable that I took out of the tail gate harness, it works great. After removing the guide lines in the camera settings there are also no confusing lines.

Great product, highly recommended to give the Canopy Camper a finished look.
 
OP
OP
cug

cug

Well-Known Member
First Name
Guido
Joined
Apr 1, 2023
Threads
13
Messages
602
Reaction score
664
Location
Christchurch, New Zealand
Vehicle(s)
JTR EcoDiesel, Land Cruiser 79, BMW R1250GS
Build Thread
Link
Occupation
Just keeping busy
We spend the last three days / two nights trying out our build. And so far, everything has worked as expected. Not perfect, but pretty good.

The highlights:
  1. Induction cooking is absolutely awesome. No more open flame, fussing around with gas canisters or bottles or, even worse, white gas cookers. An electrical water heater (0.8L) and a single household induction plate was all we used and it was near perfect. The water heater could be a little faster, but it's around five minutes for the max fill, that's just on the edge of acceptable. The induction top isn't a good one, but it works and it's sooooo much easier to control the heat properly – and not having to worry about wind is great as well.
  2. We used an electric space heater for part of the second evening just to warm up the camper inside to reasonably comfortable and it was great. Didn't use all that much battery power as I thought, although if we were to use it for longer or even a few times overnight, that would be a different story. I'd have to add another battery to our current 200Ah setup. Something to think about and play around with more, but even with the 200Ah, we were always okay.
  3. The furniture works well. The lower bench storage accessible through the two front hatches is a bit deep and getting something from it isn't super easy. Liners and organization helps.
  4. The EPIC Kraken setup for airing up tires is excellent. When we arrived at Trona Pinnacles, we aired down to around 18 psi front and 20 psi rear with Trailhead tire deflators, which we adjusted easily right then and there, which was very quick and painless. Airing back up next day was super quick and easy as well. Hook up all the air hoses, turn on the compressor, watch the tire pressure on the dash and stop when one of the four tires shows adequate pressure (they report in different intervals, so might show different values when airing up, but they are actually all the same when using this system).
  5. The fridge and storage layout in the backseat area worked great. Some optimizations forthcoming, but overall, it just worked as expected.
Overall, super happy with the setup so far. Some photos from the trip below.

Jeep Gladiator A new hope ... (build journal and component reviews) IMG_5941


Above: first evening near Isabella Lake, CA. Prepping water for tea and after that cooking some noodles.

Jeep Gladiator A new hope ... (build journal and component reviews) IMG_6022


Abive: Prepping for the second day dinner. We were at Trona Pinnacles.

Jeep Gladiator A new hope ... (build journal and component reviews) IMG_5954


Above: Cooking dinner. The mess in the truck is because we don't have our "kitchen module" built yet, and therefore carried all kitchen stuff in a Zarges case, which meant unloading nearly everything for cooking ....

Jeep Gladiator A new hope ... (build journal and component reviews) IMG_6030


Above: Dinner's ready. Took about 35Ah to get this done.

Jeep Gladiator A new hope ... (build journal and component reviews) IMG_5956


Above: Sunrise at Trona Pinnacles.

Jeep Gladiator A new hope ... (build journal and component reviews) IMG_5961


Above: Camp spot at Trona Pinnacles. We drove a bit further out, away from "Sprinter accessible areas" to be on our own. It was worth it.

Overall, a great experience and we came back with a list of ideas for the rest of the build as well as a few small improvements we can make.
 

Sponsored

OP
OP
cug

cug

Well-Known Member
First Name
Guido
Joined
Apr 1, 2023
Threads
13
Messages
602
Reaction score
664
Location
Christchurch, New Zealand
Vehicle(s)
JTR EcoDiesel, Land Cruiser 79, BMW R1250GS
Build Thread
Link
Occupation
Just keeping busy
For those interested in weights of the furniture:
  • The "utility module", 80/20 + wood dividers + lids and all hardware is about 20kg.
  • The "bench module" including all lids, doors, hardware, mounting, etc. is about 16.5kg
Total weight for "furniture" so far is therefore 36.5kg (~80lbs).

There will be another 16 to 18kg unit, then it's all in.
 
OP
OP
cug

cug

Well-Known Member
First Name
Guido
Joined
Apr 1, 2023
Threads
13
Messages
602
Reaction score
664
Location
Christchurch, New Zealand
Vehicle(s)
JTR EcoDiesel, Land Cruiser 79, BMW R1250GS
Build Thread
Link
Occupation
Just keeping busy
Total weight for "furniture" so far is therefore 36.5kg (~80lbs).
The interesting thing is when I contrast this to some storage boxes:
  • The Zarges K470 cases we own weigh about 5kg empty each. The space in the bench module is roughtly comparable to three of these.
  • A Frontrunner Wolf Pack Pro weighs 3.6kg and has significantly smaller interior dimension, so we'd need four of these to replace the bench.
For the kitchen module it gets even more interesting. The planned functionality is not possible to recreate with storage boxes, the weight for volume ratio is about the same.

It's a bit different for the utility module – it would be lighter to strap down a power station like an Ecoflow or so. Also much cheaper. Just not nearly as flexible.

Conclusion: Overall, if you think you can save a lot of weight by using Zarges or Frontrunner boxes instead of building (even complex) furniture – think again.

You can get a ton more flexibility because it takes me probably a day or two to convert from empty to travel ready, while a storage box based solution would be a lot less time. On the other hand, the convenience the furniture offers is multiple times that of storage boxes.

If you really want to go lightweight, use duffelbags for all personal items, and soft storage for kitchen items, and in general, carry less. Using hard cases isn't a solution.
 
OP
OP
cug

cug

Well-Known Member
First Name
Guido
Joined
Apr 1, 2023
Threads
13
Messages
602
Reaction score
664
Location
Christchurch, New Zealand
Vehicle(s)
JTR EcoDiesel, Land Cruiser 79, BMW R1250GS
Build Thread
Link
Occupation
Just keeping busy
"Re-review" of the GP-Factor Full Redarc System

A few months ago I reviewed the GP-Factor Full Redarc System for the Canopy camper and had some complaints about it. GP-Factor reached out and we worked on solutions together.

I’ve send the unit back to GP-Factor and they did excellent work to solve all these concerns. The handling by GP-Factor was impressive and I can definitely recommend their products since they are not only very high quality but the company absolutely stands behind them and will go above and beyond to deliver an excellent customer experience.

My rating now is 5 out of 5 for the system.


Overall, I’m now very happy with the unit, the wiring, connections, fit etc. is all first class. Here are the explanations/solutions:
  • The cabling was loose – this just shouldn’t have happened and GP-Factor took care of it. One of the bus bars on the Redarc system was replaced and GP-Factor now uses crimp-on terminal connectors (“cable shoes”?) which help with a much better and more secure connection.
  • The cabling was very clean to begin with and it still is, they even incorporated the small changes to expose the digital inputs to the system. Very nice!
  • The fit of the cutout that I had to adjust on my unit was cleaned up and the edges made nicer. It would have taken me a good amount of time with the limited tools I have for this task and I’m happy with the outcome. GP-Factor explained that they have seen relatively large variations where the camper wire loom comes out and have had to adapt to that whenever that happened.
  • The fit into the camper is still tight, but that’s just normal given the size of the components and the space available. Once everything is lined up properly it fits perfectly. Since we had the brackets in place from the first install, the unit basically dropped in and was very easy to secure.
  • HINT: The camper wiring loom can be pulled into the aluminum channel above to adjust the length without cutting it. This will open up space for the GP-Factor unit as well and make it easier to install.
  • Overall, I’m super happy with how GP-Factor handled my concerns.
In use:

The reasons for buying this unit are unchanged for me and after using it with the fixes and changes above, it’s even better than I thought it would be.

The only small negative remaining is that you have to lean far into the camper to see and/or use the display. It’s not enough of a negative to reduce the rating, since I don’t think GP-Factor could do much about this in an integrated unit (crazy thought: hinged mount for the display?).

Price/Value

I won’t reduce the rating due to price since I believe the value is right. It is an expensive unit, but the quality is all the way up there and you get what you pay for. It was worth the expense for us and I think everybody who wants a Redarc system for the Canopy Camper in a relatively easy to install unit will be very happy with it. The value is good, even though the price is high.

The rest of my notes can be found here:

Initial Review and Notes

-------

Planned Changes

We are planning some changes to the system overall, but these are due to the layout of our camper and our own ideas.
  1. We’ll relocate the display to the door. Our door opens “the other way around” from a standard Canopy camper, so we can easily route the cabling of the display to the door without having to go around it (wouldn’t have been all that hard either), and we have some space in “the upper right quadrant” we can use for this. This will make the display accessible whenever the door is opened which is exactly how we use it.
  2. The fan will be removed, since it really doesn’t seem to be needed which will open up a 10A circuit for use for us.
  3. We’ll use the digital inputs for some “if this happens do that” programming. Nothing super fancy, just some ideas floating around.
  4. Our electrical system will get a second switchboard on the passenger side of the camper for some things that are just easier to wire this way (12V travel oven, some lights inside and outside). We are using a Blue Sea switch panel for this.
Some more notes

We had some connectivity issues with the Redarc shunt / battery monitor, slight wiggling of the flat cabling solved this when it happened, which indicated some damaged or loose wiring inside the controller connection which is hard attached to the shunt. One call to Redarc and within a few days we had a replacement shunt which I have installed now and there were no more issues since. Excellent handling by Redarc.

We are still very happy with our choice of Redarc over Victron for this use case. We have a Victron system in our other truck and it’s doing less but has much higher wiring complexity. Given my personal experience I would always use Redarc unless I had a requirement that the Redarc system cannot deliver.

Overall Conclusion

I’m very happy with how the system turned out, GP-Factor as well as Redarc are first class companies to deal with and I have no hesitation recommending either of them. The functionality turned out to be just right for us, we added a few goodies here and there for personalization, but that is to be expected.
 

piroman683

Well-Known Member
First Name
Mike
Joined
Sep 13, 2019
Threads
9
Messages
427
Reaction score
462
Location
Long Beach
Vehicle(s)
2019 Gladiator
We spend the last three days / two nights trying out our build. And so far, everything has worked as expected. Not perfect, but pretty good.

The highlights:
  1. Induction cooking is absolutely awesome. No more open flame, fussing around with gas canisters or bottles or, even worse, white gas cookers. An electrical water heater (0.8L) and a single household induction plate was all we used and it was near perfect. The water heater could be a little faster, but it's around five minutes for the max fill, that's just on the edge of acceptable. The induction top isn't a good one, but it works and it's sooooo much easier to control the heat properly – and not having to worry about wind is great as well.
  2. We used an electric space heater for part of the second evening just to warm up the camper inside to reasonably comfortable and it was great. Didn't use all that much battery power as I thought, although if we were to use it for longer or even a few times overnight, that would be a different story. I'd have to add another battery to our current 200Ah setup. Something to think about and play around with more, but even with the 200Ah, we were always okay.
  3. The furniture works well. The lower bench storage accessible through the two front hatches is a bit deep and getting something from it isn't super easy. Liners and organization helps.
  4. The EPIC Kraken setup for airing up tires is excellent. When we arrived at Trona Pinnacles, we aired down to around 18 psi front and 20 psi rear with Trailhead tire deflators, which we adjusted easily right then and there, which was very quick and painless. Airing back up next day was super quick and easy as well. Hook up all the air hoses, turn on the compressor, watch the tire pressure on the dash and stop when one of the four tires shows adequate pressure (they report in different intervals, so might show different values when airing up, but they are actually all the same when using this system).
  5. The fridge and storage layout in the backseat area worked great. Some optimizations forthcoming, but overall, it just worked as expected.
Overall, super happy with the setup so far. Some photos from the trip below.

IMG_5941.jpeg


Above: first evening near Isabella Lake, CA. Prepping water for tea and after that cooking some noodles.

IMG_6022.jpeg


Abive: Prepping for the second day dinner. We were at Trona Pinnacles.

IMG_5954.jpeg


Above: Cooking dinner. The mess in the truck is because we don't have our "kitchen module" built yet, and therefore carried all kitchen stuff in a Zarges case, which meant unloading nearly everything for cooking ....

IMG_6030.jpeg


Above: Dinner's ready. Took about 35Ah to get this done.

IMG_5956.jpeg


Above: Sunrise at Trona Pinnacles.

IMG_5961.jpeg


Above: Camp spot at Trona Pinnacles. We drove a bit further out, away from "Sprinter accessible areas" to be on our own. It was worth it.

Overall, a great experience and we came back with a list of ideas for the rest of the build as well as a few small improvements we can make.
Trona is one of my favorite places to go!
 
  • Like
Reactions: cug
OP
OP
cug

cug

Well-Known Member
First Name
Guido
Joined
Apr 1, 2023
Threads
13
Messages
602
Reaction score
664
Location
Christchurch, New Zealand
Vehicle(s)
JTR EcoDiesel, Land Cruiser 79, BMW R1250GS
Build Thread
Link
Occupation
Just keeping busy
So, we are back in California and will continue the build. Things to be done in the next few weeks:
  • Build the cabinet for the passenger side. This one will be higher than the bench on the driver's side, so we get some more storage space.
  • Get the water situation sorted out. Meaning, find a small sink with folding faucet that actually fits above cabinet, sort out which water pump to use, get water filter and shutoff valves installed, find a good way for an outside spigot that isn't prone to cracking when temperatures go below freezing, etc.
  • Find a way to catch gray water with that has decent volume, but also isn't too big and has the right shape to fit where we want it.
  • Install a 12V travel oven in the above cabinet.
  • Install the secondary electrical panel on the passenger side for all the extra accessories and lights.
  • Install the GP-Factor fold down table in the rear door. We are doing a custom solution there, so unfortunately it isn't as straightforward as a "normal" GP-Factor table undoubtedly would be.
  • Install a whole bunch of insulation, mostly Thinsulate.
  • Relocate the Redarc display from the GP-Factor panel to the a place in the rear door, so it's much easier to use from outside (and inside, our furniture will get in the way at some point).
  • Install a real composting toilet instead of the Trelino, which is suboptimal for our use case.
  • Get a roof rack to have a place for a set of Maxtrax (storing them under the seat delete platform is a total pain in the ass).
So, more write-ups to arrive here ...
Sponsored


Top