Ragbagger
Well-Known Member
- First Name
- Brian
- Joined
- Jun 17, 2024
- Threads
- 5
- Messages
- 65
- Reaction score
- 128
- Location
- Gulf Coast, Alabama
- Vehicle(s)
- 2023 Jeep Gladiator, Sport S Max Tow
- Build Thread
- Link
- Occupation
- Semi retired
- Thread starter
- #1
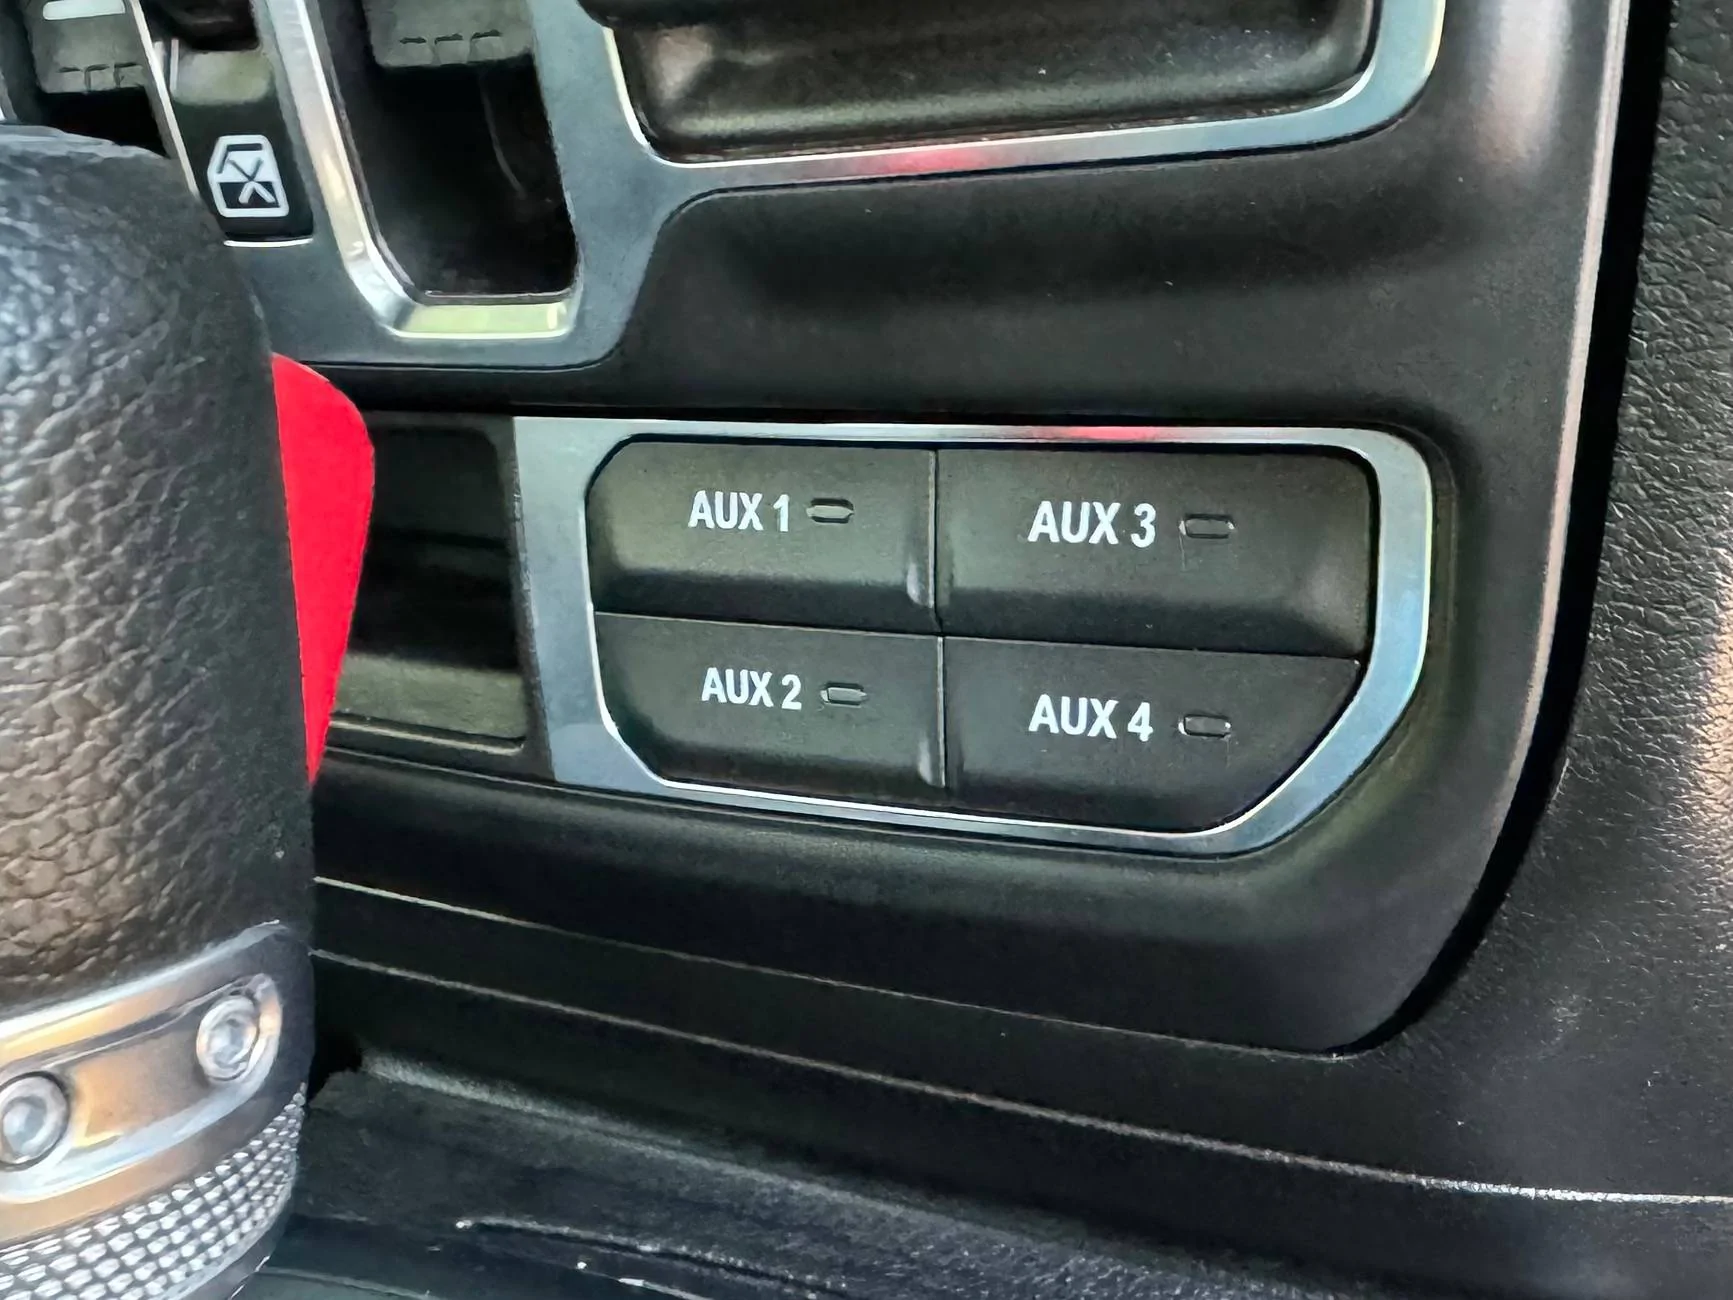
I installed the OEM auxiliary switch bank yesterday. That’s a chore, but now that it’s done I’m pleased. I’m gonna share a few pain points I encountered along the way in the hopes it will help someone else. And I have a couple questions about my install I want to revisit. If you’ve done it and have thoughts I’d love to hear them.

The instructions leave a lot to be desired. If you’re looking at this install do your homework. There is a lot of great info on this site, the JL one, and several other forums. There are also several install videos on YouTube. It’s not as easy as most of the videos make it look. In my head, the install is 3 parts. The engine bay, passing the harness through the firewall and connecting it, and pulling the center panels to install the actual switchbank in the console.
For prep, you cut three plastic rivets from your front passenger fender, the kit includes three replacements. My pop rivet gun won’t do the plastic ones, the shanks are too thick so I picked up a tool at Harbor Freight for $16 meant for them - and comes with extra plastic rivets. You also remove two round fender trim clips at the bottom. The instructions say to reuse them, but I mangled mine so bad they aren’t usable. Plan on going ahead and buying a couple extra. Then you sort of “peel” the fender liner. It might be easier to just remove it, buy extra clips and reinstall after you are done. It kept flopping on me while I was under the Jeep.
The Engine Bay:
Overall this is straightforward and the easiest part to do (note the install is different if you have a Diesel but there are instructions for you included). It’s easy to follow the instructions or a video but I did run into one issue. The instructions say to secure the switch wiring harness around the wire trough.

I couldn’t get a zip tie behind it like the picture shows and went around what I could find. I’d like to clean this up a bit.
I don’t have pictures of running the cable through the firewall, but that’s tricky. I took a wire (little thicker than a coat hanger) and used my dremel to put a point on the end. I poked through the rubber firewall boot, attached a length of scrap wire to it and pulled it back through. Then I attached the harness to my scrap wire, lubed everything up and did the final pull. I was really worried about this part, but in the end it was straightforward enough. I think planning it out is the key. Don’t hit any existing wires!
You have to depin a cable if you are following the instructions, which I did. Some people splice them instead. Word of advice, get a proper depinning tool! This was the longest part of the install for me. I ended up using my dremel to make my own depinning tool out of a SIM card remover. Also, repinning can be tricky. Be patient with it, you really don’t want to screw up the connector. Before you put everything back make sure you double check everything. I’ve read a lot of issues that were caused by the orange wires you are adjusting not making good contact. These connectors take practice. But we don’ t have that. So use patience instead.
Taking apart the center stack and routing the cable there is pretty straightforward. You have to undo several connectors. Take notes, or pictures so you can remember what goes where. That helped me a lot on reinstall.
Once you reconnect everything be prepared for your Gladiator to go a little cuckoo. My backup camera wasn’t working, the A/C had two options Hi and Lo, and who knows what else. But that’s apparently normal when you disconnect the batteries and it all resolved itself after a couple hours.
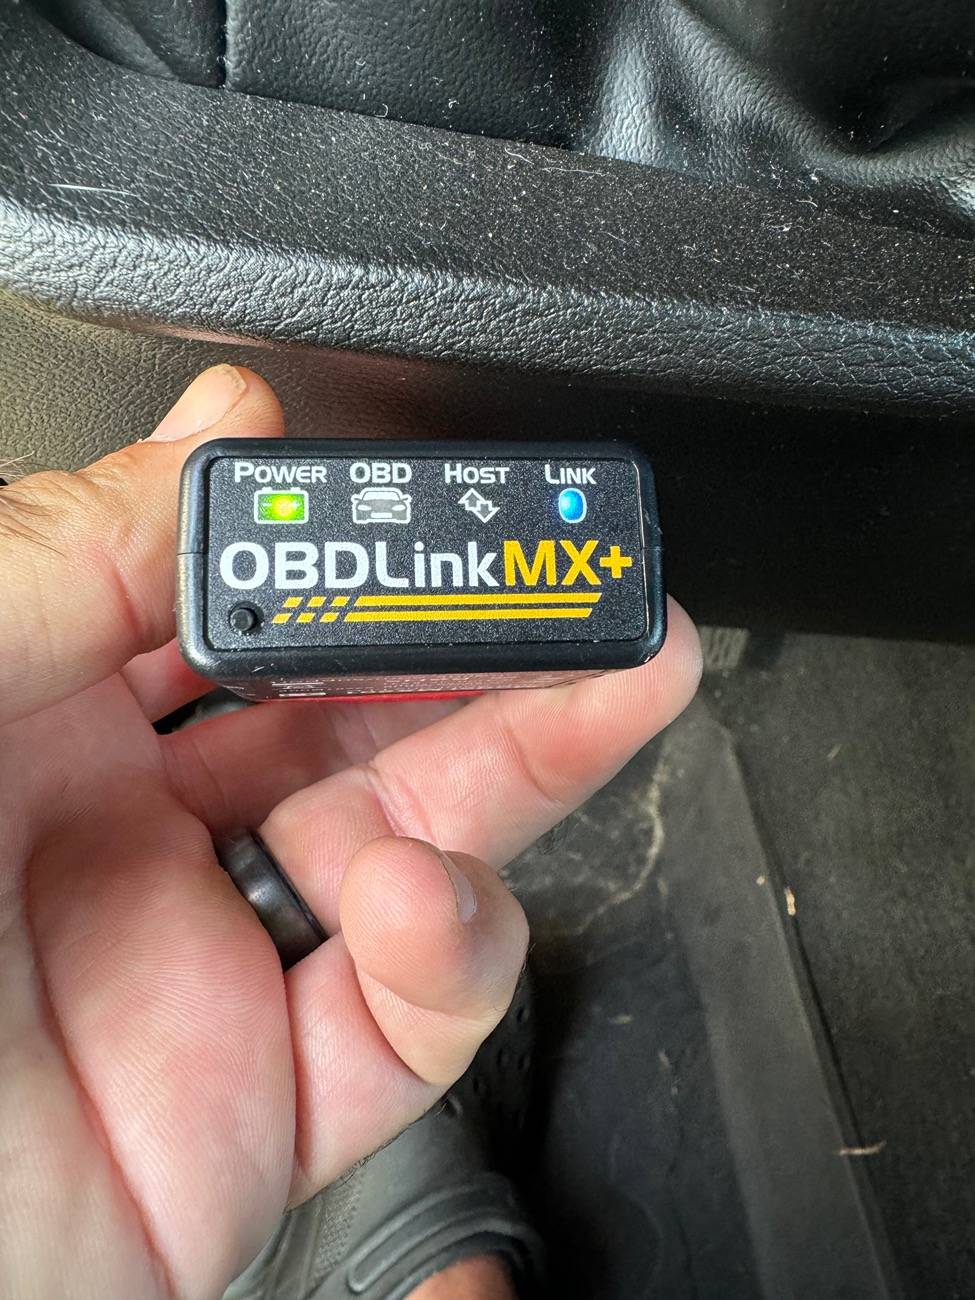
The switches did not function until I used Jscan with my bluetooth adapter to turn on the Aux functions in Uconnect.

To be honest it was quite frustrating because I couldn’t find any good documention on how to do it. So here’s what I did. I hope it’s right, maybe it will help someone else out. After connecting the batteries, put your Jeep into the run position but do not start the engine (leave you foot off the brake).
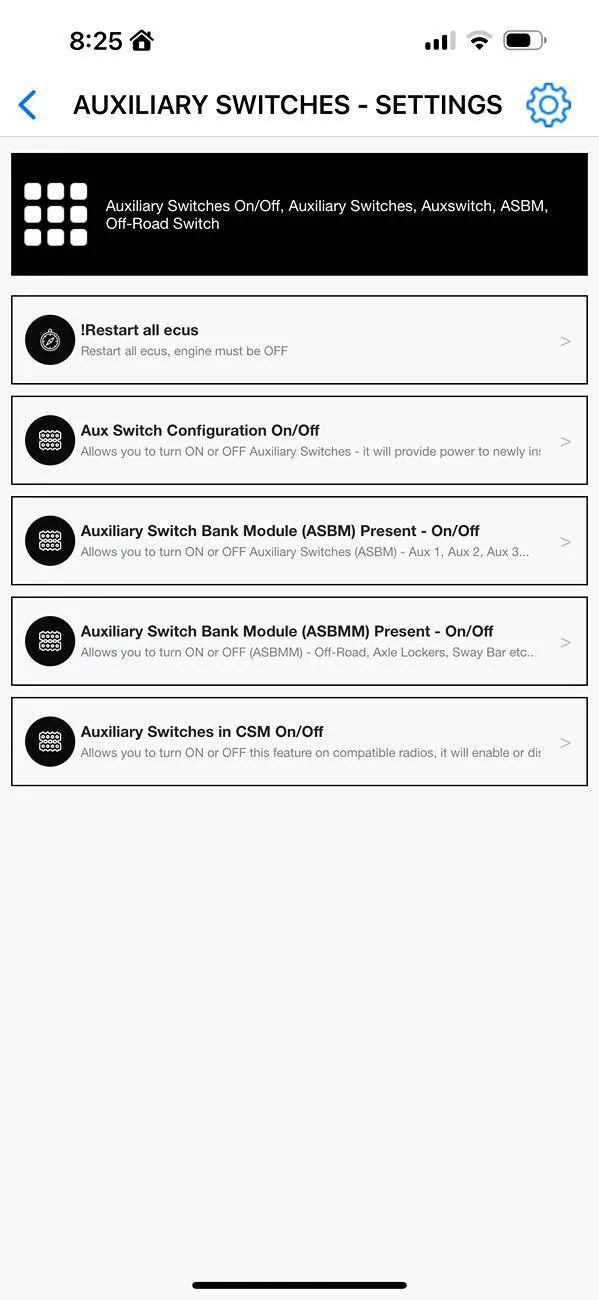
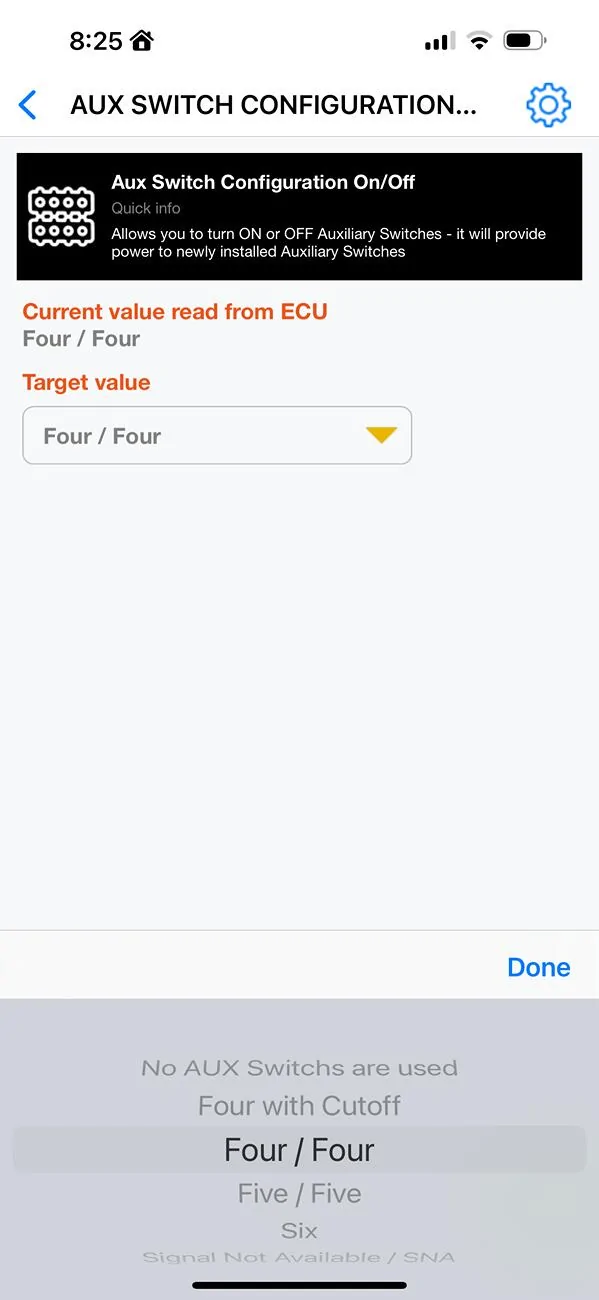
In Jscan, go into the Adaption menu, then choose the 3rd option “Auxiliary Switches - Settings”
There are four options below “!Restart all ecus”:

For Aux Switch Configuration On/Off I selected Four/Four. There is a “4 with cutoff” option
but I have no idea what it does and google didn’t help me. But this one worked.
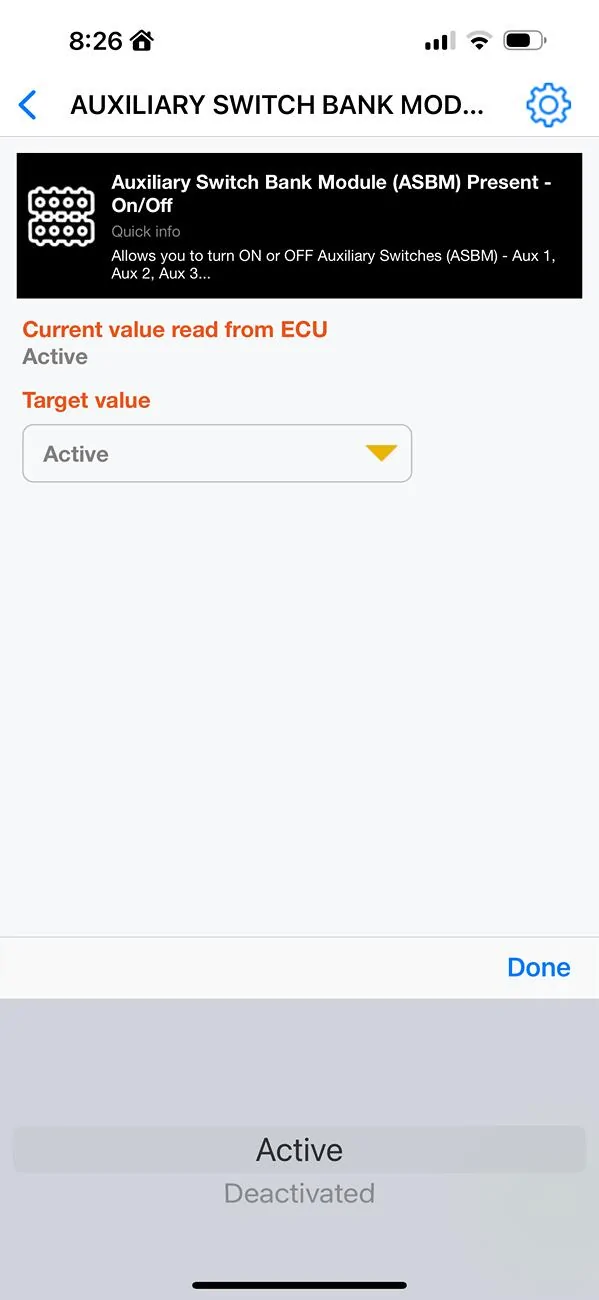
The 2nd one is Auxiliary Switch Bank Module Present - On/Off. I set this to Active.
The third option says it allows you to turn ON or OFF off road, lockers, sway bar. I have a Sport S and don’t have any of that, so I left it deactivated.
View attachment 394192
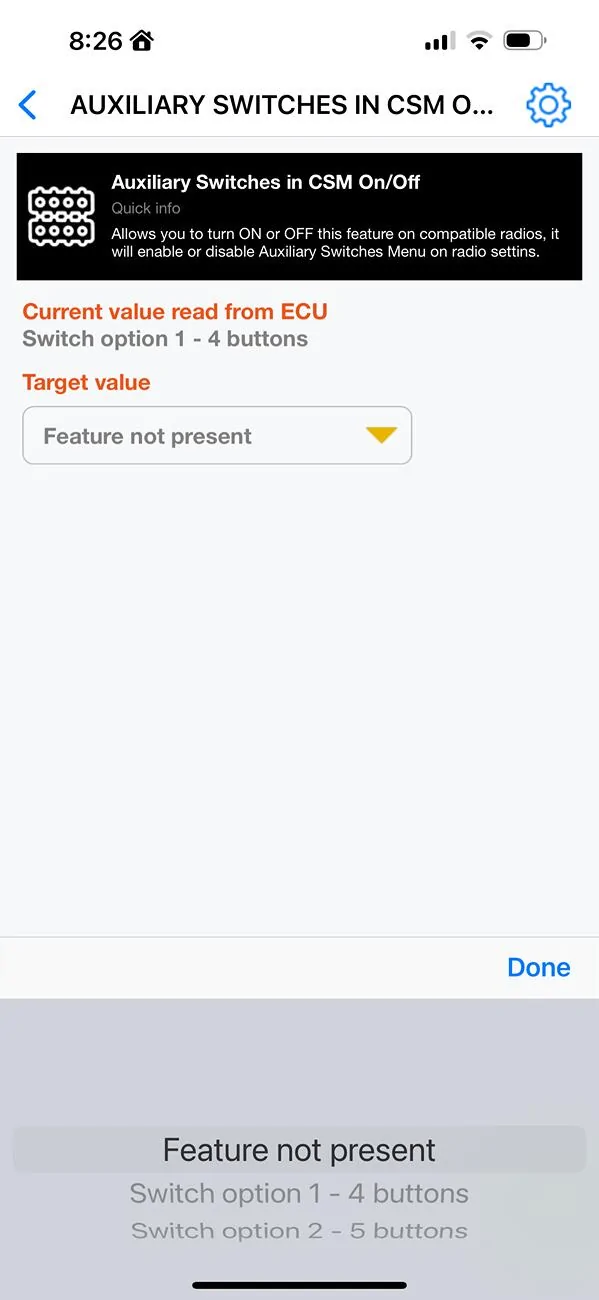
And the fourth option is Auxiliary Switches in CSM On/Off. I believe this is the one that actually allows it to show up in Uconnect. Since the OEM has 4 switches I used the “switch options 1-4“ choice.
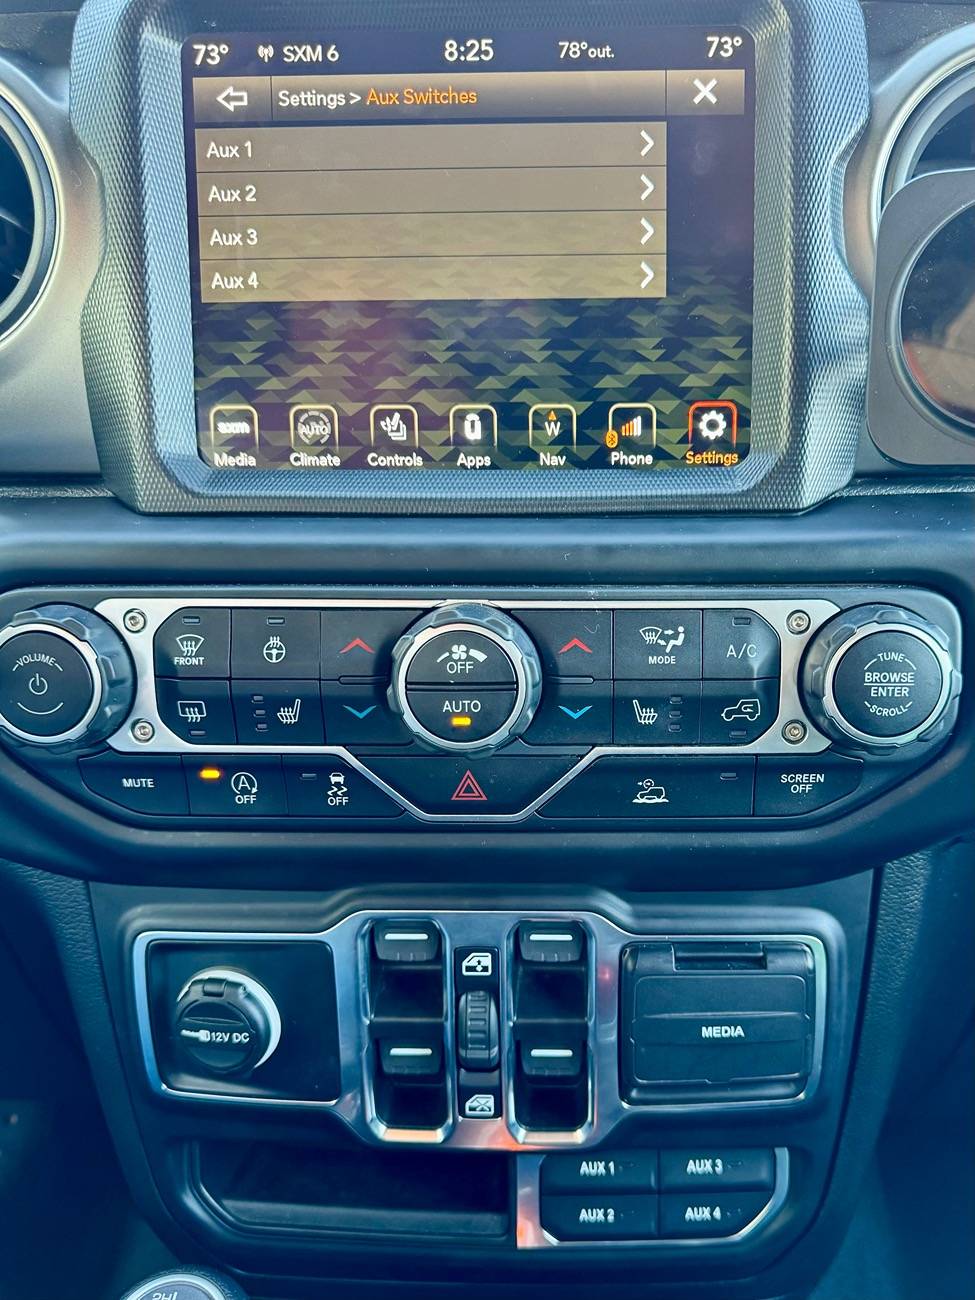
From what I’ve read I believe, if after you do this process and let your Jeep go through a couple sleep cycles it will show up. But I’m an impatient soul so I did reset the ecus. The Aux switches option showed up on restart after that.
So that worked, which I hope means I did it correctly in Jscan. I am no expert, so research anything I’ve said here before you mess with your own truck. I’m just a fellow jeeper trying to help out a little.
It took way too long to do this, but that’s on me. I think I could do it in 2 or maybe 3 hours, at a comfortable pace, next time now that I understand what I‘m doing.
It’s definitely a harder install than many of the aftermarket solutions. We put a Voswitch JL800 in my wife’s Wrangler not too long ago. That was much easier. But I wanted the integrated solution, and I’m a glutton for punishment.
The instructions leave a lot to be desired. If you’re looking at this install do your homework. There is a lot of great info on this site, the JL one, and several other forums. There are also several install videos on YouTube. It’s not as easy as most of the videos make it look. In my head, the install is 3 parts. The engine bay, passing the harness through the firewall and connecting it, and pulling the center panels to install the actual switchbank in the console.
For prep, you cut three plastic rivets from your front passenger fender, the kit includes three replacements. My pop rivet gun won’t do the plastic ones, the shanks are too thick so I picked up a tool at Harbor Freight for $16 meant for them - and comes with extra plastic rivets. You also remove two round fender trim clips at the bottom. The instructions say to reuse them, but I mangled mine so bad they aren’t usable. Plan on going ahead and buying a couple extra. Then you sort of “peel” the fender liner. It might be easier to just remove it, buy extra clips and reinstall after you are done. It kept flopping on me while I was under the Jeep.
The Engine Bay:
Overall this is straightforward and the easiest part to do (note the install is different if you have a Diesel but there are instructions for you included). It’s easy to follow the instructions or a video but I did run into one issue. The instructions say to secure the switch wiring harness around the wire trough.
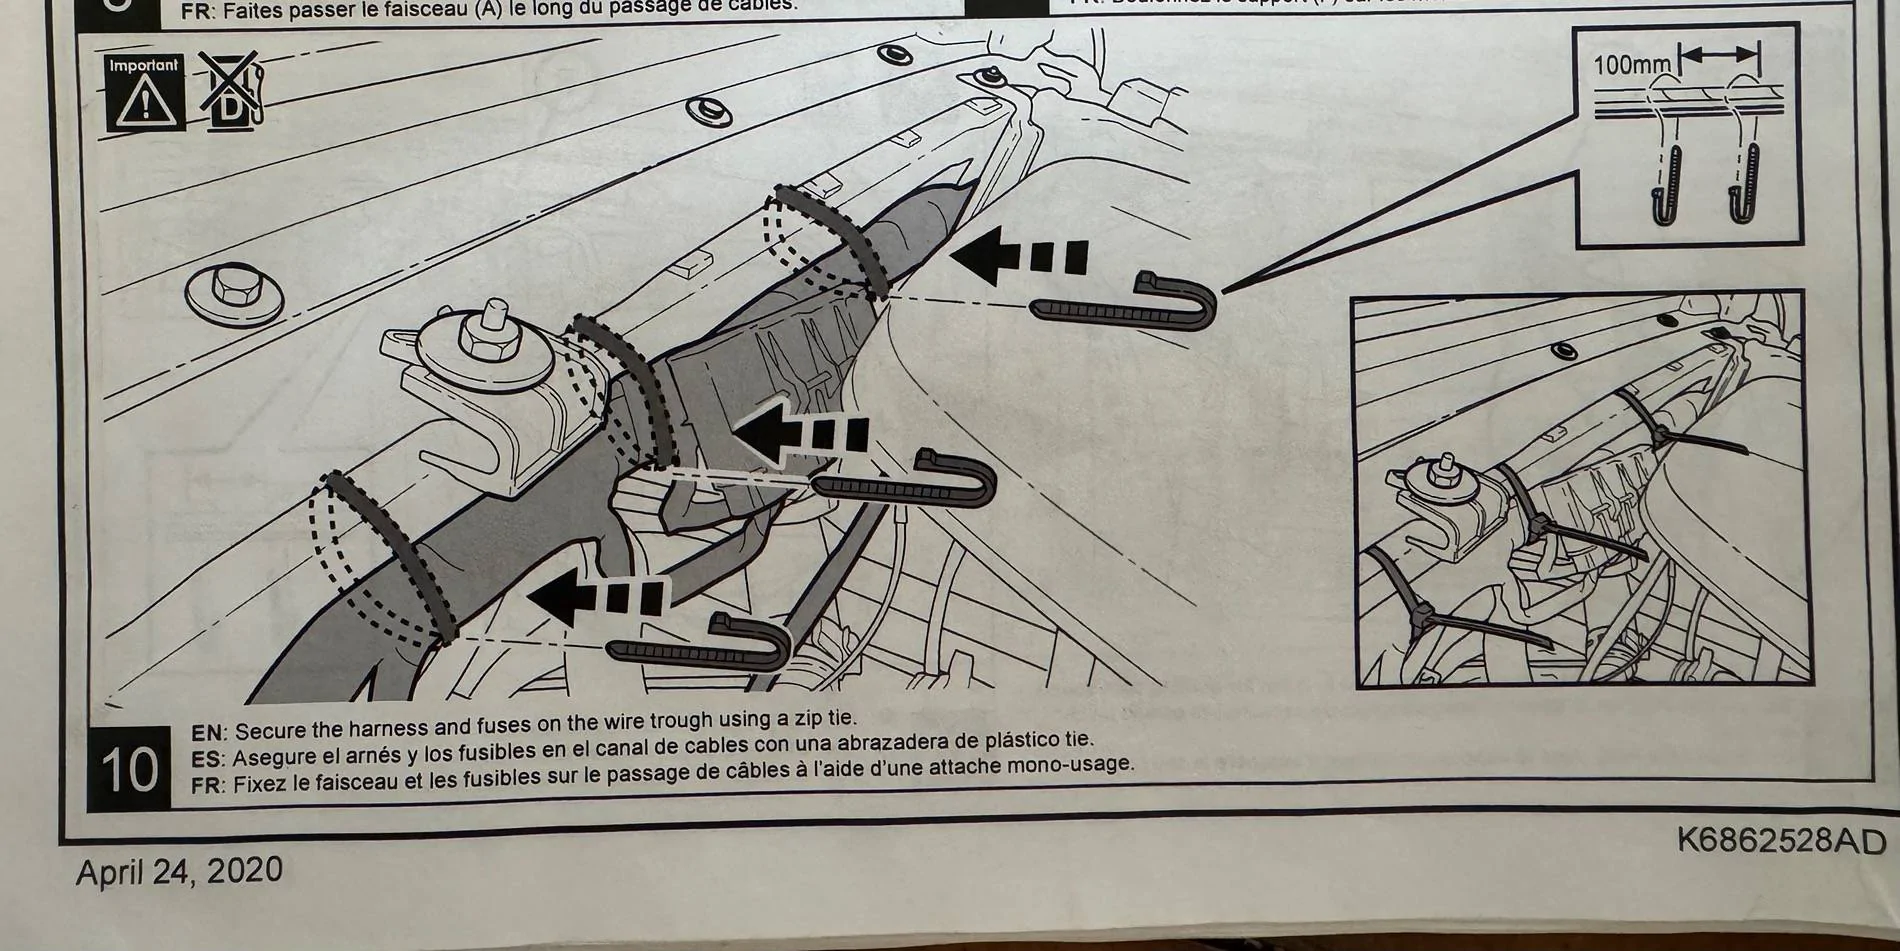
I couldn’t get a zip tie behind it like the picture shows and went around what I could find. I’d like to clean this up a bit.

I don’t have pictures of running the cable through the firewall, but that’s tricky. I took a wire (little thicker than a coat hanger) and used my dremel to put a point on the end. I poked through the rubber firewall boot, attached a length of scrap wire to it and pulled it back through. Then I attached the harness to my scrap wire, lubed everything up and did the final pull. I was really worried about this part, but in the end it was straightforward enough. I think planning it out is the key. Don’t hit any existing wires!
You have to depin a cable if you are following the instructions, which I did. Some people splice them instead. Word of advice, get a proper depinning tool! This was the longest part of the install for me. I ended up using my dremel to make my own depinning tool out of a SIM card remover. Also, repinning can be tricky. Be patient with it, you really don’t want to screw up the connector. Before you put everything back make sure you double check everything. I’ve read a lot of issues that were caused by the orange wires you are adjusting not making good contact. These connectors take practice. But we don’ t have that. So use patience instead.
Taking apart the center stack and routing the cable there is pretty straightforward. You have to undo several connectors. Take notes, or pictures so you can remember what goes where. That helped me a lot on reinstall.
Once you reconnect everything be prepared for your Gladiator to go a little cuckoo. My backup camera wasn’t working, the A/C had two options Hi and Lo, and who knows what else. But that’s apparently normal when you disconnect the batteries and it all resolved itself after a couple hours.
The switches did not function until I used Jscan with my bluetooth adapter to turn on the Aux functions in Uconnect.
To be honest it was quite frustrating because I couldn’t find any good documention on how to do it. So here’s what I did. I hope it’s right, maybe it will help someone else out. After connecting the batteries, put your Jeep into the run position but do not start the engine (leave you foot off the brake).
In Jscan, go into the Adaption menu, then choose the 3rd option “Auxiliary Switches - Settings”
There are four options below “!Restart all ecus”:
For Aux Switch Configuration On/Off I selected Four/Four. There is a “4 with cutoff” option
but I have no idea what it does and google didn’t help me. But this one worked.
The 2nd one is Auxiliary Switch Bank Module Present - On/Off. I set this to Active.
The third option says it allows you to turn ON or OFF off road, lockers, sway bar. I have a Sport S and don’t have any of that, so I left it deactivated.
View attachment 394192
And the fourth option is Auxiliary Switches in CSM On/Off. I believe this is the one that actually allows it to show up in Uconnect. Since the OEM has 4 switches I used the “switch options 1-4“ choice.
From what I’ve read I believe, if after you do this process and let your Jeep go through a couple sleep cycles it will show up. But I’m an impatient soul so I did reset the ecus. The Aux switches option showed up on restart after that.
So that worked, which I hope means I did it correctly in Jscan. I am no expert, so research anything I’ve said here before you mess with your own truck. I’m just a fellow jeeper trying to help out a little.
It took way too long to do this, but that’s on me. I think I could do it in 2 or maybe 3 hours, at a comfortable pace, next time now that I understand what I‘m doing.
It’s definitely a harder install than many of the aftermarket solutions. We put a Voswitch JL800 in my wife’s Wrangler not too long ago. That was much easier. But I wanted the integrated solution, and I’m a glutton for punishment.

Sponsored
Attachments
-
0 bytes Views: 0
Last edited: