Sponsored
OP
OP
jsyn
Well-Known Member
- Thread starter
- #47
Overlanding/Camping Gear Part 5 - Water
I'm just about done discussing camping gear for now, but no list would be complete without mentioning water. You need water to drink. To wash dishes. To clean yourself with. Did I mention to drink? You run low on water and all of a sudden tensions are high, stress skyrockets, ulcers start growing, family gets angry.
Expect to use more water than you think. Outside of the water we all need to live, I use about 1 gallon of water per meal, and that's being really careful when washing and rinsing dishes. If I had plenty to spare I'd happily use closer to 1.5 gallons per meal, especially if I'm including what I need to make coffee and hot chocolate. All of a sudden a 2 gallon Rotopax water container doesn't seem like much.
Rotopax
I started with exactly that: a 2 gallon Rotopax Water Can. I added a spout kit from GoWesty so I wouldn't have to open the Rotopax to dispense water. They're not perfect. There's no air valve, so the water comes out slowly. I found it worked best when I opened the spout and squeezed the Rotopax a bit. But I still prefer it to having to unscrew a Rotopax lid every time I want water.
I also picked up a safety siphon from them, and I should really get a second one. 1 reserved for fuel (so I can fill my gas tank from my fuel cans without worrying about spouts, or pouring, or making a mess) and 1 reserved for drinking water (so I can move water from one water can to another)
MONEY SAVING NOTE
Rotopax sells their own blemished items for a discount. Selection obviously varies, but I got both my 2 gallon fuel cans and my 2 gallon water can deeply discounted because they were "blemished". They're still fully functional, and they were all going to get scratched and beat up on my truck anyway.
I need to keep the Rotopax water can out of direct sunlight so it doesn't get too hot, so I use Rotopax mounts to attach it to my BuiltRight Molle Bedside Panel.

That's behind the rear driver's side wheel well, resting on the bed of the truck (so the molle panel doesn't really have to support the weight and it's easier to put on and take off), and turned so I can keep the spout on all the time.
For all my Rotopax mounts I REALLY prefer the DLX Pack Mount to the Standard Mount. It's only a few dollars more and a million times easier to deal with. I don't trust the locking mounts not to rust, lock up, etc. If it's inside the bed of my truck it's under the tonneau cover. If it's mounted to my bed rack I use a cable lock.
Water Filtration
A Rotopax or 3 aren't going to cut it, even for a weekend trip. And what if you break down or get stuck? We still have another, bigger problem: how to add more water to our water cans once we find it. Streams and lakes are pretty and cold, but you can't just drink from them without getting sick.
Option 1: Carry a handheld water filter and filter water into our water cans whenever you find a pond/stream/unpotable water source. It works, but I don't recommend it. I have ultralight backpacking water filters. They're awesome. But does your wife really want to sit and wait an hour while you pump 5+ gallons of water through one of those things? They're made for a liter or two at a time, not refilling an overlanding vehicle.
Option 2: Use chemicals to purify the water. I've done this plenty of times when hiking, and I always carry a small bottle of potassium permanganate as an emergency backup in case I need to do exactly this. Add a little, the water turns pink, it's safe to drink. Add a lot, the water turns purple, and you've got yourself an antiseptic for wound care. But it doesn't taste the best, and I don't want to ruin my nice morning cup of coffee.
Option 3:
LifeSaver Jerry Can
Lifesaver Jerry Cans are plastic 5 gallon jerry cans that have a water filter built into them. You fill the can (it actually only holds about 4.9 gallons, not 5, due to the space the filter takes up). They sell filters that last for 10,000 Liters (a Lifesaver 10000) or ones that last for 20,000 liters (a Lifesaver 20000). More is better, right? Eh... I don't know. Water filters only last so long. Am I honestly going to use this can for more than 10,000 liters (that's 2,641 gallons!) over the course of 5 years of camping trips, before I should probably replace the filter anyway? I don't think so. But that's me.

(Image linked to straight from the iconlifesaver.com website since I don't have a good side-view shot)
It's plastic, but it's a thick, tough plastic. This thing weight 8.5lbs when empty and dry. You don't have to worry about packing a separate water filter, you've always got it. And the water doesn't get filtered until you need to use it. That means you're not wasting an hour pumping water through a filter to fill it while your wife gets annoyed. That also means the water can never get "stale" while it's sitting around in the container, because it always comes out freshly filtered. They also have replaceable carbon filters to keep the water tasting fresh.
If you get one of these things, you need, need, need to get a Shower Attachment. This truly should come with the can. Nothing says "glamping" like having a pressurized spray spout to rinse your dishes!

We use the spray spout for almost everything.
Money Savings Note - I got the "LifeSaver JerryCan Starter Kit" that already comes with the shower attachment and 5 spare activated carbon filters. It saves about $50 over buying all the pieces separately, and it still costs just enough to qualify you for free shipping.
Important LifeSaver Jerry Can Note - Once you get the filter wet the first time, you are NEVER supposed to let it dry out. They recommend you keep at least 2" of water in the can for the rest of the time you own the can.
The LifeSaver Jerry Can has holes in the middle so you can mount it somewhere, but I'm struggling to find a decent mounting solution using their holes. It's just so damned heavy with 5 gallons of water in it. 1 Gallon of water weighs around 8.33lbs, so 8.33 x 4.9 (how many gallons it holds) + 8.59 (the weight of the can itself) = 49.5 pounds. That's not like mounting some lightweight Maxtrax to the side of your bed rack!
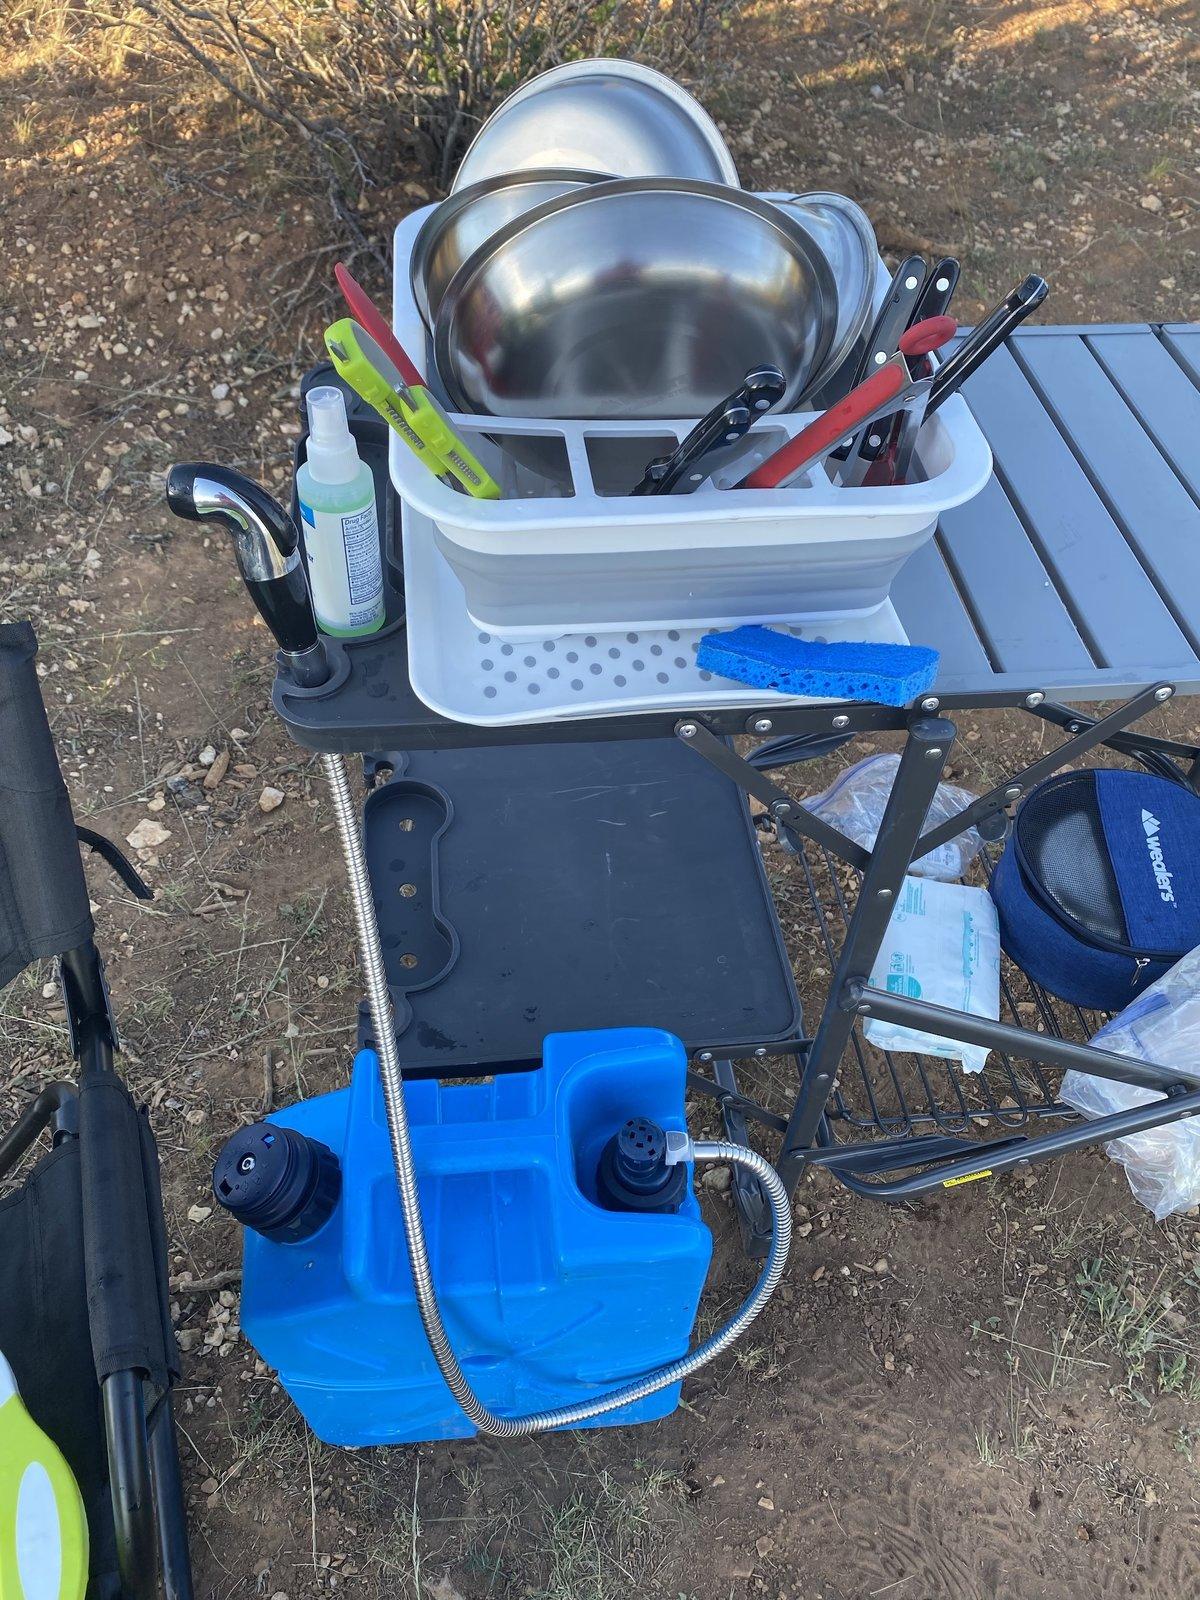
Water Bags
You still need more water, and if there's any space available, you want it stored cold and in your fridge. Enter some cheap-ass No-Leak Collapsible Water Bags from Amazon. So far, these truly have been no leak for me. I keep one full in my freezer at all times so I can grab and go with ice cold water (well, out here it will be water soon). They're so cheap, I got a 4-pack of 1.3 gallon bags and a 4-pack of 2.6 gallon bags.
These will fit in the weird space left in your fridge. Or in the footwell of your truck. Or anywhere else you have a bit of space. Best of all, they collapse to nothing when they're empty, and they've got great integrated handles for carrying. They probably won't last forever, but at that price, who cares?
Camp Shower
There are a million camp shower bag options out there, all very cheap. You fill the bag with up to 5 gallons of water, hang or lay it out with the transparent side facing the sun, and it heats up enough for you to rinse yourself off with. If you get one that has an off spout at the bag (rather than at the far end of the shower hose) you can probably safely carry an additional 4-5 gallons in your truck in one of these. I have this one (only because it was in stock during the great COVID supply chain demise), but I've seen no real difference between it and the 8-million other brands and options.
Shower Bag Hanging Note - You can hang one of these from the edge of your bed rack. However, once I have a full SlimLine II Rack I really want to try out FrontRunner Outfitters Rack Mount Shower Arm. It just seems like a cool solution for hanging a shower bag. Trouble is, I won't have any space on the sides of the rack. If anyone knows if the holes line up shuch that you can mount this one the rear of a SlimLine II Rack, please let me know!
Other Options
The above is what I'm carrying so far, but I've realized I need more. I'll have to try a few things. 4x 2-gallon Rotopax mounted on my bedrack would do the trick, but they'd be baking in the sun at all times. FrontRunner Outfitters has an upright 10 gallon water tank to go against the back of the bed of your truck, complete with cut outs for the wheel wells. They also have a footwell 10 gallon water tank that goes across the floor in your back seat. (Which only works if the only people sitting in the back are still in car seats.) None of these are great solutions for me. I love the concept of the Upright Water Tank, but it wouldn't work with my tonneau cover (it's 24" tall, and a JT truck bed is just under 18" tall).
So, I'm still looking, still thinking about how to carry more water. And I'm definitely open to suggestions!
I'm just about done discussing camping gear for now, but no list would be complete without mentioning water. You need water to drink. To wash dishes. To clean yourself with. Did I mention to drink? You run low on water and all of a sudden tensions are high, stress skyrockets, ulcers start growing, family gets angry.
Expect to use more water than you think. Outside of the water we all need to live, I use about 1 gallon of water per meal, and that's being really careful when washing and rinsing dishes. If I had plenty to spare I'd happily use closer to 1.5 gallons per meal, especially if I'm including what I need to make coffee and hot chocolate. All of a sudden a 2 gallon Rotopax water container doesn't seem like much.
Rotopax
I started with exactly that: a 2 gallon Rotopax Water Can. I added a spout kit from GoWesty so I wouldn't have to open the Rotopax to dispense water. They're not perfect. There's no air valve, so the water comes out slowly. I found it worked best when I opened the spout and squeezed the Rotopax a bit. But I still prefer it to having to unscrew a Rotopax lid every time I want water.
I also picked up a safety siphon from them, and I should really get a second one. 1 reserved for fuel (so I can fill my gas tank from my fuel cans without worrying about spouts, or pouring, or making a mess) and 1 reserved for drinking water (so I can move water from one water can to another)
MONEY SAVING NOTE
Rotopax sells their own blemished items for a discount. Selection obviously varies, but I got both my 2 gallon fuel cans and my 2 gallon water can deeply discounted because they were "blemished". They're still fully functional, and they were all going to get scratched and beat up on my truck anyway.
I need to keep the Rotopax water can out of direct sunlight so it doesn't get too hot, so I use Rotopax mounts to attach it to my BuiltRight Molle Bedside Panel.
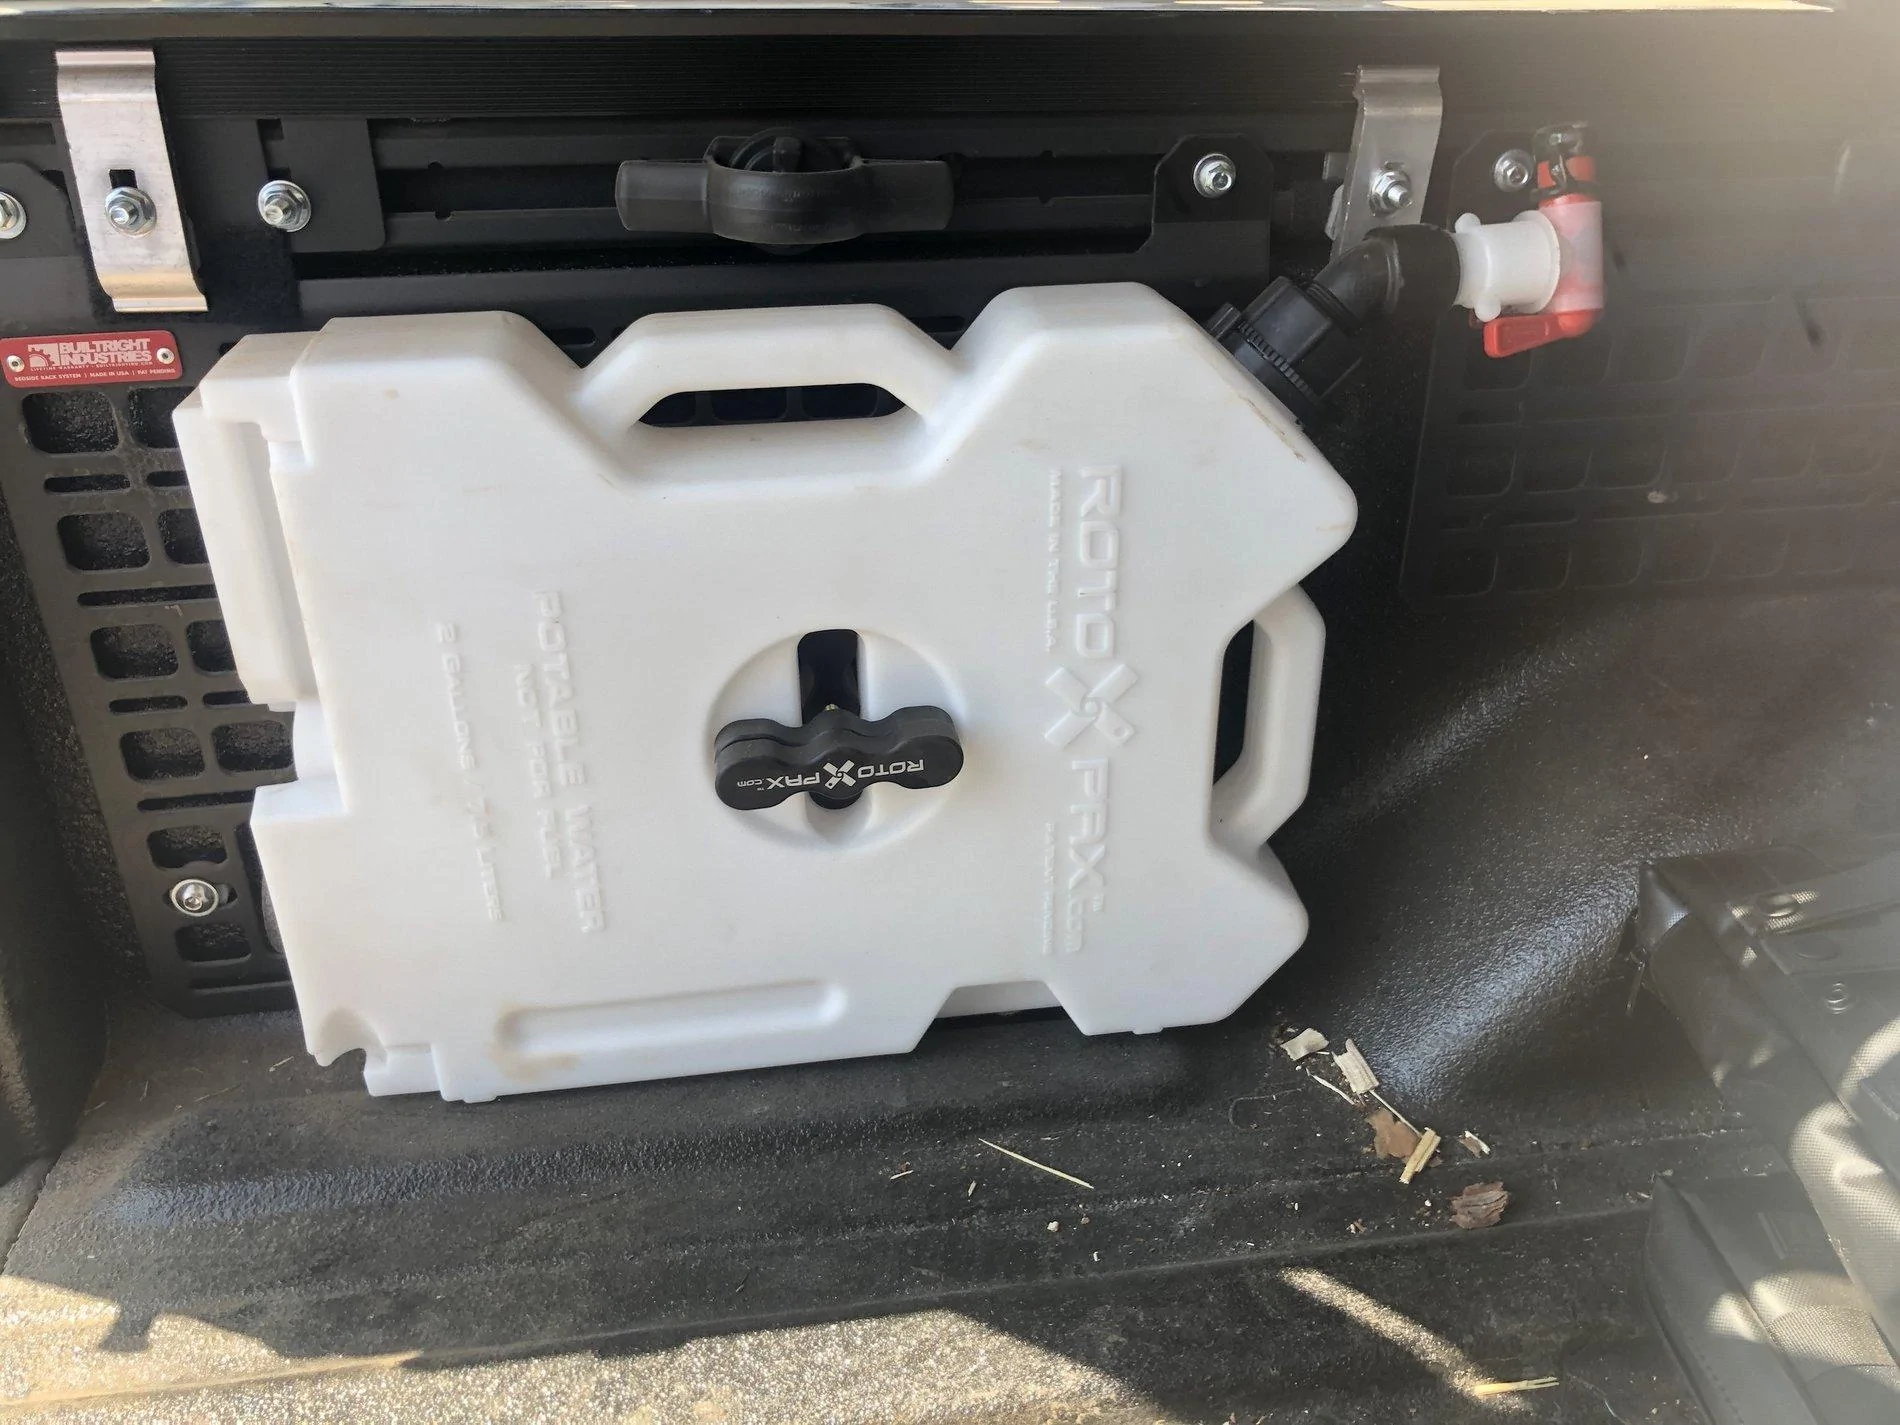
That's behind the rear driver's side wheel well, resting on the bed of the truck (so the molle panel doesn't really have to support the weight and it's easier to put on and take off), and turned so I can keep the spout on all the time.
For all my Rotopax mounts I REALLY prefer the DLX Pack Mount to the Standard Mount. It's only a few dollars more and a million times easier to deal with. I don't trust the locking mounts not to rust, lock up, etc. If it's inside the bed of my truck it's under the tonneau cover. If it's mounted to my bed rack I use a cable lock.
Water Filtration
A Rotopax or 3 aren't going to cut it, even for a weekend trip. And what if you break down or get stuck? We still have another, bigger problem: how to add more water to our water cans once we find it. Streams and lakes are pretty and cold, but you can't just drink from them without getting sick.
Option 1: Carry a handheld water filter and filter water into our water cans whenever you find a pond/stream/unpotable water source. It works, but I don't recommend it. I have ultralight backpacking water filters. They're awesome. But does your wife really want to sit and wait an hour while you pump 5+ gallons of water through one of those things? They're made for a liter or two at a time, not refilling an overlanding vehicle.
Option 2: Use chemicals to purify the water. I've done this plenty of times when hiking, and I always carry a small bottle of potassium permanganate as an emergency backup in case I need to do exactly this. Add a little, the water turns pink, it's safe to drink. Add a lot, the water turns purple, and you've got yourself an antiseptic for wound care. But it doesn't taste the best, and I don't want to ruin my nice morning cup of coffee.
Option 3:
LifeSaver Jerry Can
Lifesaver Jerry Cans are plastic 5 gallon jerry cans that have a water filter built into them. You fill the can (it actually only holds about 4.9 gallons, not 5, due to the space the filter takes up). They sell filters that last for 10,000 Liters (a Lifesaver 10000) or ones that last for 20,000 liters (a Lifesaver 20000). More is better, right? Eh... I don't know. Water filters only last so long. Am I honestly going to use this can for more than 10,000 liters (that's 2,641 gallons!) over the course of 5 years of camping trips, before I should probably replace the filter anyway? I don't think so. But that's me.

(Image linked to straight from the iconlifesaver.com website since I don't have a good side-view shot)
It's plastic, but it's a thick, tough plastic. This thing weight 8.5lbs when empty and dry. You don't have to worry about packing a separate water filter, you've always got it. And the water doesn't get filtered until you need to use it. That means you're not wasting an hour pumping water through a filter to fill it while your wife gets annoyed. That also means the water can never get "stale" while it's sitting around in the container, because it always comes out freshly filtered. They also have replaceable carbon filters to keep the water tasting fresh.
If you get one of these things, you need, need, need to get a Shower Attachment. This truly should come with the can. Nothing says "glamping" like having a pressurized spray spout to rinse your dishes!
We use the spray spout for almost everything.
Money Savings Note - I got the "LifeSaver JerryCan Starter Kit" that already comes with the shower attachment and 5 spare activated carbon filters. It saves about $50 over buying all the pieces separately, and it still costs just enough to qualify you for free shipping.
Important LifeSaver Jerry Can Note - Once you get the filter wet the first time, you are NEVER supposed to let it dry out. They recommend you keep at least 2" of water in the can for the rest of the time you own the can.
The LifeSaver Jerry Can has holes in the middle so you can mount it somewhere, but I'm struggling to find a decent mounting solution using their holes. It's just so damned heavy with 5 gallons of water in it. 1 Gallon of water weighs around 8.33lbs, so 8.33 x 4.9 (how many gallons it holds) + 8.59 (the weight of the can itself) = 49.5 pounds. That's not like mounting some lightweight Maxtrax to the side of your bed rack!
Water Bags
You still need more water, and if there's any space available, you want it stored cold and in your fridge. Enter some cheap-ass No-Leak Collapsible Water Bags from Amazon. So far, these truly have been no leak for me. I keep one full in my freezer at all times so I can grab and go with ice cold water (well, out here it will be water soon). They're so cheap, I got a 4-pack of 1.3 gallon bags and a 4-pack of 2.6 gallon bags.
These will fit in the weird space left in your fridge. Or in the footwell of your truck. Or anywhere else you have a bit of space. Best of all, they collapse to nothing when they're empty, and they've got great integrated handles for carrying. They probably won't last forever, but at that price, who cares?
Camp Shower
There are a million camp shower bag options out there, all very cheap. You fill the bag with up to 5 gallons of water, hang or lay it out with the transparent side facing the sun, and it heats up enough for you to rinse yourself off with. If you get one that has an off spout at the bag (rather than at the far end of the shower hose) you can probably safely carry an additional 4-5 gallons in your truck in one of these. I have this one (only because it was in stock during the great COVID supply chain demise), but I've seen no real difference between it and the 8-million other brands and options.
Shower Bag Hanging Note - You can hang one of these from the edge of your bed rack. However, once I have a full SlimLine II Rack I really want to try out FrontRunner Outfitters Rack Mount Shower Arm. It just seems like a cool solution for hanging a shower bag. Trouble is, I won't have any space on the sides of the rack. If anyone knows if the holes line up shuch that you can mount this one the rear of a SlimLine II Rack, please let me know!
Other Options
The above is what I'm carrying so far, but I've realized I need more. I'll have to try a few things. 4x 2-gallon Rotopax mounted on my bedrack would do the trick, but they'd be baking in the sun at all times. FrontRunner Outfitters has an upright 10 gallon water tank to go against the back of the bed of your truck, complete with cut outs for the wheel wells. They also have a footwell 10 gallon water tank that goes across the floor in your back seat. (Which only works if the only people sitting in the back are still in car seats.) None of these are great solutions for me. I love the concept of the Upright Water Tank, but it wouldn't work with my tonneau cover (it's 24" tall, and a JT truck bed is just under 18" tall).
So, I'm still looking, still thinking about how to carry more water. And I'm definitely open to suggestions!
Last edited:
Dooley the Clown
Well-Known Member
Following
J33p3r_b3ast
Member
- First Name
- Rob
- Joined
- Aug 14, 2020
- Threads
- 1
- Messages
- 20
- Reaction score
- 7
- Location
- Stevensville, MI
- Vehicle(s)
- 2020 Jeep Gladiator Overland
- Occupation
- Ninja
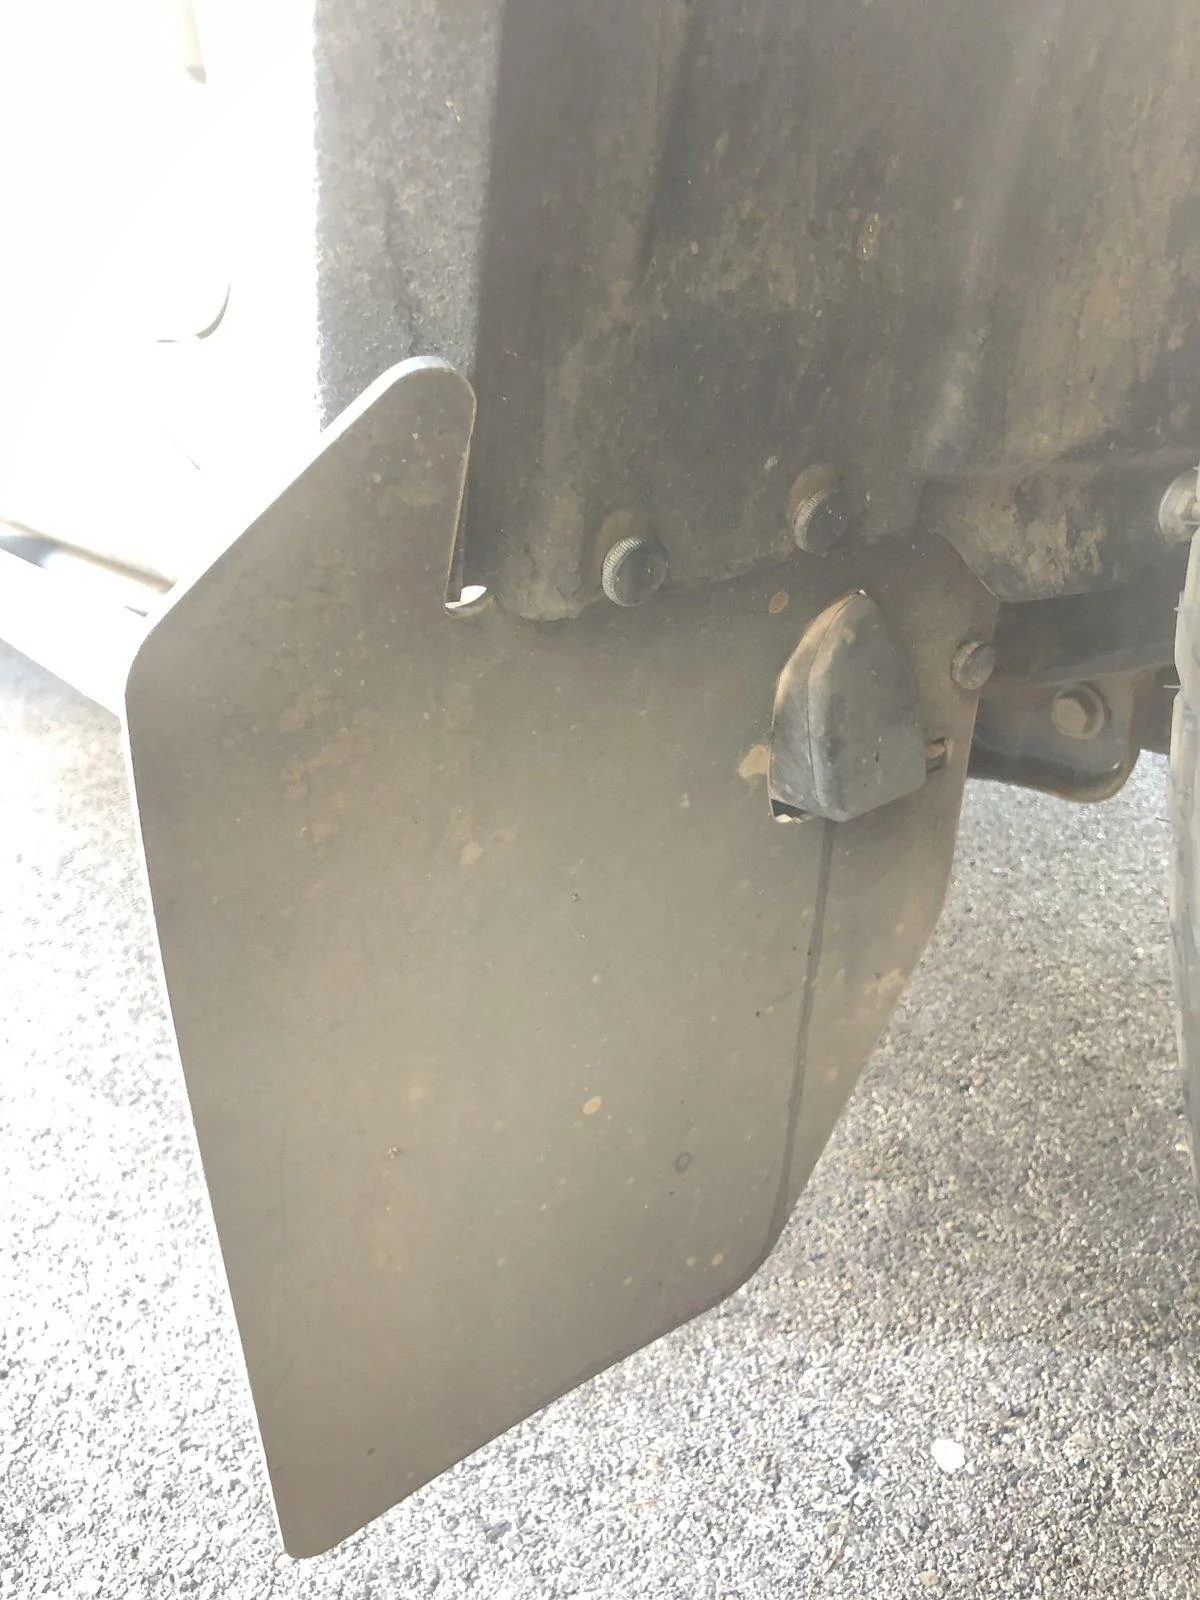
Thank you so much for taking the time to outline this! I seem to have a third plastic fin in the middle of the 2 fins you've shown, offset up and a bit behind away from the tire (maybe the Overland fender is different). Will try to work through it, thanks again!RokBlok MudFlaps (Part 2)
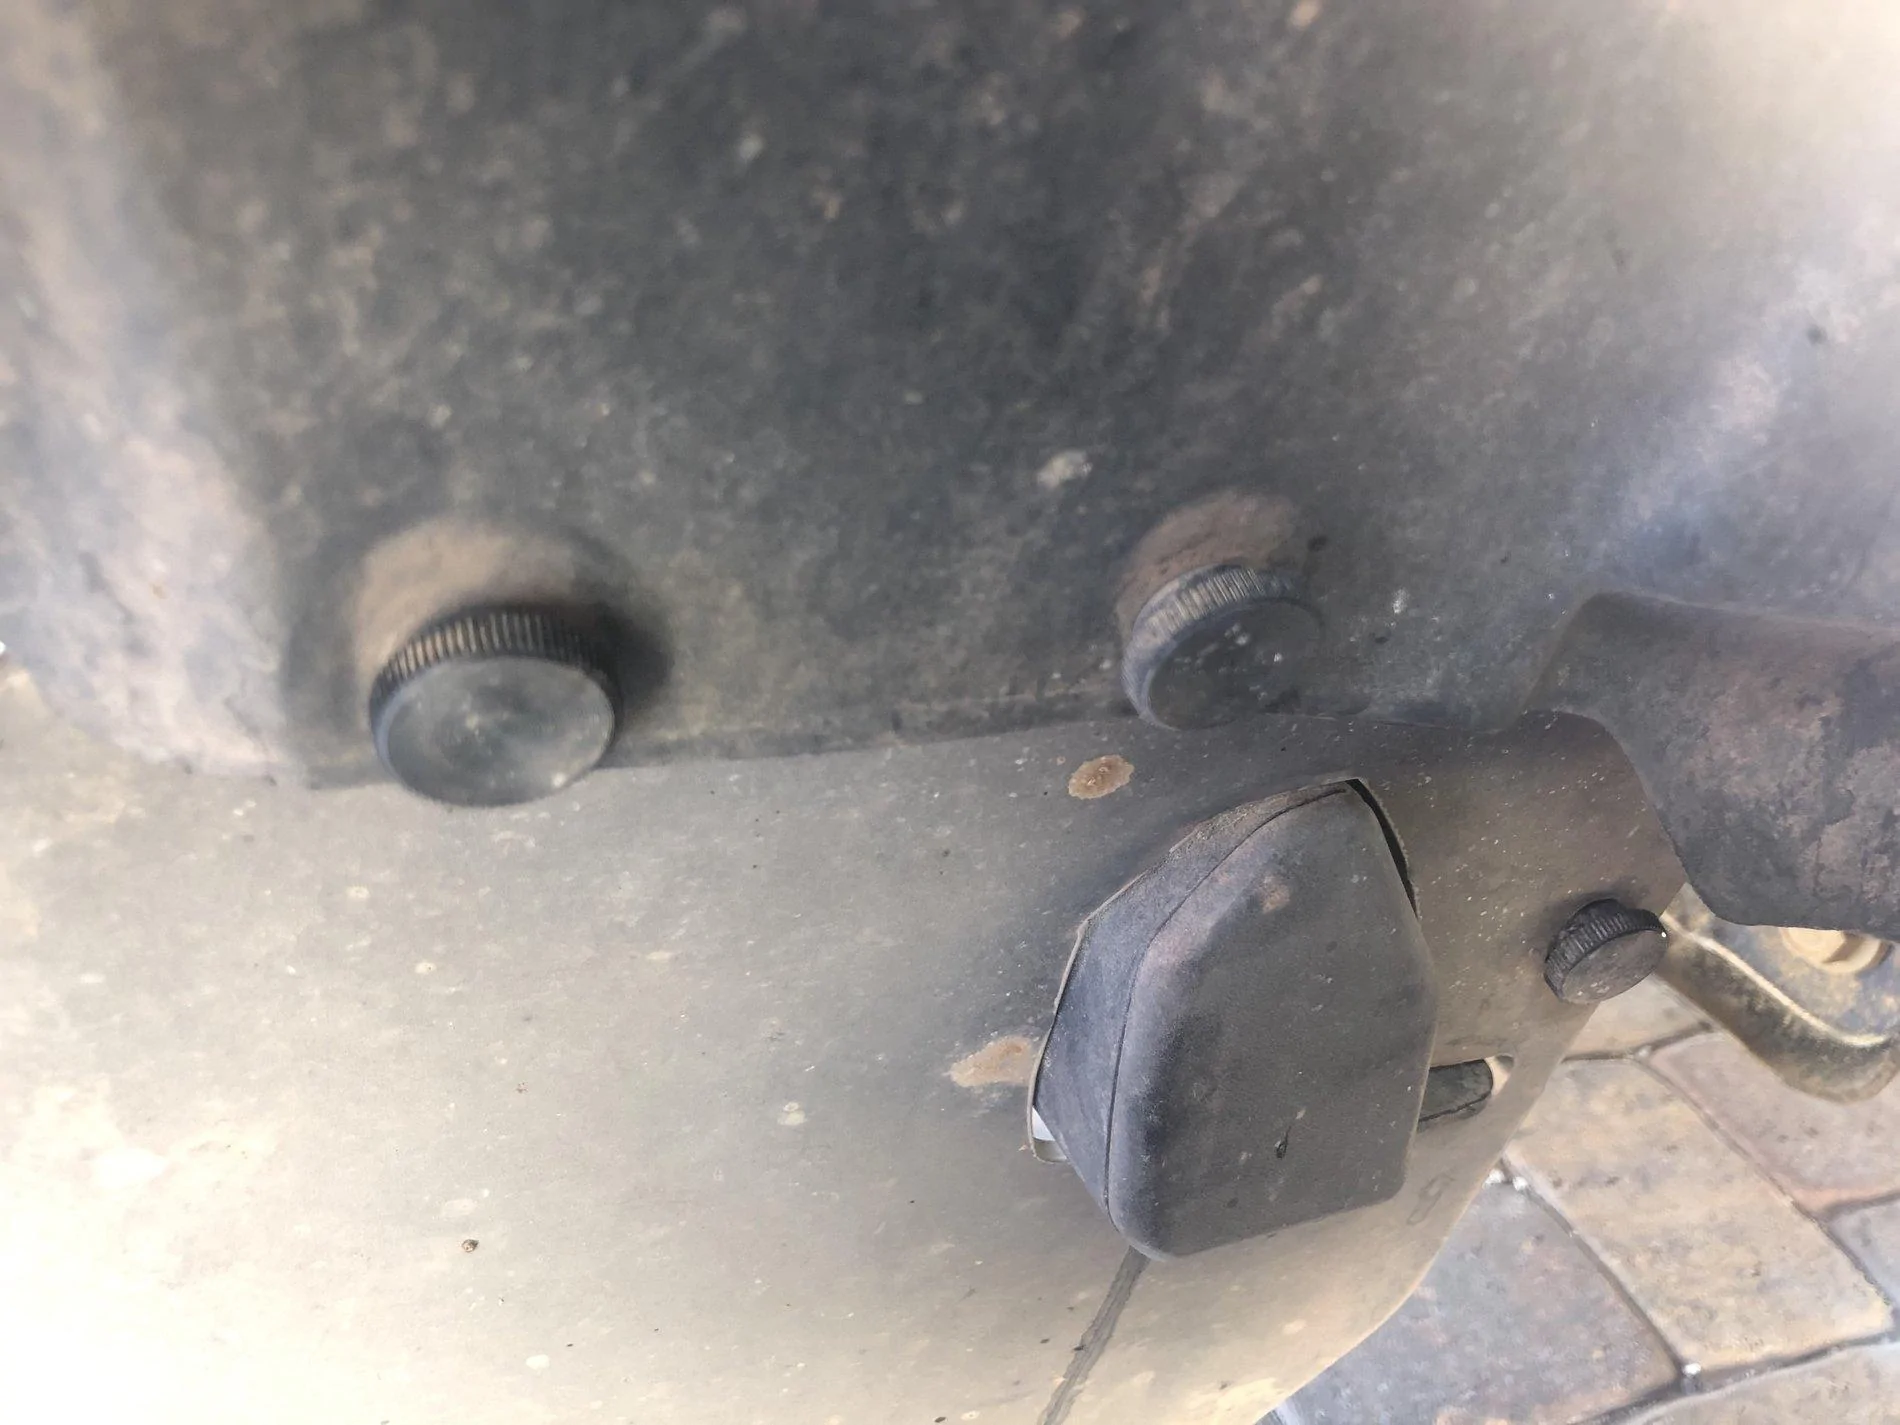
Okay, I just pulled my front passenger mud flap off and took some pictures in the hopes it could help answer your question.
Looking back from the front tire, the mud flap is held on my three bolts, two on the top and one off to the side.
But when you take the mud flap off, only the top two holes have screw thread clips on them.
The third, lower screw thread clip fits onto the truck itself
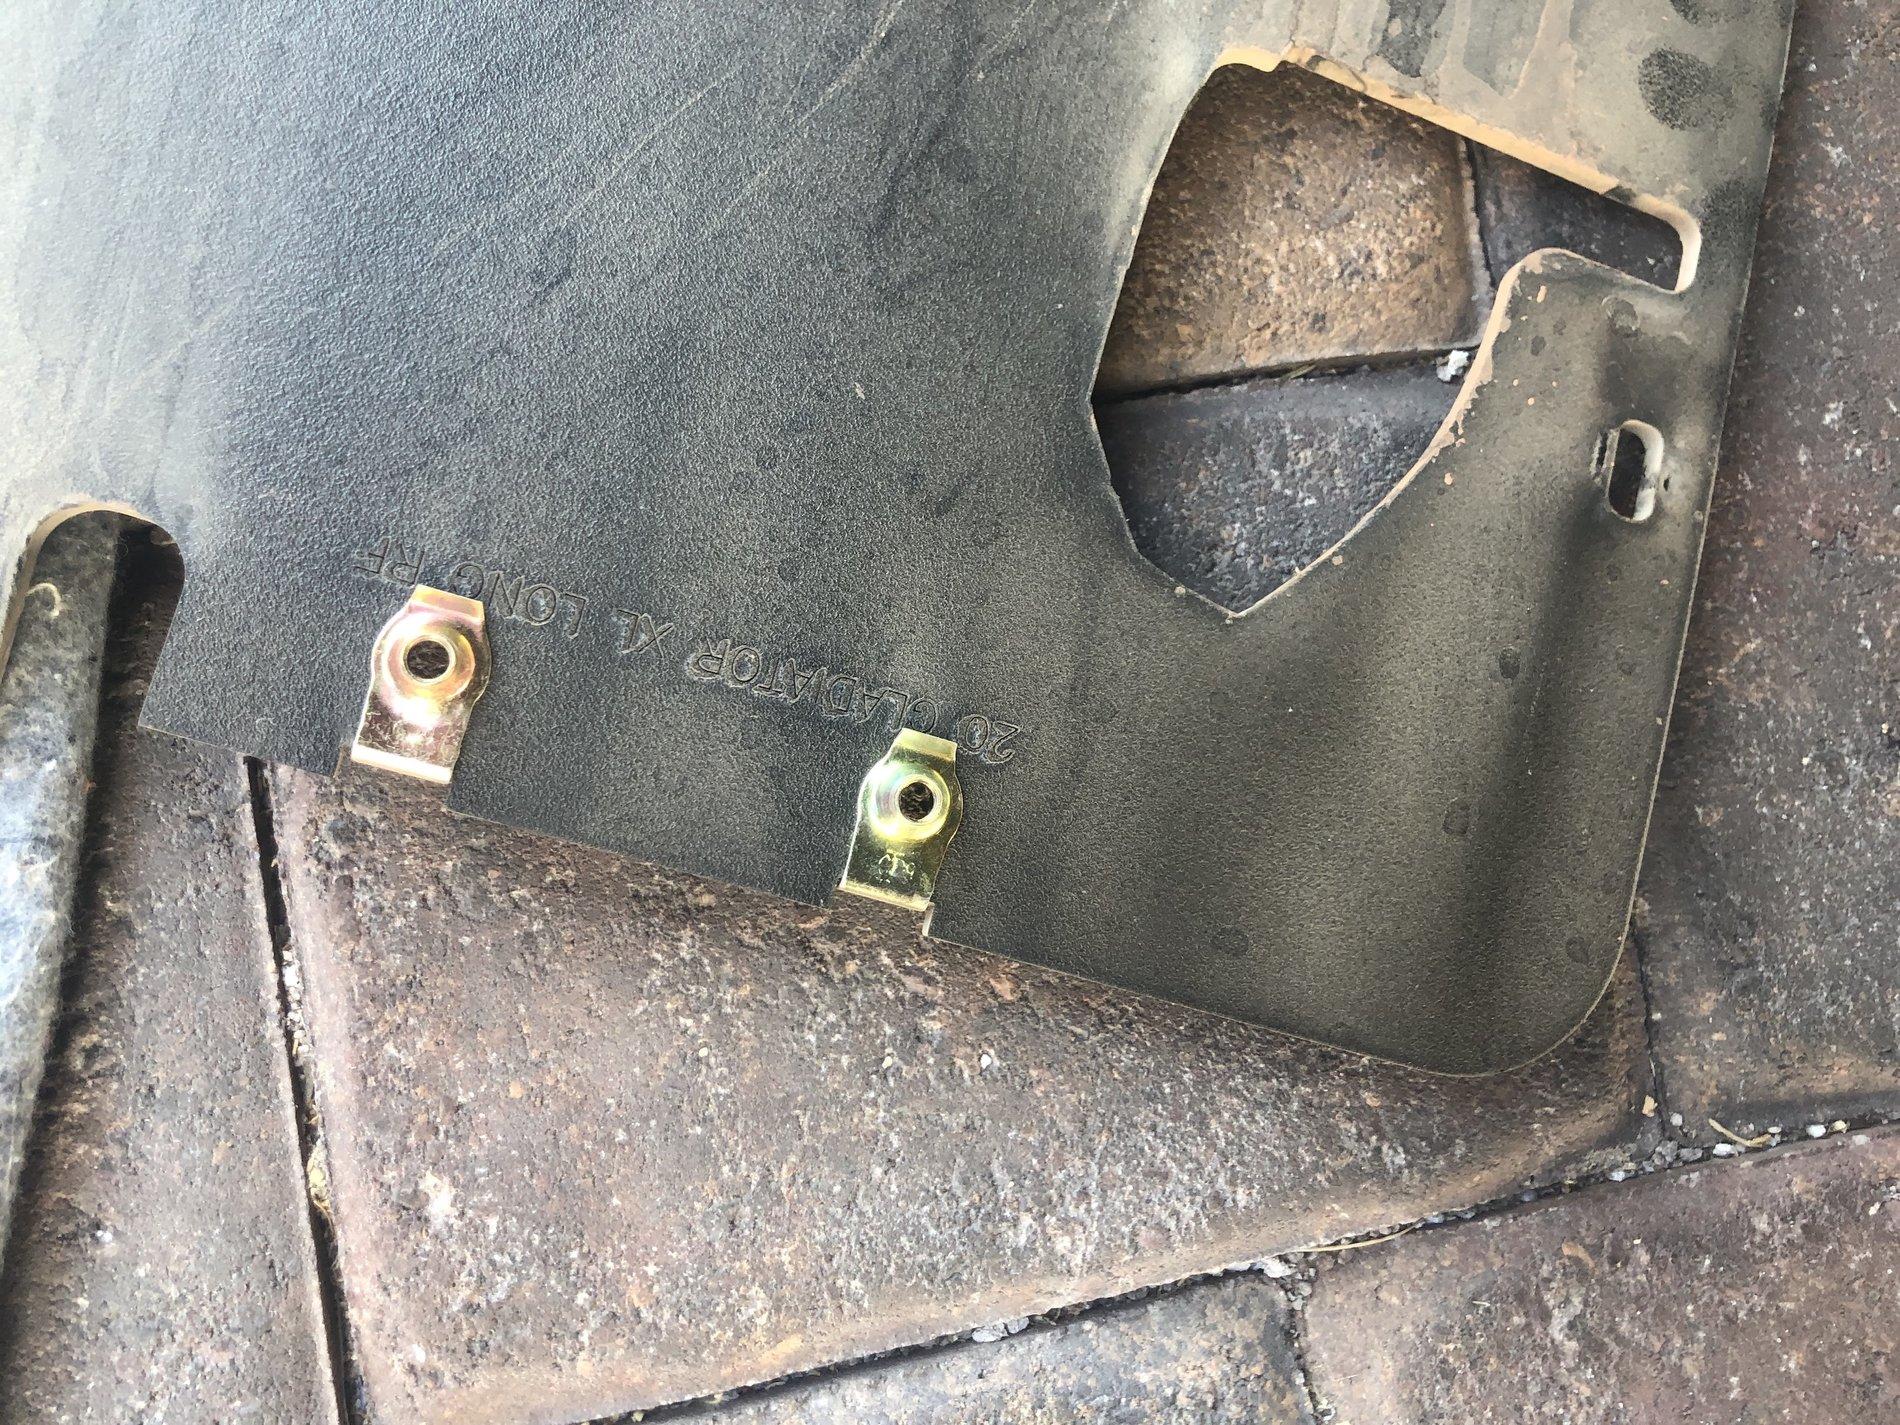
When you look forwards, towards the tire, at where the top two screw go, you sure could be fooled into thinking that the mud flap goes BETWEEN those two layers of plastic. You'd be wrong, unless you're planning to drill out the holes in those two fins of plastic and make them bigger
Instead, install the mud flap behind both layers of plastic. Here's the same view, looking forwards towards the wheel, with the mud flap installed
Then screw in the lower, rear thumbscrew
All the while, making sure that the top wing of the mud flap is on the other side, inside the wheel well, separate from the rest of the mudflaps.
If any of that helps, awesome. Otherwise, sorry, it's what I got, and as you can see, it's all based off a Rubicon fender flare. Best of luck!
OP
OP
jsyn
Well-Known Member
- Thread starter
- #50
Overlanding/Camping Gear Part 6 - Packing the Truck
You've got a bunch of gear. Now you need to carry it. Obviously this will be different for everyone, but I got asked by someone on here how I fit that stuff in, so here goes. Note - while this will obviously change some with each trip I take, I think the basic layout will remain about the same.
So far I've found that the best mid-ground for price and sturdiness for containers are Rubbermaid Commercial Brute. They'll still crack if you drop them, but they're 20x tougher than anything else Home Depot or Lowes carries. They come in 20-gallon and 14-gallon sizes. Both sizes fit under the tonneau cover. The 20-gallon is exactly the same as the 14-gallon, only taller. I got a couple of both sizes, but in the end I prefer using the 14-gallon size, because it leaves the perfect amount of room on top for me to store flat things (like tables, chairs, LifeSaver Jerry can, CleanWaste Camp Toilet, etc) I can fit three of them around the fridge in the bed of my JT, or 2 of them plus firewood.
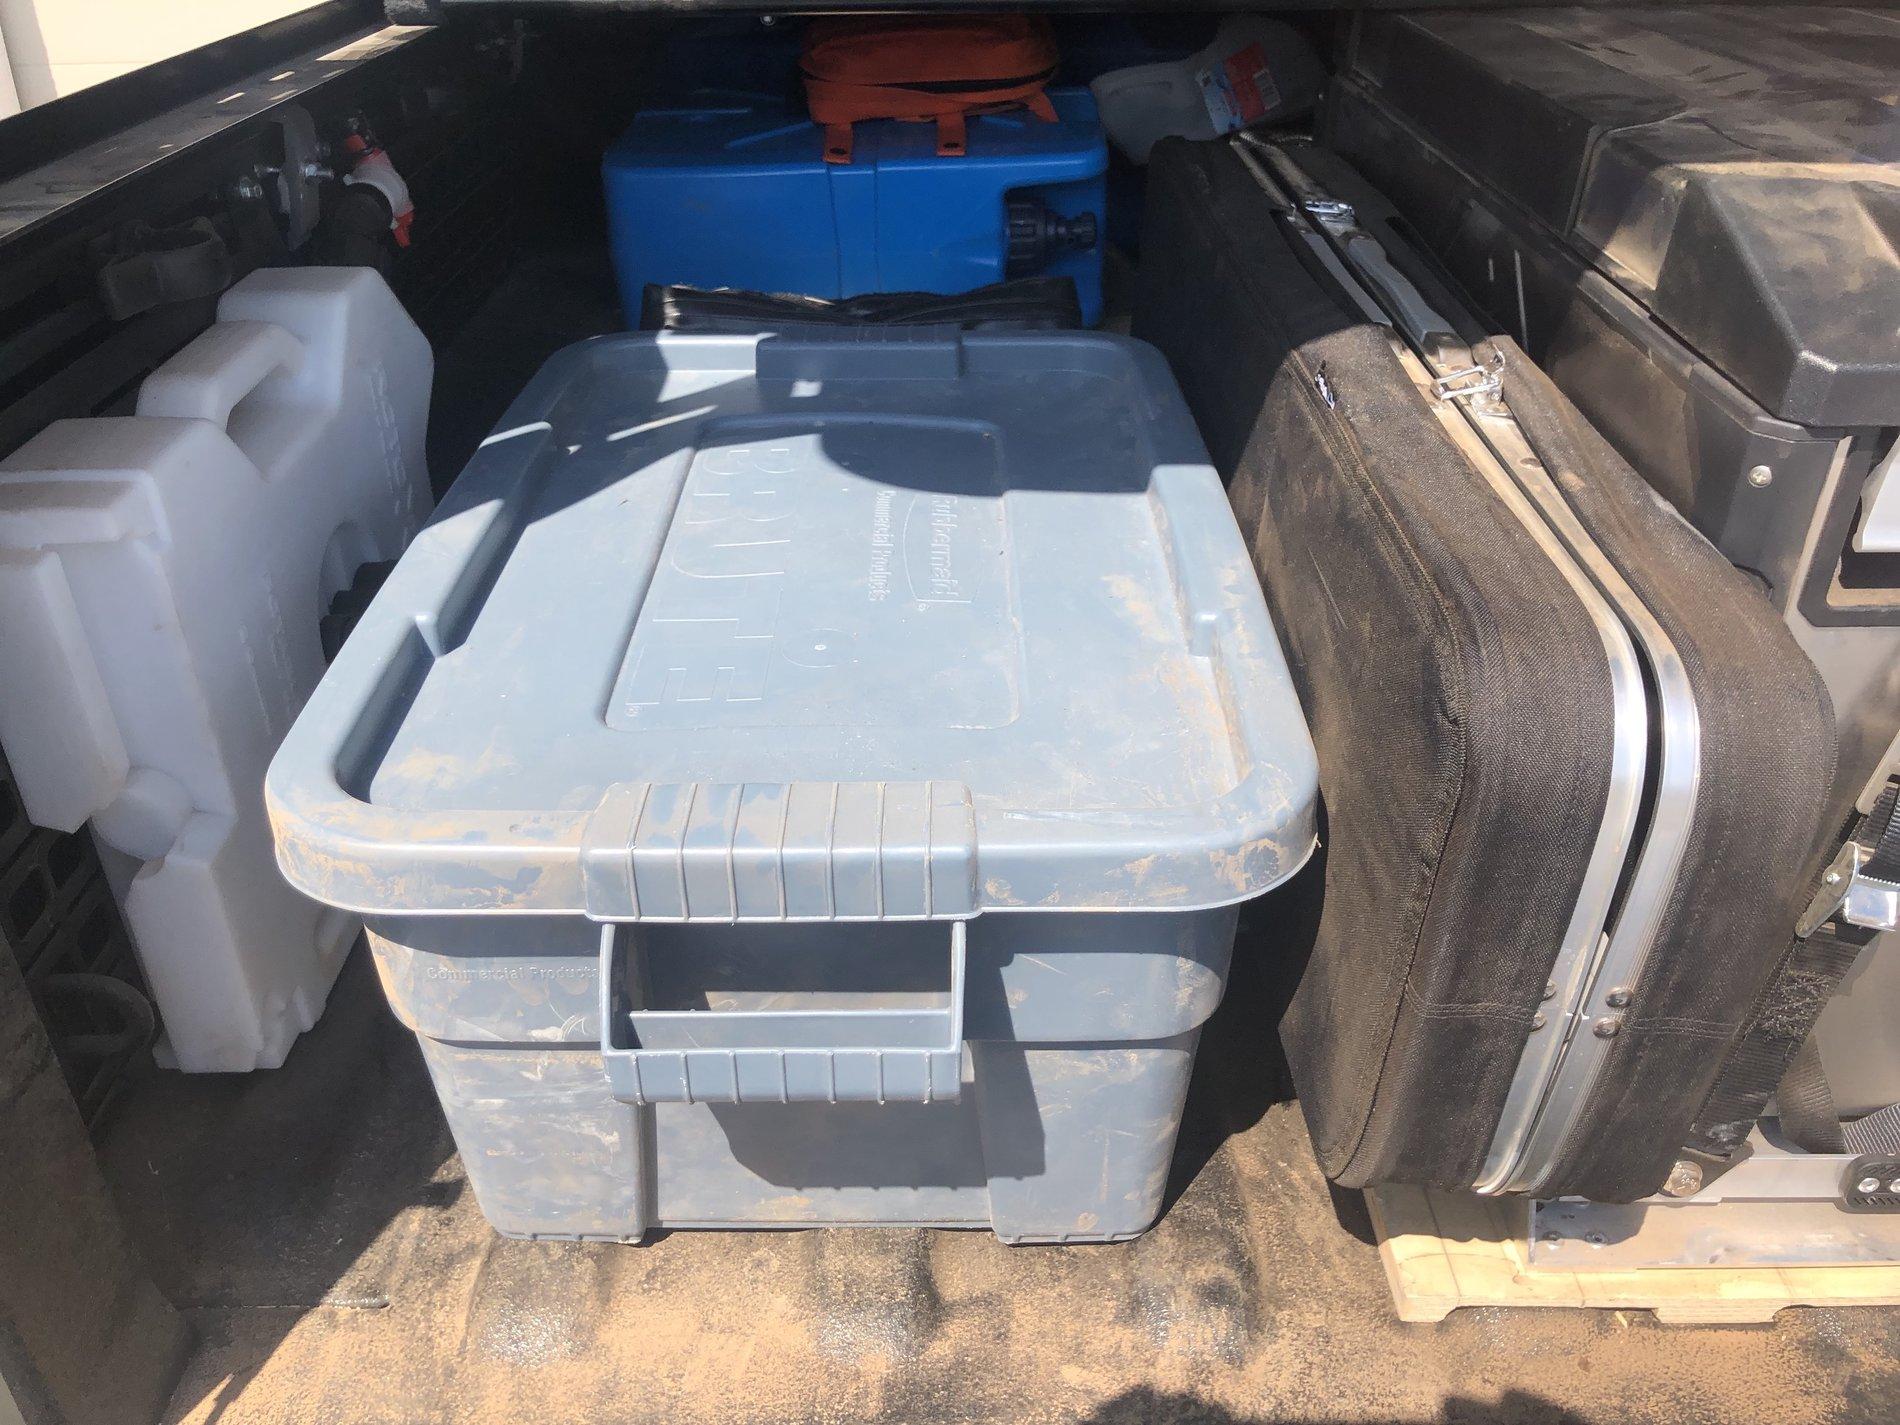
Okay, opening up the tailgate we see:
(links and descriptions of all are in previous comments in this thread):
You're seeing two camp chairs folded up and laid flat (I only had enough chair storage bags for 2 of my 3 for this trip, so the rear one's just there, loose) next to that, lengthwise between the Rubbermaid Brute and the ARB Fridge is the aluminum folding picnic table with benches that I gave up fighting to get right and so isn't closed completely properly. (Ugh.)
Pull the camp chairs out and you can see the ridiculousness that is the GCI Kitchen Prep table all folded up. It does get flat, but damn it's still big.
Underneath that you can see the Rubbermaid Brute filled with camping supplies.
I had a bit of space behind the Rubbermaid, so I tossed a Large BuiltRight Molle Bag full of bungie cords and tie-down straps back there. I never go anywhere without some way to strap more things down!
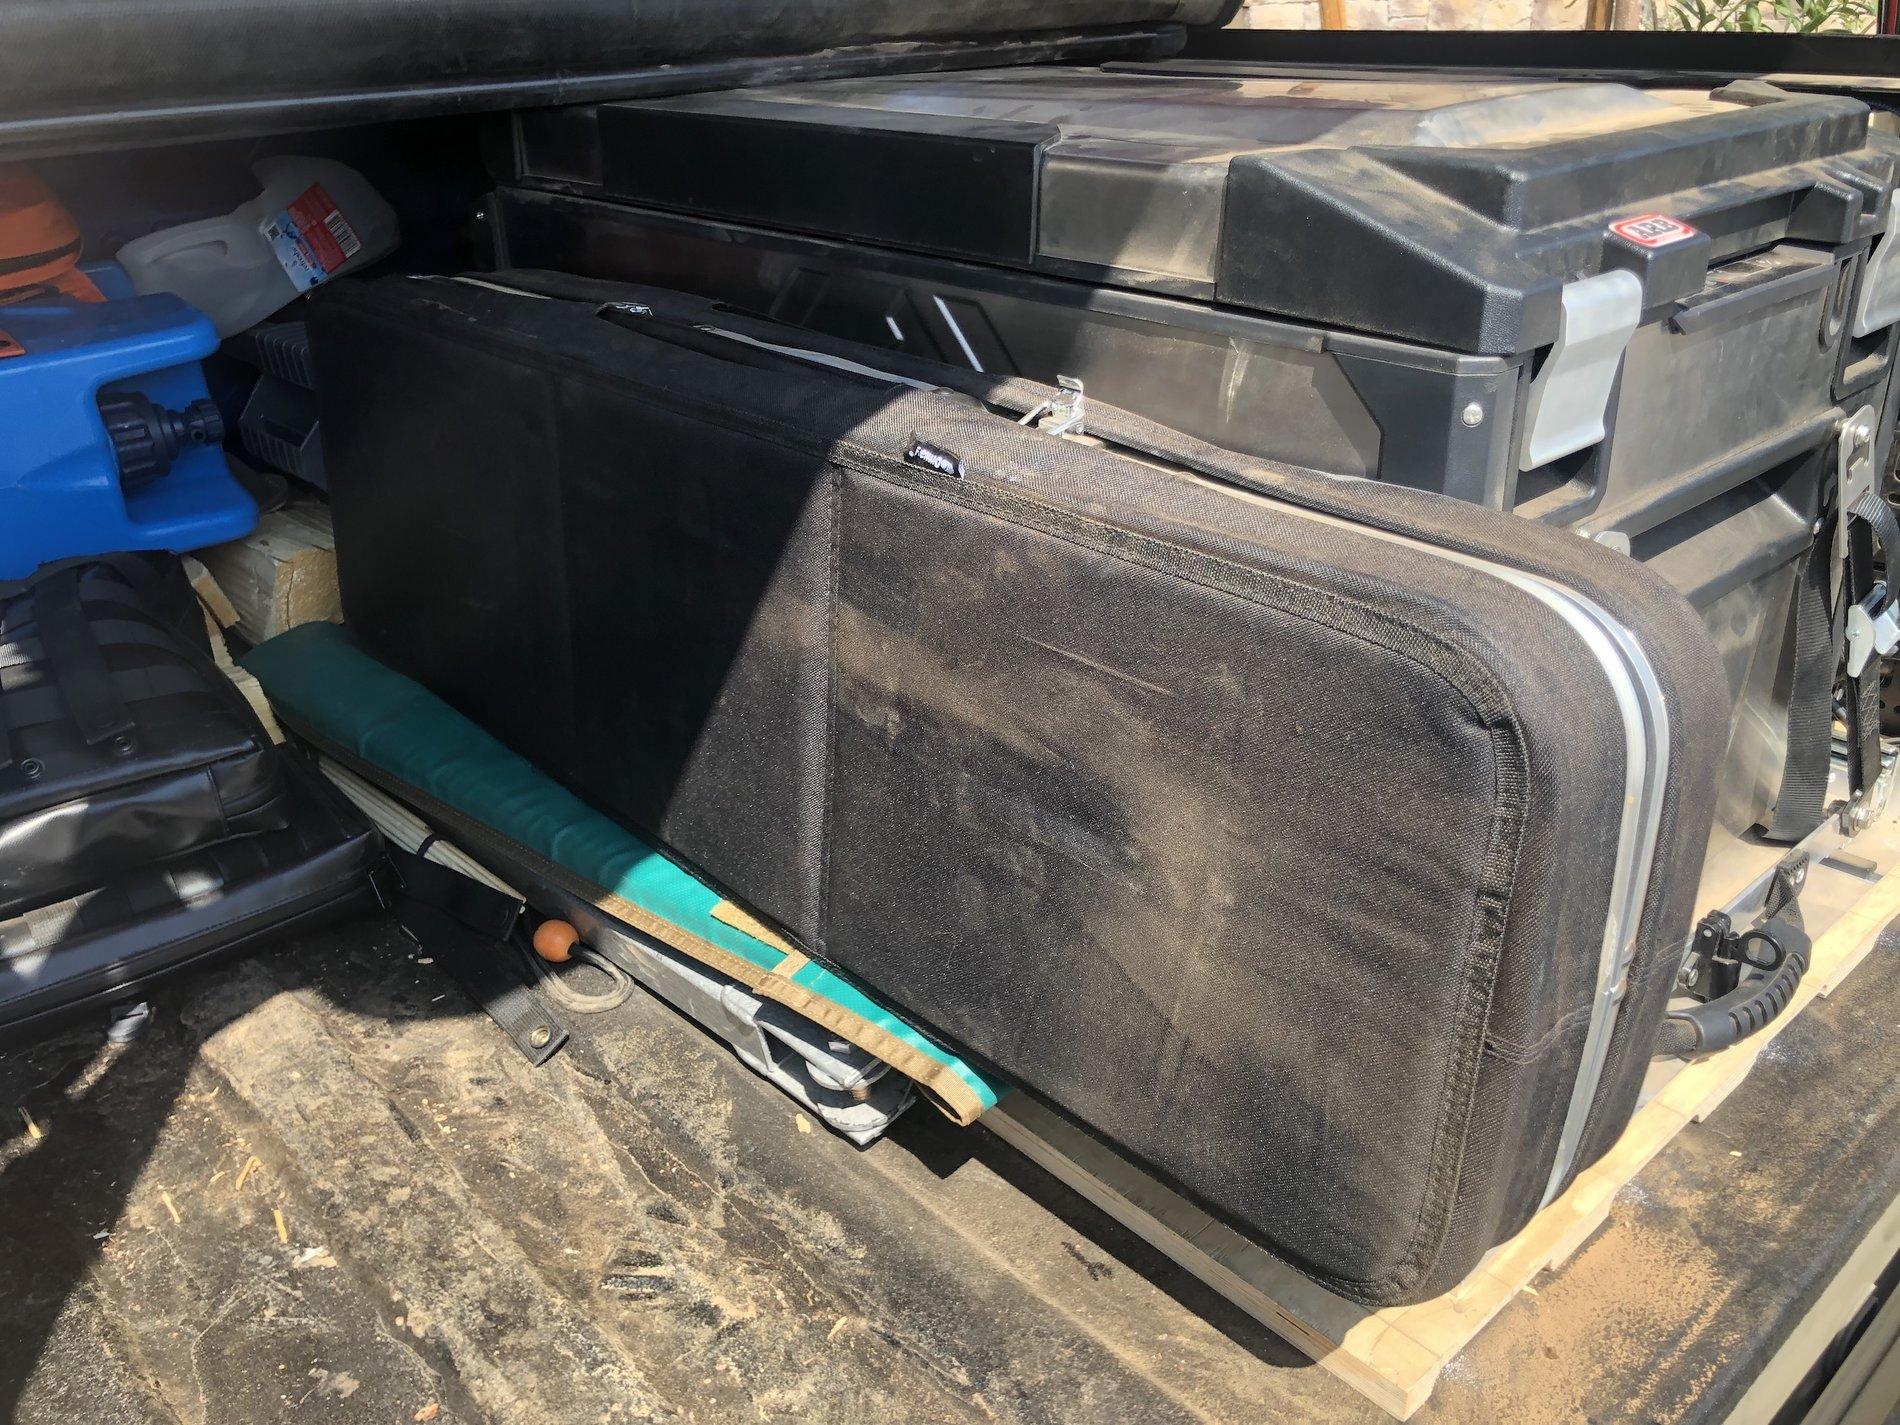
Anything long and skinny goes down the middle corridor, underneath the picnic table.
The green bag is holding the legs for the TemboTusk Skottle stove. Inside each hollow leg I've got 6 35" marshmallow skewers. Along the very bottom is the body of a Pull-Pal. I used to have the Pull-Pal mounted hanging from my bed rack, and I will again at some point, but for now I just tossed it down there. Discussion of Pull-Pal to come later, in a post about Recovery Gear.
Pull out the picnic table, unroll the tonneau cover the rest of the way, and let's see what we've got:
Note - this is AFTER a weekend trip, so there used to be a lot more firewood in here
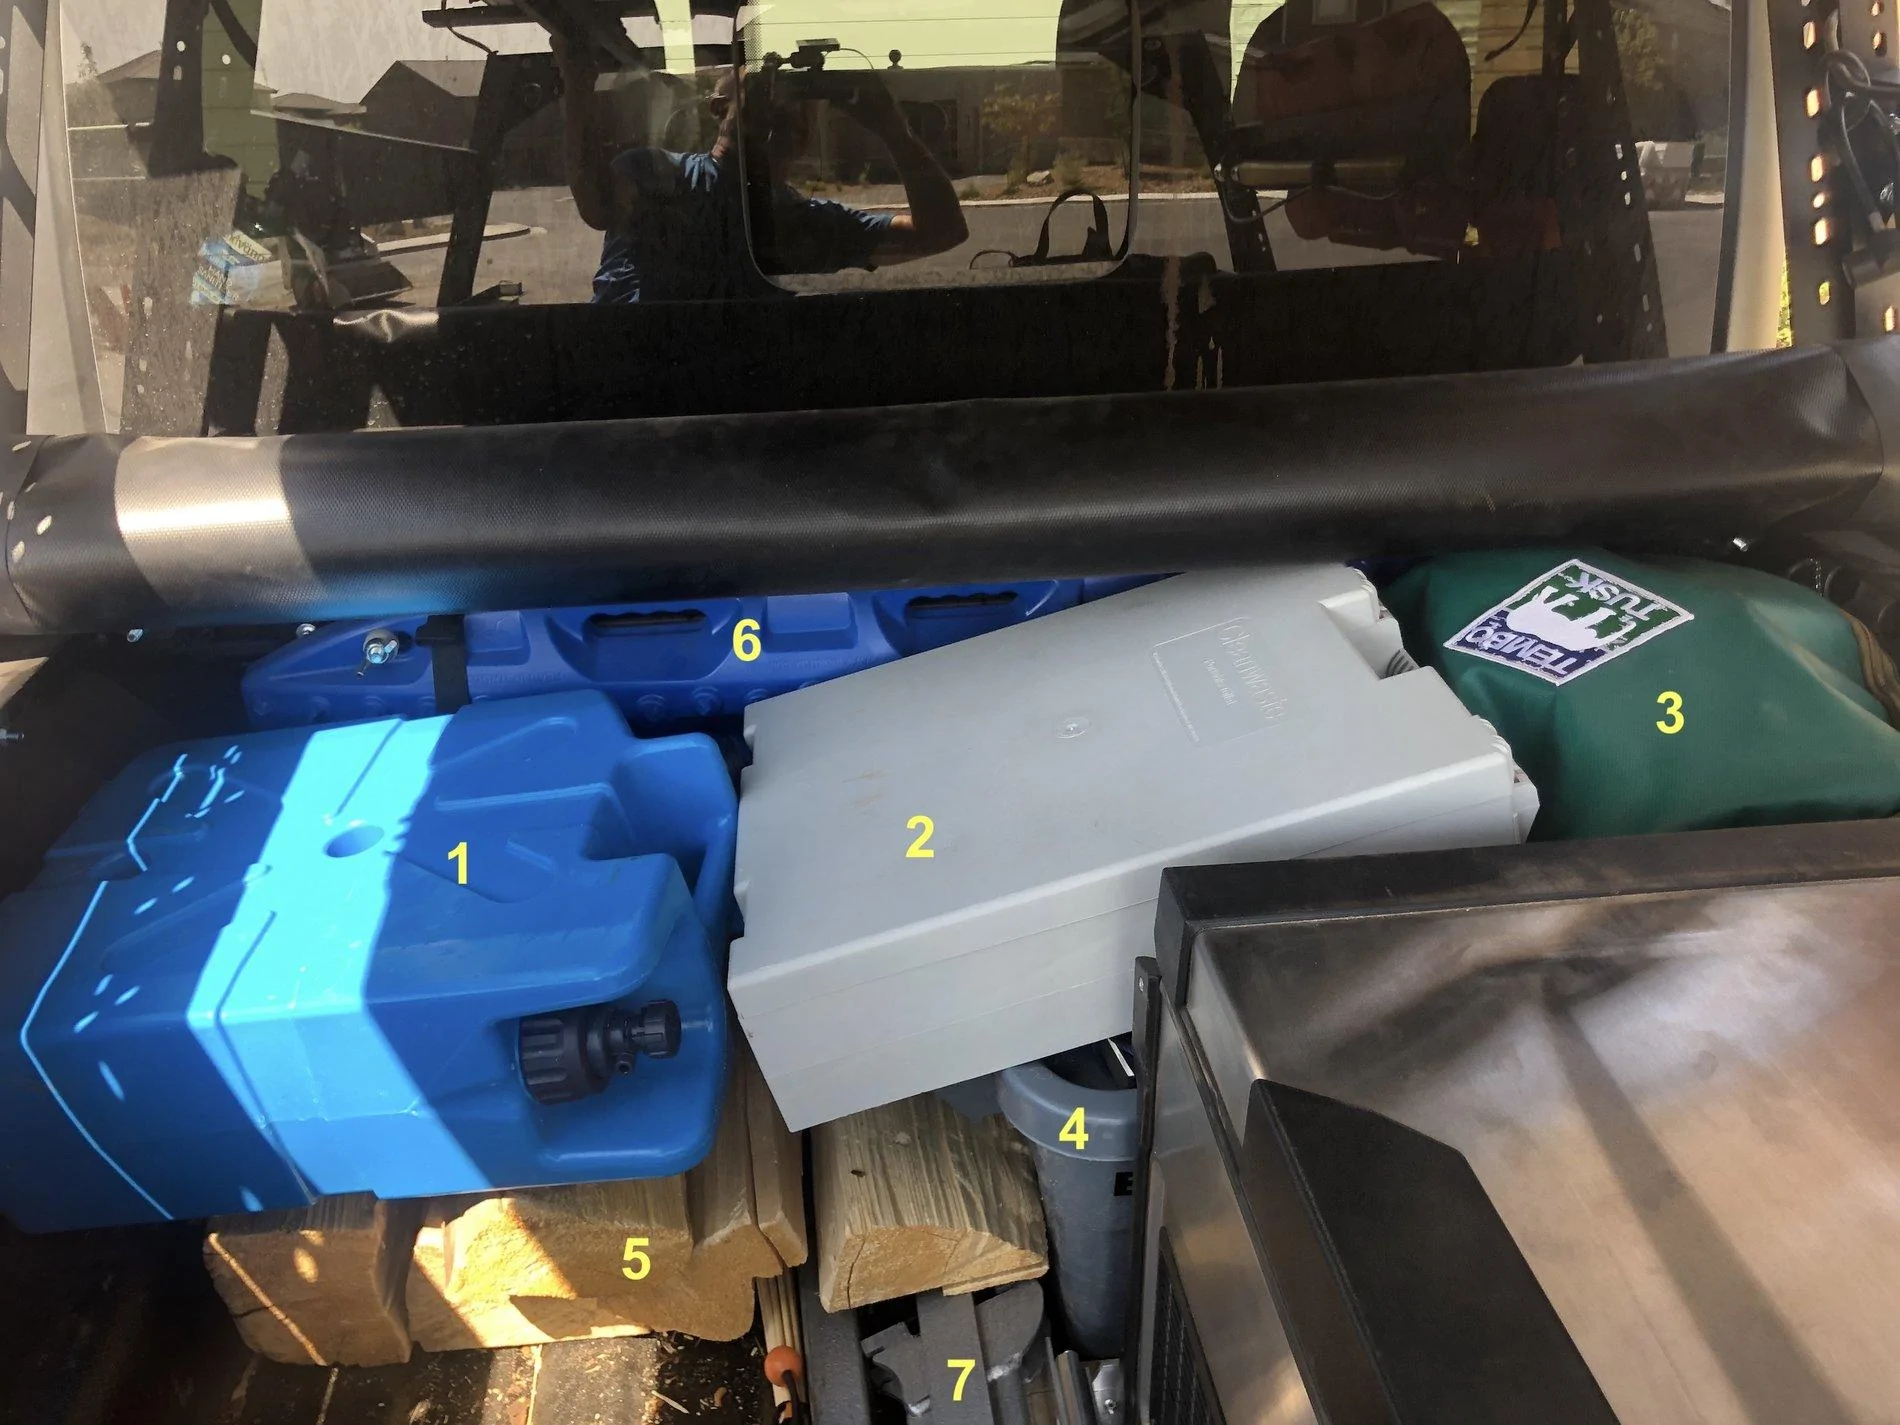
Here's the Recovery Bin uncovered
Firewood reaches under the Rubbermaid handle, and the other handle sticks over the wheel well hump, so they're not wasting space. Hatchet for camping is tossed on top. That weird thing with holes is the anchor of the Pull-Pal. Again, I'll discuss Pull-Pal in a later recovery gear post. What matters is this is a quick, ugly, temporary solution because I no longer have the Pull-Pal hanging from my bed rack. For now. The small gray bag under the Pull-Pal anchor is a bag with the Skycamp Tent Vinyl Cover rolled up in it, which will only be installed on the tent if it's raining, to keep the ladder dry.
Inside the Cabin
Tool bag, SafeJack, and Trauma Kit sit on the floor beneath my three-year old's feet. (All to be discussed in a later Recovery Gear Post) The other rear passenger floor space holds the fire pit bags, fuel canisters for stoves, and a big bag of lightweight levelers to help level the truck when needed so the roof top tent remains comfortable.
The rest of the rear passenger space:
Each person packs their own bag of clothes. The pantry tupperware of dry goods goes here. A Camelbak for hiking goes here. Pillows go here. And our down comforter, shoved in tight. This is the main space for bedding and clothes.
If I had to have 4 people in the truck, I wouldn't use a tonneau cover, I'd just get an RLD hard top so I had more storage space in back.
Camping Gear Rubbermaid
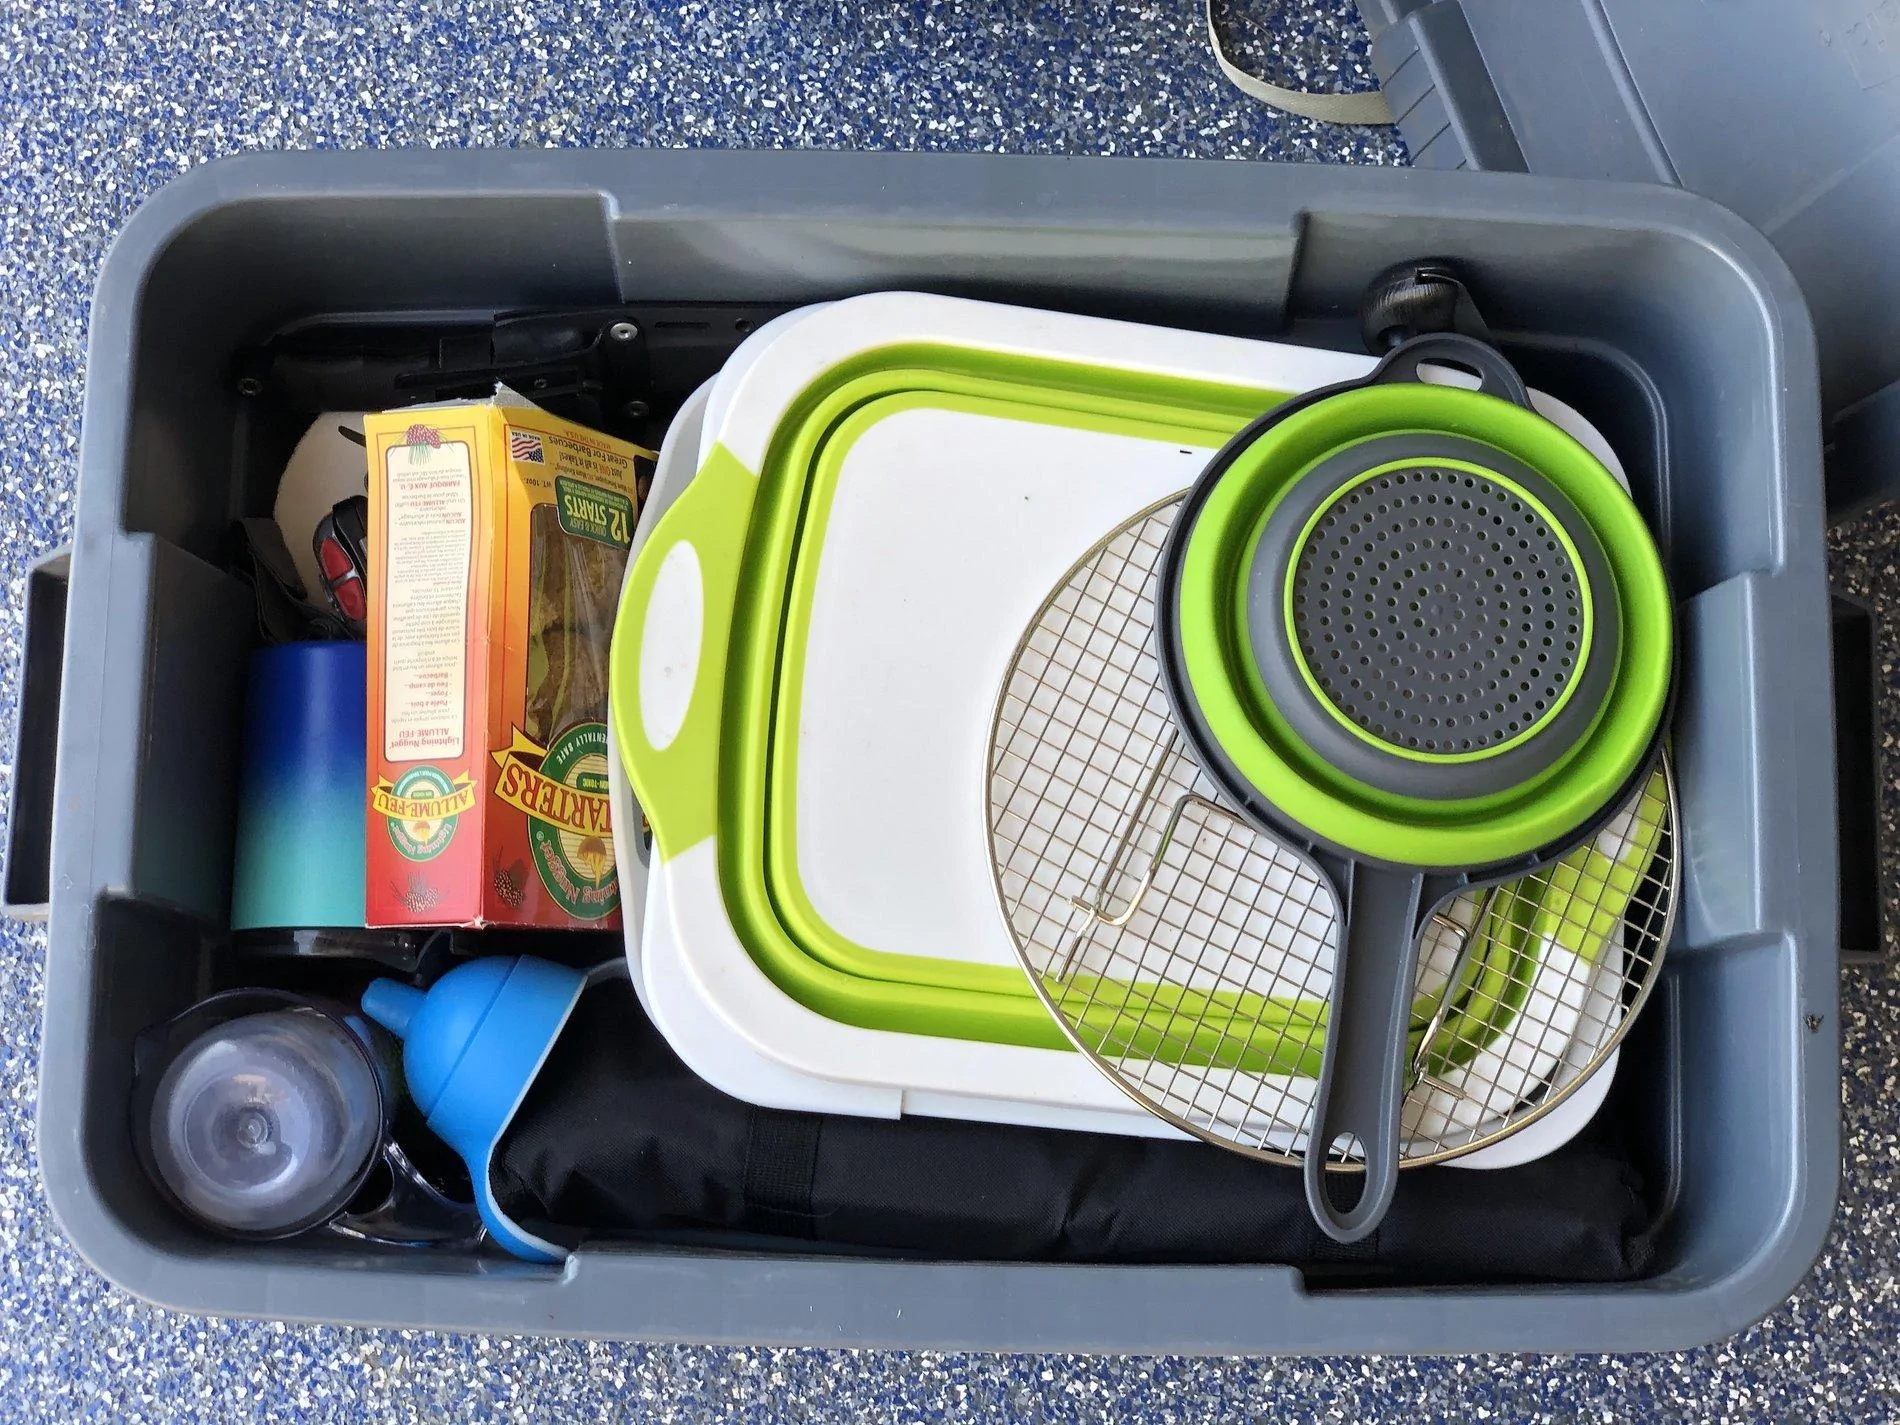
Here's the camping gear container with the lid off:
And here it is again with the collapsible dish drain, collapsible sink, TemboTusk steam tray, box of firestarters, coffee mugs, sippy cup (for toddler's hot chocolate) and collapsible colander removed:
You can clearly see:
Wow. This thread got a LOT longer than I meant it to in its first week, but we're almost done for now, I promise!
You've got a bunch of gear. Now you need to carry it. Obviously this will be different for everyone, but I got asked by someone on here how I fit that stuff in, so here goes. Note - while this will obviously change some with each trip I take, I think the basic layout will remain about the same.
So far I've found that the best mid-ground for price and sturdiness for containers are Rubbermaid Commercial Brute. They'll still crack if you drop them, but they're 20x tougher than anything else Home Depot or Lowes carries. They come in 20-gallon and 14-gallon sizes. Both sizes fit under the tonneau cover. The 20-gallon is exactly the same as the 14-gallon, only taller. I got a couple of both sizes, but in the end I prefer using the 14-gallon size, because it leaves the perfect amount of room on top for me to store flat things (like tables, chairs, LifeSaver Jerry can, CleanWaste Camp Toilet, etc) I can fit three of them around the fridge in the bed of my JT, or 2 of them plus firewood.
Okay, opening up the tailgate we see:
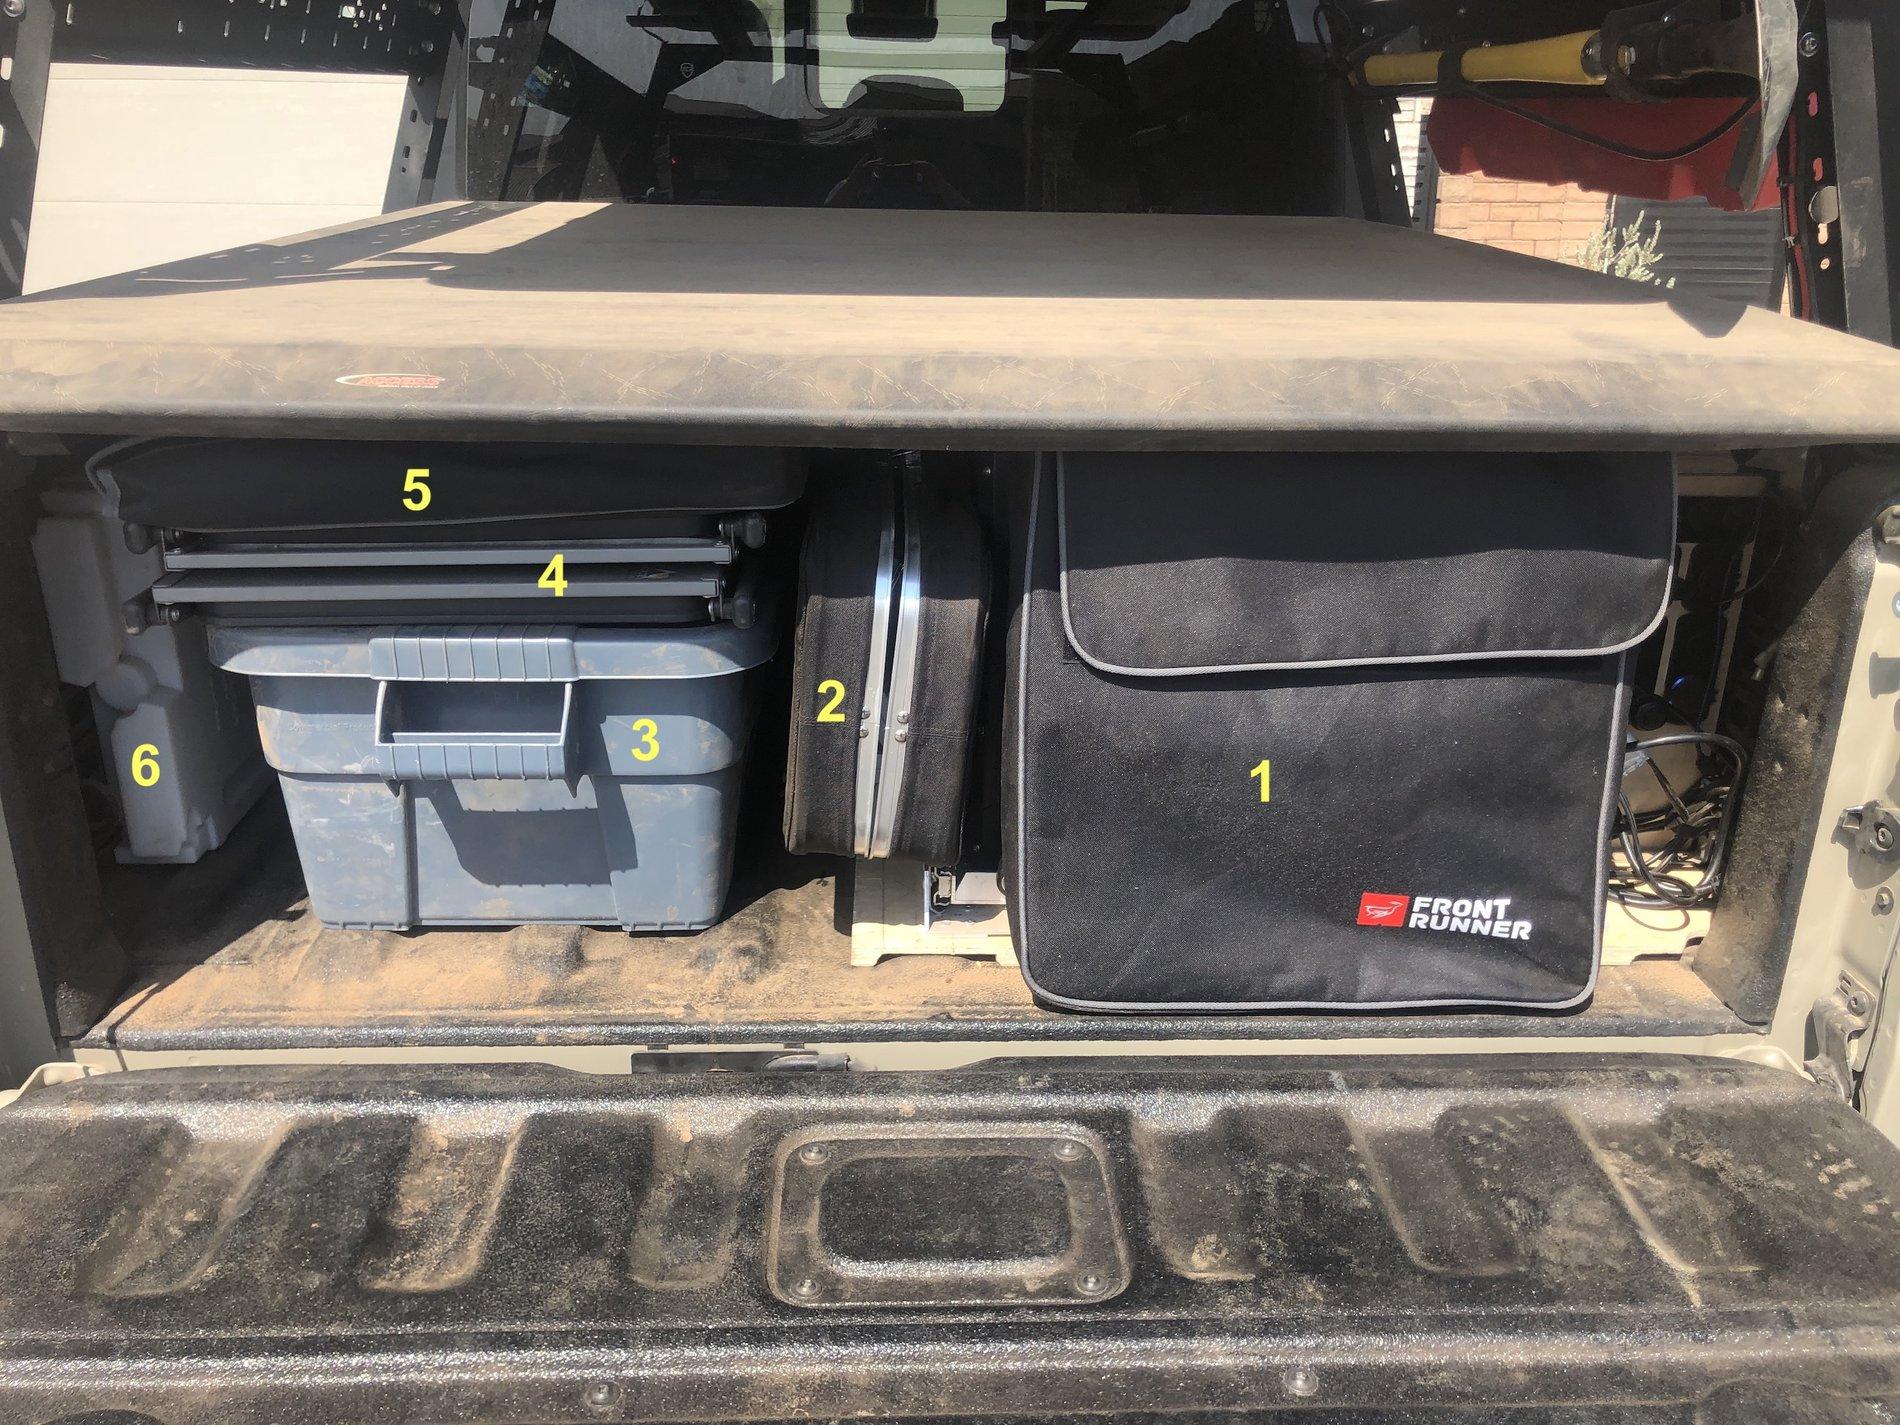
(links and descriptions of all are in previous comments in this thread):
- Camp Chair between the front of the fridge and the tailgate
- Picnic Table with benches
- Camp Supplies Container (pots, cups, etc, more details to follow)
- Folded down GCI Kitchen Prep Table
- Camp Chair laid flat
- 2 gallon Rotopax Water w/ spout
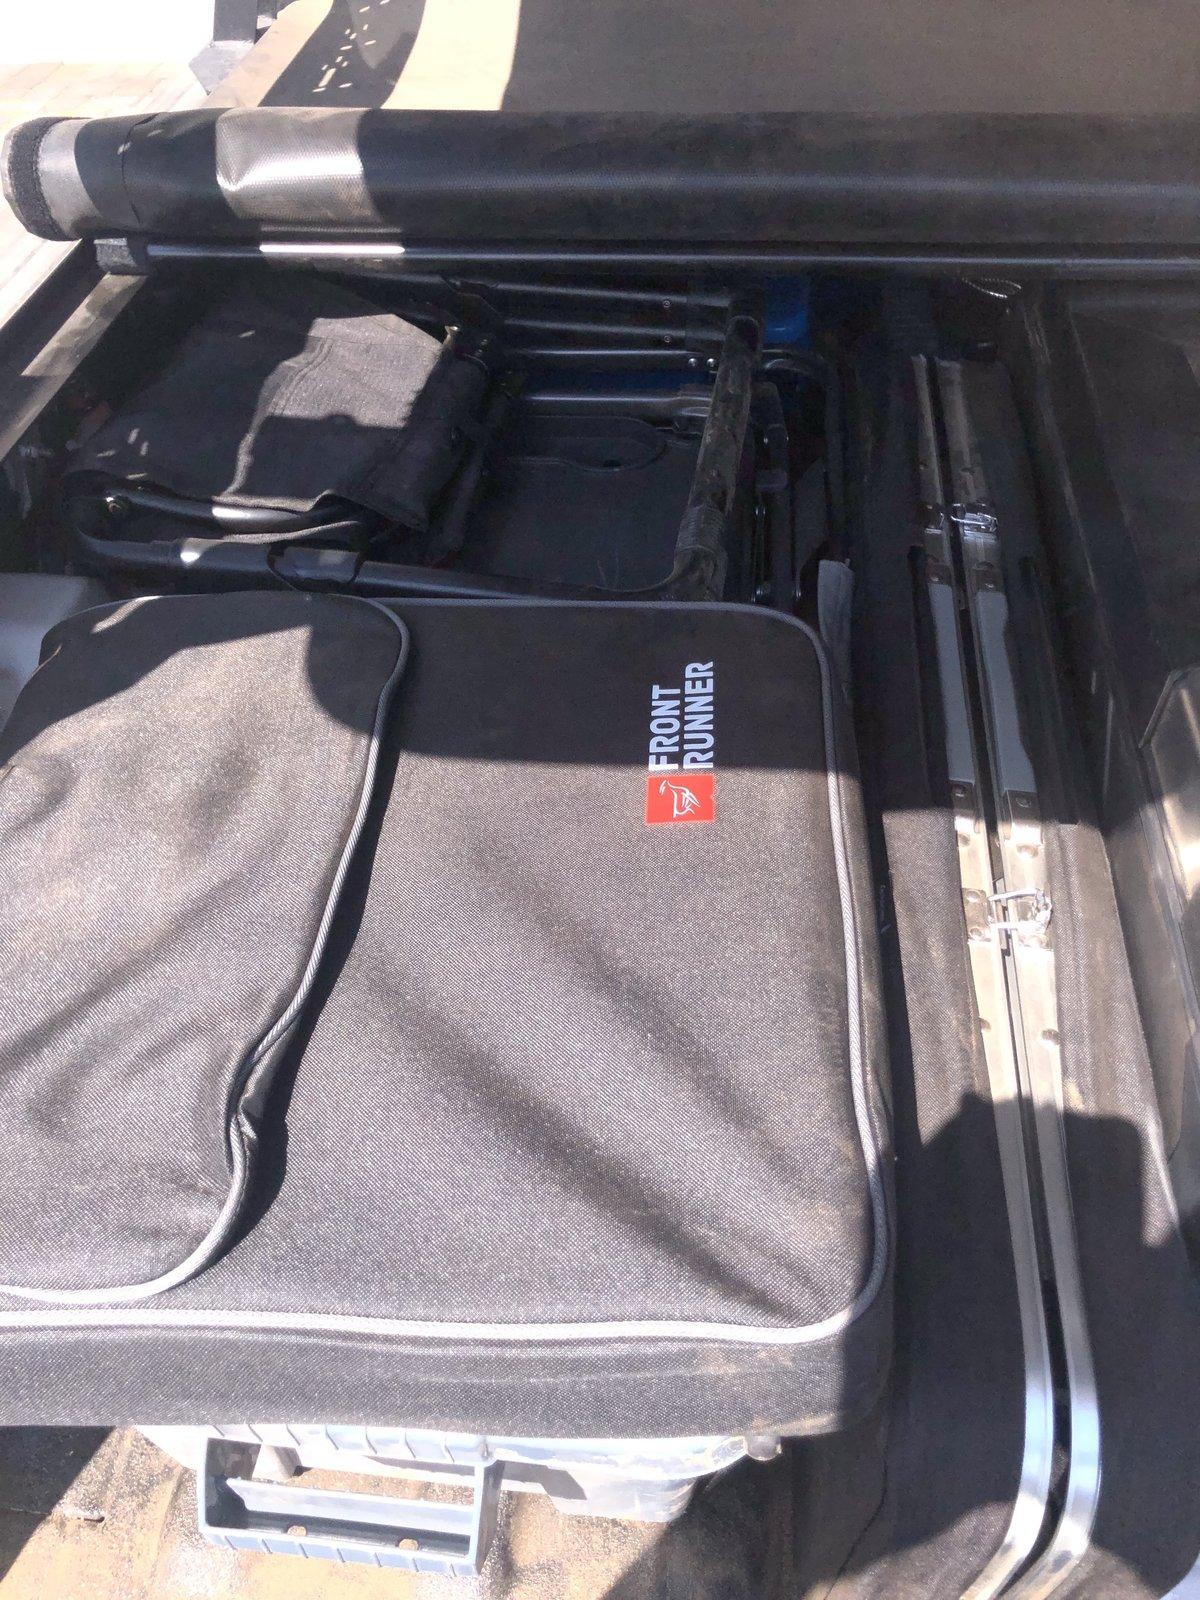
You're seeing two camp chairs folded up and laid flat (I only had enough chair storage bags for 2 of my 3 for this trip, so the rear one's just there, loose) next to that, lengthwise between the Rubbermaid Brute and the ARB Fridge is the aluminum folding picnic table with benches that I gave up fighting to get right and so isn't closed completely properly. (Ugh.)
Pull the camp chairs out and you can see the ridiculousness that is the GCI Kitchen Prep table all folded up. It does get flat, but damn it's still big.
Underneath that you can see the Rubbermaid Brute filled with camping supplies.
I had a bit of space behind the Rubbermaid, so I tossed a Large BuiltRight Molle Bag full of bungie cords and tie-down straps back there. I never go anywhere without some way to strap more things down!
Anything long and skinny goes down the middle corridor, underneath the picnic table.
The green bag is holding the legs for the TemboTusk Skottle stove. Inside each hollow leg I've got 6 35" marshmallow skewers. Along the very bottom is the body of a Pull-Pal. I used to have the Pull-Pal mounted hanging from my bed rack, and I will again at some point, but for now I just tossed it down there. Discussion of Pull-Pal to come later, in a post about Recovery Gear.
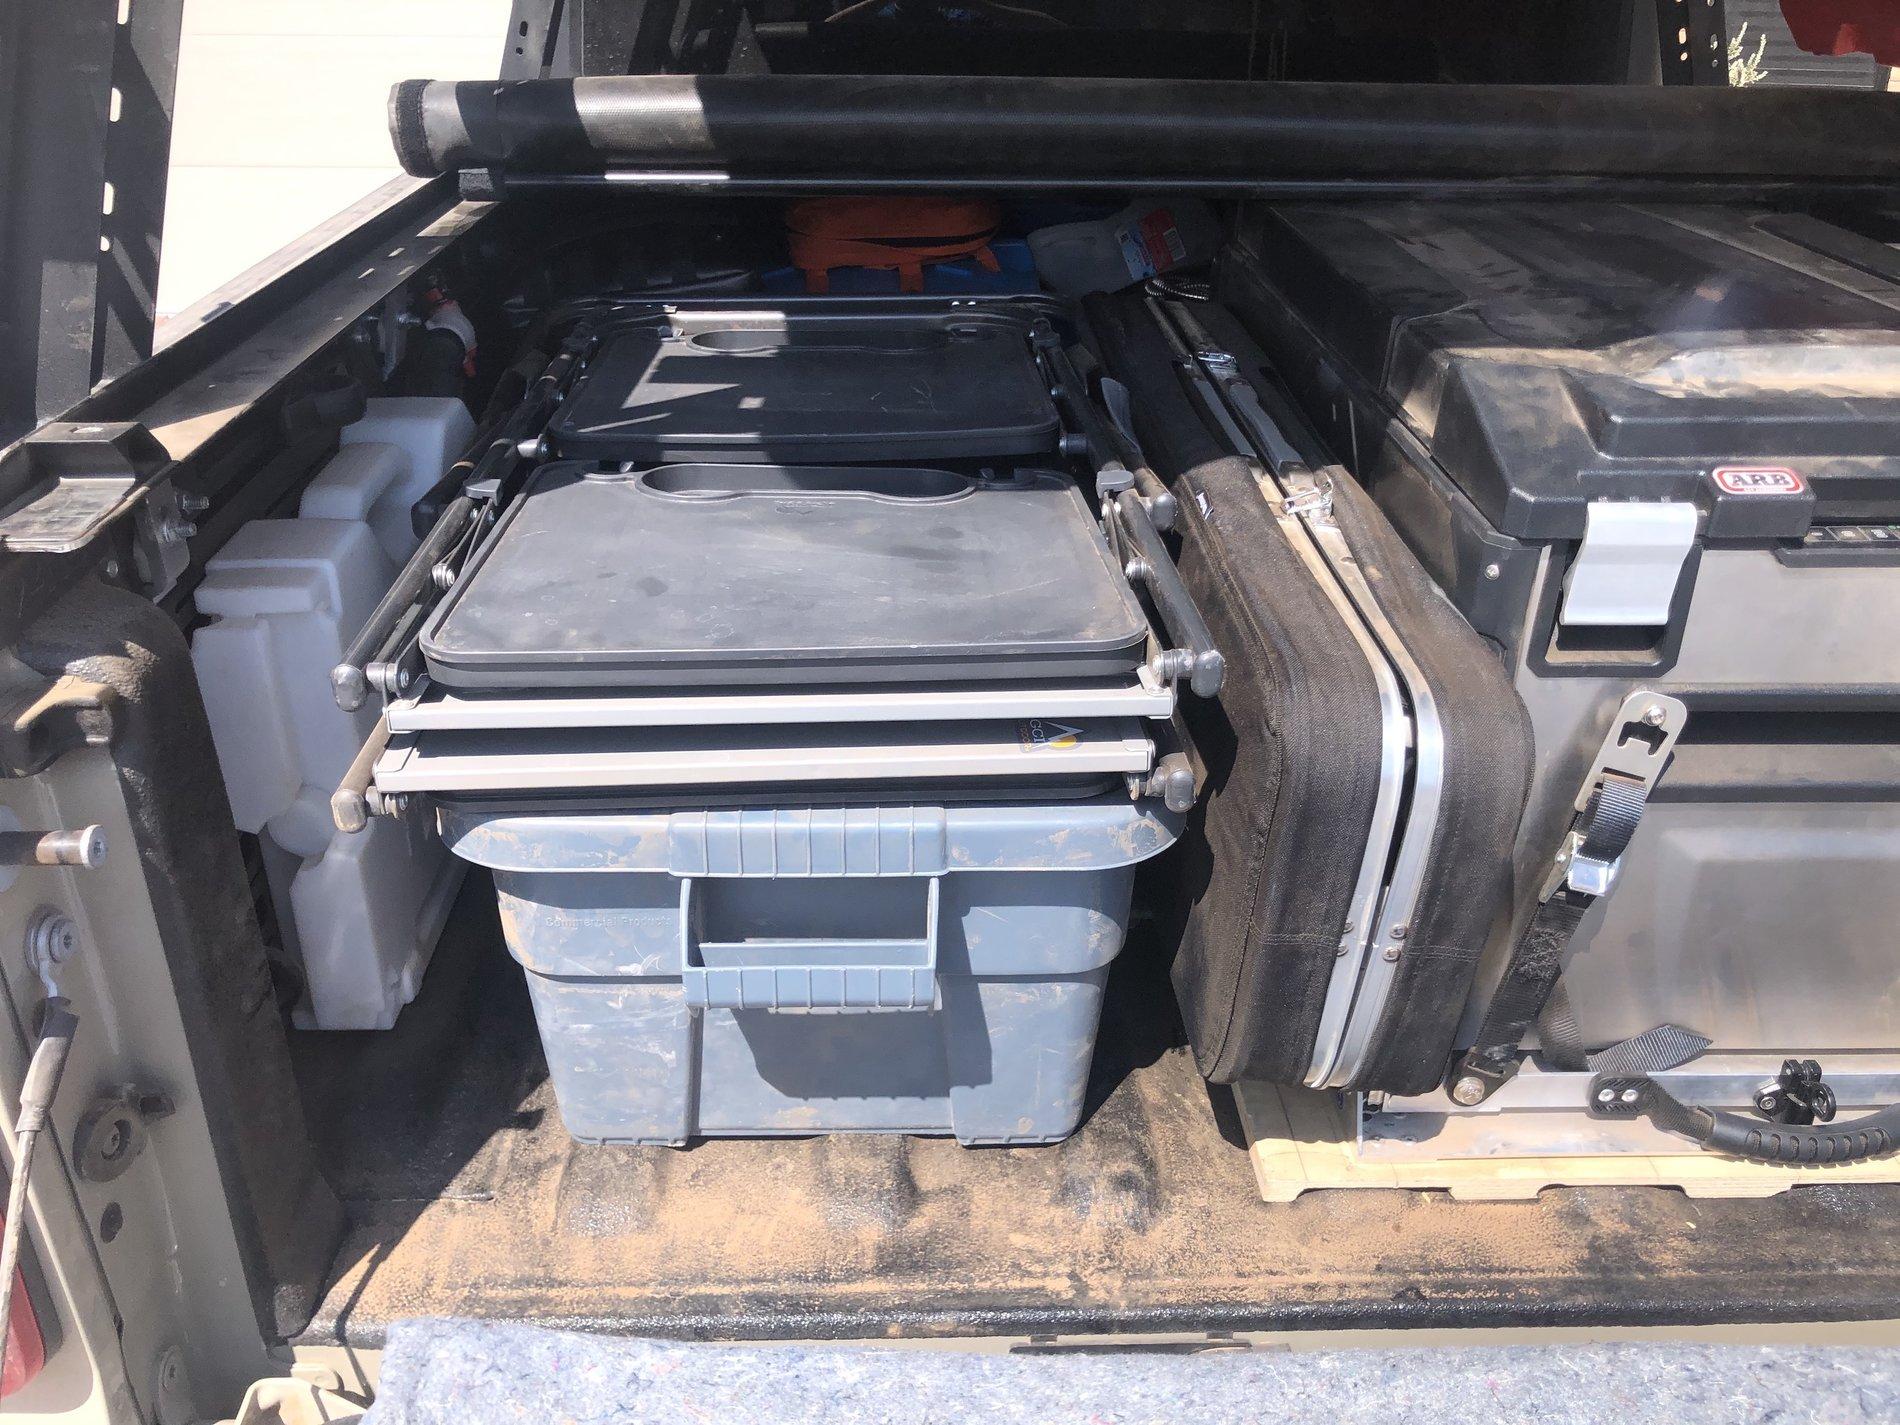
Pull out the picnic table, unroll the tonneau cover the rest of the way, and let's see what we've got:
Note - this is AFTER a weekend trip, so there used to be a lot more firewood in here
- LifeSaver 5 gallon Jerry Can laid flat, butted up to the driver-side bed wall
- CleanWaste Camp Toilet all folded up and slightly on top of the edge of the Skottle
- TemboTusk Skottle Camp Stove
- 14-gallon Rubbermaid Brute turned left-to-right behind the ARB Fridge and filled with Recovery Gear (to be discussed later in a Recovery Gear post, just know it's in the far back because if I need it chances are I'm f---ed and have plenty of time to unpack and get to it)
- Firewood (local to the destination, don't take your own to another ecosystem)
- A pair of Maxtrax MKII Recovery Boards mounted directly to my BuiltRight Molle Bed Panel, right up against the back wall of the truck bed (to be discussed in a later Recover Gear post)
- There's the body of the Pull-Pal again, still lengthwise down the middle. It's long and reaches all the way to the back wall
- You can't see #8 in this picture, but you can, barely, in the two above it. Stuffed somewhere in all this, wherever there is a tiny bit of room, is a small, bright orange molle bag filled with tire repair equipment. (to be discussed in a later Recovery Gear post)
Here's the Recovery Bin uncovered
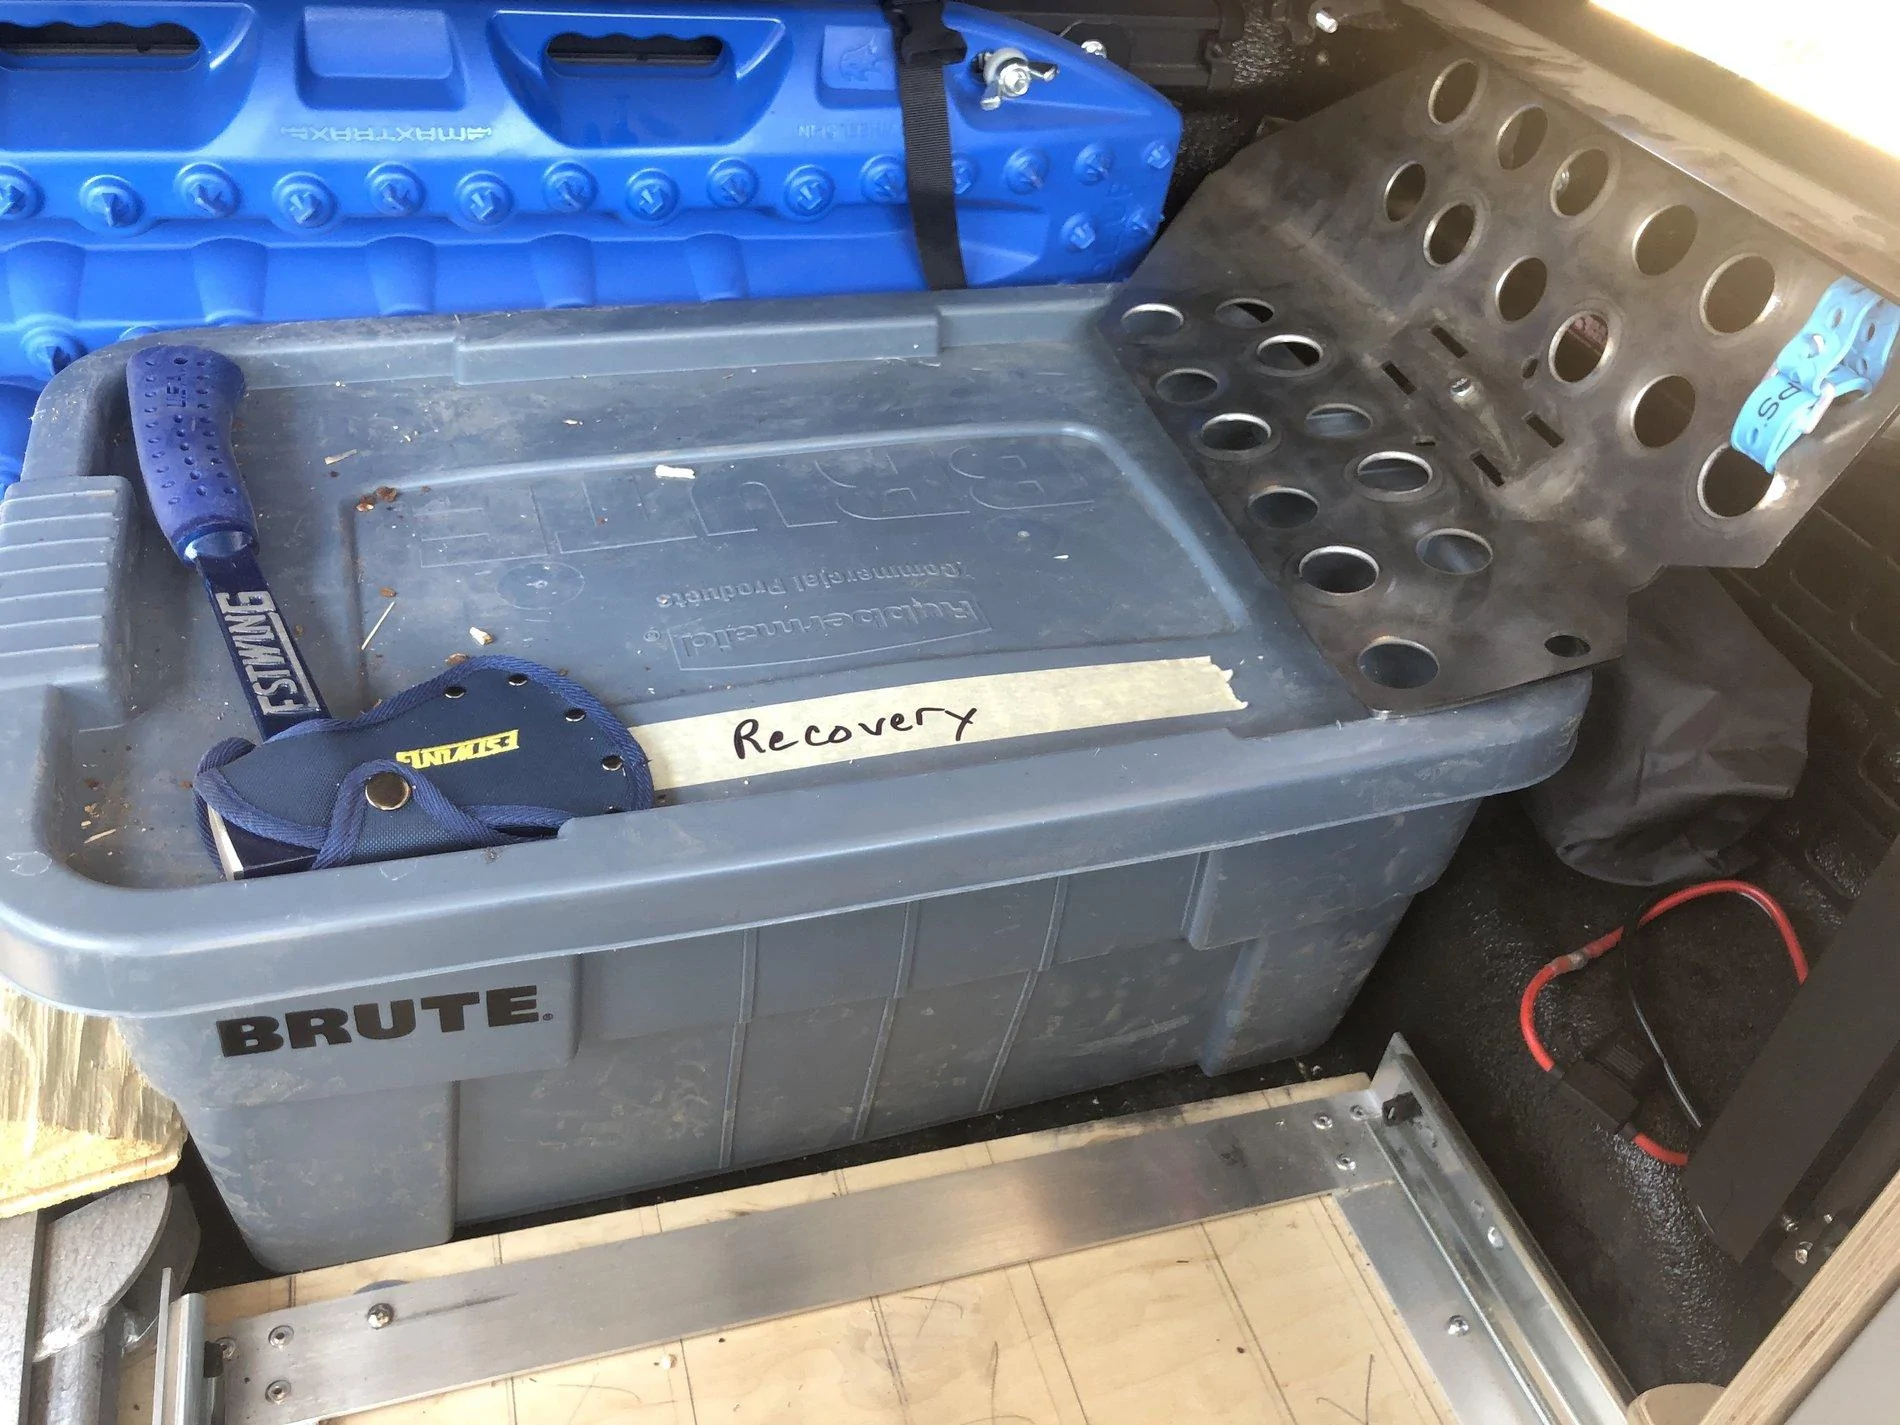
Firewood reaches under the Rubbermaid handle, and the other handle sticks over the wheel well hump, so they're not wasting space. Hatchet for camping is tossed on top. That weird thing with holes is the anchor of the Pull-Pal. Again, I'll discuss Pull-Pal in a later recovery gear post. What matters is this is a quick, ugly, temporary solution because I no longer have the Pull-Pal hanging from my bed rack. For now. The small gray bag under the Pull-Pal anchor is a bag with the Skycamp Tent Vinyl Cover rolled up in it, which will only be installed on the tent if it's raining, to keep the ladder dry.
Inside the Cabin
Tool bag, SafeJack, and Trauma Kit sit on the floor beneath my three-year old's feet. (All to be discussed in a later Recovery Gear Post) The other rear passenger floor space holds the fire pit bags, fuel canisters for stoves, and a big bag of lightweight levelers to help level the truck when needed so the roof top tent remains comfortable.
The rest of the rear passenger space:
Each person packs their own bag of clothes. The pantry tupperware of dry goods goes here. A Camelbak for hiking goes here. Pillows go here. And our down comforter, shoved in tight. This is the main space for bedding and clothes.
If I had to have 4 people in the truck, I wouldn't use a tonneau cover, I'd just get an RLD hard top so I had more storage space in back.
Camping Gear Rubbermaid
Here's the camping gear container with the lid off:
And here it is again with the collapsible dish drain, collapsible sink, TemboTusk steam tray, box of firestarters, coffee mugs, sippy cup (for toddler's hot chocolate) and collapsible colander removed:

You can clearly see:
- FrontRunner Outfitters Utensil Set
- SnowPeak Cutting Board
- Wealers Mess Kit
- JetBoil Stove (plus an old spare JetBoil cup filled with more fuel canisters I shouldn't really need)
- Collapsible Camp Saw
- Measuring Cup
- Stack of Wealers metal tumblers in their storage bag
- Spare roll of toilet paper
- Headlamp
Wow. This thread got a LOT longer than I meant it to in its first week, but we're almost done for now, I promise!
Last edited:
Sponsored
MeanMachine
Well-Known Member
- First Name
- Matt
- Joined
- Oct 10, 2019
- Threads
- 2
- Messages
- 148
- Reaction score
- 169
- Location
- Connecticut
- Vehicle(s)
- Gator Rubicon JT
so many great ideas! I'm assuming you used the 40amp switch for the winch relay? Any concerns that 40amps is not enough?Front Bumper and Winch
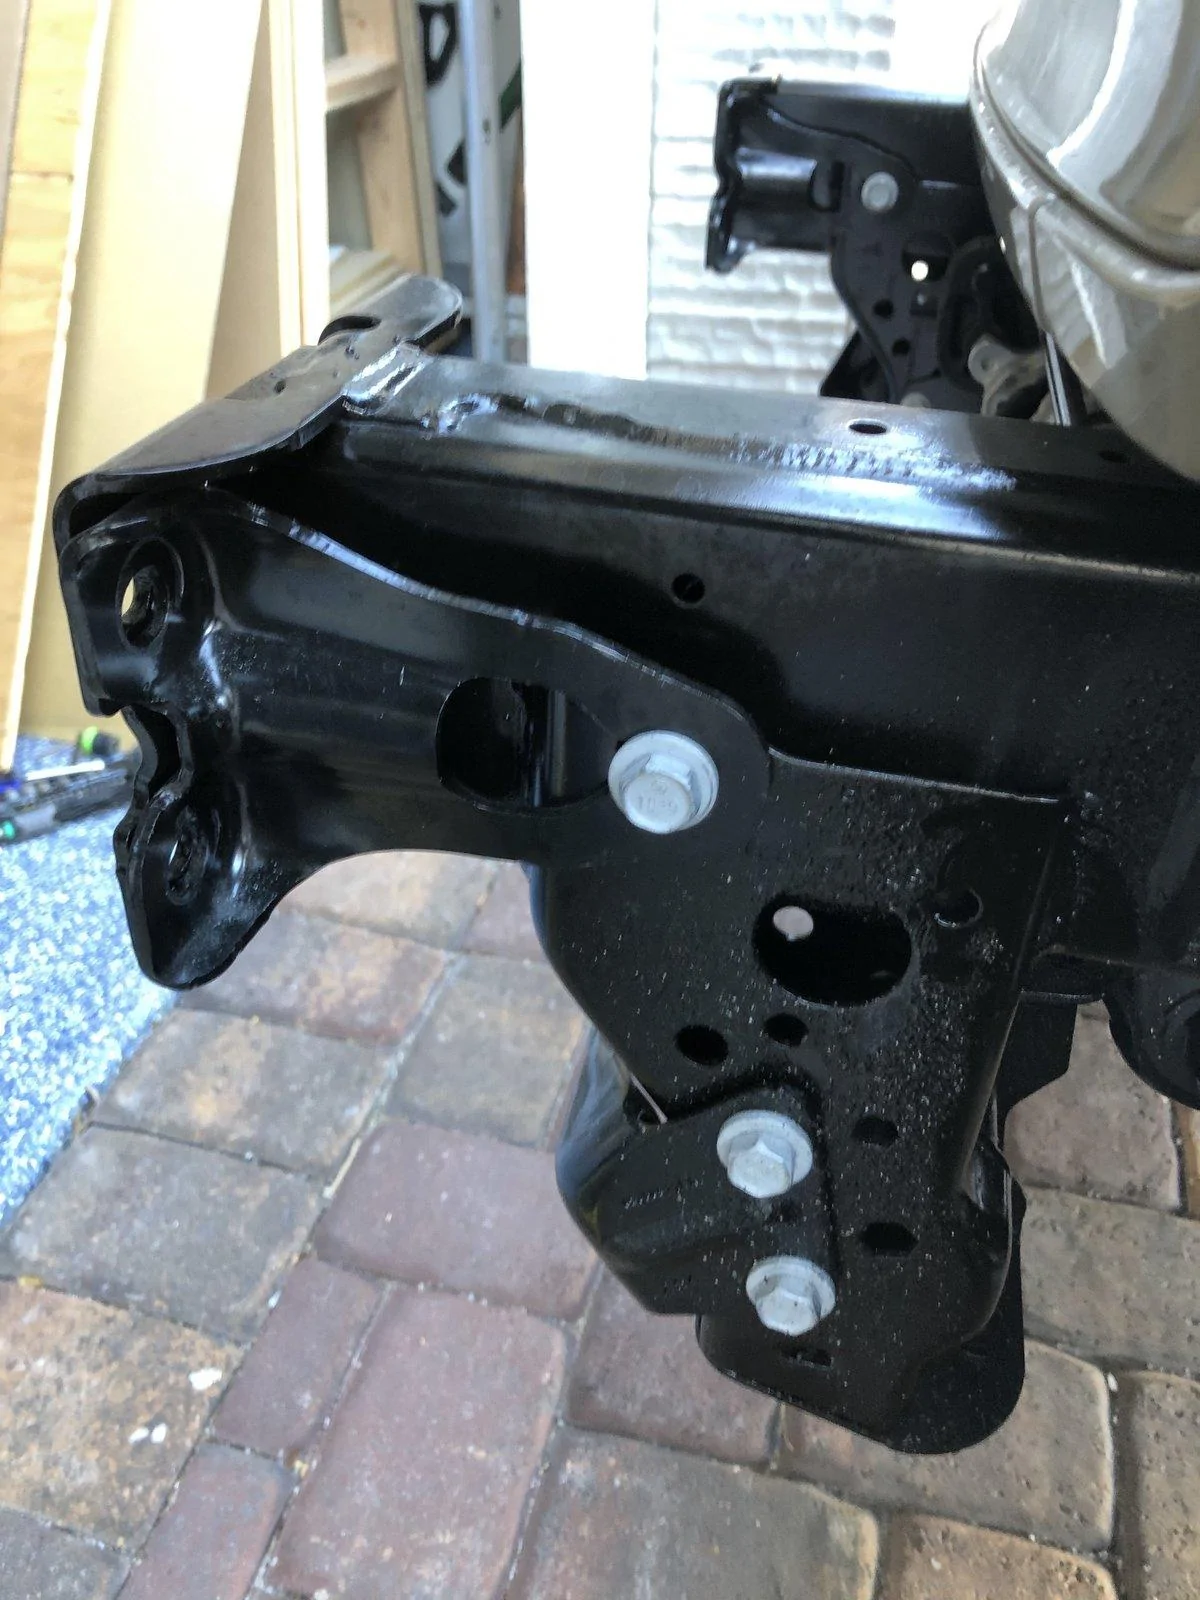
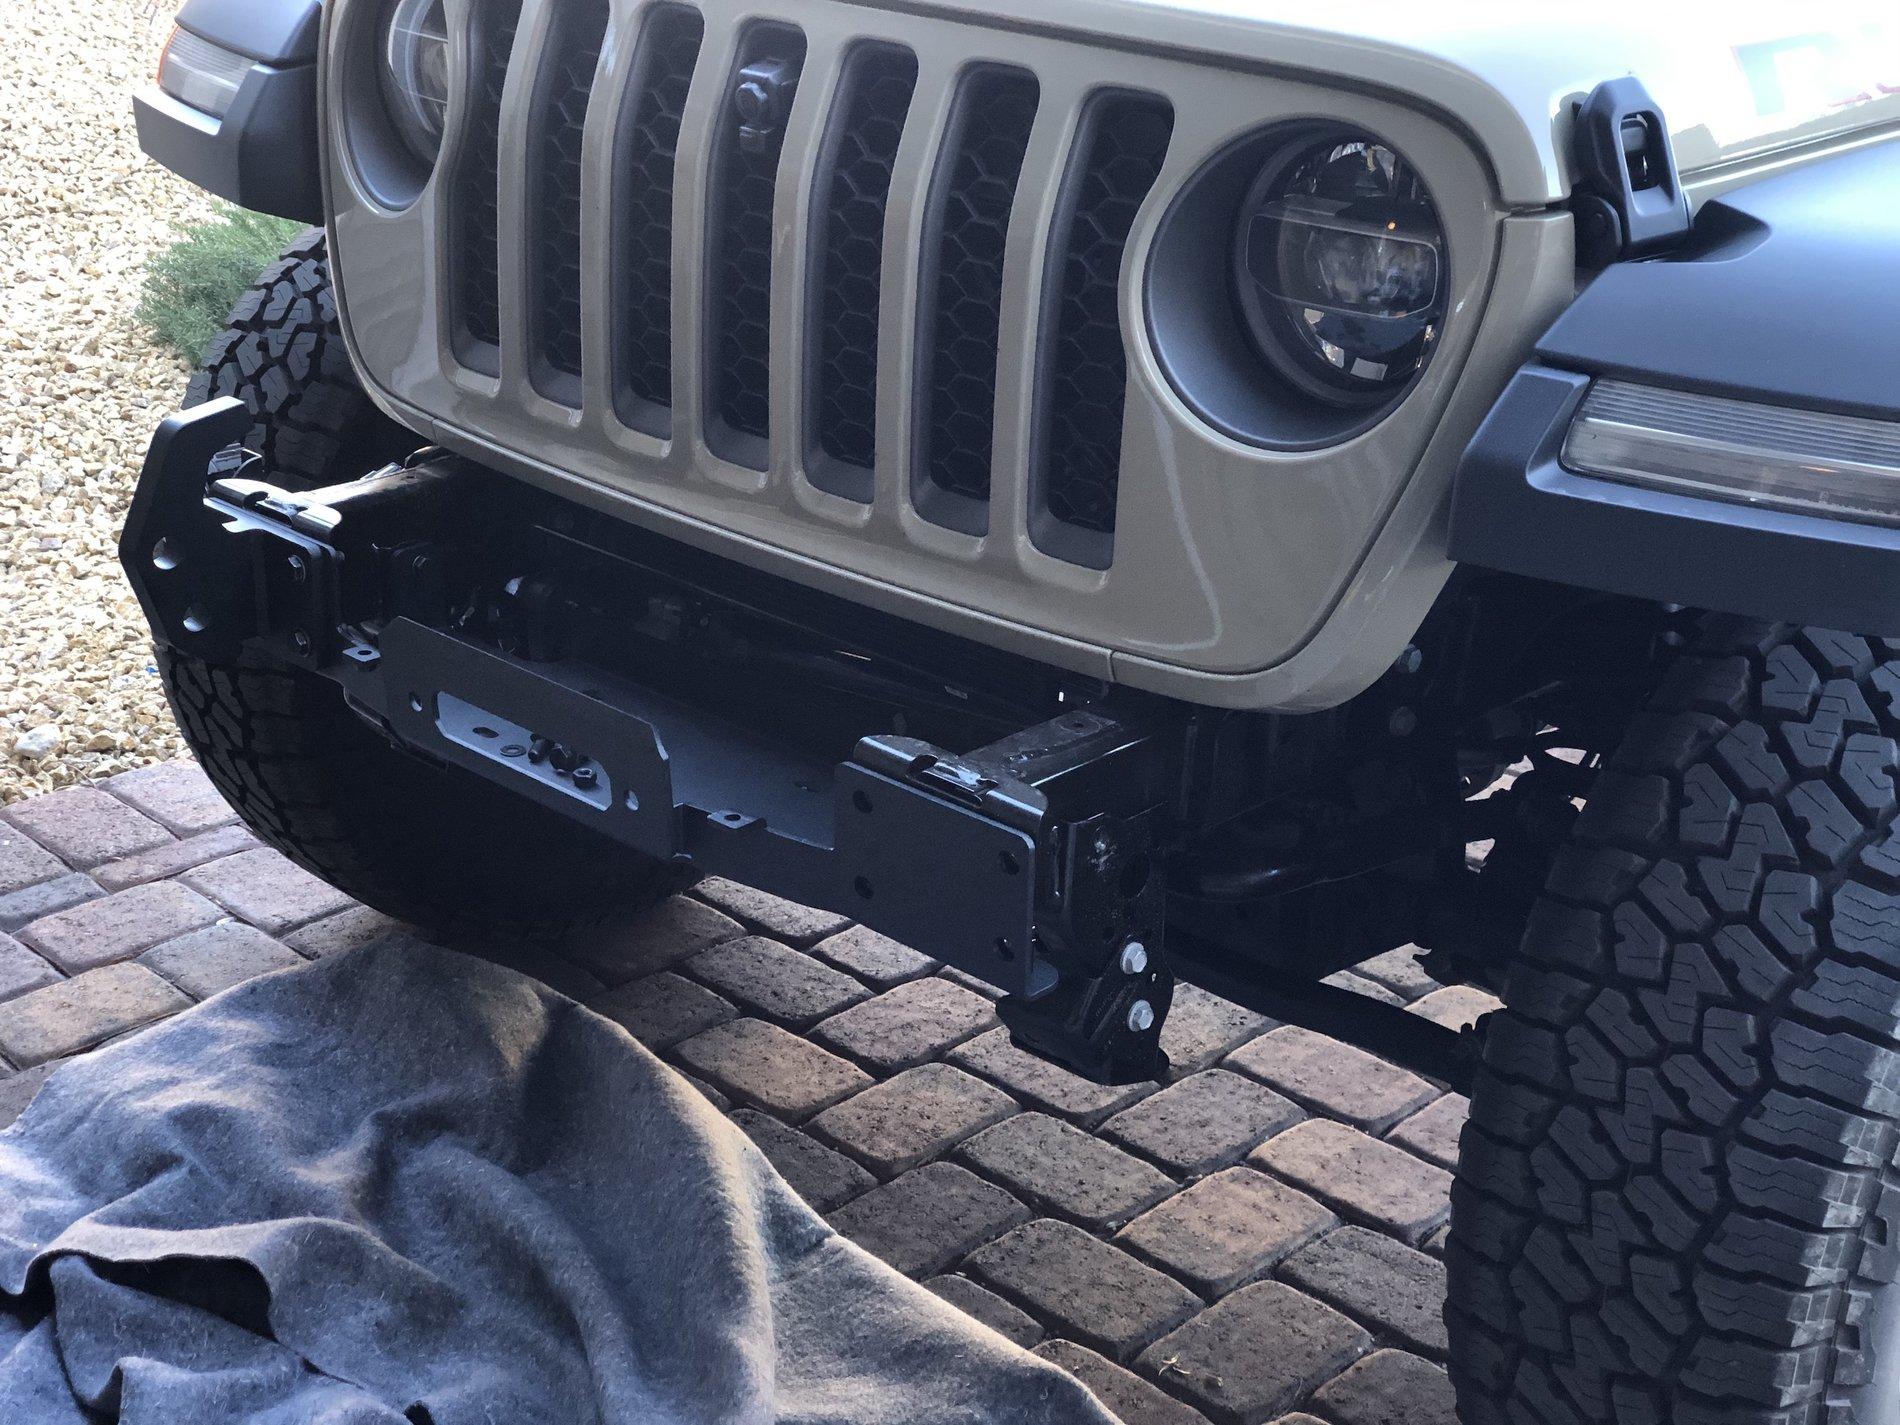
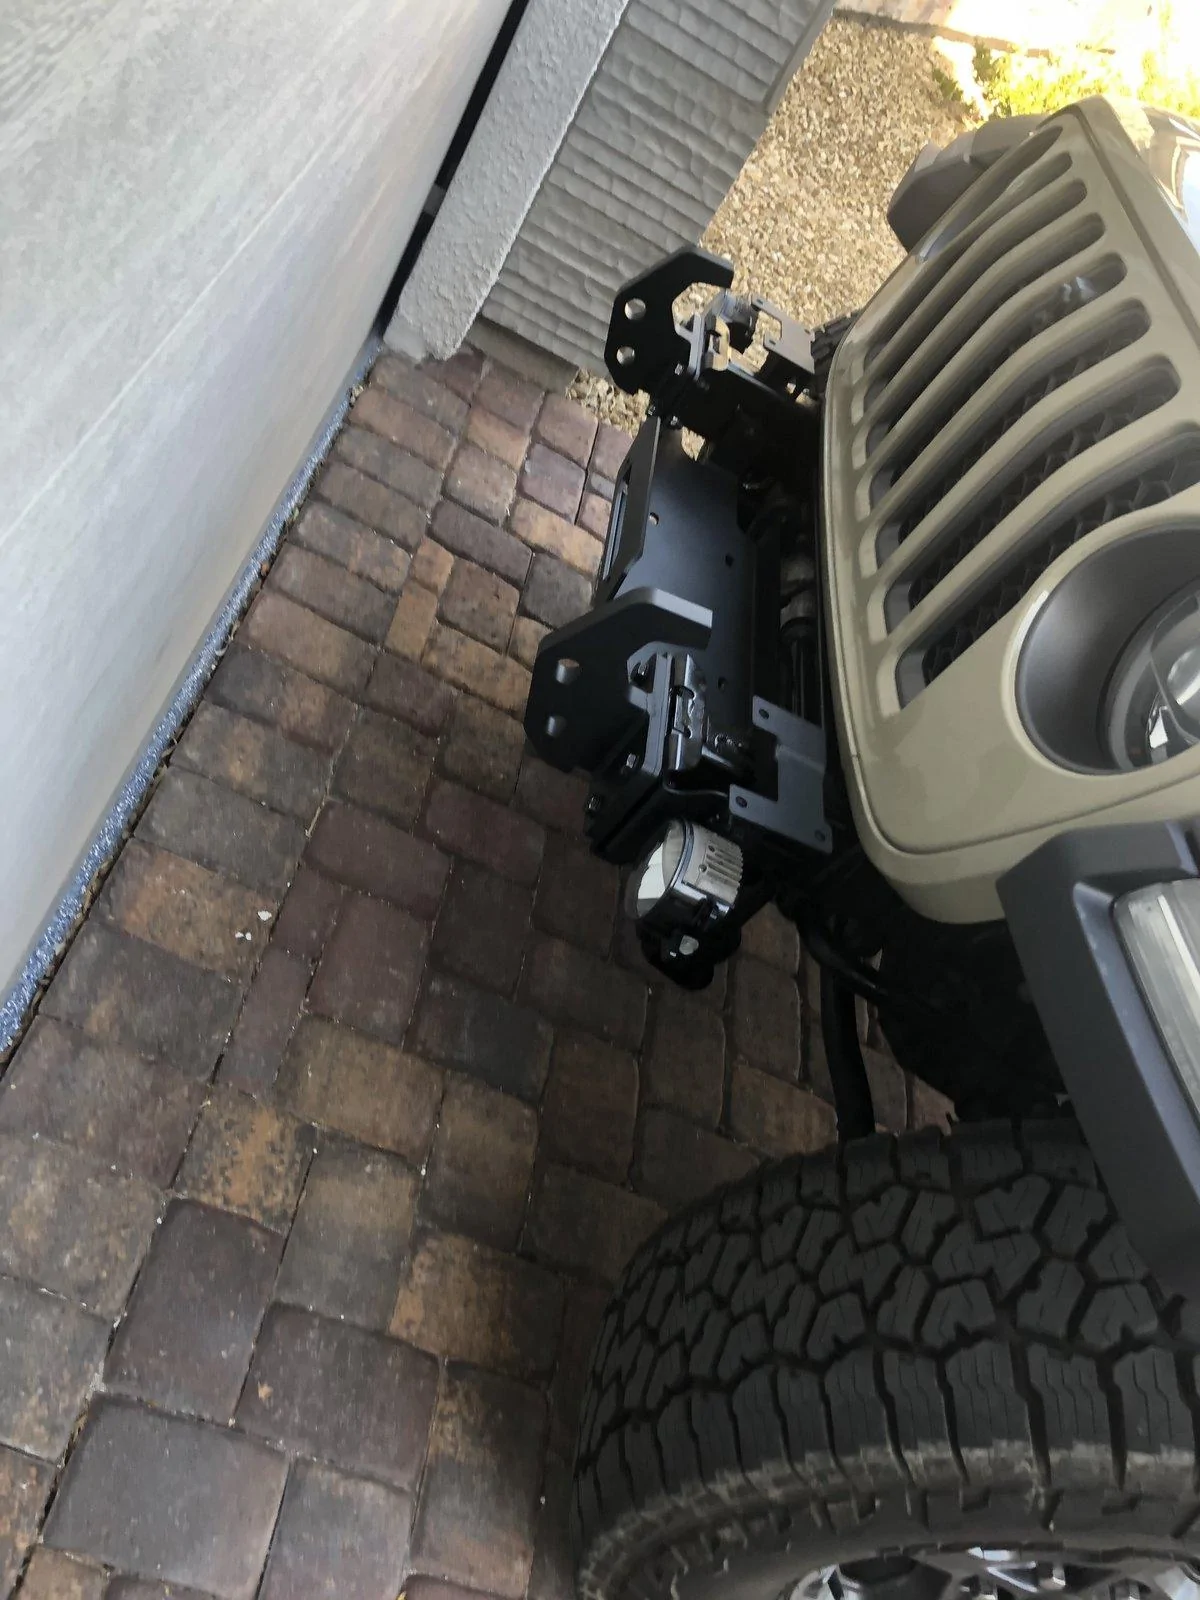
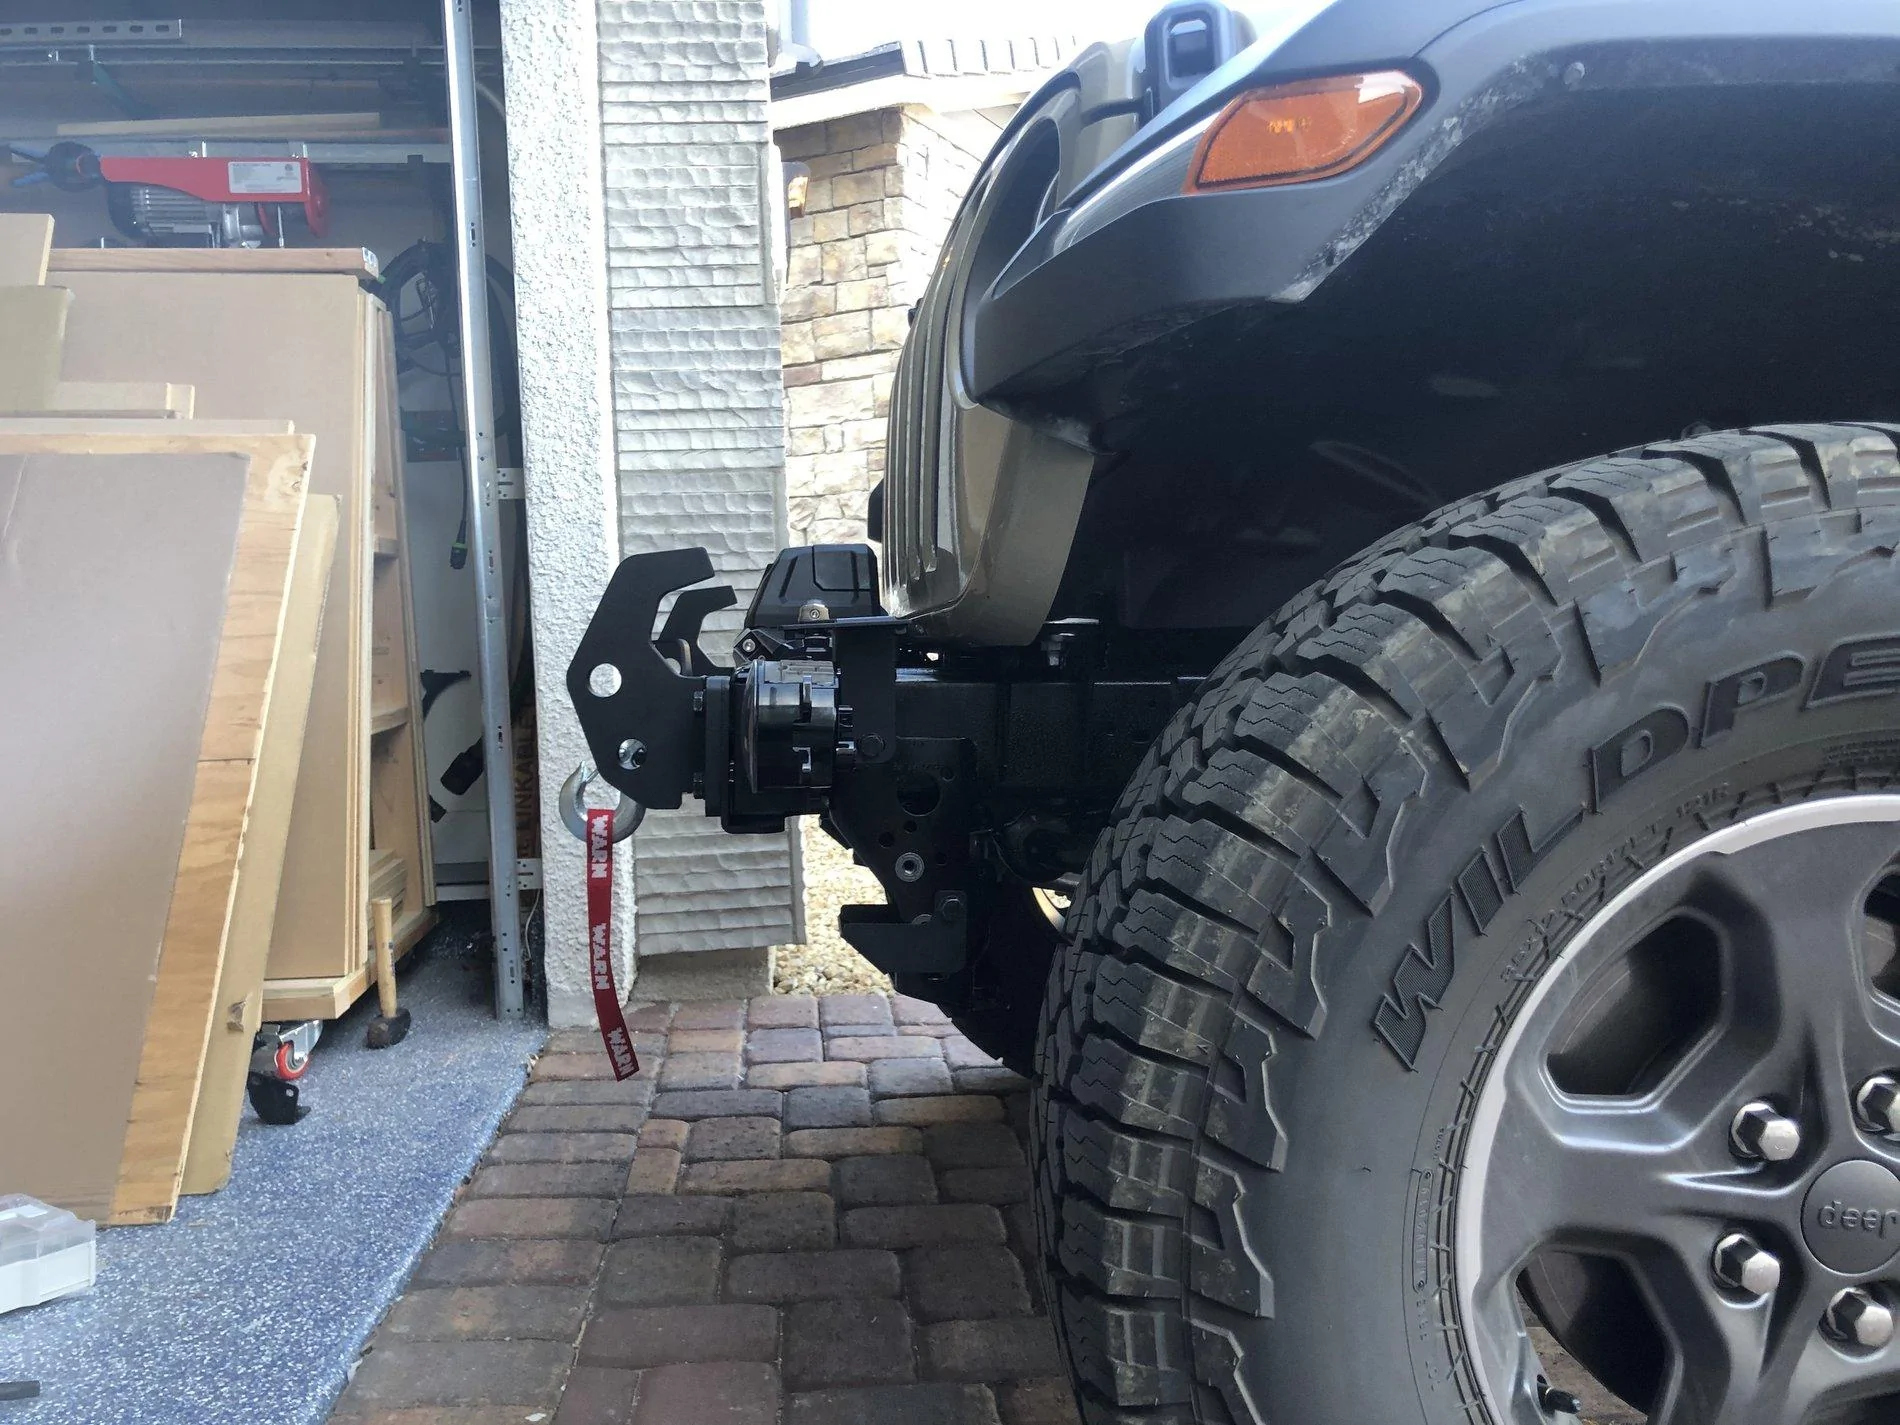
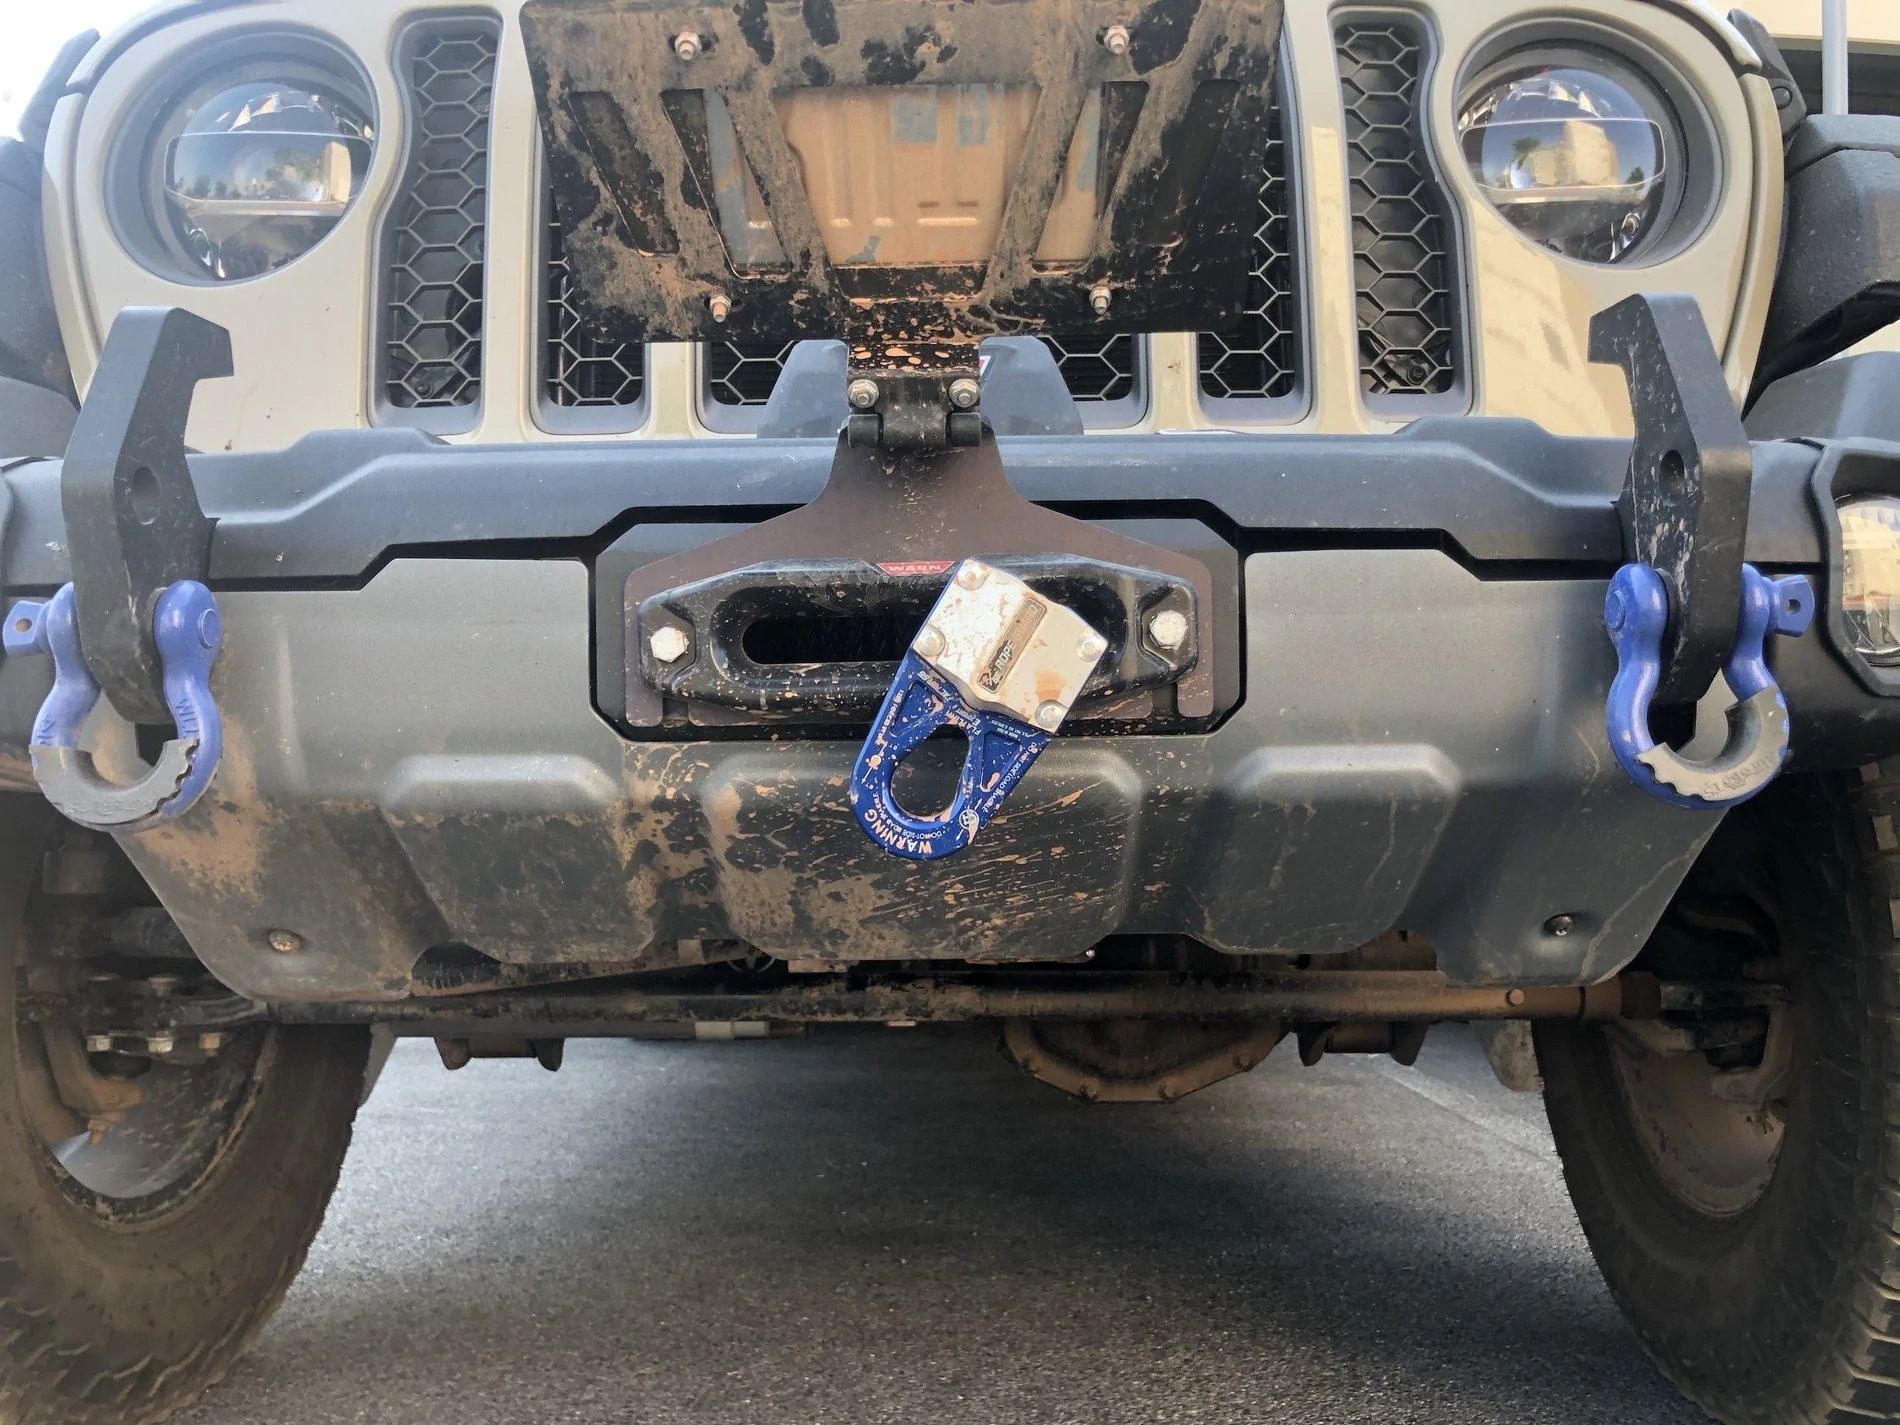
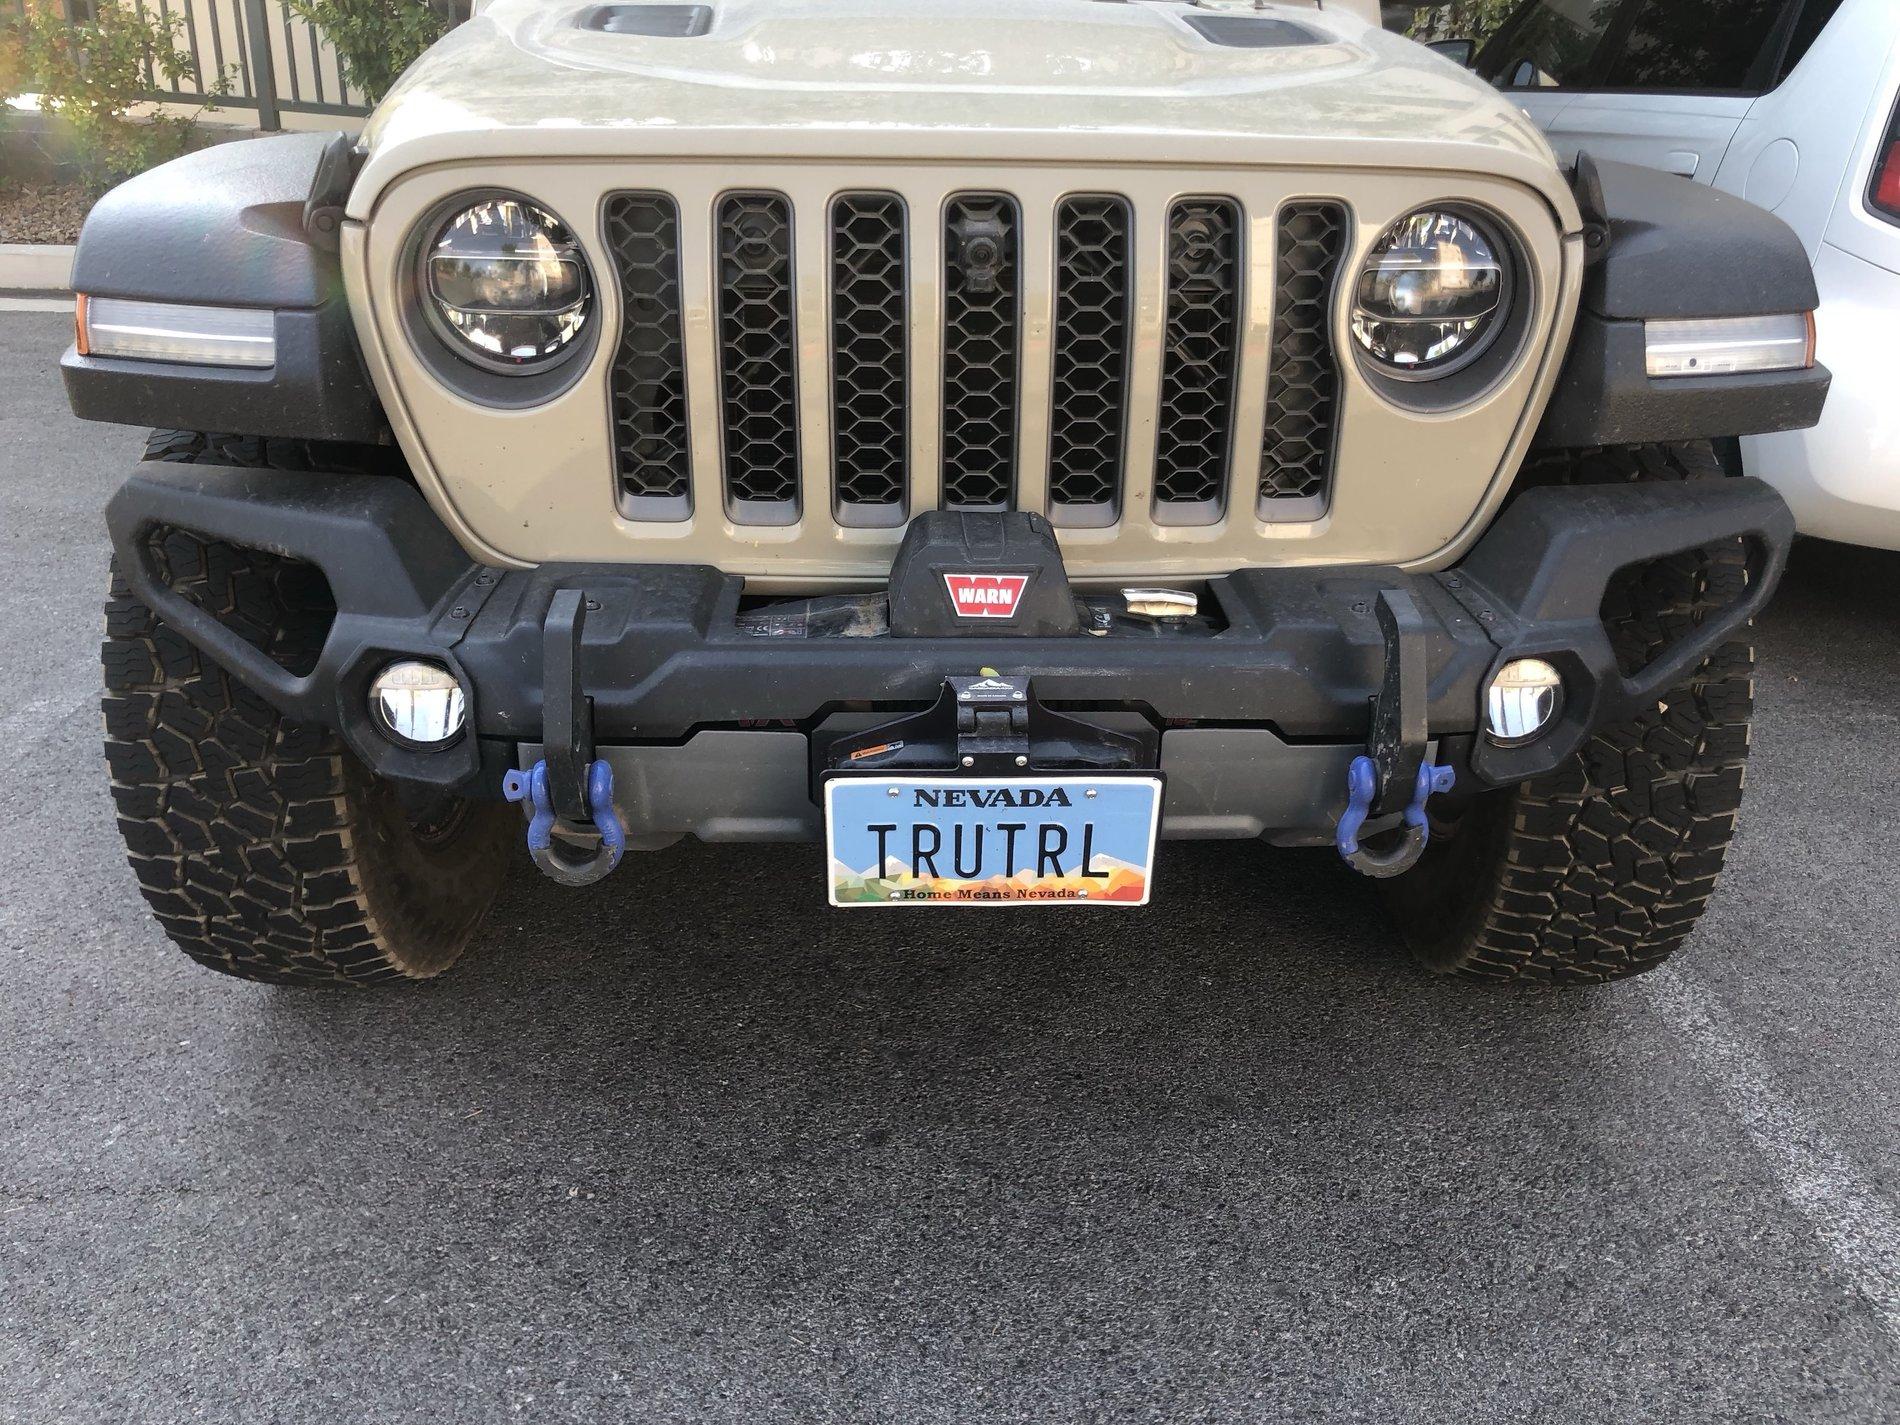
I stuck with the generic plastic Jeep front bumper when I bought my JT. Why? Because he cost of upgrading to a metal one PLUS the cost of a winch plate was going to be the same cost as a non-Jeep-brand front bumper that included a winch plate.
I went with Rugged Ridge's new Venator Front Bumper ($720 on sale + tax). It's basically a winch plate with a top cover and a skid plate attachment, and it uses the fog lights from the standard Jeep plastic bumper.
My biggest concern was for my winch. The sun here in Las Vegas is absolutely brutal, and it destroys most products faster than their manufacturers ever imagined. If I was going to get synthetic line, I wasn't going to trust it to pull the weight of my Jeep if it had been out in the sun for 3-4 years. I wanted something that hid the line of the winch from the sun.
The first step is to remove the plastic bumper.
Next you bolt in the winch plate.
Next bolt on the front tow hooks.
Time for winch install! This is a PIA, because you have to also now run the wires for your winch the way you're going to want them. Don't make the mistake I did and have to remove the winch 2-3 times to adjust wire placement!
Next the skid plate (the directions were NOT clear on this one, it took me a few tries to figure out how it bolted on the frame of the truck)
And then the top cover, then snap in the fog lights you held onto from your original bumper.
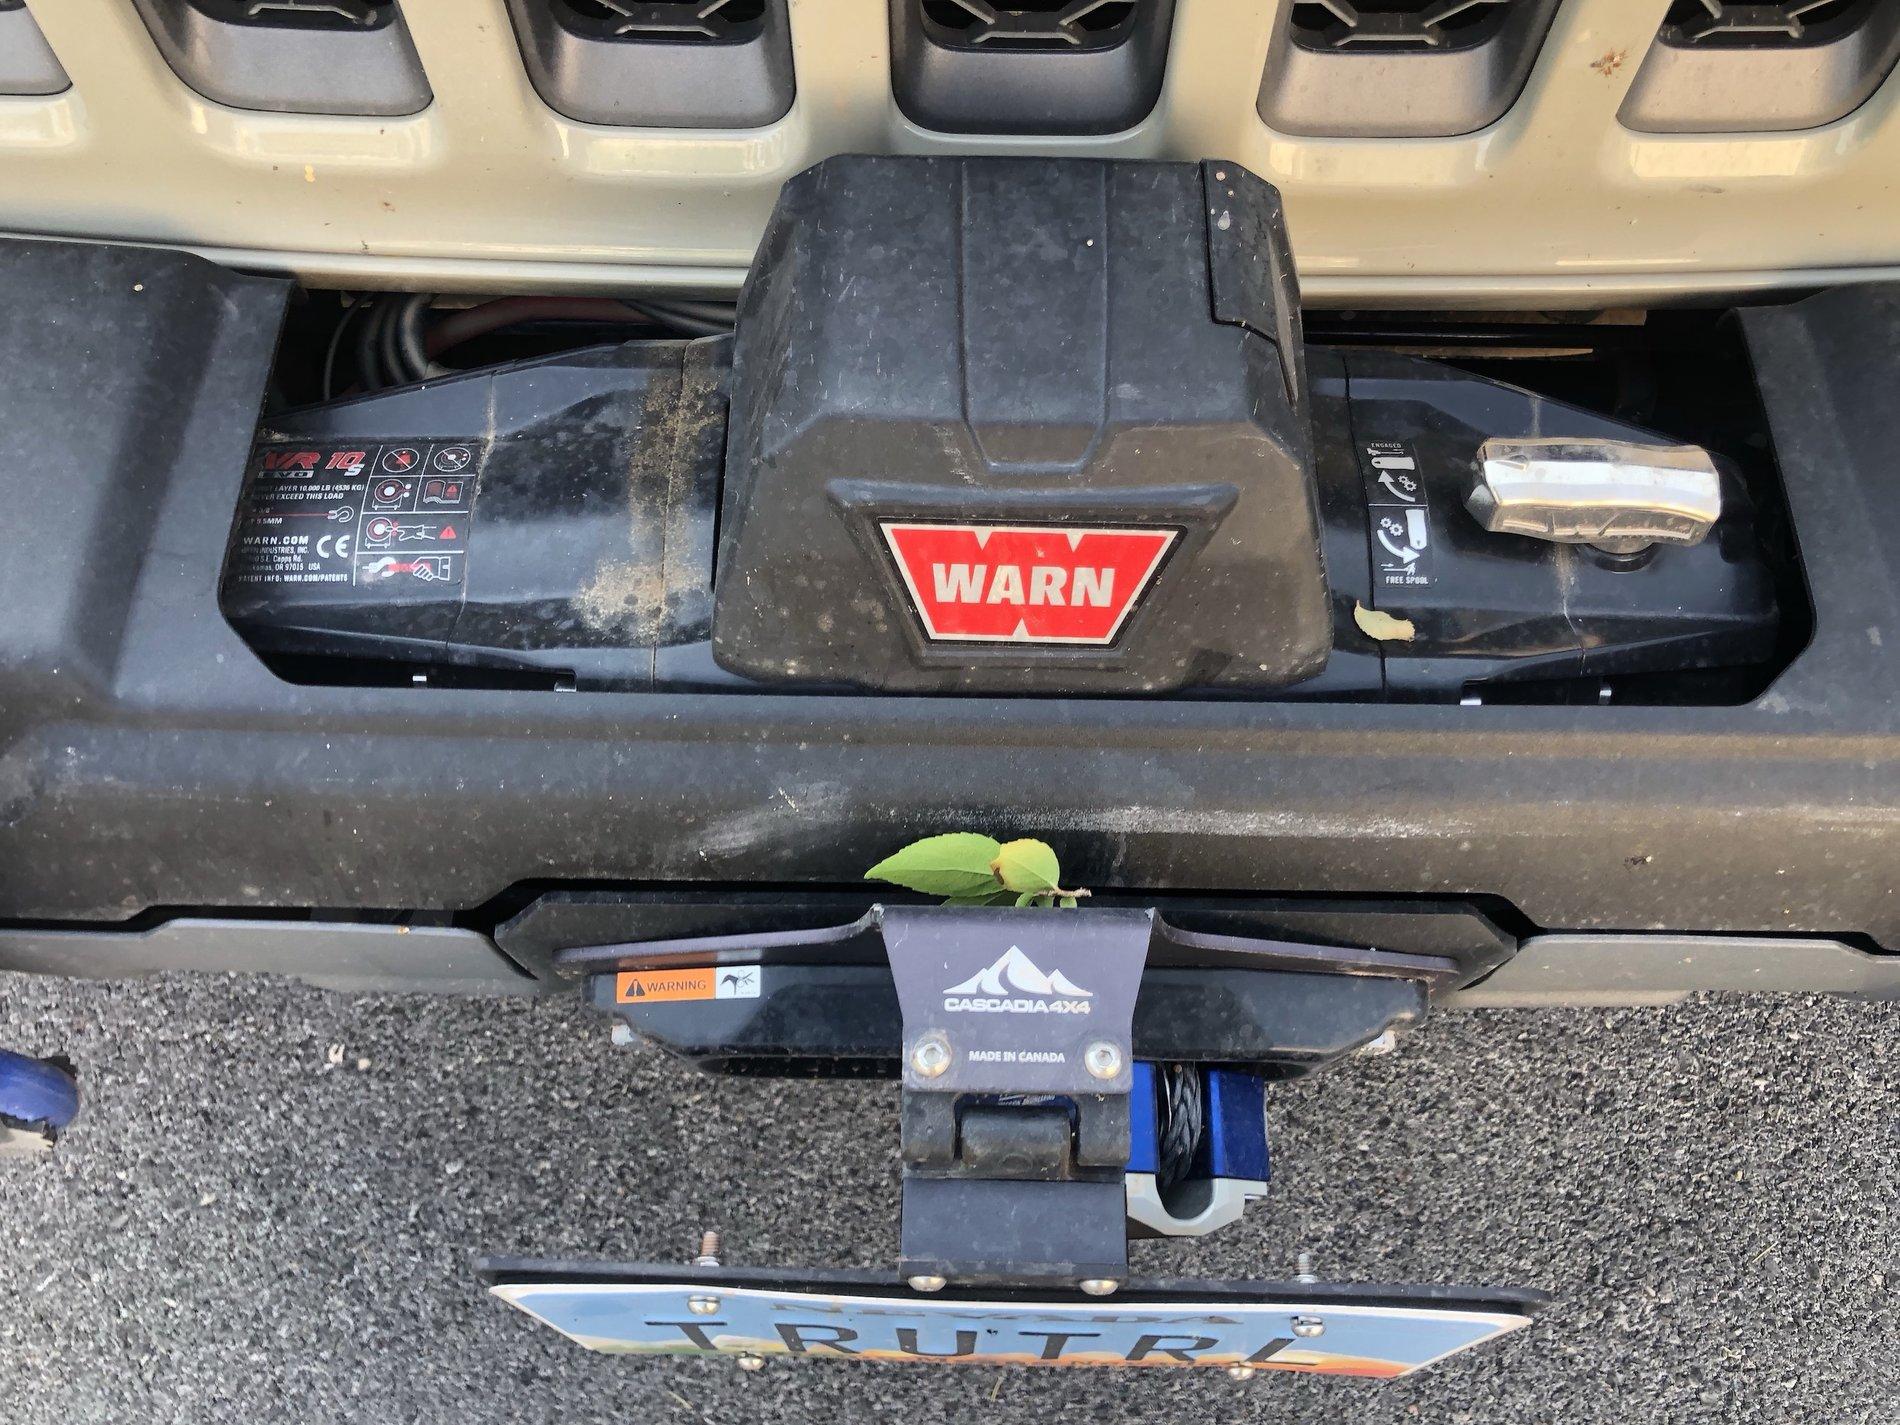
I used a Warn VR EVO 10-S winch from River City Offroad's Black Friday Sale for $633. I think the EVO is the sweet spot on Warn's product line. Zeon is too darned expensive.
Here you can see how well hidden the winch line is from the sun in this bumper:
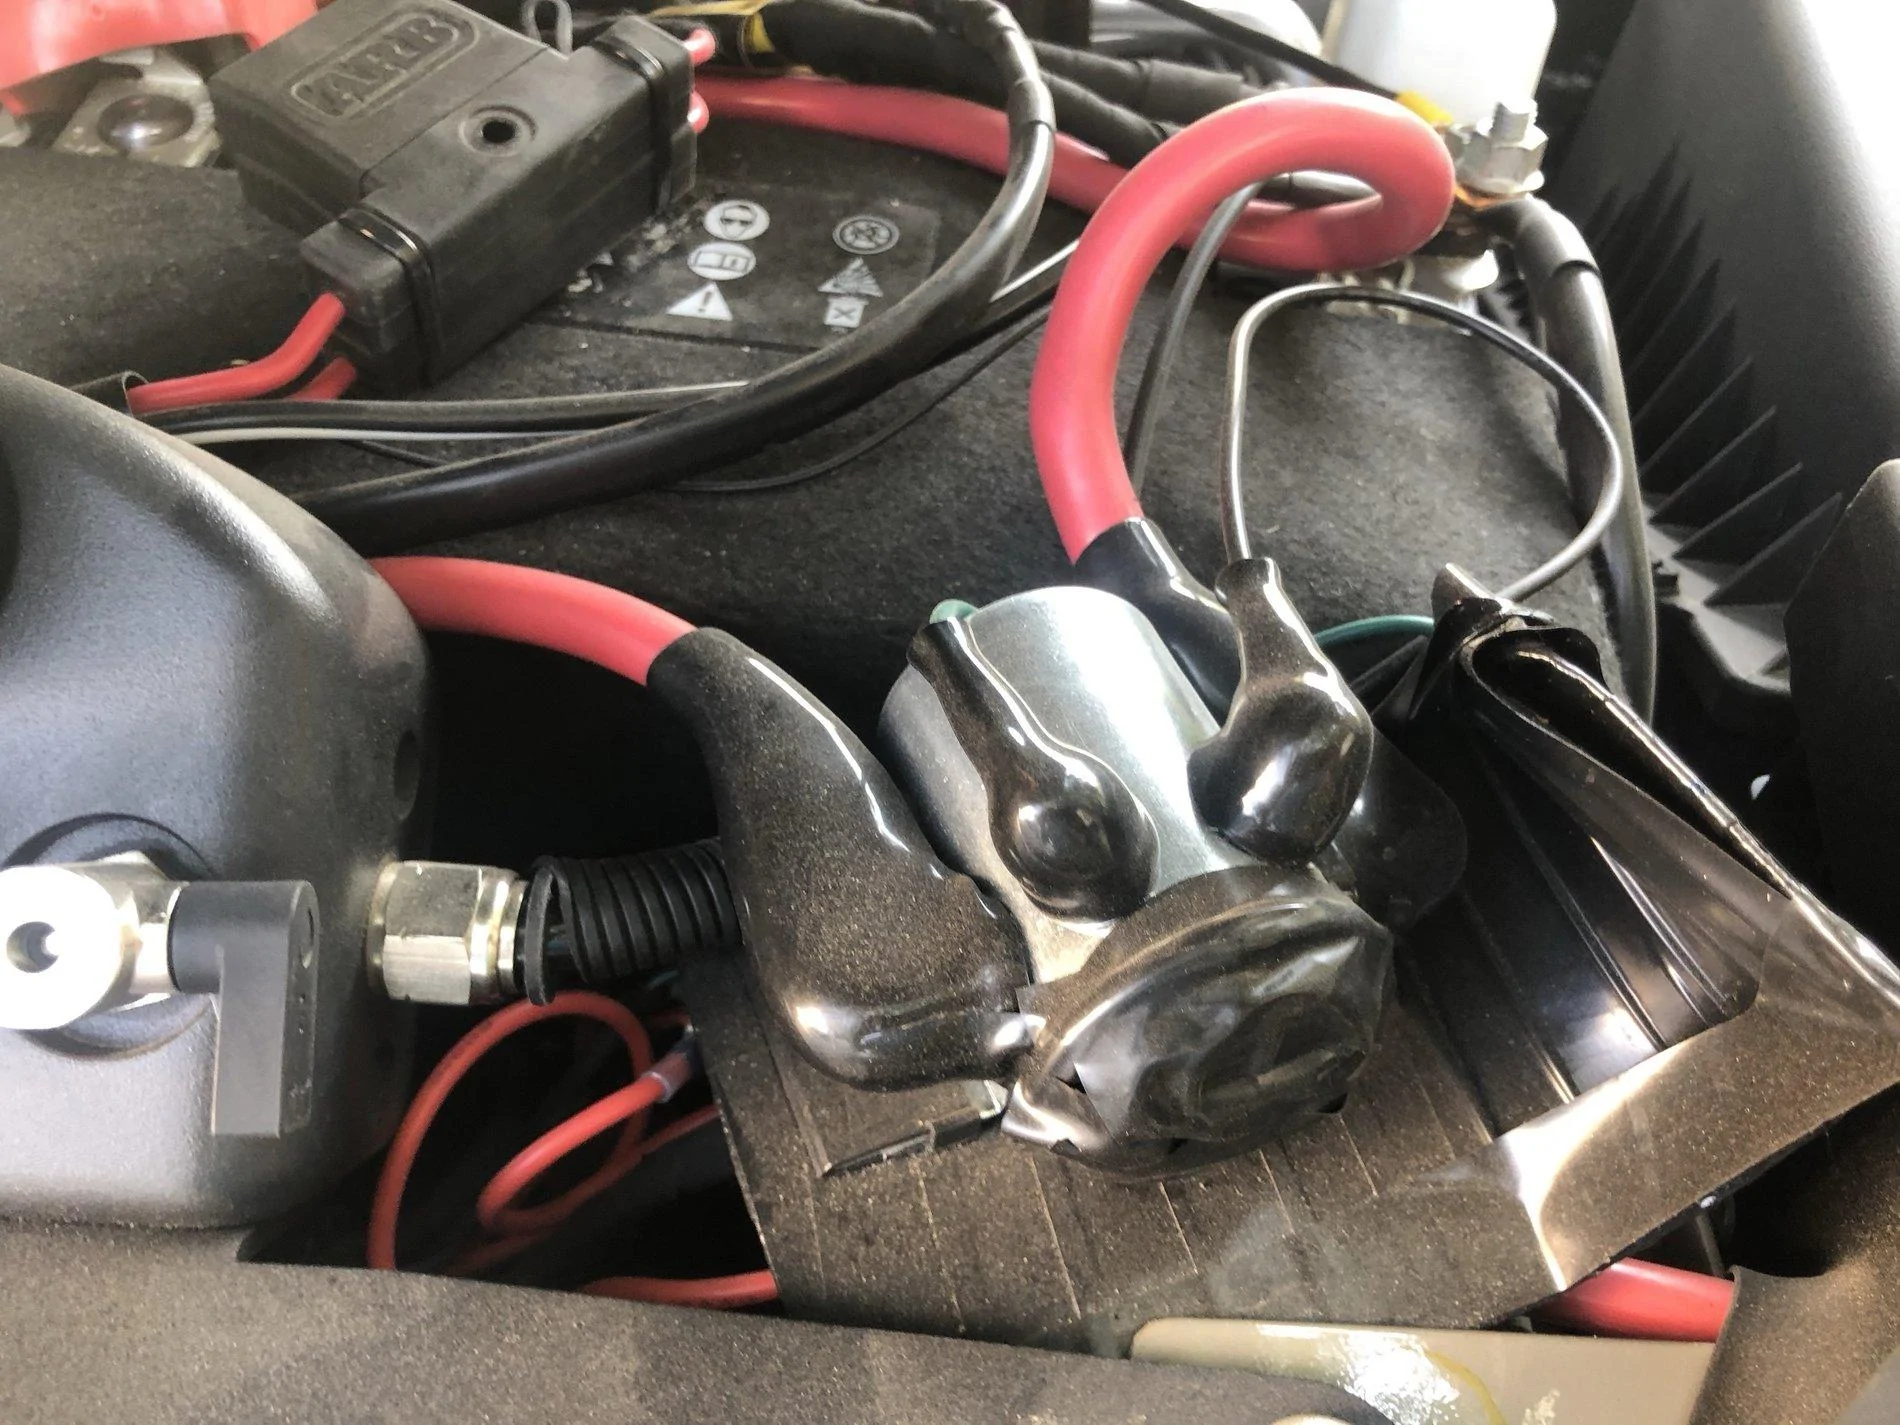
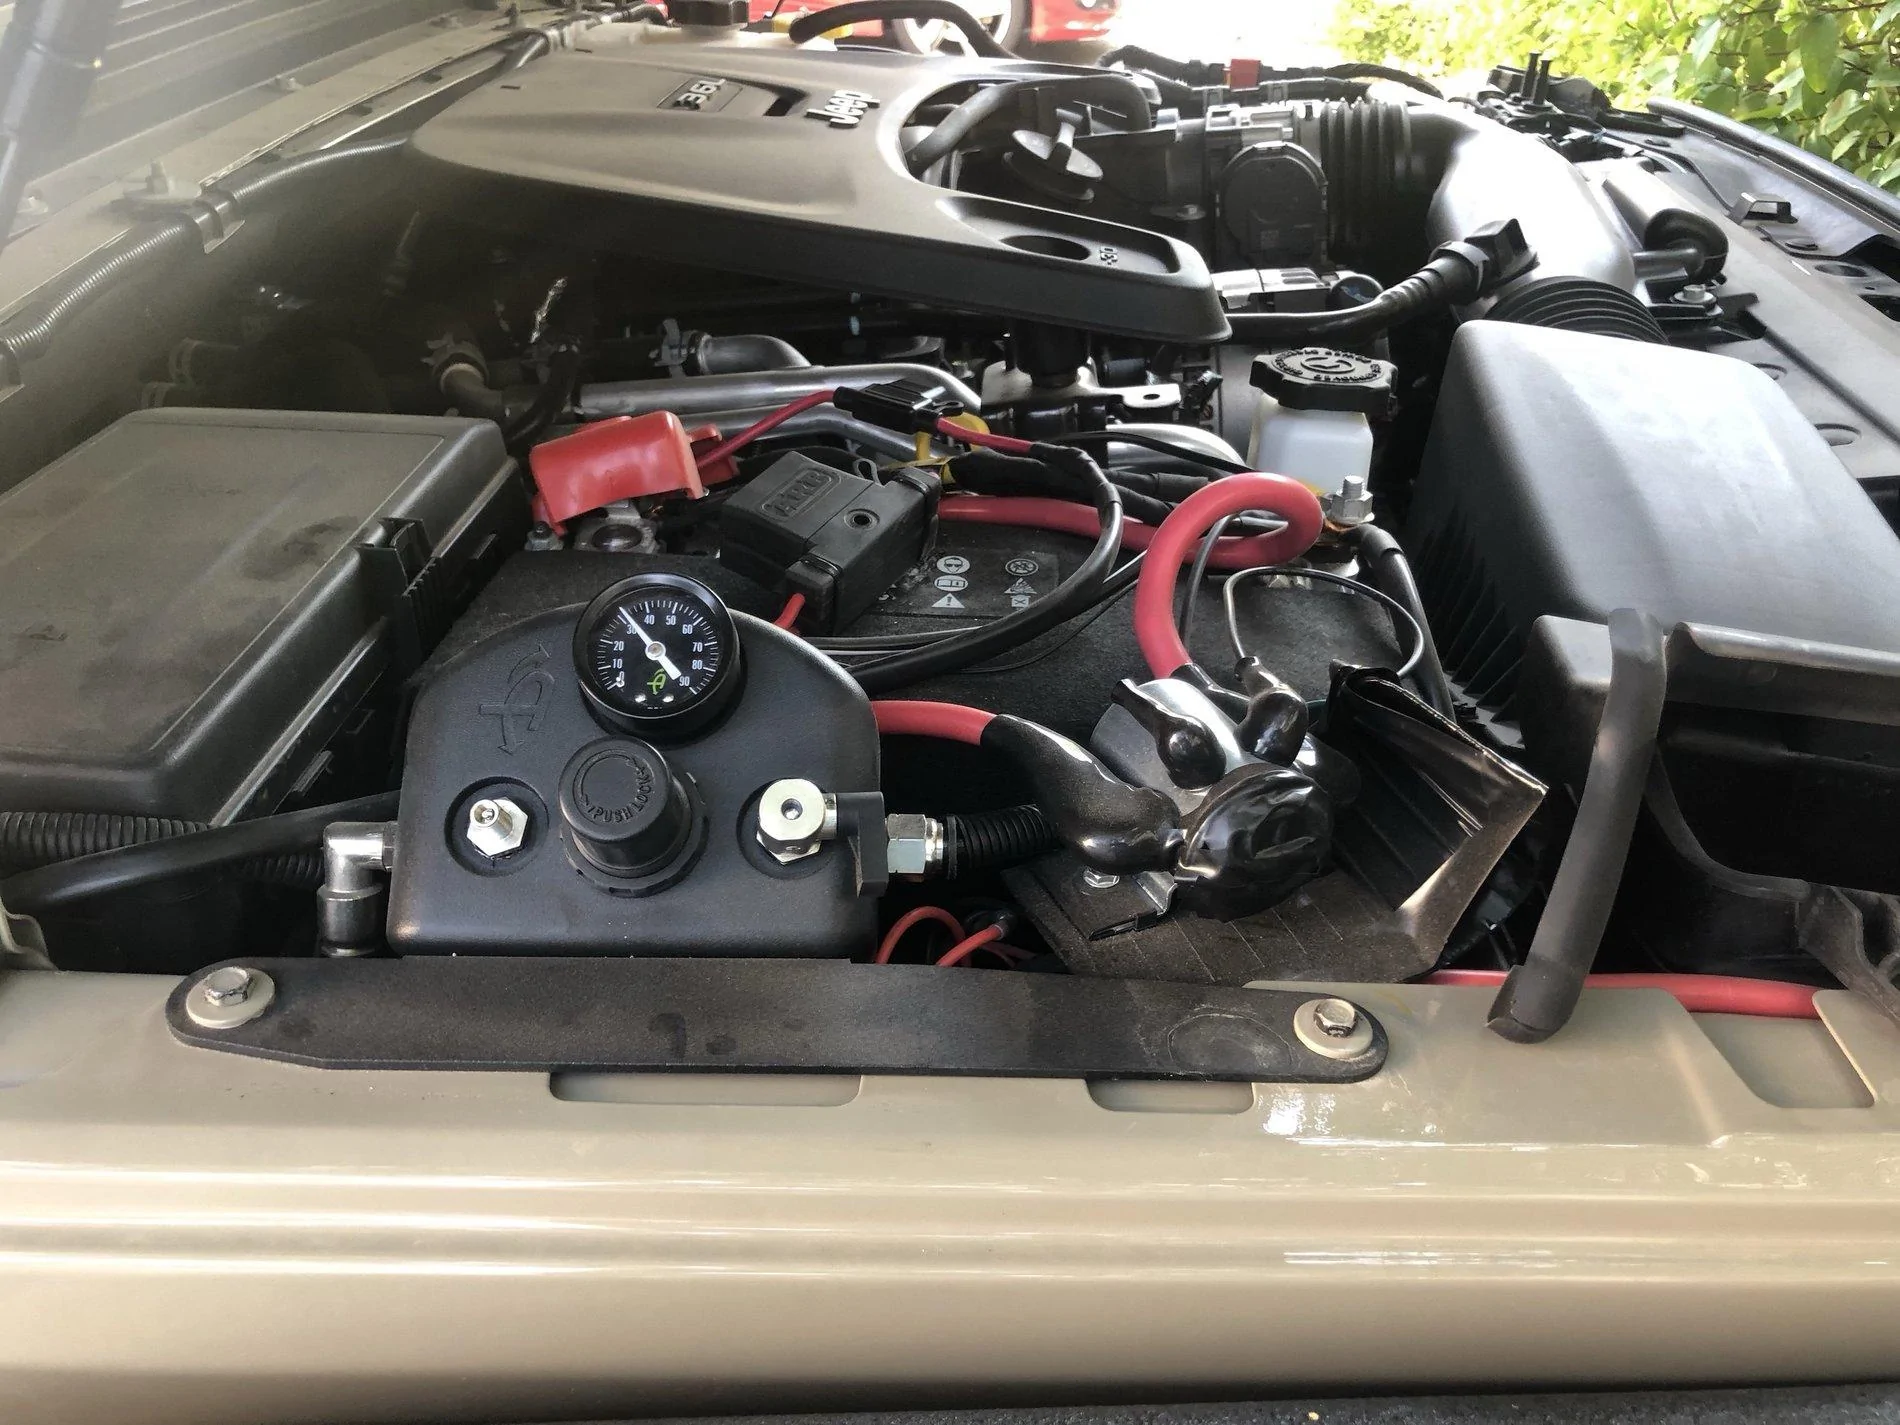
I wanted to wire the winch to one of the Accessory switches, and I didn't want power running to the winch at all times. Big long runs of high power that you're not using always seem like a bad idea to me. I got the Warn Power Interrupt Kit. This is a high power relay that you install close to the vehicle's battery. When you press your Accessory Switch, the accessory switch merely turns this relay on or off. The Relay controls whether there is power going to the winch. That way, when I'm not using the winch there's not a live power line running all the way to my bumper, asking for trouble.
The downside is that I couldn't come up with a good place to mount the Relay. I still haven't. For now, I grabbed a piece of metal flashing, wrapped it in electrical tape, mounted the relay to it, and bolted it next to the battery. It'll do for now.
Here it is, next to the regulator for my on-board air setup (to be discussed later):
Nevada requires a front license plate, so I also picked up a Flipster V2 Winch License Plate System ($84 on sale) from Cascadia 4x4.
I finished it all off with a Factor 55 FlatLink E Shackle ($160) for the end of the winch line and a Factor 55 FlatLink Rope Guard ($39) to cover the side of it.
Installation Note - To install the Factor 55 FlatLink Rope Guard, I HIGHLY recommend you purchase a pin punch. I got this one from Amazon.
Add a set of cheap blue Bow Shackles off Amazon, and the bumper is done!

OP
OP
jsyn
Well-Known Member
- Thread starter
- #52
Overlanding/Camping Gear Part 7 -Bedding and Lighting
Okay, this is my last non-Jeep-specific overlanding/camping post (for now). I just realized I hadn't mentioned what happens at night.
Lighting
I love, love, love, love, love Energizer LED Headlamps. That link is for the new model (which also offers a USB-rechargeable version, not just a 3-AAA battery version). I have 3-4 of the older model. They're spread all over the house and Jeep. I use these things all the time. Trail Running at night. Replacing an HVAC damper motor in the attic. Crawling under my Jeep to find a lost bolt. Around camp after dark.
When camping I try to keep them to the "Red Light" output so it doesn't hurt our night vision.
Look, I don't like bright lights when I'm camping. But I have a toddler, and so I also needed some cheap, basic flashlights and lanterns. I decided to go with dirt cheap USB-rechargeable since I have a Jeep (and solar panel) that can recharge these things each day if needed.
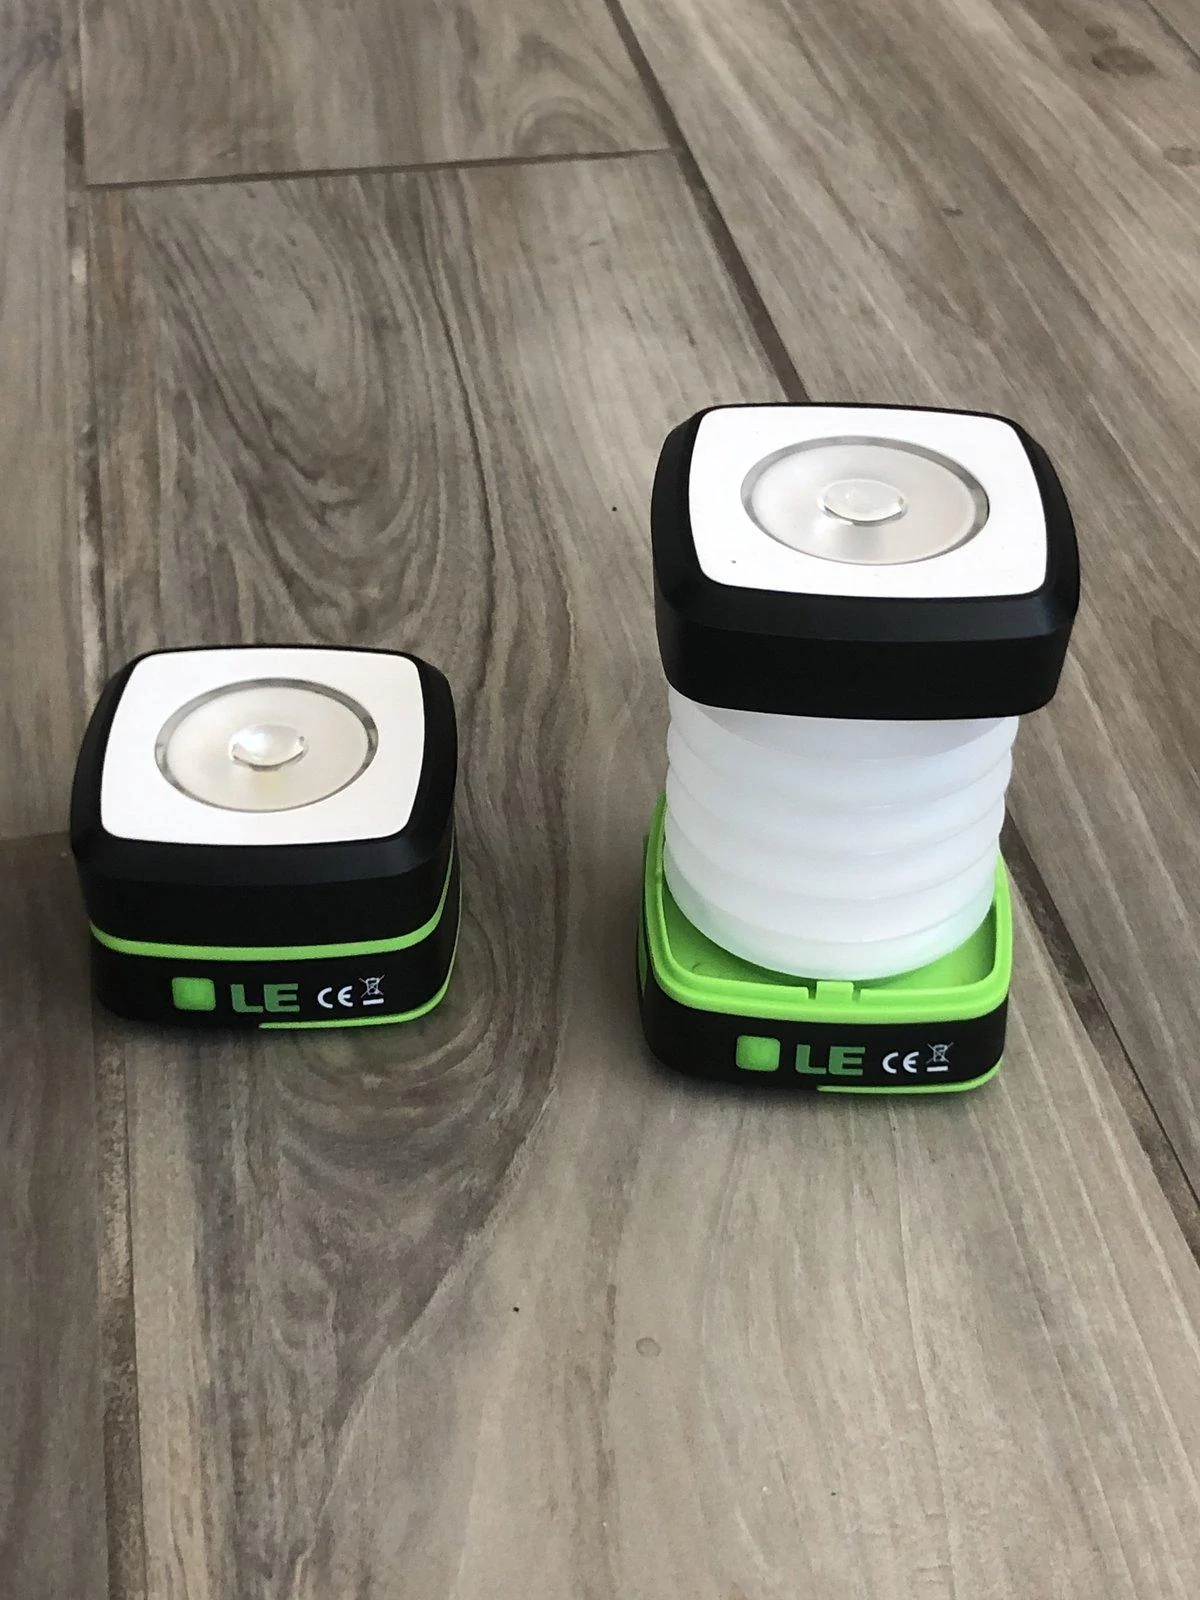
First, I got a pack of 2 flashlight lanterns. They're a flashlight until you pull them open, when they become a lantern.
Because they collapse, they pack small. And it's less than $15 for a pair of them!
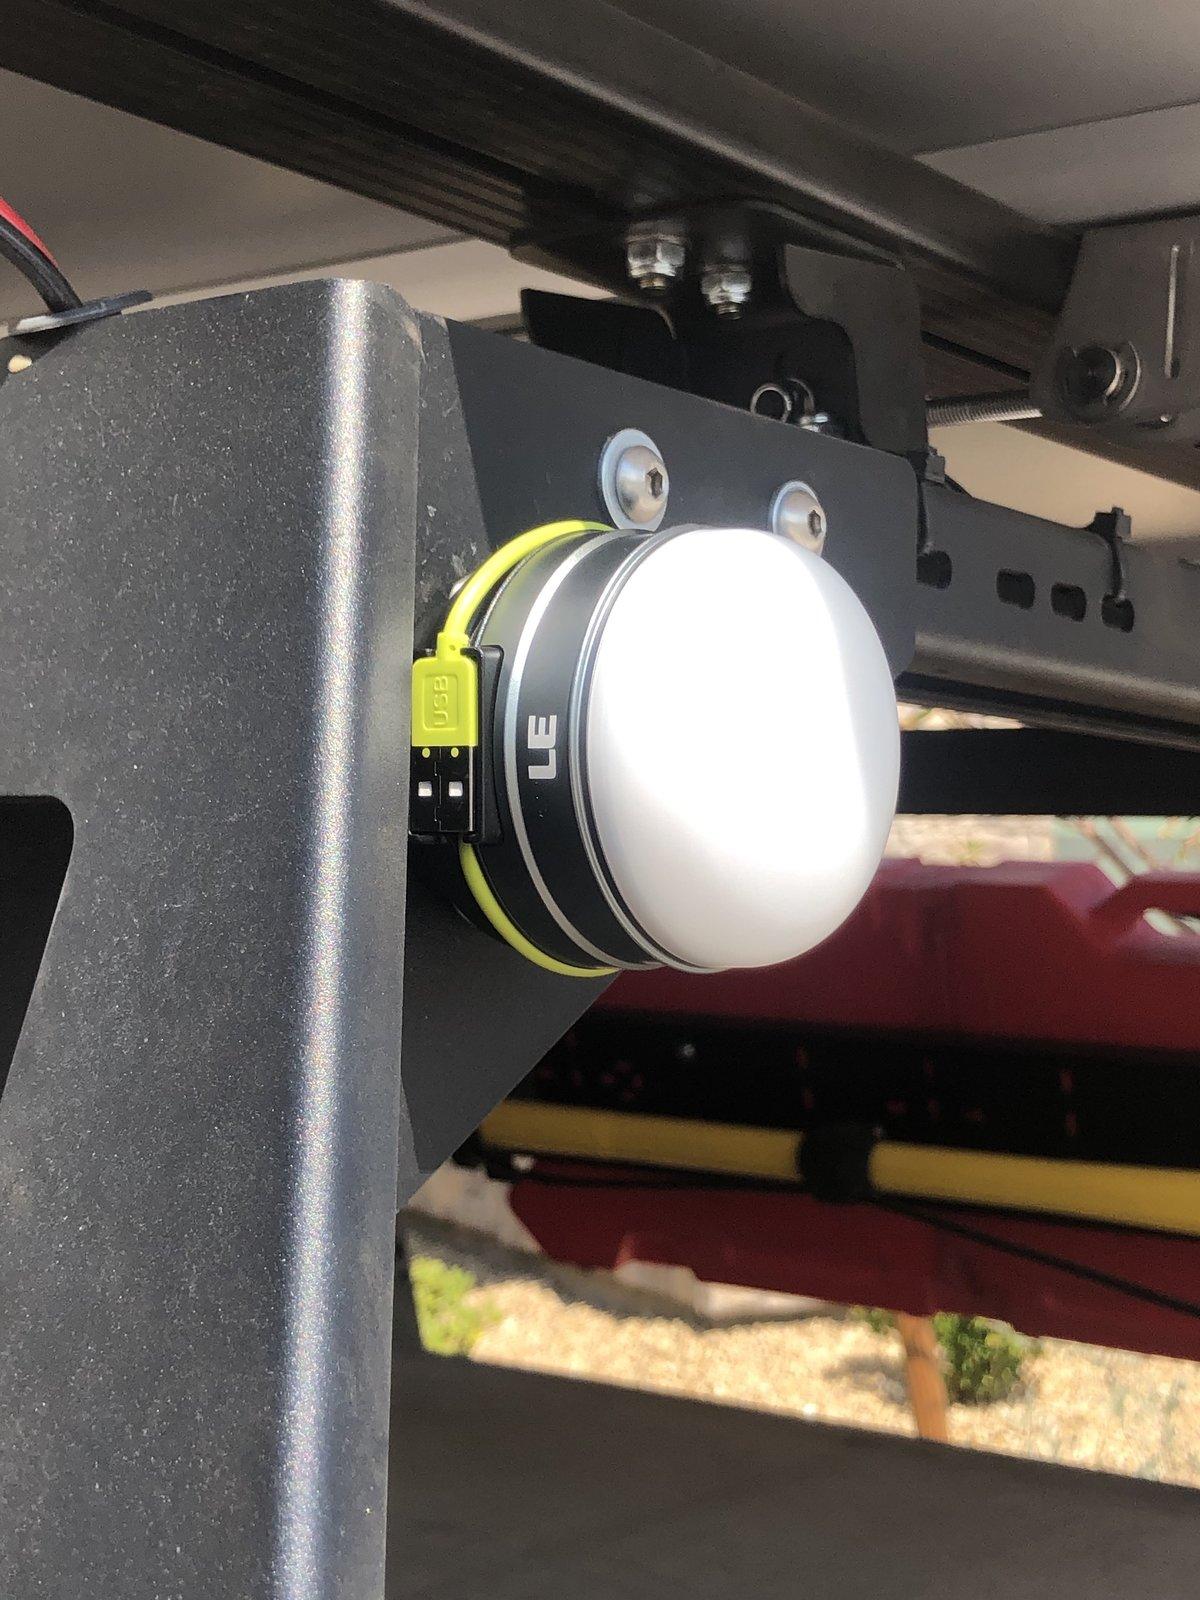
Then I bought 2 of these USB-rechargeable hang-anywhere lanterns.
These are pretty cool. They're round, so I can pack them in my coffee mugs. They have a recharging cable attached at all times. They have magnets on the back to stick them to your bed rack. Plus they have hooks on the back so you can hang them in your tent.
I accidentally left one of these stuck to the back of my bed rack before driving over 5 miles of rough dirt roads, then driving 180 miles home. It was still there, right where I left it when I got home.
My favorite part of these is that they can stick to the bed rack near the tent opening and the wife or toddler can just grab them from there to take with them for a middle-of-the-night bathroom trip.
Bedding
The Skycamp is a cool root top tent. But now that we have one, we had to ask ourselves -- do we even need our sleeping bags? We chose no. I found an old set of king-sized sheets for the mattress in our linen closet. Perfect. And we brought our normal pillows from home, because why not, it's Jeep, we're not backpacking through the wilderness. But now we needed a blanket.
I really, really tried to search online for bedding that would work well with a Skycamp. It's NOT easy. Lots of camping-specific blankets out there, but most just aren't king-sized.
What I've found to try so far is the PUFF Down Alternative blanket, size King (on sale for $86). It comes in a stuff sack, it packs down nice and small, and it's impressively warm given how thin it is. If it doesn't go much below 50°F at night, I think I'm fine with just that. However, it definitely has some downsides. It's LOUD. The fabric rustles, and when you wake up to pee in the middle of the night, chances are you're waking everyone else as well. Plus is was a non-stop source of static shocks.
On the plus side, this thing is so light and thin that we now store it inside the Skycamp tent, even when it's closed and we're driving, so it takes up literally none of our packing space.
Because that's all I've found so far that's camping-specific, I've also been packing our old down comforter in an old duvet cover. Pros: it's free. It's warm down at least into the thirties, probably far lower. And down packs fairly small if you try (although not that small when it's a big old down comforter).
The Skycamp comes with a 1.5" foam mattress. That sounds like plenty for camping, but the foam itself isn't very comfortable. For our next trip I intend to get a cheap 1" thick foam egg crate mattress topper for the Skycamp. I'll probably cut it down so it's just the size of the larger mattress inside the skycamp, since we just need it for shoulders and hips, not our legs. If I do it right I MIGHT still be able to close the Skycamp with it in. Here's hoping, and I'll post to update this thread once I give it a try.
Towels
Not lighting or bedding, but it's the only thing I really haven't mentioned. Don't forget to have some nice soft face towels, hand towels, and body towels for the family. The happier they are while camping the more often you'll get to go. These worked really well for me and kept the wife happy.
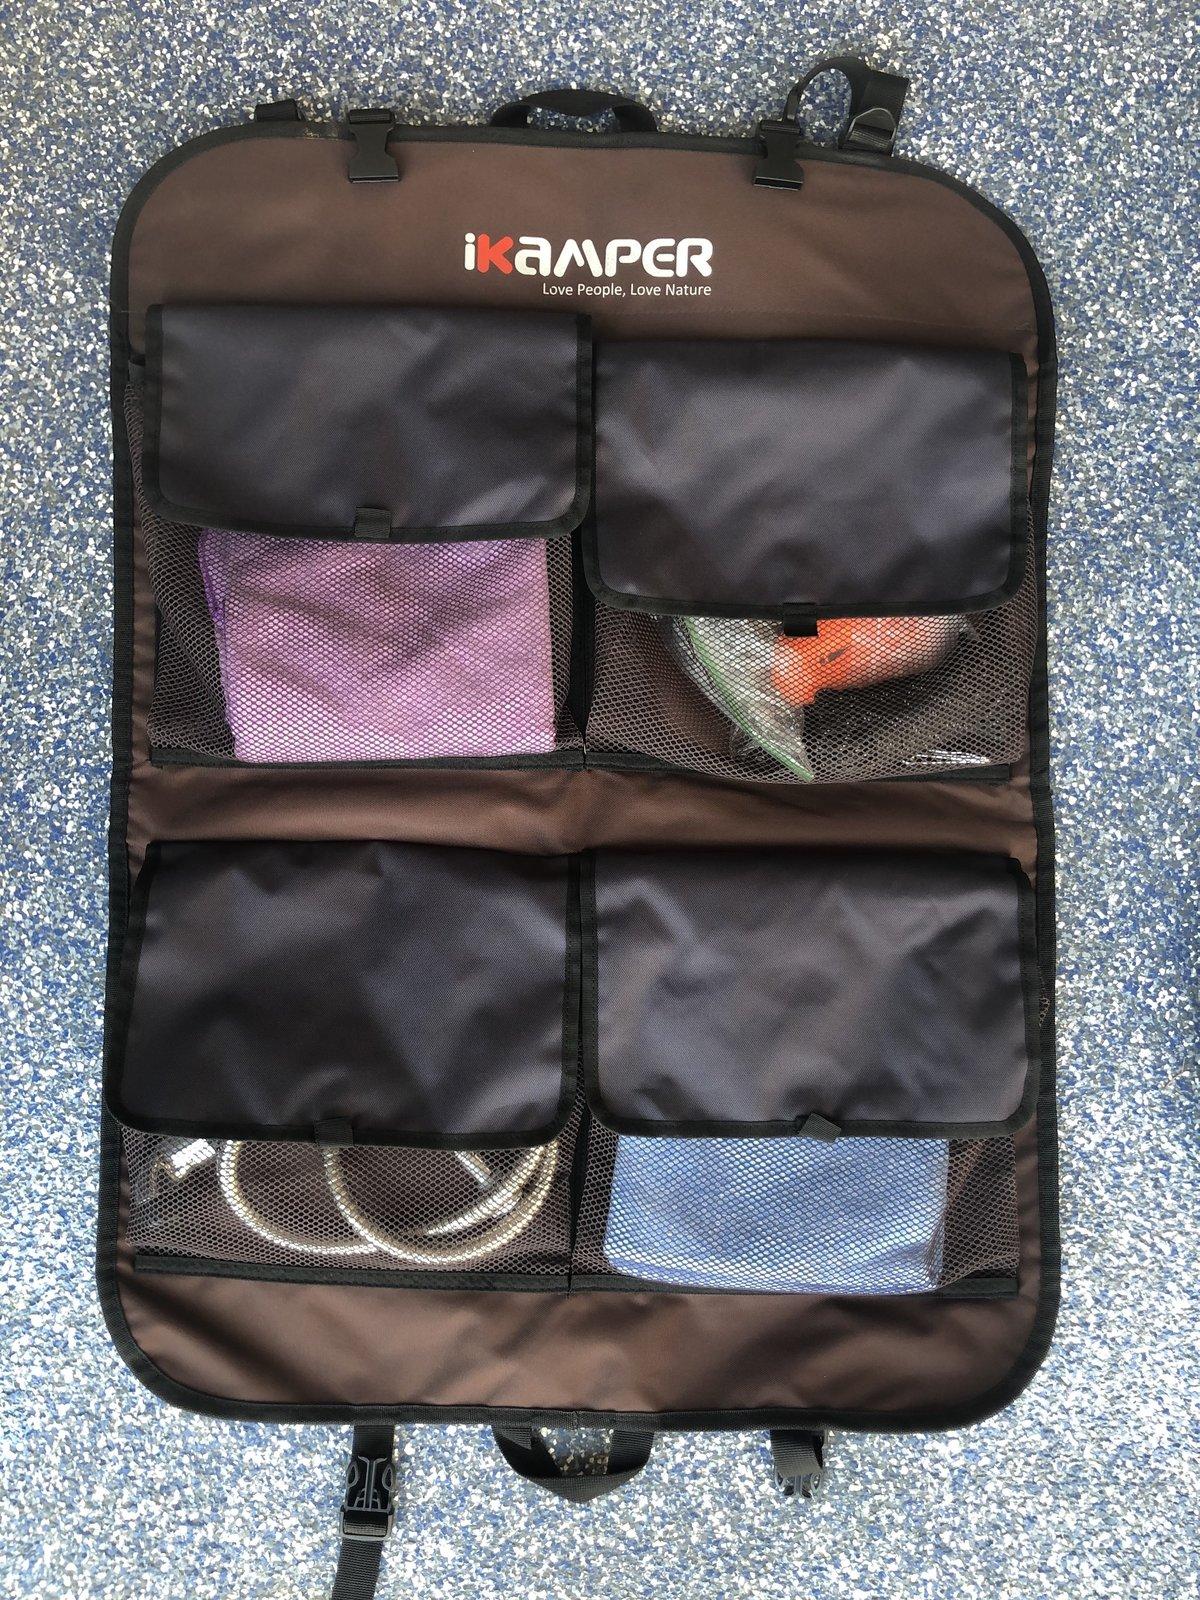
Here are those towels (plus the Jerry Can spray spout and some spare tie-down line) stored in the Skycamp accessory bag. This bag hangs under the tent and folds up inside the tent when closed.
Picnic Blanket
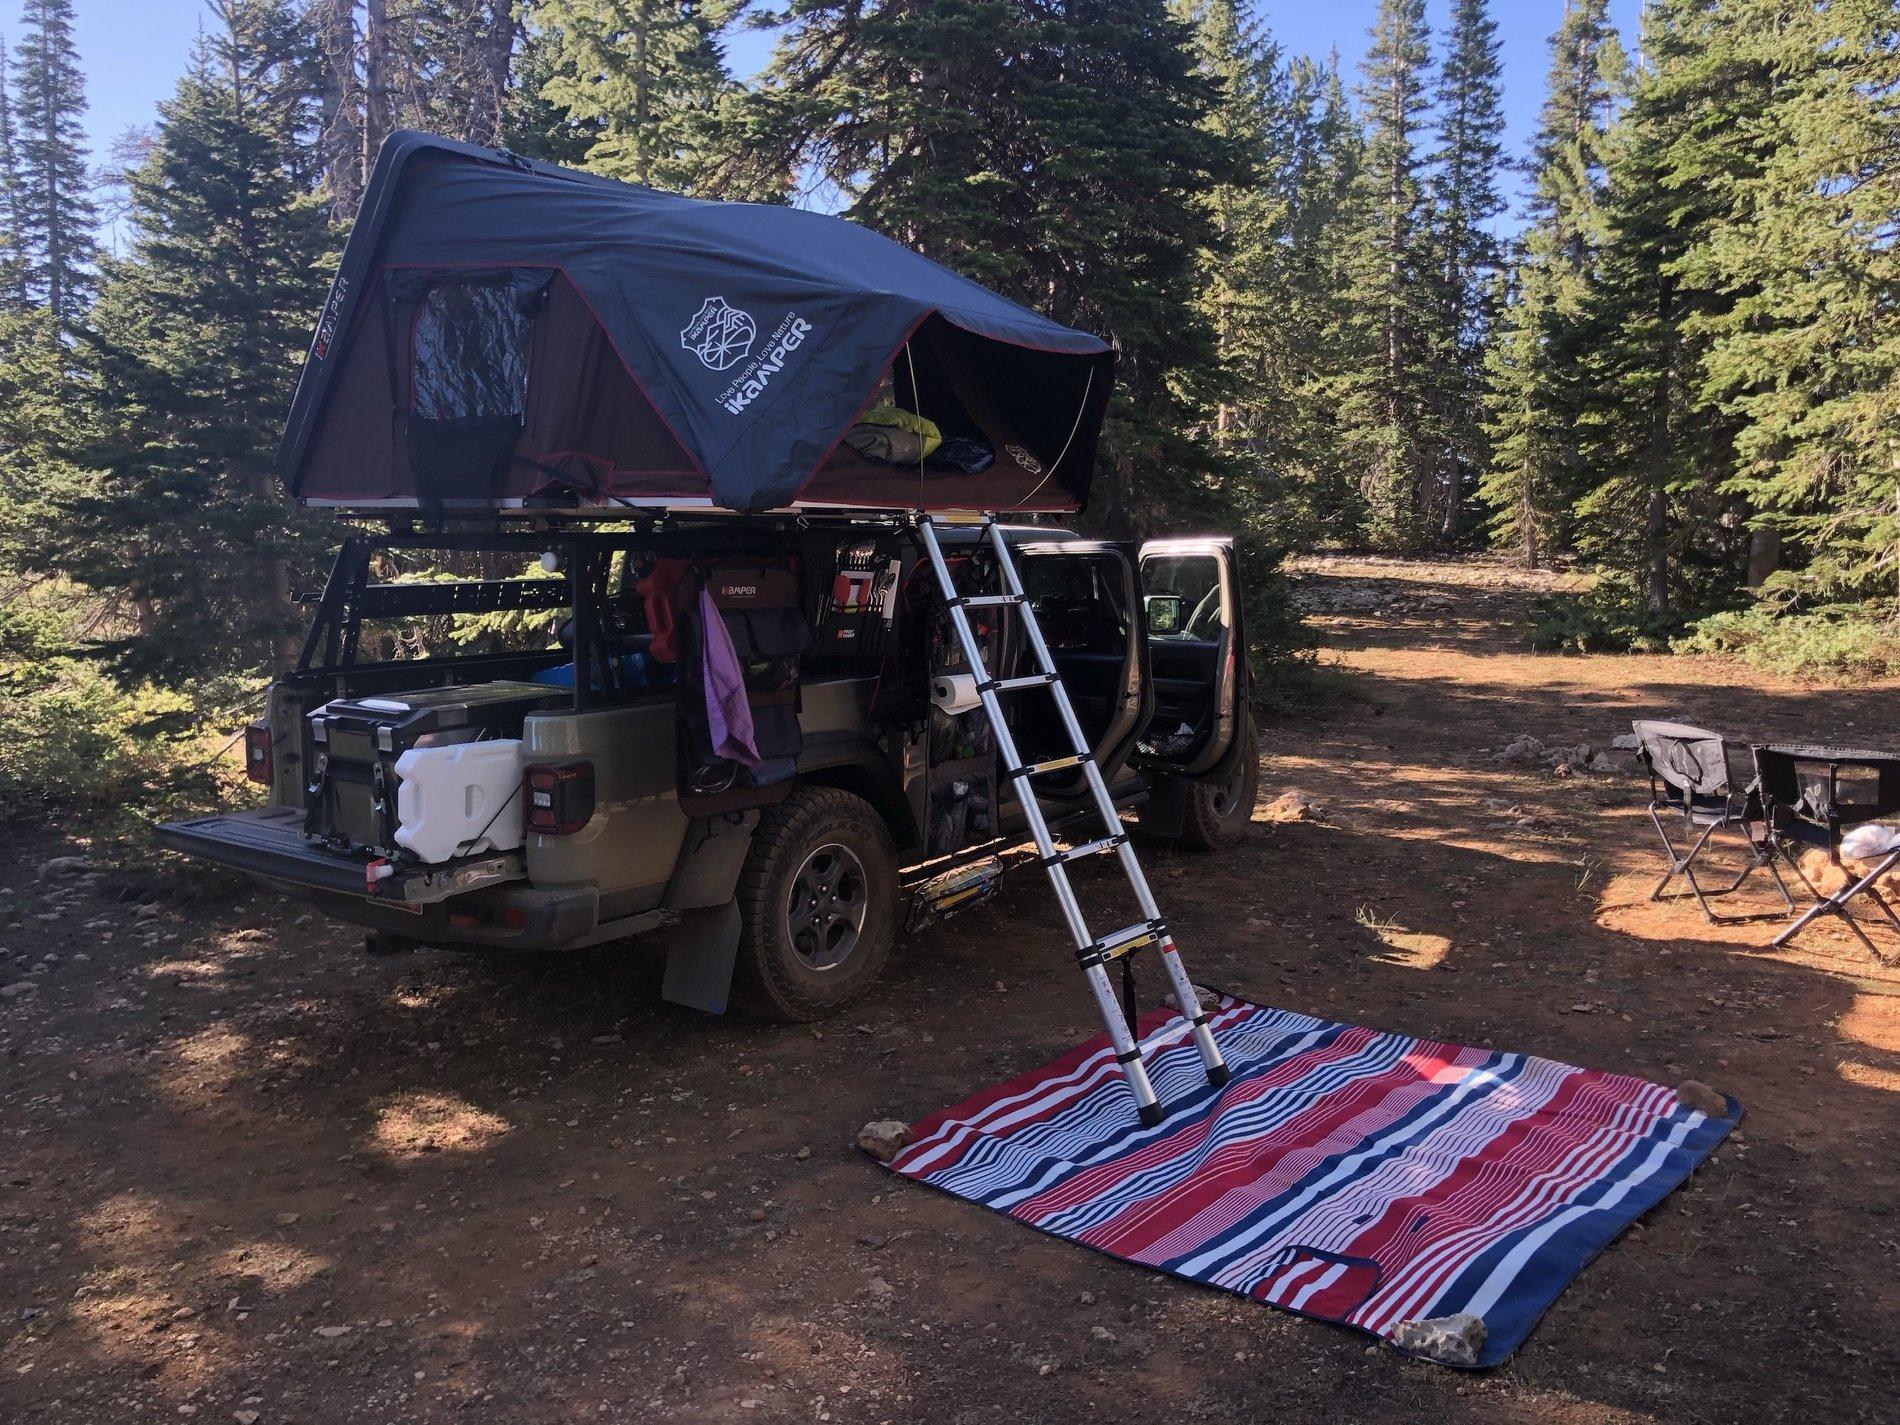
I should note that I also always carry a Picnic Blanket in my car. It's something my parents always did when I was growing up and so it's something I do now that I have a child. But these days Picnic Blankets are fancier than the old wool blanket of my youth, with waterproof covers on the bottom and soft fleece on top. On non-camping days I use it as a picnic blanket, but when camping we spread it out under the ladder of the Skycamp roof top tent, so we have somewhere to sit and take our shoes off.
That's our "Picnic Blanket" there below the ladder, keeping our feet and butts clean when we take off (or put on) shoes as we enter and leave the tent. The ladder keeps it from blowing away, and a couple of rocks found in the vicinity keep it flat.
Okay. Wow. That was a lot about Overlanding/Camping gear. Hopefully ya'll didn't mind me going slightly off-Jeep-topic for a couple posts.
Still to do in future comments:
Okay, this is my last non-Jeep-specific overlanding/camping post (for now). I just realized I hadn't mentioned what happens at night.
Lighting
I love, love, love, love, love Energizer LED Headlamps. That link is for the new model (which also offers a USB-rechargeable version, not just a 3-AAA battery version). I have 3-4 of the older model. They're spread all over the house and Jeep. I use these things all the time. Trail Running at night. Replacing an HVAC damper motor in the attic. Crawling under my Jeep to find a lost bolt. Around camp after dark.
When camping I try to keep them to the "Red Light" output so it doesn't hurt our night vision.
Look, I don't like bright lights when I'm camping. But I have a toddler, and so I also needed some cheap, basic flashlights and lanterns. I decided to go with dirt cheap USB-rechargeable since I have a Jeep (and solar panel) that can recharge these things each day if needed.
First, I got a pack of 2 flashlight lanterns. They're a flashlight until you pull them open, when they become a lantern.
Because they collapse, they pack small. And it's less than $15 for a pair of them!
Then I bought 2 of these USB-rechargeable hang-anywhere lanterns.
These are pretty cool. They're round, so I can pack them in my coffee mugs. They have a recharging cable attached at all times. They have magnets on the back to stick them to your bed rack. Plus they have hooks on the back so you can hang them in your tent.
I accidentally left one of these stuck to the back of my bed rack before driving over 5 miles of rough dirt roads, then driving 180 miles home. It was still there, right where I left it when I got home.
My favorite part of these is that they can stick to the bed rack near the tent opening and the wife or toddler can just grab them from there to take with them for a middle-of-the-night bathroom trip.
Bedding
The Skycamp is a cool root top tent. But now that we have one, we had to ask ourselves -- do we even need our sleeping bags? We chose no. I found an old set of king-sized sheets for the mattress in our linen closet. Perfect. And we brought our normal pillows from home, because why not, it's Jeep, we're not backpacking through the wilderness. But now we needed a blanket.
I really, really tried to search online for bedding that would work well with a Skycamp. It's NOT easy. Lots of camping-specific blankets out there, but most just aren't king-sized.
What I've found to try so far is the PUFF Down Alternative blanket, size King (on sale for $86). It comes in a stuff sack, it packs down nice and small, and it's impressively warm given how thin it is. If it doesn't go much below 50°F at night, I think I'm fine with just that. However, it definitely has some downsides. It's LOUD. The fabric rustles, and when you wake up to pee in the middle of the night, chances are you're waking everyone else as well. Plus is was a non-stop source of static shocks.
On the plus side, this thing is so light and thin that we now store it inside the Skycamp tent, even when it's closed and we're driving, so it takes up literally none of our packing space.
Because that's all I've found so far that's camping-specific, I've also been packing our old down comforter in an old duvet cover. Pros: it's free. It's warm down at least into the thirties, probably far lower. And down packs fairly small if you try (although not that small when it's a big old down comforter).
The Skycamp comes with a 1.5" foam mattress. That sounds like plenty for camping, but the foam itself isn't very comfortable. For our next trip I intend to get a cheap 1" thick foam egg crate mattress topper for the Skycamp. I'll probably cut it down so it's just the size of the larger mattress inside the skycamp, since we just need it for shoulders and hips, not our legs. If I do it right I MIGHT still be able to close the Skycamp with it in. Here's hoping, and I'll post to update this thread once I give it a try.
Towels
Not lighting or bedding, but it's the only thing I really haven't mentioned. Don't forget to have some nice soft face towels, hand towels, and body towels for the family. The happier they are while camping the more often you'll get to go. These worked really well for me and kept the wife happy.
Here are those towels (plus the Jerry Can spray spout and some spare tie-down line) stored in the Skycamp accessory bag. This bag hangs under the tent and folds up inside the tent when closed.
Picnic Blanket
I should note that I also always carry a Picnic Blanket in my car. It's something my parents always did when I was growing up and so it's something I do now that I have a child. But these days Picnic Blankets are fancier than the old wool blanket of my youth, with waterproof covers on the bottom and soft fleece on top. On non-camping days I use it as a picnic blanket, but when camping we spread it out under the ladder of the Skycamp roof top tent, so we have somewhere to sit and take our shoes off.
That's our "Picnic Blanket" there below the ladder, keeping our feet and butts clean when we take off (or put on) shoes as we enter and leave the tent. The ladder keeps it from blowing away, and a couple of rocks found in the vicinity keep it flat.
Okay. Wow. That was a lot about Overlanding/Camping gear. Hopefully ya'll didn't mind me going slightly off-Jeep-topic for a couple posts.
Still to do in future comments:
- Recovery Gear
- Latch-It Bike Rack
- Communications
- All the future projects I already have lined up!
Last edited:
OP
OP
jsyn
Well-Known Member
- Thread starter
- #53
Actually, I'm not. The beauty of using a relay (solenoid) is that it requires VERY low power to operate. The Jeep's Auxiliary switch is only switching the relay on and off. That's nothing. It's the relay itself that's connecting or disconnecting the winch from the battery. The wire Warn gives you to hook your switch to the interrupt kit is only 18ga. It comes with an inline 5 amp fuse. 15 amp is 3x more than it needs, so the inline will blow long before the switch fuse ever will.so many great ideas! I'm assuming you used the 40amp switch for the winch relay? Any concerns that 40amps is not enough?
Having that relay is what puts my mind at ease.
Here's what's wired to what in my Jeep right now:
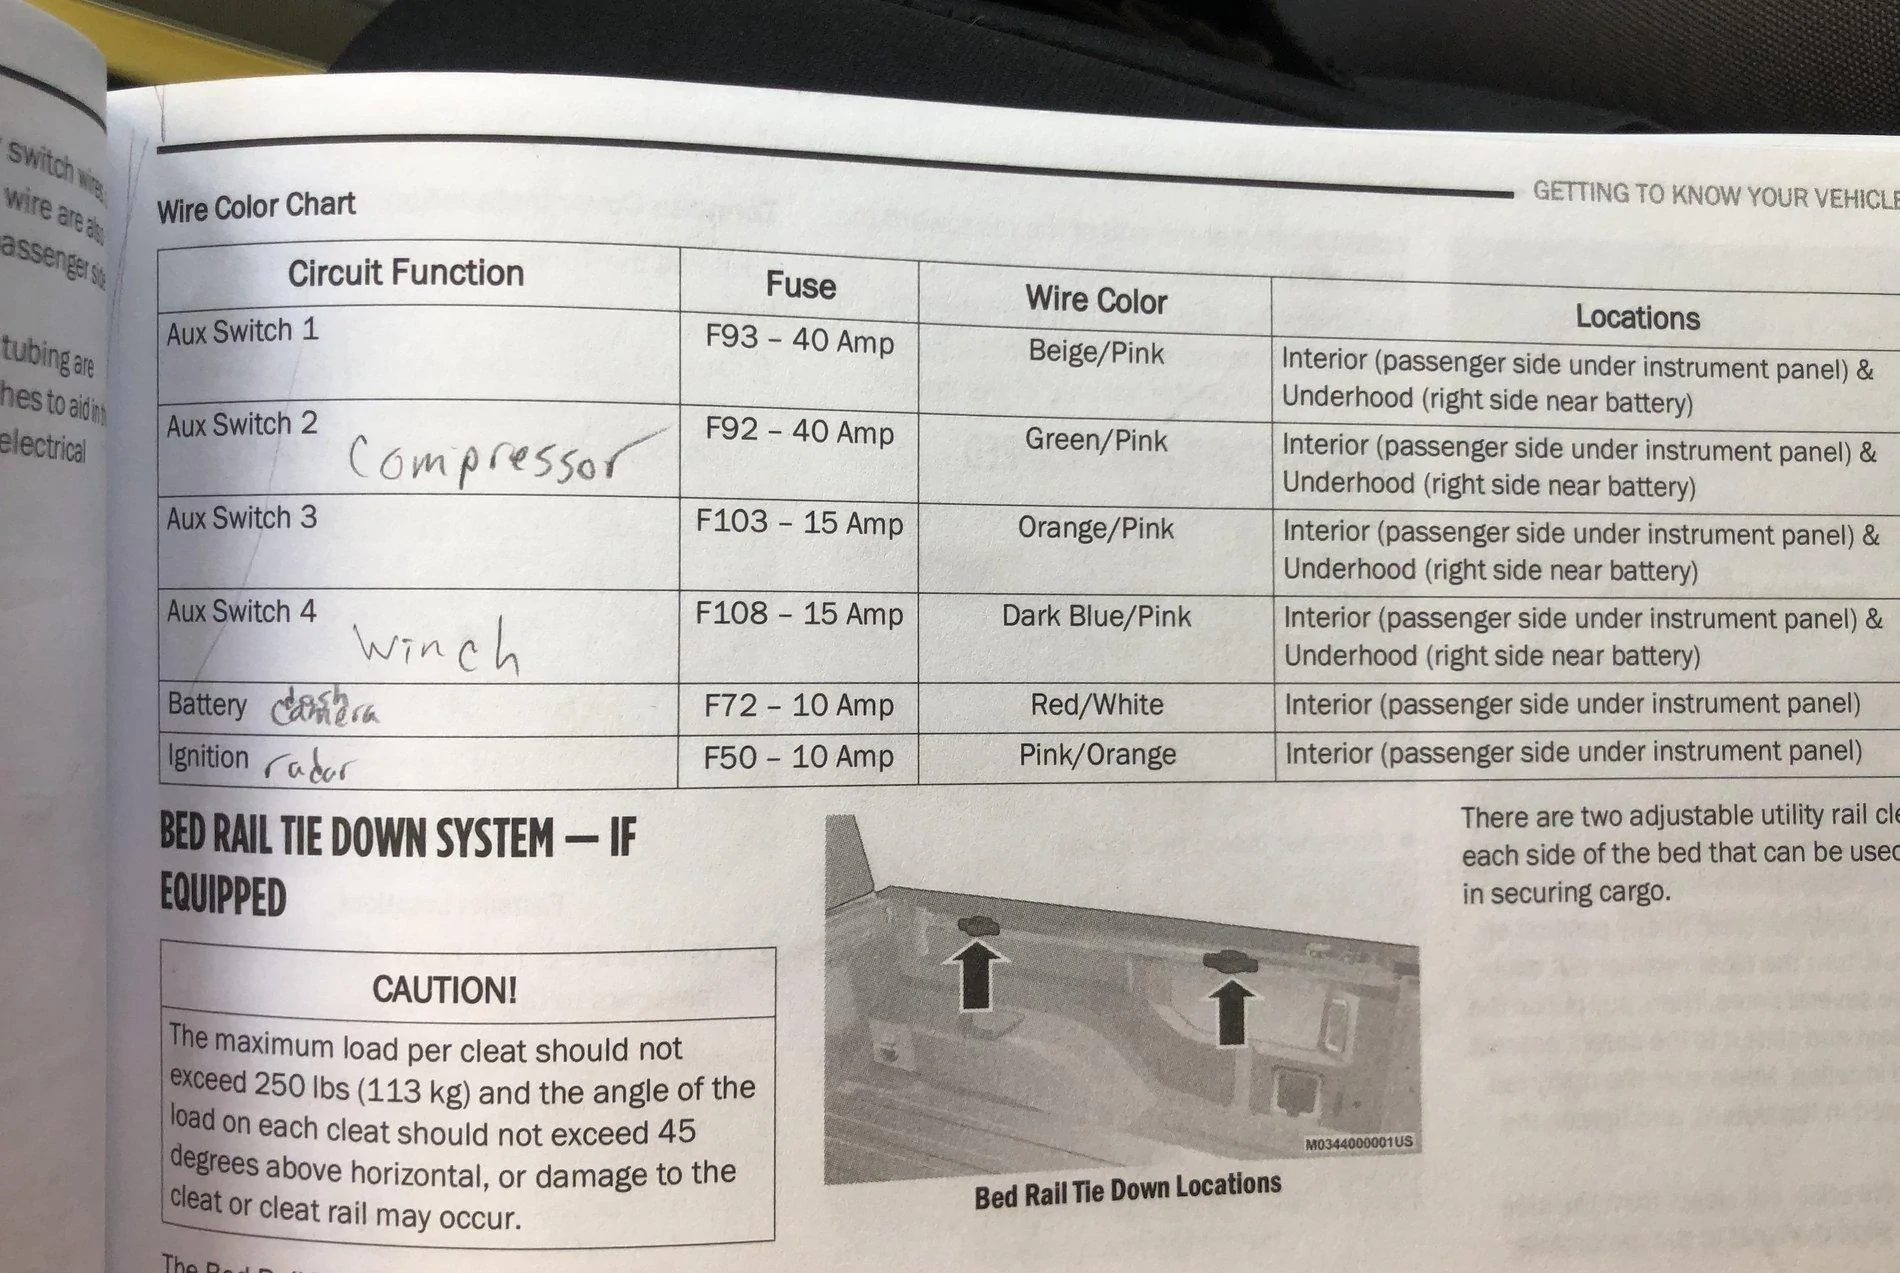
My on-board ARB Twin Air Compressor needs 40-amp. It's small enough wire that I didn't feel the need to install a relay, but it's big enough that I needed 40 amp rather than 15.
And then I also write down in my owner manual anything else I hardwire into the system using the passenger footwell wires (such as my dash cam or radar detector)
Using a pencil to write it all down in my owner's manual is the only way I keep track!
OP
OP
jsyn
Well-Known Member
- Thread starter
- #55
Just my 2c, but if I were you I wouldn't bother with the ESS. You're talking about a LOT more wiring and fiddling inside your Jeep's engine compartment versus just ignoring the ESS and wiring your new stuff straight to your alternator. I think:so my thought was just to increase gauge of the wire that normally goes to the ESS and swap in one or a pair of 100aH gel batteries. I get a healthy discount on lithium but since I want to involve the alternator, this seams like the best fit. The ESS battery itself I’d probably just sell for $25 to a local jeeper. I don’t want to do much if any wiring under the hood so it seems simple in my mind that this might work in conjunction with an MPPT in bed.
I hope that makes sense. I understand solar tech but I’ve never done vehicle integration, so I’m perhaps being over precautious. I’d like to run a single plate induction plus fridge. Plus lights plus twin arb compressor and keep all of that stuff confined to the bed.
- It'll be easier to do that way
- It'll be easier to back out and revert to normal if needed that way
- I don't see any positive you'd actually get from doing that
But that's me. If you want the extra challenge of fiddling with your ESS, you do you!
Last edited:
Sponsored
wannajeep
Well-Known Member
That's a lotta mods and great writeups!
I'm just trying to figure out what the the TRUTRL tag means. I can't figure it out.
But I just did. I'm an idiot. You already gave it away in the title of the post!

I'm just trying to figure out what the the TRUTRL tag means. I can't figure it out.
But I just did. I'm an idiot. You already gave it away in the title of the post!
jurfie
Well-Known Member
- Joined
- Sep 4, 2019
- Threads
- 7
- Messages
- 1,433
- Reaction score
- 1,997
- Location
- Vancouver, BC
- Vehicle(s)
- 2014 Granite Crystal Metallic JKR; 2016 Daytona Grey Audi A5 Competition Package
Not at all; awesome thread!Hopefully ya'll didn't mind me going slightly off-Jeep-topic for a couple posts.
OP
OP
jsyn
Well-Known Member
- Thread starter
- #58
Recovery Gear Part 1 - Tools
A lot of people read "off-road recovery" and they think "winch". That's a useful thing to have, but I thought I'd start by discussing tools. Not the tools you keep in your garage for modifying your Jeep, but the ones you keep in your Jeep for when things go wrong. It's not enough to have some straps and a winch, you also need to be able to farm-boy-rig fixes for your Jeep while on trail.
There are a lot of levels of tool capability you could bring. An old Boy Scout buddy of mine keeps his tube bumpers full of compressed air and carries a welder behind his back seat. He's broken an axle on trail, welded it back together, used an air tool to grind down the weld, then driven out an hour and a half after breaking down. But he's insane. Most of us (myself included) aren't aiming for anywhere near that level of awesomeness. I just want to be able to fix minor issues when they crop up.
NOTE - I want my nice tools in my garage where I can use them on a daily basis. The tools I keep in my Jeep are mostly old crap that I had lying around. Old stuff in the Jeep, newer stuff in the garage. I'll try to give links to things, but if it's just "phillips screwdriver" or "vise grips" or "wire stripper" that are 20+ years old, I'm gonna assume everyone else knows what that stuff is too. Decent quality but cheap cost is my goal for an in-the-Jeep tool, there's no point in spending fancy Wera or Knipex money here.
I started with a Tool Pouch Roll from Blue Ridge Overlanding Gear. Instead of all mixed up in one box or bag, tools are stored in four separate pouches, each of which can be pulled off (velcro) and brought to where you need it. What I quickly learned is that I should really buy an extra (fifth) utility pouch to roll up in there. Maybe I should've gotten their Tool Bag, which holds 6 pouches standard. The Tool Bag (vs the Tool Roll) is probably better for a lot of reasons, but for some reason I prefer the shape and design of the tool roll instead of a zipper, but that's just personal preference.
Why did I spend that much $$ on a tool pouch? Because this thing gets tossed around. It gets dragged across sharp rocks. If it wasn't made well from high quality materials it won't last 6 months.
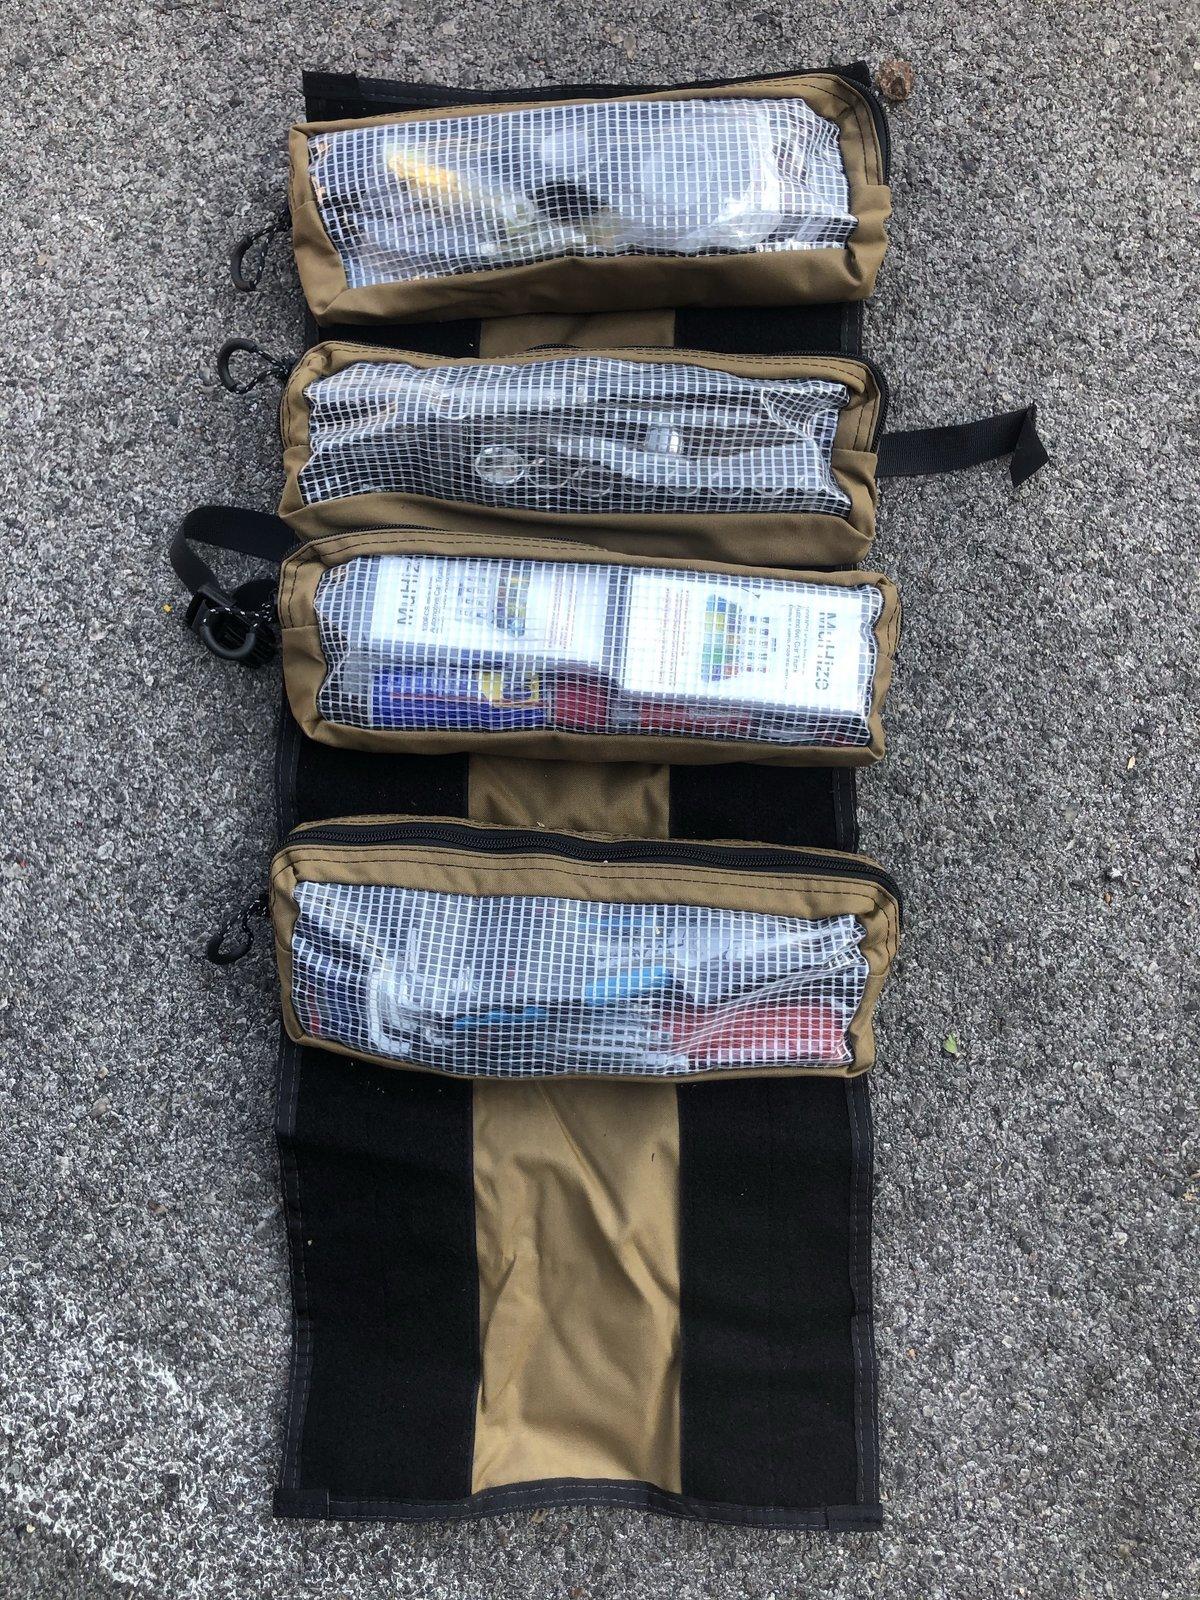
Let's start with the top pouch and work our way down.
Pouch #1: Electrical and Tape

Pouch #2: Standard Hand Tools
Pouch #3: Tubes, Bottles, and Fuses
Pouch #4: Cut It, Fasten It, Loosen It
STILL MISSING
I still need a baggie of spare parts for my Jeep. (That's what pouch #5 will be for.) Just little things, like spare bolts for my bed rack, spare nuts and bolts for under the Jeep, etc. This is tough to come up with, though. It's easy to crawl under your Jeep and fit sockets to all the bolts. It's harder to look at bolts under your Jeep and guess what size you need to buy at Home Depot as a possible replacement.
Final Notes
I think of my Tool Roll as a "bare minimum" not as a "well stocked repair center".
What tools do you guys think I'm missing that I should really be carrying?
What size nuts and bolts are you carrying as spare parts?
Tools are always subjective, but I'm VERY open to suggestions and ideas for basics that I'm missing!
A lot of people read "off-road recovery" and they think "winch". That's a useful thing to have, but I thought I'd start by discussing tools. Not the tools you keep in your garage for modifying your Jeep, but the ones you keep in your Jeep for when things go wrong. It's not enough to have some straps and a winch, you also need to be able to farm-boy-rig fixes for your Jeep while on trail.
There are a lot of levels of tool capability you could bring. An old Boy Scout buddy of mine keeps his tube bumpers full of compressed air and carries a welder behind his back seat. He's broken an axle on trail, welded it back together, used an air tool to grind down the weld, then driven out an hour and a half after breaking down. But he's insane. Most of us (myself included) aren't aiming for anywhere near that level of awesomeness. I just want to be able to fix minor issues when they crop up.
NOTE - I want my nice tools in my garage where I can use them on a daily basis. The tools I keep in my Jeep are mostly old crap that I had lying around. Old stuff in the Jeep, newer stuff in the garage. I'll try to give links to things, but if it's just "phillips screwdriver" or "vise grips" or "wire stripper" that are 20+ years old, I'm gonna assume everyone else knows what that stuff is too. Decent quality but cheap cost is my goal for an in-the-Jeep tool, there's no point in spending fancy Wera or Knipex money here.
I started with a Tool Pouch Roll from Blue Ridge Overlanding Gear. Instead of all mixed up in one box or bag, tools are stored in four separate pouches, each of which can be pulled off (velcro) and brought to where you need it. What I quickly learned is that I should really buy an extra (fifth) utility pouch to roll up in there. Maybe I should've gotten their Tool Bag, which holds 6 pouches standard. The Tool Bag (vs the Tool Roll) is probably better for a lot of reasons, but for some reason I prefer the shape and design of the tool roll instead of a zipper, but that's just personal preference.
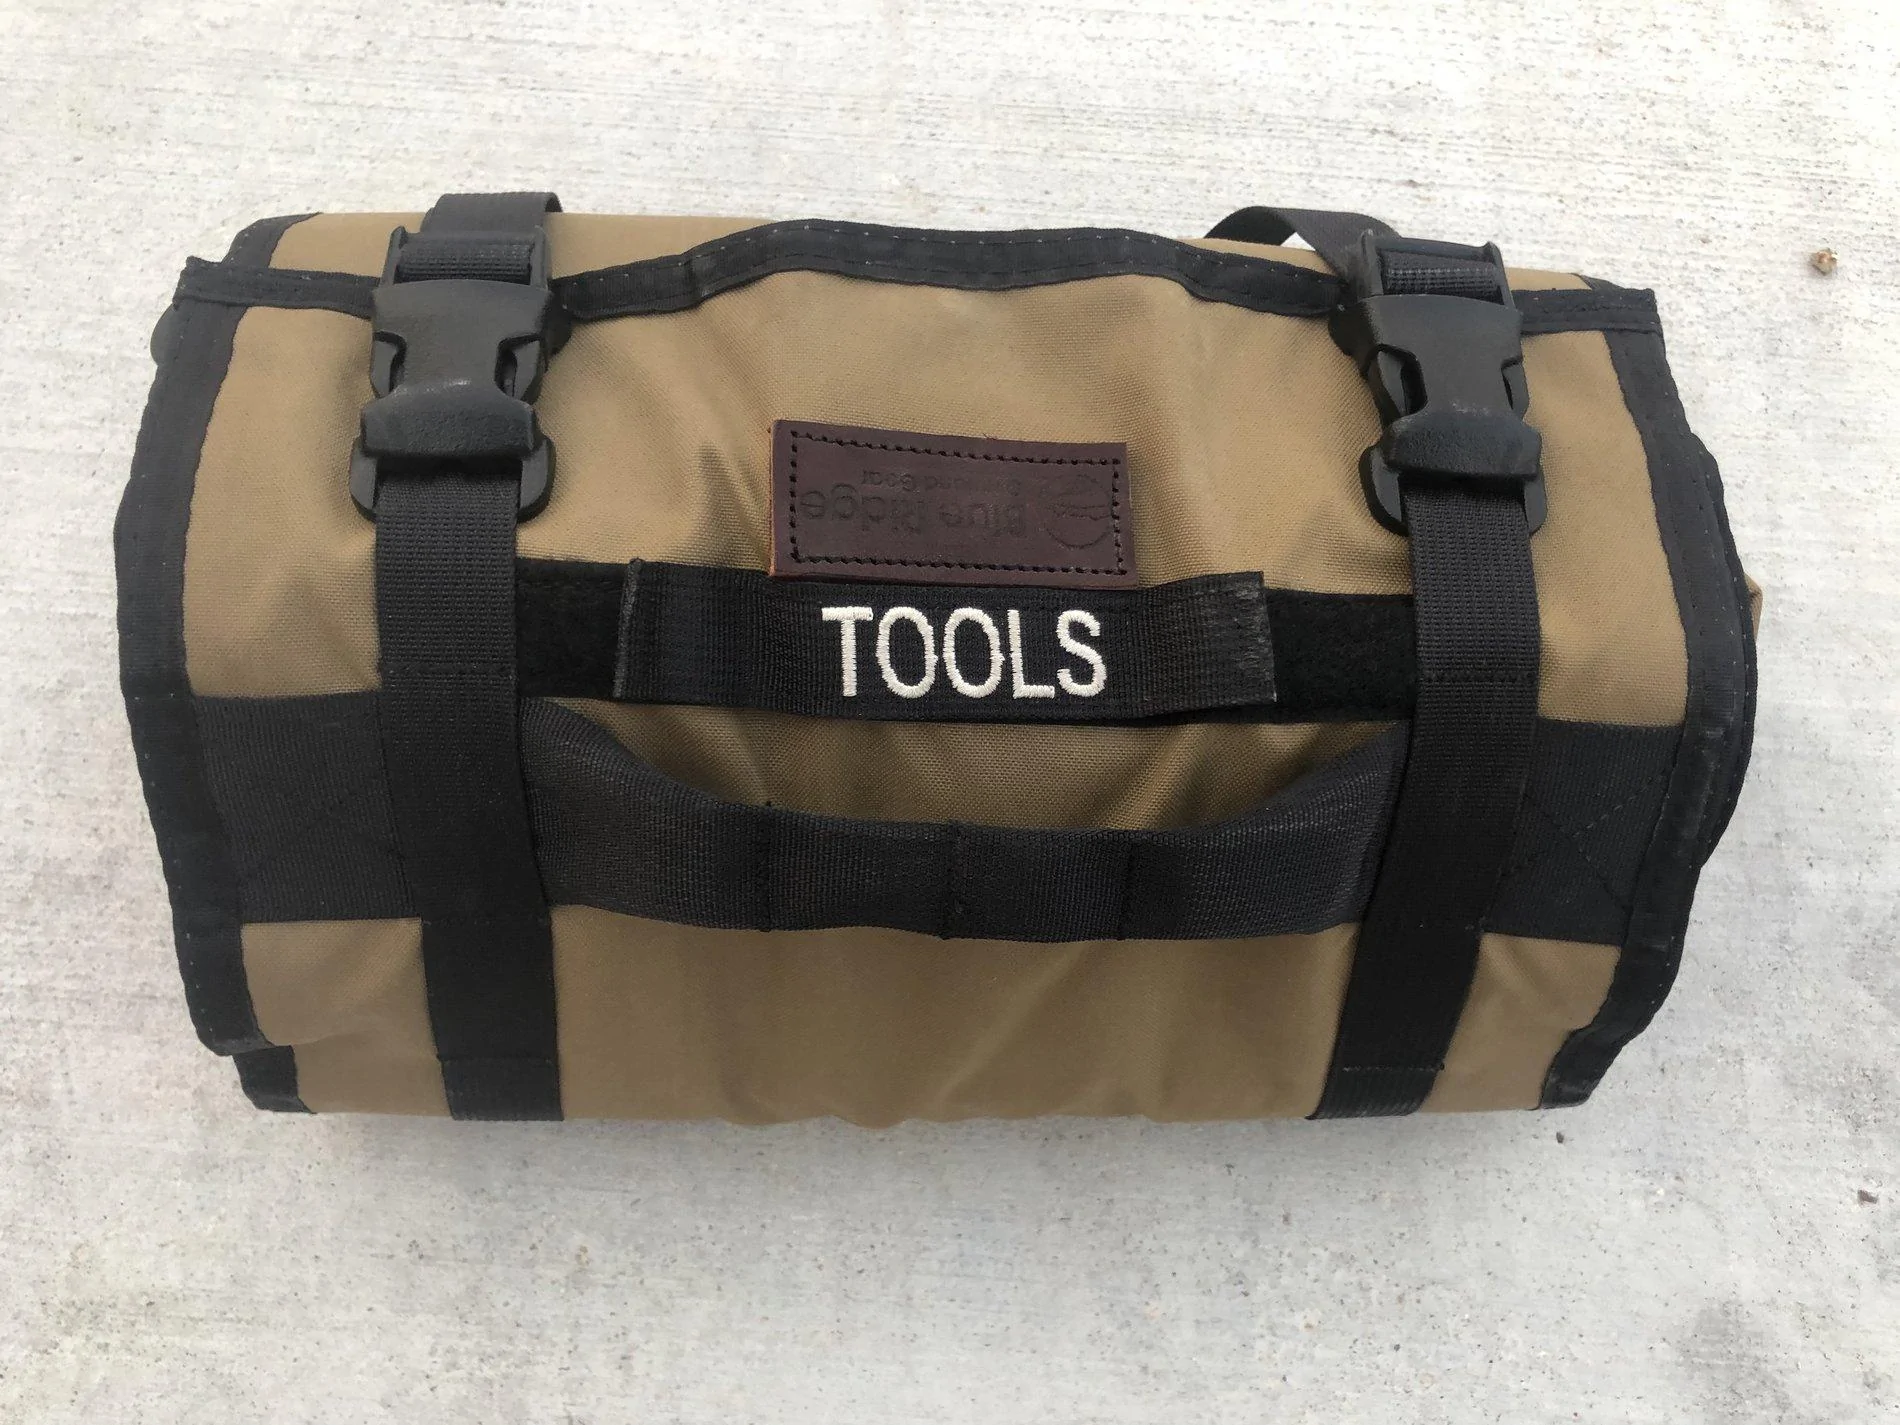
Why did I spend that much $$ on a tool pouch? Because this thing gets tossed around. It gets dragged across sharp rocks. If it wasn't made well from high quality materials it won't last 6 months.
Let's start with the top pouch and work our way down.
Pouch #1: Electrical and Tape
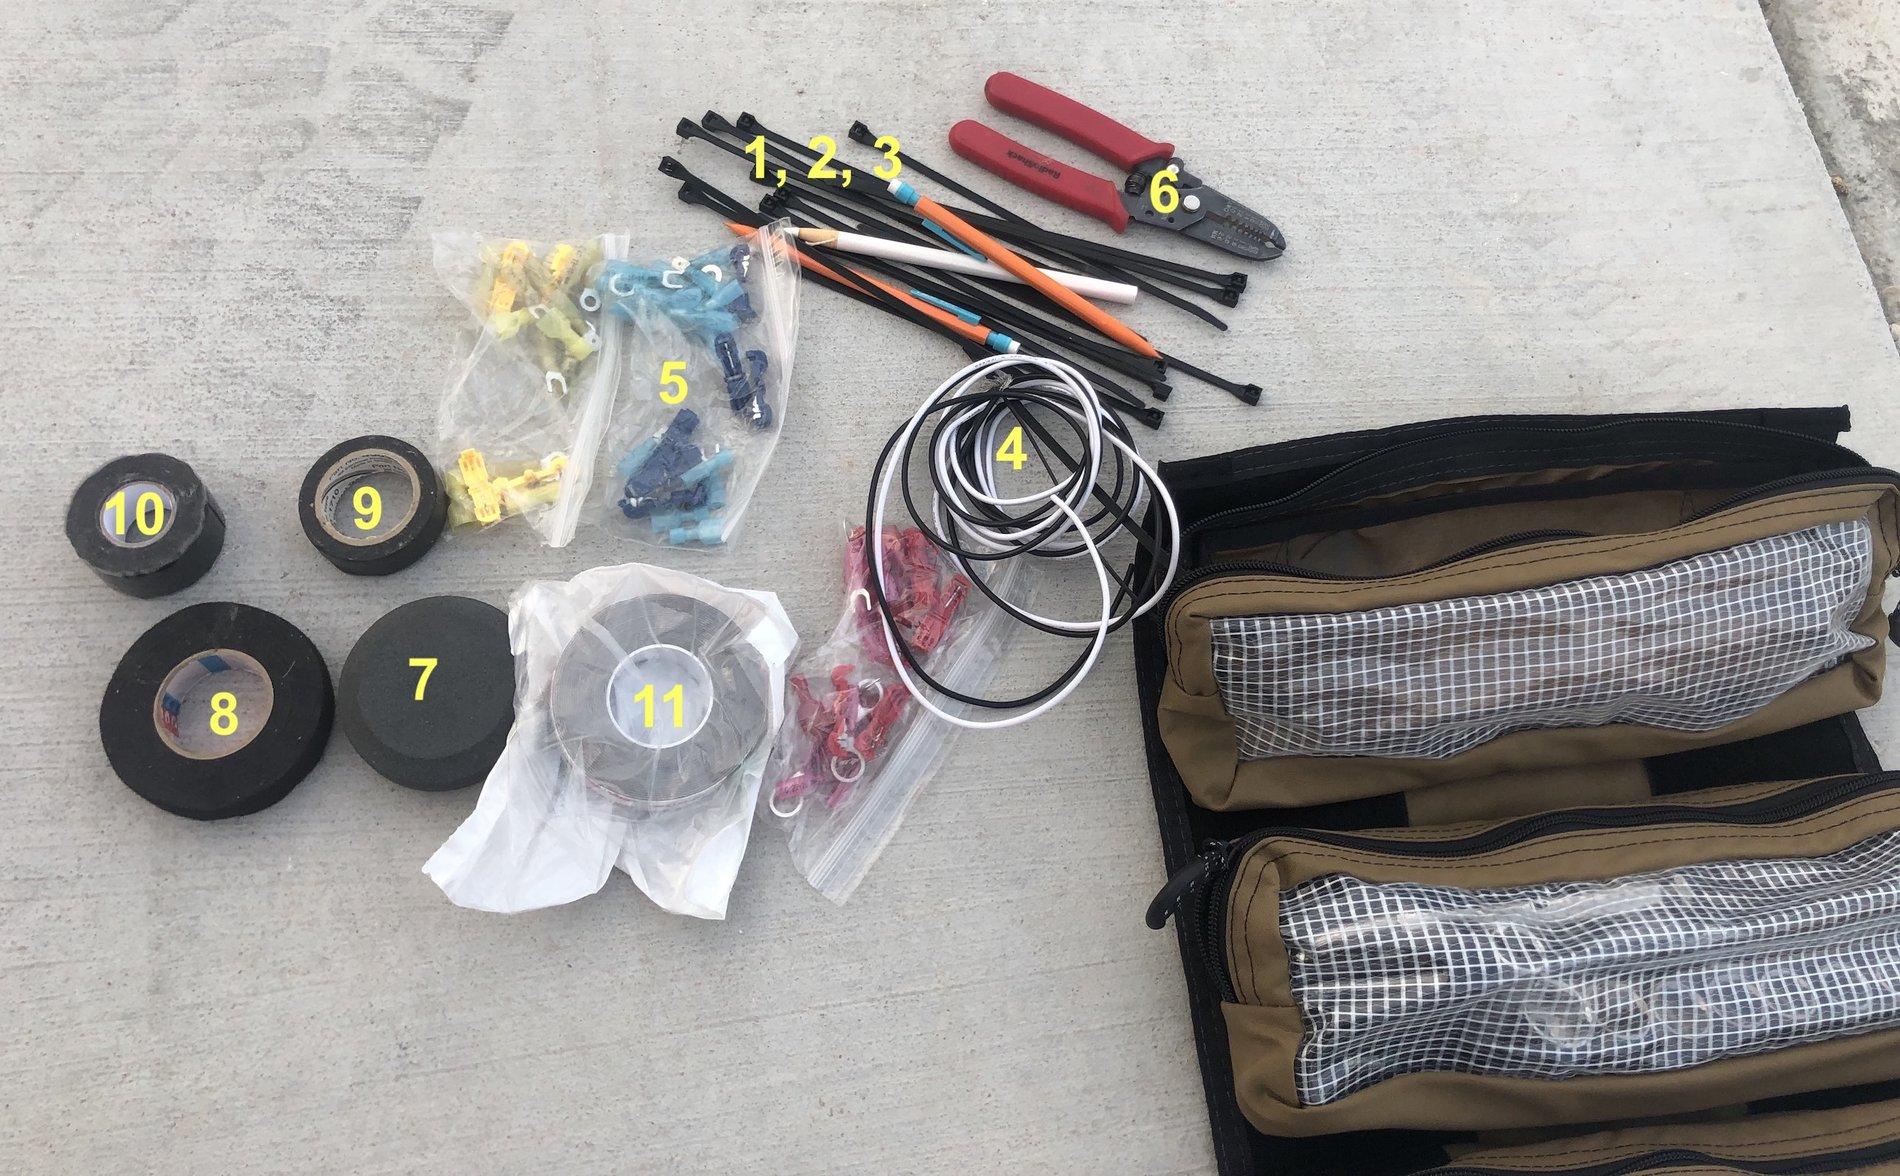
- Zip Ties
- 9mm disposable mechanical pencils (my garage is filled with these guys)
- White wax pencil (for writing on greasy parts, tires, etc)
- Spare electrical wire, just a bit of 16ga stranded wire I had lying around. NOTE - I just realized I need to add some midsize 14ga and some thicker 10ga to this still, since I have spare now after building that Overlanding Power Station
- Three snack-size zip lock baggies of random electrical connectors. T-splices, ring terminals, etc. One baggie for each of the three standard sizes.
- Old pair of wire strippers
- Axe puck - okay, this isn't electronics, but I it fits well with the rolls of tape. It's an axe sharpener, just rub it across the blade a few times after each use
- Wire Loom Harness Tape for protecting wires and holding things out of the way
- Good old generic electrical tape
- Silicone Rubber Self Fusing Tape - This is that stuff that stretches, only sticks to itself, and can handle heat up to 500°F. Insulates wiring, patches leaks, highly useful for all sorts of problems
- 3M VHB Tape - this is NOT for temporary fixes, but I had some left over from a Jeep project. If you clea the surfaces first, this stuff will stick. Permanently.
Pouch #2: Standard Hand Tools

- 3/8" Socket Wrench (I lost my old Craftsman one, so this is from Lowes)
- A 3" long 3/8" wobble socket extension and a 6" long 3/8" wobble socket extension, to help reach the tough spots
- 3/8" Sockets (all old Craftsman sockets from the toolbox my dad gave me for Christmas when I turned 16). I opened the hood and climbed under my JT and tried to make a list of socket sizes for every nut and bolt I could find. Then I tossed them all on a Wera fabric socket holder I had lying around and wasn't using. All these sockets have a use under a JT:
- 15mm Deep
- 21mm
- 18mm
- 17mm
- 16mm
- 15mm
- 14mm
- 13mm
- 10mm
- Flat Head Screwdriver
- Phillips Screwdriver (PH2 size, ie the standard American phillips size)
- An old 90-degree one-way-ratcheting Craftsman flat and phillips screwdriver for hard-to-reach areas (nowadays they're a lot fancier, with changeable bits)
- Wide mouth vise grips
- Ancient cheap pair of dykes
Pouch #3: Tubes, Bottles, and Fuses
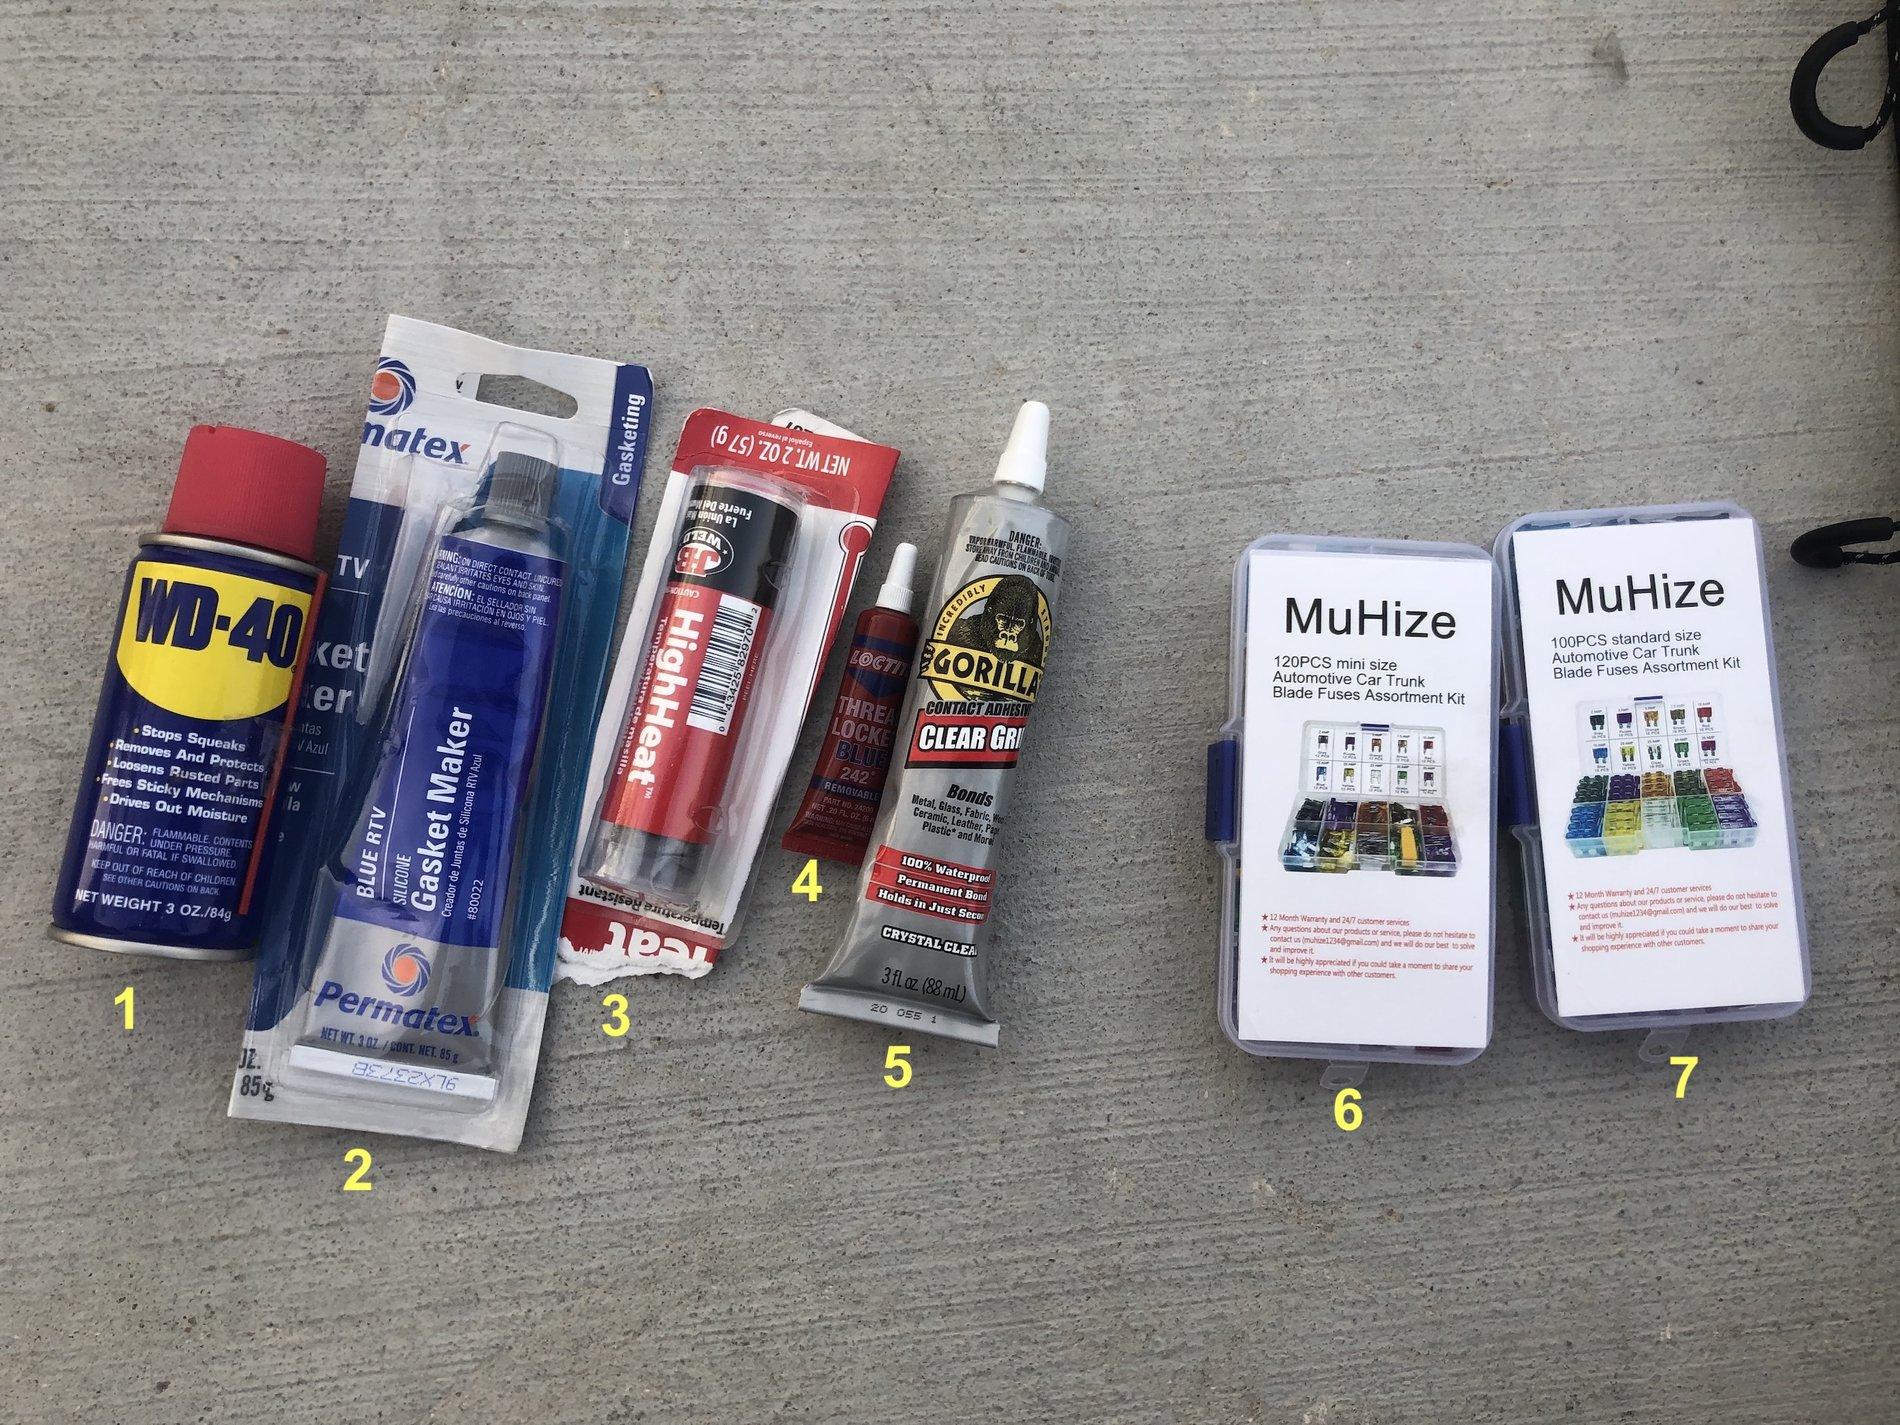
- WD-40, need I say more?
- Gasket Maker
- JB-Weld
- Blue Thread-Locker
- Gorilla Glue Waterproof Adhesive
- Mini-Size Fuse Assortment
- Regular Size Fuse Assortment (I got the both mini and standard as an assortment set on Amazon)
Pouch #4: Cut It, Fasten It, Loosen It
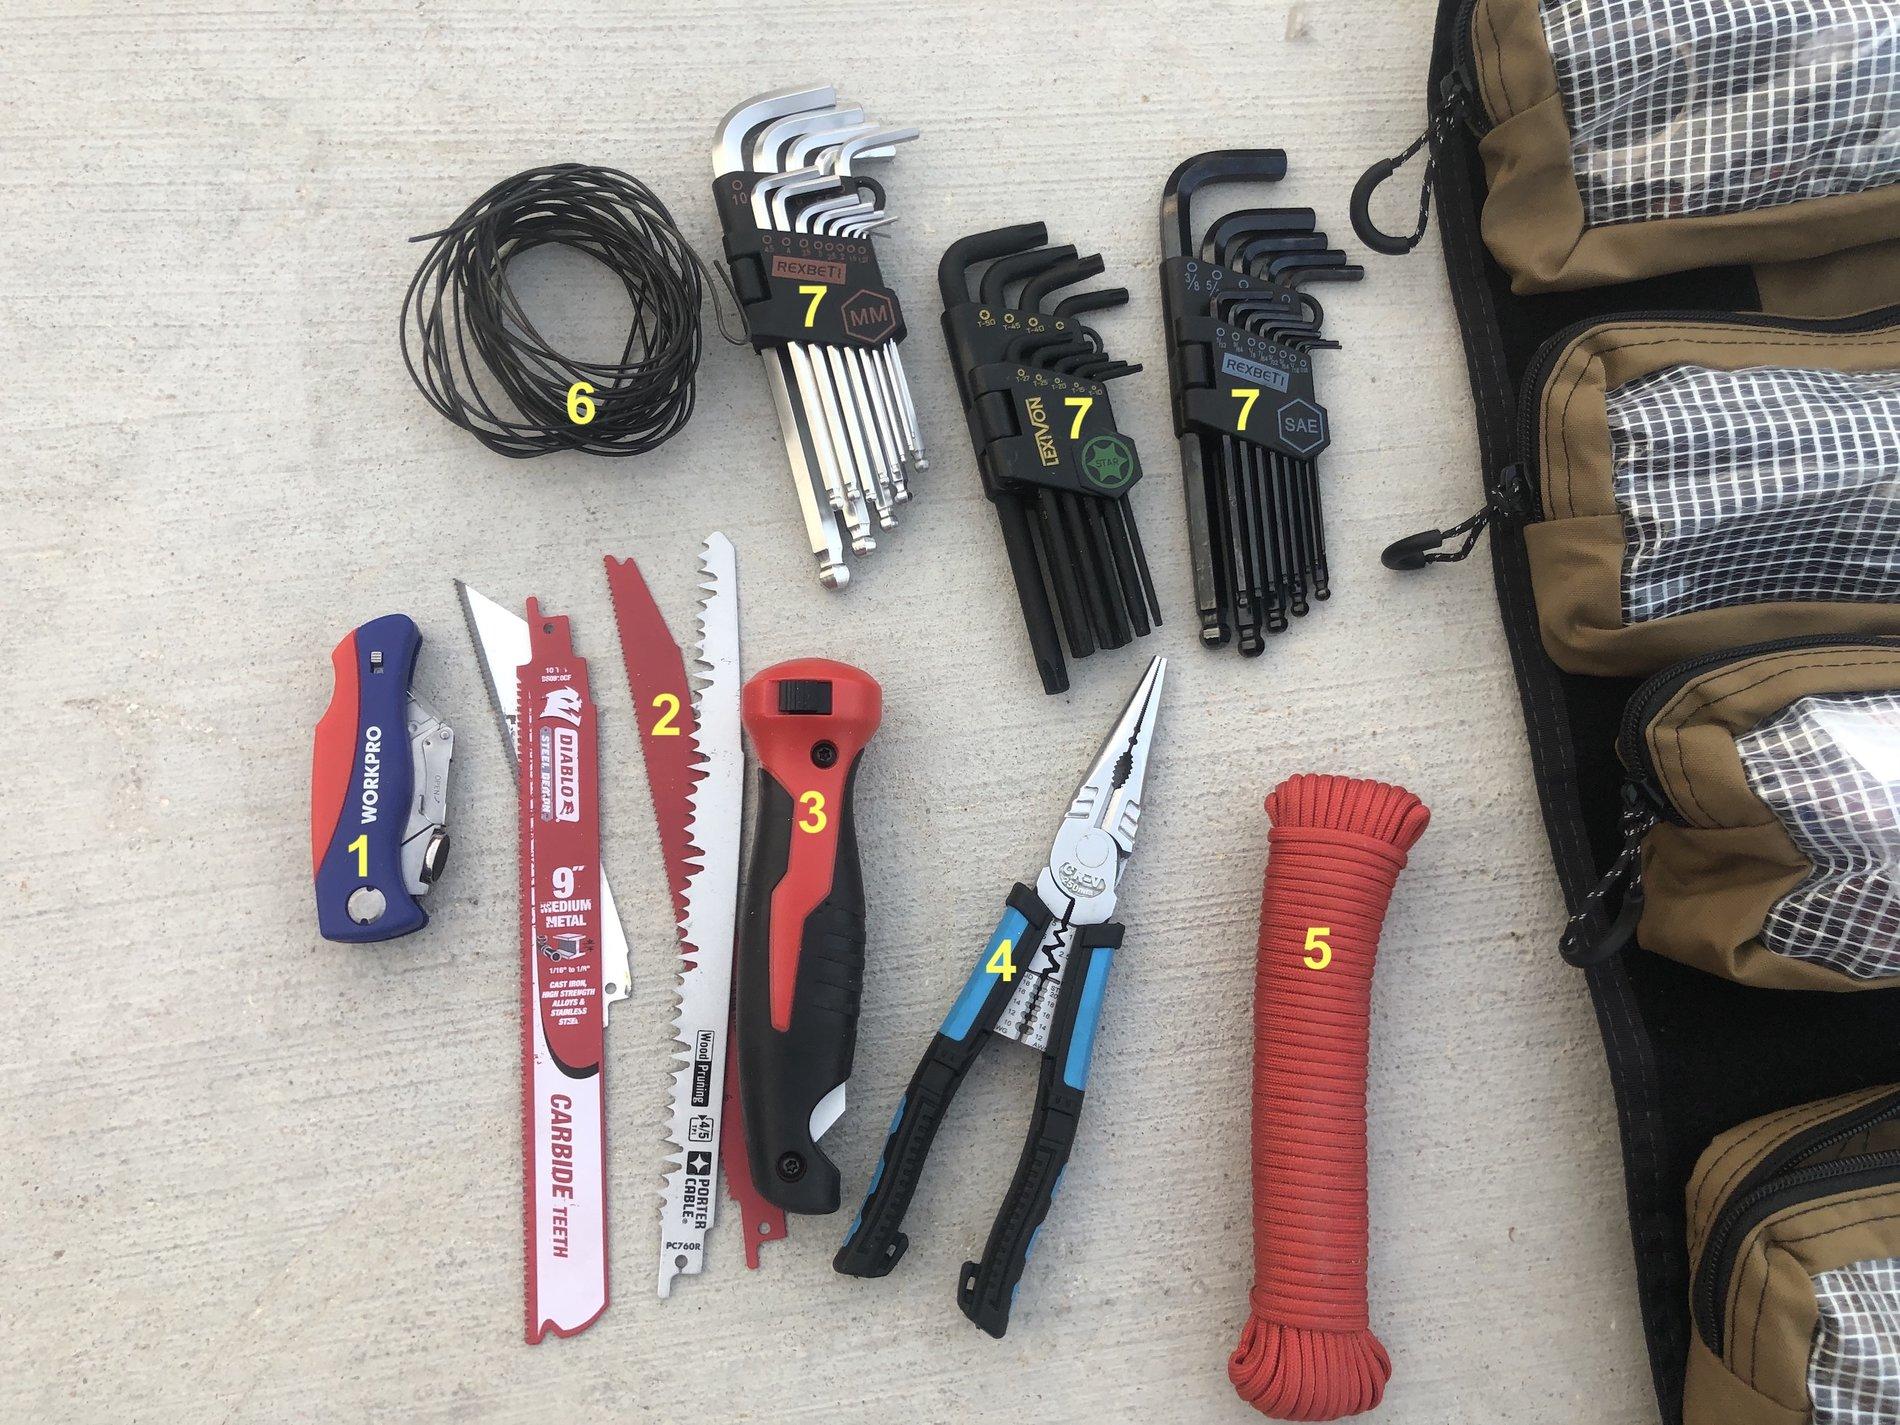
- Razor Utility Knife with spare blades
- Variety of spare sawzall blades (for wood, steel, etc)
- Milwaukee Folding Sawzall (this is basically a folding manual reciprocating saw)
- Needle Nose Pliers / Crimper / Wire Stripper
- A roll of spare 550 paracord
- A handful of bailing wire
- Hex Keys (Metric), Hex Keys (SAE), and Torx Keys
STILL MISSING
I still need a baggie of spare parts for my Jeep. (That's what pouch #5 will be for.) Just little things, like spare bolts for my bed rack, spare nuts and bolts for under the Jeep, etc. This is tough to come up with, though. It's easy to crawl under your Jeep and fit sockets to all the bolts. It's harder to look at bolts under your Jeep and guess what size you need to buy at Home Depot as a possible replacement.
Final Notes
I think of my Tool Roll as a "bare minimum" not as a "well stocked repair center".
What tools do you guys think I'm missing that I should really be carrying?
What size nuts and bolts are you carrying as spare parts?
Tools are always subjective, but I'm VERY open to suggestions and ideas for basics that I'm missing!
Etoimos
Well-Known Member
- First Name
- Keith
- Joined
- Dec 3, 2018
- Threads
- 17
- Messages
- 445
- Reaction score
- 608
- Location
- In the mountains
- Website
- adventuresofetoimos.com
- Vehicle(s)
- 2020 JTR , 2012 JKUR
- Vehicle Showcase
- 2
Nice build man, I'm really liking some of your setup.
Terminus33
Well-Known Member
I'm really interested in that picnic table set up but when I click on your link for the table on Amazon is leads me to some exercise resistance bands. Any chance you may be able to review that link in your post? Excellent write up on your build, I have enjoyed reading all of it and it gave me many ideas.
Sponsored
Similar threads
- Replies
- 161
- Views
- 47,222

- Replies
- 190
- Views
- 62,767
- Replies
- 41
- Views
- 21,277