Sponsored

Wanda the Wanderer: JTRD with Alu-Cab Canopy Camper

fourfa

Well-Known Member
Joined
Dec 12, 2021
Threads
9
Messages
745
Reaction score
944
Location
CA
Vehicle(s)
22 JTRD + ACCC
Build Thread
Link
OK, kinda dumb name I know but my GF and I always have vehicle names. Between the week-long wandering trips we tend to do around CA/NV/AZ/MX, and me explaining to her about the somewhat wandering steering on a straight axle truck, it just kinda stuck. Anyway, let's do this. At this point this thread is mostly for my own memory, to keep track of what I've doing to the truck. I'm currently un-modding and cleaning up a 2005 Tacoma with 270,000 miles to prep for sale, and I have no idea why I did half the stuff I did, lol. Wish I had a build thread to refer to!

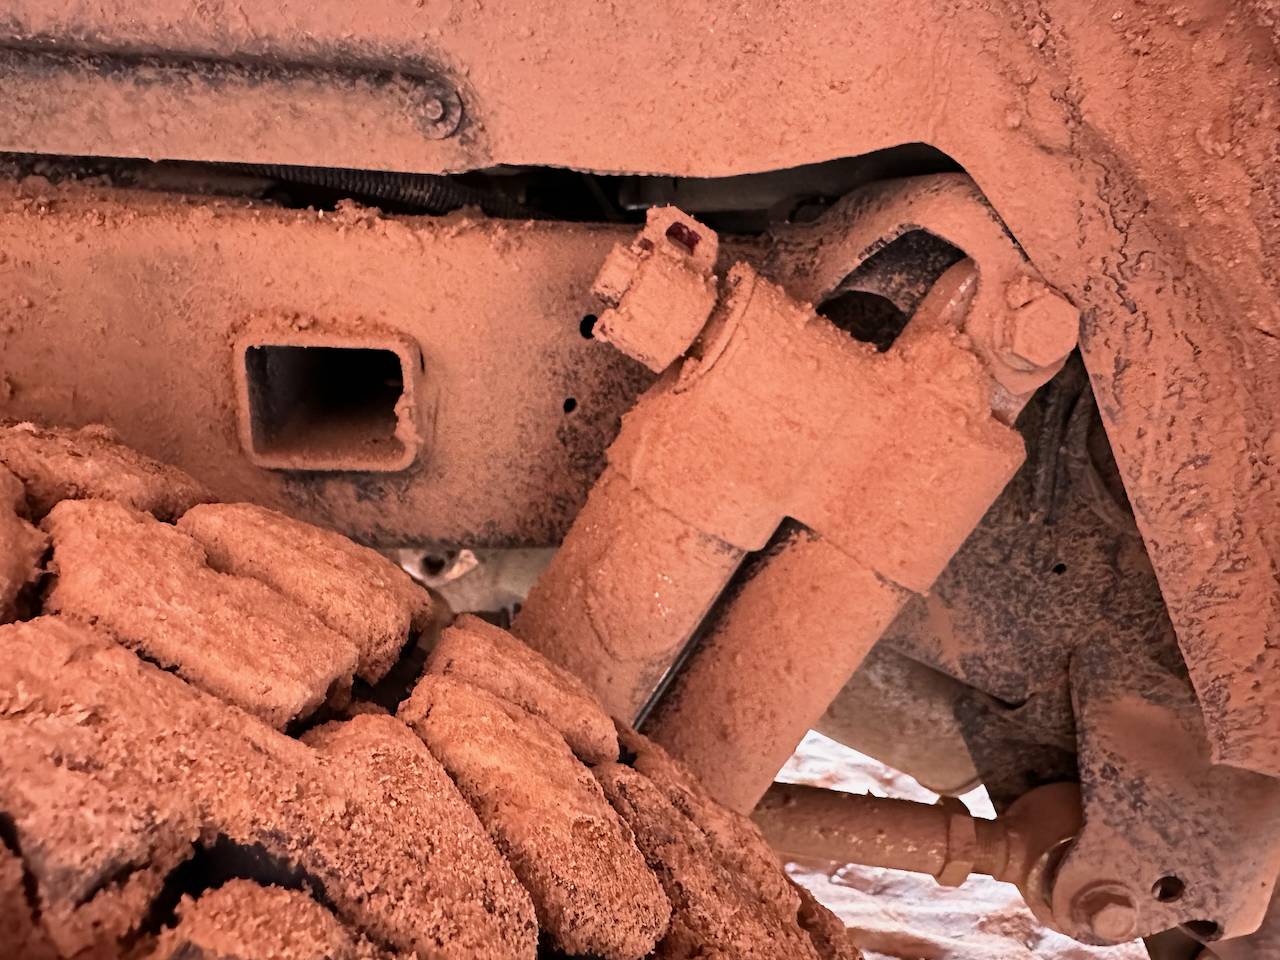
I was super happy with that DC/LB Tacoma on 32s for years... until I got into a weird little pickle where the tires dug out in soft gravel between boulders in Anza-Borrego, grounded out in the middle aft of the belly armor, then dragged and broke the driveshaft. Managed to self-rescue, repair, and salvage that trip, but that's when I realized I wanted bigger tires, more clearance, and lockers, and I didn't really want to do it on that 17-year-old high-miles platform with crap brakes. Didn't take much looking before I found the JTR with F&R lockers and room for big tires, the availability of a the diesel really sweetened it for me, and the test drive just sealed it.

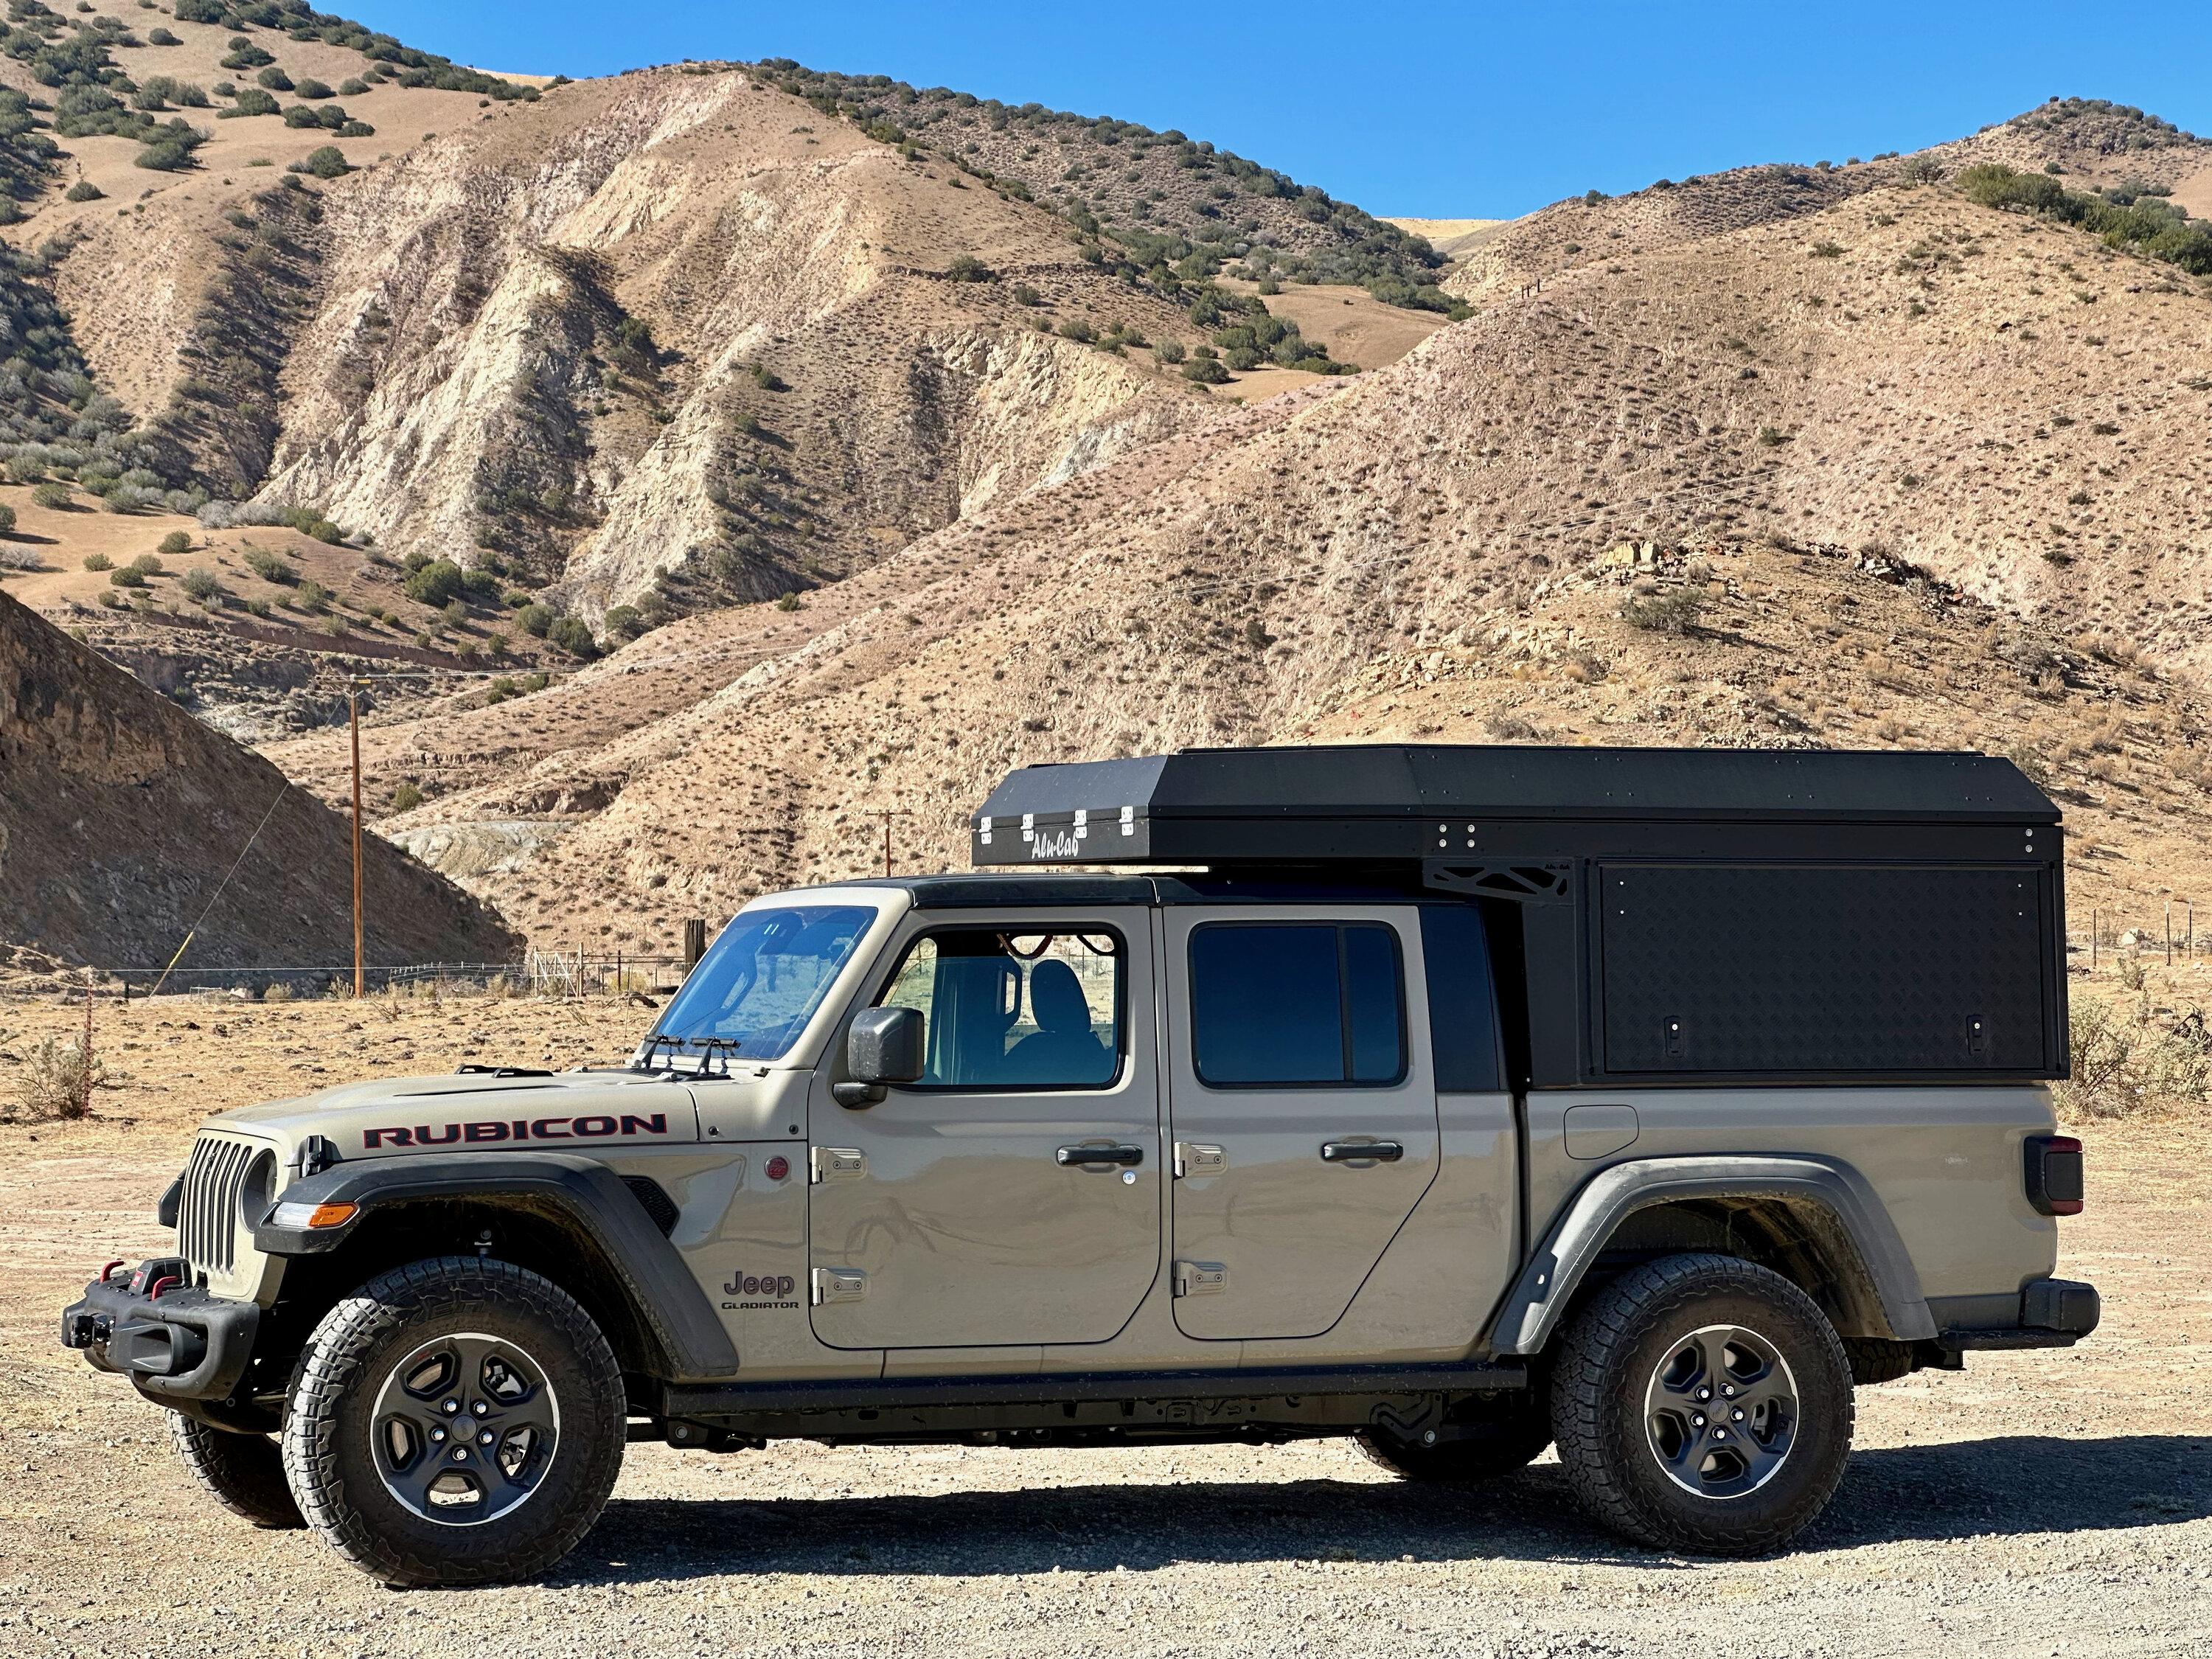
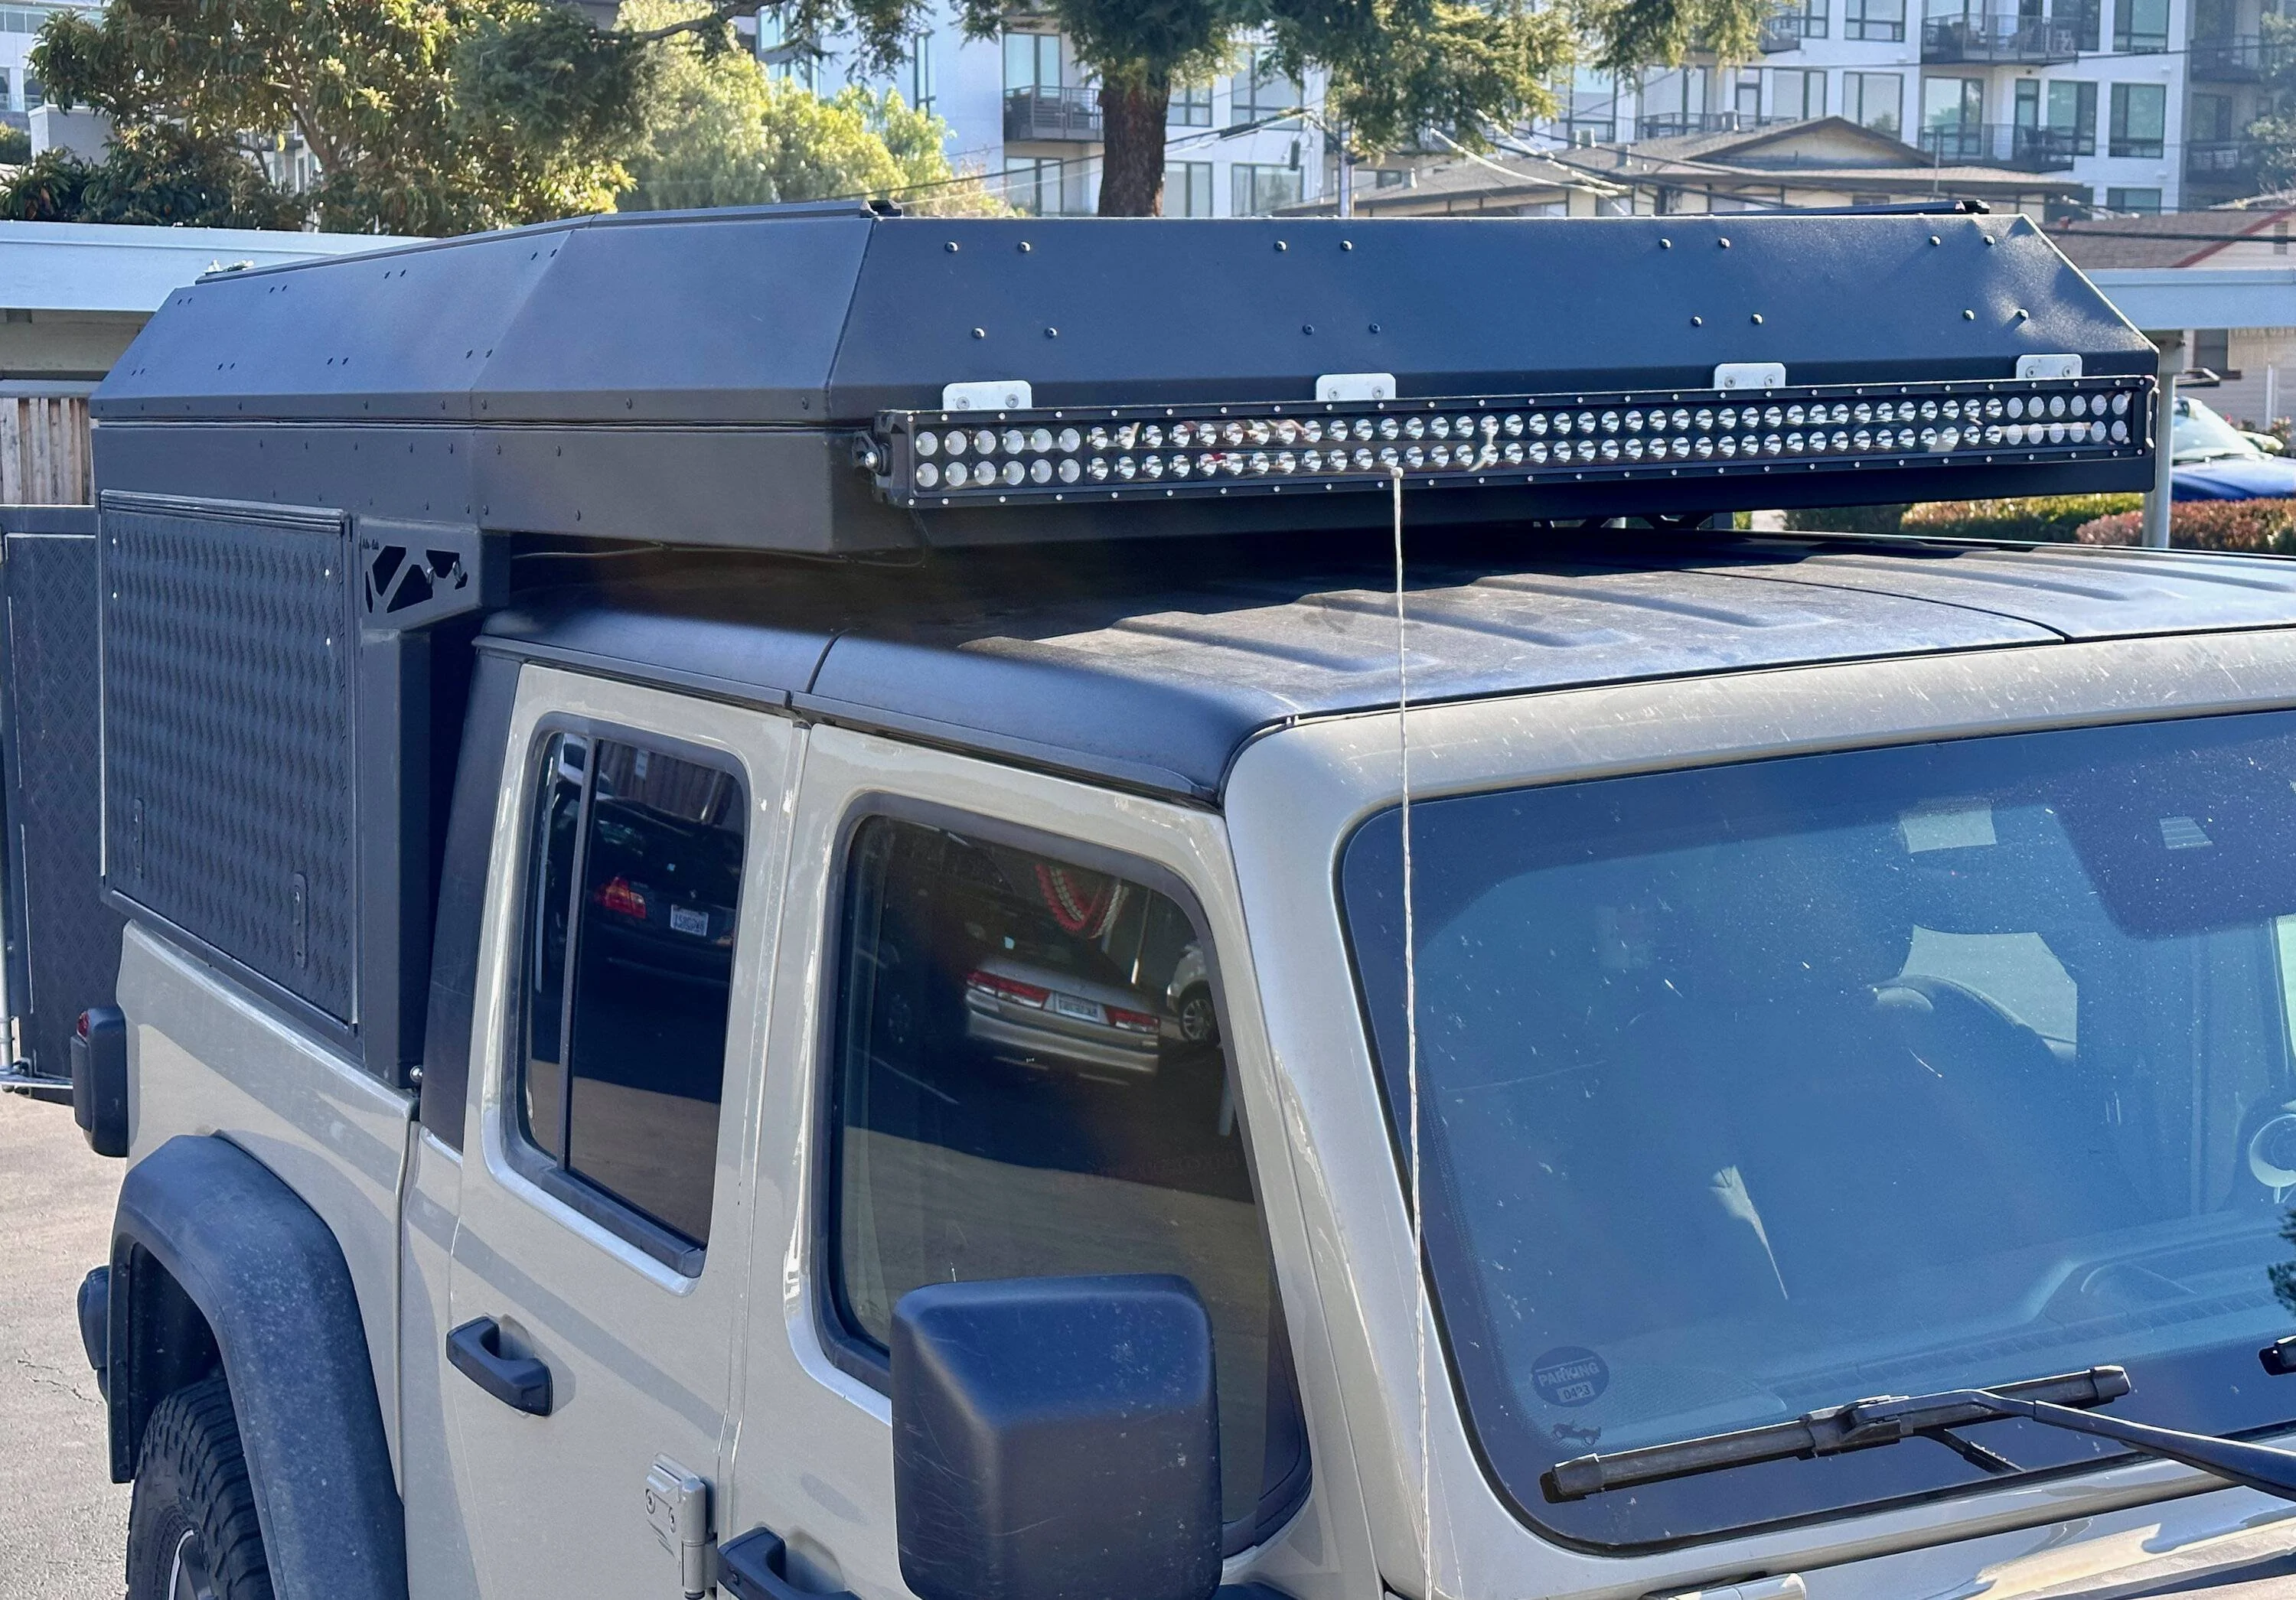
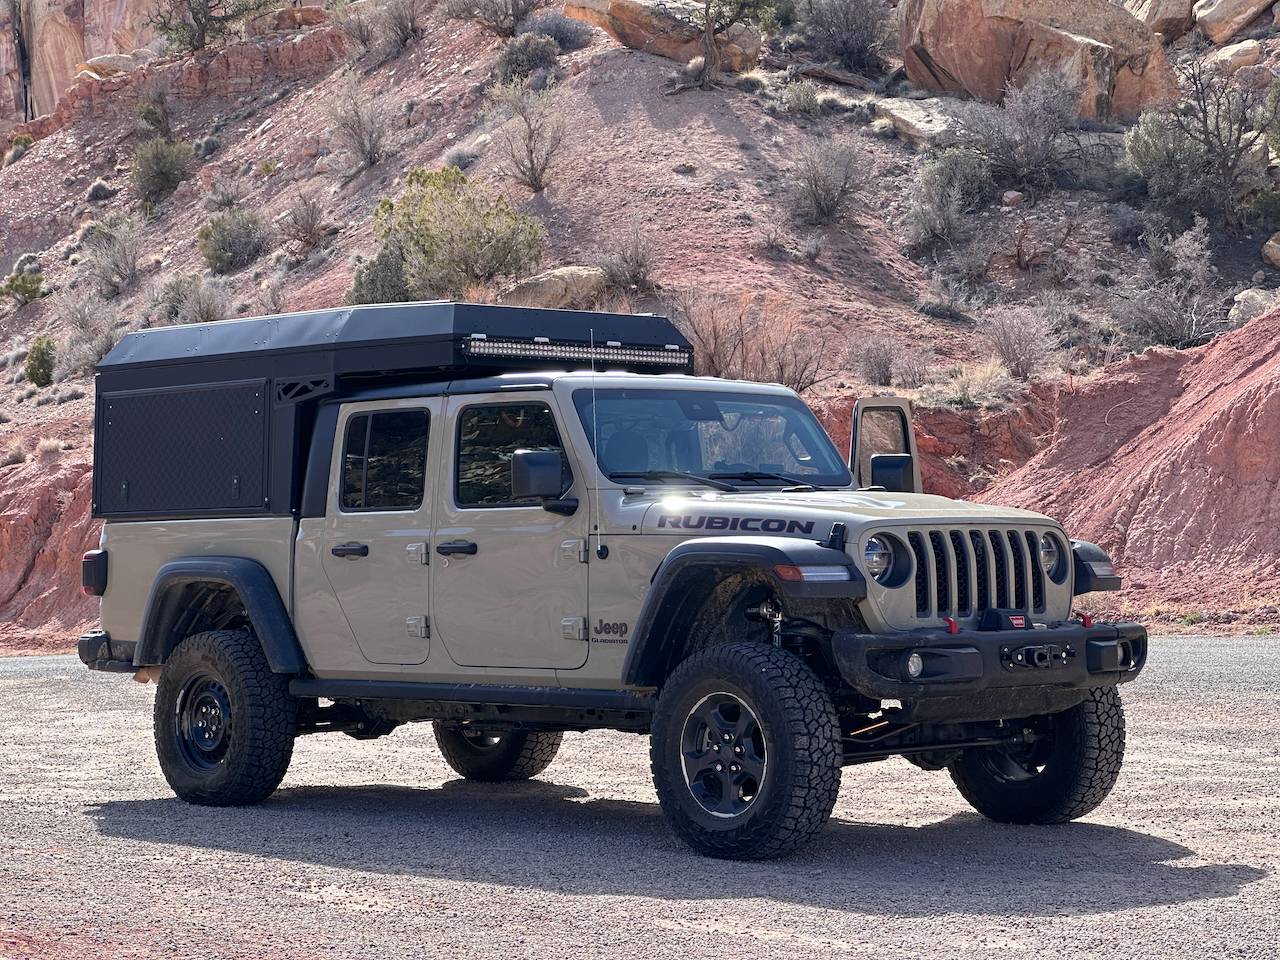
Having camped on a mattress under a cap in the back of the 6-ft bed for many years, the 5-ft bed was a problem at first... until I discovered the wealth of pop-up campers on the market currently. Narrowed it down to GFC v2 vs Alu-Cab - the GF and I together chose the heavier and more luxe Alu-Cab after a lot of thought (and spreadsheets of GVWRs and the weight of all our camping and wheeling gear, lol).

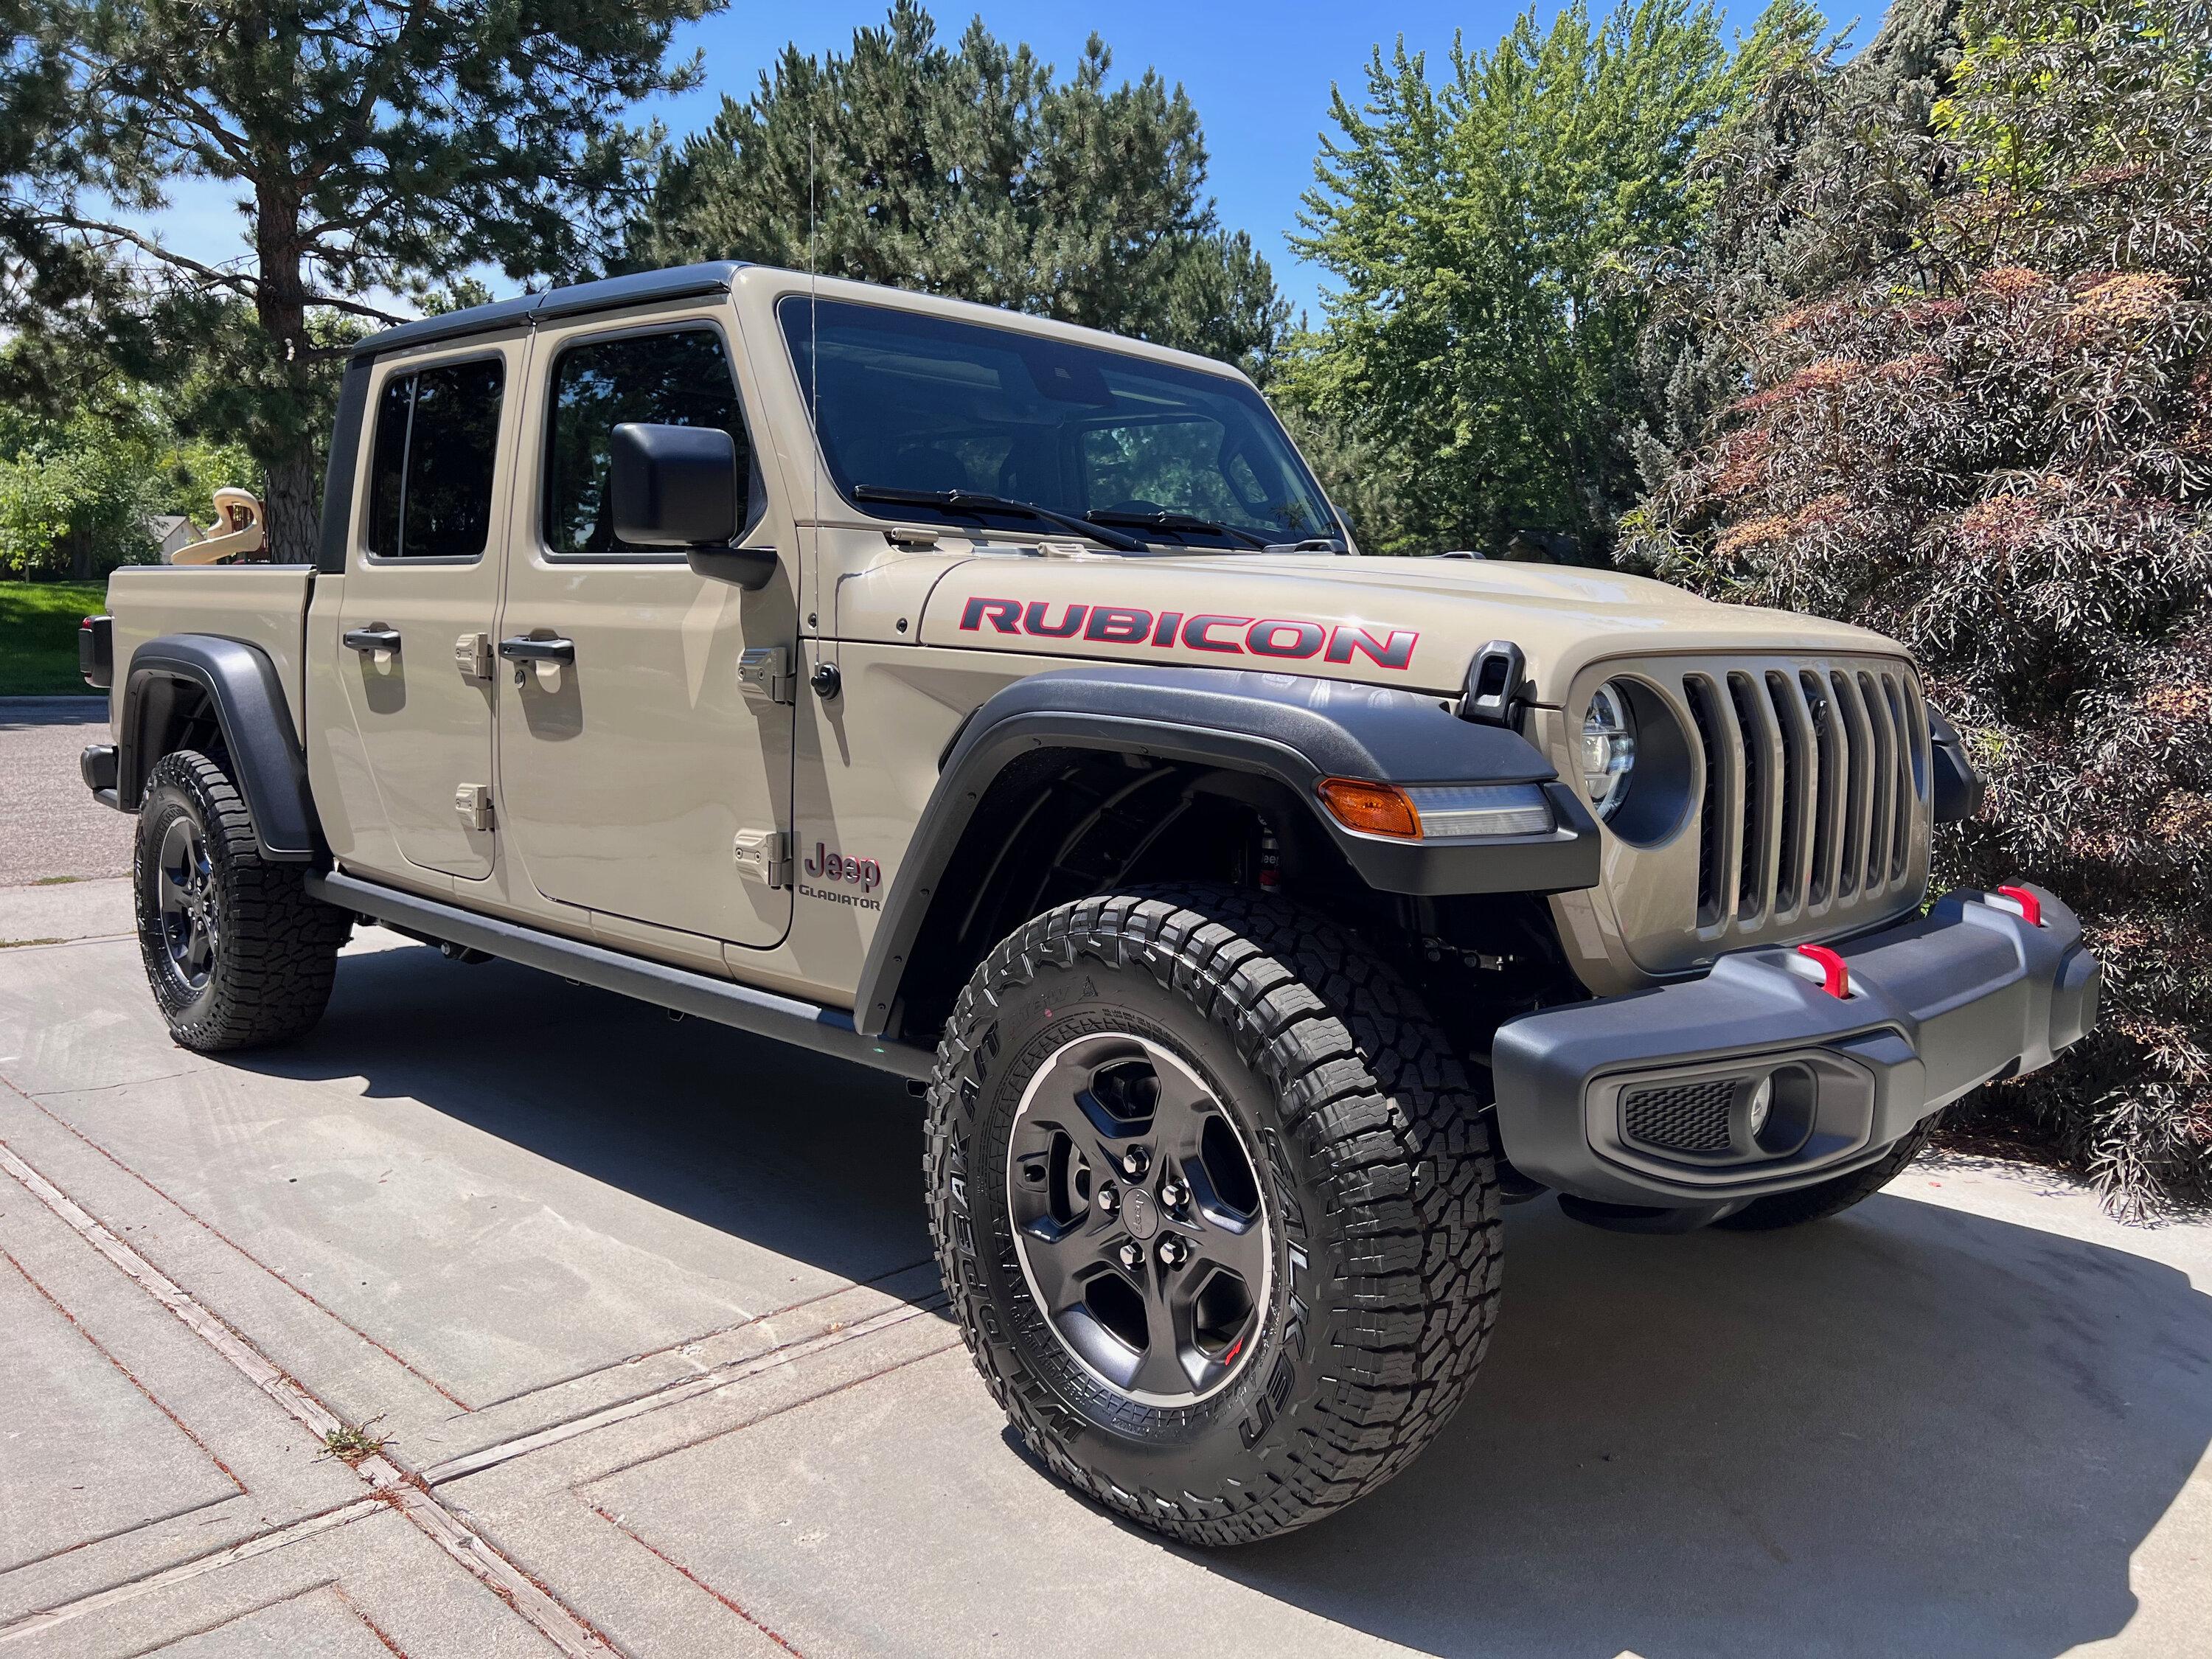
Custom ordered a Gobi diesel Rubicon from Peterson in Nampa, ID in April 2022. Truck got built a month later, shipped out 2 weeks after that, then spent a frustrating six weeks seemingly waiting for a truck transport to the dealer. 2 weeks after delivery, 15 weeks after order, I was flying into Boise. Got to the dealer half an hour before closing on a Friday, and was rolling out before they closed. I'm still kinda shocked that it can be so easy

Took two gentle days to drive back to the Bay Area, camped out on a pad in the bed somewhere in Nevada. Love the way it drives stock, and had a ton of fun with all the cool features on a modern vehicle. First tank got 28 mpg :o

IMG_8892.jpeg
Sponsored

 
OP
OP
fourfa

fourfa

Well-Known Member
Joined
Dec 12, 2021
Threads
9
Messages
745
Reaction score
944
Location
CA
Vehicle(s)
22 JTRD + ACCC
Build Thread
Link
First up was winch and bumper (mandatory first mod for me). New Warn VR Evo 10s, and the MP Concepts aluminum copy of the Mopar steel bumper. Trying to choose light gear when I can with this build, and make sure utility per pound stays high, and stop throwing in all the extra just-in-case stuff on trips. So... aluminum bumper, and this one ticked the right combination of weight, cost, and looks for me.

Install took a few iterations of loosen a lot of the bolts holding the bumper parts together, slide the winch, winch plate, and bumper all on at the same time, then tighten it all up. There is one significant rework needed on my Rubicon - the included winch plate needs a notch added to clear the swaybar disconnect. Meanwhile there's a random-ass notch on the opposite side of the winch plate, where there's nothing at all that can possibly interfere. I honestly think they flipped the part drawing!

Biggest complaint with the bumper is the finish, which is like high grit sandpaper. When it even touches foliage it just fills up the grit with vegetable matter. I plan to hide the finish under a protective layer of mud and dirt most of the time, lol.

Also added the Metalcloak rear swaybar tab reinforcements while I was doing basic intro mods. Wheel locks, hood locks, Mopar door sills, and grab handles custom-made by @darksidedesign here on the forum in tan/red/black to match the truck. Thanks Preston!

Jeep Gladiator Wanda the Wanderer: JTRD with Alu-Cab Canopy Camper IMG_8928


Jeep Gladiator Wanda the Wanderer: JTRD with Alu-Cab Canopy Camper IMG_8954 (1)


Jeep Gladiator Wanda the Wanderer: JTRD with Alu-Cab Canopy Camper IMG_8956
 
OP
OP
fourfa

fourfa

Well-Known Member
Joined
Dec 12, 2021
Threads
9
Messages
745
Reaction score
944
Location
CA
Vehicle(s)
22 JTRD + ACCC
Build Thread
Link
We put in a deposit on the Alu-Cab in May. Got the call in September (13 weeks). Drove up to Oregon for install at DasMule. Just the basic camper, Sikaflex in every nook and cranny, and the backup camera relocate, that's it. I have access to a full machine shop at work and my plan is to fabricate a lot of doohickeys as needed, keep it simple and lightweight, and add things only after we prove to ourselves we can't live without them.


One of those things in the shop was a winch disconnect switch. I wanted to relocate the Warn control pack into the engine bay, effectively doing the same thing (ie not driving around all the time with hundreds of amps of hot positive wire out in front, and making it harder for anyone to mess with the winch) , but it looked a little too messy and tight to do all four cables in the very cramped diesel engine bay (huge change from my roomy Tacoma). So I settled on a simple BlueSea disco as close to the battery as I could fit it, on a custom bracket and made use of a couple unused M6 threaded inserts on the fender.

I picked up a proper Temco hydraulic crimper (TH0006) to do the winch wiring - what a good decision. So easy to make exactly the cable I want, exactly the length and terminal I want, complete control and very high quality crimps. I probably went overboard with 1/0 mains straight from winch to battery, but what's the point of a 10k winch if your stock 2g Warn wires heat up after a few seconds and limit it to 8k of pull? That's how I read the wiring charts, anyway.

IMG_0125.jpeg


IMG_0374.jpeg


IMG_0123.jpeg
 
OP
OP
fourfa

fourfa

Well-Known Member
Joined
Dec 12, 2021
Threads
9
Messages
745
Reaction score
944
Location
CA
Vehicle(s)
22 JTRD + ACCC
Build Thread
Link
Started working on simple quality-of-life mods for the cab and camper. Got my old Scangauge II updated to handle all the turbodiesel readouts (ie boost, soot load, regens). Relocated the SiriusXM antenna, which gets partly blocked by the ACCC (I've quickly become addicted to the metal stations during the SXM trial period)

Thanks to @Jooshs for this post about a super clean wireless charging setup: Bulletpoint arm, Apple Magsafe charging puck VHB-taped to it, powered by a USB-C outlet (cut and soldered as minimal as possible, and spliced into the stock 12v dash socket with a harness) all hidden behind the dash. Way easier to do than I expected; highly recommended. The phone will pop off the magsafe puck in hard wheeling and washboards, but for 99% of the time it's perfect. Thanks Jooshs!

Added a Carlinkit 4.0 wireless Carplay adapter to go with it. I was super dubious about this, but I'll be damned if it didn't connect right up, and reliably links up every time. I stuck the tiny adapter up on the inside of the center console cubby, and leave it plugged in on its short USB-A cord, and forget about it. Just works.

Ran 6-gauge power to the bed (again probably overkill for just 40A) running off AUX1, grounded to a convenient ground above the spare tire, wired into a simple BlueSea fuse block with separate fuses for lights, chargers, and an input for a 120W folding solar panel I've had forever. Swapped the panel's connector for a gray Anderson SB50 (matching what ACCC has pre-installed on the roof), wired the controller into the fusebox, and bam I'm holding 13.5V during the day while charging phones with the engine off.

Jeep Gladiator Wanda the Wanderer: JTRD with Alu-Cab Canopy Camper IMG_0377


Jeep Gladiator Wanda the Wanderer: JTRD with Alu-Cab Canopy Camper IMG_0379


Jeep Gladiator Wanda the Wanderer: JTRD with Alu-Cab Canopy Camper IMG_0382


Jeep Gladiator Wanda the Wanderer: JTRD with Alu-Cab Canopy Camper IMG_0082
 
Last edited:
OP
OP
fourfa

fourfa

Well-Known Member
Joined
Dec 12, 2021
Threads
9
Messages
745
Reaction score
944
Location
CA
Vehicle(s)
22 JTRD + ACCC
Build Thread
Link
Started the camper build, kinda rushing to get to a usable state before a planned week in Death Valley backcountry over Thanksgiving. I looked at pre-made drop-down tables for the Alu-Cab rear door - as far as I can tell they're all sized for the Wrangler rear door (ie much shorter than the space available in the ACCC), or absurdly expensive, or both. I kinda whacked something together from aluminum diamond plate, C-channel, countersunk screws and acorn nuts, and a hinge. All found at the local big box home improvement store. Needs a bit of refinement still but it's a start.

Started adding insulation into nooks and crannies behind panels. Made a simple soft floor from utility carpet and carpet foam. Mounted a Titan Sidekick 15-gallon fuel tank on the left side of the bed (managing 4 MFCs full of gasoline was one of my big grievances with the Tacoma, but we found over and over we needed that much range. Advantage: diesel). Found a good way to secure a pair of our 20L MWCs on the front bulkhead of the bed for fresh water (I couldn't stomach the price of Alu Cab's 50L water tank, nor how unnecessarily high above the floor it mounts).

Dashed off a quick dog bed platform for the downstairs from a pair of 12x1" boards, secured with some bar-stock brackets running up thru slots in the boards, covered in utility carpet. The M8 accessory rails all over the interior and exterior of the Alu-Cab make it so easy to whip up stuff like this. The platform is a little light for people to sit on (I might work on this), but the dogs love it. Tied the ice chest down with a couple carabiners and said good enough for our first big trip

Jeep Gladiator Wanda the Wanderer: JTRD with Alu-Cab Canopy Camper IMG_0397


Jeep Gladiator Wanda the Wanderer: JTRD with Alu-Cab Canopy Camper IMG_0415


Jeep Gladiator Wanda the Wanderer: JTRD with Alu-Cab Canopy Camper IMG_0422


Jeep Gladiator Wanda the Wanderer: JTRD with Alu-Cab Canopy Camper IMG_0429
 

Sponsored

OP
OP
fourfa

fourfa

Well-Known Member
Joined
Dec 12, 2021
Threads
9
Messages
745
Reaction score
944
Location
CA
Vehicle(s)
22 JTRD + ACCC
Build Thread
Link
Let's see, want to log a few more small things. Stock Alpine sound with the 8.4" on the Rubi is... well sound comes out, that's about all I can say for it. The Infinity Reference REF-3032CFX 3.5" tweeters for the upper dash went on sale, worth a shot, popped 'em in with the Metra 72-7902 harnesses. Massive increase in treble, totally harsh and unbalanced at first - had to cut the treble and boost the mids to try to even things out. As they break in they're sounding more pleasant, but the front badly needs the 6.5" woofer to go with the tweeters as the meat of the midrange is just thin and empty. I have a lovely 8-channel a/d/s/ amp sitting around from a previous vehicle (BMW M3 Nakamichi - a/d/s/ - Dynaudio, still miss that ride), still considering ripping out everything Alpine and starting over with Focal separates or something.

2" convex mirrors stuck in the lower inside corners of the side mirrors - have had these for many years on the Taco and can't live without

Picked up a Tazer JL Mini on a great refurb discount at Z Automotive. I am still gobsmacked that Jeep can ship an important off-roading feature (Off Road Pages) that requires a cell connection to work. I guess 98% of their customers live in the East where you're never without cell service, or rarely leave pavement, or both? We aim to spend all of our trips out of service range. Anyway this required an urgent fix, and the SGW override function of the Tazer is it. Overall my review so far is mixed - ultimately this type of module seems so hacky. If you put the front camera app icon on your quick app dock, you can see the Jeep and the Tazer fighting over whether it's available at speed or not, flickering gray and white continuously. That's not great. I assume similar struggles are going on in the background with lots of functions (swaybar wouldn't disconnect in 4H once when I wanted it to). They added a PIN code lock, but didn't consider that it might kick in during an ESS stop? And immobilize the vehicle in the middle of a busy road? WTH? The setup is complex and balky, their instructions are legendarily disorganized and easy to screw up, the UI through the dash is ill-conceived, I need a cheat sheet to remember the control mapping which is always a bad sign.

The Turn Cam seems like a good idea at first, but it's so poorly implemented. Lags the start of signalling by a critical half second, stays on a little too long, and is absolutely blinding at night with no way to adjust. My GF tried driving at night with it for the first time, and told me in no uncertain terms to dust off and nuke the Turn Cam from orbit. (it's the only way to be sure). The market badly needs a product that does all the Tazer does, but with a clean smartphone app interface designed by an actual UX/UI designer (IMHO). Anyway ultimately it does the job, I'm just picky about UI

I replaced the stock Warn hook (I hate these) with a Factor 55 splice-on shackle mount. I was planning to just have a simple closed loop thimble, and hook it on the Rusty's hooked fairlead cover (stock style bumpers have a plastic cover over the fairlead, with a dozen extra slots and holes for it to snap in on, this covers all those holes), but there's no metal thimble in the world that fits over the hooks. The F55 splice-on went on sale, and along the way I learned how to properly splice rope, so I'm OK with it. I might remove the Rusty's, we'll see.

I revamped my recovery kit, replacing heavy rusty old bow shackles and giant metal pulley with OVS soft shackles and soft pulley. Kept one good metal shackle with a rotating clevis pin (not threaded) for more unusual rigging and redirects. Added an X-Lock, which is a really versatile tool for all kinds of things. Turned my old Taco soft winch line into an extension (put the original wire rope on the Taco). Made up a logbook to track use, maintenance, washing, load ratings all in one place. Found the perfect tanker's tool bag at army surplus to hold it all. Lesson learned from wheeling the Taco: never bury your recovery equipment under all your camping gear or dogs. When you need it, odds are you need it fast and you don't want the dogs jumping out into a mud pit.
 
Last edited:
OP
OP
fourfa

fourfa

Well-Known Member
Joined
Dec 12, 2021
Threads
9
Messages
745
Reaction score
944
Location
CA
Vehicle(s)
22 JTRD + ACCC
Build Thread
Link


How did I ramble on for 10 minutes, lol. But this covers the aux fuel tank, platform build, cook table, and a few other things

Installed a 52" light bar on the front edge of the Alu-Cab:
Jeep Gladiator Wanda the Wanderer: JTRD with Alu-Cab Canopy Camper IMG_0766

It's from Harbor Freight of all places. But the build quality looks good to me, waterproof, dust sealed, IP67 rated, and good value especially at their sale price. I'm sure there are other bands that are even better, but this thing is bright AF, nice broad pattern up close, carries very far down the trail.

My one oops was I looked at the wiring harness that came with it, saw it was fused at 10 amps and thought, terrific - I can just wire this straight to one of the 15 amp AUX circuits. So I cut apart the harness, deleting a relay and fuse holder, turned it on, looked great. Couple of days later I looked again at the cut harness, and it's actually a 30 amp fuse (and the instructions clearly say, do not fuse at less than 30 amps). Meanwhile that 15 amp fuse has not yet blown in several short tests around town. So I need to measure the actual current draw at the fuse and see if I really need to put this on a supplemental relay or not. Definitely want to be safe

Alu-Cab has a bracket that holds the camper side of the rear door gas strut, and the webbing strap that limits the door opening. That bracket is riveted in four places, but the strut and webbing hang down lower than they need to, putting a substantial moment arm on the forces from the door. The design is crap, and four aluminum pop rivets are not up to the task. After just 10 weeks, the rivets sheared off and the bracket broke completely free:
Jeep Gladiator Wanda the Wanderer: JTRD with Alu-Cab Canopy Camper IMG_0767


For the meantime, I enlarged the rivet holes for 4x M6 threaded rivnuts (I've ben using these all over the Alu-Cab), enlarged the holes in the bracket for some M6 button head cap screws, and bolted it back on. Seems stronger than it ever was with the rivets, but it's still a crap design and I'd like to build my own sturdier solution. Ideally, one that can quick release somehow to allow opening the door 180 when needed. A lot of ACCC installs have a MOLLE plate, or propane tank, or spare tire mount that prevents opening the door wider - I don't plan to have any of those things so it would be nice to open up wider when cooking.
 
Last edited:
OP
OP
fourfa

fourfa

Well-Known Member
Joined
Dec 12, 2021
Threads
9
Messages
745
Reaction score
944
Location
CA
Vehicle(s)
22 JTRD + ACCC
Build Thread
Link
Hacked up a compressor mount for under the passenger seat with the leftover diamond plate from the rear door table project:
Jeep Gladiator Wanda the Wanderer: JTRD with Alu-Cab Canopy Camper F5248606-3C13-4896-A12E-1F295B14C263

Jeep Gladiator Wanda the Wanderer: JTRD with Alu-Cab Canopy Camper 6E8869CB-D161-4394-95BB-4E12EC39BDBC

Jeep Gladiator Wanda the Wanderer: JTRD with Alu-Cab Canopy Camper 4FF75651-6E8E-43DD-A198-1C31DA62C574

wired straight to one of the 40A AUX under the glovebox. There’s a perfect ground under the left side rail of the passenger seat. Removed some unnecessary stuff (switch, rear cap, etc) and spliced on an Anderson 50 connector.

Also hacked up a 2-tire inflation system:
Jeep Gladiator Wanda the Wanderer: JTRD with Alu-Cab Canopy Camper 22C434D9-D283-4C48-ADE1-B9A8EE6188AE


I’ve had this Viair 300 around prior to Wanda, so I might as well run it. But eventually it may prove undersize. Maybe that day will come soon:
Jeep Gladiator Wanda the Wanderer: JTRD with Alu-Cab Canopy Camper 3836C903-06EB-4474-9C07-C3995FFE731C
 

Sponsored

OP
OP
fourfa

fourfa

Well-Known Member
Joined
Dec 12, 2021
Threads
9
Messages
745
Reaction score
944
Location
CA
Vehicle(s)
22 JTRD + ACCC
Build Thread
Link
I had my 15-gallon Titan Sidekick aux fuel tank out for clean and check, so I shot a quick video on how it goes in

 
OP
OP
fourfa

fourfa

Well-Known Member
Joined
Dec 12, 2021
Threads
9
Messages
745
Reaction score
944
Location
CA
Vehicle(s)
22 JTRD + ACCC
Build Thread
Link
Let's see... going to try to be better about updating this thread more regularly. We had a April spring break trip to Escalante lined up, so I spent a few weekends doing the suspension install. Mostly stuff I collected last black friday and has been sitting in boxes since.

Clayton springs (3.5" HD rear, 3.5" diesel front), Metalcloak adjustable arms and track bars, and Teraflex's rear swaybar and extended travel kit. And the diesel-specific Falcon SP2 3.3 shocks. Lots of work, lots of banged knuckles, but I got it done myself.

Some random notes I kept: apparently none of the aftermarket front track bar ends actually fit the stock vehicle? The space in the axle-side bracket is pretty small, and aftermarket joints are larger diameter, so they interfere on the bottom and don't allow the bolt to slide through. The mfg's just say "no big deal, get out a die grinder and make space." Using a dremel instead is slow going, but it worked. OK, fine.

For the passenger side, frame-side upper control arm bolt, MC says just cut the bolt out, you can't get it past the exhaust heat shield. On my diesel, I was just able to sneak it by the exhaust by pushing the aluminum heat shield down a bit. Which is good, as the bolt Metalcloak supplies is coarse-threaded imperial, instead of the fine-thread metric everywhere else, which would have made me twitch for a long time. I labeled the flag nut "DO NOT REMOVE" so I don't forget. I can adjust the arm length from the other end.

The Teraflex rear sway bar kit is top-notch. If you haven't seen it, it's rear control arm brackets to reduce bind and pinion dive, a complete sway bar replacement, Anti-Rock style with the bar mounted over the frame and the links tucked up tight on the axle. No more links hanging way back behind the axle where they can land on rocks, and no more weak unsupported frame mounts that bend and crack. The CA brackets are solid machined beef. The sway bar system is pretty well thought-out (though getting a torque wrench on the second mounting bracket, once the first one has fixed the system more or less in place, is impossible. I had to use the calibrated elbow and count on safety checks down the road). All the possible hang-up spots that limit travel are addressed (brake lines, ABS wiring, parking brake cables, spring retainers, driveshaft carrier bearing spacer, etc)

The sway bar arm and link length is set to require +2.5" bump stop extension though (which happens to be a good fit for 37" tires) - and this is a hard requirement as the sway bar arm will collide with the inner fender sheet metal with any less. But it works out to be a good match for the Falcon "3.5-4.5 lift" shock (19.4" compressed / 32.3" extended / 12.9" travel), instead of their usual 0-3" lift shock (17.6" compressed / 28.3" extended / 10.8" travel). So in exchange for giving up 2.5" of uptravel with the bumpstop, you gain 4" of extension at the shock and ~6" of wheel travel. And this setup droops like crazy now. I love it

The Clayton HD rear spring rate is working GREAT for me and my heavy Alu-Cab. It's sitting about 2.5" higher than bone stock in the rear, and a LOT higher than stock + Alu Cab where the rear control arms were inverted, bottomed easily, swayed a ton, drastically underdamped etc.

The front is +4.5" over bone stock, and +5" compared to stock front springs with the bumper and winch (total +82 lbs by my scales). I'm not thrilled with the front-high aesthetic and maybe I'll swap to the 2.5" springs down the road, we'll see
Jeep Gladiator Wanda the Wanderer: JTRD with Alu-Cab Canopy Camper IMG_1635

Jeep Gladiator Wanda the Wanderer: JTRD with Alu-Cab Canopy Camper IMG_1398

Jeep Gladiator Wanda the Wanderer: JTRD with Alu-Cab Canopy Camper IMG_1478

Okay, I did the thing. I put the big lift on stock tires, and yes it looks the way it looks. As a matter of fact I bought 37s (Yokohama X-ATs) and wheels (Icon Rebound Pros) but did not get them mounted in time for this trip. Get your leg day jokes in
 
Last edited:
OP
OP
fourfa

fourfa

Well-Known Member
Joined
Dec 12, 2021
Threads
9
Messages
745
Reaction score
944
Location
CA
Vehicle(s)
22 JTRD + ACCC
Build Thread
Link
On that trip, we ran Pleasant Creek / South Draw Pass out of Capitol Reef National Park. Mistakes were made - we kinda just went for it without enough detailed info. If we'd done that research, we would have been told that it's "impassible in winter," as it goes up to 10,000 feet at the end and mid-April is very much still winter up there. Well, we didn't do that, and got mired in frictionless wet snow over and over. Nevertheless with a lot of winching, wet cold feet, and raw hands we passed this impassible trail driving over snowmobile tracks and even got back to camp with our buddies before dark. (They did an easy kid hike day instead.)


During one of the bad pulls, where we'd built up a hard ice dam in front of the axle, the winch load really ramped up a lot more than I expected. Something loudly went POP up front, and the winch plate BENT! This is the steel plate that's included with the aluminum MP Concepts bumper (see post #2). Fortunately the winch is fine and got us out of there; the janky arrangement of support brackets and washers that fight the winch loads on this plate are just not good. More to come on that.
 
OP
OP
fourfa

fourfa

Well-Known Member
Joined
Dec 12, 2021
Threads
9
Messages
745
Reaction score
944
Location
CA
Vehicle(s)
22 JTRD + ACCC
Build Thread
Link
Something interesting I made notes on during the suspension install:

Stock Jeep suspension parts coming off (shocks, springs, control arms, track bars, rear sway bar, assorted small hardware):
front 57 lbs
rear ~67 lbs
rear swaybar kit 22.5 lbs
TOTAL STOCK 146 lbs

aftermarket suspension parts going on:
front 92 lbs
rear 113 lbs
rear swaybar kit 53 lbs
TOTAL aftermarket 257 lbs

increase over stock +111.4 lbs
Rated payload used up just by suspension parts: 12%

I bet this is something that not many people have kept track of, when they go to the CAT scale and realize they have no payload left, and can't figure out where it all came from
 

chorky

Well-Known Member
First Name
Chad
Joined
Feb 26, 2022
Threads
154
Messages
2,979
Reaction score
3,046
Location
Montana
Website
www.youtube.com
Vehicle(s)
'06 TJ GE, '22 JTR
Build Thread
Link
Occupation
Forester
Something interesting I made notes on during the suspension install:

Stock Jeep suspension parts coming off (shocks, springs, control arms, track bars, rear sway bar, assorted small hardware):
front 57 lbs
rear ~67 lbs
rear swaybar kit 22.5 lbs
TOTAL STOCK 146 lbs

aftermarket suspension parts going on:
front 92 lbs
rear 113 lbs
rear swaybar kit 53 lbs
TOTAL aftermarket 257 lbs

increase over stock +111.4 lbs
Rated payload used up just by suspension parts: 12%

I bet this is something that not many people have kept track of, when they go to the CAT scale and realize they have no payload left, and can't figure out where it all came from
nice job!! i have a pretty robust spreadsheet going of every item removed and every item added and also estimates food, water, clothes, etc and considers both GVW and GAW. They are separated into 3 colums: permanent modifications, EDC items, and removable camping gear (like clothes and stove, etc). Its pretty nice to see calculations and estimates and compare them to cat scale numbers
Sponsored


Top