Sponsored

A new hope ... (build journal and component reviews)

OP
OP
cug

cug

Well-Known Member
First Name
Guido
Joined
Apr 1, 2023
Threads
13
Messages
602
Reaction score
664
Location
Christchurch, New Zealand
Vehicle(s)
JTR EcoDiesel, Land Cruiser 79, BMW R1250GS
Build Thread
Link
Occupation
Just keeping busy
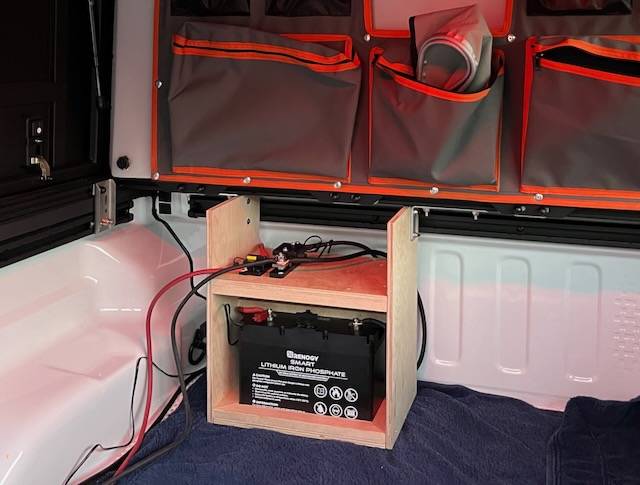
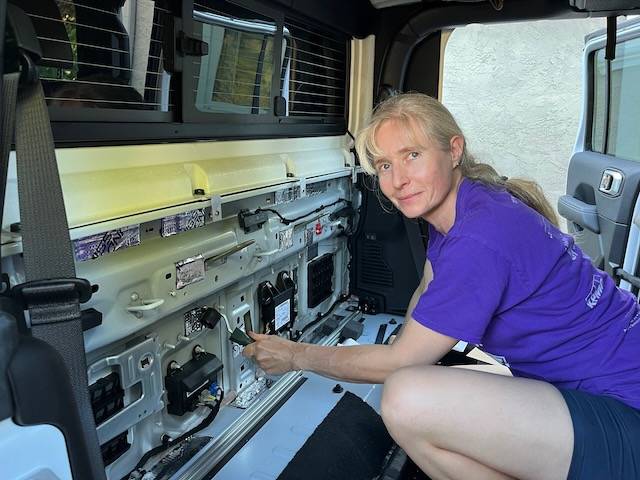
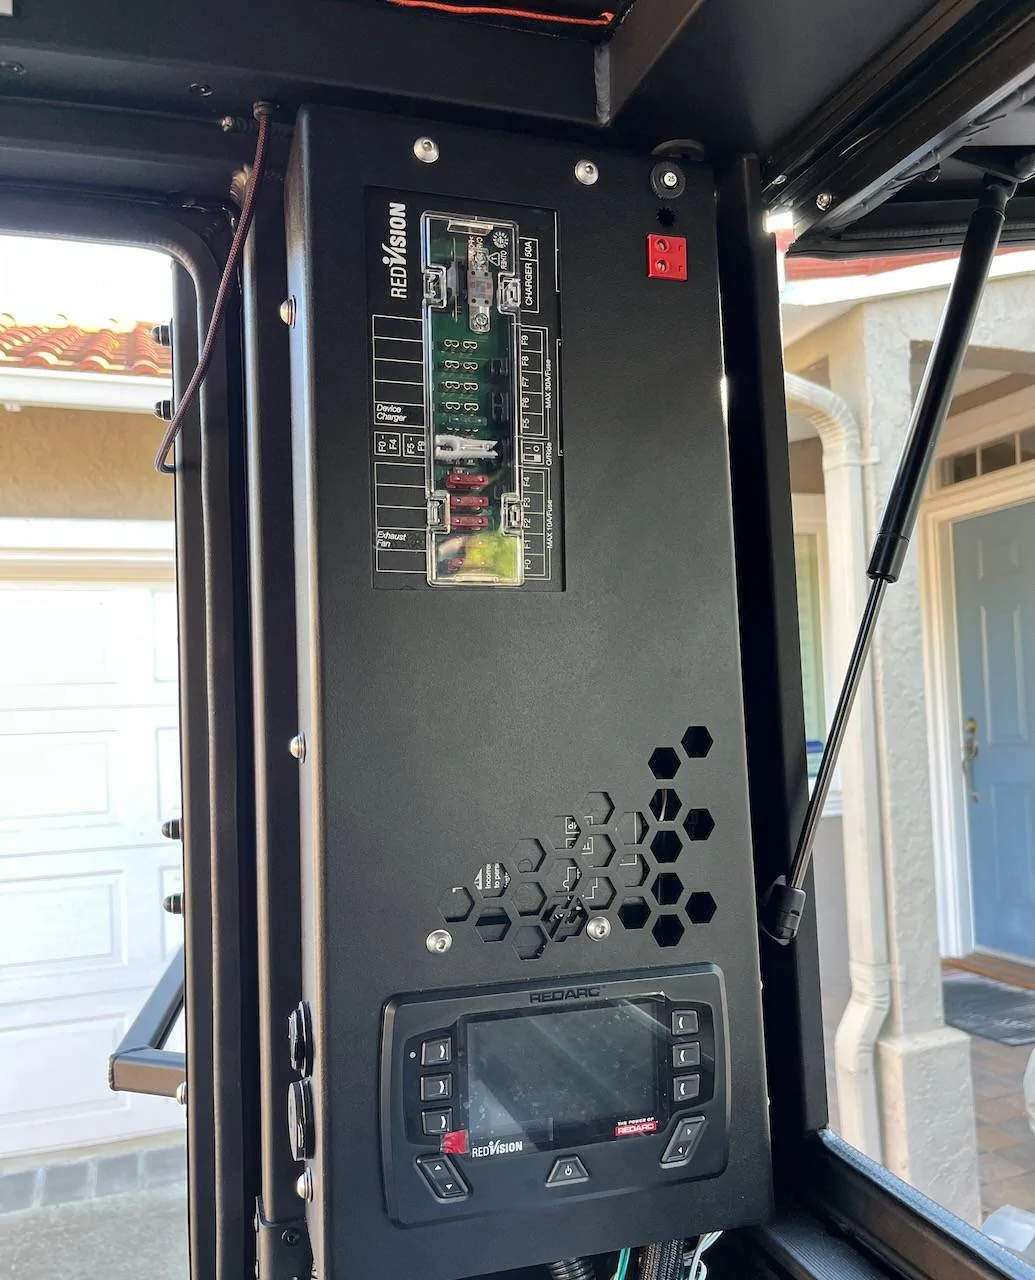
So, while the finishing process on the plywood floor happens (and airs out), we have installed the electrical corner unit today:

Jeep Gladiator A new hope ... (build journal and component reviews) IMG_5642


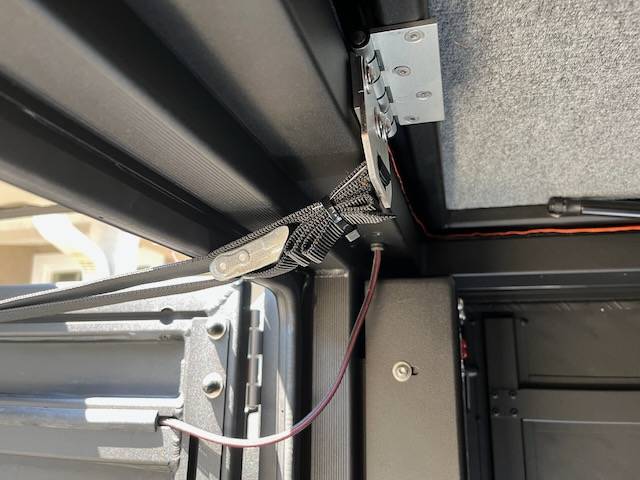
Updated: The following may or may not be necessary. Alu-Cab seems to changing cable outlet locatiions, harness, etc. without notification to even the importers, so it's near impossible to have everything always fit every revision.

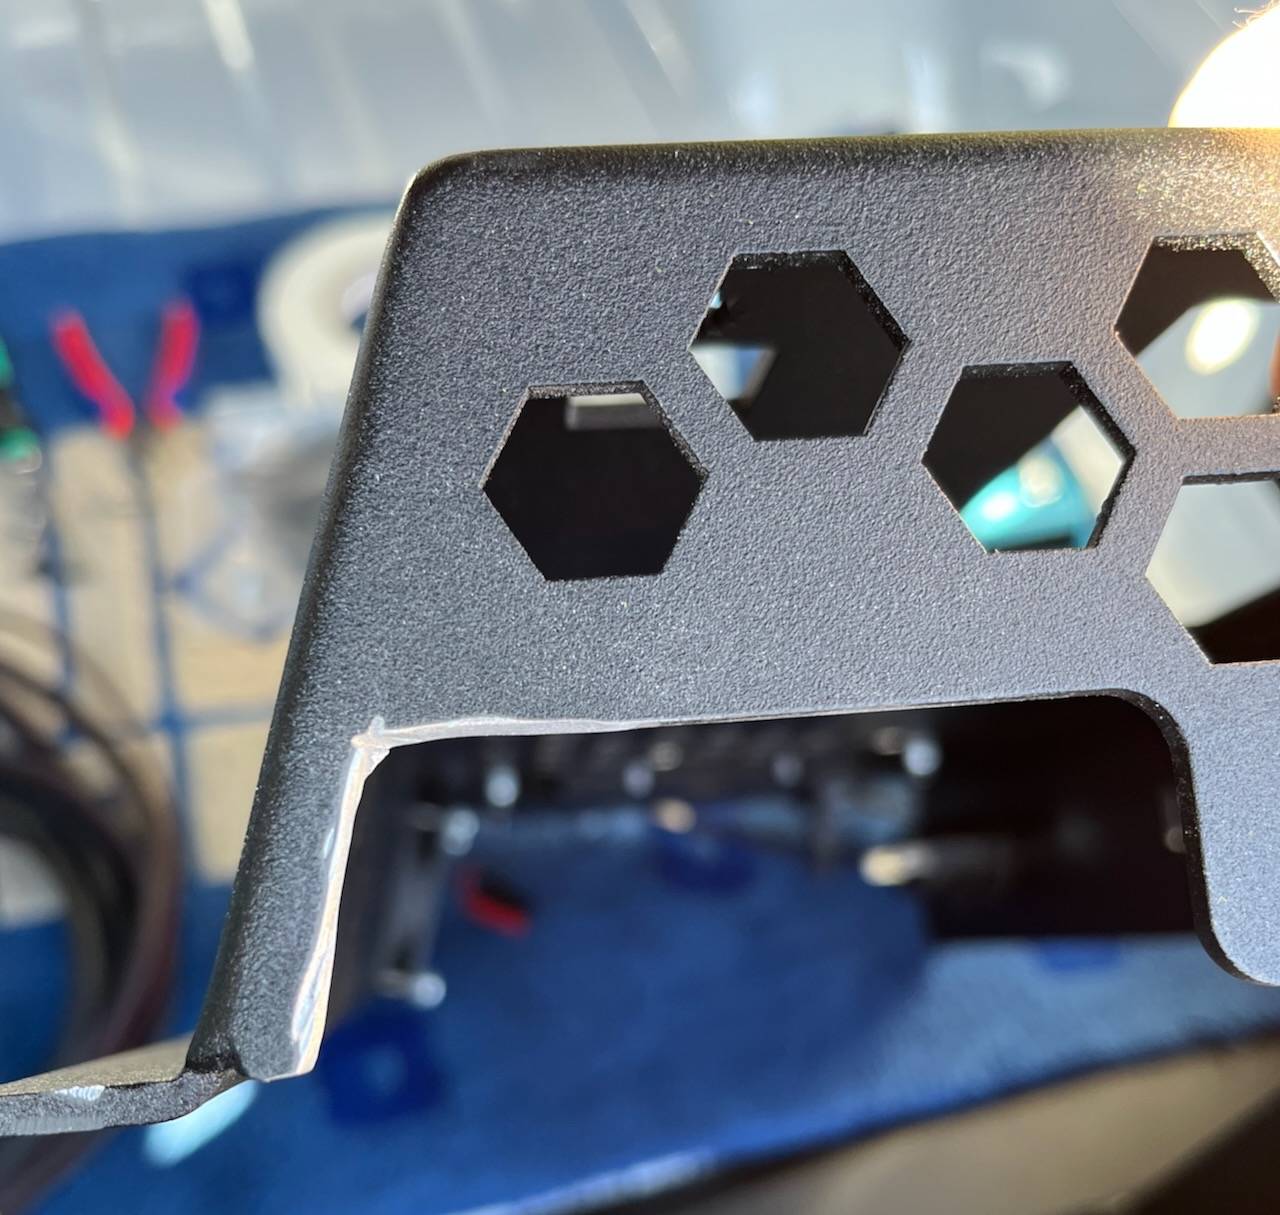
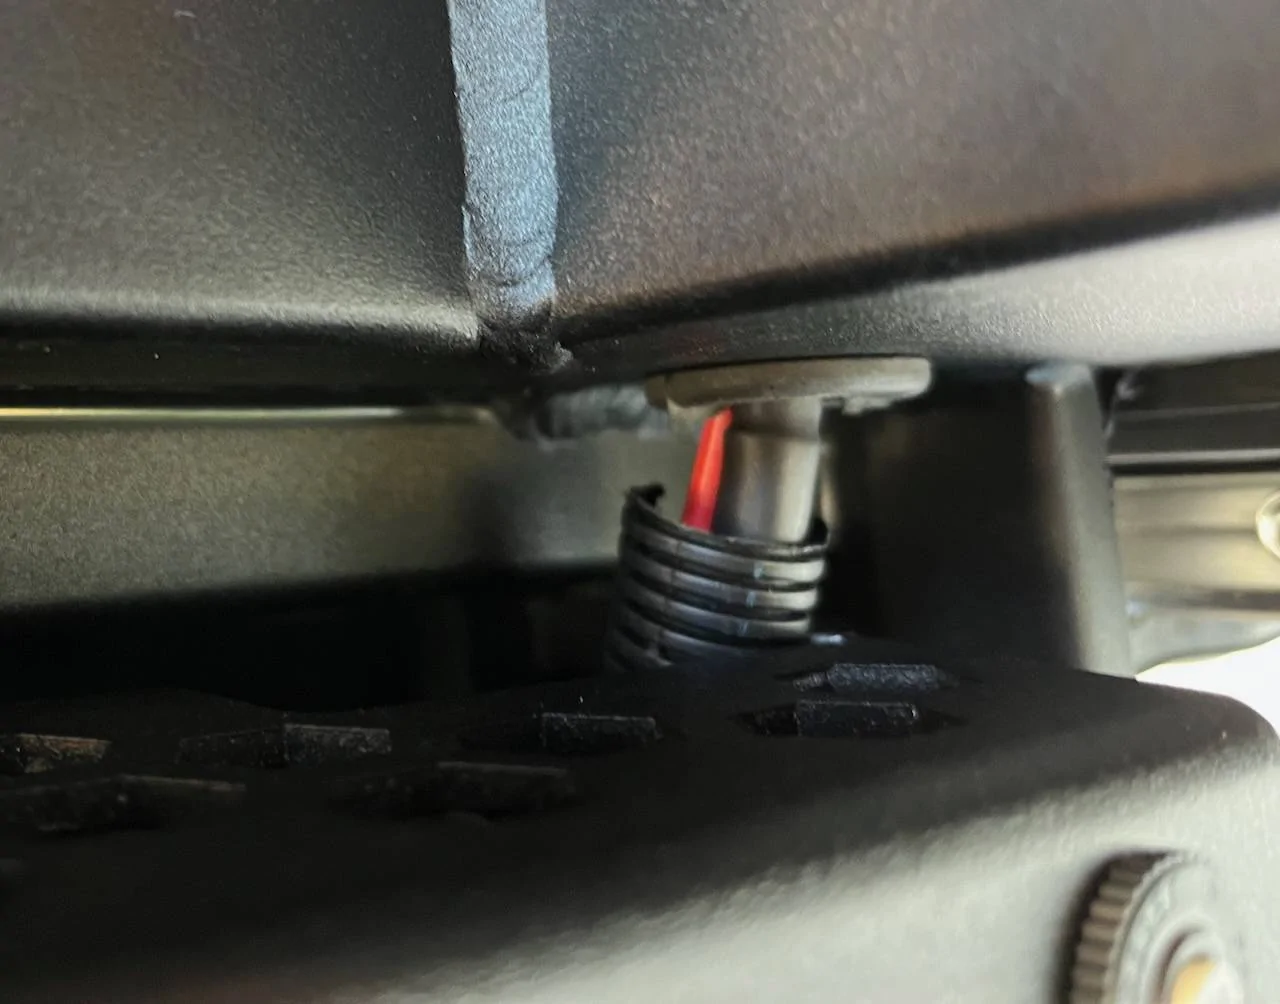
To make it fit without shortening the Alu-Cab wire loom and revmoving the cable protector, we had to enlarge the cutout in the top right corner of the panel (this might be incorporated in a future revision of the panel, so again, not GP Factors fault, it's just one of these things when designing or building for a moving target):

Jeep Gladiator A new hope ... (build journal and component reviews) IMG_5639


I'd say that this is advisable even when shortening the wires and removing the plastic protector, as the cutout just doesn't align with the hole in the Canopy Camper frame. It's much easier to install this way:

Jeep Gladiator A new hope ... (build journal and component reviews) IMG_5641


The above pciture is WITH the new, enlarged, cutout. Without, the wire loom would be pressed about one inch to the left (in this picture) and it would have been near impossible to get it routed on the inside without cutting it down and removing the plastic sleeve.

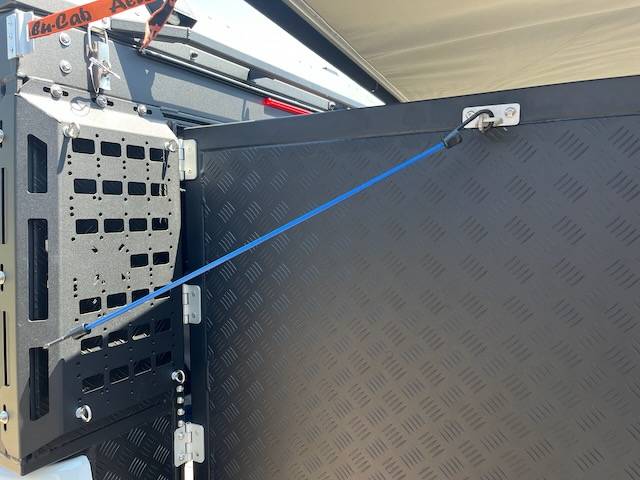
I haven't tested it (again) yet, but will do so tomorrow. Ran out of energy today.
Sponsored

 
Last edited:
OP
OP
cug

cug

Well-Known Member
First Name
Guido
Joined
Apr 1, 2023
Threads
13
Messages
602
Reaction score
664
Location
Christchurch, New Zealand
Vehicle(s)
JTR EcoDiesel, Land Cruiser 79, BMW R1250GS
Build Thread
Link
Occupation
Just keeping busy
Updated Review and Rating for GP Factor Full Redarc System

So, with all the above information about the GP Factor Full Redarc System, I'm downgrading my personal recommendation rating to:

TBD, see update below

Update:


I just had another chat with AJ, the owner of GP Factor. Based on that, I can only say, the service and turn-around time you will get from GP Factor, if there are any issues or if you have questions, is absolutely outstanding. I will get into more details in a longer update, but for now, I'm removing the ratings and part of the review I had here and will put together a completely new review in a week or two.
 
Last edited:
OP
OP
cug

cug

Well-Known Member
First Name
Guido
Joined
Apr 1, 2023
Threads
13
Messages
602
Reaction score
664
Location
Christchurch, New Zealand
Vehicle(s)
JTR EcoDiesel, Land Cruiser 79, BMW R1250GS
Build Thread
Link
Occupation
Just keeping busy
So, more fun in the electrical system.

When hooking up a temporary and improvised version of my battery setup for a trip we are on now, I found that the common ground, which was put in by the shop during the install of the Canopy Camper, didn't work properly. While it measured alright with a multimeter, it didn't have a proper connection, so it all seemed to work, but when actually trying to charge the battery via the Manager 30, the voltage dropped down to 10.8V on the wire from the truck battery.

After a long search, where I didn't really suspect the professionally installed common ground, I replaced this one with a simple connection to one of the tie down mount points in the bed and THAT suddenly worked properly. Hmpf. Battery charging is normal and quick now (at 30A just from the M30 at this point). I will re-route the ground to a proper ground point on the chassis when I get back home, but for now, my clobbered together "solution" works nicely and doesn't show any significant voltage drop when charging. Go figure.

Picture before using new ground connection:

Jeep Gladiator A new hope ... (build journal and component reviews) IMG_5645


I decided not to try and build part of the furniture setup in a hurry and that was a good decision. The temporary box above is stable, holds the battery absolutely rock solid in place, and was easy and cheap to build, so I feel no reason to retain much of it, when I get to the real build-out. The one downside of the install is, that my wire loom was a bit short, so it really looks clobbered together. Didn't have enough 4 or 6 gauge cabling here and needed to finish, so just living with the improvised routing for a week.

Currently we are on a trip with this temporary setup in place and it has worked fine. Tomorrow we are getting our new suspension installed, really looking forward to that. More information when it's in and I have a first impression.

Regarding the OEM Rubicon suspension: it doesn't handle the added weight all too well, but it is driveable. It has way too much body roll now and reacts harsh on sharp bumps. So, high speed compression dampening isn't great, just as before, slow speed rebound and compression really sucks with the additional weight of the camper, plus I lost about an inch of travel in the rear and about 1/2 in the front. If I can trust the data from Alu-Cab, the overall vehicle weight at this point should be about 180kg (396lbs) over empty weight before. That's with the ACCC, but of course with tailgate removed and we took the rear seats out as well. Overall still a guesstimate since we have not been to a scale before or after the install.

We'll see how the new suspension will work out. Looking forward to it!
 

mx5red

Well-Known Member
First Name
Paul
Joined
May 7, 2020
Threads
28
Messages
1,495
Reaction score
2,228
Location
San Diego
Vehicle(s)
2020 Firecracker JTR; 2020 DGC JLUR
Build Thread
Link
Maybe I missed it, but what is your suspension plan?
Springs fix height for the most part, shocks fix ride for the most part.

I swapped to Clayton springs, HD in the back, and didn’t really notice a difference in ride but I got my lift height back compared to spacer lift.
When I put on Mojave takeoff shocks the ride transformed. Something stiffer like bilsteins or whatever would probably make a big difference. Don’t always have to spend a fortune here to be comfortable, I’m not convinced you need $3k shocks!
 
OP
OP
cug

cug

Well-Known Member
First Name
Guido
Joined
Apr 1, 2023
Threads
13
Messages
602
Reaction score
664
Location
Christchurch, New Zealand
Vehicle(s)
JTR EcoDiesel, Land Cruiser 79, BMW R1250GS
Build Thread
Link
Occupation
Just keeping busy
Maybe I missed it, but what is your suspension plan?
Getting a Terraflex HD kit installed. I'll write more about it, when it's installed and I have some impressions, so probably towards the weekend or so.
 

Sponsored

OP
OP
cug

cug

Well-Known Member
First Name
Guido
Joined
Apr 1, 2023
Threads
13
Messages
602
Reaction score
664
Location
Christchurch, New Zealand
Vehicle(s)
JTR EcoDiesel, Land Cruiser 79, BMW R1250GS
Build Thread
Link
Occupation
Just keeping busy
So, a small progress report might be in order.

Alu-Cab Canopy Camper

So far, I really like the ACCC. It's what I hoped it would be. We've got the version with right side awning (more on that later) and shower tent as well as the water tank, so probably on the heavier side of an empty ACCC.

Layout

When we ordered our camper, we asked for the right side (passenger) mounted awning and the shower tent to be on the driver side. We wanted the same general layout as our Land Cruiser and to be away from normal traffic, if we do road side stops. I don't think it's actually a problem, but it makes for a nice and consistent experience for us.

Doors

The side doors are big and easy to use, the rear door is a mixed bag though. The gas strut is very strong, the mount of the strut is total shit though. It's just a matter of time until it breaks. We have ours mounted so it opens toward the left, same reason as having the awning on the right side. This means having to deal with the stupid retention strap every time we close the door, since it's on the bottom of the door. The door can't be left slightly ajar, it will just spring open and in that case probably break the aluminium mounting of the gas strut ... I understand why the strut is so strong, e.g. when there are heavy items mounted to the door, but if that's the case, the whole mechanism should be build a whole lot better. As it is, it's crap. Our mid-term plan is, to remove the gas strut and retention strap and put a manual "retention bar" in place which can hold the door in a given position (or multiple positions) once opened. Then we are free to handle the door as we want.

I have the @813 Fabrication & Design strap bracket here, but have not installed it yet. I'm still thinking whether to use it at all, since it fixes only one of the issues we have with the door.

Bed

The mattress was not great by itself, we slept on it for a few nights, but really didn't like it all that much. To make it more comfortable, we added a Froli bed spring system (review upcoming) and that fixed the sleeping experience. On the recent trip I slept better in the truck than in the hotels we visited.

Roof

The gas struts for the roof are very strong and at this point, I can close it, but it's not easy. My wife has a really hard time, but she can manage with a lot of huffing and puffing. We are both lightweight and there is nothing on the roof yet. With a solar panel mounted on top, it might be easier to manage, we'll just have to see.

Canvas/Tent

Great. Good quality, very good mosquito netting, good venting. Better than our FiftyTen camper tent, which has one side window with clear plastic and the rear without a small awning. None of the FiftyTen tent windows can be opened for pass-through, this is much more flexible and, in my personal opinion, much better.

Installation

We had the ACCC installed by TinyRig in Southern California and on the cabin, they have done a great job. They sealed the truck bed really well and right now we have only found two spots,where light comes in (and dust/water might come in) – the upper corners of the side windows. Whether these will turn out to be problematic will have to be seen, I doubt it, but you never know.

[Update on the above: we have pressure washed the whole truck yesterday, there was absolutely no water intrusion I could see. So far so good.]

We had asked to get a right hand side awning and were never told that this does NOT come with a wind deflector. It's also now mounted on brackets that put it slightly away from camper, which might let some rain through, not sure how the left side version is in that regard. I'm not happy that we weren't told about it, although I currently don't really have a problem with the fact that it is what it is now.

On the electrical side they missed the mark slightly. A few things weren't done to the point we agreed on (and paid for) when we were there to pick up the truck, although they fixed some right then and there.. The common ground setup was only bolted to a chassis bolt that still had thick paint on, so wouldn't carry ANY rasonable load without completely breaking down in voltage. That cost me a Sunday of swearing and searching for the problem with charging the house battery.

TinyRig was also supposed to install the backup camera with the 813 Fabrication bracket, but had ordered the wrong part and then, during install, completely forgot about it. After a promise that they'll figure out a solution for us, I have yet to hear again from them, it's been three weeks since we picked up the camper, I'll give them to the end of the week, and then circle back (and probably just ask for a refund and deal with it myself). Bummer, since I wanted to save the time dealing with this.

So, ever so slightly mixed experience there. Overall great, but small and avoidable mishaps. We are all human, so again, I can recommend TinyRig.

Living Space Build-out

This is total work in progress, but we have confirmed, that we do need a livable space in the back. There are always situations where we want to have a quick breakfast or so inside without having to go out at all – mostly due to common camp spots generally being harassed by wasps as soon as the car stops. So, something usable, even if it is super small, is very important.

Car Cabin Build-out

This has now become a priority over the actual furniture build-out of the ACCC, since it will enable us to do test tours without having to improvise EVERYTHING. Our current tour was packing and repacking, moving stuff and moving it back without end. Horrible. Everything will get it's place, and will then reside there until found either impractical or we have better ideas.

The main principle for the full build-out, front, rear, inside, outside will be that we never have to move something to get to something else. This is of course impossible to achieve 100%, but we hope to get reasonably close if we do it right (which will be the hard part, of course). At this stage in my life, I'm too old to deal with packing, unpacking, re-packing, moving, searching, etc.

The fridge will be in car cabin, behind the passenger seat. To make enough room, we'll remove the subwoofer (any either leave it out completely or replace with something we can put in a better spot), build a two part platform which will replace the seats. The rest will then be planned when we have a better impression of the space there.

Suspension – First Impressions

Part of the reason for the trip last week (up to Surrey, BC) was to get a full Terraflex HD suspension with Falcon shocks installed. We had talked to Christian from EPIC ("The Ginger") about the installed accessories and our plan for the future, so hoped we'd get it close in terms of weight handling.

Overall, the goal was mostly achieved for now. The Falcon shocks hold the weight much better under control and are easy to adjust with a very good adjustment range. Rolling and bouncing can be reduced to the point of being a very firm ride, we like it comfortable though and even in all soft setting, the suspension is still handling the weight better than the OEM was.

Unfortunately, as it looks now, the Terraflex HD springs in the rear are actually NOT strong enough to hold the weight in the rear balanced compared to the front. It is pretty good right now, but we are not at the end of our build yet. At this point, the suspension is sitting well, but with the weight we are adding plus gear and water, I have no doubt, that we'll have to touch it again.

It's not totally unexpected though, given that I was warned and maybe should have listened to @CrazyCooter on this, but hoped I could get away with an off-the-shelf solution. For now, we will keep going with our build-out up to the point when are close to final weight and balance and then re-assess how the truck sits and drives. Given my current experience with the setup (about 1500 miles), I'm fairly certain the shocks will handle it well, but I doubt the rear springs will.

Again, it's a small bummer. Since we talked with EPIC about the fact that the truck has the ACCC and what my build plans are, they should have been able to sort out rear springs better in my opinion. This chapter isn't closed yet, but to be realistic, I didn't think it would be until the build is mostly finished. The install itself and the experience at EPIC was great.

Tires/Wheels

At this time, we are leaving these alone, once the Falken Wildpeak M/T are nearing their end of life (or don't have enough life left for a planned trip), we'll see what to do about that. Since I don't want to add much weight in tires, we might switch to an all-terrain tire, maybe the new Falken Wildpeak R/T ("Rough Terrain") in 34" size. This will give us slightly more ground clearance, but won't add much weight.

Onboard Air

We now have the ARB double compressor system from EPIC installed under the front passenger seat (Kraken). We have yet to use it properly, but since I know the compressor, I have no doubts, that it will work just fine and quick for our setup. Not sure what to make of the "push to connect" connections, but will have to see how they'll work out over time. I'm going to build an adapter to a standard compressor outlet so I can use it for other use cases as well.

So far so good. Time will tell how this all turns out. Today is a day of downtime, tomorrow I'll start on the rear seat delete storage platform.
 
Last edited:

813 Fabrication & Design

Rock Sponsor (Level 1)
First Name
Jeremy
Joined
Dec 21, 2019
Threads
51
Messages
918
Reaction score
1,323
Location
Louisville, KY
Website
www.813fabrication.com
Vehicle(s)
2020 Jeep Gladiator Rubicon Launch Edition
So, a small progress report might be in order.

Alu-Cab Canopy Camper

So far, I really like the ACCC. It's what I hoped it would be. We've got the version with right side awning (more on that later) and shower tent as well as the water tank, so probably on the heavier side of an empty ACCC.

Layout

When we ordered our camper, we asked for the right side (passenger) mounted awning and the shower tent to be on the driver side. We wanted the same general layout as our Land Cruiser and to be away from normal traffic, if we do road side stops. I don't think it's actually a problem, but it makes for a nice and consistent experience for us.

Doors

The side doors are big and easy to use, the rear door is a mixed bag though. The gas strut is very strong, the mount of the strut is total shit though. It's just a matter of time until it breaks. We have ours mounted so it opens toward the left, same reason as having the awning on the right side. This means having to deal with the stupid retention strap every time we close the door, since it's on the bottom of the door. The door can't be left slightly ajar, it will just spring open and in that case probably break the aluminium mounting of the gas strut ... I understand why the strut is so strong, e.g. when there are heavy items mounted to the door, but if that's the case, the whole mechanism should be build a whole lot better. As it is, it's crap. Our mid-term plan is, to remove the gas strut and retention strap and put a manual "retention bar" in place which can hold the door in a given position (or multiple positions) once opened. Then we are free to handle the door as we want.

I have the @813 Fabrication & Design strap bracket here, but have not installed it yet. I'm still thinking whether to use it at all, since it fixes only one of the issues we have with the door.

Bed

The mattress was not great by itself, we slept on it for a few nights, but really didn't like it all that much. To make it more comfortable, we added a Froli bed spring system (review upcoming) and that fixed the sleeping experience. On the recent trip I slept better in the truck than in the hotels we visited.

Roof

The gas struts for the roof are very strong and at this point, I can close it, but it's not easy. My wife has a really hard time, but she can manage with a lot of huffing and puffing. We are both lightweight and there is nothing on the roof yet. With a solar panel mounted on top, it might be easier to manage, we'll just have to see.

Canvas/Tent

Great. Good quality, very good mosquito netting, good venting. Better than our FiftyTen camper tent, which has one side window with clear plastic and the rear without a small awning. None of the FiftyTen tent windows can be opened for pass-through, this is much more flexible and, in my personal opinion, much better.

Installation

We had the ACCC installed by TinyRig in Southern California and on the cabin, they have done a great job. They sealed the truck bed really well and right now we have only found two spots,where light comes in (and dust/water might come in) – the upper corners of the side windows. Whether these will turn out to be problematic will have to be seen, I doubt it, but you never know.

We had asked to get a right hand side awning and were never told that this does NOT come with a wind deflector. It's also now mounted on brackets that put it slightly away from camper, which might let some rain through, not sure how the left side version is in that regard. I'm not happy that we weren't told about it, although I currently don't really have a problem with the fact that it is what it is now.

On the electrical side they missed the mark slightly. Parts just weren't done to the point we agreed on (and paid for) when we were there to pick up the truck, although they fixed some right then and there.. The common ground setup was only bolted to a chassis bolt that still had thick paint on, so wouldn't carry ANY rasonable load without completely breaking down in voltage. That cost me a Sunday of swearing and searching for the problem with charging the house battery.

They were also supposed to install the backup camera with the 813 Fabrication bracket, but had ordered the wrong part and then, during install, completely forgot about it. After a promise that they'll figure out a solution for us, I have yet to hear again from them, it's been three weeks since we picked up the camper, I'll give them to the end of the week, and then circle back (and probably just ask for a refund and deal with it myself). Bummer, since I wanted to save the time dealing with this.

So, slightly mixed experience there. Overall good, but small mishaps.

Living Space Build-out

This is total work in progress, but we have confirmed, that we do need a livable space in the back. There are always situations where we want to have a quick breakfast or so inside without having to go out at all – mostly due to common camp spots generally being harassed by wasps as soon as the car stops. So, something usable, even if it is super small, is very important.

Car Cabin Build-out

This has now become a priority over the actual furniture build-out of the ACCC, since it will enable us to do test tours without having to improvise EVERYTHING. Our current tour was packing and repacking, moving stuff and moving it back without end. Horrible. Everything will get it's place, and will then reside there until found either impractical or we have better ideas.

The main principle for the full build-out, front, rear, inside, outside will be that we never have to move something to get to something else. This is of course impossible to achieve 100%, but we hope to get reasonably close if we do it right (which will be the hard part, of course). At this stage in my life, I'm too old to deal with packing, unpacking, re-packing, moving, searching, etc.

The fridge will be in car cabin, behind the passenger seat. To make enough room, we'll remove the subwoofer (any either leave it out completely or replace with something we can put in a better spot), build a two part platform which will replace the seats. The rest will then be planned when we have a better impression of the space there.

Suspension – First Impressions

Part of the reason for the trip last week (up to Surrey, BC) was to get a full Terraflex HD suspension with Falcon shocks installed. We had talked to Christian from EPIC ("The Ginger") about the installed accessories and our plan for the future, so hoped we'd get it close in terms of weight handling.

Overall, the goal was mostly achieved for now. The shocks hold the weight much better under control and are easy to adjust with a very good adjustment range. Rolling and bouncing can be reduced to the point of being a very firm ride, we like it comfortable though and even in all soft setting, the suspension is still handling the weight much better than the OEM was.

Unfortunately, as it looks now, the Terraflex HD springs in the rear are actually NOT strong enough to hold the weight balanced compared to the front. It is pretty good right now, but we are not at the end of our build yet. At this point, the suspension is sitting well, but with the weight we are adding plus gear and water, I have no doubt, that we'll have to touch it again.

It's not totally unexpected though, given that I was warned and maybe should have listened to @CrazyCooter on this, but hoped I could get away with an off-the-shelf solution. At this point, we will keep going with our build-out up to the point when are aren't adding any more weight anywhere and then re-assess how the truck sits and drives. Given my current experience with the setup (about 1500 miles), I'm fairly certain the shocks will handle it well, but I doubt the rear springs will.

Again, slightly mixed feelings with this. Since we talked with EPIC about the fact that the truck has the ACCC and what my build plans are, they should have been able to sort out rear springs better in my opinion. This chapter isn't closed yet, but to be realistic, I didn't think it would be until the build is mostly finished.

Tires/Wheels

At this time, we are leaving these alone, once the Falken Wildpeak M/T are nearing their end of life (or don't have enough life left for a planned trip), we'll see what to do about that. Since I don't want to add much weight in tires, we might switch to an all-terrain tire, maybe the new Falken Wildpeak R/T ("Rough Terrain") in 34" size. This will give us slightly more ground clearance, but won't add much weight.

Onboard Air

We now have the ARB double compressor system from EPIC installed under the front passenger seat (Kraken). We have yet to use it properly, but since I know the compressor, I have no doubts, that it will work just fine and quick for our setup. Not sure what to make of the "push to connect" connections, but will have to see how they'll work out over time. I'm going to build an adapter to a standard compressor outlet so I can use it for other use cases as well.

So far so good. Time will tell how this all turns out. Today is a day of downtime, tomorrow I'll start on the rear seat delete storage platform.
Let me know if you need help with the camera bracket. I have the bracket and extension cables in stock. Also, let me know if there is anything I can help with on the door.
 
OP
OP
cug

cug

Well-Known Member
First Name
Guido
Joined
Apr 1, 2023
Threads
13
Messages
602
Reaction score
664
Location
Christchurch, New Zealand
Vehicle(s)
JTR EcoDiesel, Land Cruiser 79, BMW R1250GS
Build Thread
Link
Occupation
Just keeping busy
Let me know if you need help with the camera bracket. I have the bracket and extension cables in stock. Also, let me know if there is anything I can help with on the door.
Thanks for the offer, really appreciate it!

Regarding the bracket, I'm undecided what I want to do there. I was thinking of actually moving the inside handle to the outside c-track above the door. I'm often missing something to hold on to, when I'm closing the tent or dealing with the awning poles, so I'm actually not 100% certain anymore whether I really want the camera relocated there.

For the door, we are still thinking about this. There are multiple things I want to do with it:
  1. Mount a table to it. I'm planning to use the Frontrunner table, which is basically the same as the GP Factor, just not stainless steel and not a fitted backplate. The fitment kit from GP Factor would likely not work for me anyways due to other things I want to do and it would be more of a hassle to deal with fitment issues on metal than on a plywood mounting panel. I have neither the tools nor the experience to deal with metal other than cutting profiles or the occasional hackjob with a grinder or dremel.
  2. Restrict opening with a strap at the top of the door (currently it's at the bottom, since our door opens to the other side). I might use your bracket and strap for that.
  3. Prevent the door from closing even if the gas strut is removed. The idea I have is to use the same principle as the metal rod that holds the truck's hood open ... something that goes into a clip when not in use and maybe uses an eyebolt or so to keep the door at a certain position.
  4. Mount load bars. On our Land Cruiser we have what in Europe is called "airline tracks" on the rear, something like this, maybe the Rhino loadbars like you have done, or some other flexible track system I can cut to length and bolt to the door.
  5. Insulate the interior of the door. (Thinsulate)
That's as far as I can see currently. I'm going to remove one of the inside latches (we only ever use one when inside anyways) and move the other one more to half height, just out of the way of the table.

The rear door has become a sub-project in my build plan right now since there are quite a few things to consider/do. The other main sub-projects are rear seat delete storage system, cabin furniture, water system, and general insulation of the cabin (planning for Alaska late in the season next year).
 

Sponsored

OP
OP
cug

cug

Well-Known Member
First Name
Guido
Joined
Apr 1, 2023
Threads
13
Messages
602
Reaction score
664
Location
Christchurch, New Zealand
Vehicle(s)
JTR EcoDiesel, Land Cruiser 79, BMW R1250GS
Build Thread
Link
Occupation
Just keeping busy
In case you're interested, we've tracked our last trip up to Canada and back and here are some interesting results:

Jeep Gladiator A new hope ... (build journal and component reviews) IMG_5707


The truck's onboard computer claimed better fuel consumption than the average of 10.14 L/100km (~23.2mpg), but that's pretty normal. The computer seems to be around 6 to 7% off right now.

The additional weight of ACCC certainly takes its toll, but since this was a roadtrip and we took it slow, we got what I consider very reasonable consumption. On freeways we were generally going between 60 and 65mph, going slow since it kept the truck quieter. On backroads we just went witih the flow. The raised suspension didn't affect the mileage much, if at all. The above diagram shows the whole trip, the continuous downtrend was interesting, the last jump back up was due to me not filling properly on the second to last fill.

Overall, it was a good trip, some good camping, some fireroads, but mostly making miles and visiting some cities we wanted to see for a while (Olympia, WA, Salem, OR, Ashland, OR).

We also visited Burney Falls on the way back. Well worth it, although, if you don't want to do a 3 mile roundtrip hike, don't park at the lake (overflow parking).

Jeep Gladiator A new hope ... (build journal and component reviews) IMG_5703


To get there, we took some CA backroads off from highway 97 that were a REAL test for the suspension. I was so frustrated with the horrible road quality, we put the suspension to completely soft and even lowered tire pressure, but the breaks in the tarmac were still jarring and we took it really slow there. What an unexpected pain in the butt.
 
OP
OP
cug

cug

Well-Known Member
First Name
Guido
Joined
Apr 1, 2023
Threads
13
Messages
602
Reaction score
664
Location
Christchurch, New Zealand
Vehicle(s)
JTR EcoDiesel, Land Cruiser 79, BMW R1250GS
Build Thread
Link
Occupation
Just keeping busy
Update on the GP Factor Redarc System

I had another chat with AJ, owner of GP Factor, regarding the challenges I had with my unit and can definitely say: the GP Factor customer service is absolutely outstanding. While I have the system installed now, GP Factor is working on improvements and I'm happy to contribute – so I removed the review ratings I had so far as well as some of issues I ran into that are already either solved in new versions or about to be solved. I will write a completely new review once we have worked through this.

I'm well aware that I'm super anal about product functionality, practicality, and quality. It's been part of my job and life for longer than I care to remember and GP Factor has been patient and helpful with their responses, which I really appreciate. Once we have this all sorted, I'm happy to write a new review about this unit as it is today (or coming).
 
Last edited:
OP
OP
cug

cug

Well-Known Member
First Name
Guido
Joined
Apr 1, 2023
Threads
13
Messages
602
Reaction score
664
Location
Christchurch, New Zealand
Vehicle(s)
JTR EcoDiesel, Land Cruiser 79, BMW R1250GS
Build Thread
Link
Occupation
Just keeping busy
Rear Storage Platform

Slow progress today. We took the rear trim in the truck cabin out – what a pain in the butt. Broke it since the stupid one-time clips at the top are basically really just that: one time in, never out clips. I really want to meet the a-hole who designed these ... long story short, if you plan on taking this one out, don't be surprised if you break it.

In the end it didn't matter to us, since we are removing the subwoofer and are working on installing a plywood replacement. Need to make space in that area and the subwoofer just took too much.

The truck wall behind the trim is not great for installing a panel, no wonder that Goose Gear instructions have people drill additional holes into metal. Not going to do that for now, I have a different plan – will show what I mean when I actually have tested that it actually works. Regarding the plate, we made a template today for it and once the ordered plywood arrives here we'll install it relatively quickly I hope.

For the actual storage plate, we have a plan on how to install it, very similar to how the Goose Gear platform is affixed. Not surprising since there aren't all that many options.

We are going to build a "high platform", proper height so that the fridge fits nicely and can still be fully opened. That will leave a good amount of storage space underneath for rarely used pieces. Some seldom used cooking gear will go there as well as tools and spares.

The rest of the platform we'll sort out, once the base is in.

Question for those who are still reading here: do you have experience with simple spray can bedliner? I'm planning on trying this as the treatment for the storage parts. Will try it on a small piece of plywood first to see how it turns out.

Mosquito Protection

Since we are planning travel into some really mosquito heavy areas, we are also looking into how to keep the bugs away from us as much as possible/reasonable. I have ordered the Alu-Cab mozzie nets for the camper and my wife has started planning a small "screen room" that can be hooked up to the awning and has enough space for a table, two chairs, and the two of us.

More on this when we move forward with the plan. If you have ideas or have seen other solutions, feel free to chime in, happy to save some work and time by not doing this ourselves. And no, the awning room is not a solution for us, too big, heavy, and cumbersome to install. Similar for typical mosquito shelters, mostly they are just too big and heavy to be worthwhile carrying around.
 
OP
OP
cug

cug

Well-Known Member
First Name
Guido
Joined
Apr 1, 2023
Threads
13
Messages
602
Reaction score
664
Location
Christchurch, New Zealand
Vehicle(s)
JTR EcoDiesel, Land Cruiser 79, BMW R1250GS
Build Thread
Link
Occupation
Just keeping busy
Today's modification here was to remove the gas strut at the rear door and install an 813 Fabrication bracket to stop the door.
Jeep Gladiator A new hope ... (build journal and component reviews) img_5709-jpe


We wanted to be able to just leave it slightly ajar, and with the gas strut forcing it open, this wasn't possible. So, for now, we removed it. Maybe we find a better solution at some point.

The 813 Fabrication bracket is a high quality piece, I just wish it was a bit longer, so that the strap wouldn't rub on the door seal. Other than that, it does what it's supposed to do.

To keep the door open, this is the short term "solution":
Jeep Gladiator A new hope ... (build journal and component reviews) img_5710-jpe


The slightly less short term solution will likely be a turn buckle or a threaded rod or something similar and some brackets similar to the one that holds the gas strut in the door added to the c-channels. Manual, but should be easy and solid enough.

Another work item was cutting the "rear legs" for the rear seat storage platform:

Jeep Gladiator A new hope ... (build journal and component reviews) IMG_5711


The truck bottom isn't perfectly the same across the width. The ones fitting the sides slightly rock in the middle, but a bit of sanding took care of that. We are now waiting for the plywood to build the rear trim, then we can continue with the base platform, right now, I'd love to have the rear in to get proper measurements for the contact point between rear and base.

Tomorrow I'll fabricate some aluminum right angle brackets for the rear wall trim as well as for these legs.
 
Last edited:
OP
OP
cug

cug

Well-Known Member
First Name
Guido
Joined
Apr 1, 2023
Threads
13
Messages
602
Reaction score
664
Location
Christchurch, New Zealand
Vehicle(s)
JTR EcoDiesel, Land Cruiser 79, BMW R1250GS
Build Thread
Link
Occupation
Just keeping busy
Unfortunately, we are making REALLY slow progress these days. Too many things going on overall.

Made a rear plate for the truck cabin:

Jeep Gladiator A new hope ... (build journal and component reviews) IMG_5721


Mounting brackets:

Jeep Gladiator A new hope ... (build journal and component reviews) IMG_5722


Added some butyl mat on the truck rear wall to reduce drone:

Jeep Gladiator A new hope ... (build journal and component reviews) IMG_5728


And made a template for the rear trim plate. PM, if you're interested. The plate is made from 6mm Baltic Birch plywood, sits in two 8020 Series 25 pieces which are attached to car via existing bolts from the car and nyloc nuts. We've also glued and stuck some soft foam pieces between plate and rear wall to reduce rattle. The wallplate will get automative carpet covering for final install.
Sponsored

 
Last edited:


Top