Sponsored
OP
OP
arskemp
Well-Known Member
- First Name
- Andrew
- Joined
- Jan 9, 2022
- Threads
- 10
- Messages
- 325
- Reaction score
- 729
- Location
- Northern CA
- Vehicle(s)
- 22 Sarge Green Mojave
- Build Thread
- Link
- Occupation
- IT
- Thread starter
- #107
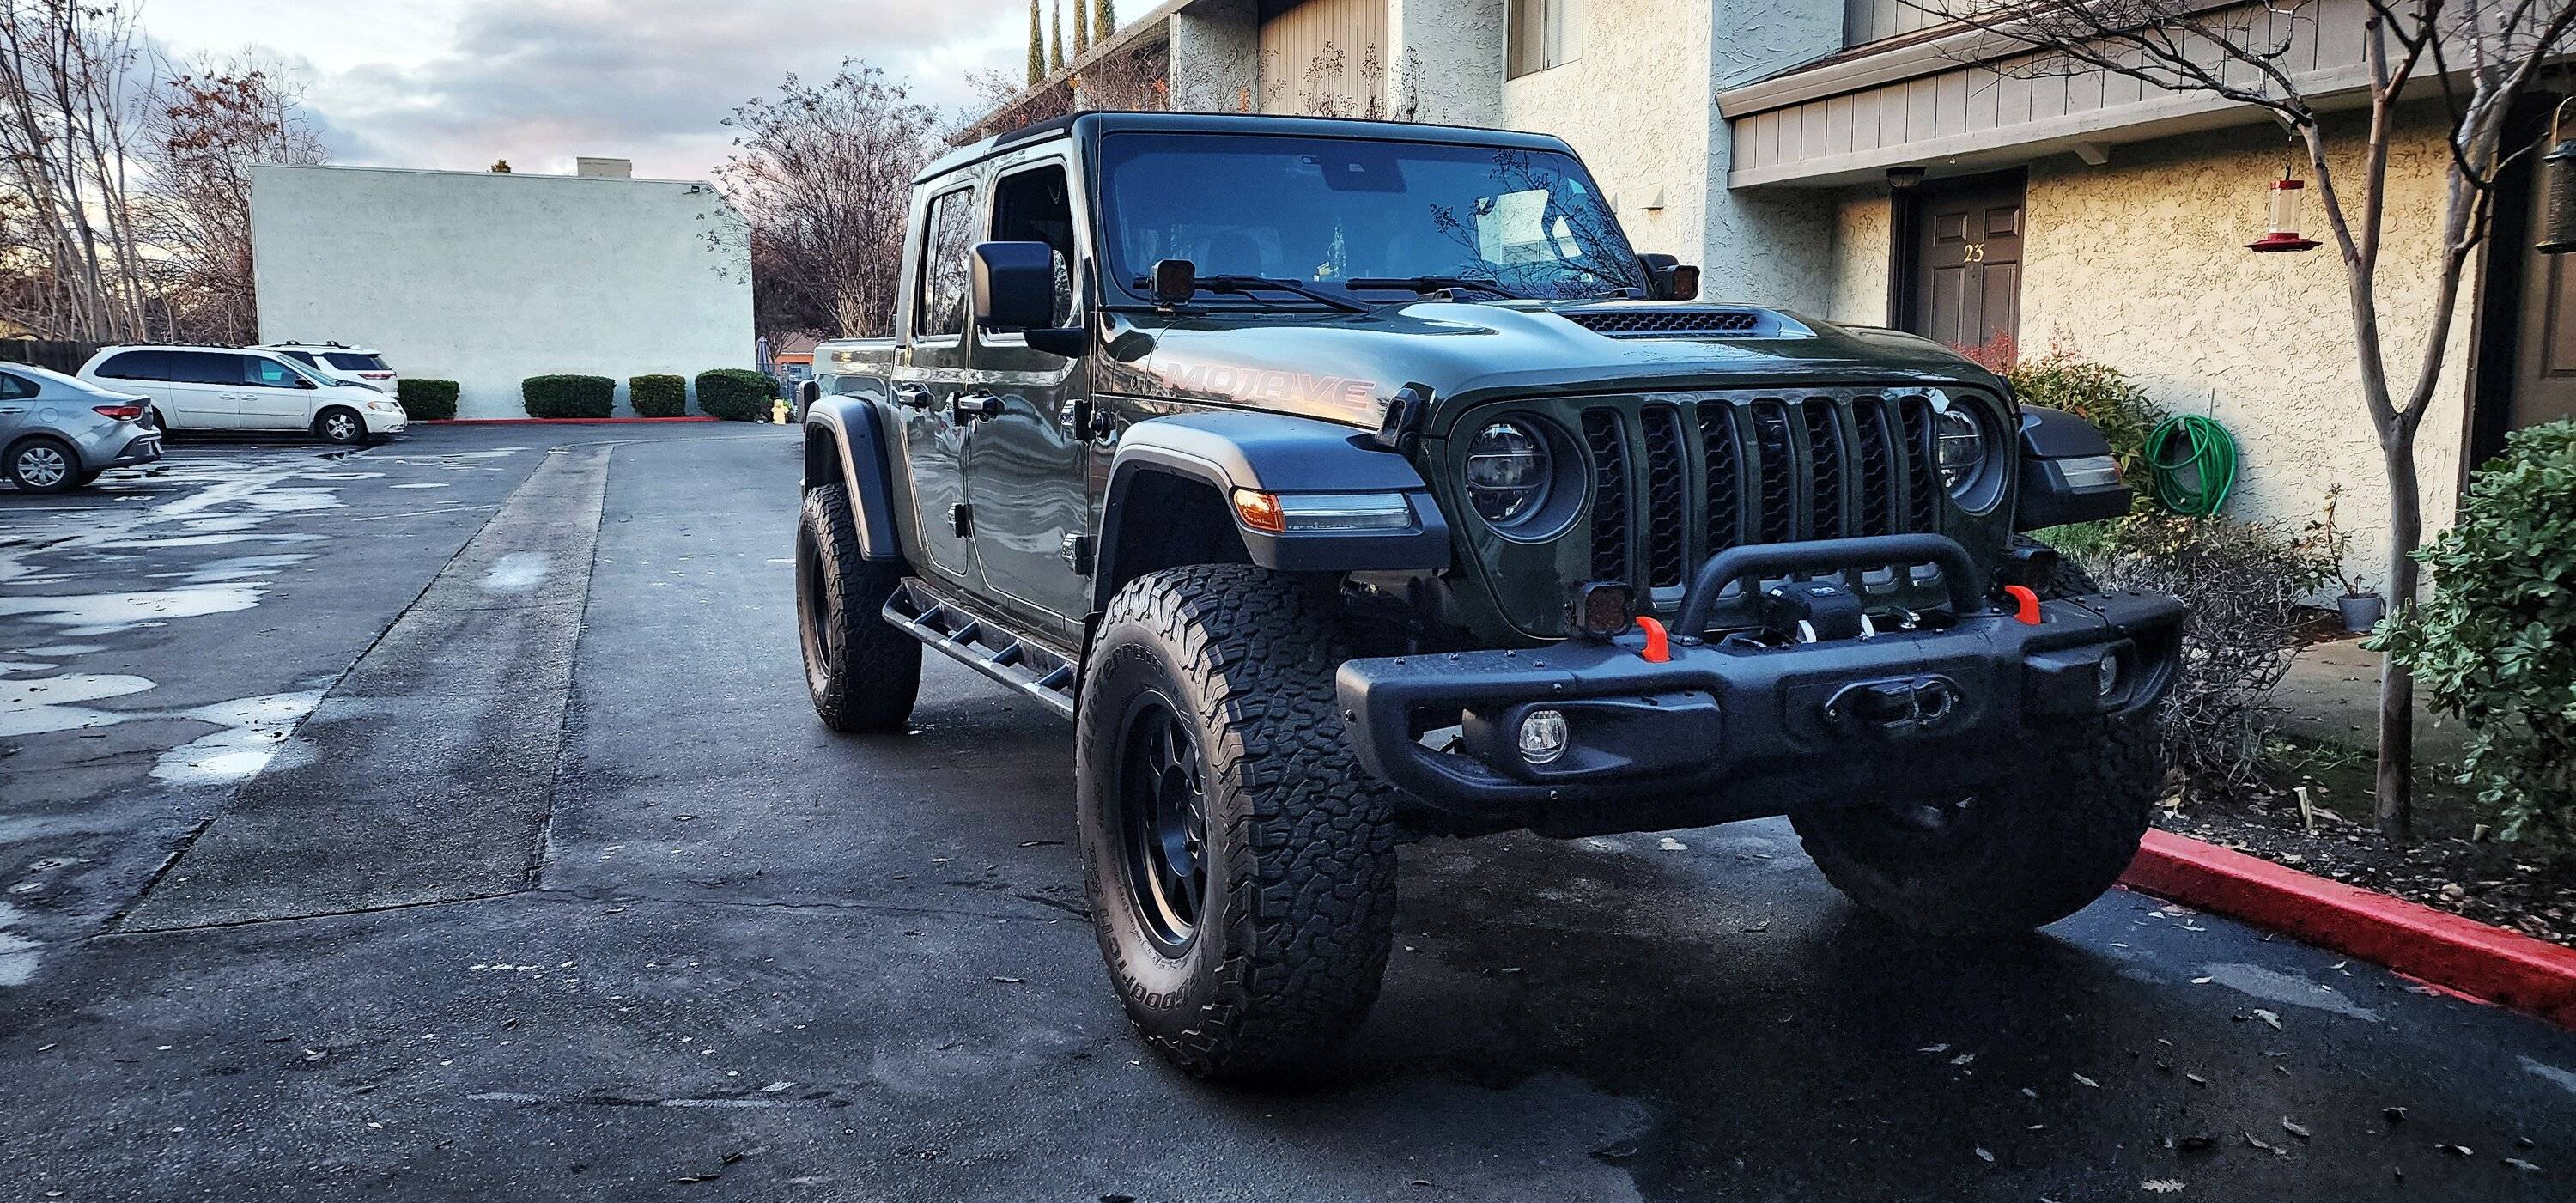
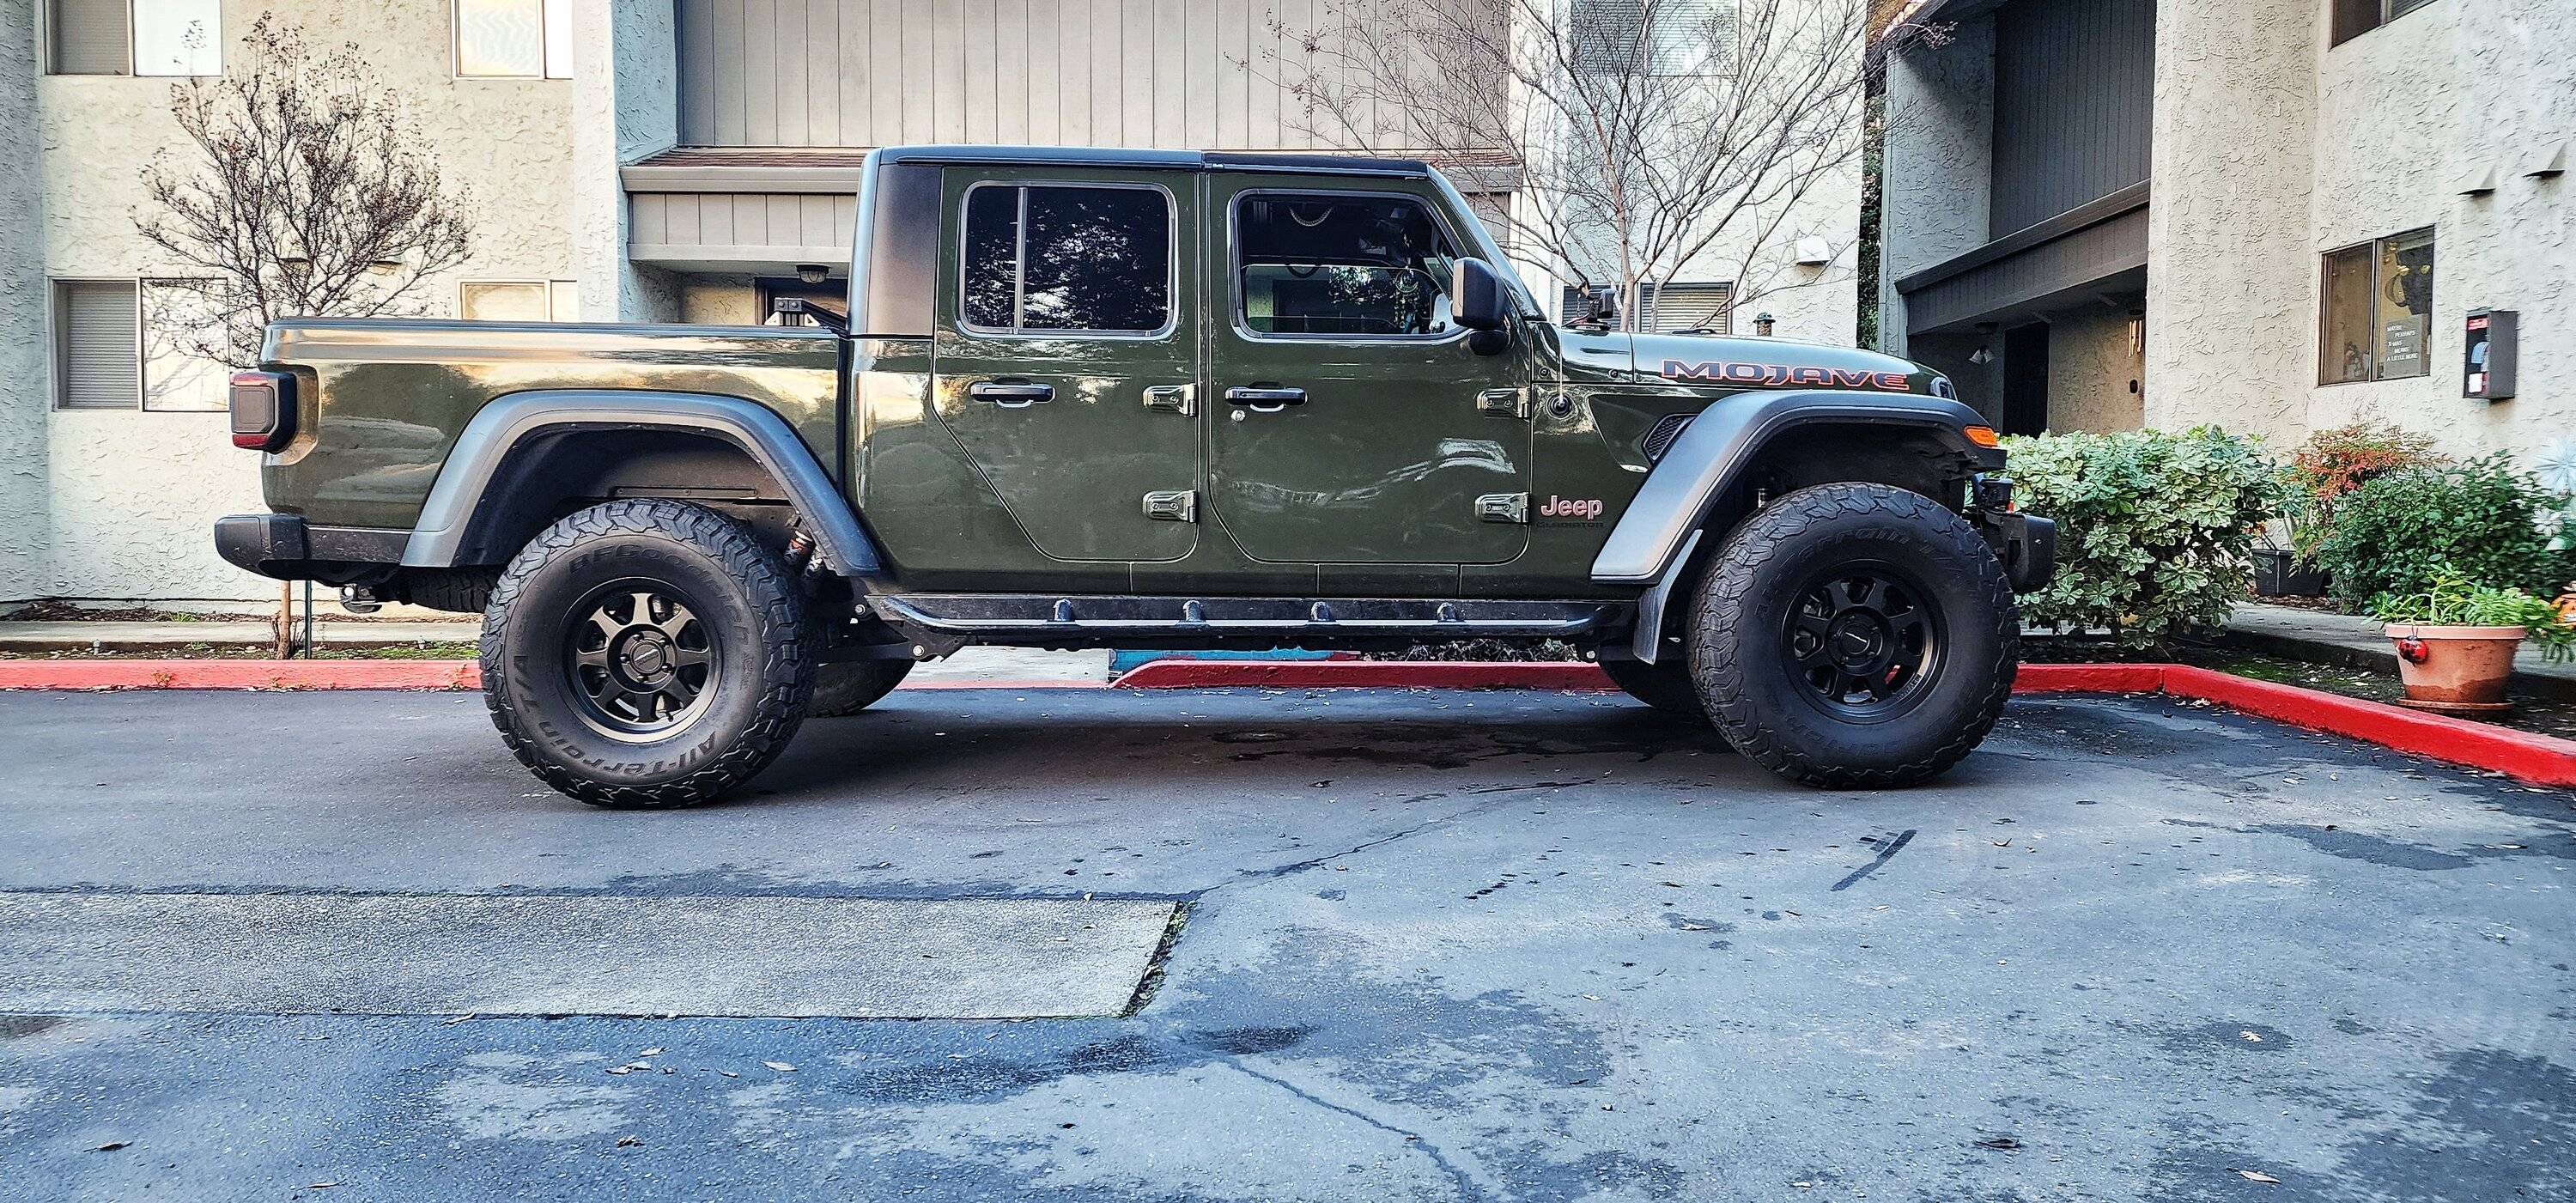
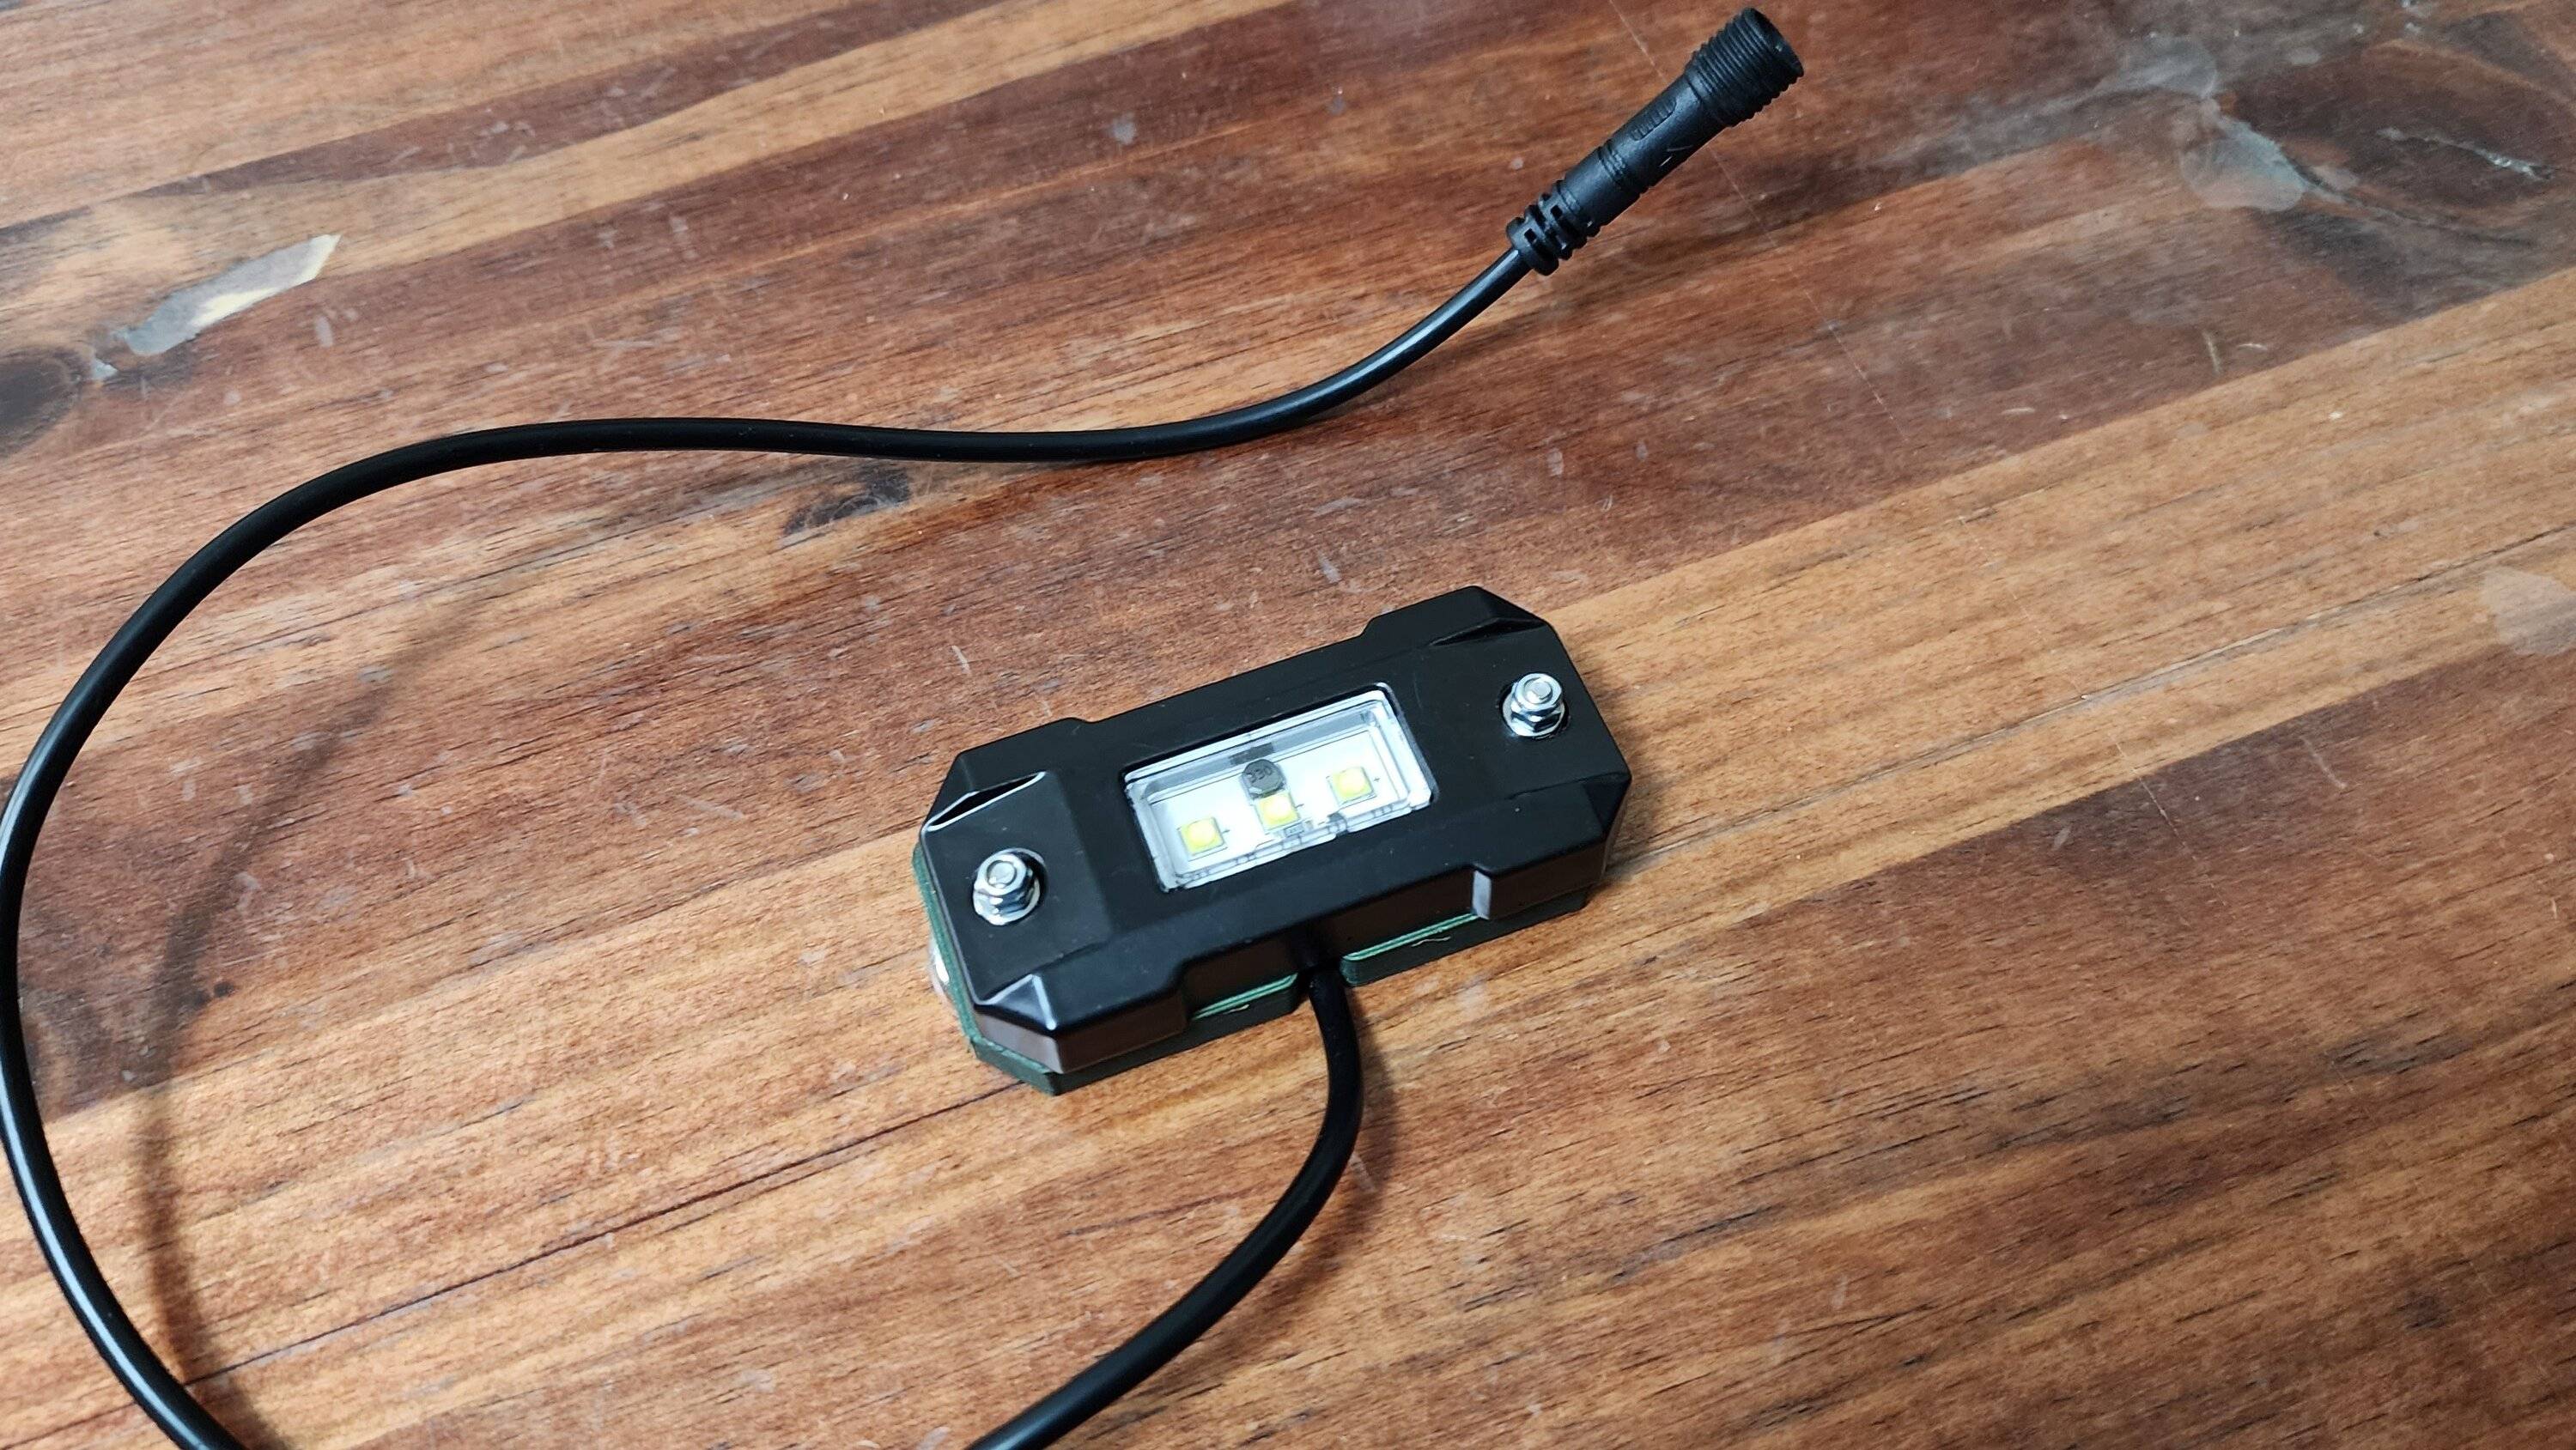
Been looking at budget rock lights for a bit (not necessarily to use AS rock lights, but more for courtesy lighting). While I saw a lot of people liked LUX branded lights, I did not like the price tag. Some research led me to trying out a random brand on amazon to see how they faired. My minimum requirements were for them to be 1 - Not to be made of plastic and 2 - appear to be well sealed (water resistance). I ended up settling on a 12 pack of the below.
https://a.co/d/bu9pj6D
I also wanted to make them as easy to install as the LUX (aka - magnets). I bought a couple packs of these: https://a.co/d/ffMgQ9A.
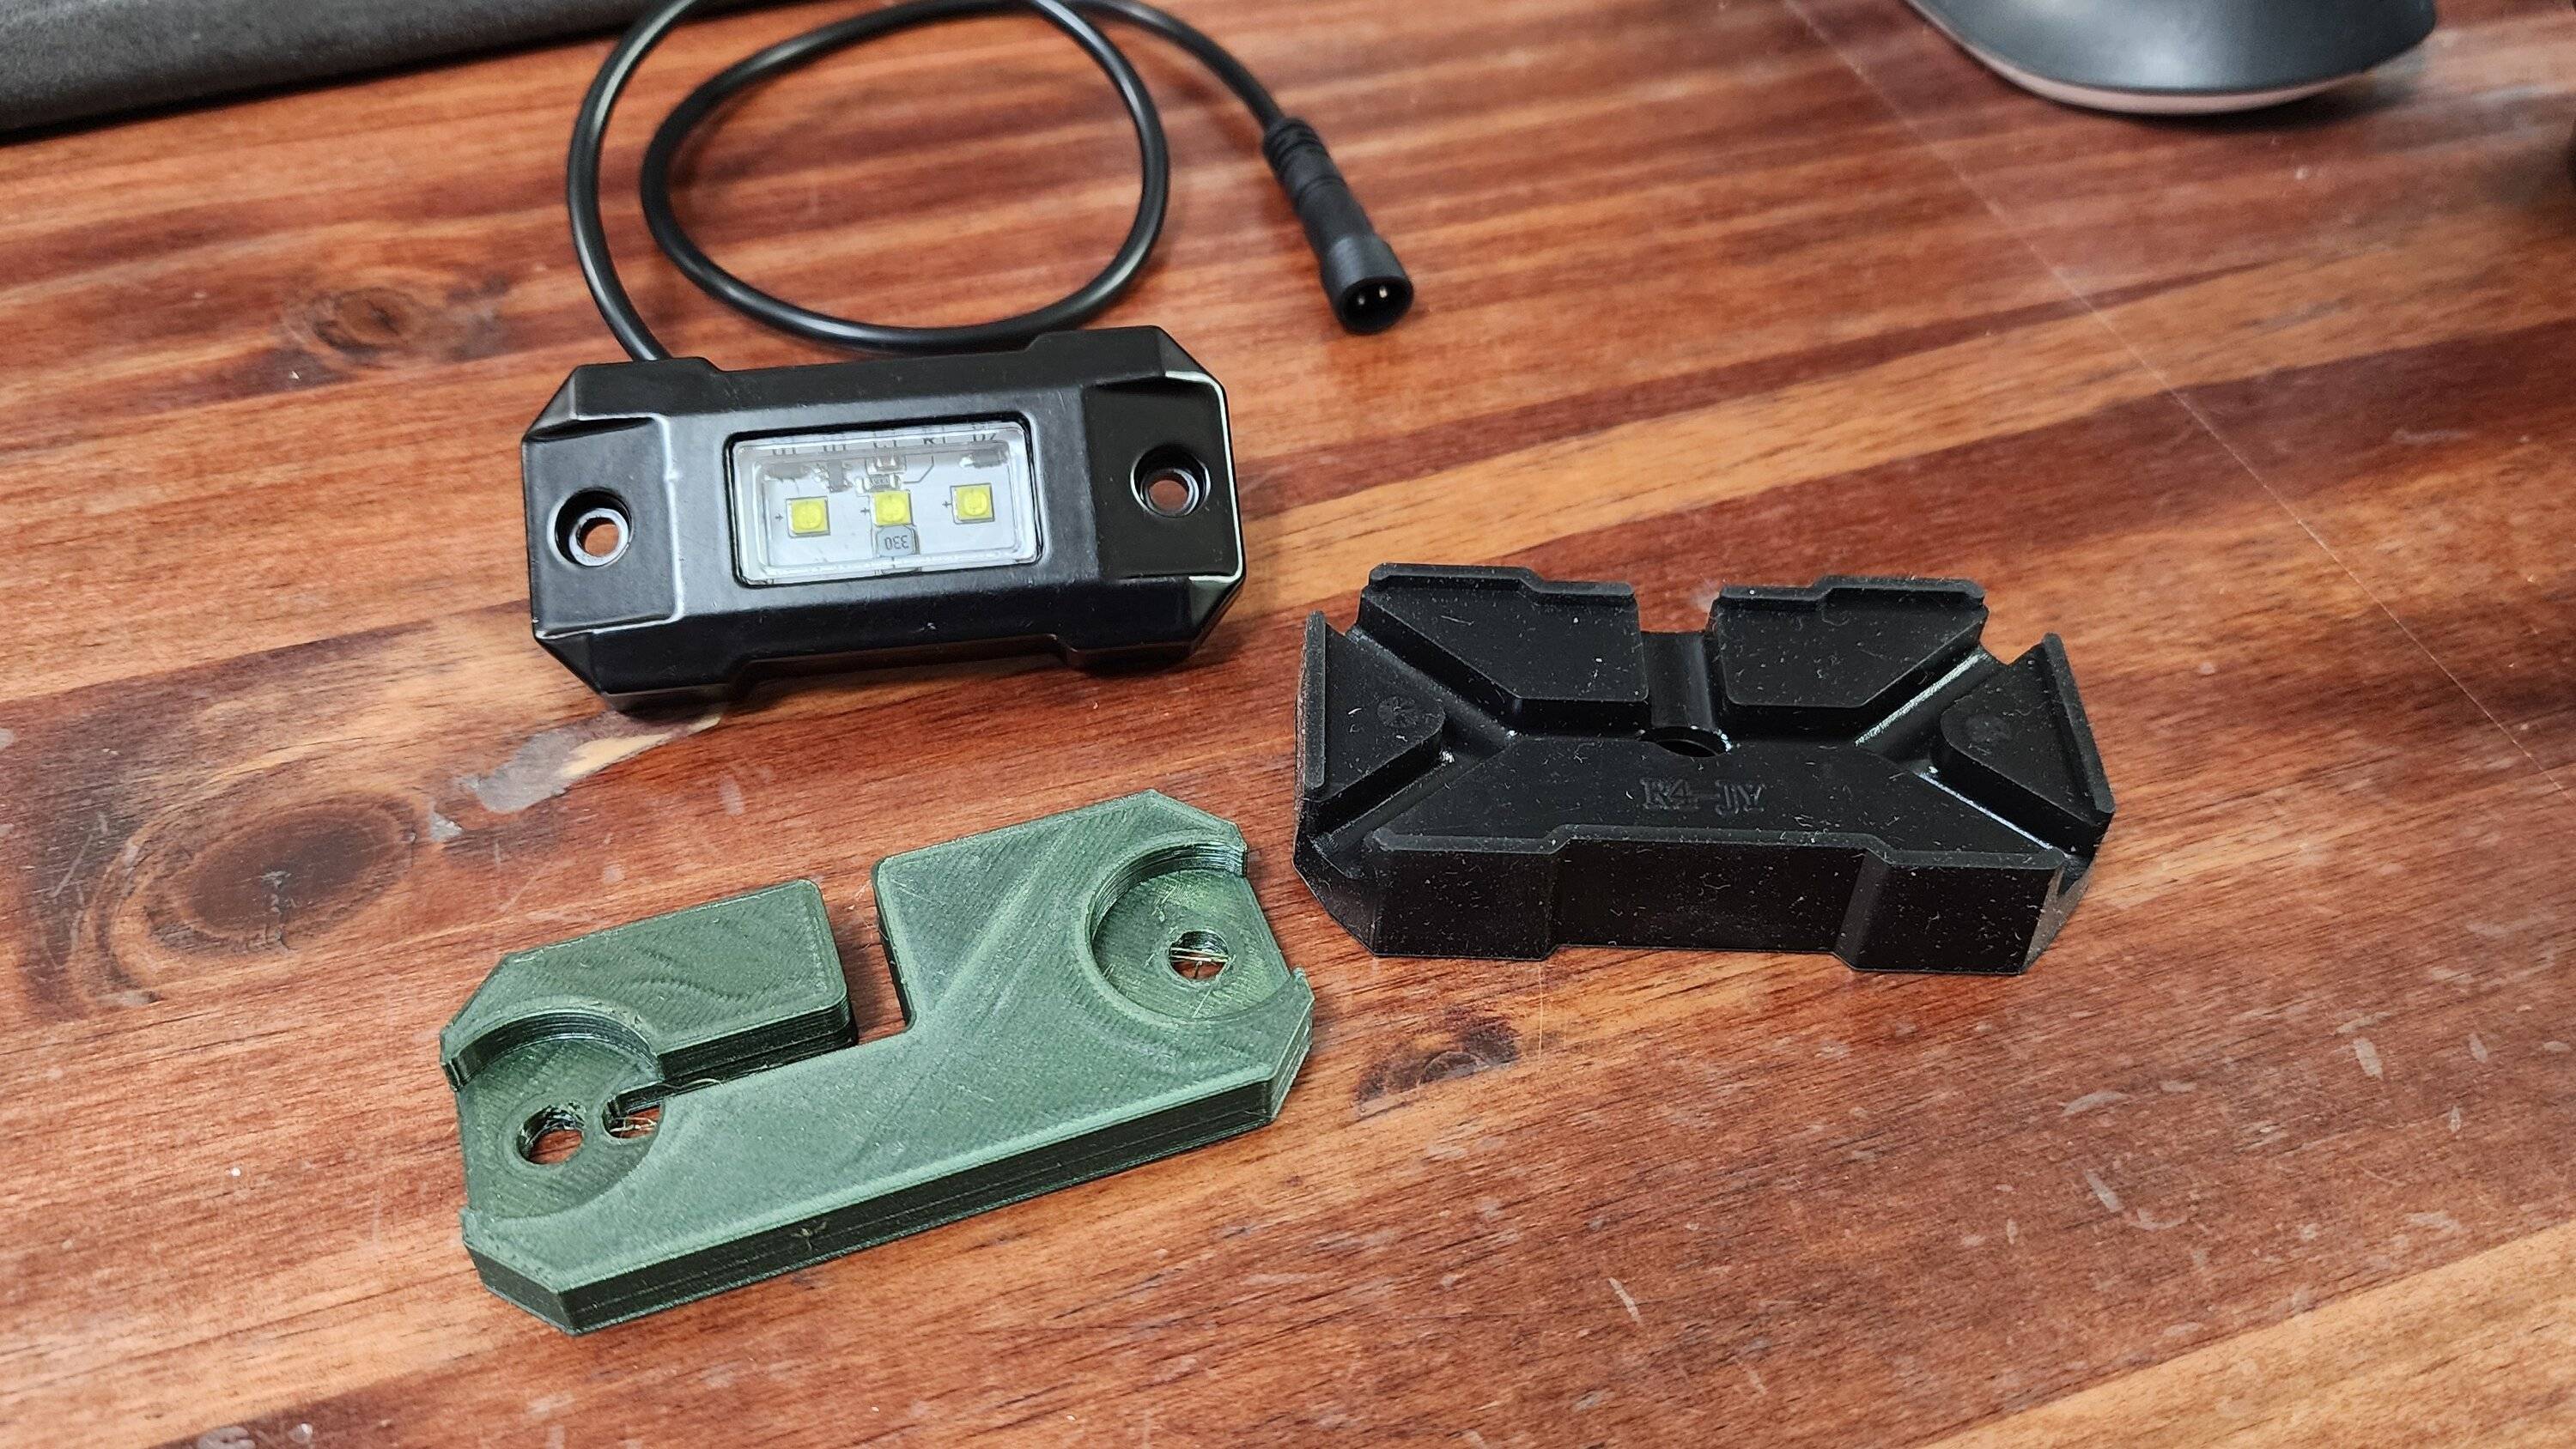
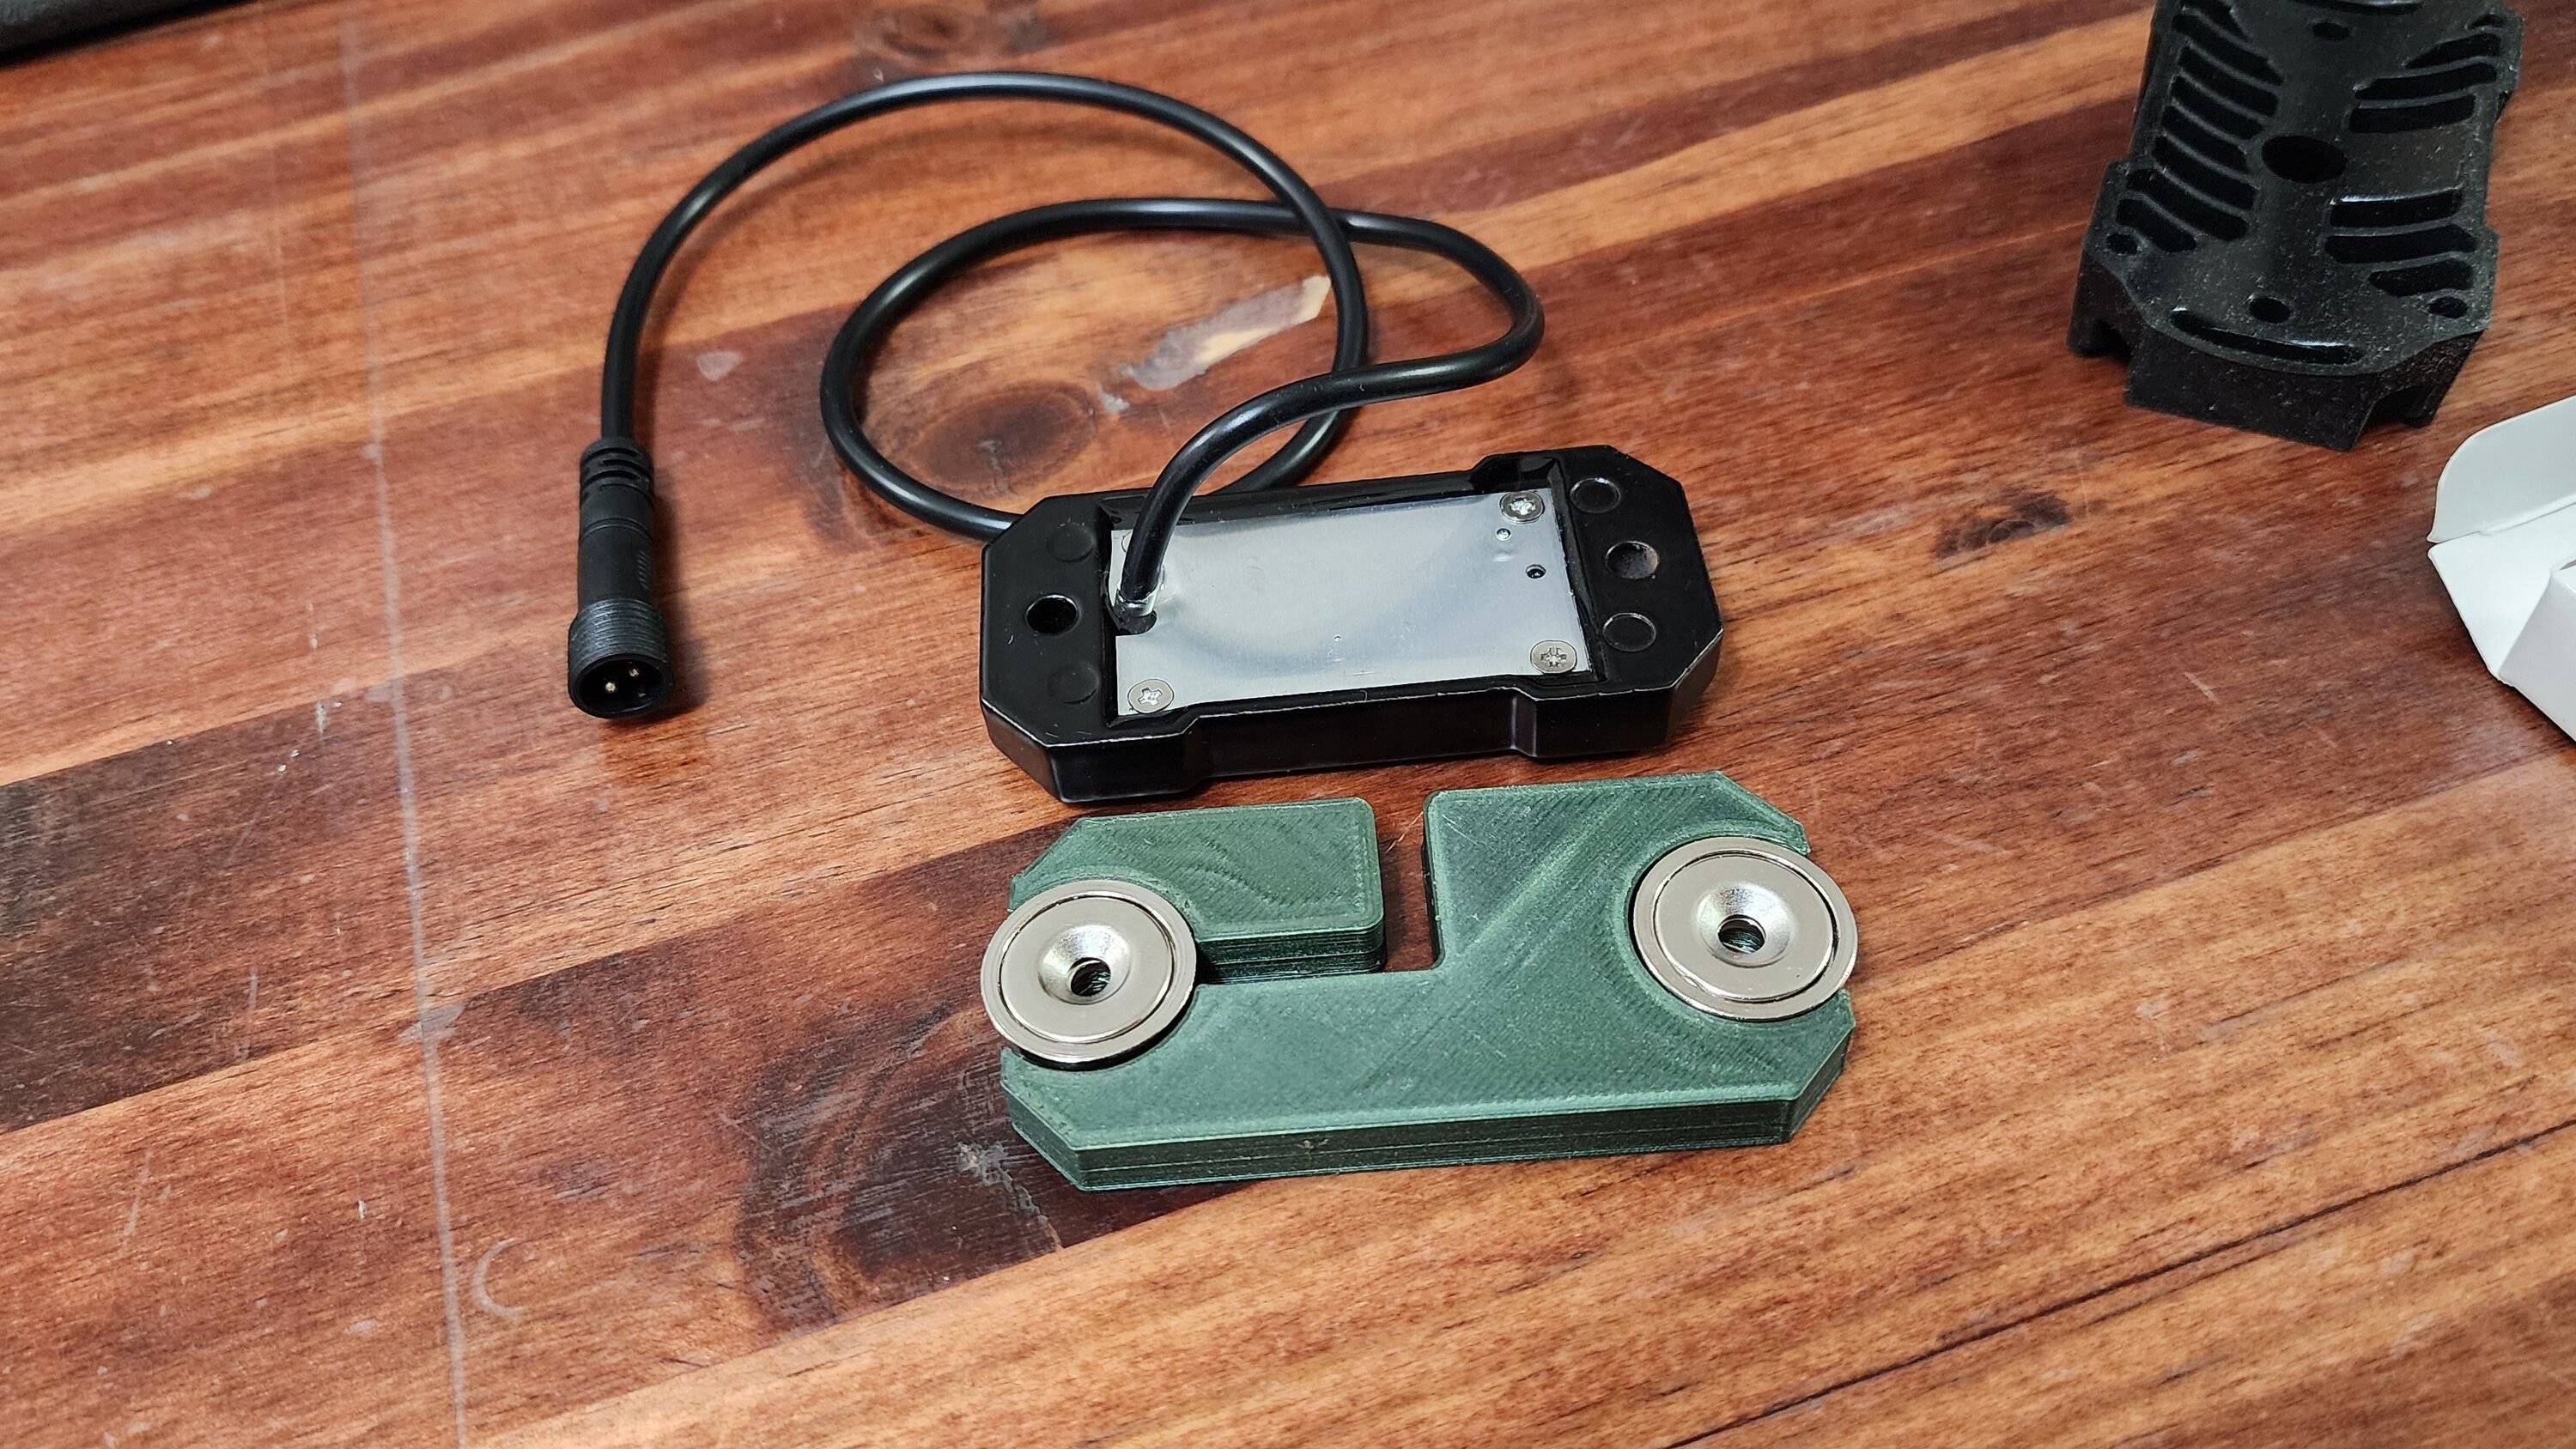
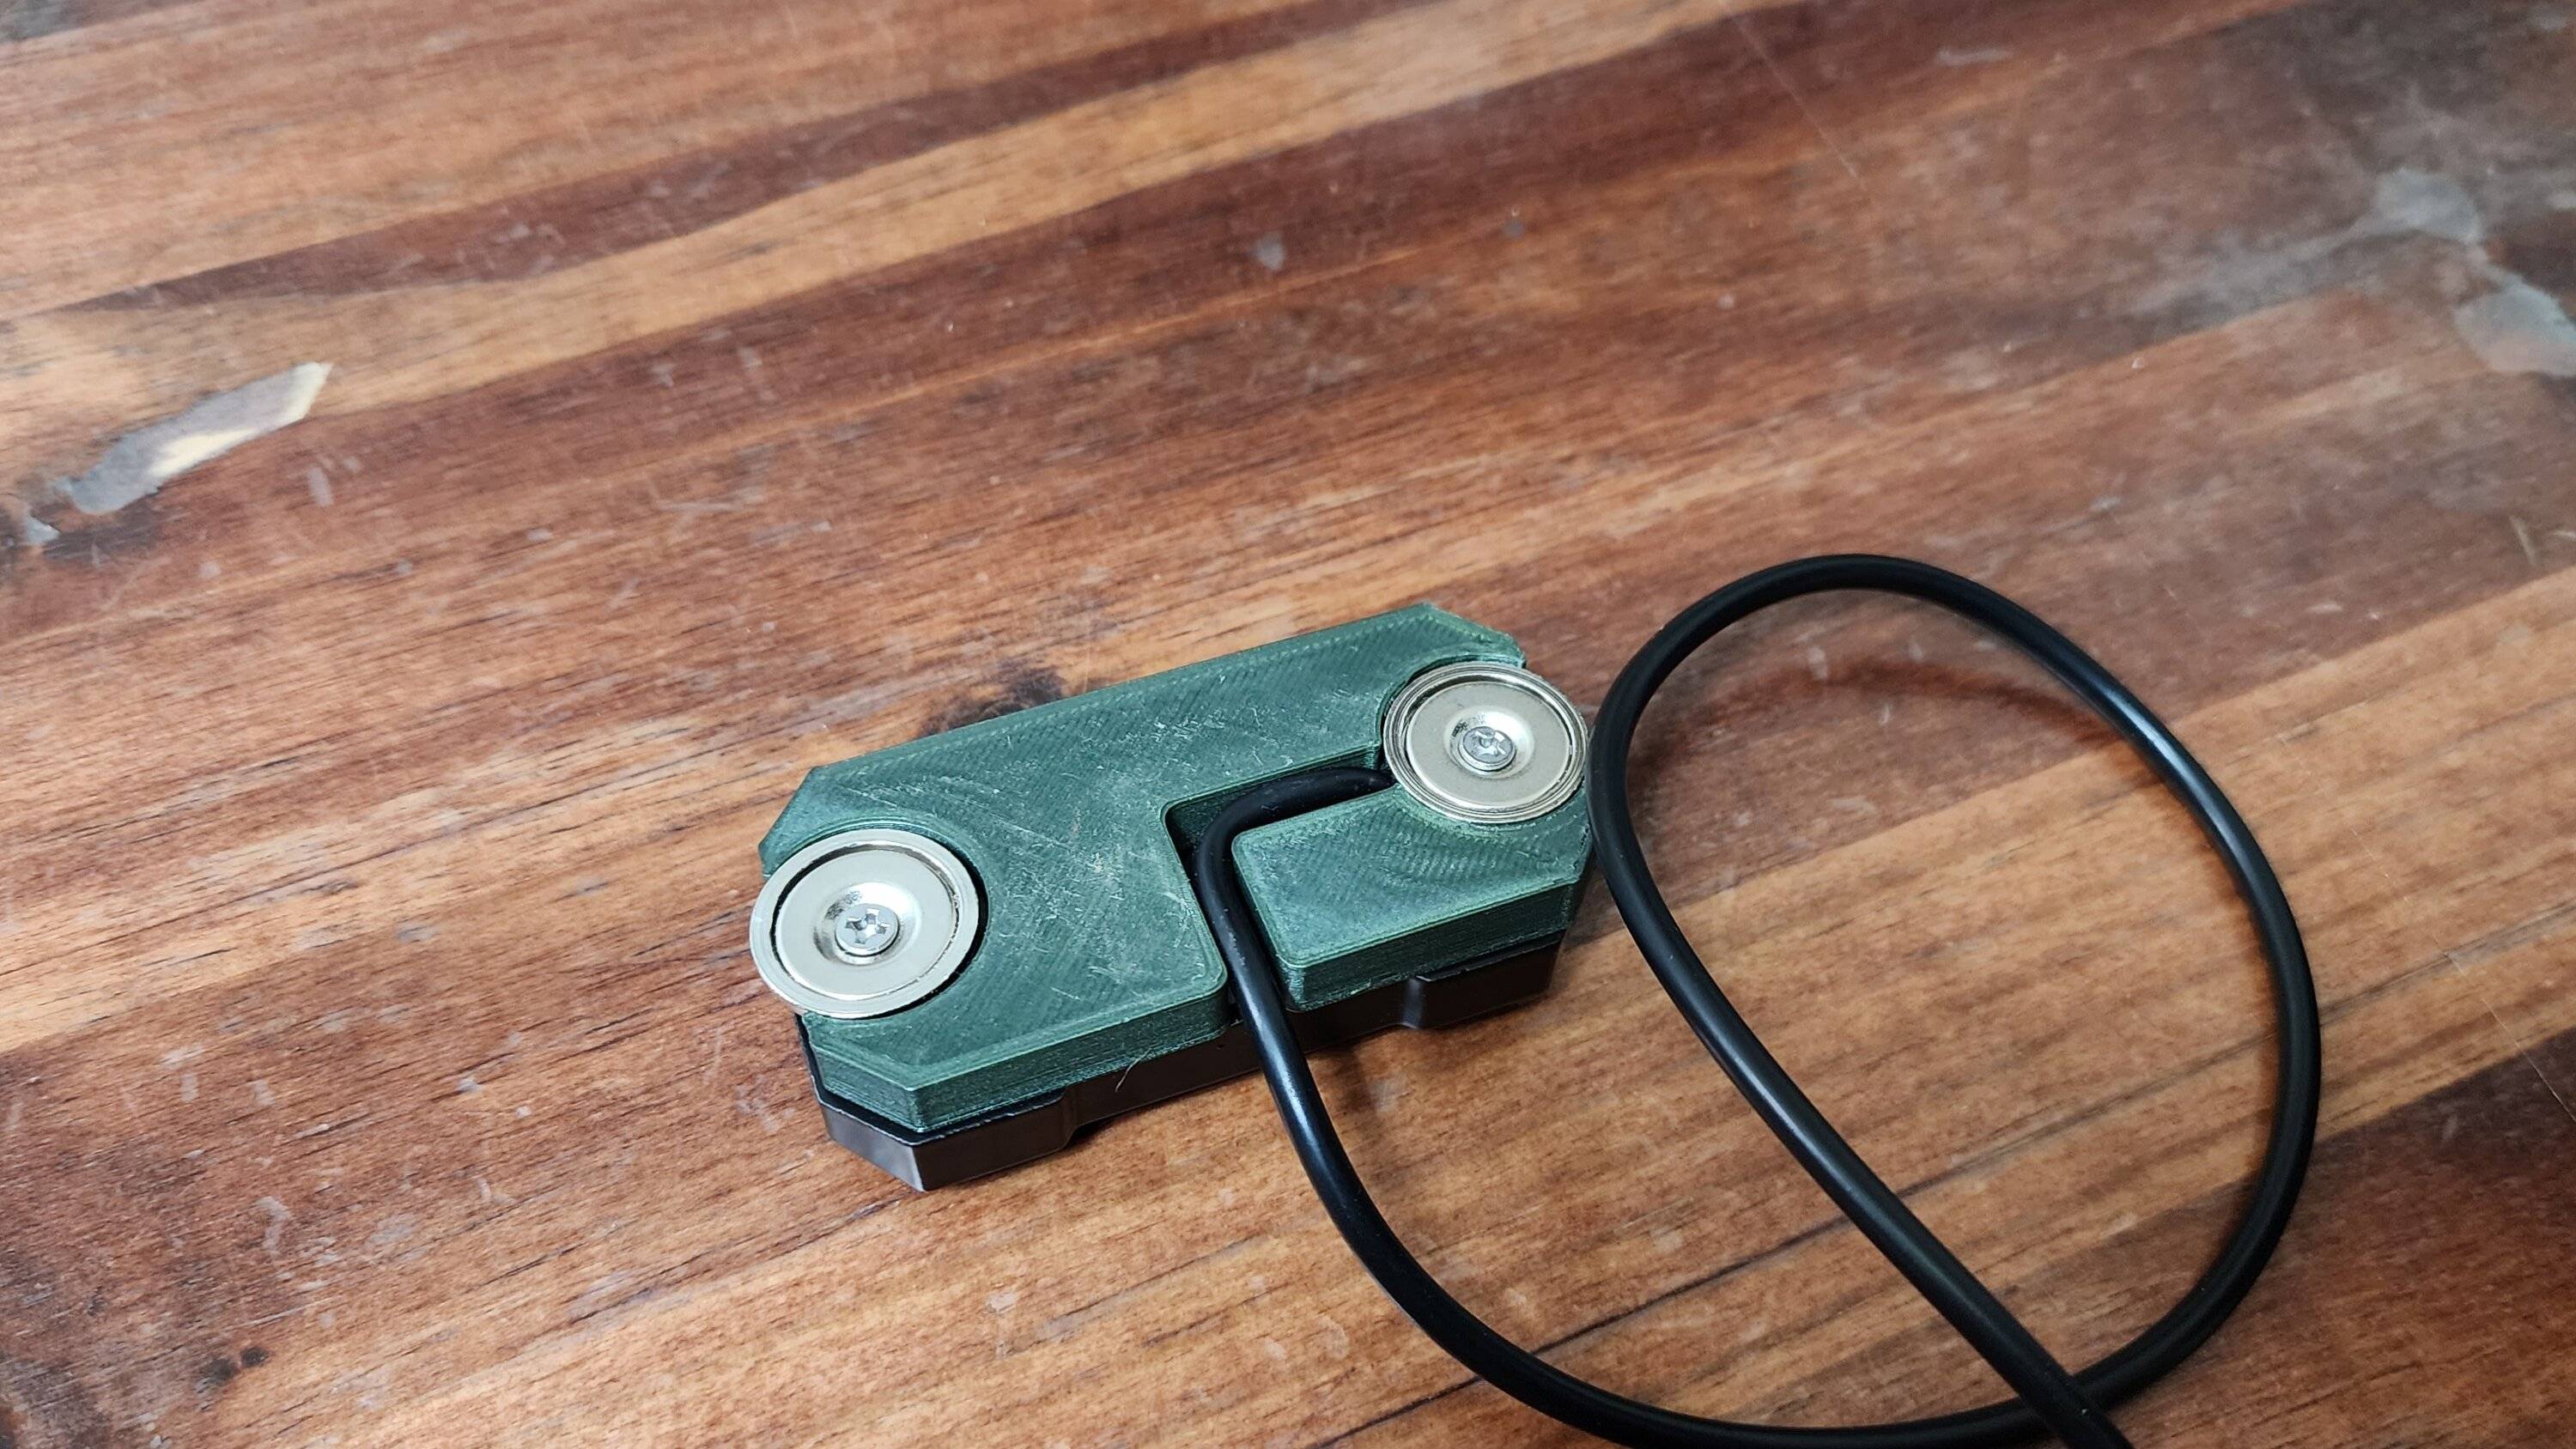
Once they came in, I started working on a design I could 3D print to mount the magnets to the light. While it doesn't look like its going to be an issue, I didn't realize how far the cable protruded out the back which made the design thicker than I'd like (black came with the light, the green is my 3D print).

Below is with the magnet magnet placed for a test fit.
Everything screwed together

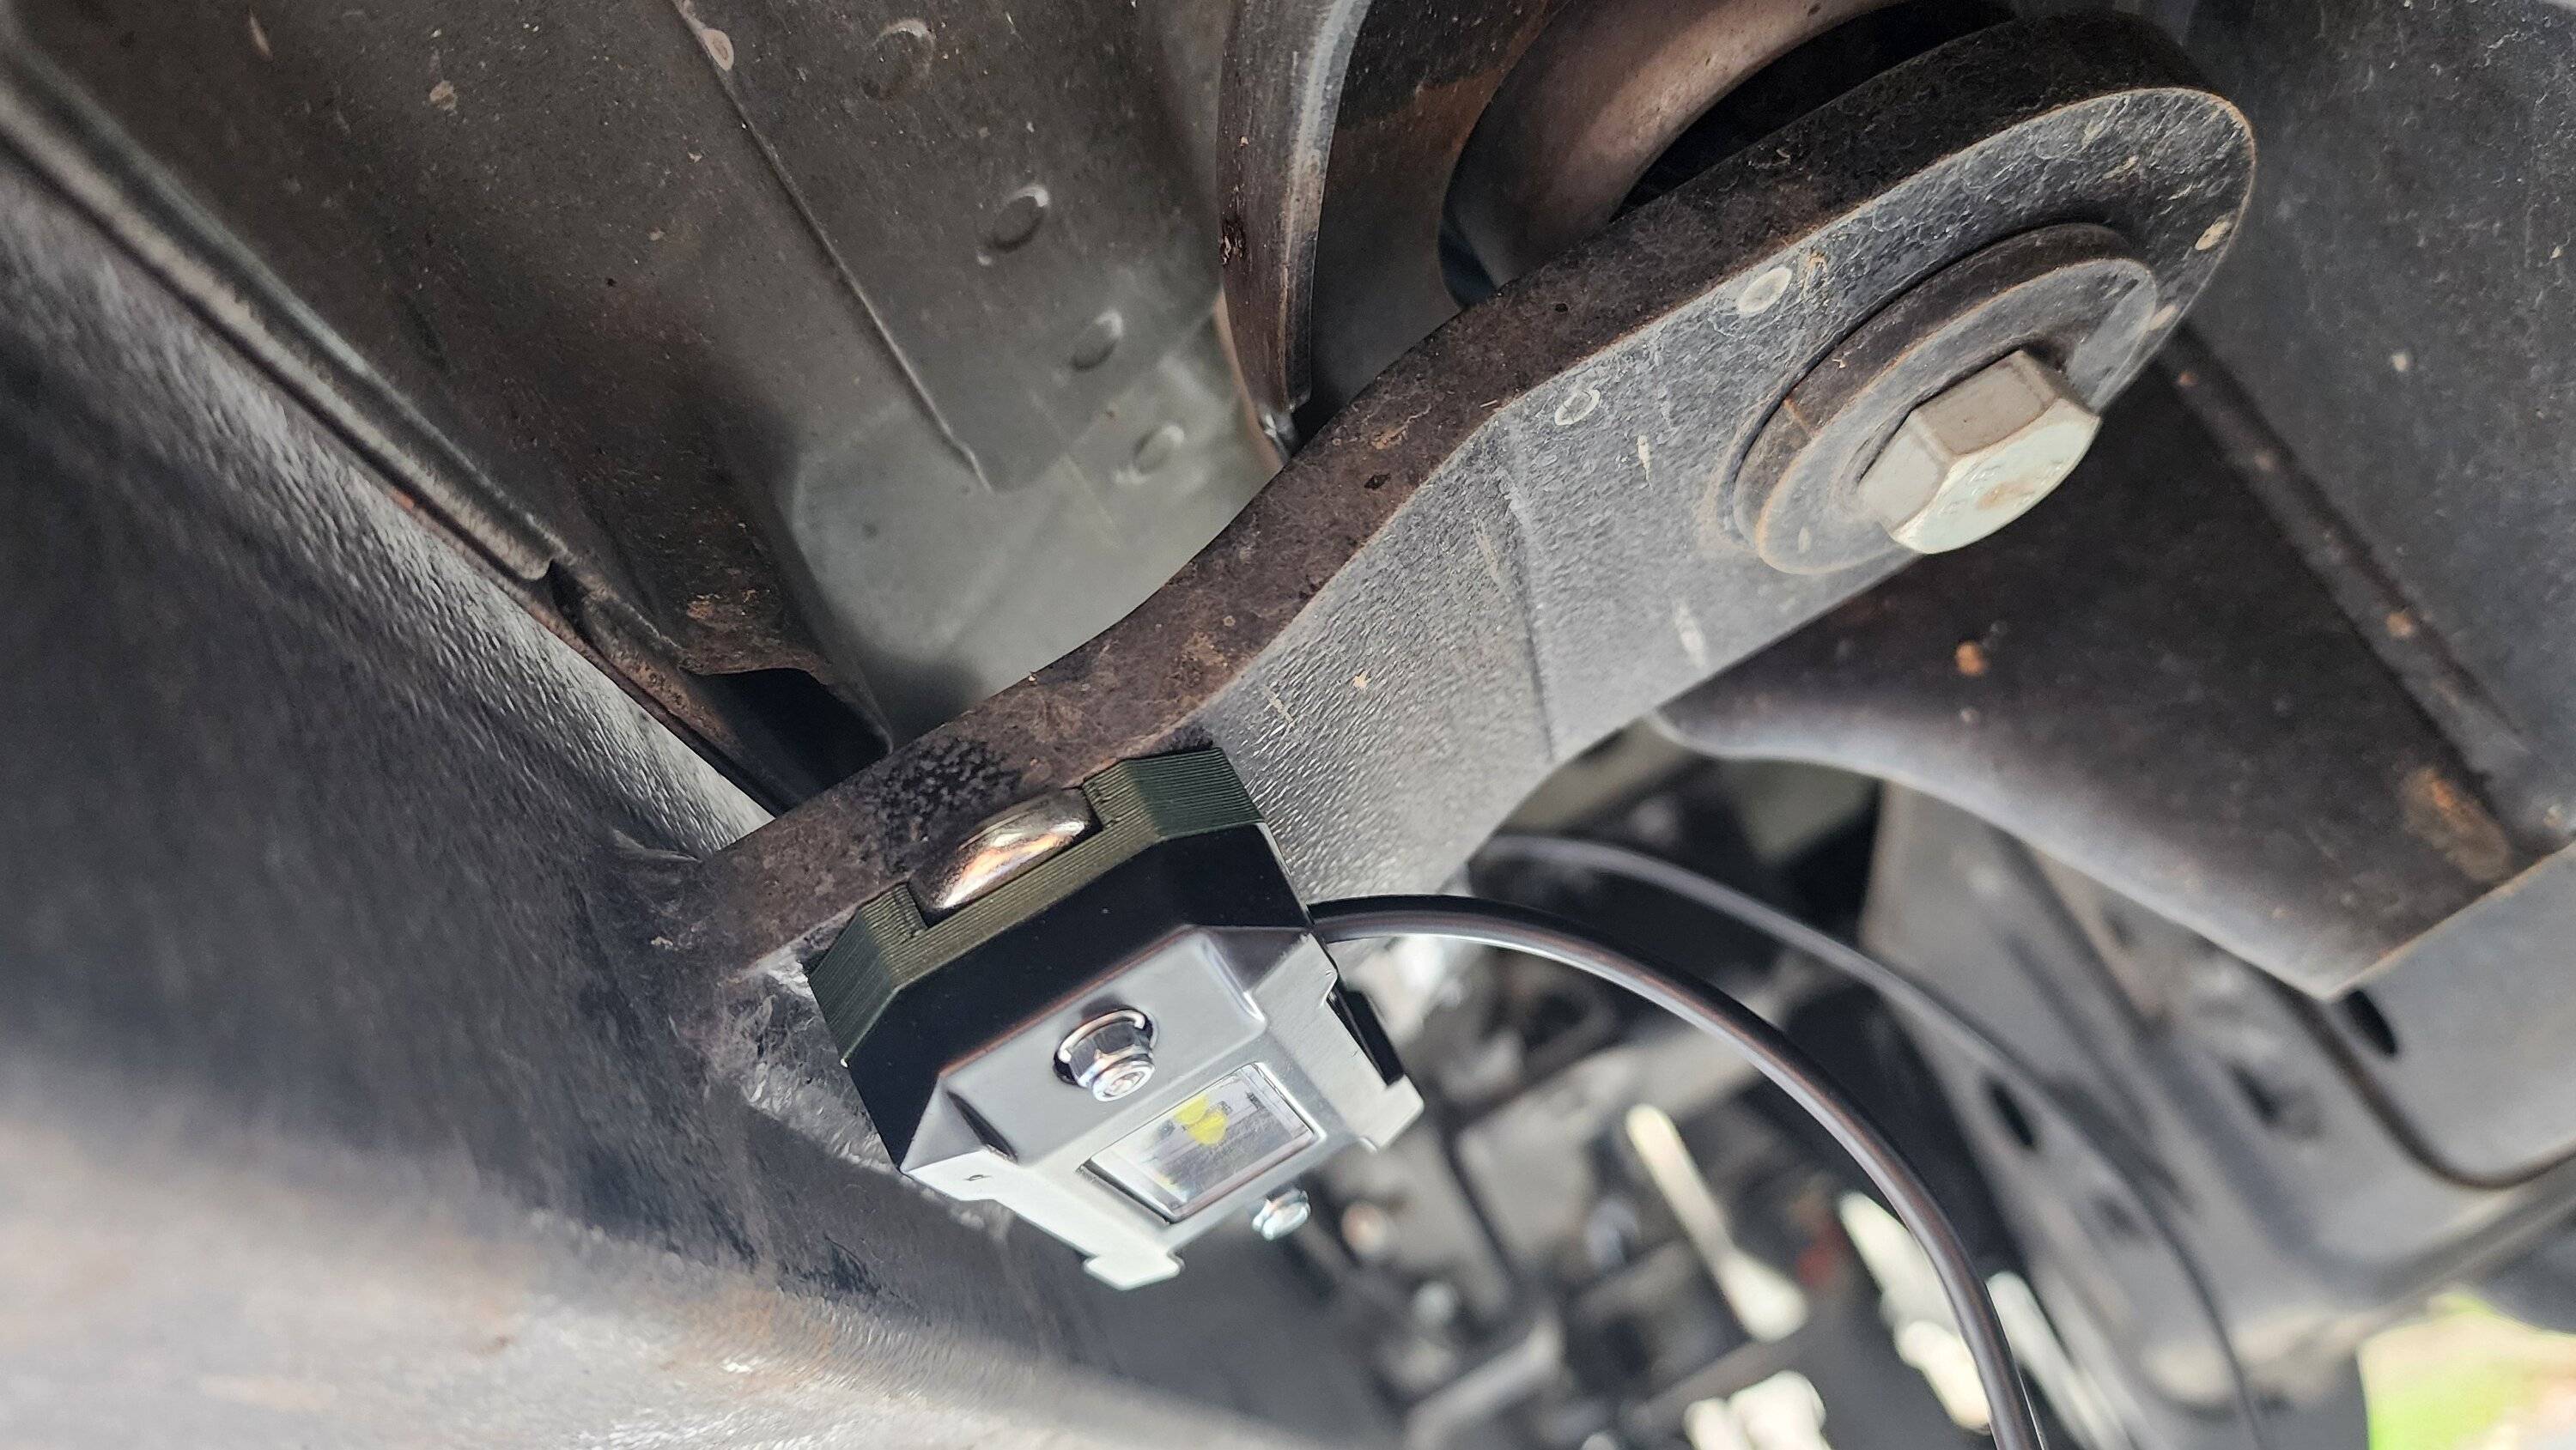
When I brought them out to test locations, I'm very happy with this solution. These magnets are strong, and if they are on a completely flat surface I can't lift the light unless I slide it to an edge that will let me grip a corner and pull it off. The depth is also shallow enough that I can place it on the mounts for my rock sliders and its still short enough to be protected (hard to tell in the photo, but it is shorter). My sliders also protrude down, so that is not the lowest point either.
Still haven't completed mounting them all yet or completed the wiring, but this is my test placement so far. Likely will be settling on 3 on each side for the doors, 3 in the rear, and 2 in the front corners (ignore the light in the front wheel well in the photo - that is my flash light). Will make for 11 total so I now have 1 spare.

My wiring plans include:
- Wiring it to the Bed lights
- Wiring it to an Aux switch
The reasons for using the bed light instead of courtesy lights directly was because doing it this way will allow me to still switch on the master interior light on while driving (occasionally do this while driving at night while my wife or I is helping grab something for the kid in the backseat) and I didn't want the rock lights coming on at that time. However, the bed lights still come on when you unlock the vehicle or when you open the door. Additionally, with tazer, pressing the unlock button 3 times in a row keeps the bed lights on for 30 minutes (use this all the time when loading groceries in the bed). Since I still have a spare Aux switch, obviously adding that in is easy and will allow me to actually use them as rock lights if I need to as well.
Likely won't complete the project this weekend (due to weather). Pretty happy with progress so far though, and I think the 12 pack give some pretty even, functional lighting.
https://a.co/d/bu9pj6D
I also wanted to make them as easy to install as the LUX (aka - magnets). I bought a couple packs of these: https://a.co/d/ffMgQ9A.
Once they came in, I started working on a design I could 3D print to mount the magnets to the light. While it doesn't look like its going to be an issue, I didn't realize how far the cable protruded out the back which made the design thicker than I'd like (black came with the light, the green is my 3D print).
Below is with the magnet magnet placed for a test fit.
Everything screwed together
When I brought them out to test locations, I'm very happy with this solution. These magnets are strong, and if they are on a completely flat surface I can't lift the light unless I slide it to an edge that will let me grip a corner and pull it off. The depth is also shallow enough that I can place it on the mounts for my rock sliders and its still short enough to be protected (hard to tell in the photo, but it is shorter). My sliders also protrude down, so that is not the lowest point either.
Still haven't completed mounting them all yet or completed the wiring, but this is my test placement so far. Likely will be settling on 3 on each side for the doors, 3 in the rear, and 2 in the front corners (ignore the light in the front wheel well in the photo - that is my flash light). Will make for 11 total so I now have 1 spare.
My wiring plans include:
- Wiring it to the Bed lights
- Wiring it to an Aux switch
The reasons for using the bed light instead of courtesy lights directly was because doing it this way will allow me to still switch on the master interior light on while driving (occasionally do this while driving at night while my wife or I is helping grab something for the kid in the backseat) and I didn't want the rock lights coming on at that time. However, the bed lights still come on when you unlock the vehicle or when you open the door. Additionally, with tazer, pressing the unlock button 3 times in a row keeps the bed lights on for 30 minutes (use this all the time when loading groceries in the bed). Since I still have a spare Aux switch, obviously adding that in is easy and will allow me to actually use them as rock lights if I need to as well.
Likely won't complete the project this weekend (due to weather). Pretty happy with progress so far though, and I think the 12 pack give some pretty even, functional lighting.
OP
OP
arskemp
Well-Known Member
- First Name
- Andrew
- Joined
- Jan 9, 2022
- Threads
- 10
- Messages
- 325
- Reaction score
- 729
- Location
- Northern CA
- Vehicle(s)
- 22 Sarge Green Mojave
- Build Thread
- Link
- Occupation
- IT
- Thread starter
- #108
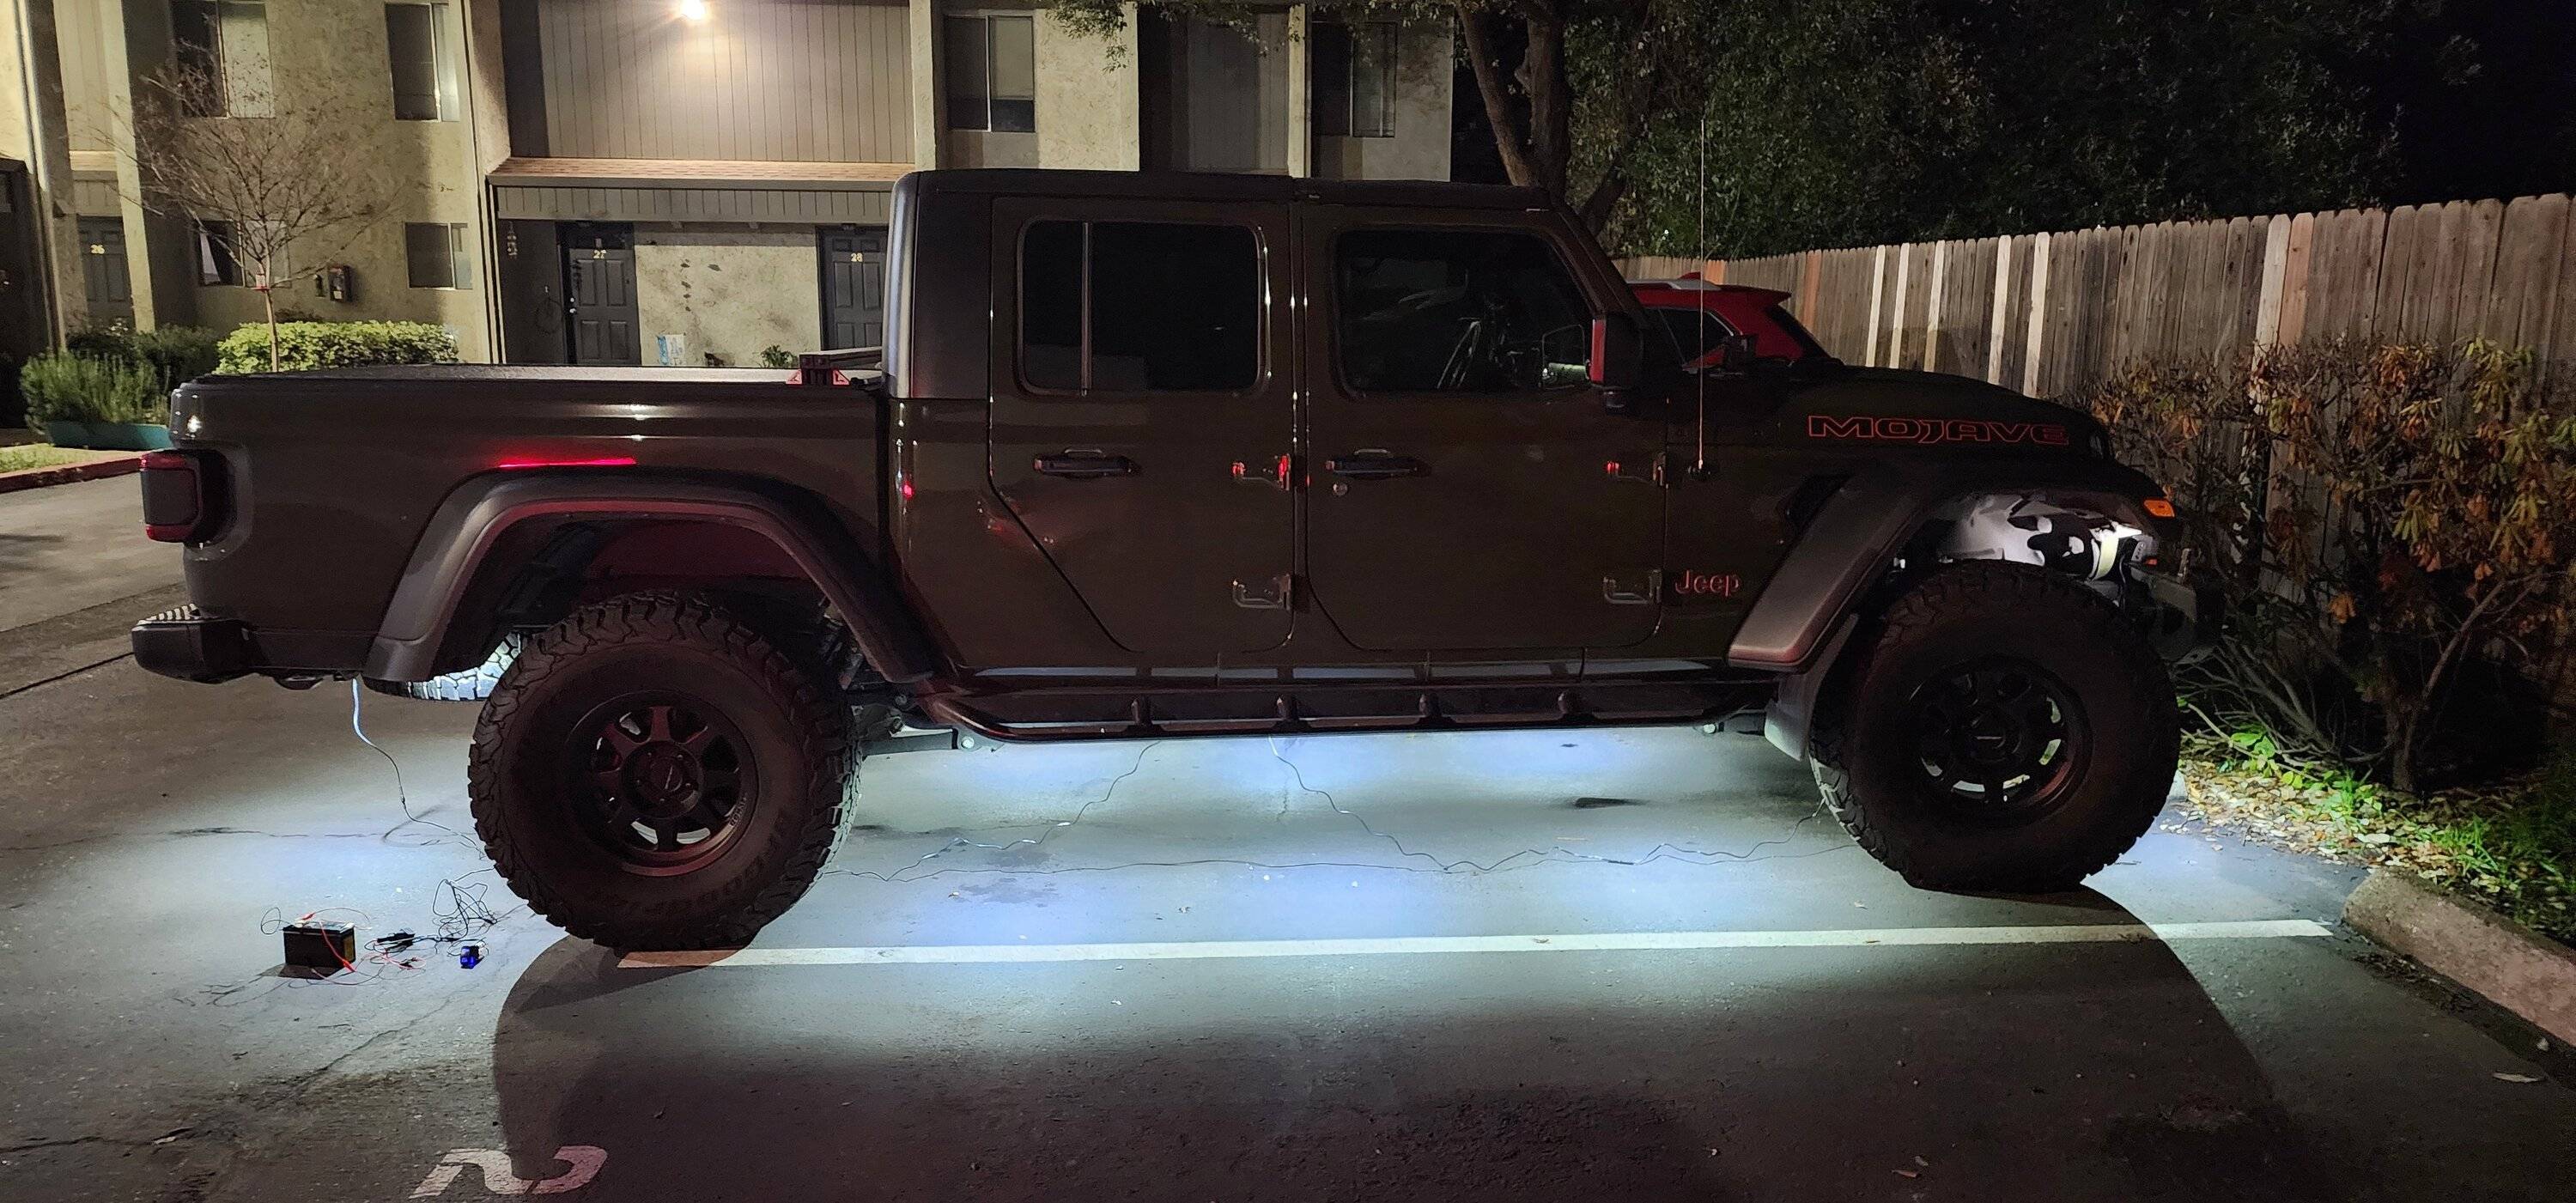
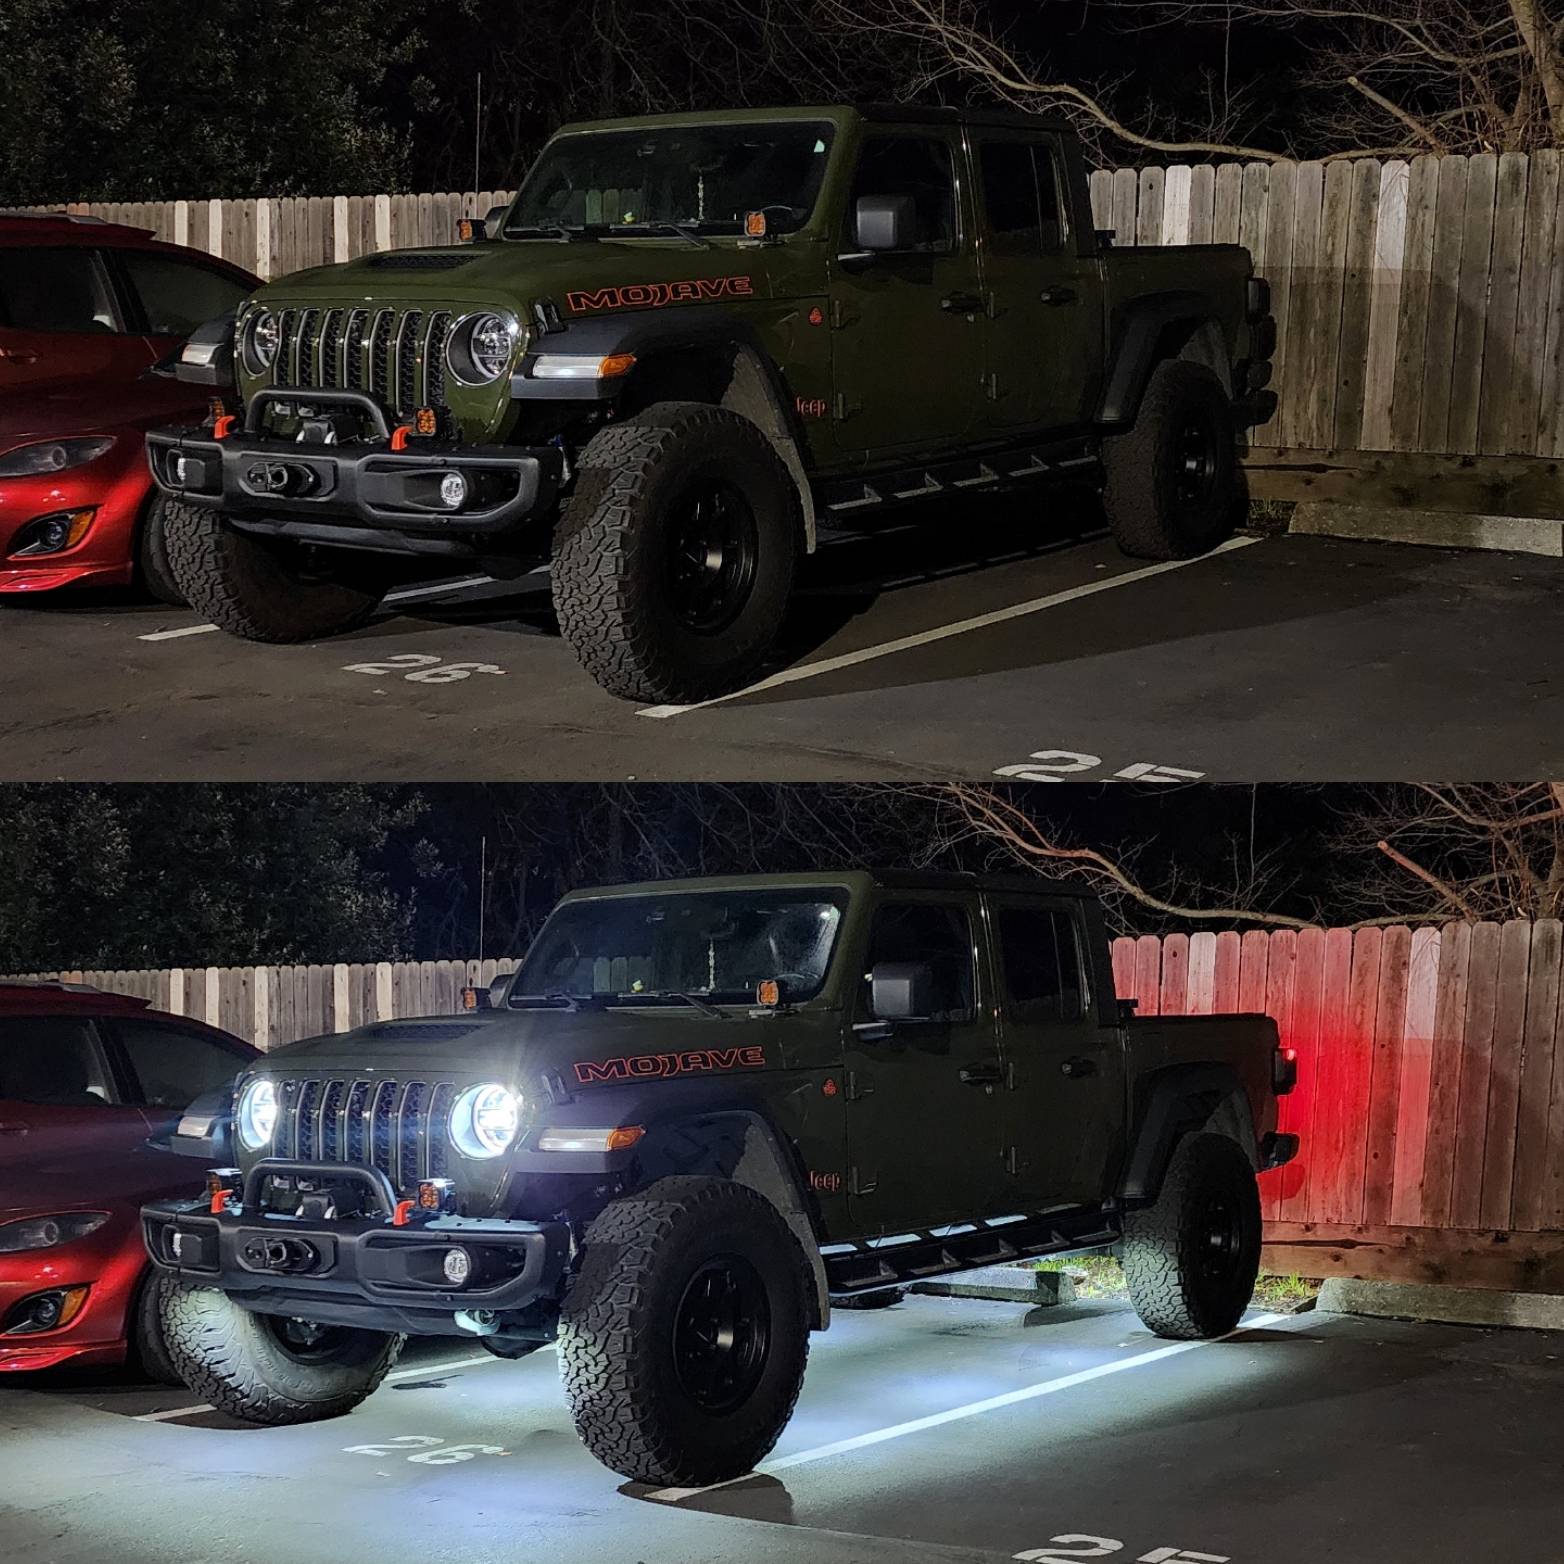
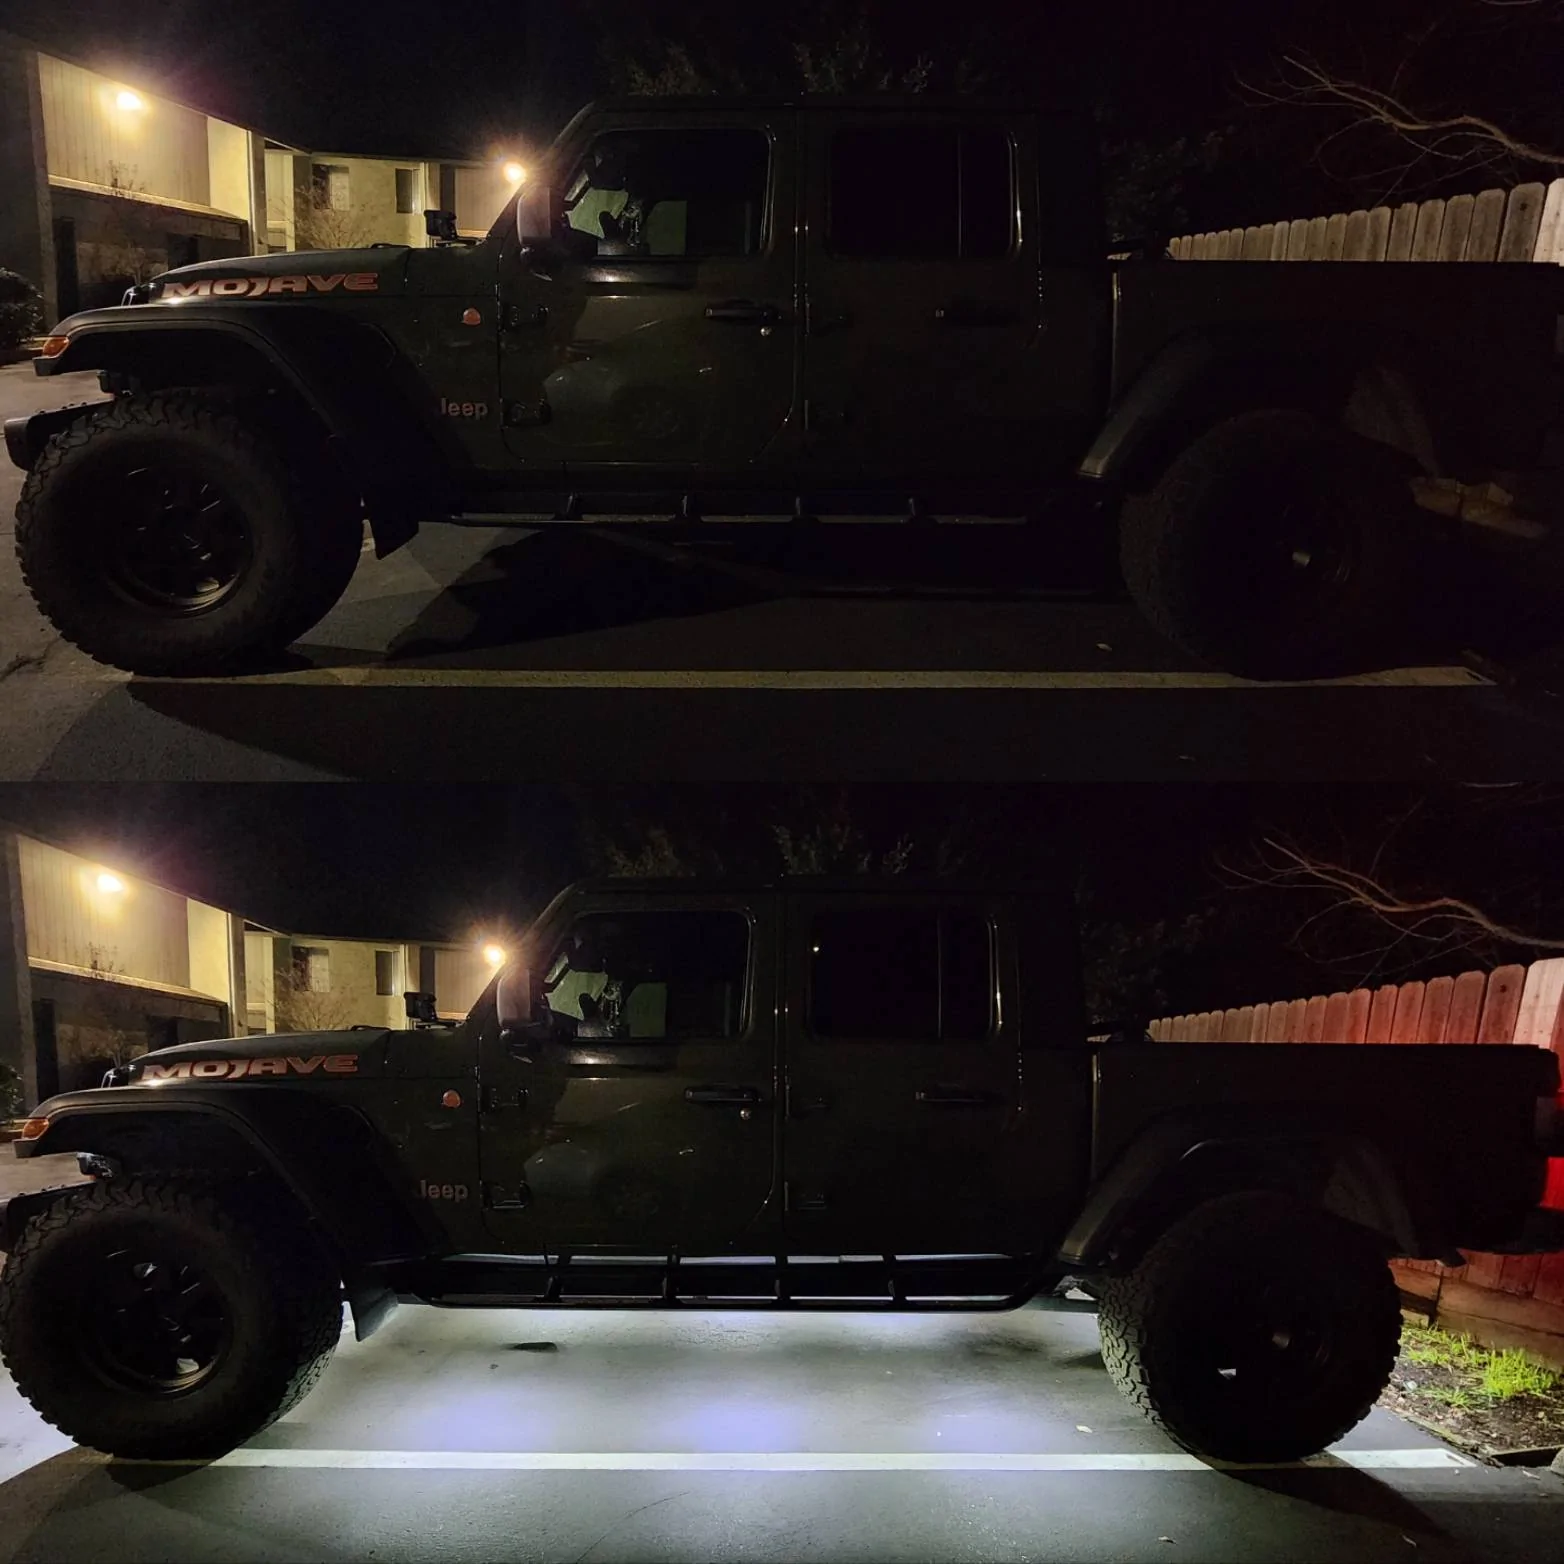
Had a dry day yesterday, so I got to wrap up my Rock light project. Pretty happy with how even the light came out. I also think these positions would work well as actual rock lights, being that you can see in front of and behind each tire pretty well, as well as underneath the whole vehicle front to back.
Using 11 lights (1 in each front corner, 3 on each side, 1 on each rear corner, and 1 in the rear center).
I ended up wiring it to come on a few different ways with the included relay (and purchasing some diodes + a waterproof switch)
- Wired through the bed light switch as courtesy lights (comes on when opening the door, unlocking, stays on for 30 minutes when pressing unlock 3 times). I also have a switch in the right rear corner of the bed to switch off this if I DON'T want them coming on when unlocking (basically, to revert back to OEM if desired)
- Wired through the Aux panel to manually turn them on/off
Hard to capture night photos, especially since where I park is pretty lit up at night.
Last edited:
lordmundi
Member
- First Name
- Frank
- Joined
- Dec 7, 2023
- Threads
- 3
- Messages
- 14
- Reaction score
- 1
- Location
- Houston, TX
- Vehicle(s)
- 2021 JT Mojave, 2020 JL Rubicon, 2005 TJ Sport
this is really really great. i appreciate you taking the time to write it up and post links. I want to do something very similar, so I'm interested in seeing where you mounted your relay and your diode. I think I want to wire mine the same but I'm wondering what the best way is to mount those and run those wires. I'm assuming you also had some sort of method of tieing all the leads from all 11 lights together - did you use a bus bar or something or just sequentially tie more and more wires together? Lastly, are you planning on sharing the 3d model file for your magnetic mount? Anyhow, thanks for any info on where you mounted those components and thanks again for the writeup. Looks great!
OP
OP
arskemp
Well-Known Member
- First Name
- Andrew
- Joined
- Jan 9, 2022
- Threads
- 10
- Messages
- 325
- Reaction score
- 729
- Location
- Northern CA
- Vehicle(s)
- 22 Sarge Green Mojave
- Build Thread
- Link
- Occupation
- IT
- Thread starter
- #110
Had a dry date yesterday, so I got to wrap up my Rock light project. Pretty happy with how even the light came out. I also think these positions would work well as actual rock lights, being that you can see in front of and behind each tire pretty well, as well as underneath the whole vehicle front to back.
Using 11 lights (1 in each front corner, 3 on each side, 1 on each rear corner, and 1 in the rear center).
I ended up wiring it to come on a few different ways with the included relay (and purchasing some diodes + a waterproof switch)
- Wired through the bed light switch as courtesy lights (comes on when opening the door, unlocking, stays on for 30 minutes when pressing unlock 3 times). I also have a switch in the right rear corner of the bed to switch off this if I DON'T want them coming on when unlocking (basically, to revert back to OEM if desired)
- Wired through the Aux panel to manually turn them on/off
Hard to capture night photos, especially since where I park is pretty lit up at night.
this is really really great. i appreciate you taking the time to write it up and post links. I want to do something very similar, so I'm interested in seeing where you mounted your relay and your diode. I think I want to wire mine the same but I'm wondering what the best way is to mount those and run those wires. I'm assuming you also had some sort of method of tieing all the leads from all 11 lights together - did you use a bus bar or something or just sequentially tie more and more wires together? Lastly, are you planning on sharing the 3d model file for your magnetic mount? Anyhow, thanks for any info on where you mounted those components and thanks again for the writeup. Looks great!
I have the relay and diodes mounted in the rear close to the bed light. I pulled from the 7-pin connector for power (used a 7 pin extension and cut the end off so that I didn't have to cut into any wiring - https://www.amazon.com/dp/B09BMNLX6S?ref=ppx_pop_mob_ap_share). This made it so the only wire I had running to the front was for the aux switch. In retrospect, it probably would have been just as easy to pull off the battery but either way works.
For tying all the lights together, the lights I linked to already came with a harness for all the wiring for 12 lights to simply plug straight in, no bus bar or splicing needed (the connectors press in and then screw tight to protect from water). For the front lights however, I did have to buy a set of the wire extensions they sell.
Wasn't sure if there was any interest in the stl files for the magnet adapter, but if there is I can easily post the files on thingiverse in a few days.
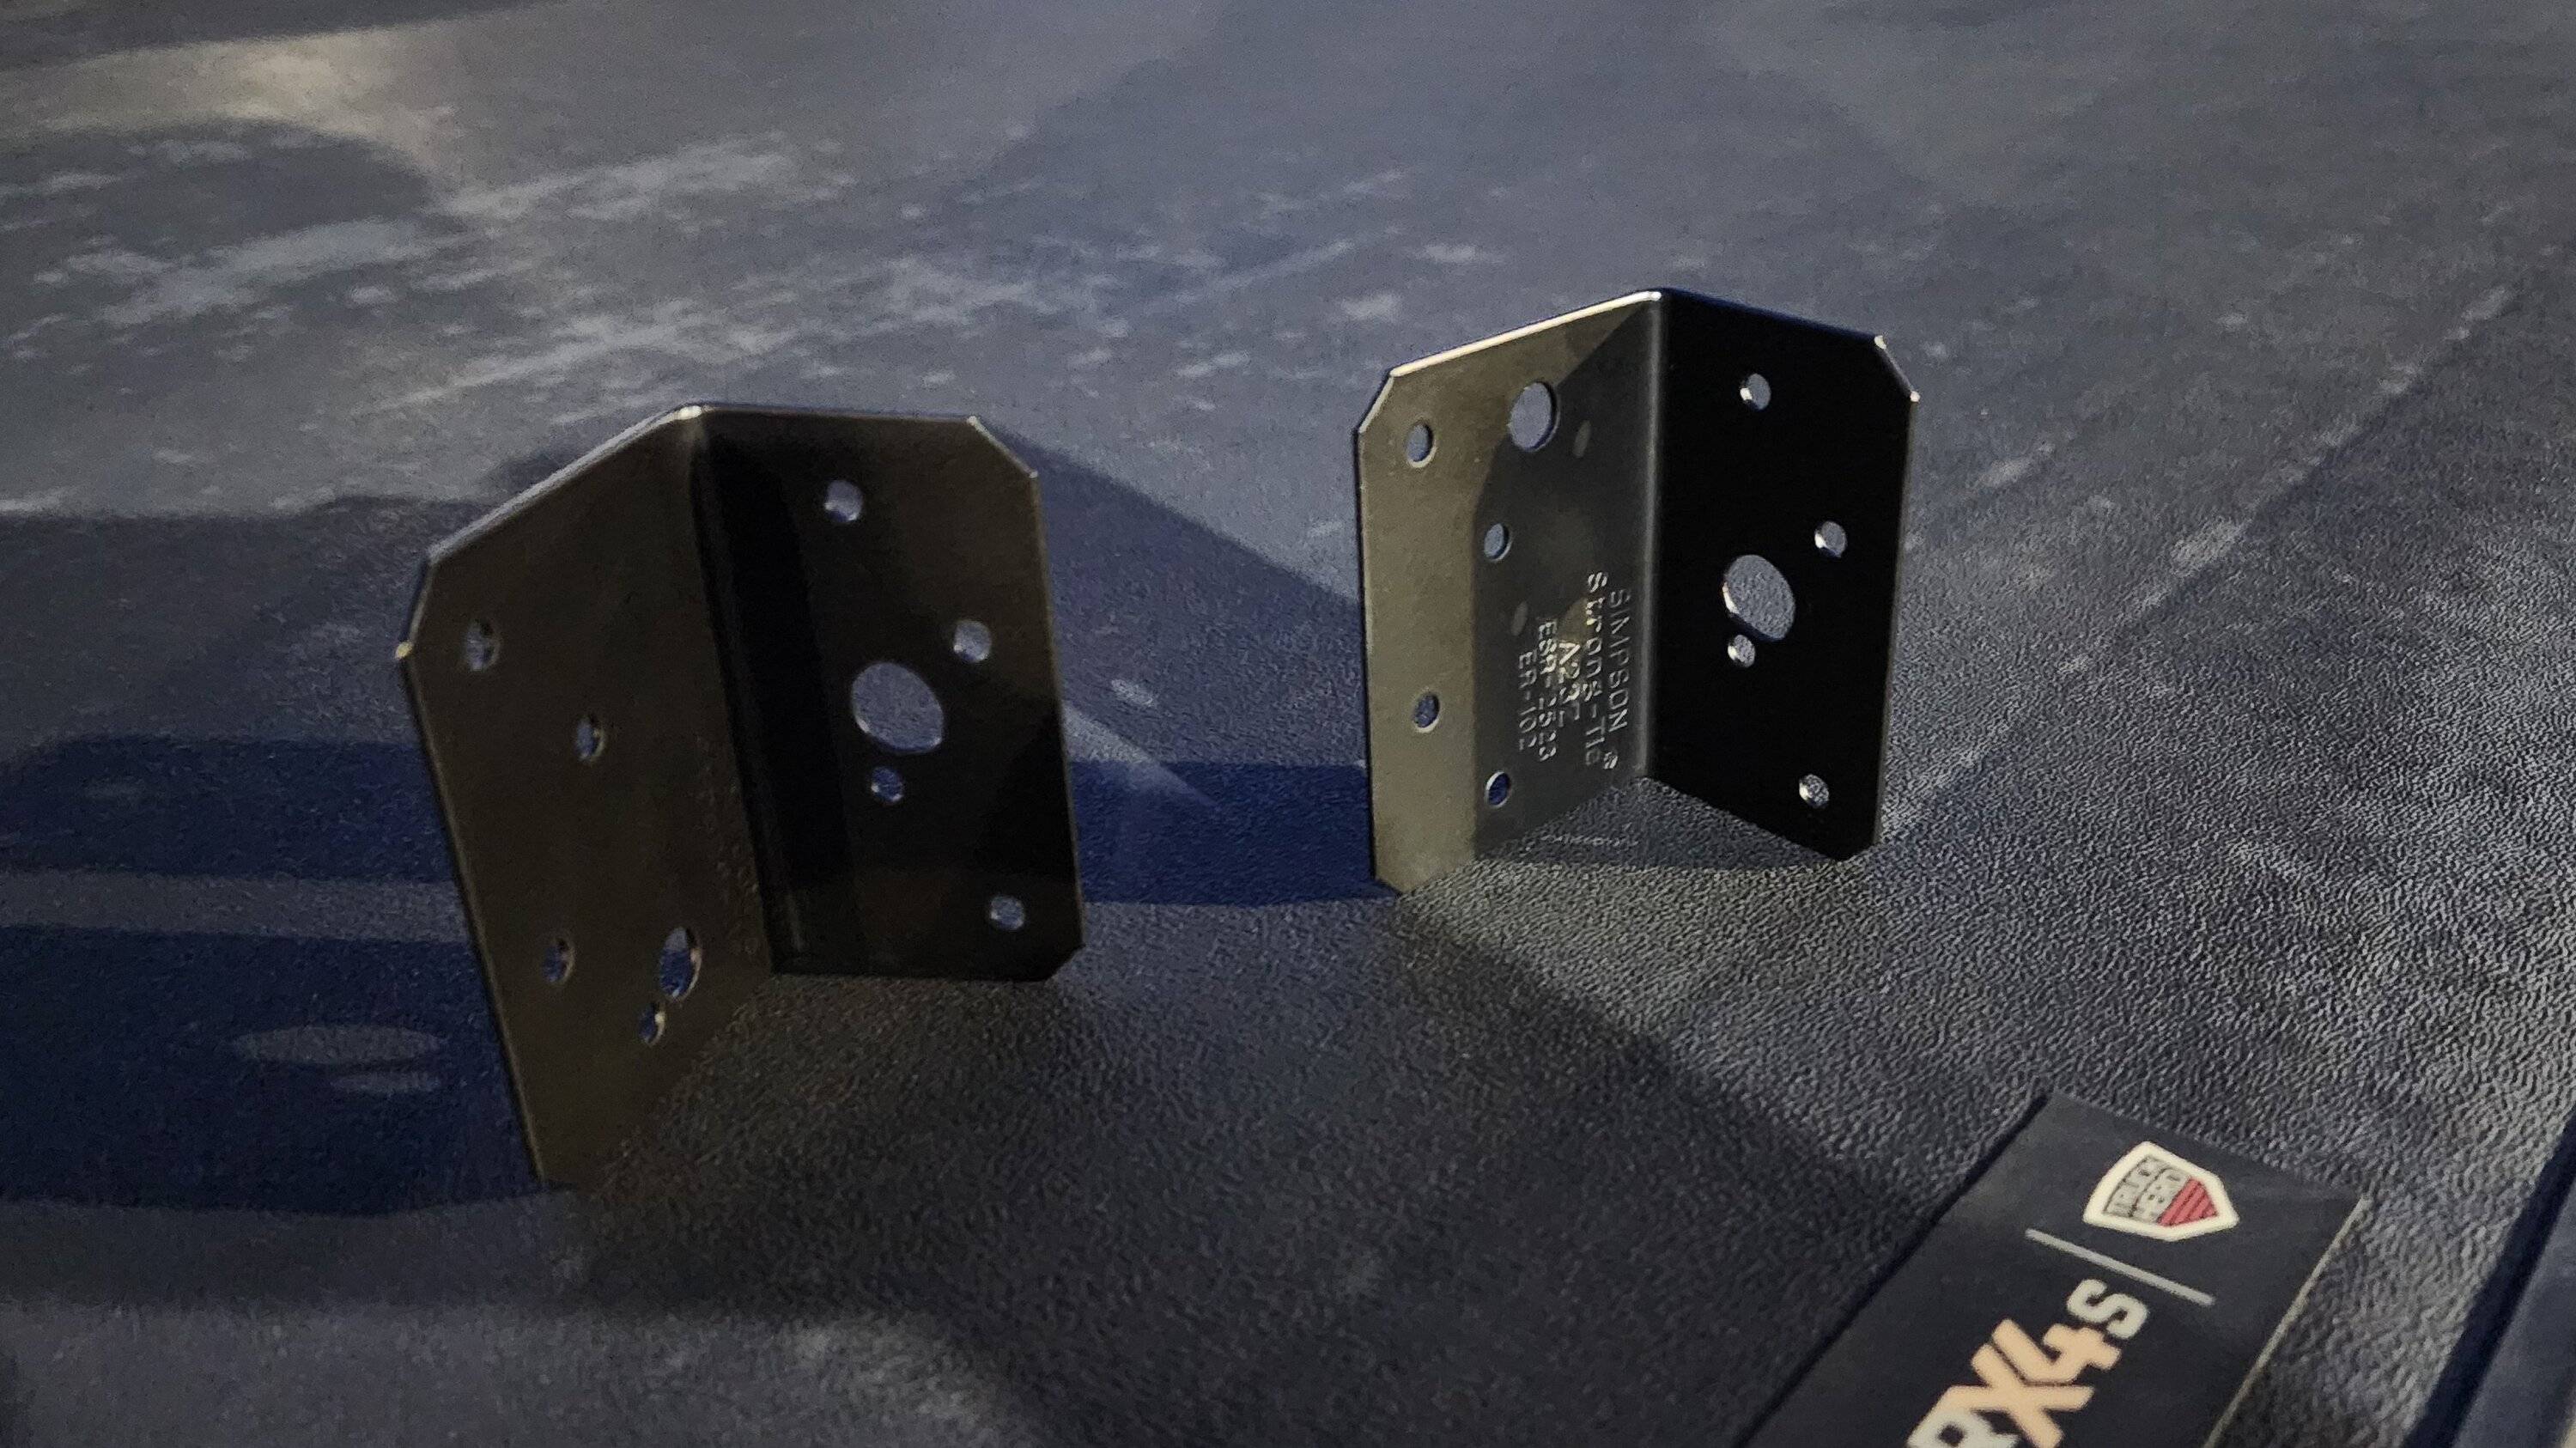
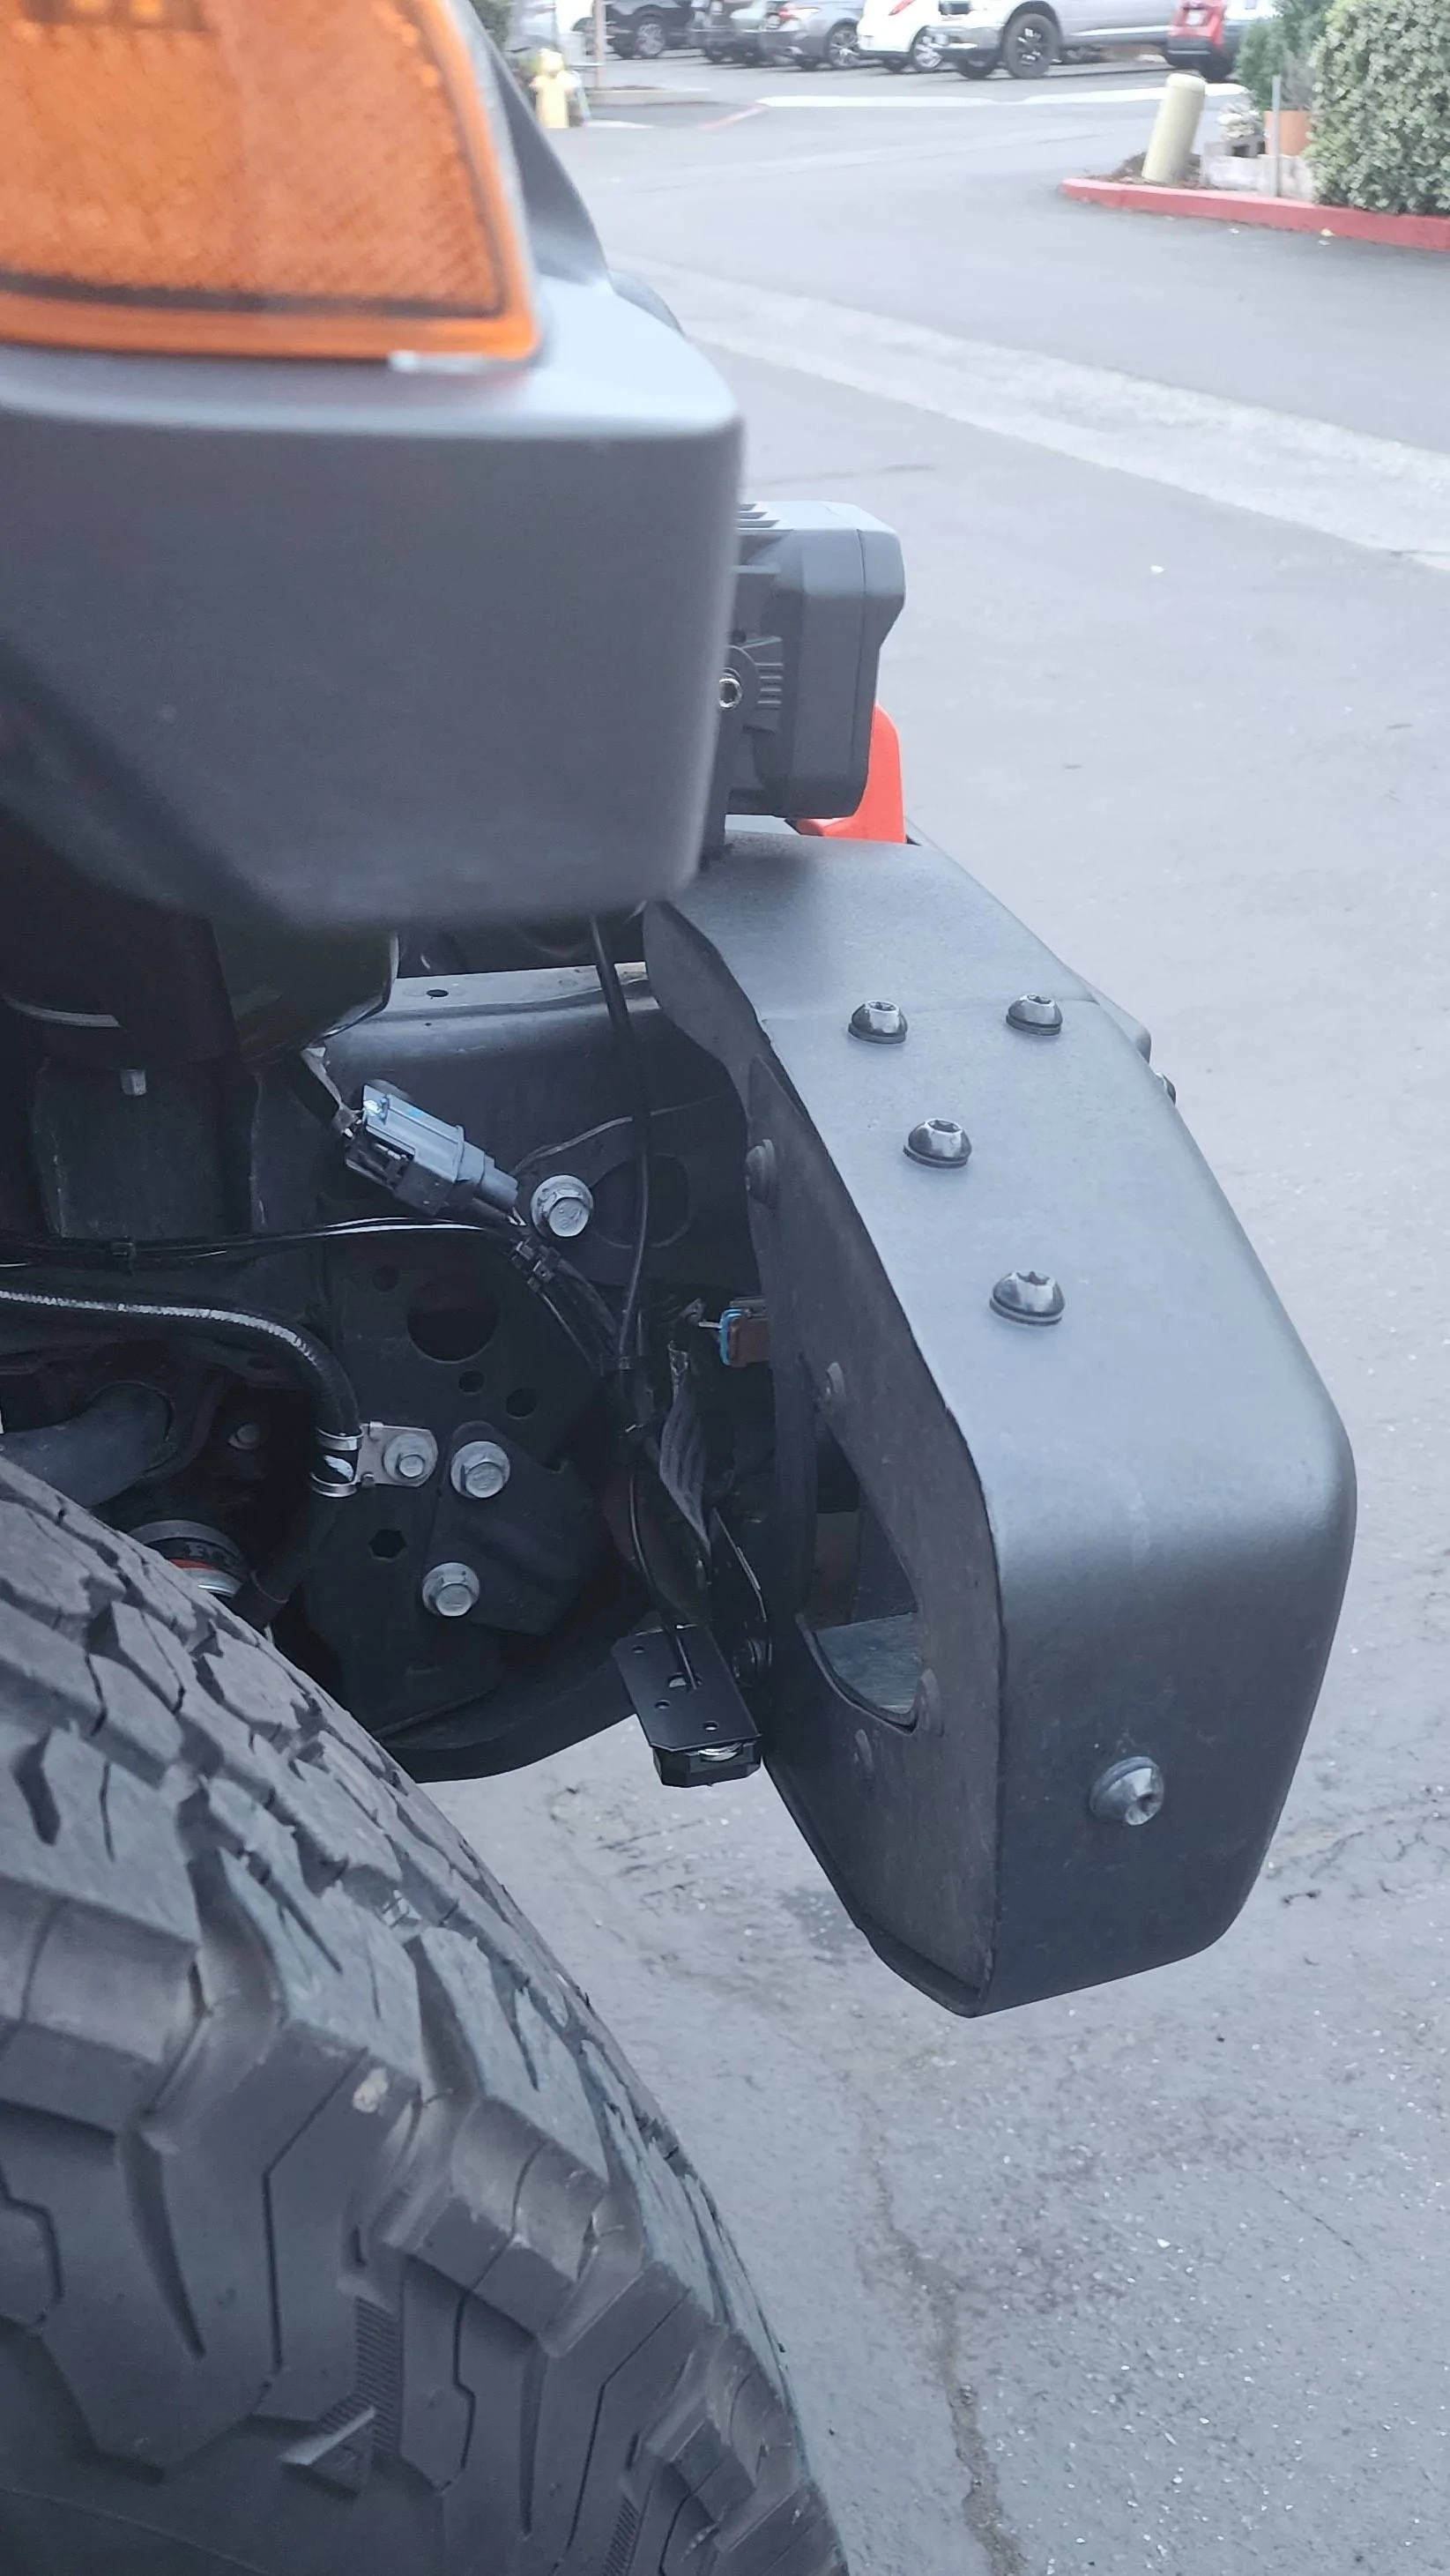
Only other thing I did that I realized wasn't mentioned is I made some brackets for the two rock lights up front to mount to since I couldn't find a place where I was happy with for light coverage. I bought 2 appropriately sized steel angles (https://www.acehardware.com/departm...ye_IALaGS_fC-jBOFiwaAv8WEALw_wcB&gclsrc=aw.ds), drilled a couple holes (one for the rock light cable, one to mount) and then painted them black to protect from rust. I was initially worried they might touch the tires but in testing it looks like there is plenty of space with my wheel/tire combo.
Sponsored
Cspence
Well-Known Member
You read my mind! I was admiring your work the other day and though about asking for the mount STL file, but didn't want to be a free loader lol. That'd be awesome if you were willing to share. I was thinking about the LUX system, but man is it spendy for some little LED lights.I have the relay and diodes mounted in the rear close to the bed light. I pulled from the 7-pin connector for power (used a 7 pin extension and cut the end off so that I didn't have to cut into any wiring - https://www.amazon.com/dp/B09BMNLX6S?ref=ppx_pop_mob_ap_share). This made it so the only wire I had running to the front was for the aux switch. In retrospect, it probably would have been just as easy to pull off the battery but either way works.
For tying all the lights together, the lights I linked to already came with a harness for all the wiring for 12 lights to simply plug straight in, no bus bar or splicing needed (the connectors press in and then screw tight to protect from water). For the front lights however, I did have to buy a set of the wire extensions they sell.
Wasn't sure if there was any interest in the stl files for the magnet adapter, but if there is I can easily post the files on thingiverse in a few days.
Only other thing I did that I realized wasn't mentioned is I made some brackets for the two rock lights up front to mount to since I couldn't find a place where I was happy with for light coverage. I bought 2 appropriately sized steel angles (https://www.acehardware.com/departm...ye_IALaGS_fC-jBOFiwaAv8WEALw_wcB&gclsrc=aw.ds), drilled a couple holes (one for the rock light cable, one to mount) and then painted them black to protect from rust. I was initially worried they might touch the tires but in testing it looks like there is plenty of space with my wheel/tire combo.
OP
OP
arskemp
Well-Known Member
- First Name
- Andrew
- Joined
- Jan 9, 2022
- Threads
- 10
- Messages
- 325
- Reaction score
- 729
- Location
- Northern CA
- Vehicle(s)
- 22 Sarge Green Mojave
- Build Thread
- Link
- Occupation
- IT
- Thread starter
- #112
Here are some photos to follow up with what I was talking about for the front mounts. I drilled the holes so that they would be using existing bolts in the bumper and raised slightly so that the rest higher than the steel bumper itself.


lordmundi
Member
- First Name
- Frank
- Joined
- Dec 7, 2023
- Threads
- 3
- Messages
- 14
- Reaction score
- 1
- Location
- Houston, TX
- Vehicle(s)
- 2021 JT Mojave, 2020 JL Rubicon, 2005 TJ Sport
yep, definitely interested in that, and also interested in any pictures of mounted stuff like that bracket you made and how you mounted the diode and the relay. Thanks so much for sharing this stuff!Wasn't sure if there was any interest in the stl files for the magnet adapter, but if there is I can easily post the files on thingiverse in a few days.
OP
OP
arskemp
Well-Known Member
- First Name
- Andrew
- Joined
- Jan 9, 2022
- Threads
- 10
- Messages
- 325
- Reaction score
- 729
- Location
- Northern CA
- Vehicle(s)
- 22 Sarge Green Mojave
- Build Thread
- Link
- Occupation
- IT
- Thread starter
- #114
The relay isn't mounted any special way, I just have it ziptied up in the back with the rest of the harness next to the connector to the wire that goes up to the bed light. While it will still probably get a little wet there, I'm not really worried. If the relay fails it's easy to replace and I can find a place higher up (or buy a waterproof project box and stick it in there).yep, definitely interested in that, and also interested in any pictures of mounted stuff like that bracket you made and how you mounted the diode and the relay. Thanks so much for sharing this stuff!
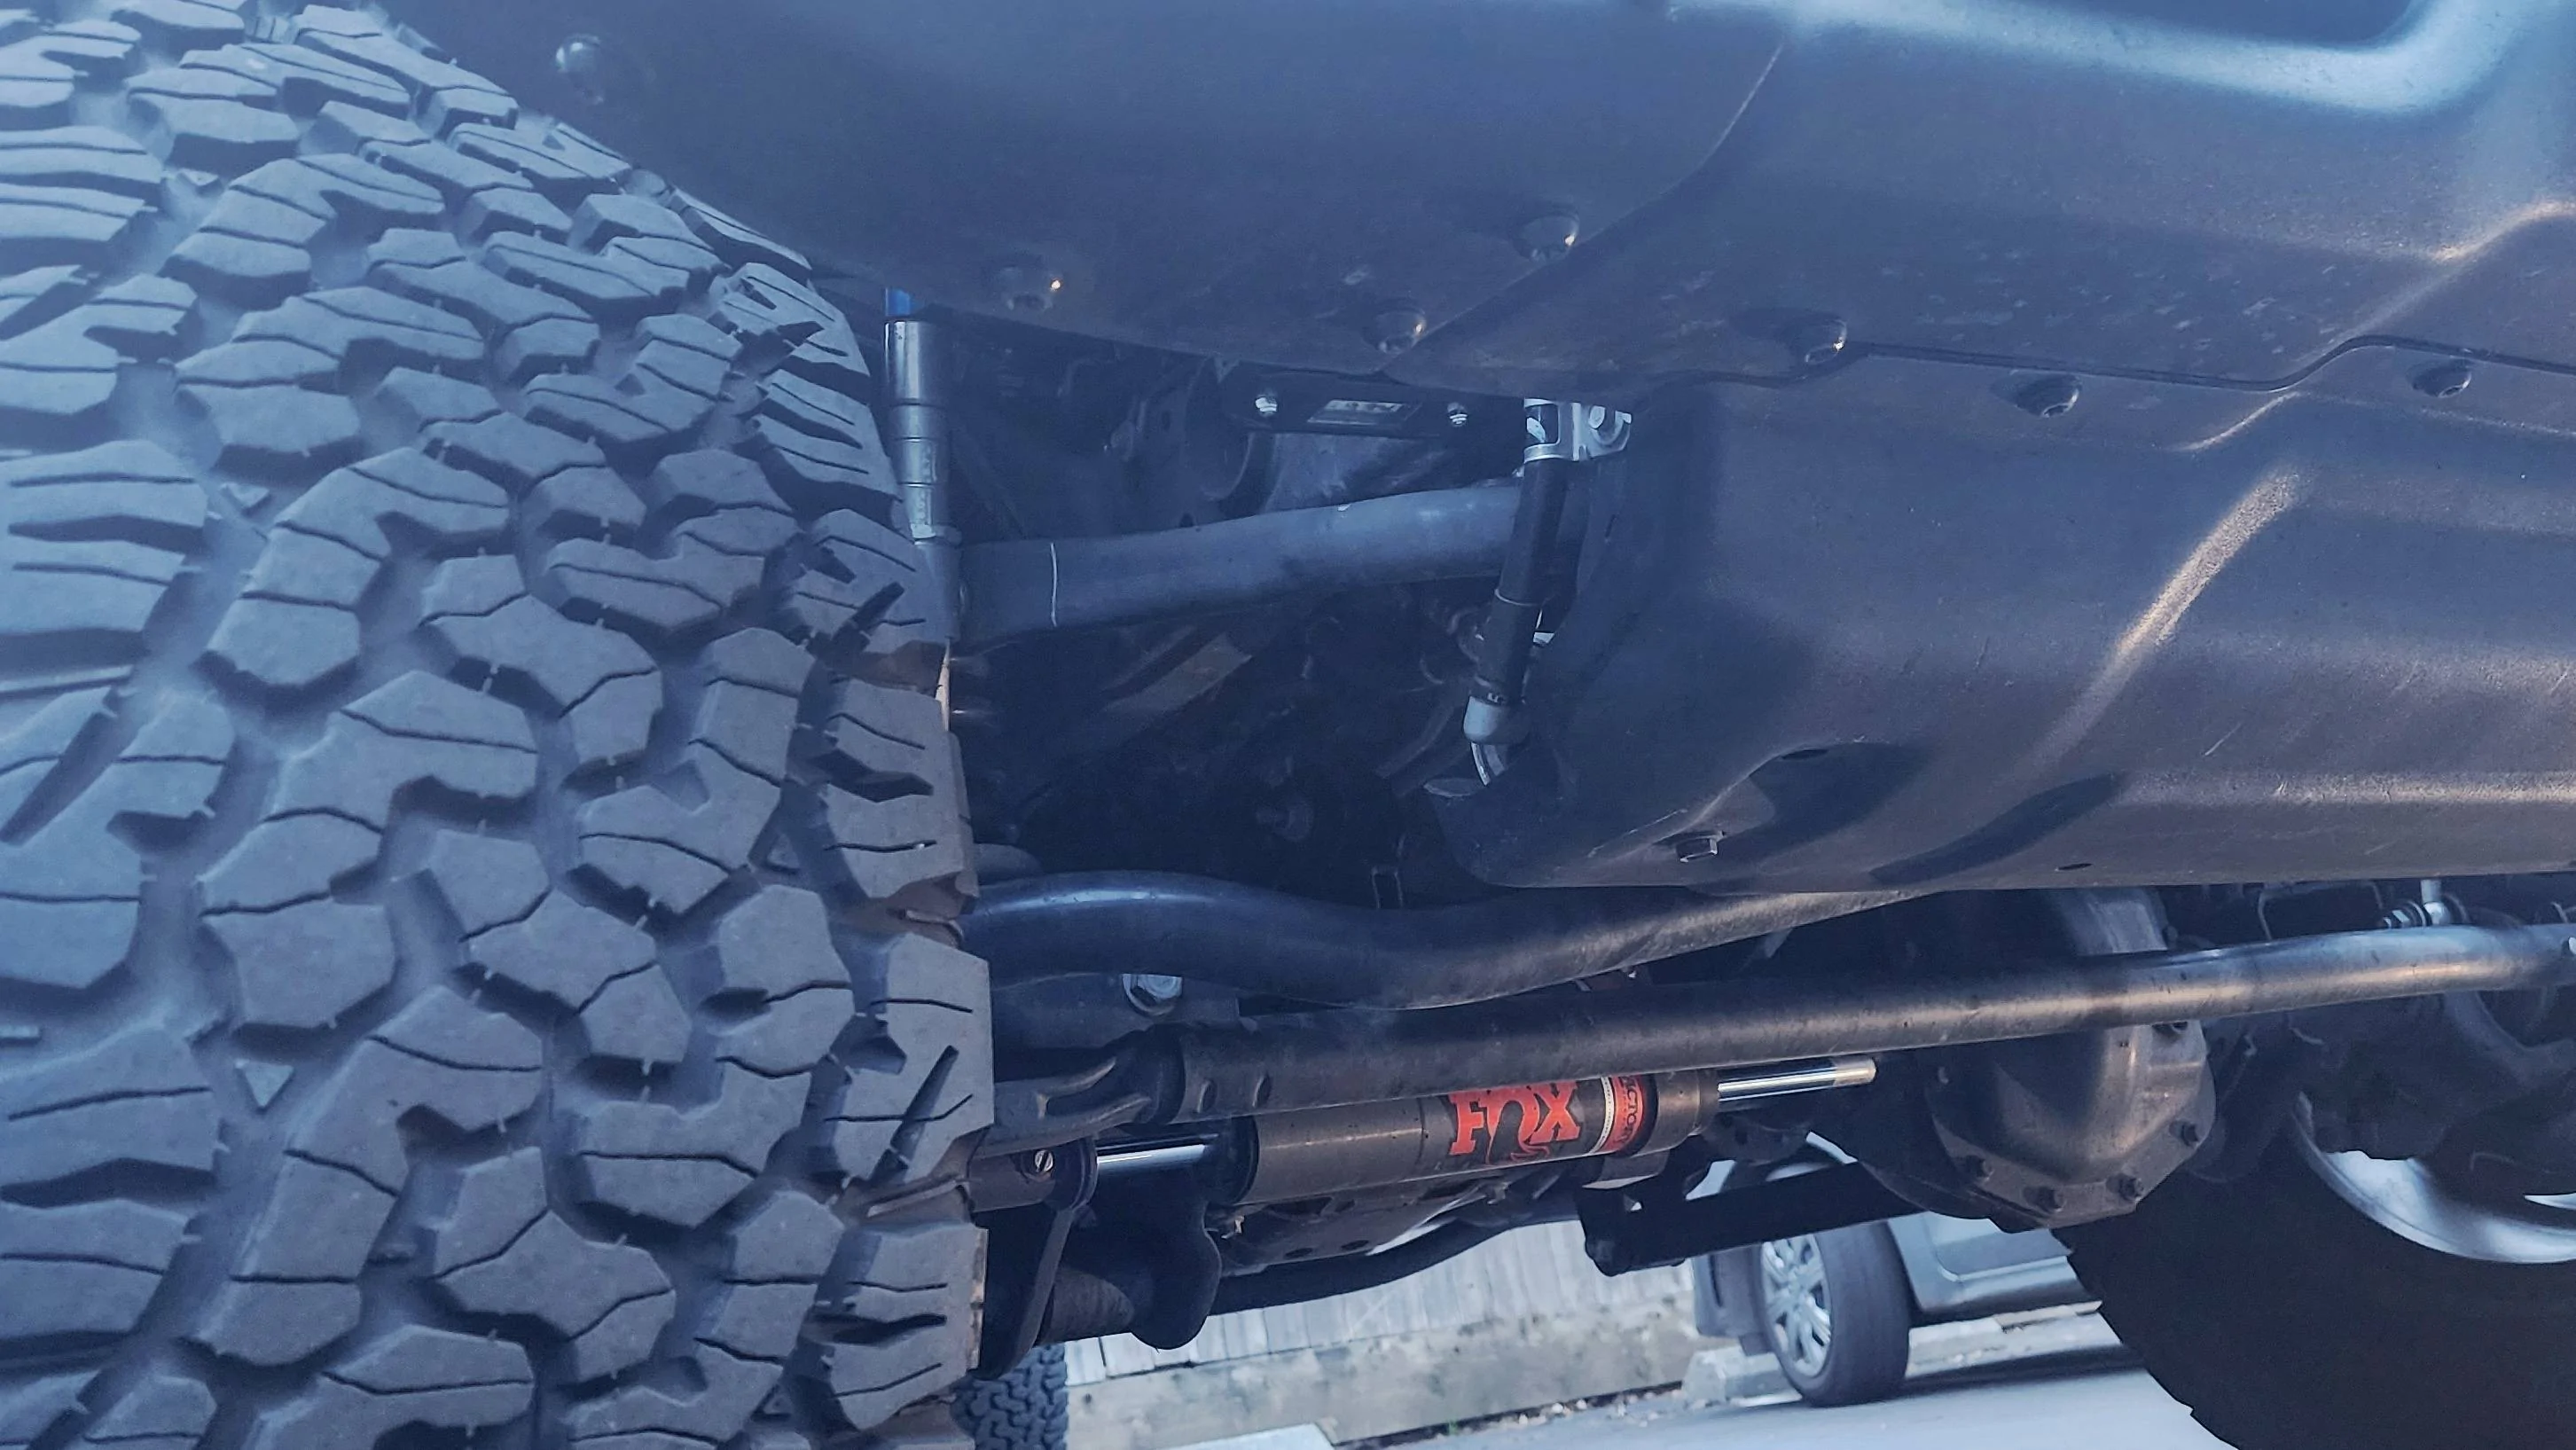
For the diodes, there is a common 3 prong diode that I've seen when doing research (2 inputs, 1 output). That is NOT the one I'm using. While that one is perfectly fine, I already have diodes from other random projects so I just used those. They look something like this, although I think the ones I had are 3A, not 10A rated - https://a.co/d/h7hHRON. I have 2 of these diodes -1 for each input (bed lights, aux switch) in line before it reaches the trigger wire for the relay. Since the trigger wire is low current, 3A is probably overkill (the basic 5W pack of diodes are more than enough). All my connections are soldered this are soldered and then heatshrinked to protect from the elements.
OP
OP
arskemp
Well-Known Member
- First Name
- Andrew
- Joined
- Jan 9, 2022
- Threads
- 10
- Messages
- 325
- Reaction score
- 729
- Location
- Northern CA
- Vehicle(s)
- 22 Sarge Green Mojave
- Build Thread
- Link
- Occupation
- IT
- Thread starter
- #115
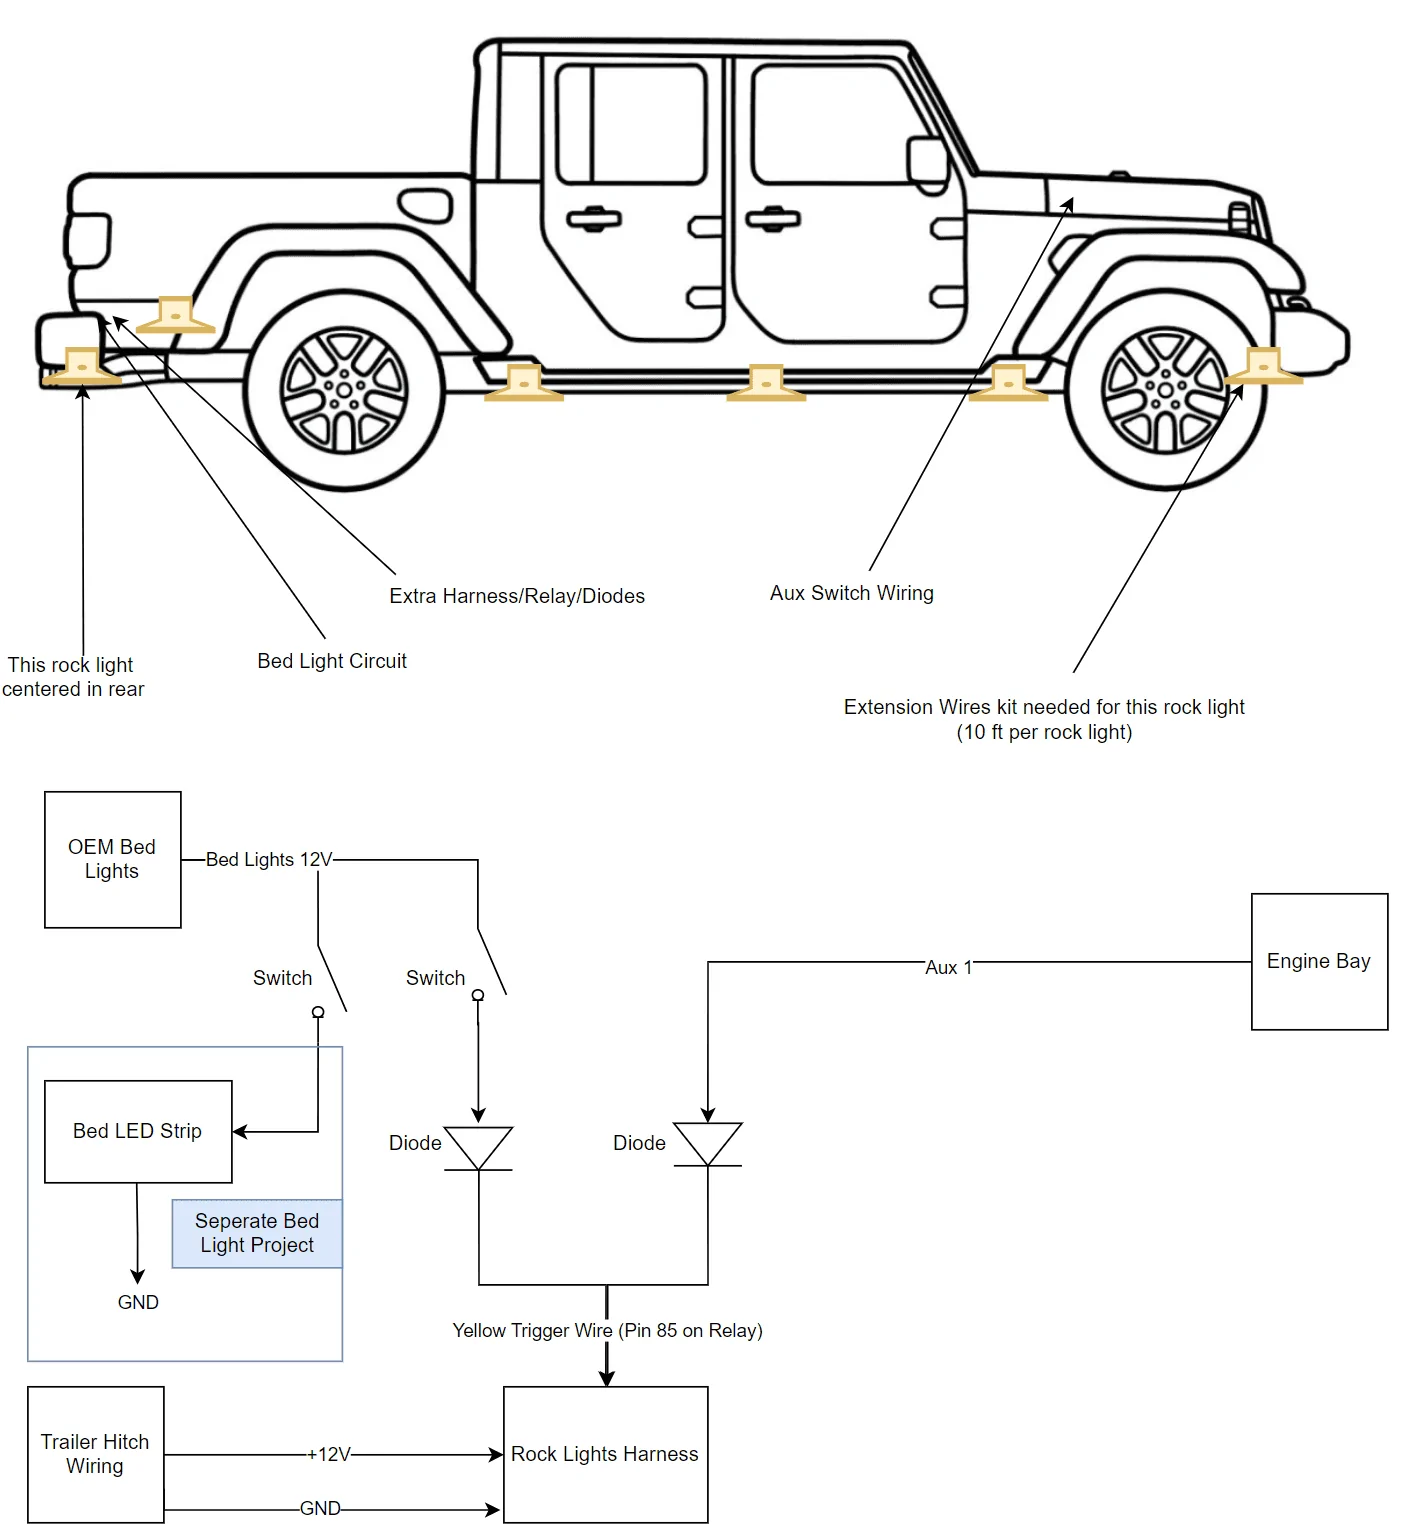
This might help for anyone who is doing something similar. Some things of note:
- On my relay/harness, pin 85 is used for the trigger wire. This might not always be the case depending on the lights you have and/or the relay wiring in your kit
- The blue area is my other bed light project that is somewhere previously in this thread

- On my relay/harness, pin 85 is used for the trigger wire. This might not always be the case depending on the lights you have and/or the relay wiring in your kit
- The blue area is my other bed light project that is somewhere previously in this thread
Sponsored
OP
OP
arskemp
Well-Known Member
- First Name
- Andrew
- Joined
- Jan 9, 2022
- Threads
- 10
- Messages
- 325
- Reaction score
- 729
- Location
- Northern CA
- Vehicle(s)
- 22 Sarge Green Mojave
- Build Thread
- Link
- Occupation
- IT
- Thread starter
- #116
Posted the files up on Thingiverse as well as more details on the hardware needed to put it together:
https://www.thingiverse.com/thing:6463278
https://www.thingiverse.com/thing:6463278
Cspence
Well-Known Member
Thanks again for sharing! My lights and magnets should be arriving today!! Not sure when I'll get to doing the install, but I'm going to print out a bunch of the mounts to have them ready to go.Posted the files up on Thingiverse as well as more details on the hardware needed to put it together:
https://www.thingiverse.com/thing:6463278
OP
OP
arskemp
Well-Known Member
- First Name
- Andrew
- Joined
- Jan 9, 2022
- Threads
- 10
- Messages
- 325
- Reaction score
- 729
- Location
- Northern CA
- Vehicle(s)
- 22 Sarge Green Mojave
- Build Thread
- Link
- Occupation
- IT
- Thread starter
- #118
Awesome, let me know if you have more questions. Only other thing I can think of worth mentioning is about the harness. Since all the wiring for each individual light splits off from a single place on the harness, making sure to be mindful where you decide to place that. For my setup, I placed it on top the crossbar just in front of the spare tire. That's what gave me enough length to reach every location except for the front two (which I needed to purchase the 4 pack extension kit - https://a.co/d/9PQlXl0). Even with that kit, the front two wires just made it to the metal bracket I mounted. (used 2 extensions per light, so it took me an extra 10 ft).Thanks again for sharing! My lights and magnets should be arriving today!! Not sure when I'll get to doing the install, but I'm going to print out a bunch of the mounts to have them ready to go.
I also used a LOT of zip ties to keep everything up. I tried to follow wiring that already existed on the vehicle if I could, and in some places I went through holes in the frame (mainly the extension wires to reach the front). In the rear and front, there are locations that you could potentially route close to the exhausts, so where I could I tried my best to choose a route that wasn't directly exposed to heat.
Reddout99
Well-Known Member
- First Name
- Bob
- Joined
- Oct 27, 2022
- Threads
- 13
- Messages
- 637
- Reaction score
- 667
- Location
- Papillion, NE
- Vehicle(s)
- Black 2021 80th Anniv. JT Sport S
- Occupation
- Cad Manager - Retired
- Vehicle Showcase
- 1
Looks great, man. Sounds like you are finding great deals along the wayGot them on! Pretty happy with the look.
Cspence
Well-Known Member
Awesome, let me know if you have more questions. Only other thing I can think of worth mentioning is about the harness. Since all the wiring for each individual light splits off from a single place on the harness, making sure to be mindful where you decide to place that. For my setup, I placed it on top the crossbar just in front of the spare tire. That's what gave me enough length to reach every location except for the front two (which I needed to purchase the 4 pack extension kit - https://a.co/d/9PQlXl0). Even with that kit, the front two wires just made it to the metal bracket I mounted. (used 2 extensions per light, so it took me an extra 10 ft).
I also used a LOT of zip ties to keep everything up. I tried to follow wiring that already existed on the vehicle if I could, and in some places I went through holes in the frame (mainly the extension wires to reach the front). In the rear and front, there are locations that you could potentially route close to the exhausts, so where I could I tried my best to choose a route that wasn't directly exposed to heat.
Thanks for the extra tips! I have the factory Aux switches, so I'm planning to power via one of the 15a buttons. Given that, I'll probably try to have the harness centrally located, though it may be biased to the front. Hoping with the ~8ft leads, I can make it work. Not that its expensive, but it'd be a kick in the shorts when the whole kit of (12) lights and wiring cost $81 and then a couple extensions cost 1/4 of the cost more. But can't really complain, its a bargain overall. You made a good choice on these lights, they seem surprisingly well constructed with the full metal housing! Can't thank you enough for sharing!
Sponsored
