Sponsored

A new hope ... (build journal and component reviews)

cug

Well-Known Member
First Name
Guido
Joined
Apr 1, 2023
Threads
13
Messages
602
Reaction score
663
Location
Christchurch, New Zealand
Vehicle(s)
JTR EcoDiesel, Land Cruiser 79, BMW R1250GS
Build Thread
Link
Occupation
Just keeping busy
A "Purpose Built Build"

Another day, another build. That's how it feels at the moment. We've just started another project, after our initial attempts were basically all thrown out the window after a while. Live and learn, this time it's all about purpose and goals.

In a galaxy far far away (but not long ago) ...

Our own background is more hiking, motorcycling, and backpack camping rather than car camping or in modern words "overlanding". So we had some knowledge, but not enough to avoid obvious mistakes and miscalculations. The biggest miscalculation was that we didn't account for a massively lowered annoyance threshold when it comes to suboptimal set up and break down of camp – we are getting older and we certainly are getting grumpier.

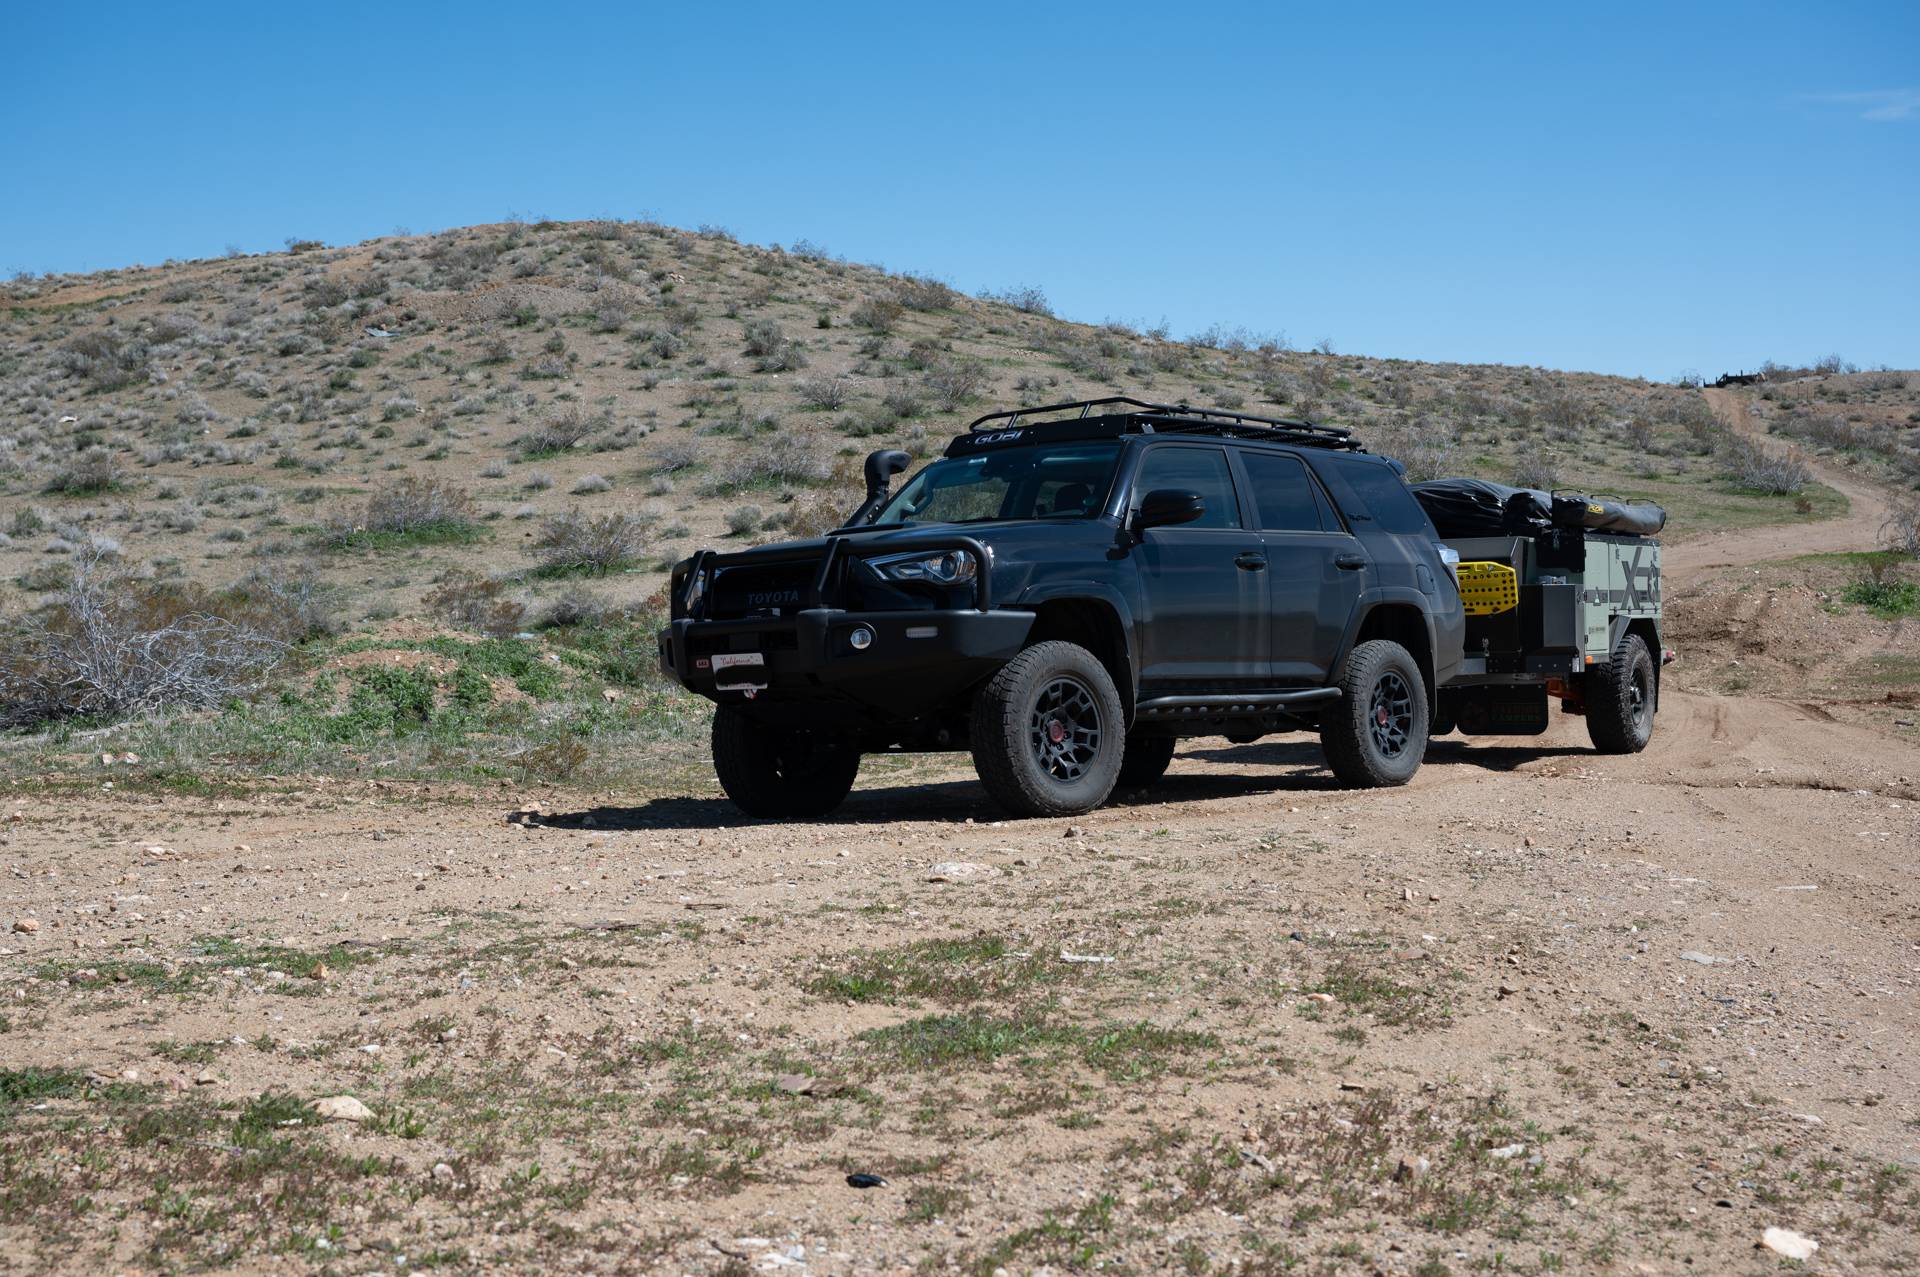
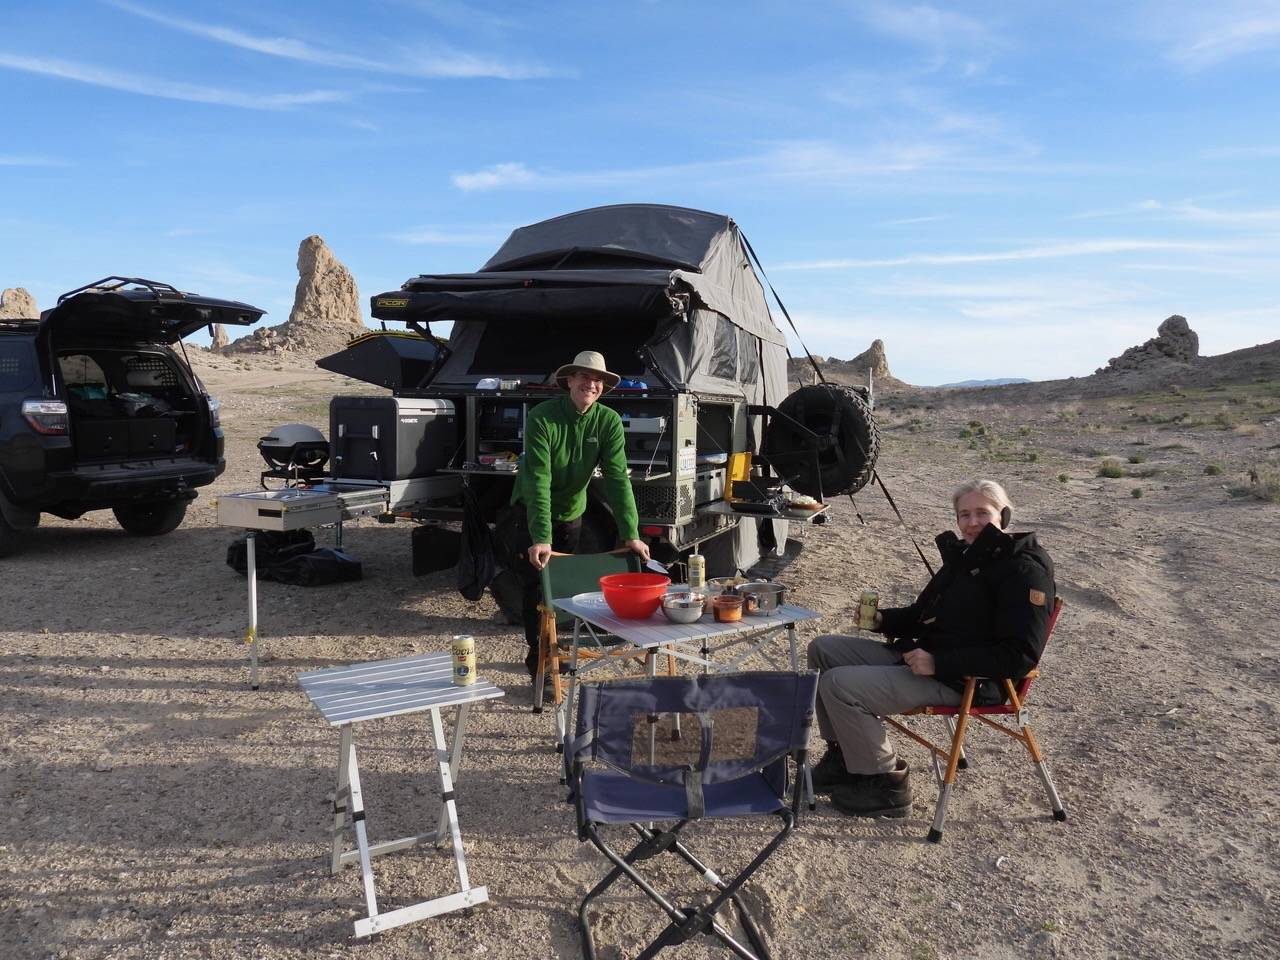
We started a few years ago with a Toyota 4Runner and our backpacking ground tent. That was actually not too bad overall, simple, quick, flexible, but the ground tent gets old after a while when you're on the far side of fifty. So, we switched to a rooftop tent (iKamper Mini). Hmmm, not bad, but wasn't actually all that much faster to set up than the ground tent, biggest benefit was that it was off the ground, away from some of the critters and out of the mud and dust we have plenty of here in the West. The added comfort of the iKamper Mini was actually marginal at best and negative at worst, the ground tent was better in wind, more flexible to set up, had more space, and overall it felt like we added complexity for very questionable benefits.

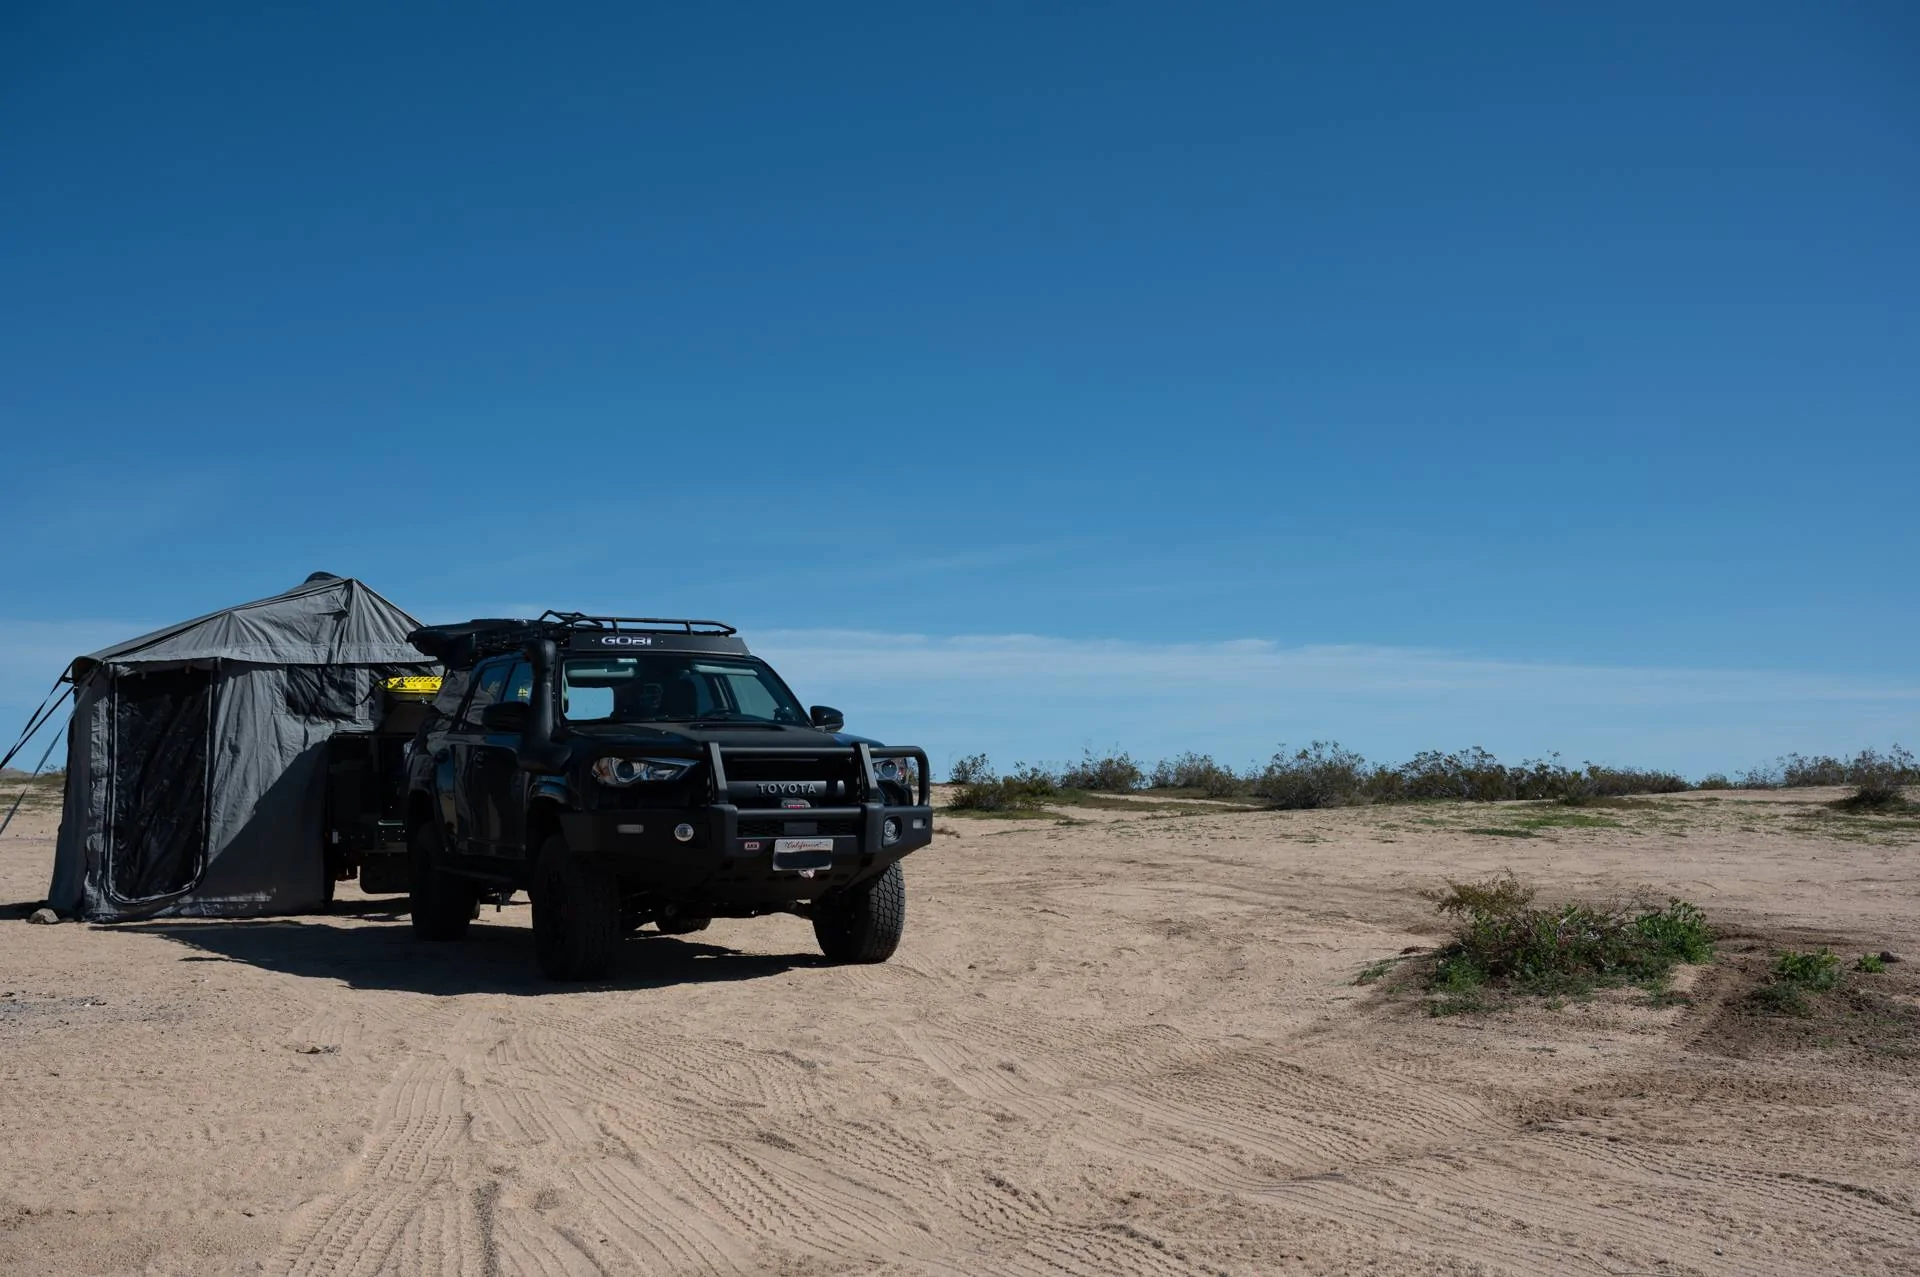
So, stupid as we were, we went for even more complexity. In came a Patriot Camper X1 off-road trailer, which had its own challenges. In some ways it combined the downsides of a soft top roof tent with the roll around in the mud setup of a ground tent. For some reason we didn't account for the again increased camp setup complexity. In great conditions we could set up tent and awning in about 20 minutes, that's more than the Patriot Camper videos suggest, but that's mostly because there are NEVER optimal conditions, there are ALWAYS more steps to do, there is ALWAYS some wind in the areas we camp in and so on. At worst, it once took us nearly 40 minutes to break down camp in high wind and a lot of things just going wrong.

Don't get me wrong, we absolutely loved the X1 when it was all set up. The bed mattress is incredibly comfortable, the size awesome, the "change room" unbelievably nice to have, the kitchen area great when out of the wind, the space and creature comfort features beyond comprehension. Again, when it was set up (or packed away) we loved it. We hated the set up and packing away. To the point that we said to either not go camping anymore with that kit or completely change our approach. It's an incredible "base camp" setup if your goal is the actual camping and staying in a location for bit longer, but it was hard to travel the way we do, where quick and painless camp set up and break down has become a requirement to keep us happy.

After a trade in with one of Patriot Campers retailers (RVs of America) for an X3 or X1H fell through since they had already too many X1 at hand, we decided to just cut our losses and start over.

The Toyota 4Runner and the Patriot Camper X1 have new owners now who hopefully have different styles of camping and traveling and other priorities than we do. We hope they will work out really well for the new owners! Both are excellent pieces of equipment, they were just not right for us.

A New Hope

With all the lessons learned from above, we started thinking about what is really important to us, which then lead to the following requirements for the new rig:
  • One Minute Sleep Ready: After arriving at camp having a bed ready to jump in must be achievable in under a minute (preferably way under a minute, but of course plus any work the actual site needs for either clearing stuff or leveling the truck). Same for packing away the basics.
  • 30 second awning: Setting up an awning should be quick and simple, basically "instant", so that we'd use it more.
  • Ability to be out of the elements when the weather is not great for being outside. We don't need a full living space inside, this isn't our house or home, but it's great to be able to avoid rain, mosquitos, etc. if needed.
  • Fewer tires to air down and fill up.
  • Off-road capabilities at least as good as our 4Runner which had a 2" lift, decent tires, and excellent suspension.
Other than the above points, we were relatively flexible with the approach. A lot of back and forth and experience with a rig we currently have in Europe got us to the point that we basically replicated a lot of that said rig:
  • An off-road capable pickup truck.
  • A camper box with integrated wedge style tent.
After some looking around, all the smaller trucks in the US have laughable payloads (mostly around 500kg/1100lb, sure, some have more, but none to the point to make an actual real world difference), so it didn't really matter which one, they would all be heavier than intended, but still manageable if we get it right.

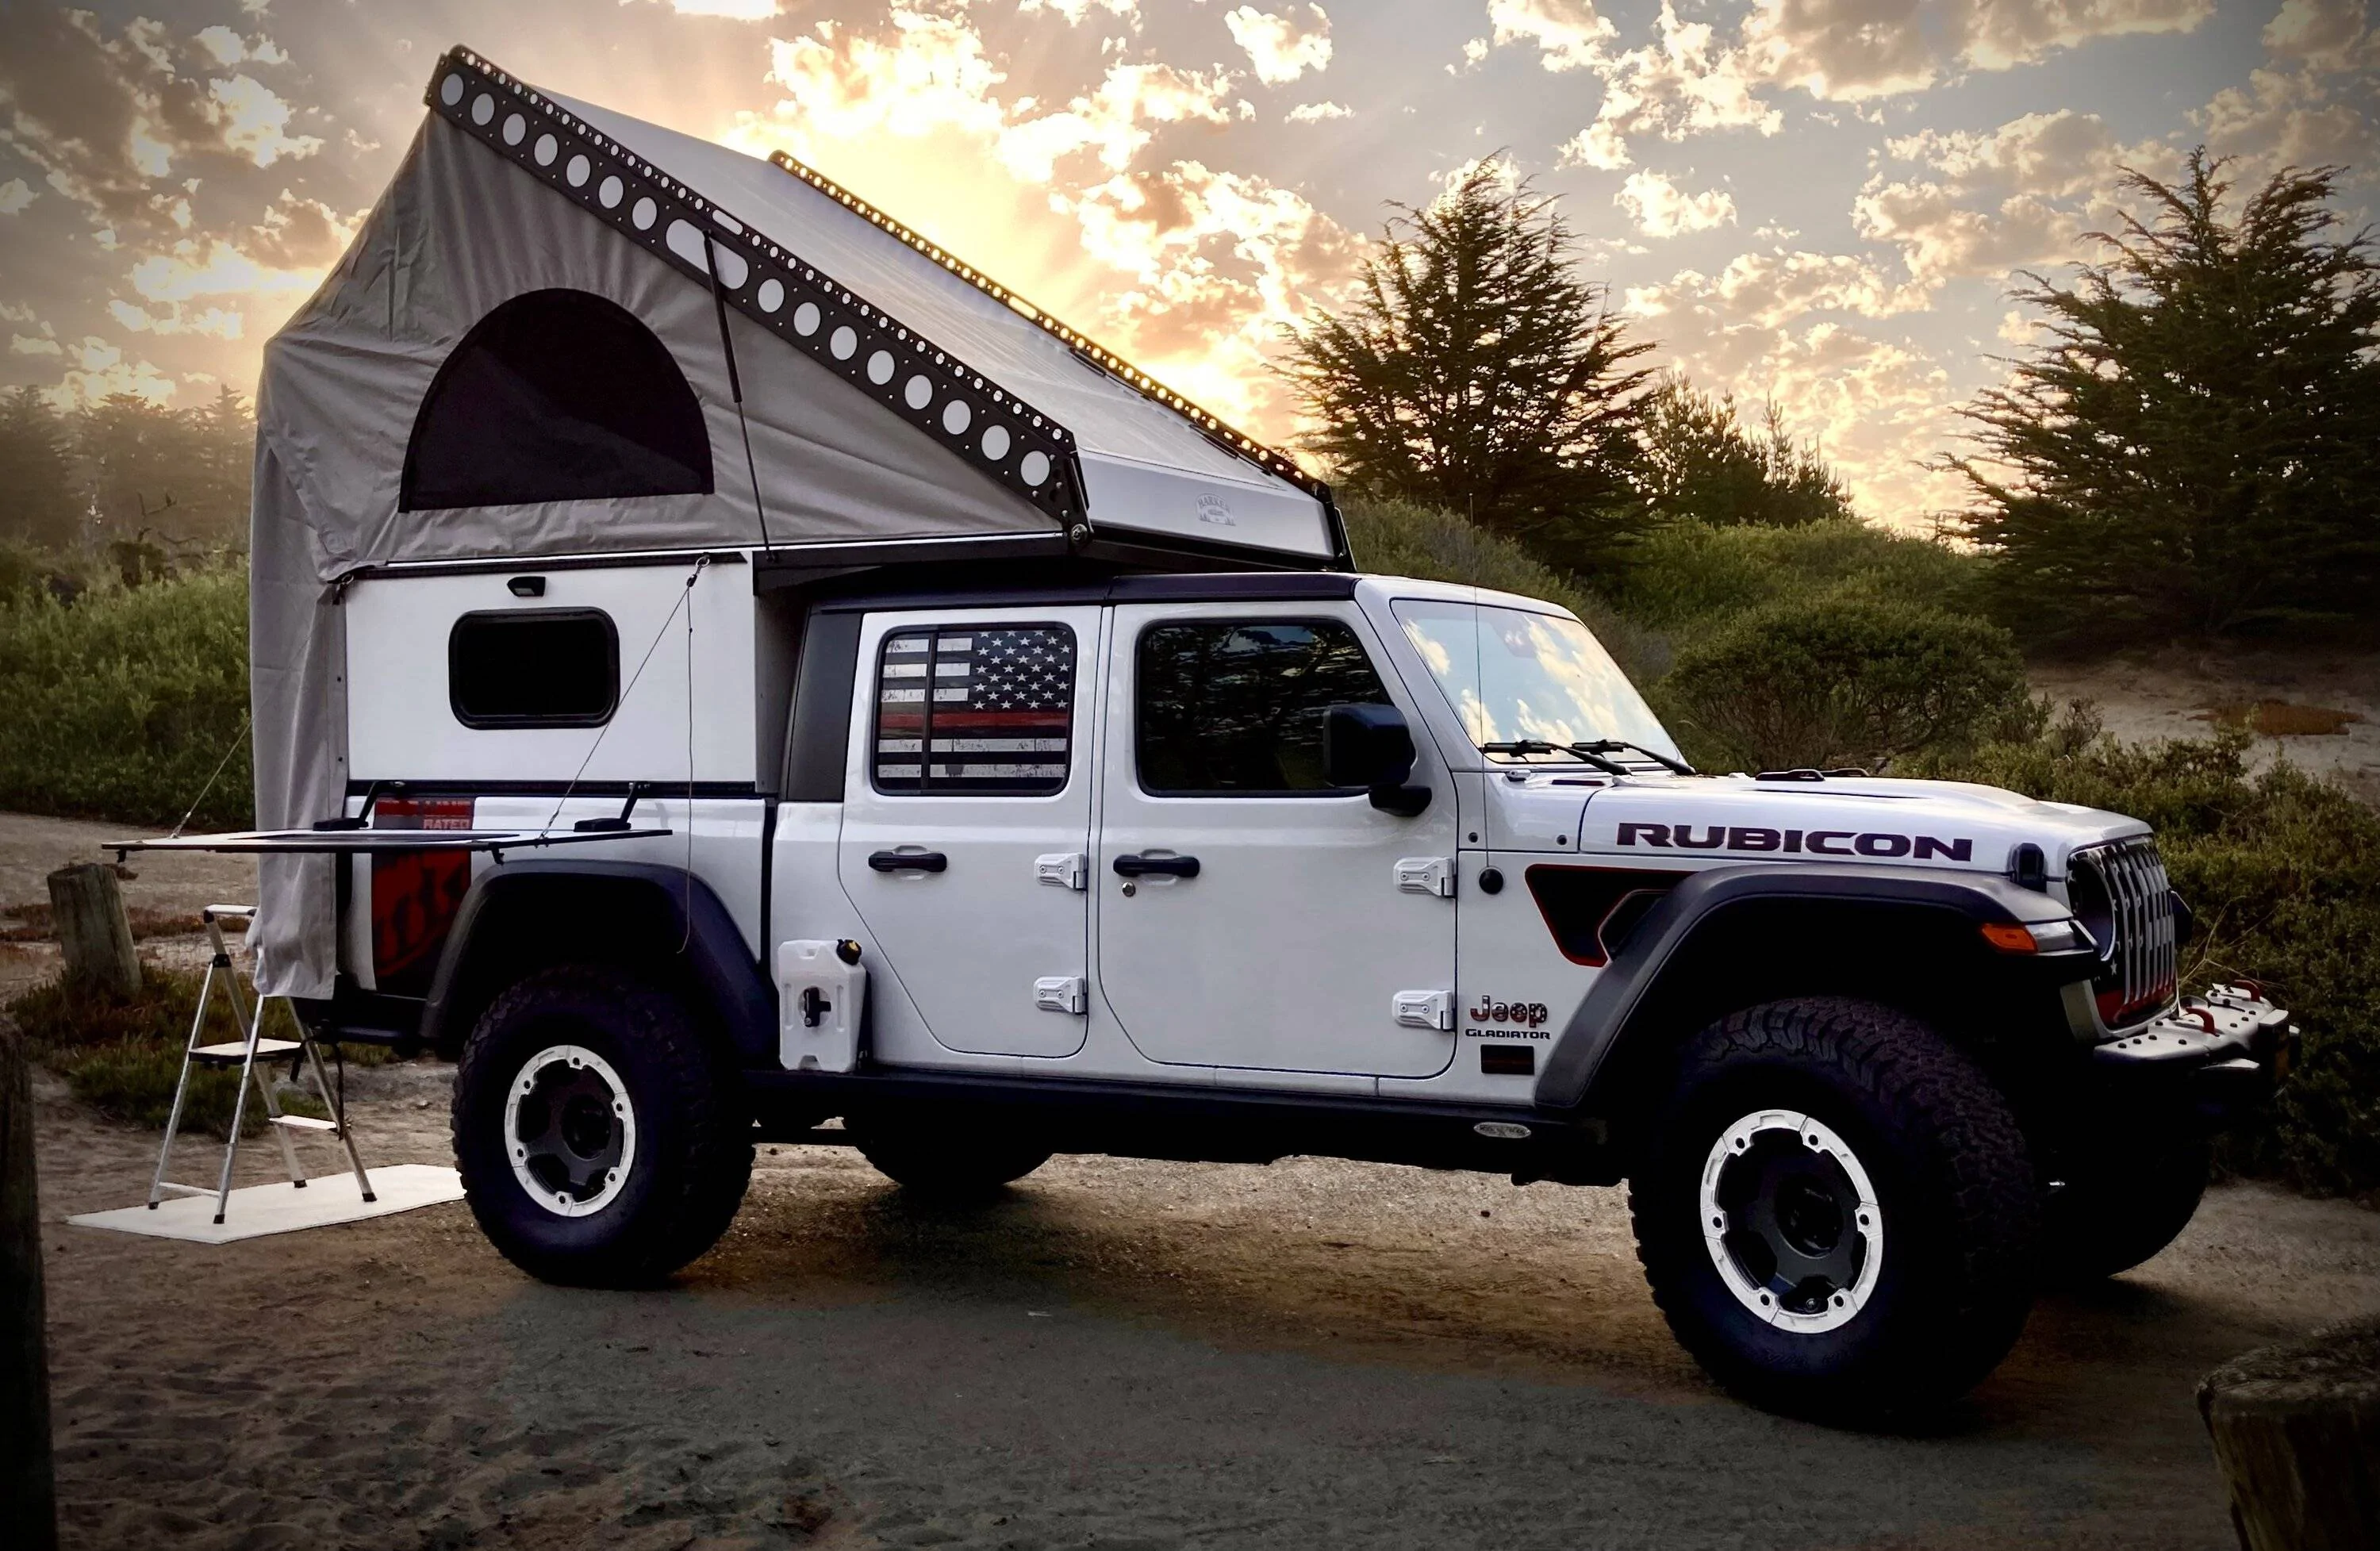
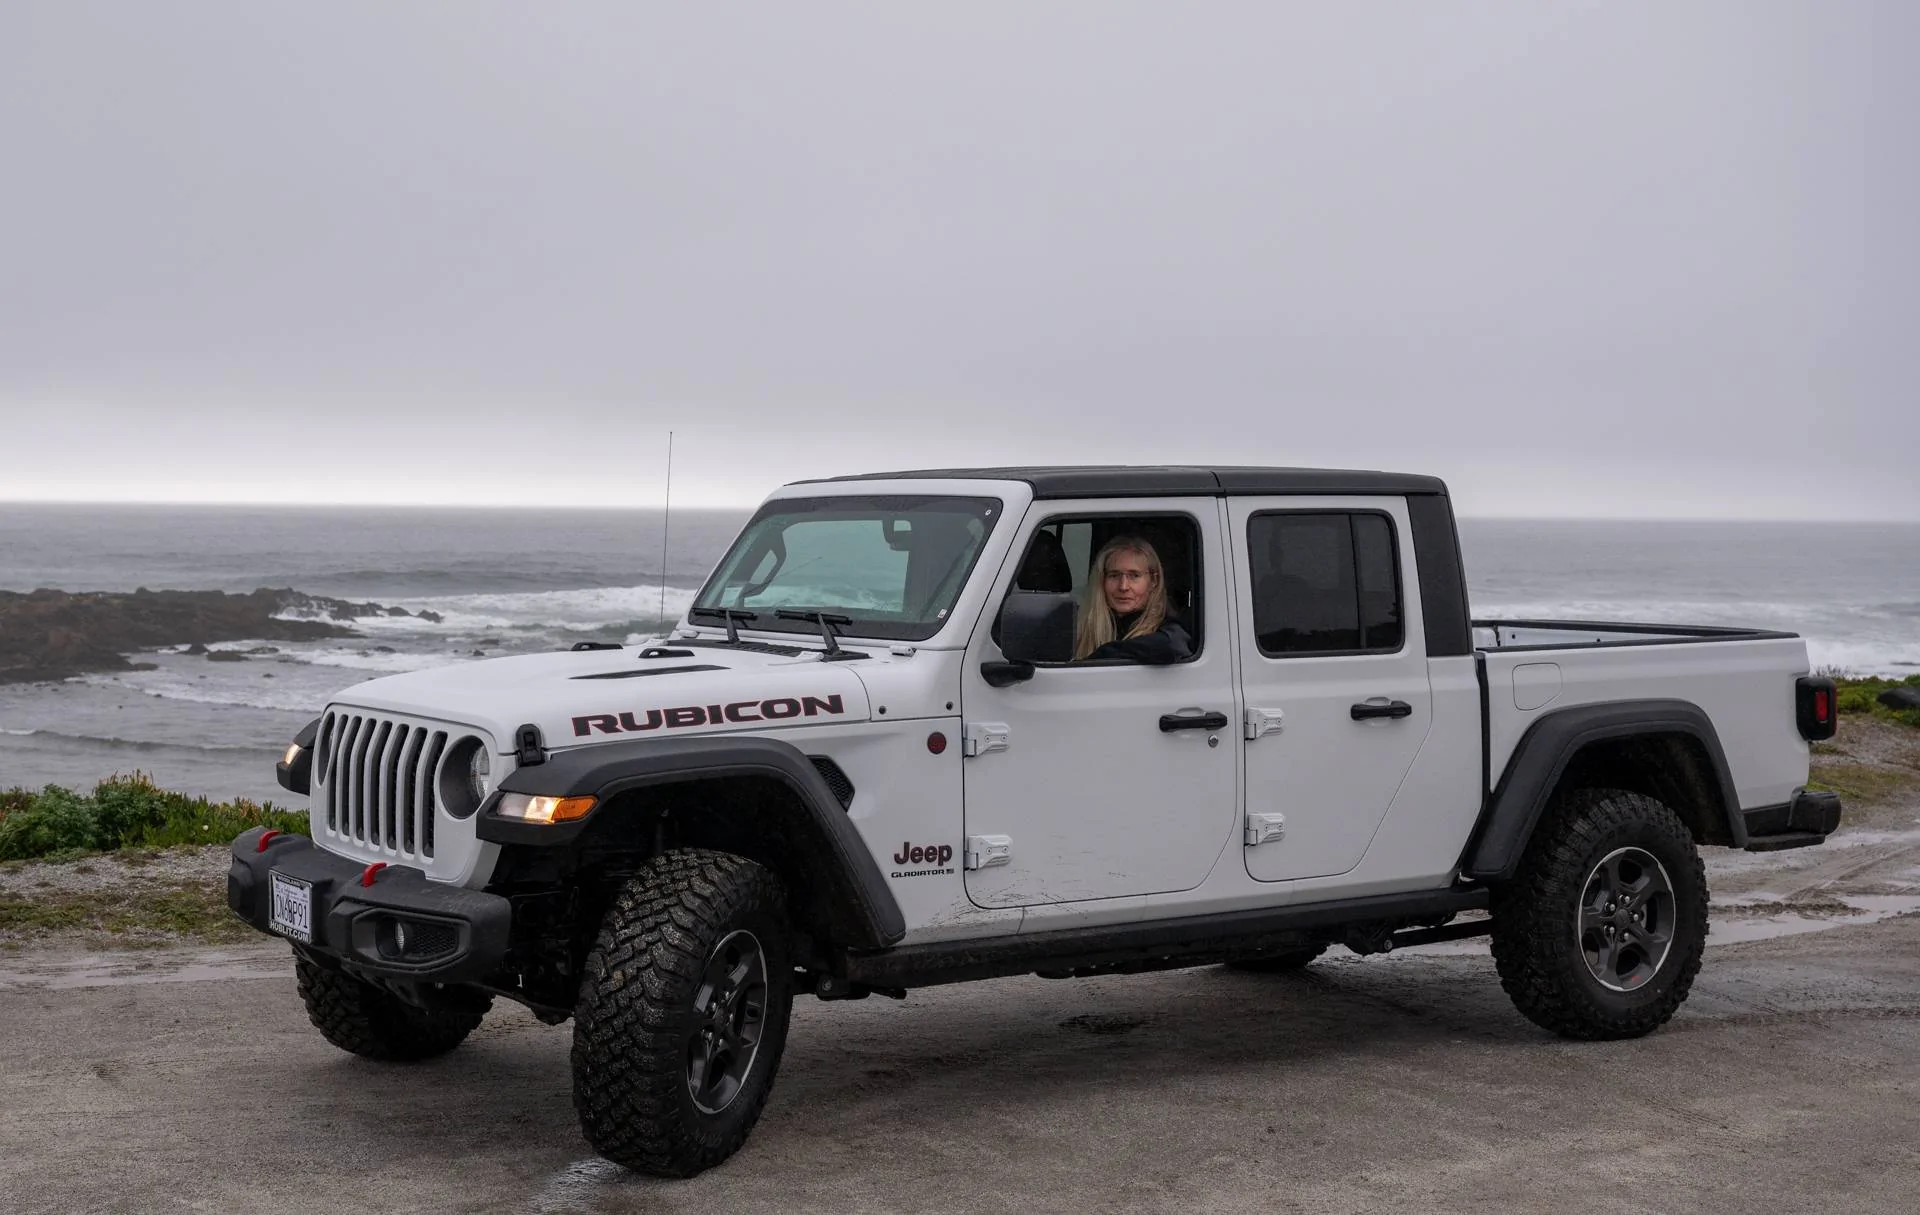
What we ended up with is a Jeep Gladiator Rubicon with the EcoDiesel engine and relatively few accessories from factory which we either wouldn't use or would replace anyways. For the camper box we have an Alu Cab Canopy Camper on order from Tiny Rig in SoCal (bare bones, we plan to test and improve along the way).

Interestingly, we won't have all that much to pay on top after trading the 4Runner and selling the X1. Sure, we've lost some money in the process, but it was manageable thanks to ridiculous used prices for 4Runners and the fact that we bought the X1 before all the recent craze set in and prices went through the roof.

Initial Impressions

The Gladiator is a much more modern vehicle inside the cabin than the 4Runner was. There is so much more attention to detail, it isn't funny anymore. From the infotainment system, over general features, to the quality and selection of materials, it is not just one step above the 4Runner, it's several. So, that was already a good start. The Gladiator drives much more truck like than the 4Runner, no big deal for us, as a diesel it has a much better fuel mileage (which is abysmal on the 4Runner, especially when towing and having it lifted), the diesel engine is also less annoying from a sound perspective than the TRD Pro exhaust was, it starts with muss less "fanfare" and then feels better when driven slowly.

So far so good.

First Modifications

We started with a few things we would have liked from factory and/or that we believe are basic things a travel vehicle needs:
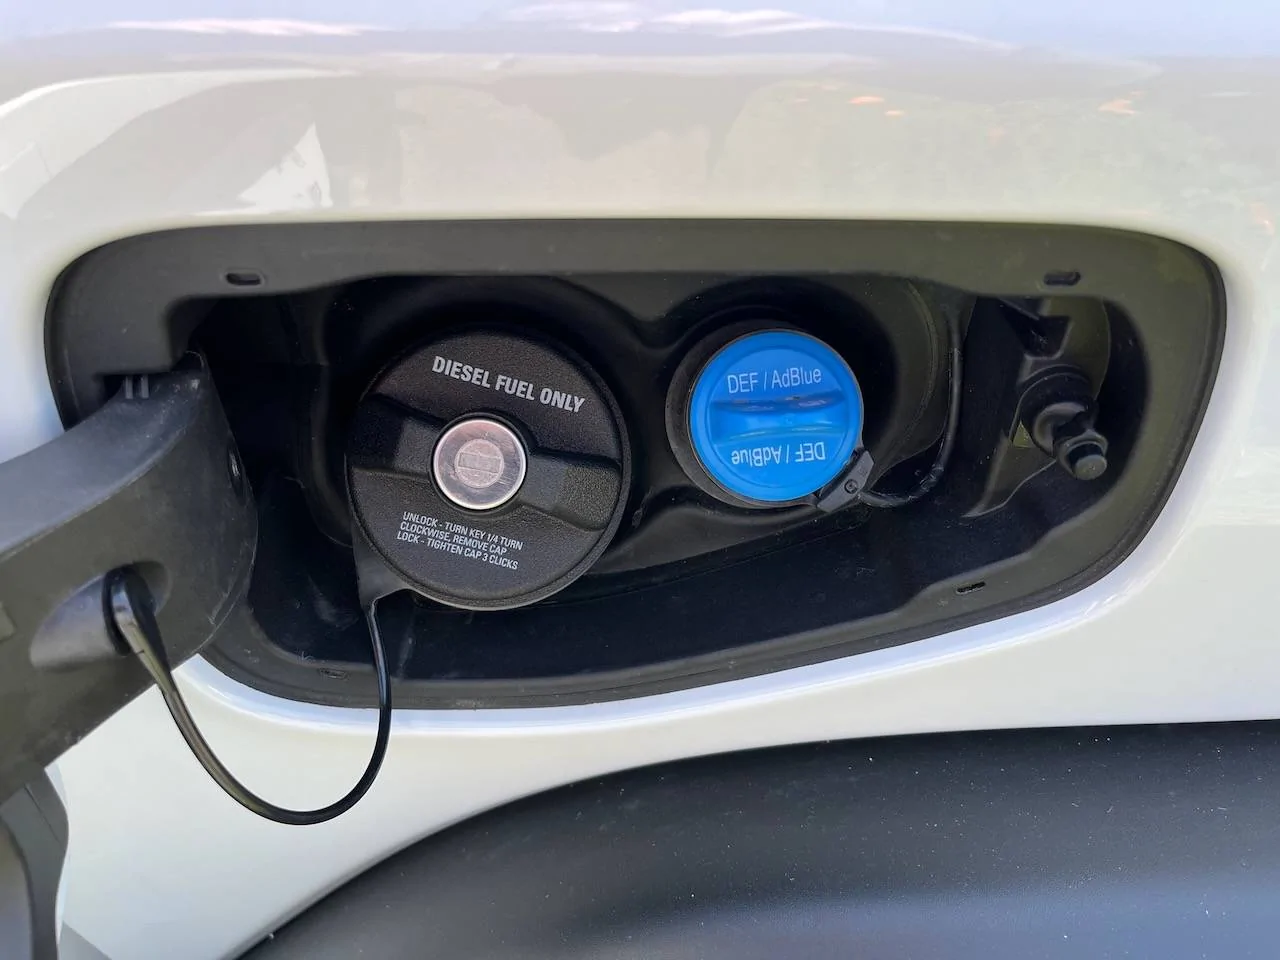
  • A locking gas (diesel) cap, lockable with vehicle key. Why they can't integrate the outer flap into central locking just to keep curious fingers away is beyond me. This doesn't need to be “safe”, it only needs to keep idiots and kids away.
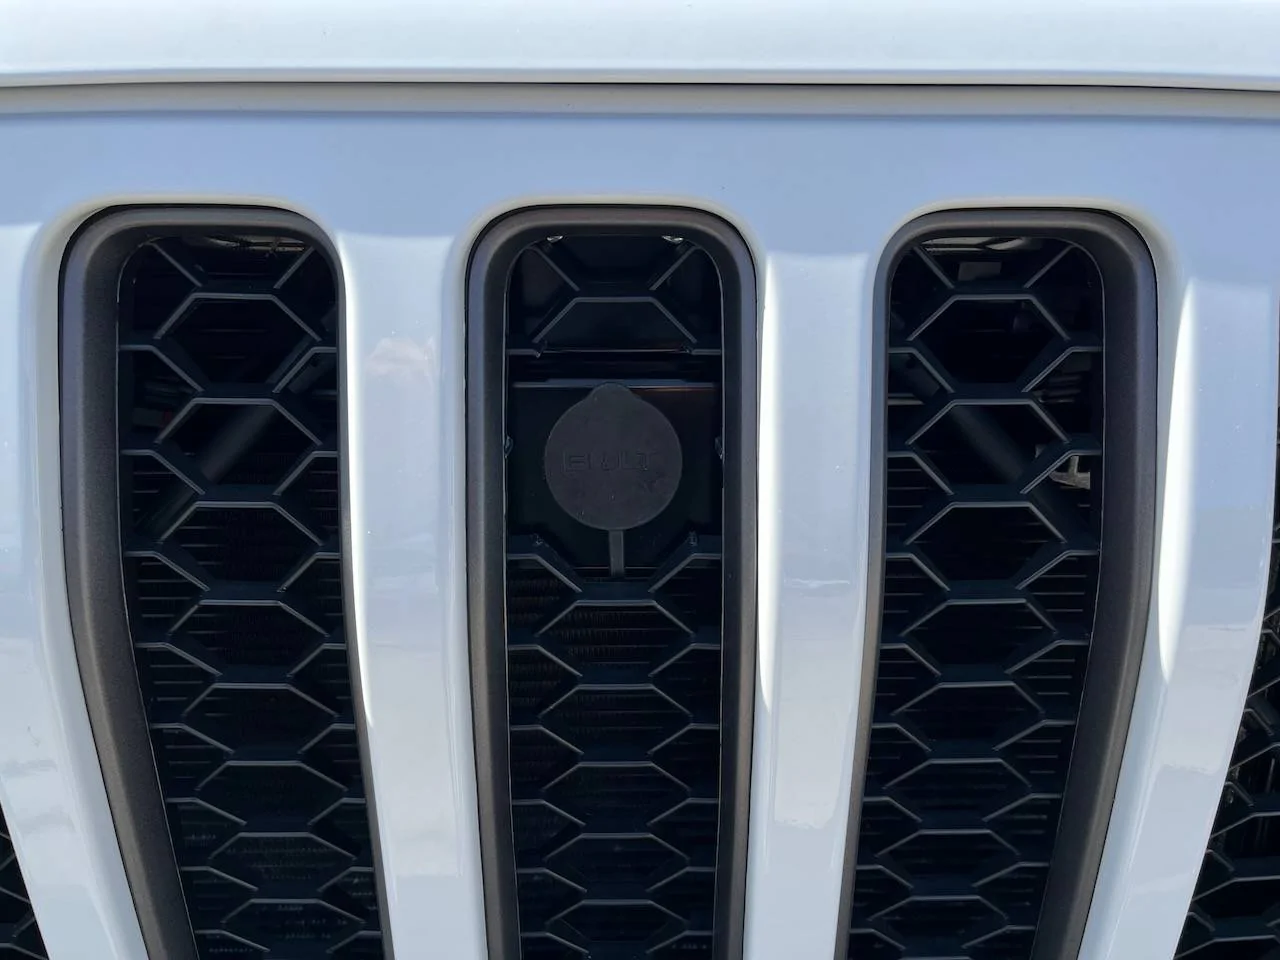
  • A lock for the hood, same reason as above.
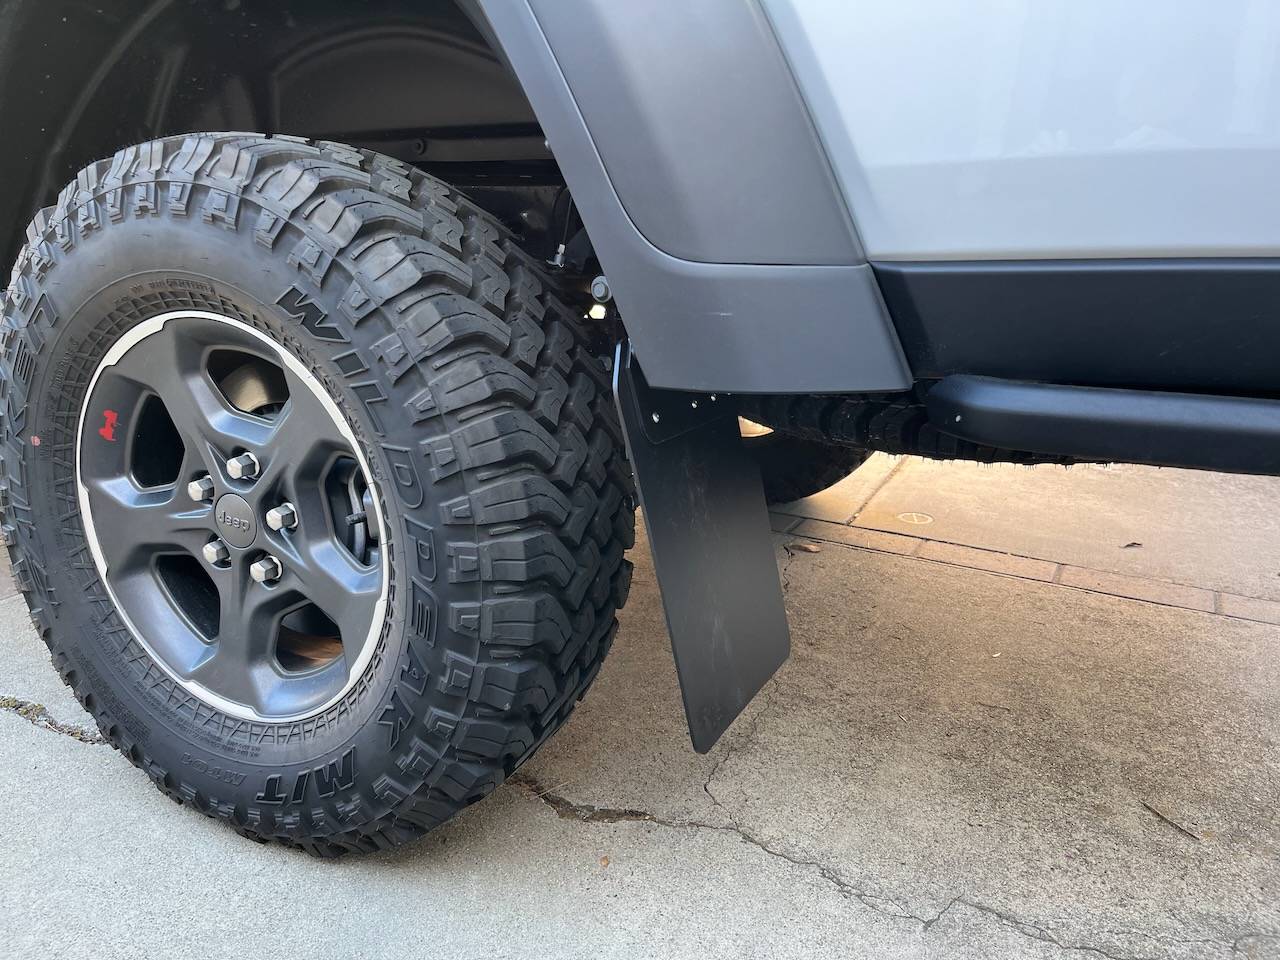
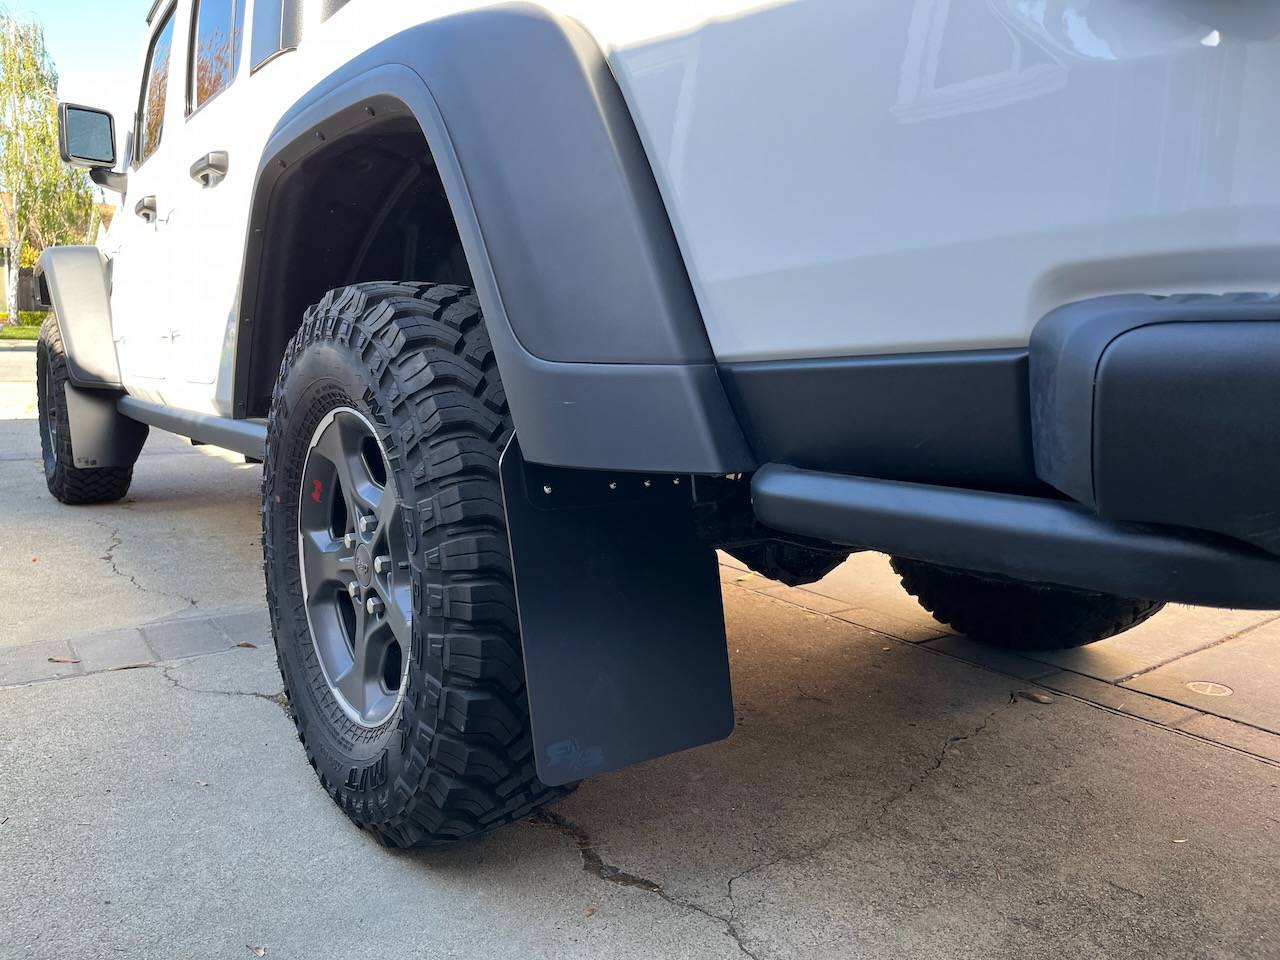
  • Mudflaps, this thing loves to throw shit at itself, like a pig in the mud.
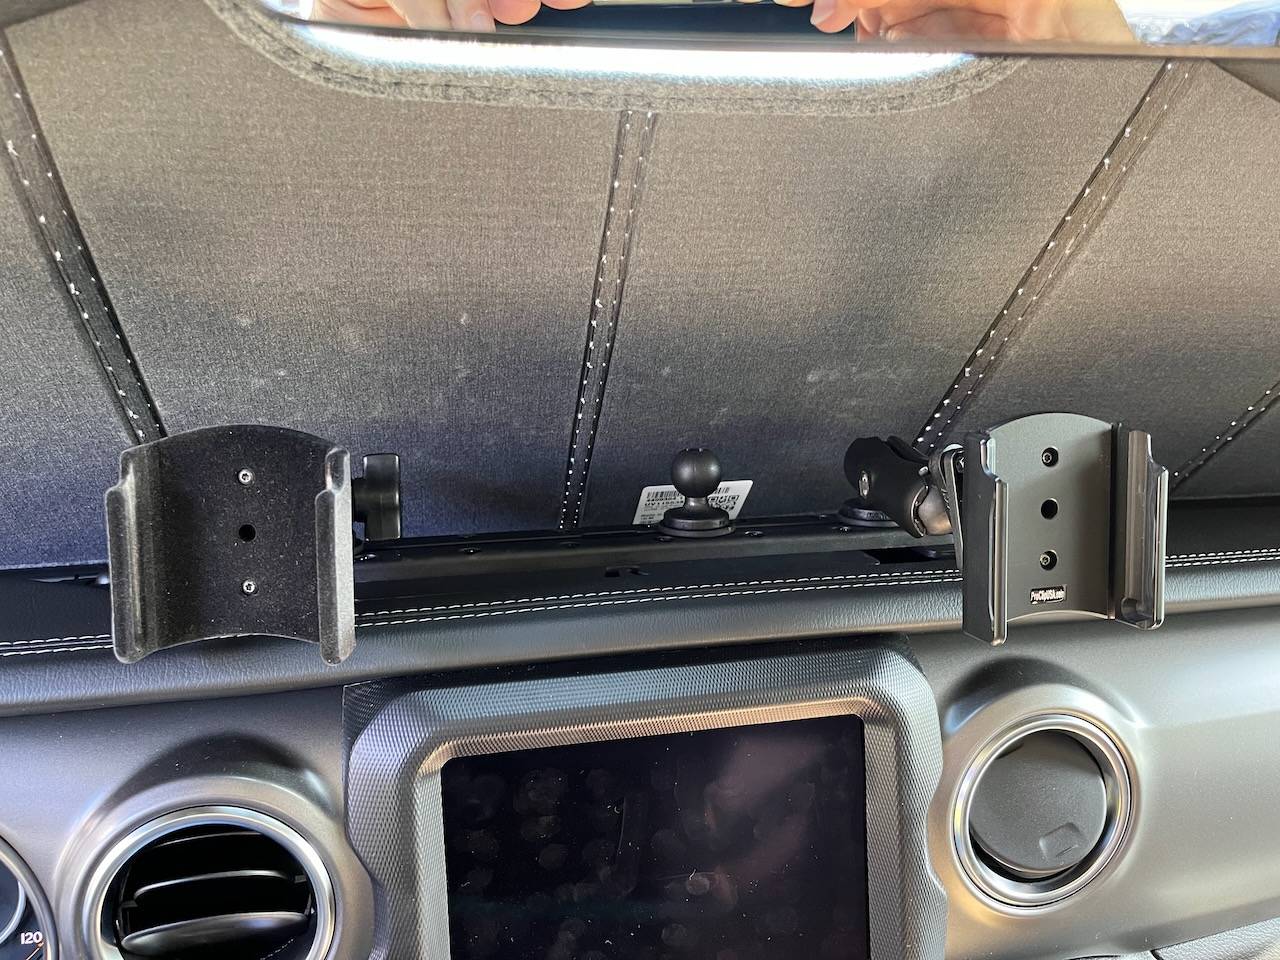
  • Phone and navigation mounts.
  • Mods for less noise and less heat in the cabin.
  • Some small storage cubbies that will help keep stuff from flying around.
The Mopar diesel fuel cap was easy to key and super easy to mount, that solved the first point above. Same with the Bolt hood lock, a bit more work, but not much. The mudflaps were a bit longer research, I finally ended up with the Rokblokz and I have mixed feelings about these. They'll probably work, but they are way overpriced for the cheap plastics and non-metric fasteners they use (come on guys, the 19th century (and even the 20th) is over for a while now, get on with metric fasteners like the car manufacturers do). For phone mounts I have decided to use Ram Mount’s Tough Track since we already have more Ram Mount stuff than I care to admit. The temp and noise insulation choice went to Hot Heads, the small organizer stuff to various cheap things from Amazon.

I'm happy to review or go into more details of the above items in future posts, if you actually read all through my sermon above and arrived here – you won the right to ask for details on each thing mentioned above ... ;-)

And the journey continues ...

Some photos

Old setup:

Jeep Gladiator A new hope ... (build journal and component reviews) 20230327-133240-01


Jeep Gladiator A new hope ... (build journal and component reviews) 20230327-102527-01


Jeep Gladiator A new hope ... (build journal and component reviews) DSCN9045


And the new start:

Jeep Gladiator A new hope ... (build journal and component reviews) 20230407-172256-01
Sponsored

 
OP
OP
cug

cug

Well-Known Member
First Name
Guido
Joined
Apr 1, 2023
Threads
13
Messages
602
Reaction score
663
Location
Christchurch, New Zealand
Vehicle(s)
JTR EcoDiesel, Land Cruiser 79, BMW R1250GS
Build Thread
Link
Occupation
Just keeping busy
Detailed "Change Log":
  • Truck, various small mods
    • [âś”] Bolt hood lock (short review)
    • [âś”} Mopar locking diesel cap (short review)
    • [âś”] Rokblokz Mudflaps (review)
    • [âś”] Ram Mount Tough Track phone mount (short review, to be replaced by Anvil Overland mounting system)
    • [âś”] Hot Heads Headliner (review)
    • [âś” ] Backup Camera – new mount - DONE
  • Camper– Alu-Cab Canopy Camper
    • [âś”] Installed by TinyRig
    • [âś”] Bedplate (write up)
    • [âś”] Furniture – check thread
    • [âś”] Water System – done, tank => pump => GuzzleH2O filter => outlets
    • [âś”] Mosquito Tent for under the awning, check thread, review TBD
    • [âś”] Mosquito Nets for doors and windows – the AluCab nets were too bulky and heavy, made our own
    • [âś”] Heating – Webasto Air Top 2000 STC diesel heater installed
  • Suspension
    • [âś”] Terraflex HD with Falcon 3.3 shocks, Hellwig Swaybar, Nexus Steering Stabilizer
      • Installed by EPIC Adventure Outfitters (review when it's tested more)
  • Wheels/Tires
    • [âś”] Relatively happy with the 33" Falken Wildpeak MT, will probably stay with size, brand, and model, will likely go to E rated tires when the time comes
  • Electrics
    • [âś”] Full Redarc System with Redvision, Manager 30, additional BCDC25 charger, 2x 100Ah batteries, Redarc 2000W inverter
    • [âś”] GP Factor corner unit with above mentioned Redvision and Manager 30 as well as display (initial review, more to come)
  • Winch/Bumpers
    • [-] Currently nothing is planned, we have yet to be in a situation where recovery boards wouldn't get us out or, within a few hours, somebody with a winch came by, might add one later on to be more independent.
  • Recovery
    • [âś”]
      • Maxtrax boards mounted to a roofrack
      • Recovery strap
      • Soft Shackles
      • Shovel
    • Winch – right now, not planned
  • Lights
    • [âś”] Switched from OEM Halogen to OEM LED – great improvement
    • [ ] Additional lights: none planned for now
      • [ ] Baja Fog Lights on order, these arrived, but we won't have time to install them before our upcoming trip
  • Communications
    • [âś”] GMRS Radio Setup – Midland MXT275 installed
  • Storage
    • [âś”] Rear Seat Delete and rear trim panel (write up over many posts from here, or on our blog)
    • [âś”] FrontRunner Wolf Pack Pro, ordered
    • [âś”] Roofrack – Trailrax Roof Rack, DONE
  • General Accesssories
    • [âś”] Recovery Gear – review upcoming, but we just got the roof rack to mount the Maxtrax, we do have most other things already
    • [âś”] Camping chairs and table – we'll keep using our old Coleman table for now and have now FrontRunner chairs (need to write a review)
    • [âś”] Cooking setup
      • Full electric setup with induction cooktop, 12V travel oven, water boiler, etc.
    • [âś”] Flashlight
      • Went for a Maglite, I just like their lights
    • [âś”] Fire Extinguisher
      • Element Fire
    • [âś”] Toolkit – DONE
  • Navigation
    • iPad Mini with various navigation apps (write up TBD), this is still a work in progress project unfortunately, since I'm running into roadblock after roadblock.
That's as far as I know it today. There will be more to come over time. The Canopy Camper should get installed in late June, after that it's testing time, then go from there.
 
Last edited:
OP
OP
cug

cug

Well-Known Member
First Name
Guido
Joined
Apr 1, 2023
Threads
13
Messages
602
Reaction score
663
Location
Christchurch, New Zealand
Vehicle(s)
JTR EcoDiesel, Land Cruiser 79, BMW R1250GS
Build Thread
Link
Occupation
Just keeping busy
The Bolt Hood Lock

Installation

It's surprisingly simple to install.
  1. You "prime" the lock with your vehicle's key, this is a five second job, but can't be undone once set.
  2. Remove the plastic holders of the front grill at the top. Pull grill forward enough to have access.
  3. Rivet the lock into place with the rivets that came in the kit. You need a heavy duty rivet tool, I bought one on Amazon since I didn't have one yet, and it did work, although it had it's difficulties with the 1/4 rivets.
  4. Cut out the grill to fit.
  5. Re-attach with the new, included, plastic fasteners.
  6. Done.
It looks stock, it works with the vehicle key, it doesn't seem to be easily defeated (although I could be wrong there), so it SHOULD keep curious fingers away. The metal part is heavy duty, appears to be very high quality, the parts are well made and fit perfectly, comes with a rubber protector. There isn't really much else to say about it, other than it just works.

This was a simple, very nice, and easy modification, that I can highly recommend.

Rating: 5/5 – would definitely install again

Jeep Gladiator A new hope ... (build journal and component reviews) IMG_5256
 
OP
OP
cug

cug

Well-Known Member
First Name
Guido
Joined
Apr 1, 2023
Threads
13
Messages
602
Reaction score
663
Location
Christchurch, New Zealand
Vehicle(s)
JTR EcoDiesel, Land Cruiser 79, BMW R1250GS
Build Thread
Link
Occupation
Just keeping busy
Mopar Locking Diesel Fuel Cap

Reason to install

This has been bugging us on our 4Runner as well and while I fully understand that thieves will just drill the tank, I don't care about "professional" gas or diesel thieves. I care about a-holes dropping stuff in the tank because for some reason, and possibly in their twisted minds, don't like us or our vehicle.

So, this is to keep less determined people away from things that shouldn't be in easy access anyways. Not a safety measure, an anti-idiot measure.

Quality

The fuel cap itself feels cheap and very plasticy, it rattles a bit and is fully plastic, the lock cylinder feels pretty solid, I guess it's the same used for the doors, just repurposed for this cap.

Installation

Installation time is mainly used for keying the lock cylinder to the vehicle's key, Quadratec has a good video on how to do that in a pretty much fool-proof way. It's still a "one way installation", so if the lock cylinder is inserted into the gas cap and not keyed correctly, you're done, you have just wasted more than $100. I don't get why they don't included a small slot in the cap where the "cylinder retainer" could be released when the cap is open, but it is what it is.

Since I have re-keyed many such cylinders before (mostly on BMW motorcycle luggage), I was well aware of the process, so it was a simple job of just sorting through the parts, arranging them on a paper towel, installing the springs, lock plates, and plastic retainer, then inserting the cylinder into the cap and installing that on the car. Multiple stages of testing and making sure I'm not locking myself out inbetween, but otherwise quick and simple.

In Use

The lock is a bit fiddly since the key is so bulky. You have to insert the key, hold the cap in place so it doesn't turn, turn the key to unlock, then turn the cap with the key in the cap. As said, fiddly, but perfectly doable. Would have been nicer to have the outer door included in the central locking, but hey, we get what we pay for (or ask for, if enough people complained about this, Jeep would include it, but people seem to be ambivalent about this in the US – not so much in Europe, never seen a vehicle with non-locking cap there).

Overall

Quick and easy, should have been included from stock, should be able to remove key when unlocked to make it less fiddly.

Rating: 3.5/5 – would install again, but could be better

Jeep Gladiator A new hope ... (build journal and component reviews) IMG_5257
 
OP
OP
cug

cug

Well-Known Member
First Name
Guido
Joined
Apr 1, 2023
Threads
13
Messages
602
Reaction score
663
Location
Christchurch, New Zealand
Vehicle(s)
JTR EcoDiesel, Land Cruiser 79, BMW R1250GS
Build Thread
Link
Occupation
Just keeping busy
Ram Mount Tough Track

Reasoning

I was going back and forth between the various options for phone, camera, navigation device holders and ended up deciding on Ram Mount since I have so much of their stuff already, like device cradles, flexible mounts, and so on.

Quality

The base plate that gets screwed to the Jeep is metal, but the track portion weirdly is plastic. Not too happy about the plastic part, otherwise, no complains.

Installation

Dead simple. Take out two screws from the dash, insert base plate where the track is already mounted (hard to get to the screws when mounting the track later), put screws back in, done.

Then Ram balls can be placed easily.

In Use

I've attached three balls at this point, one of driver's phone, one for passenger's phone, one for a Garmin Inreach Mini (not shown). I've re-used existing cradles and it works reasonably well so far. Much cheaper than the Bulletpoint mount, maybe slightly less flexible at the moment, the flexible mount I had ordered didn't work out (review of that coming up as a warning to others).

The rail sticks up a bit higher than I would like, overall, not a great impression, but it does work reasonably well.

Overall

Rating: 3/5 – could use a better flexible mount option, track should be metal, should be better fit

Jeep Gladiator A new hope ... (build journal and component reviews) IMG_5258
 

Sponsored

OP
OP
cug

cug

Well-Known Member
First Name
Guido
Joined
Apr 1, 2023
Threads
13
Messages
602
Reaction score
663
Location
Christchurch, New Zealand
Vehicle(s)
JTR EcoDiesel, Land Cruiser 79, BMW R1250GS
Build Thread
Link
Occupation
Just keeping busy
RokBlokz Mud Flaps

Reasoning

This Gladiator will be for travel. Traveling on unpaved roads, gravel roads, dirt, some tracks, etc. We want to camp away from the Subarus and Kias and whatnot, so traveling away from paved roads will always be a goal, we don't do rock crawling, therefore the size doesn't bother me too much for that. We wanted detachable just in case and these were basically the only ones that fit the bill.

We decided on normal width, but long.

Initial Quality Impression Before Installation

Bad. Relatively cheap, straight plastic, nothing molded, nothing to go better with the lines of the vehicle, nothing to make them fit the installation areas better. The fasteners are non-metric, metric do fit, but not great. Why can't accessory manufacturers not switch over just like the vehicle manufacturers did? It's beyond stupid and leaves a bad aftertaste.

Comes as multiple pieces of plastic, some marked for position, others not, and multiple bags of screws and nuts. Again, cheap, inconsiderate, but not unheard of.

Installation

Relatively simple, but their video is only half helpful. There are brackets included in the kit that weren't explained in the manufacturers video I watched, figured it out by myself. Otherwise relatively easy and painless. Passenger side front was a bit harder to get to the OEM plastic trim holder to cut off, but again, not too bad.

The rear is more complex than the front, the flaps need to be assembled in multiple layers with the included hardware, I would have preferred if this was actually properly formed plastic and better attachment points.

The metal hardware in the rear attaches easily, the included and unexplaned small bracket is to stiffen the rear mount, it fits well, and makes sense once you see it. Multiple sizes of fasteners for the small bracket as well, worked with my metric kit, but I doubt it's metric hardware (again, hmpf).

The rear can be moved in/out a bit to adjust for wheel spacing, so setting it up just right was eyeballed and turned out okay.

The cut out on the front flaps for the Rubicon rock rail is tight, might want to scrape some material off to prevent rubbing if you're concerned about it rubbing off the powdercoating and then having rusting rails. I don't mind too much, since these will likely get nicks and scrapes anyways.

Looks

Leaves a lot to be desired, but if they do the job, in can live with it. Just from the looks department and the initial feel of the plastic parts, rating would be a 1 or 1.5/5 or so.

In Use

Since it finally stopped raining in California, at least for the time being, we have not had a chance to test them, but they look like they'd protect the body of the vehicle as well as following cars reasonably well with the stock 33" tires on the Gladiator. Larger tires might need wider flaps though.

The quick detach will probably work for a while and then muck up solid to be removed with pliers only. It's okay, I've added some thumbscrews on my list of "consumables" to add to the kit, don't have them yet, but will find some.

Overall

They are priced stupidly high for what they are and do, but okay, blame me for spending the money.

Should have gone with Weathertech and just replaced them if they ever broke due to not having quick detach.

Rating: 2.5/5 so far, not convinced by plastic quality, fit, price, mounting instructions, or looks; I might update my rating later on, but as of now, it stands.

Jeep Gladiator A new hope ... (build journal and component reviews) IMG_5266
Jeep Gladiator A new hope ... (build journal and component reviews) IMG_5267
 
Last edited:

AKJTR

Member
First Name
Will
Joined
Feb 15, 2022
Threads
0
Messages
18
Reaction score
22
Location
North Pole, AK
Vehicle(s)
2022 Gladiator Rubicon
Occupation
USAF
Nice rig so far. The RokBlokz are priced a little steep. But they work very well. I got them fror my recent move from Alaska to New Mexico and they worked very well on the gravel highways of the ALCAN. I would look at some steel bumpers in the future. Depending which one you get, they offer better tow/winch points and the ability to put more lights or a winch if you go that route. I have a warn winch and yellow lens LED fog lights that do a great job at cutting trough the fog. I haven't used my winch a whole lot except to pull my buddies car on a trailer haha.
 
  • Like
Reactions: cug
OP
OP
cug

cug

Well-Known Member
First Name
Guido
Joined
Apr 1, 2023
Threads
13
Messages
602
Reaction score
663
Location
Christchurch, New Zealand
Vehicle(s)
JTR EcoDiesel, Land Cruiser 79, BMW R1250GS
Build Thread
Link
Occupation
Just keeping busy
@AKJT – thanks, yes, they might work well, but I would have REALLY liked if they were a bit better molded towards the truck. As is, they are rather fugly. Probably functional, but really only something a mother can love ...

Regarding steel bumpers and winch: My personal take on winches (after having one on the 4Runner and one on a rig in Europe) is that, most winches are never used, never needed, and just a waste of money and weight, especially with a steel bumper. I'm not going to add one as a "just in case" option, if I'm ever going to add one is because I really feel I need one. Same for additional lights. I actually see more of a case for lights than a winch. Probably 99% of the situations I'll be in will be easily handled by recovery boards and a shovel. Might a winch make some of them easier? Probably, but again, just for "easier" I'm not carrying a winch around. Also, I have seen so many people use a winch when a shovel or some Maxtrax would have been faster, easier, and safer, right now I'm just following my own advice and will see where I get stuck ... ;-)

The truck has the stock fog lights, I'll see well these work.
 

AKJTR

Member
First Name
Will
Joined
Feb 15, 2022
Threads
0
Messages
18
Reaction score
22
Location
North Pole, AK
Vehicle(s)
2022 Gladiator Rubicon
Occupation
USAF
Yeah the RokBlokz are definitely functional rather then looking good. But they work and have quick disconnects which is a plus in my book. A winch is nice to have but definitely not needed. I've used my traction boards way more. Plus traction boards are perfect for leveling a vehicle at camp! But I go a great deal on my winch and living in Alaska you never know when it may come in handy. A lot of the places my wife and I would camp and off road were very boggy or had loose rock and the road/highway to get there would be a halfway maintained dirt road with a steep shoulder or drop off. I got my steel bumper on sale too. I mostly did the steel bumper because I didn't like the plastic one and I wanted better approach angle. The LED baja design fog lights were need in my case with the whole 24hrs of darkness during the winter and needing to see moose on my drive to work haha. The halogen just wasn't cutting it. I look forward to seeing your Alu-Cab canopy camper. I've been looking at them for a while. But my wife isn't sold yet. So help me convince her haha!!!!
 
OP
OP
cug

cug

Well-Known Member
First Name
Guido
Joined
Apr 1, 2023
Threads
13
Messages
602
Reaction score
663
Location
Christchurch, New Zealand
Vehicle(s)
JTR EcoDiesel, Land Cruiser 79, BMW R1250GS
Build Thread
Link
Occupation
Just keeping busy
I've used my traction boards way more. Plus traction boards are perfect for leveling a vehicle at camp!
That's pretty much how we used ours. Either bridging when approach or departure angle are not enough, or putting a whole bunch into a rut to help with not putting the diff pumpkin to the ground, or setting up camp. Plus they are awesome in sand and snow. I really like having them. A winch, I've used something like 10 times in my life, and 9 of these times were more than 30 years ago when going hunting in winter with my dad.

The LED baja design fog lights were need in my case with the whole 24hrs of darkness during the winter and needing to see moose on my drive to work haha. The halogen just wasn't cutting it.
That I can see (pun intended). I'd do the same in that case. As I said, I will definitely change the main lights to LED, not sure yet about all the others.

So help me convince her haha!!!!
LOL – I'll keep myself out of that ... our build in that regard will probably be rather sparse. I'm not planning on a cool full Goose Gear build-out, just the base plate to put my own stuff on top. Goose Gear is too heavy for my taste. It's very nice and I might be tempted if I had better payload with the Jeep, but as it is – no way. Currently more thinking along the lines of flight case extrusions with 7mm plywood riveted in. We used these back in the day for disco lights (a 7x2 feet box with two bars of 6xPAR64 lights) and they survived two big guys dancing on them during a party. Granted, they were from 9mm plywood, but still ...

That part of the build will get interesting. As will the electrics part. I haven't really decided which direction to go: cheap, aka an EcoFlow Delta Max with a DC-DC Converter to 30V charge voltage, or a component system. Need to plan and read more there. And test a bit at home with an induction plate, a small kettle, and a Kill-A-Watt power monitor.

I might be tempted to import EGON DC and Water hubs for this. There isn't really something like this in the US and it makes cabling just soooo much easier.
 

Sponsored

OP
OP
cug

cug

Well-Known Member
First Name
Guido
Joined
Apr 1, 2023
Threads
13
Messages
602
Reaction score
663
Location
Christchurch, New Zealand
Vehicle(s)
JTR EcoDiesel, Land Cruiser 79, BMW R1250GS
Build Thread
Link
Occupation
Just keeping busy
Hot Head Roofliner

Reasoning

I'm really sensitive to noise and the Gladiator with mud terrain tires and diesel engine is certainly not a quiet ride once you get past 40 or 50 mph. Also, putting the hand up when the roof is in direct sunlight showed some serious heat radiation coming down to our heads, so something had to be done about both of these.

The research into this was quick and dirty, I settled fairly quickly on the Hot Heads product and ordered this a day after bringing the Jeep home.

Initial Quality Impression

Pretty good. They stink, though. When new they have a rather offending smell to them, it really goes well along with the "new car smell" that now creates something close to cow dung smell in the car when it is sitting for a bit. I know this will go away over time, right now, it takes some time getting used to whenever we get in the car.

Other than that the roofliner comes with everything I wanted or needed, even some blue painters tape to mark the position of the sticky tape on the visible side to know where to press down. A very thoughtfully compiled package.

We got ours with the Sound Assassion strips and the small rear side panels. In black of course, to go with the rest of the interior trim and not the saddle leather seat trim.

The package even comes with a hard cardboard piece to distribute pressure and a small roller to appy the Sound Assassin butyl strips.

That's how it's done and the RokBlokz folks REALLY should take a closer look at matching the quality of the parts, the instructions, and the completeness of the package.

Installation

We took the long way, removing the front roof panels as well as the complete rear from the car to be able sand the parts properly without completely covering the whole insight with plastic dust. It worked rather well this way, applying everything was as simple as laying out the Sound Assassin (SA)stips on the roof parts, cutting them to size in preparation, then sanding the roof interior, cleaning it with Acetone, sticking on the SA strips, rolling them down, then sticking on the actual roofliner pieces and pressing the tape on properly. Much easier when the panels are off the car.

One note: I accidentally touched a black plastic trim with the Acetone soaked rag and of course it ruined the black color. It's in rear, upper, passenger side corner, not too bad, so I'll be able to ignore. Might have been a good idea to but a big warning marker in the instruction, especially since they recommend using Acetone. I was aware of the potential, just not aware enough to avoid clumsiness. My mistake.

Putting the roof back on was also not hard. I did all this with my wife, she's 5'7" and slender, but was able to handle her part of the rear roof reasonably well. Might still be a good idea to have a buddy help with this if your partner is smaller or not a rock climber (my wife is a hobby rock climber).

Removing and re-installing the roof was also easy. Nice touch on this.

In Use

We did not measure the decibel levels before installing the roofliner, but for my ears, it seems to be about 30% less noise (I used to have a sound and light company back in the day, out of school, so have a little bit of a feel for this). My guess is that the 4 to 6dB(A) that can be found on their website as well as in various reviews is pretty much spot on. Also, less echo-y. Think room without to room with large carpet. Similar effect.

Conclusion

I'm happy to have done that, it's relatively expensive at around $500, but for me it was well worth it. There is very little heat "bleading" through the roof line now, and that is in California sun. Not yet really warm, but there is a MASSIVE difference to before. The decreased noise level and slightly less hollow sound is a nice bonus.

Might actually take a look behind the door trim and see whether we can use up the rest of the Sound Assassin strips there to damping the rather cheesy door closing sound.

Rating: 4.5/5 – half point taken off for the relatively hefty price

No photo taken of this one, there are enough out there and there will be more from this car when I get to more interior work.
 

Chocolyle

Well-Known Member
First Name
Lyle
Joined
Sep 13, 2020
Threads
21
Messages
305
Reaction score
304
Location
Manchester, CT
Vehicle(s)
21 JTR Sarge Green MT
Occupation
Technical Sales / Security
I have the RAM mount in my JTR, I have been using their products since 99, I think. They never let me down. Mater of fact I just ordered their Apple Mag Safe RAP-B-202-AP-MAGU adapter and the MagSafe charger. I have been using the X Grips for a long time. The X grip has held the phone firm for filming while off road. Zero issues with them. Work van has the one for the iPad, tractor has one for the phone. MagSafe is just for connivence. Check out their website, tons of arms to do what ever you need.

I have the RokBlokz. I found a lot of chips in the door hinges, I went with the long and wide though still running the stock 33" Wild Peaks, plan is to go to 35" 10.5 wide tires and lift. But of course I did go with the red. They stand out a bit!

If you want easy to clean out floor and sound deadning check out the Armorlite flooring. Just installed mine, night and day in sound and heat. So much easier to clean out, especially dust, mud and dog hair.

Last thing I did and love a lot, search for the Jeep factory Euro mirrors. You can do just the glass, or replace the entire mirror/housing and will have built in turn signals. Will need to do some simple wiring for the turn signals. Their mirrors are convex, much better side view.
 
OP
OP
cug

cug

Well-Known Member
First Name
Guido
Joined
Apr 1, 2023
Threads
13
Messages
602
Reaction score
663
Location
Christchurch, New Zealand
Vehicle(s)
JTR EcoDiesel, Land Cruiser 79, BMW R1250GS
Build Thread
Link
Occupation
Just keeping busy
@Chocolyle

Thanks for the comments!

The Ram Mount stuff is also something I've been using for a long time. For car, motorcyle, cameras, etc. I don't love their stuff, but it works. I just find they could have executed better here. I also have one of the X-Grip holders, but the downside of that is it's very easy to either press the volume or the on/off button on the phone.

At this point in time, I have no need to get any larger tires. Would it look a bit better? Maybe. Do I care? Not really. I want it functional, which means that the smaller tire will result in lower fuel consumption, giving me a better range per tank, less annoyance with gas stations and DEF.

Thanks for the tip on Armolite flooring, I will look into it. Right now, I have carpet and on top of the carpet are the rubber mats. A bit weird, since the drain plug just sticks up, I really need to take a look underneath to understand this a bit better.

The mirrors seem okay to me right now, so, no need to go down that route for me at the time.
 

NotSo Bright White

Well-Known Member
First Name
Tim
Joined
Jul 29, 2021
Threads
9
Messages
521
Reaction score
1,398
Location
Nor Cal
Vehicle(s)
2021 JTR DIESEL
Occupation
Retire Fireman
Vehicle Showcase
1
We have a lot in common with out rigs. I also have the JTRD with a wedge camper. As far a noice, mine became a lot quieter with all terrains. You will take a pretty good hit on fuel mileage with a wedge camper. I also have Hotheads and Ram Mounts so to summarize, I like your Jeep!
 
  • Like
Reactions: cug


Top