Sponsored

Alu-Cab Canopy Camper Roll Call

813 Fabrication & Design

Rock Sponsor (Level 1)
First Name
Jeremy
Joined
Dec 21, 2019
Threads
51
Messages
918
Reaction score
1,322
Location
Louisville, KY
Website
www.813fabrication.com
Vehicle(s)
2020 Jeep Gladiator Rubicon Launch Edition
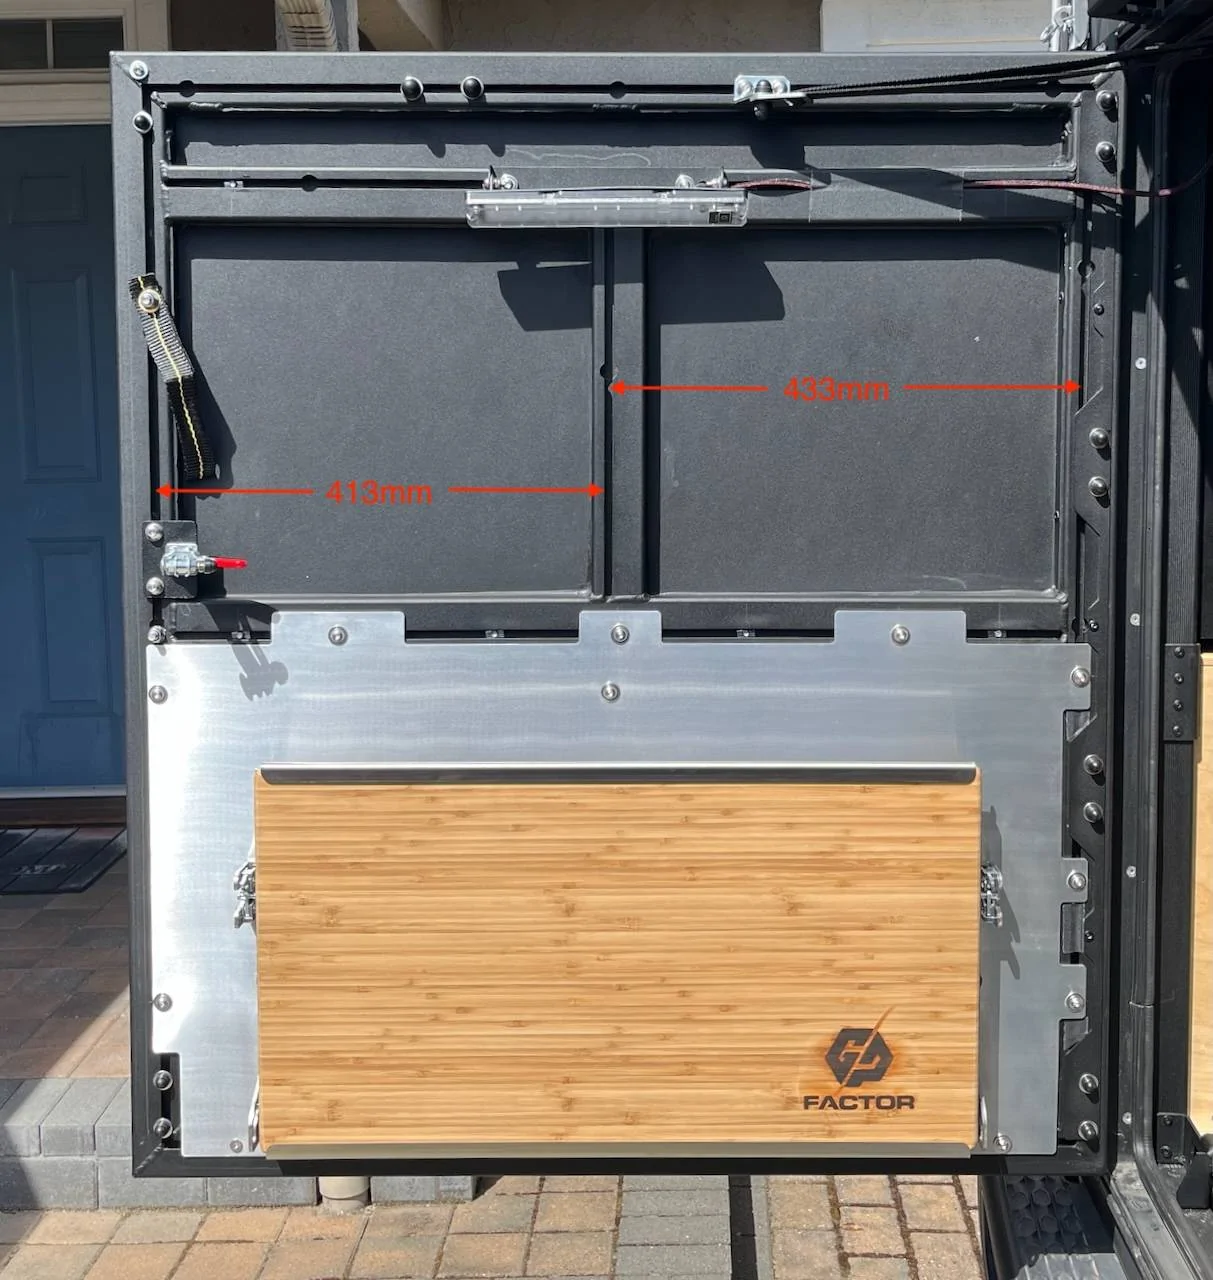
So ... since I'm now starting to think about the "upper quadrants" of the door – the panel with the Redvision display, would this fit a new style door with extrusion as well? Do you know?
Yes, I just need to tweak the hole pattern slightly to match the offset of the extrusion track. I could do so and have one cut in raw aluminum if you like.

As you can see in my photo from the post before, I have the table sorted now, so the next questions are:
  • How do I mount a Last US Bag Half Caddy? I have one already here, thinking that I'd use the "left upper quadrant" for this. I would add a couple eye bolts to the extrusion and use the hooks on the bag to hang it.

  • How to move the Redvision display to a place where it's more useful than "around the corner"? Moving the screen is pretty easy. You just need a longer RJ45 cable to reach from the Manager30 to the screen.

  • Where would I put a roll of paper towels? A custom mount for the top of the door into the extrusion or use the Expedition Essentials towel holder that you can stick in many areas. It is magnetic but seems limiting since a lot of stuff is aluminum.

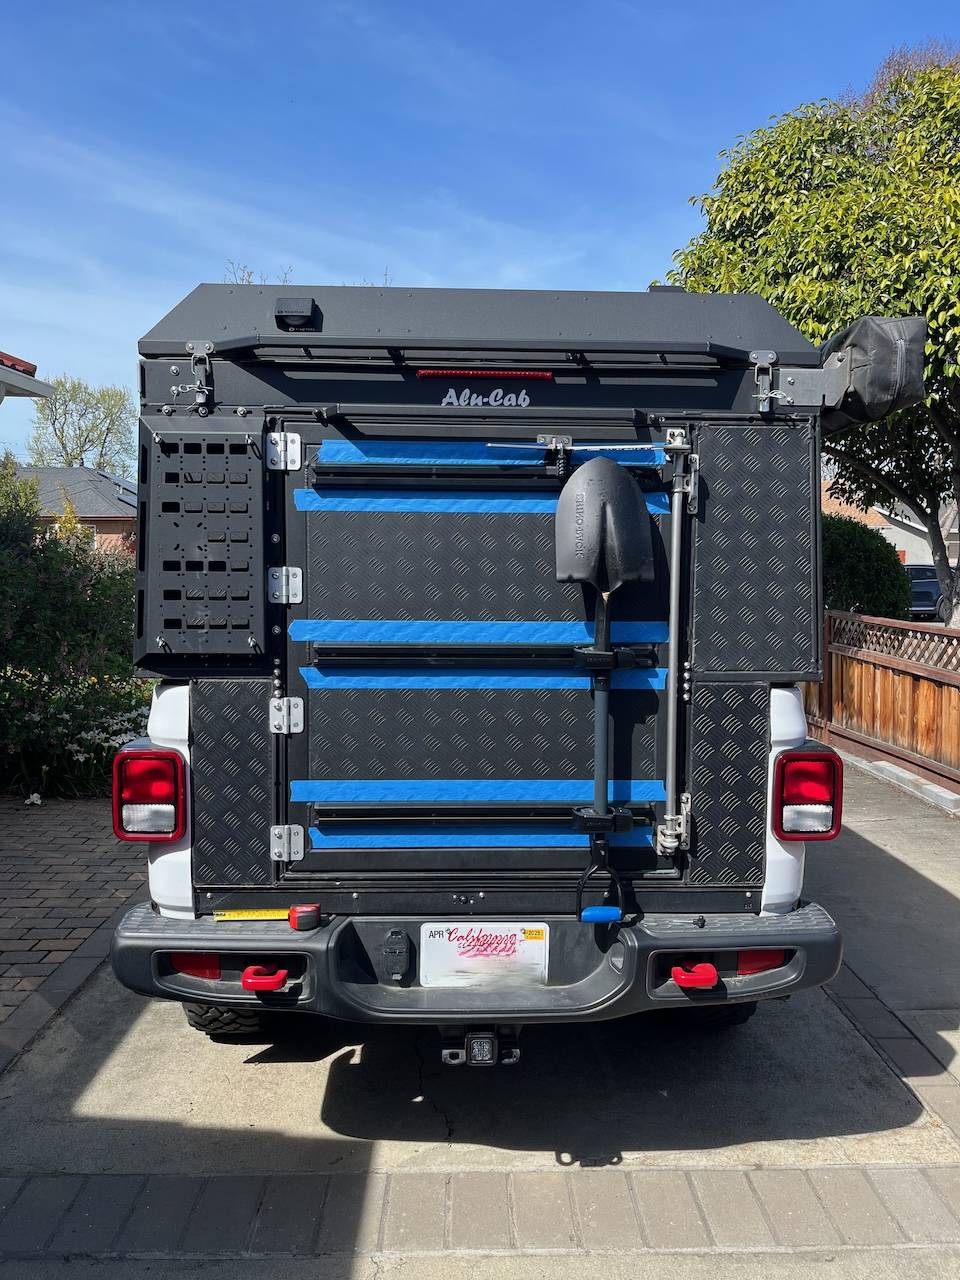
Unbelievable how long ago this was ... Today we finally mounted the load bars. Still thinking about what to mount where. There are things I'm not certain where to mount/store them, although the rear door is the obvious choice for some of them:
  • 2x two gallon diesel Rotopax (preferably near the hinges) - I am drawing some ideas today for a mount that gives some flexibility. You could also use track on the back door.

  • 1x 43" shovel - I have mine mounted to the rear door on the tracks

  • 1x Storage for some "dirty diesel thingies" (Ai13 filler neck, gloves, ...) - Hmmm, sounds like a case or bag for outside somewhere

  • Trash – although we have an idea for that
Let me know what I can do to help! You can see how stuff is mounted to my back door in this photo.

Jeep Gladiator Alu-Cab Canopy Camper Roll Call IMG_4550.JPG
Sponsored


cug

Well-Known Member
First Name
Guido
Joined
Apr 1, 2023
Threads
13
Messages
602
Reaction score
663
Location
Christchurch, New Zealand
Vehicle(s)
JTR EcoDiesel, Land Cruiser 79, BMW R1250GS
Build Thread
Link
Occupation
Just keeping busy
Yes, I just need to tweak the hole pattern slightly to match the offset of the extrusion track. I could do so and have one cut in raw aluminum if you like.
I'll need to think carefully what I want to put where so that it makes sense in usage. One of the problems we're often facing when trying to adapt existing solutions is that our door is "flipped". Meaning it opens towards the driver side. Which means, that "quadrants" end up in different places. I think (not 100% certain) that TinyRig flipped the door and frame 180 degrees for installation, which can throw fitment of accessories off.

Here's a straight on shot with two measurements:

Jeep Gladiator Alu-Cab Canopy Camper Roll Call IMG_6349


Then there are all our "custom ideas", e.g. that we are adding insulation in the quadrants when closing them up.

My current thinking is:
  • Last US Bag Half Caddy in upper left quadrant. It collides a bit with the latch, but if I move it slightly right, it should be workable.
  • Upper right for Redvision panel
  • Maybe the paper towel holder either above or underneath the Redvision panel. The Expedition Essentials holder is tempting, although magnets are rather useless, since most of the things to attach to are either stainless or aluminium. So, might have to remove the magnets and mount with screws or rivets to a backing plate.
  • I might want to move the light to the long horizontal area above the current location. Also put something underneath the mount to pull it out by maybe two or three inches so that it has a chance to get light on the table with the paper towels and bag underneath. Not sure if that'll work though.
  • Need to find a better handle than the little strap we are using right now.
I would add a couple eye bolts to the extrusion and use the hooks on the bag to hang it.
That would be the easiest and lightest way of doing it. Might end up doing that for sake of simplicity, but it doesn't work well with insulation behind. Need to think about this.

Moving the screen is pretty easy. You just need a longer RJ45 cable to reach from the Manager30 to the screen.
Right, I need to pull the GP-Factor unit out again to get the panel out and extend the cable.

2x two gallon diesel Rotopax (preferably near the hinges) - I am drawing some ideas today for a mount that gives some flexibility. You could also use track on the back door.


There might be a catch for that too: The distance between the upper load bar channel to the middle is 410mm while the middle to the lower is 375mm (always middle of mounting channel to middle of mounting channel). That might have an impact. Can't see how that is on your door.

I was thinking of two bracket types, one for upper, one for lower mounts, both with various mounting holes and slots for "stuff", including Rotopax pattern, and the mounting flanges "interlaced" so that they can sit in line (upper exactly above the lower). Again, this might be too much custom work to be worth your while, since I don't think anybody else has the same door setup ... ;-)

1x Storage for some "dirty diesel thingies" (Ai13 filler neck, gloves, ...) - Hmmm, sounds like a case or bag for outside somewhere
Yep. Either a Pelican case on the door, or we use our "trash can" (a Bear Vault can) which we are currently planning on mounting to the driver's side molle panel.

I'd love to re-use existing solutions or at least ideas, but some of the things we've done (reversed the door for example) prevent easy installation. E.g. I believe the original GP-Factor table back plain wouldn't have fit since our extrusions are flipped horizontally and the table would only fit upside down ...

Sometimes I hate all the customization we have. But when it's all said and done, I love the usability.
 

813 Fabrication & Design

Rock Sponsor (Level 1)
First Name
Jeremy
Joined
Dec 21, 2019
Threads
51
Messages
918
Reaction score
1,322
Location
Louisville, KY
Website
www.813fabrication.com
Vehicle(s)
2020 Jeep Gladiator Rubicon Launch Edition
I'll need to think carefully what I want to put where so that it makes sense in usage. One of the problems we're often facing when trying to adapt existing solutions is that our door is "flipped". Meaning it opens towards the driver side. Which means, that "quadrants" end up in different places. I think (not 100% certain) that TinyRig flipped the door and frame 180 degrees for installation, which can throw fitment of accessories off.

Here's a straight on shot with two measurements:

IMG_6349.jpeg


Then there are all our "custom ideas", e.g. that we are adding insulation in the quadrants when closing them up.

My current thinking is:
  • Last US Bag Half Caddy in upper left quadrant. It collides a bit with the latch, but if I move it slightly right, it should be workable.
  • Upper right for Redvision panel
  • Maybe the paper towel holder either above or underneath the Redvision panel. The Expedition Essentials holder is tempting, although magnets are rather useless, since most of the things to attach to are either stainless or aluminium. So, might have to remove the magnets and mount with screws or rivets to a backing plate.
  • I might want to move the light to the long horizontal area above the current location. Also put something underneath the mount to pull it out by maybe two or three inches so that it has a chance to get light on the table with the paper towels and bag underneath. Not sure if that'll work though.
  • Need to find a better handle than the little strap we are using right now.


That would be the easiest and lightest way of doing it. Might end up doing that for sake of simplicity, but it doesn't work well with insulation behind. Need to think about this.


Right, I need to pull the GP-Factor unit out again to get the panel out and extend the cable.


There might be a catch for that too: The distance between the upper load bar channel to the middle is 410mm while the middle to the lower is 375mm (always middle of mounting channel to middle of mounting channel). That might have an impact. Can't see how that is on your door.

I was thinking of two bracket types, one for upper, one for lower mounts, both with various mounting holes and slots for "stuff", including Rotopax pattern, and the mounting flanges "interlaced" so that they can sit in line (upper exactly above the lower). Again, this might be too much custom work to be worth your while, since I don't think anybody else has the same door setup ... ;-)


Yep. Either a Pelican case on the door, or we use our "trash can" (a Bear Vault can) which we are currently planning on mounting to the driver's side molle panel.

I'd love to re-use existing solutions or at least ideas, but some of the things we've done (reversed the door for example) prevent easy installation. E.g. I believe the original GP-Factor table back plain wouldn't have fit since our extrusions are flipped horizontally and the table would only fit upside down ...

Sometimes I hate all the customization we have. But when it's all said and done, I love the usability.
Yes, I did not think about your door being flipped changing the position of the channel. It would for sure need a custom panel to fit. Sounds like you have lots of thinking to do to get things polished.
 
  • Haha
Reactions: cug

cug

Well-Known Member
First Name
Guido
Joined
Apr 1, 2023
Threads
13
Messages
602
Reaction score
663
Location
Christchurch, New Zealand
Vehicle(s)
JTR EcoDiesel, Land Cruiser 79, BMW R1250GS
Build Thread
Link
Occupation
Just keeping busy
Yes, I did not think about your door being flipped changing the position of the channel. It would for sure need a custom panel to fit. Sounds like you have lots of thinking to do to get things polished.
That's what I feared ... damn ... but okay, we've been building custom stuff for the last half year.
 

cug

Well-Known Member
First Name
Guido
Joined
Apr 1, 2023
Threads
13
Messages
602
Reaction score
663
Location
Christchurch, New Zealand
Vehicle(s)
JTR EcoDiesel, Land Cruiser 79, BMW R1250GS
Build Thread
Link
Occupation
Just keeping busy
Shovel mount solved:

Jeep Gladiator Alu-Cab Canopy Camper Roll Call IMG_6351 (1)


Wife's comment: "We can leave the painter's tape on, works well with the shovel handle."

The above still leaves room for a max of four Rotopax 2G containers, a small Pelican case (Pelican Storm iM2306) or a Bear Vault. I can design the mounting brackets in a way that we can mount the Pelican case or the Bear Vault on the door or molle panel, that'll give us flexibility.
 

Sponsored

westrollamo

Member
First Name
Sean
Joined
Feb 5, 2023
Threads
0
Messages
14
Reaction score
23
Location
Western WA
Vehicle(s)
23 Gladiator Rubicon
Occupation
General Contractor
When did the Canopy Camper get channels in the door frame? Mine was installed last year and it doesn’t have them.

By channels I mean the interior door frame, not the added exterior ones.
 

cug

Well-Known Member
First Name
Guido
Joined
Apr 1, 2023
Threads
13
Messages
602
Reaction score
663
Location
Christchurch, New Zealand
Vehicle(s)
JTR EcoDiesel, Land Cruiser 79, BMW R1250GS
Build Thread
Link
Occupation
Just keeping busy
Mine was ordered in April last year and installed in July. I'm happy that it has the channels, as it makes a few things more flexible.
 

813 Fabrication & Design

Rock Sponsor (Level 1)
First Name
Jeremy
Joined
Dec 21, 2019
Threads
51
Messages
918
Reaction score
1,322
Location
Louisville, KY
Website
www.813fabrication.com
Vehicle(s)
2020 Jeep Gladiator Rubicon Launch Edition
When did the Canopy Camper get channels in the door frame? Mine was installed last year and it doesn’t have them.

By channels I mean the interior door frame, not the added exterior ones.
They started sending the new door design in April on random orders. They did not let many know that it was changing so several had to scramble to adjust their mounts to fit.
 
  • Like
Reactions: cug

cug

Well-Known Member
First Name
Guido
Joined
Apr 1, 2023
Threads
13
Messages
602
Reaction score
663
Location
Christchurch, New Zealand
Vehicle(s)
JTR EcoDiesel, Land Cruiser 79, BMW R1250GS
Build Thread
Link
Occupation
Just keeping busy
They started sending the new door design in April on random orders. They did not let many know that it was changing so several had to scramble to adjust their mounts to fit.
That's one, the other is that it is much, much harder to fit certain items, e.g. a table like the GP-Factor table. With the old style, you drilled a few holes and riveted it on. With the new style, you basically have to take the door off since t-nuts or bolts in the slots will always just fall down or need elaborate contraptions to stay in place (we've put some rolled up gaffer's tape under the t-nuts to make future endeavors easier) ... taking the door off normally means breaking the Sikaflex seal on the door hinges and getting alignmnent out of whack.

On the other hand, it's much easier to fit something quickly to the door or adjust fitment slightly. I like the channels, but if I never have to take the door off again, I'd be VERY glad.
 
Last edited:

Sponsored

caryt

Well-Known Member
First Name
Cary
Joined
May 29, 2023
Threads
33
Messages
426
Reaction score
284
Location
Wellington NV
Vehicle(s)
'84 stretched CJ7/LS/tons/40's, 2021 Rubicon JT 39
Occupation
Retired/ Build jeeps
Both have their positives and negatives..my door top rail only has the hole to install a bolt on the end's so 2x's now I've had to remove parts to install additional ones. Have to remove a propane bracket 1 more time to add 1 more handle...hope thats the last time.
 

cug

Well-Known Member
First Name
Guido
Joined
Apr 1, 2023
Threads
13
Messages
602
Reaction score
663
Location
Christchurch, New Zealand
Vehicle(s)
JTR EcoDiesel, Land Cruiser 79, BMW R1250GS
Build Thread
Link
Occupation
Just keeping busy
Both have their positives and negatives..my door top rail only has the hole to install a bolt on the end's so 2x's now I've had to remove parts to install additional ones. Have to remove a propane bracket 1 more time to add 1 more handle...hope thats the last time.
I'm using 80/20 roll-in t-nuts for M6 bolts in these cases when I can't easily get a M8 bolt to the place I want. That way, while I'm not using M8 bolts, I am flexible in where I put a t-nut without having to remove things. We also now have to do this in some areas, since the bolts that hold the outside tracks in place, end in the channels on t-nuts. Unless I want to take that bolt out and risk a water leak.

These are the ones I'm using: https://8020.net/13092.html

M6 stainless hardware is plenty strong for what I need. Our outside loadbars are mounted with them, the furniture is mounted to the side extrusion in some place with M8 in some with M6, the table is mounted to the door with M6. I'm either using threadlocker blue or nylock nuts with the hardware.
 

westrollamo

Member
First Name
Sean
Joined
Feb 5, 2023
Threads
0
Messages
14
Reaction score
23
Location
Western WA
Vehicle(s)
23 Gladiator Rubicon
Occupation
General Contractor
I'm using 80/20 roll-in t-nuts for M6 bolts in these cases when I can't easily get a M8 bolt to the place I want. That way, while I'm not using M8 bolts, I am flexible in where I put a t-nut without having to remove things. We also now have to do this in some areas, since the bolts that hold the outside tracks in place, end in the channels on t-nuts. Unless I want to take that bolt out and risk a water leak.

These are the ones I'm using: https://8020.net/13092.html

M6 stainless hardware is plenty strong for what I need. Our outside loadbars are mounted with them, the furniture is mounted to the side extrusion in some place with M8 in some with M6, the table is mounted to the door with M6. I'm either using threadlocker blue or nylock nuts with the hardware.
What load bars did you end up using for the outer door? Apologies if you posted about it earlier.
 

cug

Well-Known Member
First Name
Guido
Joined
Apr 1, 2023
Threads
13
Messages
602
Reaction score
663
Location
Christchurch, New Zealand
Vehicle(s)
JTR EcoDiesel, Land Cruiser 79, BMW R1250GS
Build Thread
Link
Occupation
Just keeping busy

cug

Well-Known Member
First Name
Guido
Joined
Apr 1, 2023
Threads
13
Messages
602
Reaction score
663
Location
Christchurch, New Zealand
Vehicle(s)
JTR EcoDiesel, Land Cruiser 79, BMW R1250GS
Build Thread
Link
Occupation
Just keeping busy
An FYI for people here:

I don't know if it's just our molle panels (doubt it), but the hole pattern around the larger holes isn't the same in all rows. The second row from the bottom, the lower holes have a different distance.

Just mentioning this as I'm in the process of designing mounting brackets that are supposed to go on these panels as well as on my own loadbar brackets. Now I have to repeat this insanity on my own brackets if I want the ability to mount to both ... argl.
Sponsored


Top