Sponsored
OP
OP
TheHops
Well-Known Member
- Thread starter
- #32
Thanks! I honestly don't think that you can go wrong with any of the metal toppers. It's unfortunate, but the only one that I personally would steer clear of for now is the ARE. They've just had way too many QC issues lately, based on what I have seen.Nice video! I got the Alu-Cab, but its always nice to compare stuff. I agree the auto open is kind of an annoying feature. We paid good money for our tops, we want them to be flawless, don't worry, my Alu-Cab's handles/locks freeze up whenever there are dropping temps. Seem to be fine once its below 32 and stays below. I bet none of the tops are perfect. Glad to see an RSI on a jt now, looks good.
I expect to have the same issue on my locks. We had a cool, humid night a week or so back in the high 30s, and the locks took about a second to deploy, so I'm pretty sure they weren't too far off from freezing in place. I'll probably add a small bit of lock de-icer or a small spray bottle of water/vinegar mixture to my kit.
Appreciate it! I did not see any option on their site or during the pre-order for screens, so I don't *believe* they're available with it. It'd be simple enough to make one, but still, it would be a nice option for them to have.Nice cap! Good walk around! Does the sliding window have a screen option?
steffen707
Well-Known Member
- Joined
- Jan 28, 2018
- Threads
- 204
- Messages
- 8,624
- Reaction score
- 8,940
- Location
- Middle Wisconsin
- Vehicle(s)
- 2001 Jetta TDI RIP, 89' Civic SI, 2019 Pacifica Hybrid, 2020 GLADIATOR SPORT S "GLADYS"
i hadn't thought of the water/vineagar mixture, i'll have to try that out.I'll probably add a small bit of lock de-icer or a small spray bottle of water/vinegar mixture to my kit.
Sponsored
MudderTruker
Well-Known Member
- First Name
- Mike
- Joined
- Aug 29, 2019
- Threads
- 17
- Messages
- 260
- Reaction score
- 205
- Location
- Sydney, Australia
- Vehicle(s)
- Toyota Hilux SR5 and Jeep Renegade ... name is on the list for a Gladiator!
- Occupation
- Computer dude
Any chance of a pic with the soft top on and the roof down, with the canopy please?
OP
OP
TheHops
Well-Known Member
- Thread starter
- #37
Sorry, but I no longer have a soft top, so I can't accommodate. RSI did post pictures of that though on one of the threads that they have going on the forum, though I can't recall which one. Based on the pictures, and what they described, it functions just fine.Any chance of a pic with the soft top on and the roof down, with the canopy please?
OP
OP
TheHops
Well-Known Member
- Thread starter
- #39
To be honest, I'm not sure where that banner came from lol. A moderator moved and renamed this thread (I originally posted it under the exterior mods portion), and that banner picture was there after that. It looks like it came from around the 50 second mark of the video, but I'm not sure if it was pulled automatically somehow or what.Can you post the full profile pic in the banner for this thread? Thanks.
I snipped this from the video. Hopefully this works for you.
MikeInMo
Well-Known Member
Thanks. I didn't realize it was a screencap. I enjoyed your review. Your video and photos are better than RSI's website.To be honest, I'm not sure where that banner came from lol. A moderator moved and renamed this thread (I originally posted it under the exterior mods portion), and that banner picture was there after that. It looks like it came from around the 50 second mark of the video, but I'm not sure if it was pulled automatically somehow or what.
I snipped this from the video. Hopefully this works for you.

Sponsored
OP
OP
TheHops
Well-Known Member
- Thread starter
- #41
No worries.Thanks. I didn't realize it was a screencap. I enjoyed your review. Your video and photos are better than RSI's website.
And thanks! Glad you enjoyed. I'll probably have a more detailed, longer term review up after the holidays after I get back from my trip out west. I have a setup shakedown trip planned out over Christmas.
OP
OP
TheHops
Well-Known Member
- Thread starter
- #42
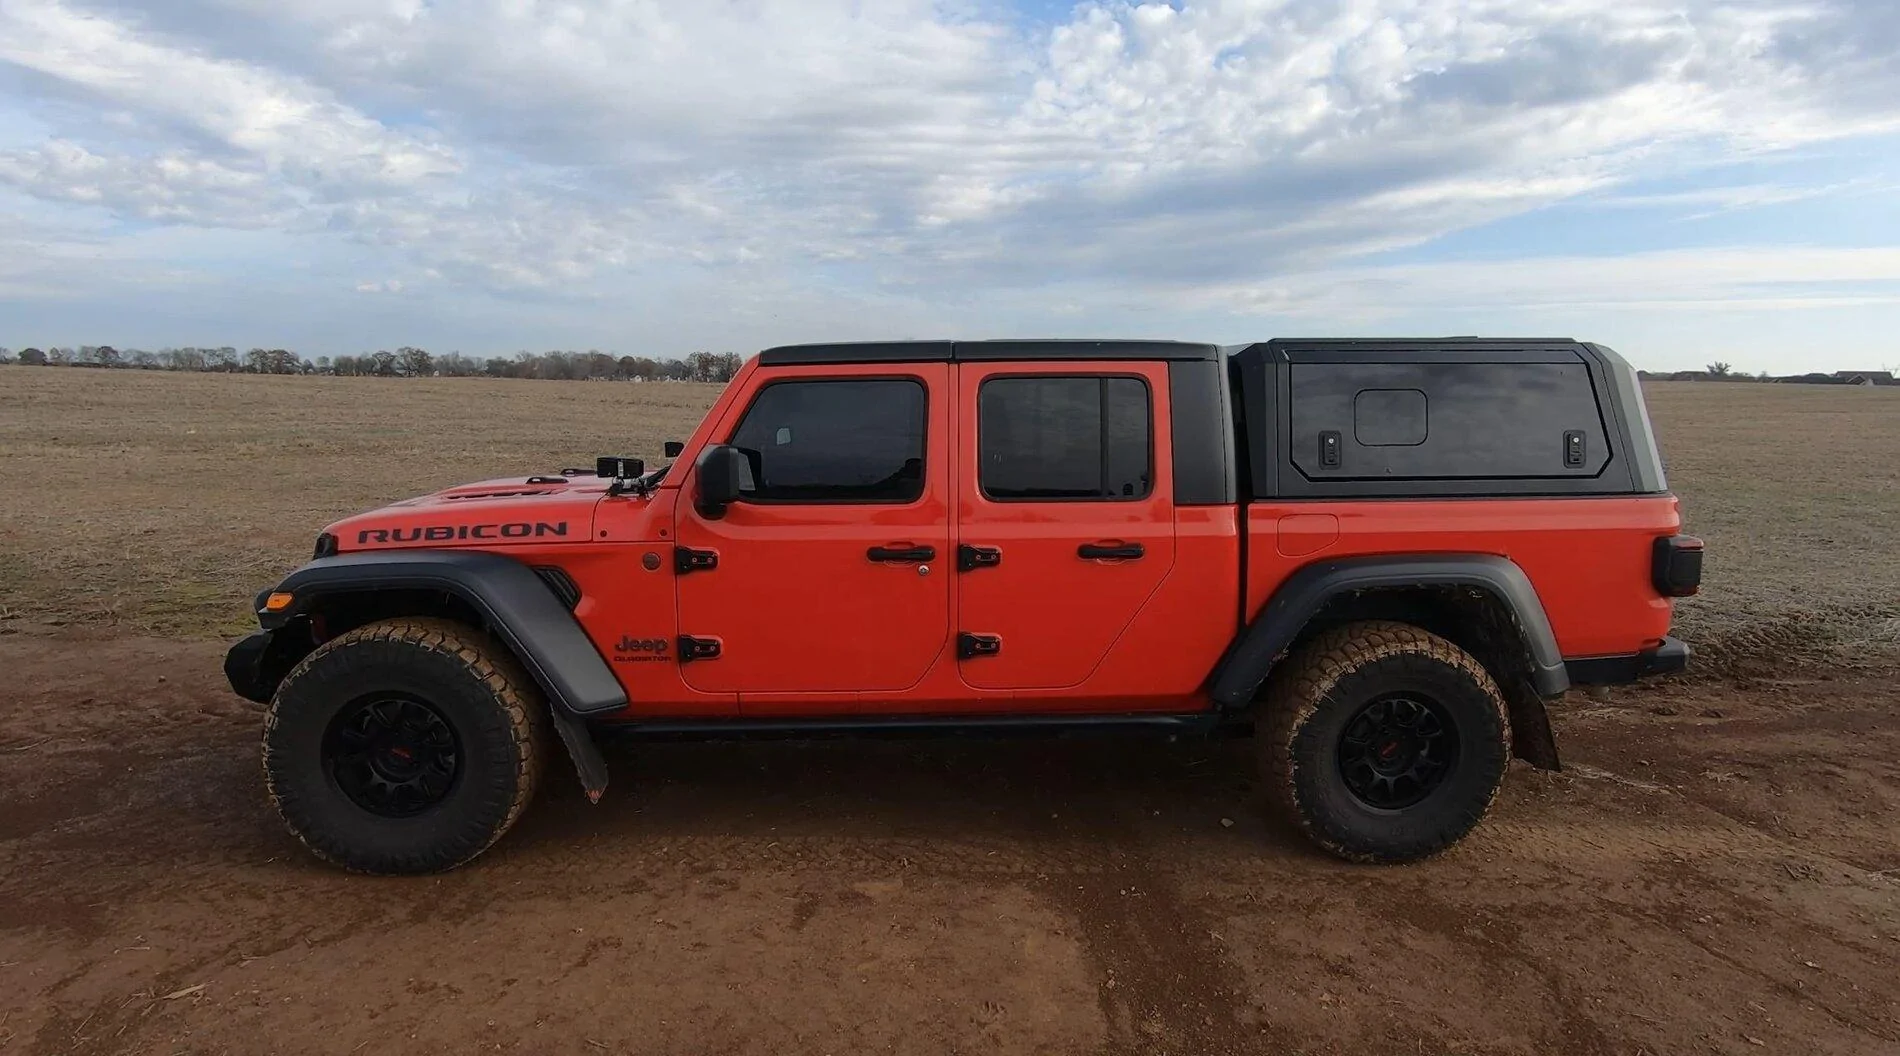
Since it pertains directly to the cap, here's my writeup on adding aux bed/cargo lighting, for anyone interested. This was necessary for me because, between the cap, and the recent addition of BuiltRight rails and side panels, the stock lights provided essentially zero illumination. Feel free to scroll to the very bottom if you just want to see the finished product!
What I used:
-Set of lights (with approximately 20ft of wiring)
-Fasteners for the lights (either double sided tape, or screws)
-Four red Posi-Taps
-Heat shrink
-Heat gun
-Wiring pliers
-Zip ties
-Wire hanger
-Tape
I found this set of lights on amazon:
https://www.amazon.com/gp/product/B07YZFN925/ref=ppx_yo_dt_b_asin_title_o06_s00?ie=UTF8&psc=1


The package came with 8 total lights, two sets of 4 lights that are wired together. They are backed with double sided adhesive tape. The lights are very light, and the tape holds solid. They also come with a 2 year warranty. I was pleasantly surprised by the overall quality. This is the first set of lights that I ordered to try for my application, and they ended up fitting perfectly. This whole project cost me less than $20.
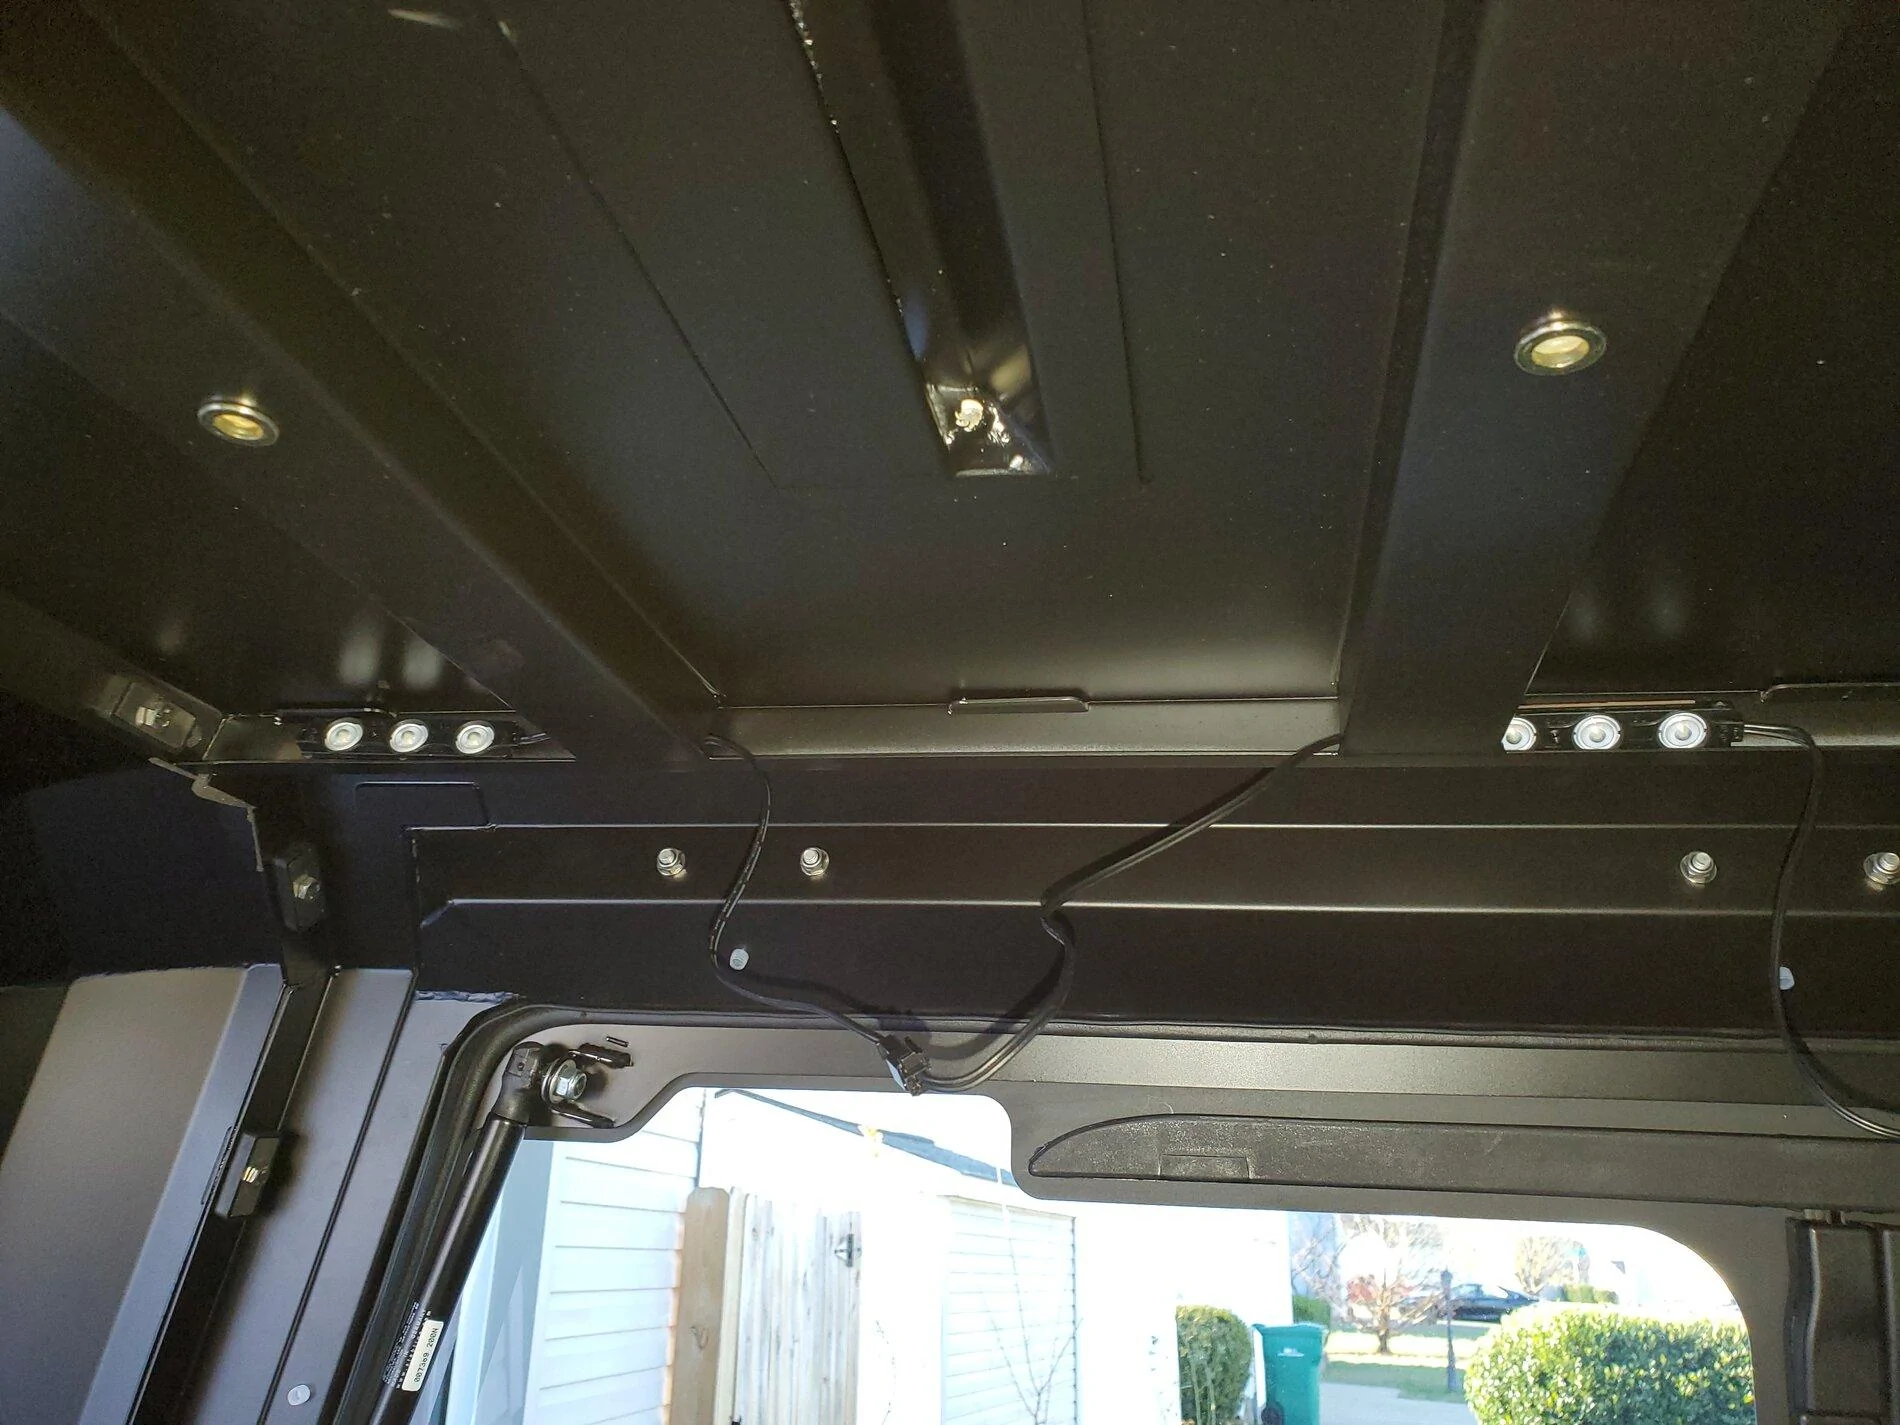
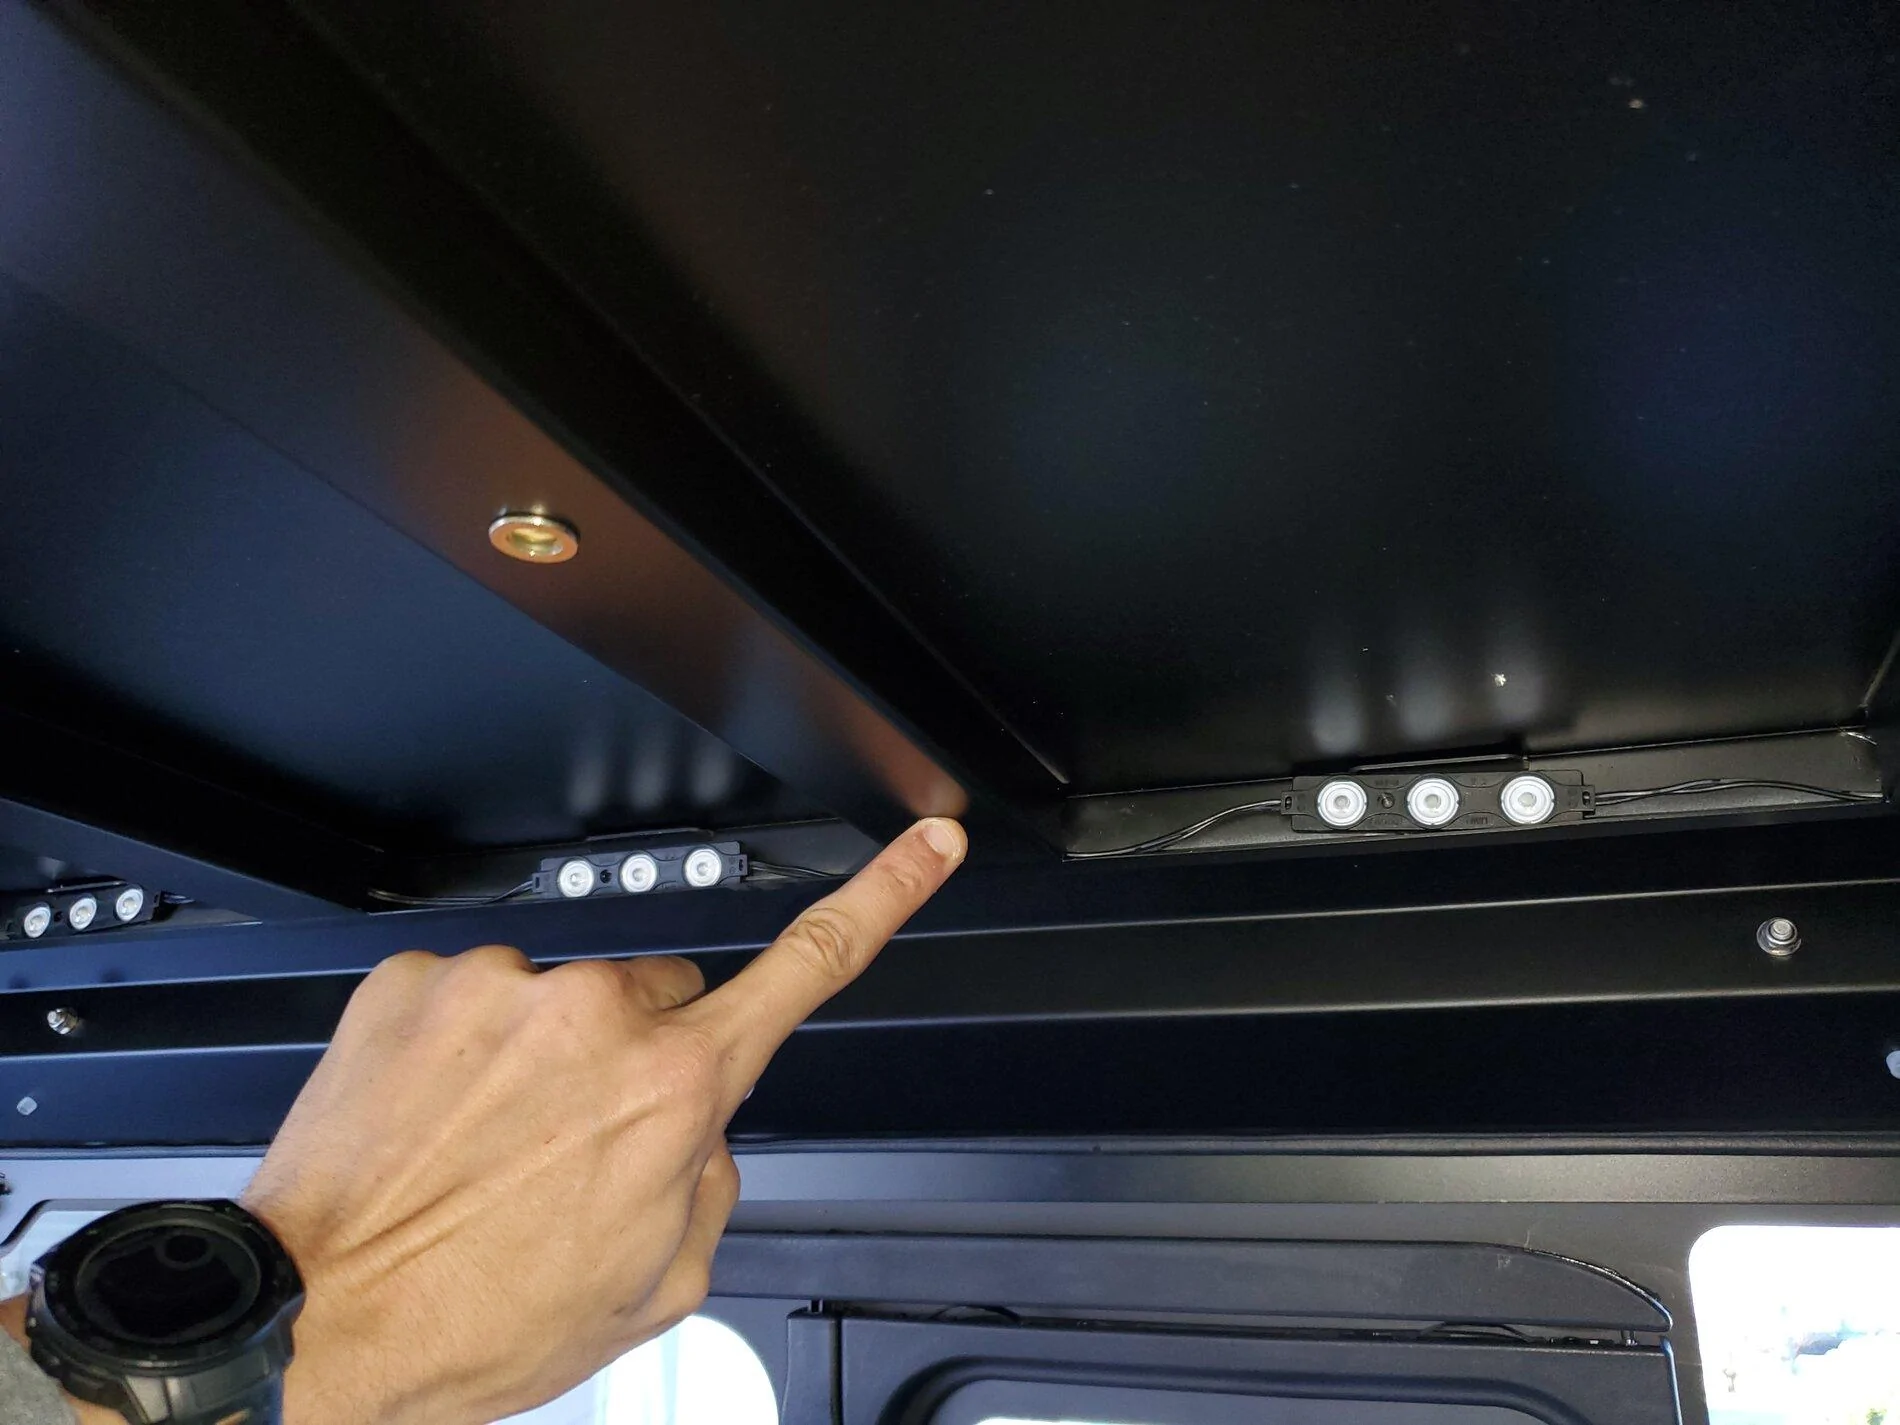
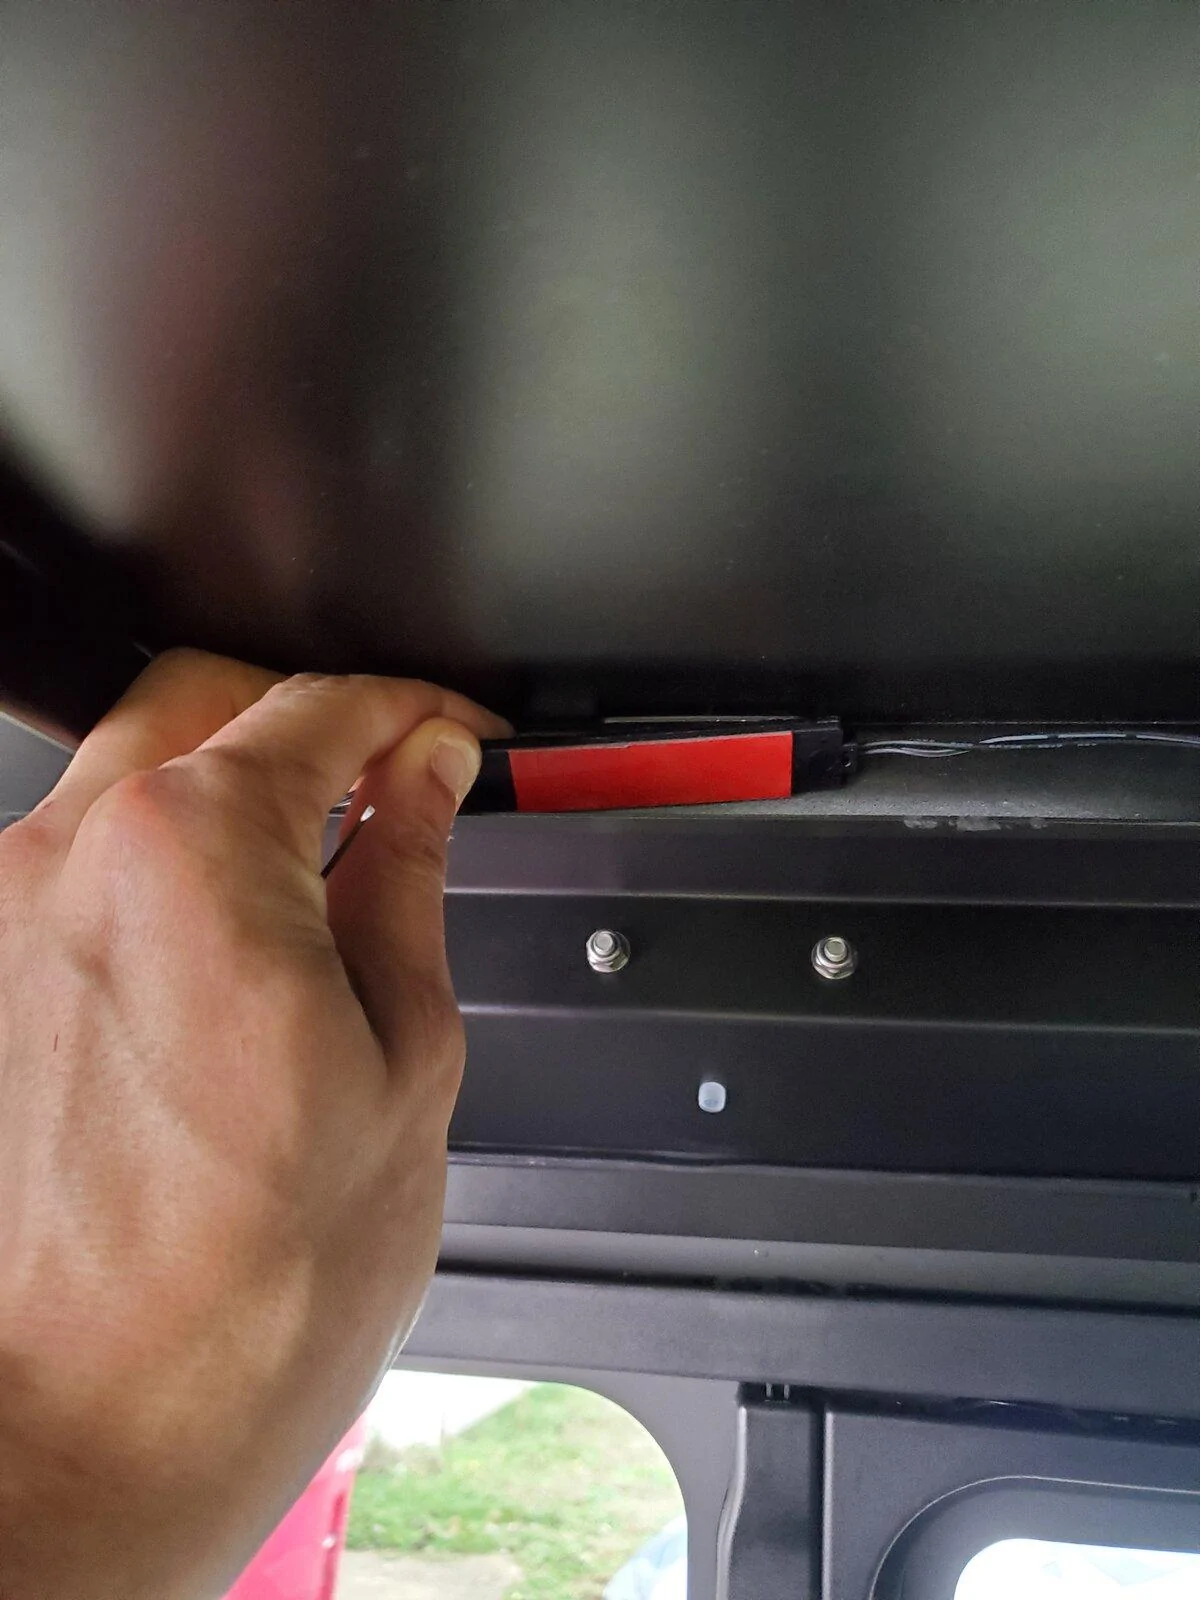
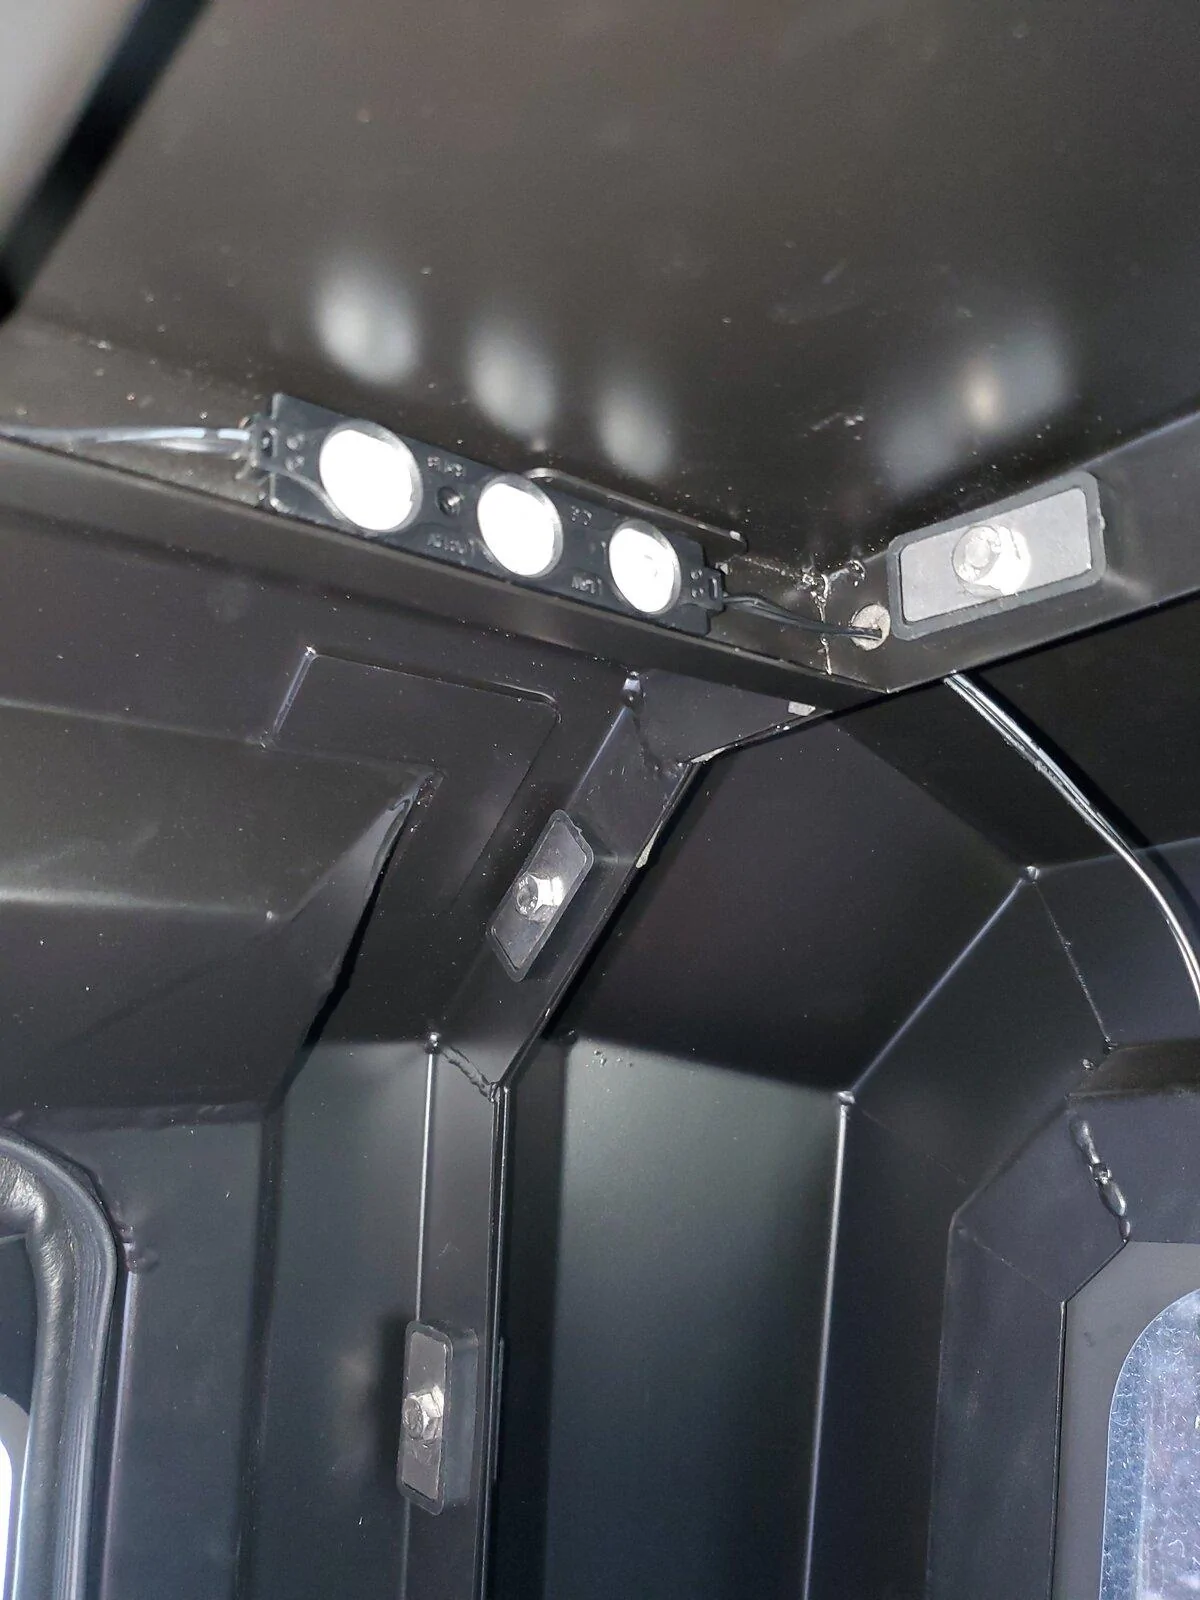
I started off by choosing a location. I knew I wanted the lights up high for an evenly distributed, diffused pattern over the cargo area, so I went straight to the ceiling of my SmartCap. There is a lip that runs the length of the roof, which also happens to have pass-throughs between hollow crossmembers. This ended up working perfectly, because I could route the wiring in between these pass-throughs, and tuck all excess cordage inside of the hollow crossmembers.
Before sticking down the lights, I tapped the leads on to a spare battery to ensure that output and spread was sufficient in this location. I tested during daylight, and after sunset. These lights pump out a surprising amount of light, as the entire bed was illuminated. Having checked that, I began sticking down the lights and routing the wiring.
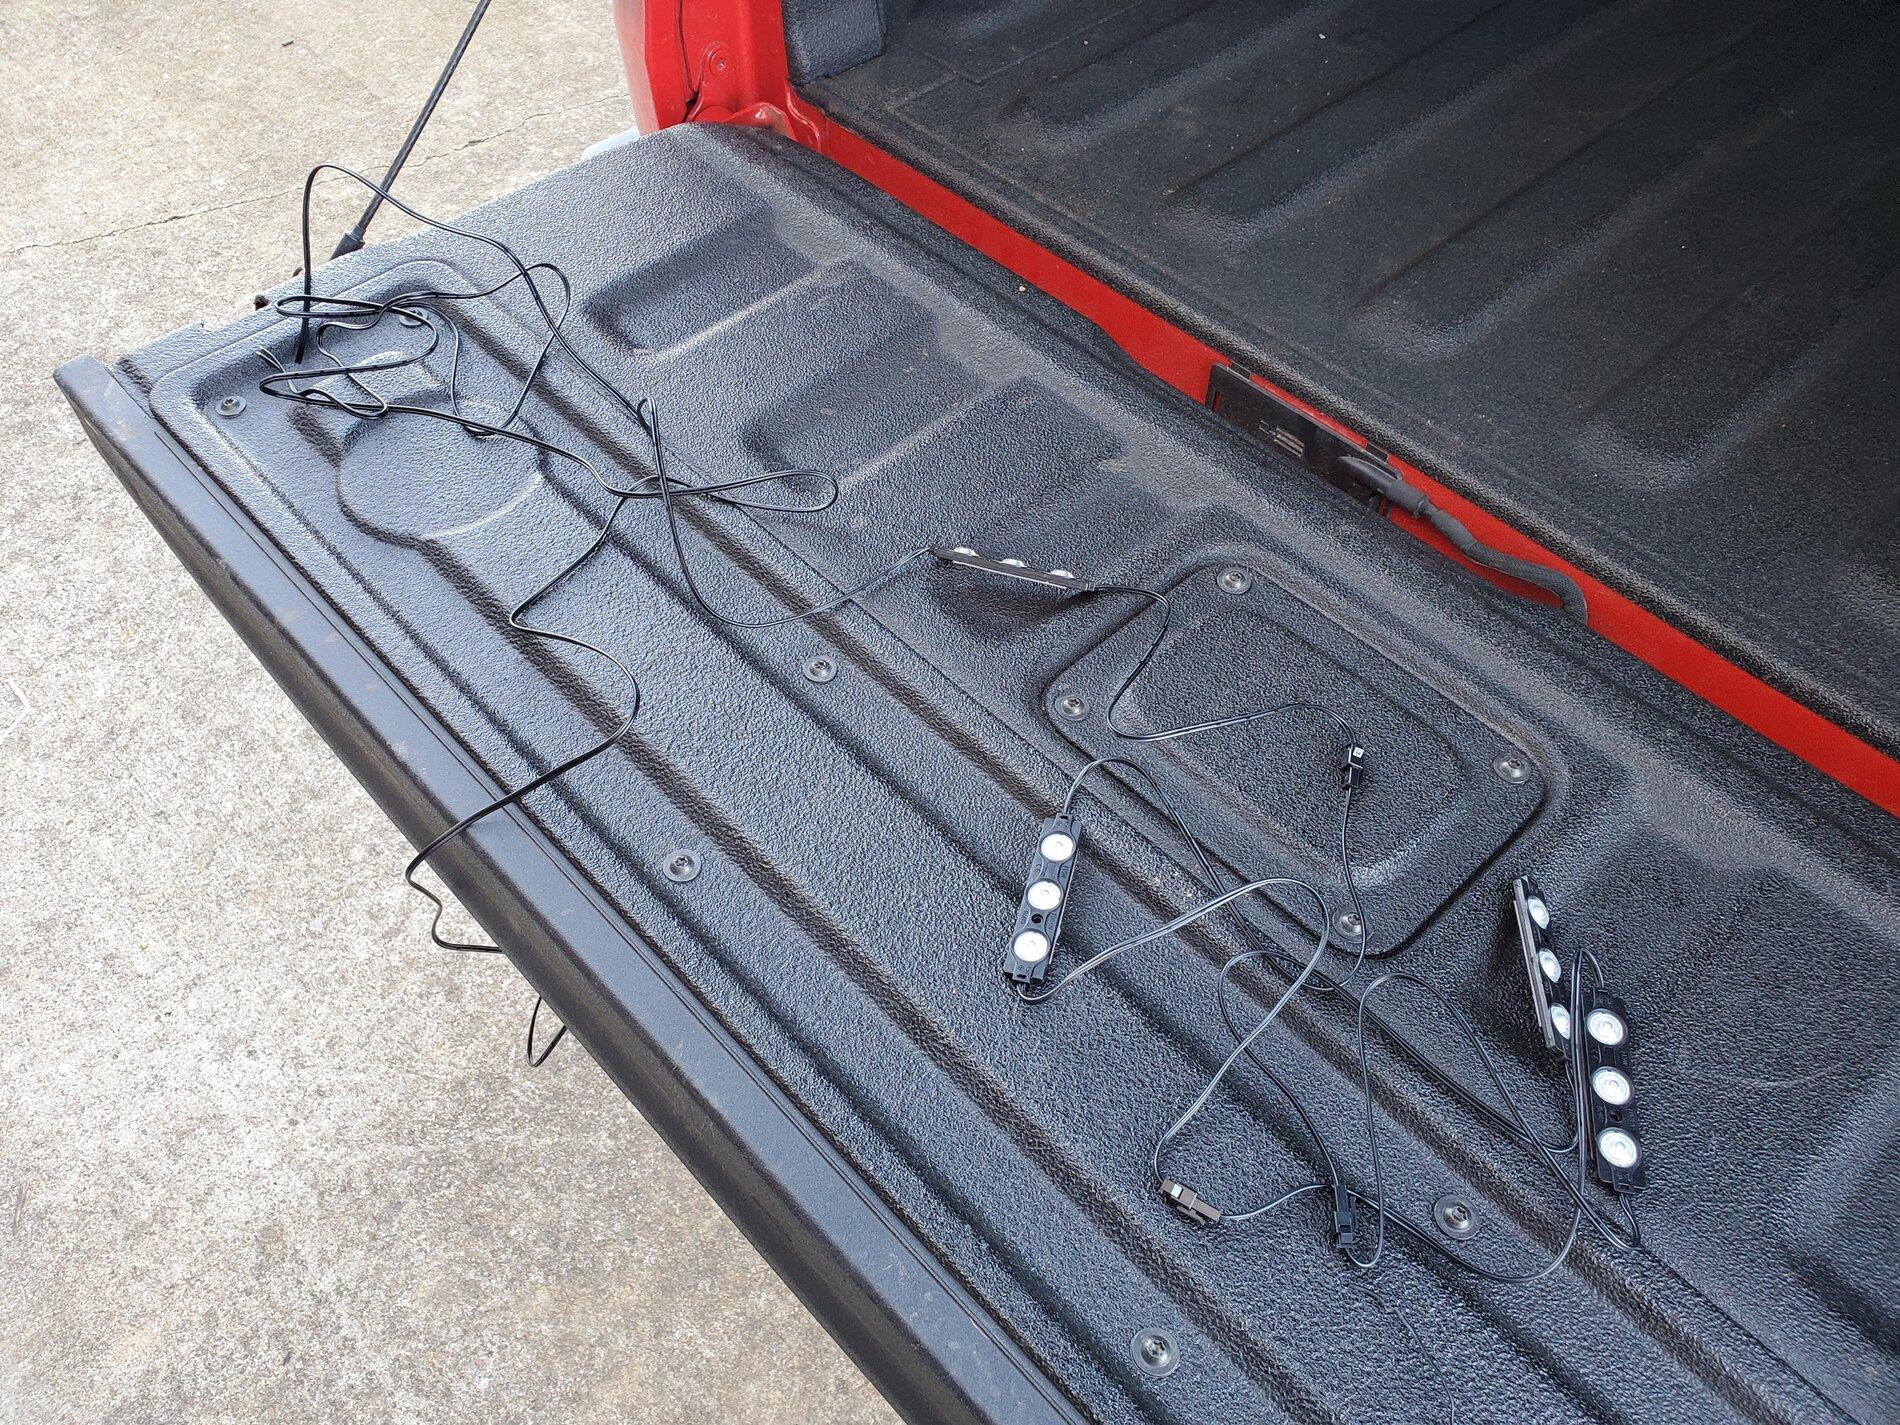
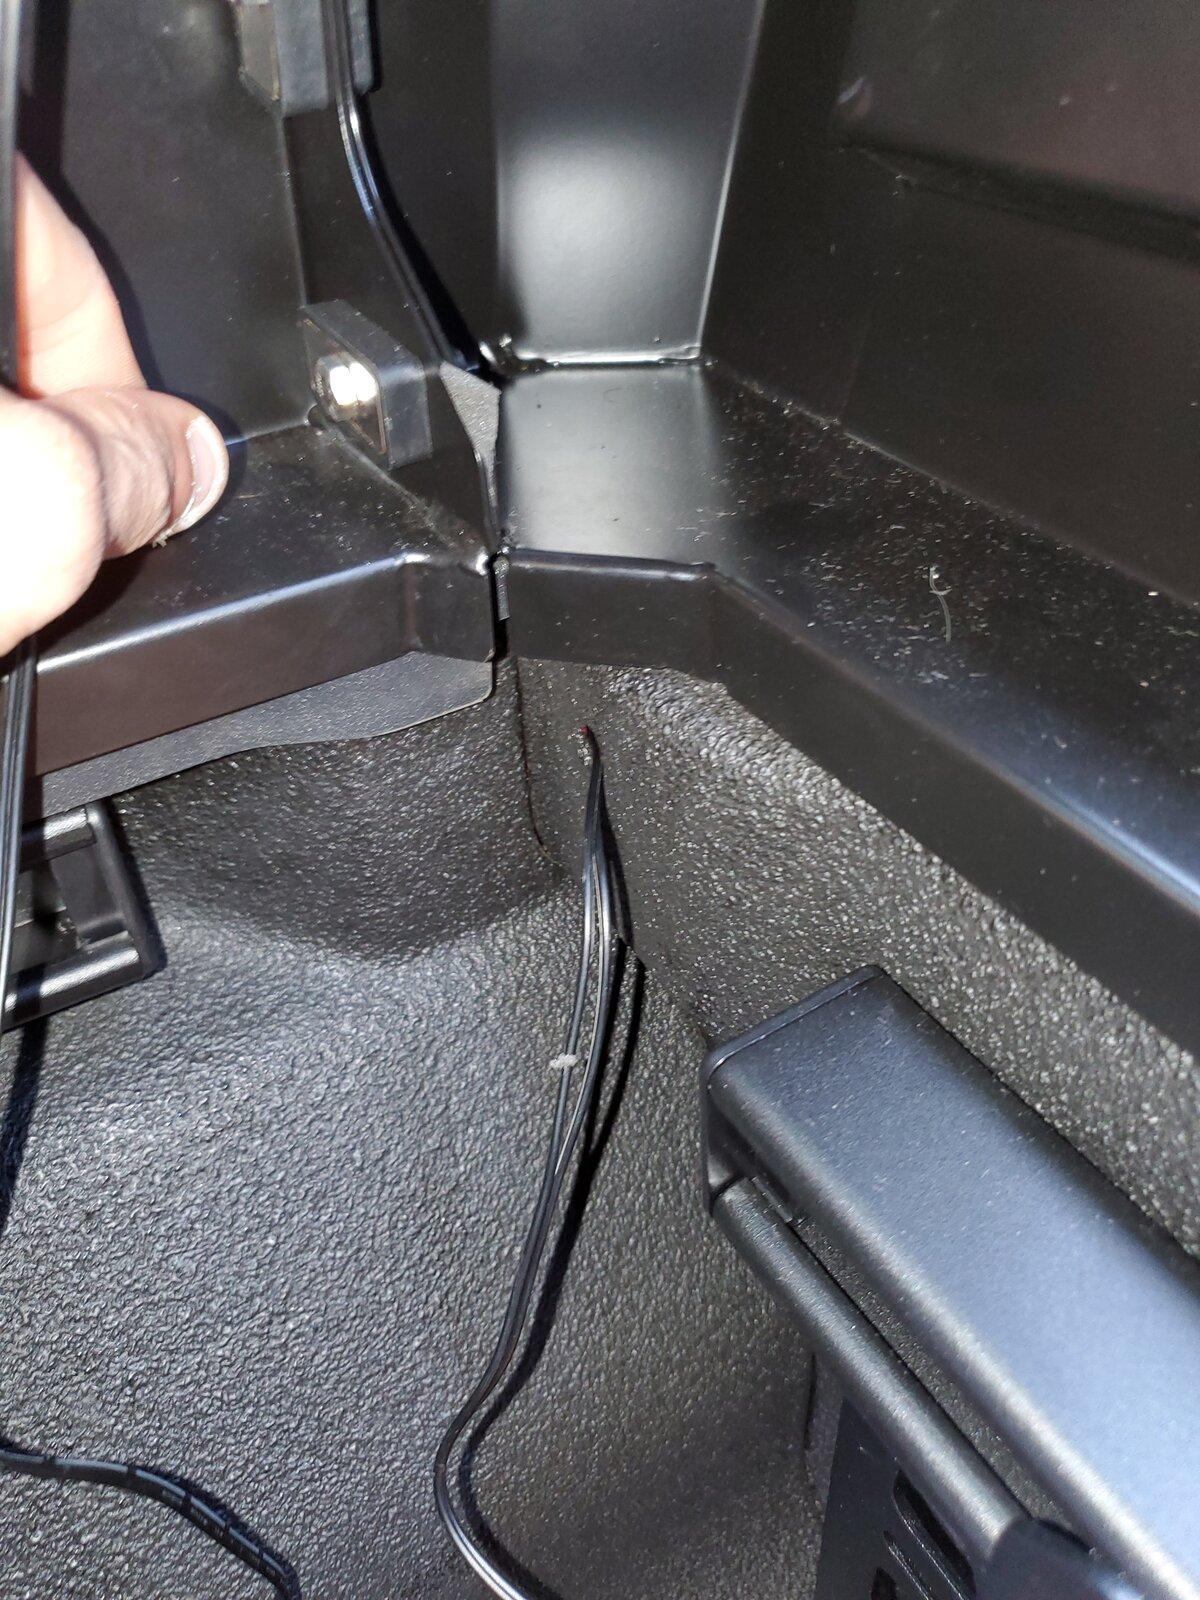
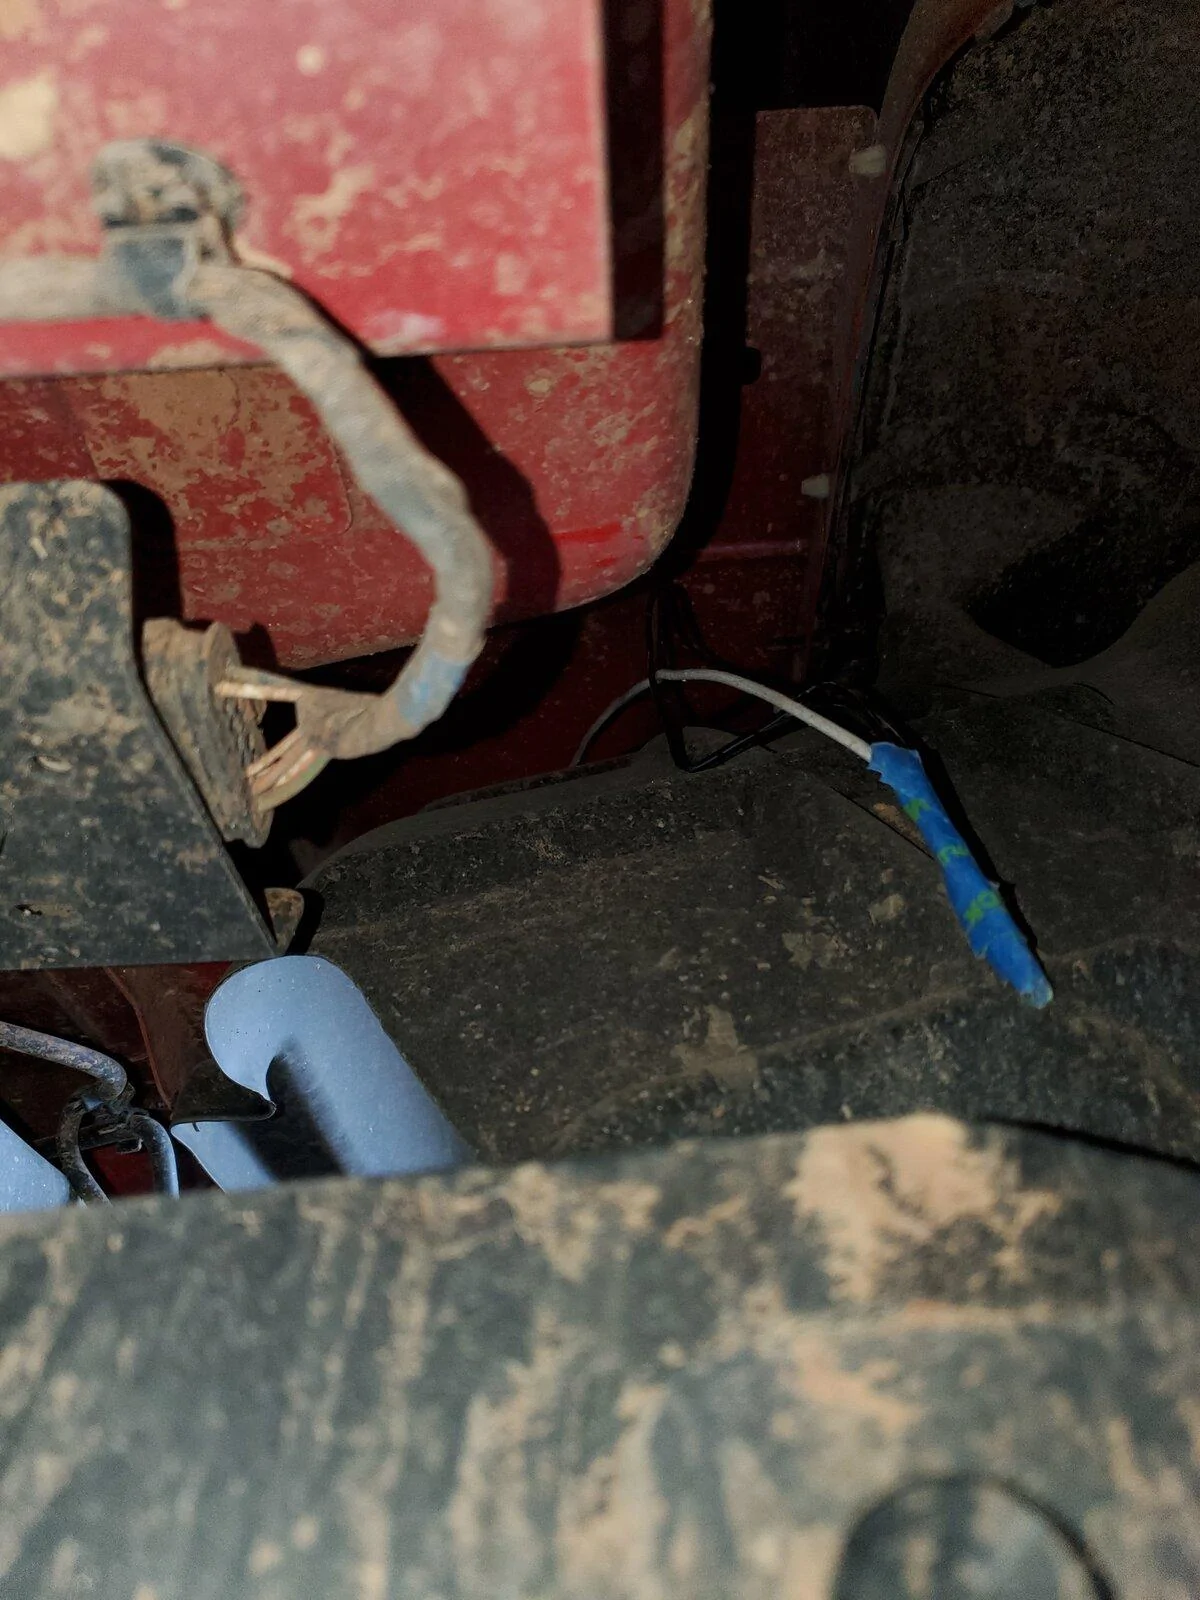
I ran the wiring along the ceiling, and then through an existing hole in my RSI Smart Cap. I punched a hole through the gasket, and dropped the wires down to hide behind the front flange of the shell, before routing the wires out of another existing hole in the bed.
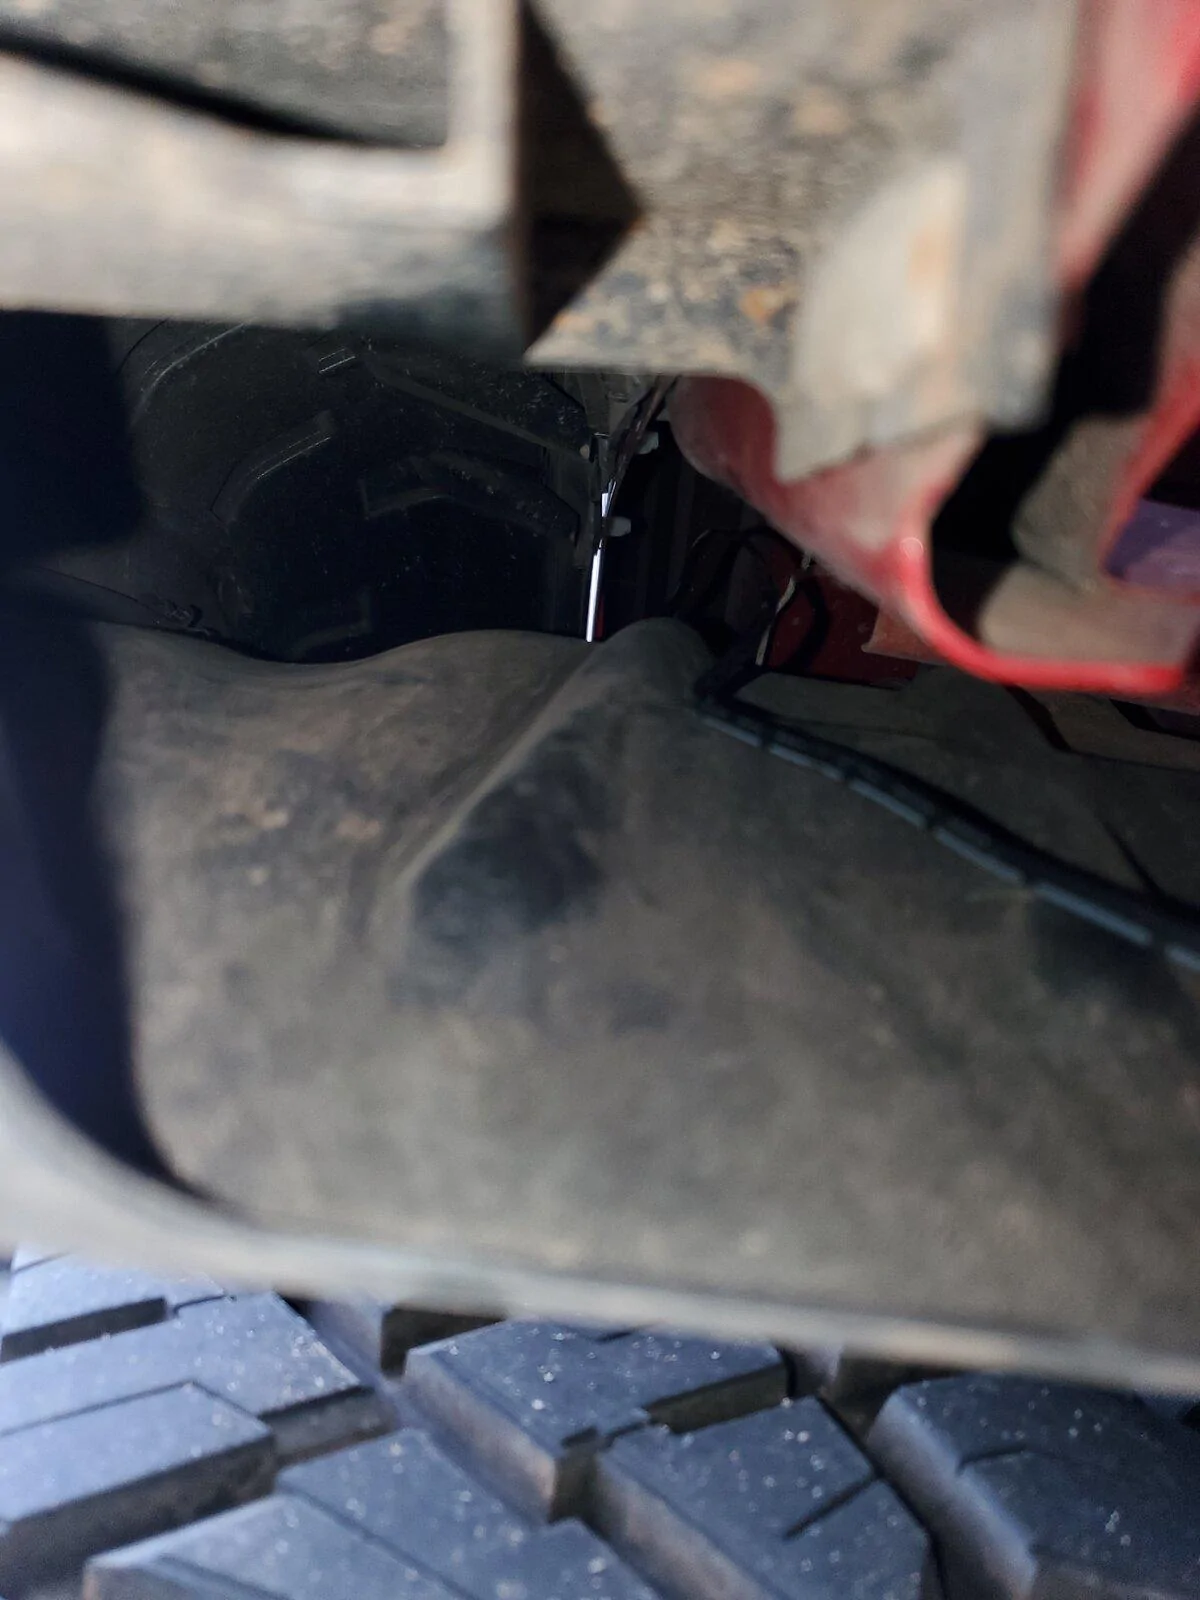
From there, the wires dropped between the bed and the cab. I fished them out and down to the ground with a hook on the end of a wire hanger, and decided how to route. Riding across the inside of the plastic fender liner seemed to be the best way, as it would keep the wires hidden and protect the wiring from debris. With my trusty wire hanger in hand, I taped the leads, made a slight bend, and fished up through the fender well.
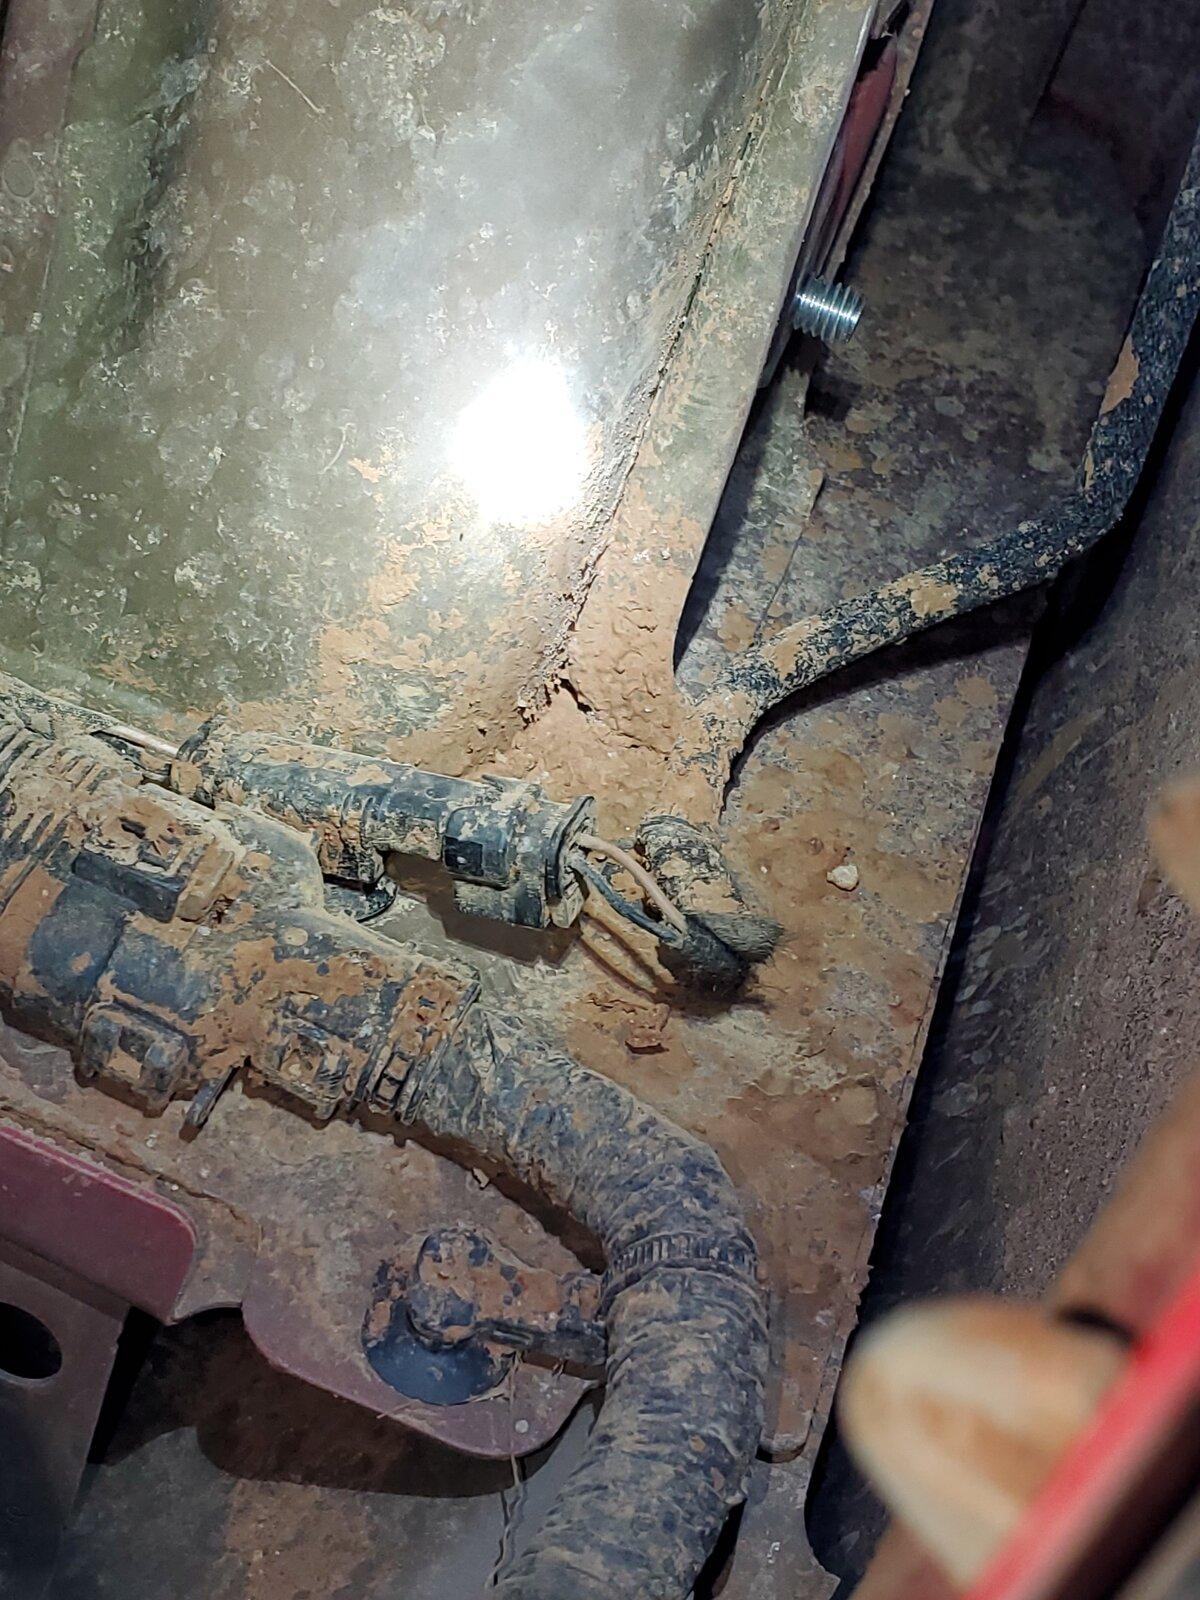
Once the leads were on the rear side of the fender well, I identified the bed light/cargo light harness. It's very easy to find--just follow from where the light is. It is the only harness leading to that location, and there are only two wires associated with it. On the driver side, your positive is brown-ish/yellow-ish (I had a hard time telling through the mud), and ground is black. On your passenger side, the positive is red, and the ground is black.
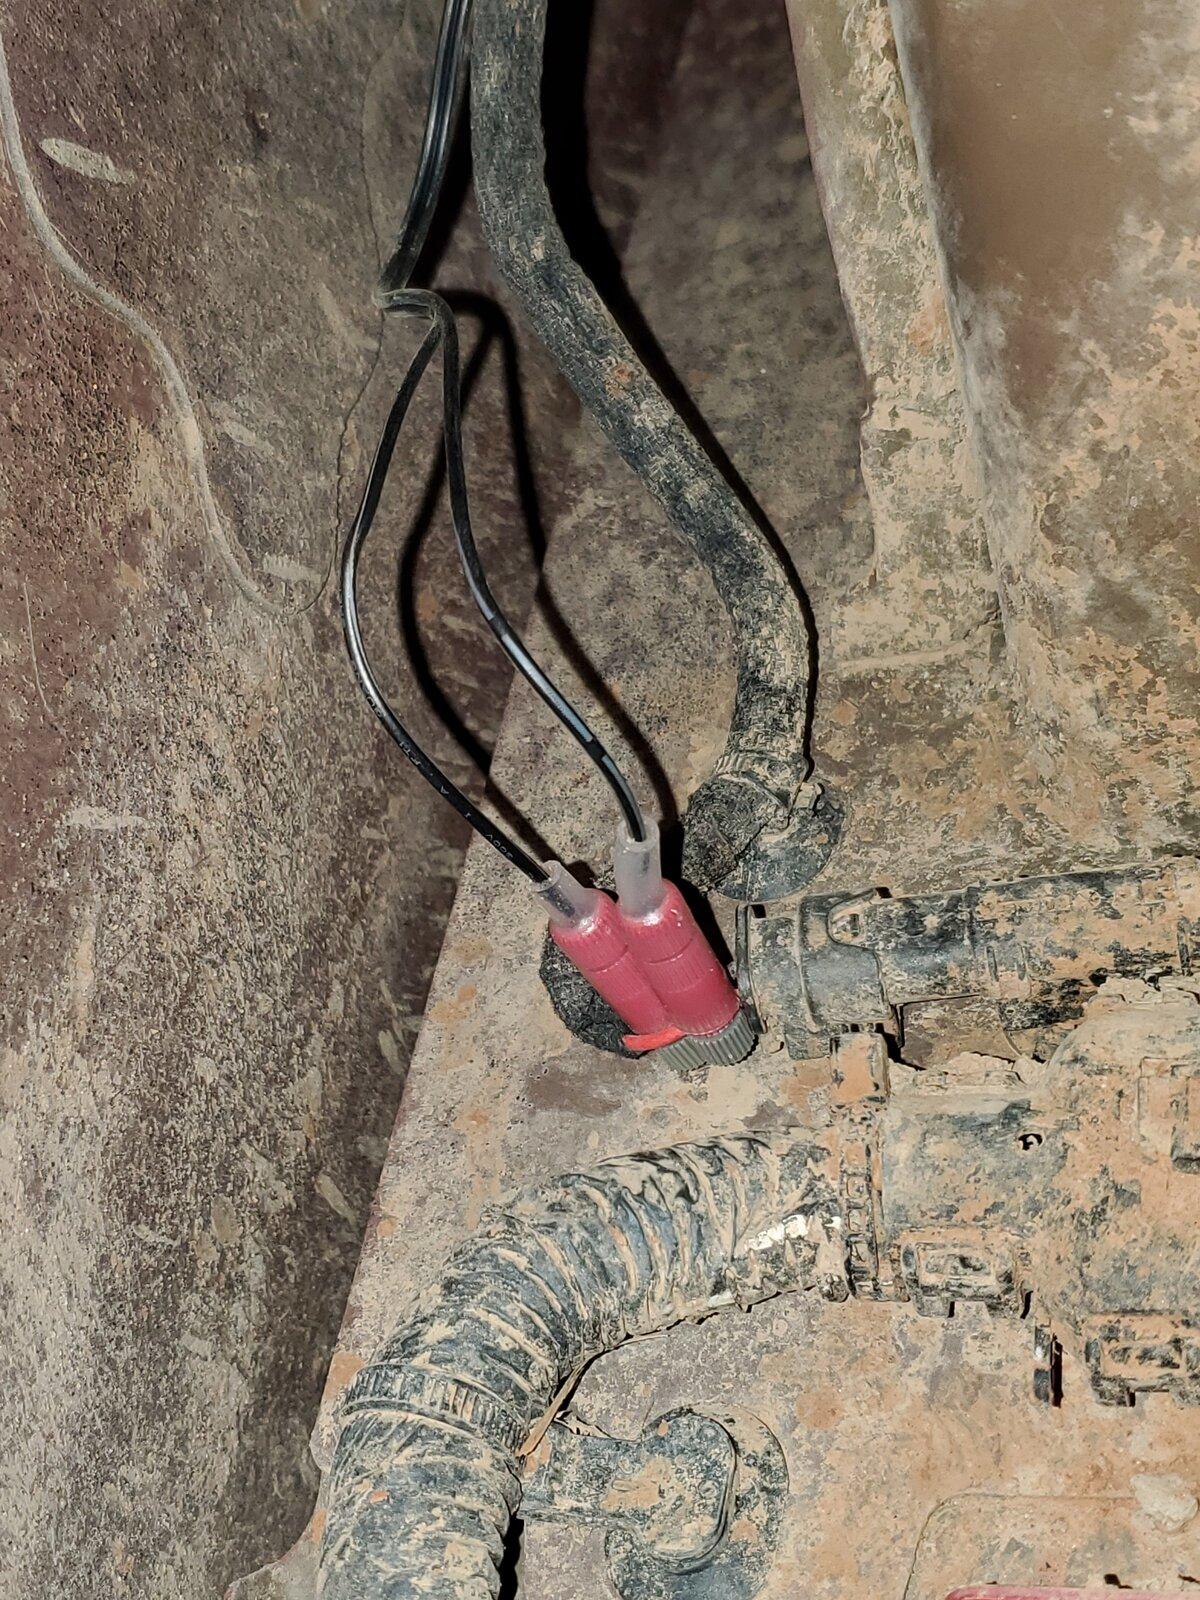
Once identifying the correct harness, I got the Posi-Taps ready. I set up one on each wire to ensure I had the correct positive and negative wires. I verified with my my multimeter by hitting the unlock button on the key fob to activate the cargo lights.
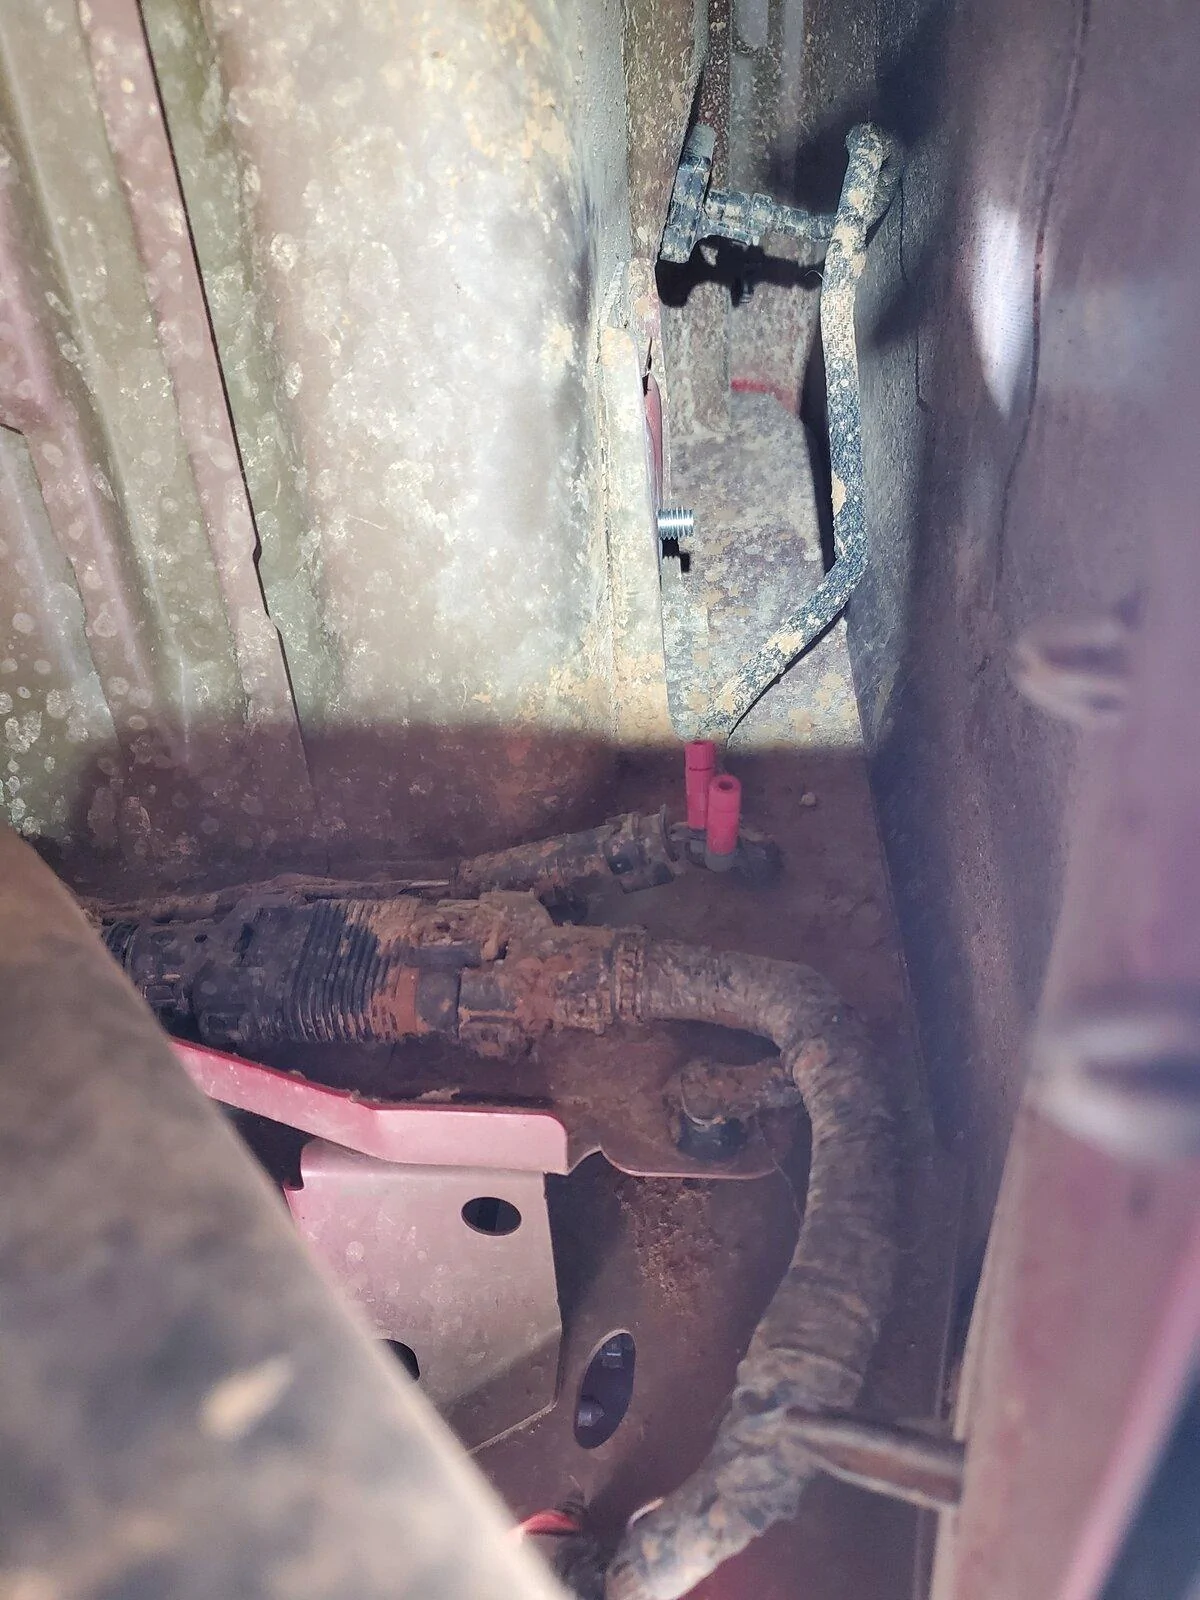
Once I was sure that I had good connections, I cut the new light wires to length, being sure to leave about a half a foot of slack, then zip tied them to the stock harness to keep them out of the way and make them easier to identify in the future. I connected them to the Posi-Taps and tested the new lights by hitting the key fob again, and once I ensured everything was good, I hit them with heat shrink. Though it's not a 100% waterproof connection, it's pretty damn close, and I don't anticipate any issues, even though I seem to get a fair bit of mud and grit in this location. The good thing about Posi-Taps is that they're easy to remove, so if I have any issues I can rehab the connection and reuse the same connector.
After repeating the process on both sides, I made sure I trimmed my two zip ties, checked all wiring for tolerance and tucked everything away. The end result is a completely hidden install off of the stock function that provides plenty of light output, even during the day.
What I used:
-Set of lights (with approximately 20ft of wiring)
-Fasteners for the lights (either double sided tape, or screws)
-Four red Posi-Taps
-Heat shrink
-Heat gun
-Wiring pliers
-Zip ties
-Wire hanger
-Tape
I found this set of lights on amazon:
https://www.amazon.com/gp/product/B07YZFN925/ref=ppx_yo_dt_b_asin_title_o06_s00?ie=UTF8&psc=1

The package came with 8 total lights, two sets of 4 lights that are wired together. They are backed with double sided adhesive tape. The lights are very light, and the tape holds solid. They also come with a 2 year warranty. I was pleasantly surprised by the overall quality. This is the first set of lights that I ordered to try for my application, and they ended up fitting perfectly. This whole project cost me less than $20.
I started off by choosing a location. I knew I wanted the lights up high for an evenly distributed, diffused pattern over the cargo area, so I went straight to the ceiling of my SmartCap. There is a lip that runs the length of the roof, which also happens to have pass-throughs between hollow crossmembers. This ended up working perfectly, because I could route the wiring in between these pass-throughs, and tuck all excess cordage inside of the hollow crossmembers.
Before sticking down the lights, I tapped the leads on to a spare battery to ensure that output and spread was sufficient in this location. I tested during daylight, and after sunset. These lights pump out a surprising amount of light, as the entire bed was illuminated. Having checked that, I began sticking down the lights and routing the wiring.
I ran the wiring along the ceiling, and then through an existing hole in my RSI Smart Cap. I punched a hole through the gasket, and dropped the wires down to hide behind the front flange of the shell, before routing the wires out of another existing hole in the bed.
From there, the wires dropped between the bed and the cab. I fished them out and down to the ground with a hook on the end of a wire hanger, and decided how to route. Riding across the inside of the plastic fender liner seemed to be the best way, as it would keep the wires hidden and protect the wiring from debris. With my trusty wire hanger in hand, I taped the leads, made a slight bend, and fished up through the fender well.
Once the leads were on the rear side of the fender well, I identified the bed light/cargo light harness. It's very easy to find--just follow from where the light is. It is the only harness leading to that location, and there are only two wires associated with it. On the driver side, your positive is brown-ish/yellow-ish (I had a hard time telling through the mud), and ground is black. On your passenger side, the positive is red, and the ground is black.
Once identifying the correct harness, I got the Posi-Taps ready. I set up one on each wire to ensure I had the correct positive and negative wires. I verified with my my multimeter by hitting the unlock button on the key fob to activate the cargo lights.
Once I was sure that I had good connections, I cut the new light wires to length, being sure to leave about a half a foot of slack, then zip tied them to the stock harness to keep them out of the way and make them easier to identify in the future. I connected them to the Posi-Taps and tested the new lights by hitting the key fob again, and once I ensured everything was good, I hit them with heat shrink. Though it's not a 100% waterproof connection, it's pretty damn close, and I don't anticipate any issues, even though I seem to get a fair bit of mud and grit in this location. The good thing about Posi-Taps is that they're easy to remove, so if I have any issues I can rehab the connection and reuse the same connector.
After repeating the process on both sides, I made sure I trimmed my two zip ties, checked all wiring for tolerance and tucked everything away. The end result is a completely hidden install off of the stock function that provides plenty of light output, even during the day.

HeyYoSchmitty
Well-Known Member
- First Name
- Mike
- Joined
- Nov 24, 2019
- Threads
- 3
- Messages
- 124
- Reaction score
- 120
- Location
- Oklahoma City
- Vehicle(s)
- 2020 Gator Green Jeep Gladiator
I should have chosen Front Runner for my rack. I went with the RSI rack and I was told that my cap shows this week but the bin and roof rack won't show until the end of January. [sigh]
OP
OP
TheHops
Well-Known Member
- Thread starter
- #44
Ouch...that's lame. I have no doubt the RSI rack will be great, but still.I should have chosen Front Runner for my rack. I went with the RSI rack and I was told that my cap shows this week but the bin and roof rack won't show until the end of January. [sigh]
I'm familiar with frontrunner products, having run a couple of their racks on a previous build, so I knew they'd fit the bill this time around. No regrets so far. They make stellar products.
HeyYoSchmitty
Well-Known Member
- First Name
- Mike
- Joined
- Nov 24, 2019
- Threads
- 3
- Messages
- 124
- Reaction score
- 120
- Location
- Oklahoma City
- Vehicle(s)
- 2020 Gator Green Jeep Gladiator
Yeah, a buddy of mine runs one on his wrangler with the backbone system. The thing is super sturdy. The biggest win is that FR is all about options for their racks. Axes to awnings, you know that whatever you need has a bracket or a fixture to support it.Ouch...that's lame. I have no doubt the RSI rack will be great, but still.
I'm familiar with frontrunner products, having run a couple of their racks on a previous build, so I knew they'd fit the bill this time around. No regrets so far. They make stellar products.
You are probably right on the RSI rack, I really just wanted that "it was made for it" fitment and was leery of trying something untested. I like being cutting edge, not bleeding edge. But, now that I see how easy it was to make it work, I still have a little remorse. Oh well, February camping is just as good as December camping as long as you have the camping trinity, "Friends, Food, and Fire"
Sponsored
Similar threads
- Replies
- 5
- Views
- 2,043