Sponsored

Factory Aux Switches: What do you have yours connected to?

OP
OP
KidBobot

KidBobot

Well-Known Member
First Name
Joe
Joined
Jan 17, 2022
Threads
26
Messages
344
Reaction score
484
Location
Woodside, NY
Vehicle(s)
22 Gladiator Mojave, 17 Sienna, 92 VW Cabriolet
I like the idea of being able to turn on my Oracle reverse lights with an aux switch. I thought about tapping into the 12V feed to the lights at the back bumper but I was worried about back feeding the whole reverse light system. @ShadowsPapa, I see you used a diode in your setup. Could you explain the setup better for me as I am a bit challenged when it comes to wiring?
Thanks in advance.
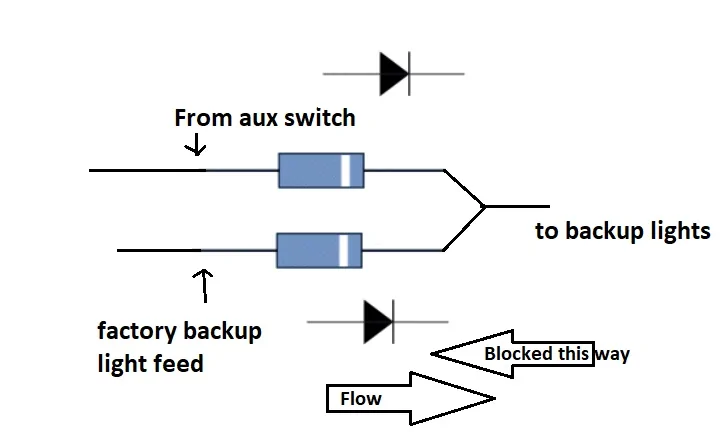
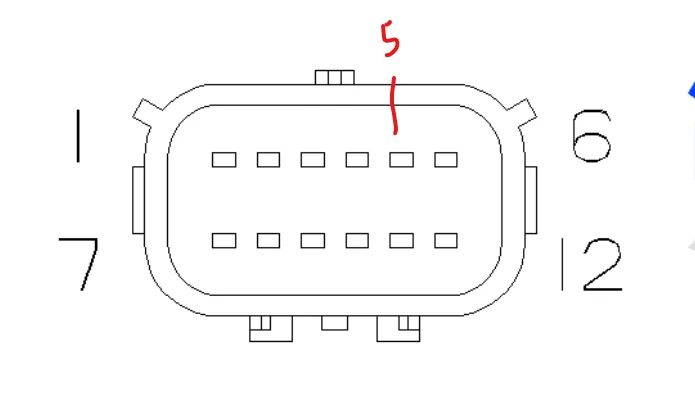
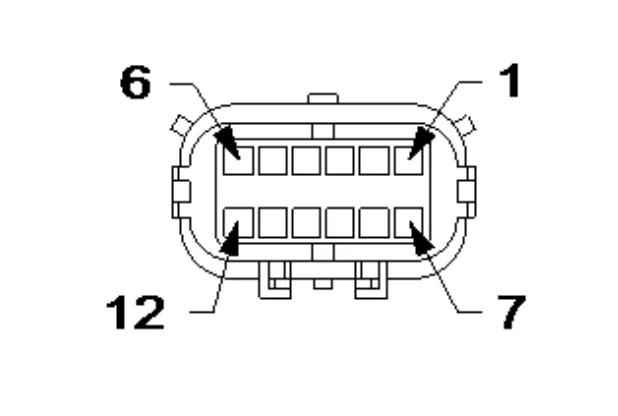
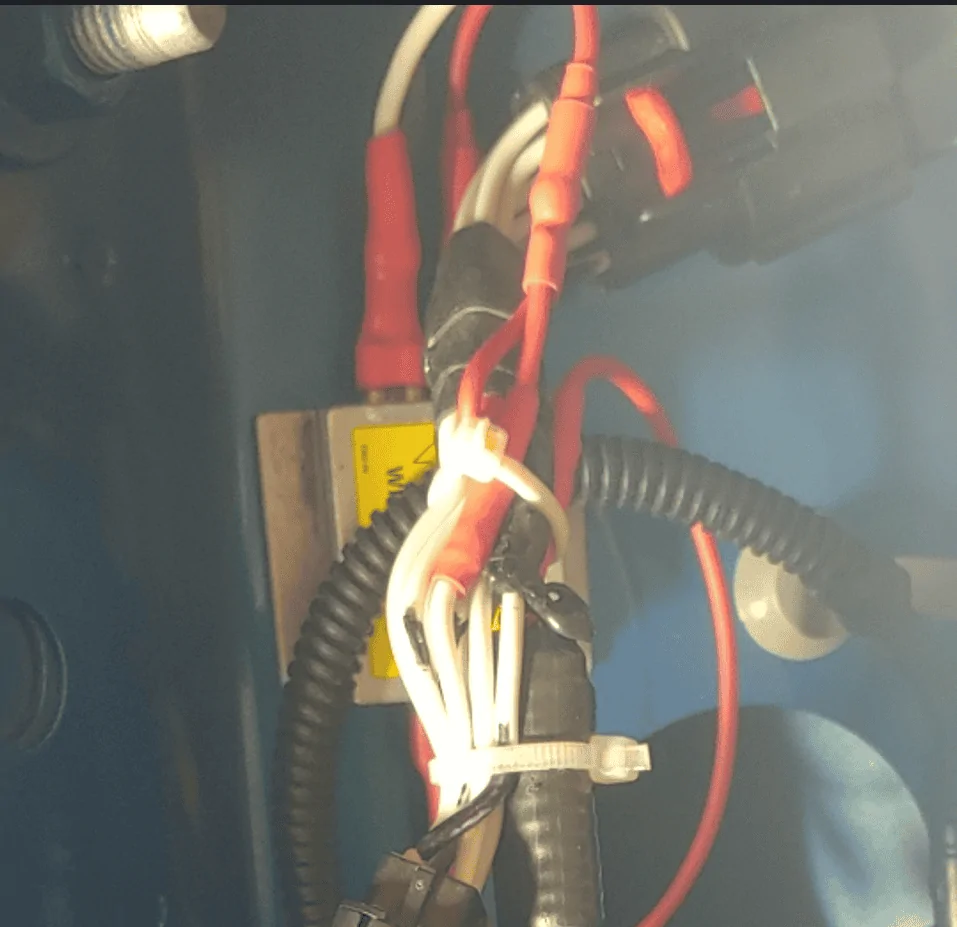
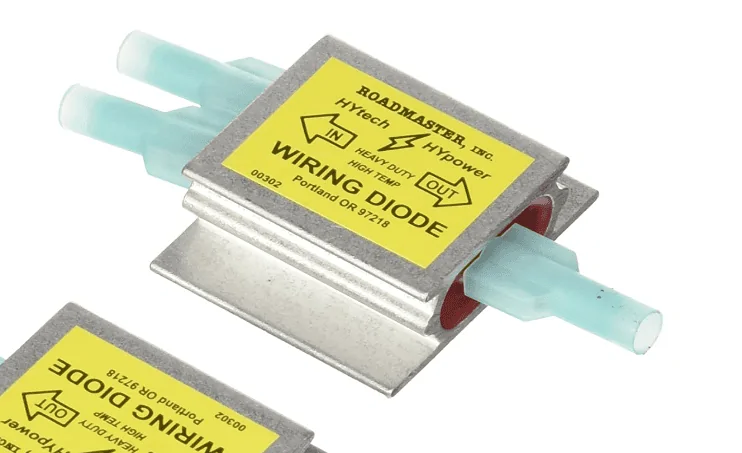
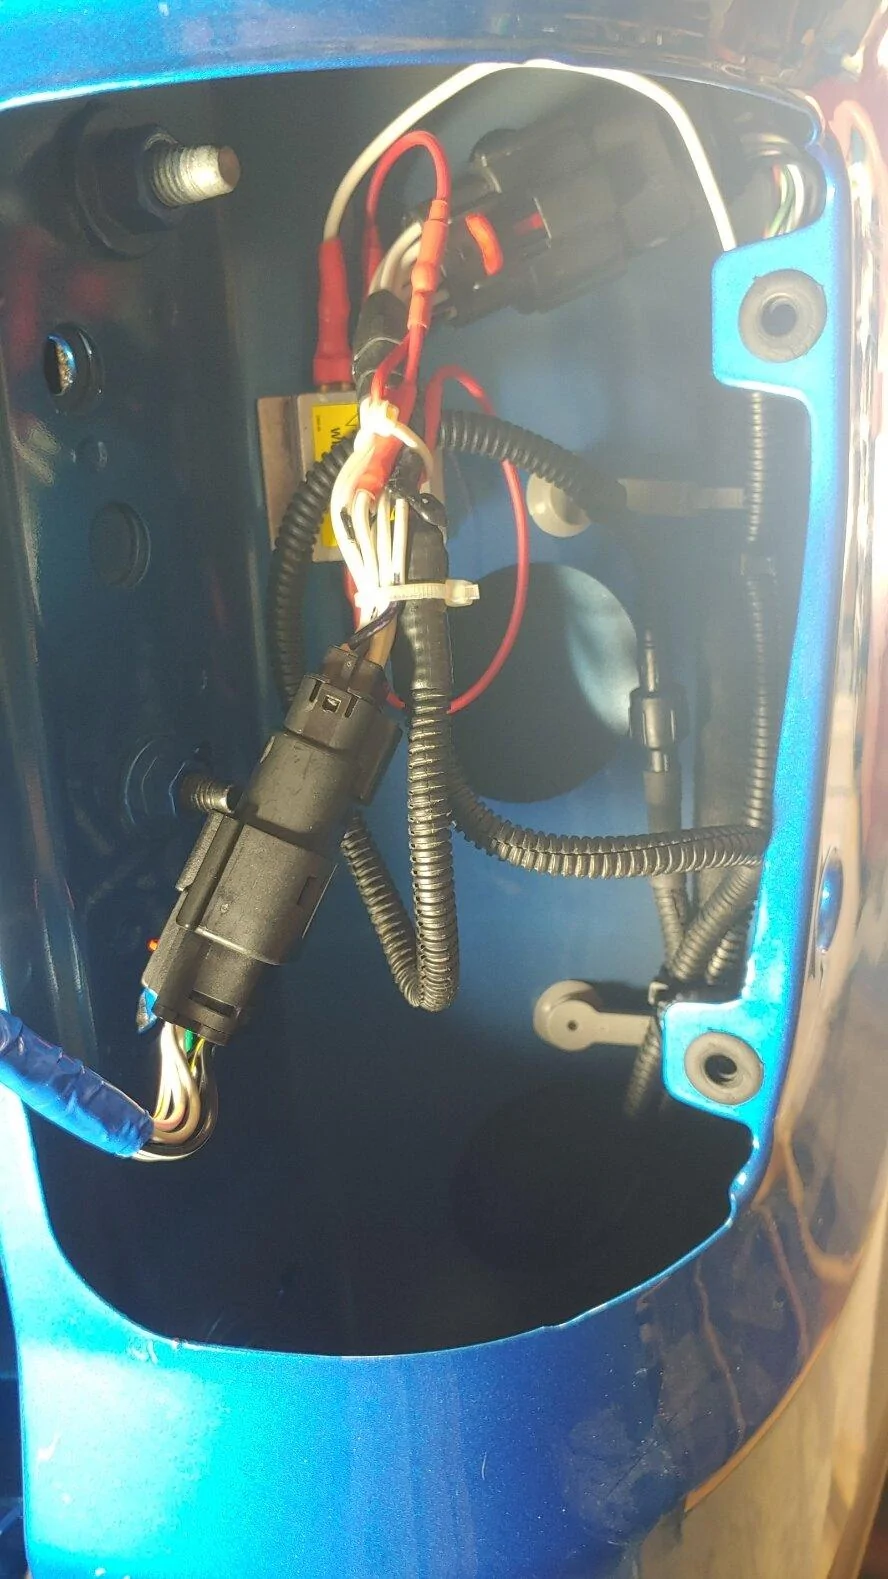
A more detailed explanation would be great. Admittedly, I was just gonna roll the dice and copy picture above. LOL
Sponsored


ShadowsPapa

Well-Known Member
First Name
Bill
Joined
Oct 12, 2019
Threads
247
Messages
40,453
Reaction score
53,888
Location
Runnells, Iowa
Vehicle(s)
'25 JTMX, '23 JLU 4xe, '82 SX4, '73 Javelin
Occupation
Retired auto mechanic, frmr gov't ntwrk security admin
Vehicle Showcase
3
My solution - it can be done in different ways, but this was how I did it on this particular day (I find myself doing things differently every time I attack something)

Some basics - diodes are "check valves" - allowing flow one direction, blocking it the other direction (*I won't get into other types like zener diodes and so on) Basically, for our purposes, they are a one-way valve.

Jeep Gladiator Factory Aux Switches: What do you have yours connected to? diode_01


The diode I used has three terminals, 2 input and one output. That allows 2 sources for one device - and neither source can feed back into the other, only to the device being controlled, like a light.
Note that if power from your aux switch tries to follow the path back out to the factory backup light feed, it's blocked, and the power from the factory feed when in reverse, can't get back to the aux switch, either. Either can only go to the bumper mounted backup lights.

Jeep Gladiator Factory Aux Switches: What do you have yours connected to? diodes


This is the Oracle plug and play harness. Mine looks different because I ran the pigtails or wires from the harness to the lights through plastic loom to protect the wires from hanging ice and snow in the winter. This pic, having this in mind is important as this is what you cut and modify, leaving the factory wires intact, untouched!

Jeep Gladiator Factory Aux Switches: What do you have yours connected to? 20210702_115845_HDR


The harness above has 2 wires to each light - the ground, of course, which "taps into" the factory backup light ground circuit,. and then the power/feed/hot wire going to the Oracle backup lights.
The leads to each light tie into the same places in their plug and play harness, keeping it pretty simple.

I wish I had taken other/better pics but maybe this will help.
You leave the Oracle harness alone where the GROUND wires go to the bumper lights. Don't mess with or cut the black wires that go to the ground in this harness. I used a marker and colored the ground wire in the harness black to keep straight which was which as I worked. It isn't necessary, it was a visual crutch for me. Anyway, leave black wires that connect to the white wire alone.

DO cut the two red wires coming from the lights off the white wire.
In the lower part of the picture below, you might see where I stripped those two red wires (or were they white in the harness? Gee, now I can't recall LOL.
Anyway, they are the wires that aren't block HA.
So again, leave the black wires that go out to the lights alone, cut the other wires off the white wire in the plug and play harness.
Strip those two back a bit and connect BOTH of those to another wire to extend them out, but make them into one wire. That's what goes to the upper right part of the pic below.
I crimped on a female connector that will go to the OUTPUT terminal on the diodes. (2nd pic down)
Now the white wire you snipped the power wires that go to the lights off of, I cut that where the other wires were connected.
I connected red wires to the ends of the now snipped white wire in the harness. That gave me some room to work. I then took those two red wires and combined them into one wire as seen in the pic, and again, another female connector that will go to the other diode input.

Jeep Gladiator Factory Aux Switches: What do you have yours connected to? IMG_20220724_115758


I crimped on female connectors (below) and used sealing heat shrink.

Jeep Gladiator Factory Aux Switches: What do you have yours connected to? IMG_20220724_115748


You will be dealing with ONLY TWO (2) of the wires in the Oracle harness - #5 and #6
In this pic, 5 is just to the right of 6 which is in the corner. Remember, #6, which is the in the corner, is ground. The ground wire is in the corner, don't need to deal with it or cut it or anything.
5, the feed to the backup lights is right next to it. That is the one you will mess with.

Jeep Gladiator Factory Aux Switches: What do you have yours connected to? 1661436268516


Jeep Gladiator Factory Aux Switches: What do you have yours connected to? 1661436213327


Jeep Gladiator Factory Aux Switches: What do you have yours connected to? 1661436391511


You can buy these on Amazon. The two marked IN - the aux switch goes to one of those, the wire from the plug and play harness (#5) goes to the other.
The out goes to the wire feeding power to the bumper mount LED backup lights.

Jeep Gladiator Factory Aux Switches: What do you have yours connected to? 1661436640687
 

Cruizer8

Well-Known Member
First Name
Ian
Joined
May 7, 2019
Threads
7
Messages
133
Reaction score
153
Location
Northeast Nebraska
Vehicle(s)
'21 Gladiator Freedom Edition, 1983 Postal Jeep
My solution - it can be done in different ways, but this was how I did it on this particular day (I find myself doing things differently every time I attack something)

Some basics - diodes are "check valves" - allowing flow one direction, blocking it the other direction (*I won't get into other types like zener diodes and so on) Basically, for our purposes, they are a one-way valve.

diode_01.gif


The diode I used has three terminals, 2 input and one output. That allows 2 sources for one device - and neither source can feed back into the other, only to the device being controlled, like a light.
Note that if power from your aux switch tries to follow the path back out to the factory backup light feed, it's blocked, and the power from the factory feed when in reverse, can't get back to the aux switch, either. Either can only go to the bumper mounted backup lights.

diodes.jpg


This is the Oracle plug and play harness. Mine looks different because I ran the pigtails or wires from the harness to the lights through plastic loom to protect the wires from hanging ice and snow in the winter. This pic, having this in mind is important as this is what you cut and modify, leaving the factory wires intact, untouched!

20210702_115845_HDR.jpg


The harness above has 2 wires to each light - the ground, of course, which "taps into" the factory backup light ground circuit,. and then the power/feed/hot wire going to the Oracle backup lights.
The leads to each light tie into the same places in their plug and play harness, keeping it pretty simple.

I wish I had taken other/better pics but maybe this will help.
You leave the Oracle harness alone where the GROUND wires go to the bumper lights. Don't mess with or cut the black wires that go to the ground in this harness. I used a marker and colored the ground wire in the harness black to keep straight which was which as I worked. It isn't necessary, it was a visual crutch for me. Anyway, leave black wires that connect to the white wire alone.

DO cut the two red wires coming from the lights off the white wire.
In the lower part of the picture below, you might see where I stripped those two red wires (or were they white in the harness? Gee, now I can't recall LOL.
Anyway, they are the wires that aren't block HA.
So again, leave the black wires that go out to the lights alone, cut the other wires off the white wire in the plug and play harness.
Strip those two back a bit and connect BOTH of those to another wire to extend them out, but make them into one wire. That's what goes to the upper right part of the pic below.
I crimped on a female connector that will go to the OUTPUT terminal on the diodes. (2nd pic down)
Now the white wire you snipped the power wires that go to the lights off of, I cut that where the other wires were connected.
I connected red wires to the ends of the now snipped white wire in the harness. That gave me some room to work. I then took those two red wires and combined them into one wire as seen in the pic, and again, another female connector that will go to the other diode input.

IMG_20220724_115758.jpg


I crimped on female connectors (below) and used sealing heat shrink.

IMG_20220724_115748.jpg


You will be dealing with ONLY TWO (2) of the wires in the Oracle harness - #5 and #6
In this pic, 5 is just to the right of 6 which is in the corner. Remember, #6, which is the in the corner, is ground. The ground wire is in the corner, don't need to deal with it or cut it or anything.
5, the feed to the backup lights is right next to it. That is the one you will mess with.

1661436268516.png


1661436213327.png


1661436391511.png


You can buy these on Amazon. The two marked IN - the aux switch goes to one of those, the wire from the plug and play harness (#5) goes to the other.
The out goes to the wire feeding power to the bumper mount LED backup lights.

1661436640687.png
I have been meaning to do exactly this for a couple months. Its reassuring to see someone else do it so I am not as worried about messing something up.
 

jeepers29

Well-Known Member
First Name
Joel
Joined
Aug 24, 2021
Threads
10
Messages
1,565
Reaction score
2,557
Location
Georgetown Tx
Vehicle(s)
JKUR, GC
Occupation
Domestic engineer
I used the Oracle plug and play harness and a diode from Amazon. I was going to use my own military surplus diodes from the 60s, but decided the commercial setup would be neater for wiring.
It all sits behind the right tail light. You can see the diode - two inputs, one output.
One input is the white wire from my aux switch, the other is the red wire I have coming from the Oracle harness.
Output goes to the red wires in the pigtails from the bumper mounted backup lights.

20220728_152905.webp
i WISH i UNDERSTOOD THIS FORIENG LANGIAGE YOU ARE SPEAKI
I like the idea of being able to turn on my Oracle reverse lights with an aux switch. I thought about tapping into the 12V feed to the lights at the back bumper but I was worried about back feeding the whole reverse light system. @ShadowsPapa, I see you used a diode in your setup. Could you explain the setup better for me as I am a bit challenged when it comes to wiring?
Thanks in advance.
X2 Please and thank you
 

Coldtoes

Well-Known Member
First Name
Kris
Joined
Apr 1, 2022
Threads
13
Messages
252
Reaction score
234
Location
Ventura, CA
Vehicle(s)
Previously 2022 JT Rubicon, now '24 F-350 Tremor
My solution - it can be done in different ways, but this was how I did it on this particular day (I find myself doing things differently every time I attack something)

Some basics - diodes are "check valves" - allowing flow one direction, blocking it the other direction (*I won't get into other types like zener diodes and so on) Basically, for our purposes, they are a one-way valve.

diode_01.gif


The diode I used has three terminals, 2 input and one output. That allows 2 sources for one device - and neither source can feed back into the other, only to the device being controlled, like a light.
Note that if power from your aux switch tries to follow the path back out to the factory backup light feed, it's blocked, and the power from the factory feed when in reverse, can't get back to the aux switch, either. Either can only go to the bumper mounted backup lights.

diodes.jpg


This is the Oracle plug and play harness. Mine looks different because I ran the pigtails or wires from the harness to the lights through plastic loom to protect the wires from hanging ice and snow in the winter. This pic, having this in mind is important as this is what you cut and modify, leaving the factory wires intact, untouched!

20210702_115845_HDR.jpg


The harness above has 2 wires to each light - the ground, of course, which "taps into" the factory backup light ground circuit,. and then the power/feed/hot wire going to the Oracle backup lights.
The leads to each light tie into the same places in their plug and play harness, keeping it pretty simple.

I wish I had taken other/better pics but maybe this will help.
You leave the Oracle harness alone where the GROUND wires go to the bumper lights. Don't mess with or cut the black wires that go to the ground in this harness. I used a marker and colored the ground wire in the harness black to keep straight which was which as I worked. It isn't necessary, it was a visual crutch for me. Anyway, leave black wires that connect to the white wire alone.

DO cut the two red wires coming from the lights off the white wire.
In the lower part of the picture below, you might see where I stripped those two red wires (or were they white in the harness? Gee, now I can't recall LOL.
Anyway, they are the wires that aren't block HA.
So again, leave the black wires that go out to the lights alone, cut the other wires off the white wire in the plug and play harness.
Strip those two back a bit and connect BOTH of those to another wire to extend them out, but make them into one wire. That's what goes to the upper right part of the pic below.
I crimped on a female connector that will go to the OUTPUT terminal on the diodes. (2nd pic down)
Now the white wire you snipped the power wires that go to the lights off of, I cut that where the other wires were connected.
I connected red wires to the ends of the now snipped white wire in the harness. That gave me some room to work. I then took those two red wires and combined them into one wire as seen in the pic, and again, another female connector that will go to the other diode input.

IMG_20220724_115758.jpg


I crimped on female connectors (below) and used sealing heat shrink.

IMG_20220724_115748.jpg


You will be dealing with ONLY TWO (2) of the wires in the Oracle harness - #5 and #6
In this pic, 5 is just to the right of 6 which is in the corner. Remember, #6, which is the in the corner, is ground. The ground wire is in the corner, don't need to deal with it or cut it or anything.
5, the feed to the backup lights is right next to it. That is the one you will mess with.

1661436268516.png


1661436213327.png


1661436391511.png


You can buy these on Amazon. The two marked IN - the aux switch goes to one of those, the wire from the plug and play harness (#5) goes to the other.
The out goes to the wire feeding power to the bumper mount LED backup lights.

1661436640687.png
Thank you for all the detailed descriptions and photos. I'm just (in)competent enough with electrical stuff to get myself into trouble. In this case I wouldn't have known to use the diode. So thanks for saving me those headaches!
I've seen the reviews for the Oracle lights are not all that great. Have you had any concerns with them? (reviews ARE becoming less and less trustworthy...)
 

Sponsored

Ted Striker

Well-Known Member
Joined
May 25, 2019
Threads
30
Messages
597
Reaction score
1,157
Location
Houston, Texas
Vehicle(s)
2021 Gladiator Texas Trail
Build Thread
Link
Vehicle Showcase
2
Aux 3 - KC HiLites LED ProSport 6"

Jeep Gladiator Factory Aux Switches: What do you have yours connected to? I8kBIwih


Aux 4 - KC HiLites LED LZR 4"

Jeep Gladiator Factory Aux Switches: What do you have yours connected to? Jc3qVu8h


Aux 2 - Midland MXT275 GMRS Radio

Jeep Gladiator Factory Aux Switches: What do you have yours connected to? tektGtXh


All of it ran to a JL Badgeglow aux board

Jeep Gladiator Factory Aux Switches: What do you have yours connected to? fTqDhMph
 

ShadowsPapa

Well-Known Member
First Name
Bill
Joined
Oct 12, 2019
Threads
247
Messages
40,453
Reaction score
53,888
Location
Runnells, Iowa
Vehicle(s)
'25 JTMX, '23 JLU 4xe, '82 SX4, '73 Javelin
Occupation
Retired auto mechanic, frmr gov't ntwrk security admin
Vehicle Showcase
3
Thank you for all the detailed descriptions and photos. I'm just (in)competent enough with electrical stuff to get myself into trouble. In this case I wouldn't have known to use the diode. So thanks for saving me those headaches!
I've seen the reviews for the Oracle lights are not all that great. Have you had any concerns with them? (reviews ARE becoming less and less trustworthy...)
No problems. The plug and play harness worked, the lights worked GREAT.
I had the lights in my 2020 and they were fine. The dealer wanted the 2020 stripped back to factory before they took it in trade for my 2022, so these lights are now in my second truck - and still doing just fine.
I can't speak to their other lighting products, but these are fine and crazy bright.
 

Jteakus

Well-Known Member
First Name
Teakus
Joined
Feb 19, 2022
Threads
19
Messages
1,811
Reaction score
3,274
Location
Oil City, LA
Vehicle(s)
2020 JLURD, 2022 JTRD, 2017 JKU, 1998 TJ, 1983 CJ-7
Build Thread
Link
Vehicle Showcase
1
Diodes ordered from Amazon. Pack of 4, $52.34 shipped.
Thanks again sir!
 
OP
OP
KidBobot

KidBobot

Well-Known Member
First Name
Joe
Joined
Jan 17, 2022
Threads
26
Messages
344
Reaction score
484
Location
Woodside, NY
Vehicle(s)
22 Gladiator Mojave, 17 Sienna, 92 VW Cabriolet
My solution - it can be done in different ways, but this was how I did it on this particular day (I find myself doing things differently every time I attack something)

Some basics - diodes are "check valves" - allowing flow one direction, blocking it the other direction (*I won't get into other types like zener diodes and so on) Basically, for our purposes, they are a one-way valve.

diode_01.gif


The diode I used has three terminals, 2 input and one output. That allows 2 sources for one device - and neither source can feed back into the other, only to the device being controlled, like a light.
Note that if power from your aux switch tries to follow the path back out to the factory backup light feed, it's blocked, and the power from the factory feed when in reverse, can't get back to the aux switch, either. Either can only go to the bumper mounted backup lights.

diodes.jpg


This is the Oracle plug and play harness. Mine looks different because I ran the pigtails or wires from the harness to the lights through plastic loom to protect the wires from hanging ice and snow in the winter. This pic, having this in mind is important as this is what you cut and modify, leaving the factory wires intact, untouched!

20210702_115845_HDR.jpg


The harness above has 2 wires to each light - the ground, of course, which "taps into" the factory backup light ground circuit,. and then the power/feed/hot wire going to the Oracle backup lights.
The leads to each light tie into the same places in their plug and play harness, keeping it pretty simple.

I wish I had taken other/better pics but maybe this will help.
You leave the Oracle harness alone where the GROUND wires go to the bumper lights. Don't mess with or cut the black wires that go to the ground in this harness. I used a marker and colored the ground wire in the harness black to keep straight which was which as I worked. It isn't necessary, it was a visual crutch for me. Anyway, leave black wires that connect to the white wire alone.

DO cut the two red wires coming from the lights off the white wire.
In the lower part of the picture below, you might see where I stripped those two red wires (or were they white in the harness? Gee, now I can't recall LOL.
Anyway, they are the wires that aren't block HA.
So again, leave the black wires that go out to the lights alone, cut the other wires off the white wire in the plug and play harness.
Strip those two back a bit and connect BOTH of those to another wire to extend them out, but make them into one wire. That's what goes to the upper right part of the pic below.
I crimped on a female connector that will go to the OUTPUT terminal on the diodes. (2nd pic down)
Now the white wire you snipped the power wires that go to the lights off of, I cut that where the other wires were connected.
I connected red wires to the ends of the now snipped white wire in the harness. That gave me some room to work. I then took those two red wires and combined them into one wire as seen in the pic, and again, another female connector that will go to the other diode input.

IMG_20220724_115758.jpg


I crimped on female connectors (below) and used sealing heat shrink.

IMG_20220724_115748.jpg


You will be dealing with ONLY TWO (2) of the wires in the Oracle harness - #5 and #6
In this pic, 5 is just to the right of 6 which is in the corner. Remember, #6, which is the in the corner, is ground. The ground wire is in the corner, don't need to deal with it or cut it or anything.
5, the feed to the backup lights is right next to it. That is the one you will mess with.

1661436268516.png


1661436213327.png


1661436391511.png


You can buy these on Amazon. The two marked IN - the aux switch goes to one of those, the wire from the plug and play harness (#5) goes to the other.
The out goes to the wire feeding power to the bumper mount LED backup lights.

1661436640687.png
@ShadowsPapa - There's always one or two guys in every auto enthusiast forum I've been on that really goes way above and beyond to help other members, move everyone forward, and share information to all so that "all ships rise"... In the short time I've been part of this community, I get the sense that you're one of those guys.
Thanks much for this!!!
 

#HuckleberryJeep

Well-Known Member
First Name
Ryan
Joined
Nov 26, 2018
Threads
4
Messages
207
Reaction score
278
Location
Edmond, OK
Website
www.flowcode.com
Vehicle(s)
2020 JT 5.7 Hemi, '21 JLUR 392, '84 CJ7, '69 CJ5
Build Thread
Link
Occupation
Realtor
Jist a thought, for you guys adding reverse lights. You can easily wire those directly to your reverse lighting, without having to cut and splice your factory harness:

https://amzn.to/3wEOAYz
 

Sponsored

ShadowsPapa

Well-Known Member
First Name
Bill
Joined
Oct 12, 2019
Threads
247
Messages
40,453
Reaction score
53,888
Location
Runnells, Iowa
Vehicle(s)
'25 JTMX, '23 JLU 4xe, '82 SX4, '73 Javelin
Occupation
Retired auto mechanic, frmr gov't ntwrk security admin
Vehicle Showcase
3
Jist a thought, for you guys adding reverse lights. You can easily wire those directly to your reverse lighting, without having to cut and splice your factory harness:

https://amzn.to/3wEOAYz
I think it was Mr_Bill, maybe others, who have used that.
It gives you access to the trailer plug reverse light circuit at the bumper.

I used the Oracle harness because it sits way up high away from salt, ice and snow tucked up behind the tail lights and kept my wiring really short - and a good place to mount a diode out of the Iowa winter brine.

I'd use one of those methods and not cut into the factory wiring. I've never liked to do that, even in decades past.

Besides, if there's ever an issue with your factory lighting you want a dealer to take care of under warranty, you simply unplug the other harness and it's all back to stock - no cutting or compromising the factory sealed connections.
The curt harness gives you access to the trailer lighting connections - which are fused independent of the truck lighting so that's a consideration.
 

AKDrifter

Well-Known Member
First Name
Judah
Joined
Jun 26, 2019
Threads
1
Messages
369
Reaction score
454
Location
Eagle River, AK
Vehicle(s)
2020 JT Rubicon
AUX 1 Winch interrupter.
AUX 2 Unused
AUX 3 is A pillar lighting
AUX 4 is ARB Compressor
Constant hot that is included with the AUX wiring goes to the GMRS radio.
Sponsored


Top