Sponsored

AirLift rear bag system - info you need to know

Blade1668

Well-Known Member
First Name
Darrell
Joined
Jan 7, 2020
Threads
12
Messages
3,277
Reaction score
3,162
Location
N. AL.
Vehicle(s)
90XJ, 91XJ, 91MJ, 05 LJ, 20 JT
Build Thread
Link
Vehicle Showcase
1
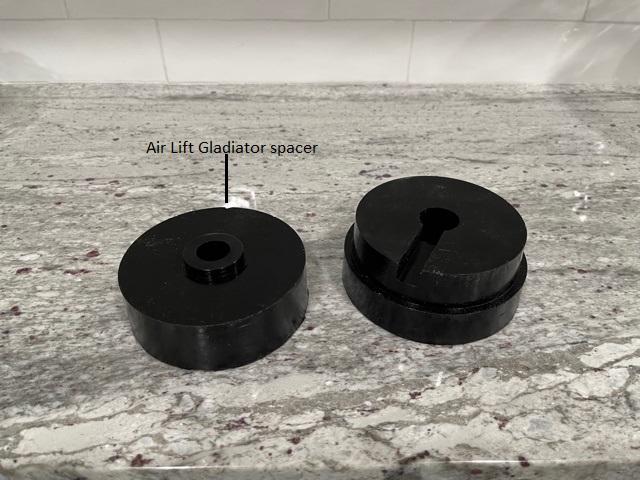
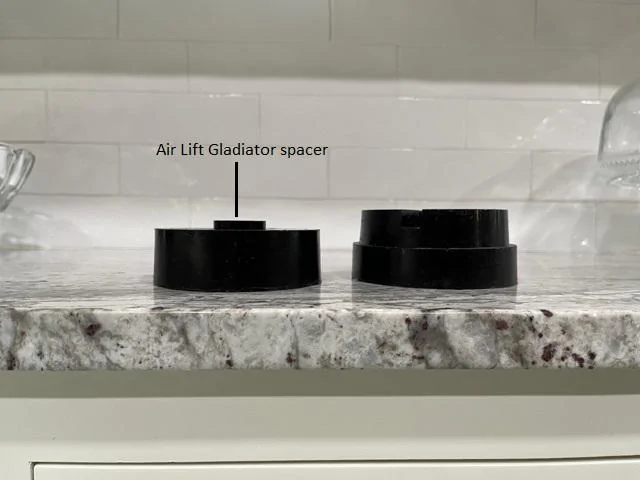
Dang I looked for this thread for some time and didn't find it before I started a new one on this. :headbang: :headbang: :headbang:
Then a few days later I get a email on threads with new posts.
Sponsored


Trickster

Well-Known Member
First Name
Rick
Joined
Mar 17, 2019
Threads
21
Messages
766
Reaction score
880
Location
Alberta Canada
Vehicle(s)
21 JT HA, 22 Volvo V60 CC, 76 Fiat 124,
Occupation
Heavy equipment operator
Old thread but doing the bags today on the new to us JT. Having done half dozen already on 1500’s and a Durango another tip to make the bags more pliable when folding them up to cable tie them is to immerse them for a minute in a bowl of hot water. Always gone through the spring openings, help yourself out and use a floor jack under the hitch to raise up and extend the springs. Never done an install without blood on my knuckles.?
Bags done. No blood. Easiest set of Airlifts I have ever done. 1 hour all in, set psi to 30 and will let it sit overnight and recheck in the morning.
 

Whitejeeptj

Well-Known Member
First Name
James
Joined
Jun 28, 2020
Threads
6
Messages
111
Reaction score
94
Location
Louisiana
Vehicle(s)
2000 Jeep Wrangler TJ, 2013 F150 FX4, Gladiator Sport S Diesel
Occupation
MRI tech

Muddzy

Well-Known Member
First Name
Keith
Joined
Feb 19, 2021
Threads
0
Messages
65
Reaction score
62
Location
NJ
Vehicle(s)
2020 JTR, 2013 JKUR, 2008 JKU Sahara (sold)

Sponsored

RVJEEP

Active Member
Joined
Jul 21, 2021
Threads
6
Messages
44
Reaction score
11
Location
RV LIFE HOME IS WHERE YOU PARK IT
Vehicle(s)
Jeep Gladiator
I got the Air Lift kit 60830 listed for the Gladiator and successfully installed in my Mojave this morning. Taking tips from others (thanks!) and pulling on my chin while under the truck for some time, I came up with a few more tips that might help others in the future.

Knowing the air bags must be deflated and folded in a way to fit through the spring openings and seeing a Ty-Rap used to hold the folded bag together I modified the procedure and the bags went in super easy with the air hose already prepped, avoiding trying to get tools inside the springs to attach the air lines.

There is a particular way to fold the bags by stepping in the middle and when deflated stepping on the top and bottom edges folding them inwards, then capping off the air barb so it won't inflate as in the picture below.

IMG_3877.JPG


Then fold the bag over and attach a Ty-Rap around the lower section keeping the Ty-Rap lock mechanism near the open side of the bag. I found placing the bag on a step then putting my knee on the bag helped get the fold started.

IMG_3878.JPG


Then measure the length of air hose needed to reach the T or fill valve and attach that to the bag making sure the sharp edges of the hose clamp face towards the open fold in the bag and can't poke into the bag when its squeezed. This picture shows the sharp hose clamp ears safely resting between the open fold in the bag.

IMG_3879.JPG


Now fold down the upper part of the bag and attach a second Ty-Rap at the upper end of the bag as shown. Orient the Ty-Rap locks to the outer edge of the bag and trim off the excess Ty-Rap This will avoid snagging the Ty-Raps when the bag is pushed through the open spring coils.

IMG_3880.JPG


At this point I inserted the big plastic doughnut that sits on top of the bag up into the spring and held it there with a scrap piece of sheet metal I had laying around. The sheet metal was about 1" wide and slightly longer than the springs are wide. After the doughnut is pushed all the way to the top of the spring and centered, I slid the sheet metal between the spring coils then rotated it screwing it towards the doughnut so it would rest on the coil and screwed it upward along the spring coil locking the doughnut at the top of the spring. You could probably use a thin wooden stick or plastic, etc, to accomplish the same thing.

I could then thread the air hose through the lowest coil opening up through the hole in the doughnut and the collapsed folded bag slid easily through the coil opening and bent upward in place inside the spring. with almost no effort I then removed the sheet metal holding the doughnut and it lowered onto the bag now held in place by the air hose going through it.

The rest of the install is normal stuff avoiding exhaust pipes and leaving some slack before Ty-raping down the air hose to the fill valve. I chose to put the fill valve in an existing hole that holds the plastic bumper trim on under the rear passenger tow hook as shown below. I pulled out the plastic rivet thing and enlarged the hole to accommodate the air valve. This location is recessed and should not snag anything for my type of off roading and you'll have to decide if its a good spot for you.

IMG_3882.JPG
I followed this procedure , made it a piece of cake .. took me about 30 min to get both sides in... and ran the lines to the license plate area. I used push to connect values .

https://www.amazon.com/dp/B08BJ57PDS?psc=1&ref=ppx_yo2_dt_b_product_details.

Much better ride since i have a load all ramp in the truck ( ~ 200lbs ) which leveled the JT. Lets see how it holds up once i load my 960 lb bike in the rear ( which will max out the JT ) ... need to play with the pressure.. I will probably run 25 to 30 as with the weight i don't want to pop the bags , but we will see. Next i will install some sumo springs to help offset some of the load on the bags once i have some xtra coin to spend.
 

jrf

Well-Known Member
First Name
J.R.
Joined
Sep 17, 2019
Threads
8
Messages
387
Reaction score
327
Location
PA
Vehicle(s)
2020 Jeep Gladiator Rubicon Launch Edition (White), 2001 TJ Sahara (white)
Vehicle Showcase
2
Another bringing this thread back up.... Did everyone remove the plastic piece on the spring before installing the bag? Is the reason to remove it because it can tear the bag or more that the bag will act as an isolator?
 

Gren71

Well-Known Member
First Name
Matt
Joined
Jul 9, 2019
Threads
143
Messages
4,004
Reaction score
6,392
Location
Delaware
Vehicle(s)
Jeep JT sports S Max Tow (Sold) '23 Ram 1500
Occupation
Magician
Vehicle Showcase
1
Another bringing this thread back up.... Did everyone remove the plastic piece on the spring before installing the bag? Is the reason to remove it because it can tear the bag or more that the bag will act as an isolator?
I didn’t and I haven’t had any issues
 

jeepers29

Well-Known Member
First Name
Joel
Joined
Aug 24, 2021
Threads
10
Messages
1,565
Reaction score
2,557
Location
Georgetown Tx
Vehicle(s)
JKUR, GC
Occupation
Domestic engineer
Lots of good info here. Will be doing in the near future. Is there thoughts on airlift vs firestone set?
 

4S50

Well-Known Member
First Name
Gone
Joined
Nov 27, 2019
Threads
16
Messages
169
Reaction score
254
Location
Ttag
Vehicle(s)
Sold the POS Pentastar
Occupation
Sportsman of Leisure
I have the airlift bags and after having them installed and using them for about a month one developed a minor leak. It still functioned, but would leak down around the air line fitting at the bag. I went back to where I purchased them, they contacted Airlift, and within a week I had two replacement airbags and an apology! Excellent customer service and zero issues since then. I heartily recommend airlift!
 

Sponsored

ShadowsPapa

Well-Known Member
First Name
Bill
Joined
Oct 12, 2019
Threads
247
Messages
40,504
Reaction score
54,031
Location
Runnells, Iowa
Vehicle(s)
'25 JTMX, '23 JLU 4xe, '82 SX4, '73 Javelin
Occupation
Retired auto mechanic, frmr gov't ntwrk security admin
Vehicle Showcase
3
The air bags arrived today - I haven't really opened and looked inside or at "directions/instructions" but have seen their videos. One thing that I find interesting is that in the video - they show the air line actually being in between the top of the spring and the stock spring isolator on top of the spring. Uh, pinching the line?


IS that really how it goes?

I'm a little concerned because when washing up my Daystar 3/4" spacers (for reinstallation on the rear, likely storing the front ones for now) I found that over the 2 years they were installed in my 2020, the springs had actually compressed the poly a bit and left impressions in the spacers and you could see and feel where the ends of the springs were on the spacers - and truck isolators.
If the springs can actually press into the poly spacers and isolators, I see the springs crushing the air lines if they go in like shown in the video and the pic below.
They literally wrap the line over the top of the spring and pop the factory isolator on it.
I've never seen any install video where they show the air line going straight up, all seem to go over the top of the spring or between coils. No one shows how they actually route. Or is that how they route?
I've not opened the box or looked at the instructions in the box - just the videos like this one.


Jeep Gladiator AirLift rear bag system - info you need to know 1660014304993
 

Gren71

Well-Known Member
First Name
Matt
Joined
Jul 9, 2019
Threads
143
Messages
4,004
Reaction score
6,392
Location
Delaware
Vehicle(s)
Jeep JT sports S Max Tow (Sold) '23 Ram 1500
Occupation
Magician
Vehicle Showcase
1
The air bags arrived today - I haven't really opened and looked inside or at "directions/instructions" but have seen their videos. One thing that I find interesting is that in the video - they show the air line actually being in between the top of the spring and the stock spring isolator on top of the spring. Uh, pinching the line?


IS that really how it goes?

I'm a little concerned because when washing up my Daystar 3/4" spacers (for reinstallation on the rear, likely storing the front ones for now) I found that over the 2 years they were installed in my 2020, the springs had actually compressed the poly a bit and left impressions in the spacers and you could see and feel where the ends of the springs were on the spacers - and truck isolators.
If the springs can actually press into the poly spacers and isolators, I see the springs crushing the air lines if they go in like shown in the video and the pic below.
They literally wrap the line over the top of the spring and pop the factory isolator on it.
I've never seen any install video where they show the air line going straight up, all seem to go over the top of the spring or between coils. No one shows how they actually route. Or is that how they route?
I've not opened the box or looked at the instructions in the box - just the videos like this one.


1660014304993.png
The compression is actually why I went with the IRO spacers. The steel doesn't deform like the poly does, though Im impressed that they only have a bit of deformation. I had a set of daystars on a KK and they actually deformed enough I had to replaced one side.

That being said I followed the video Ill link for installing. This fella's way made more sense to me. I did do my air lines different though. i ran my air lines along the frame and down into the top of the upper spring mount. There is a space in the middle where the air line can go straight down to the bag and never once be in contact with the spring its self. I can snap a pic or three in the morning for ya if that will help.

I also oriented the nipple of my bag vertical instead of down.

In another thread folks figured out that when you fold the air bags hot dog style you can use zip ties to hold the bag in that position for easier insertion between the spring sections. REALLY wish I though of that because its pretty frustrating to put them in otherwise.


ShadowsPapa

Well-Known Member
First Name
Bill
Joined
Oct 12, 2019
Threads
247
Messages
40,504
Reaction score
54,031
Location
Runnells, Iowa
Vehicle(s)
'25 JTMX, '23 JLU 4xe, '82 SX4, '73 Javelin
Occupation
Retired auto mechanic, frmr gov't ntwrk security admin
Vehicle Showcase
3
i ran my air lines along the frame and down into the top of the upper spring mount. There is a space in the middle where the air line can go straight down to the bag and never once be in contact with the spring its self.
I finally dug out the instructions and there was a bit about running the line through the hole in the top spring mount - odd tha the video shows the line going over the top of the spring and then that factory isolator going on over the top of the line! They should show the line going up through the center of the isolator. I guess being under the truck it makes more sense - ah, that hole up there looks like a good place for the line LOL.

I'll be taking the springs loose anyway to put the Daystar spacers back under them and give me that tiny bit of lift I want.
 

Gren71

Well-Known Member
First Name
Matt
Joined
Jul 9, 2019
Threads
143
Messages
4,004
Reaction score
6,392
Location
Delaware
Vehicle(s)
Jeep JT sports S Max Tow (Sold) '23 Ram 1500
Occupation
Magician
Vehicle Showcase
1
I finally dug out the instructions and there was a bit about running the line through the hole in the top spring mount - odd tha the video shows the line going over the top of the spring and then that factory isolator going on over the top of the line! They should show the line going up through the center of the isolator. I guess being under the truck it makes more sense - ah, that hole up there looks like a good place for the line LOL.

I'll be taking the springs loose anyway to put the Daystar spacers back under them and give me that tiny bit of lift I want.
nice! That is also a step I wish I did in retrospect haha

If you watch that video I linked I did my fill nipple in the same location as he did, behind the fuel door. I really like that spot since I never have to be concerned it will get damaged by road debris or who the heck knows what. And its very easy for me and my fubar back to reach to fill the bags when I need them.
 

Alaska-HWY JK

Well-Known Member
Joined
Jun 26, 2019
Threads
4
Messages
207
Reaction score
194
Location
BC
Vehicle(s)
2005 Rubicon LJ 2007 JKU 2020 Rubicon Gladiator
I put the valve stem behind the fuel door as well. Used a fender washer to stiffen up the rubber boot a bit.
Sponsored


Top