Sponsored

Overlanding build out/Adventures

HooliganActual

Well-Known Member
First Name
Robert
Joined
Jun 27, 2020
Threads
9
Messages
1,410
Reaction score
3,601
Location
10 miles from the Sun
Vehicle(s)
2020 Gladiator Rubicon
Occupation
Retired
Given that I have a tad over 30 days until launch and I am startin' from scratch. I will develop an acceptable level of campsite support but really not have time to fully sort the thing out. I think I'll just create an action packer for the stove/cooking stuff and live with that.
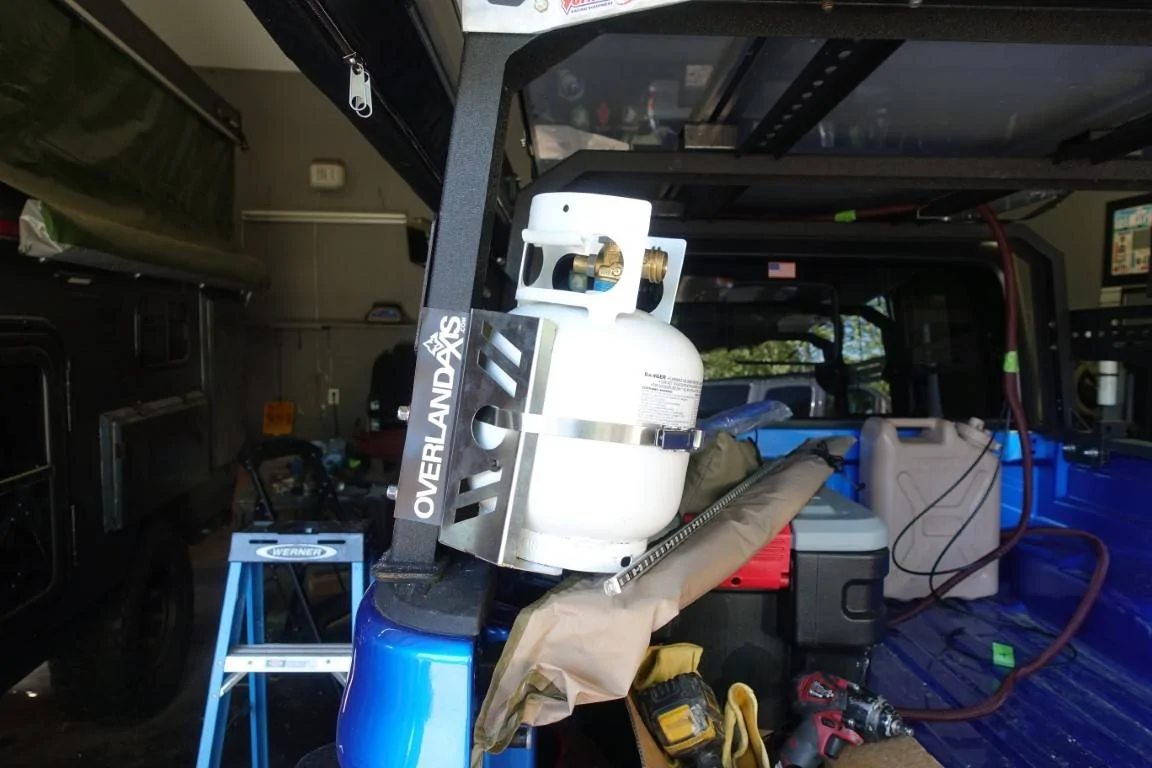
Brother, my pics above are v3 of my build. I can't tell you how many times I have had to go out in the field with a half-built (read half-baked) setup. I always rationalized it in my head as it just being a "shakedown cruise" for what was built so far. No shame in heading out in an unfinished (by your own standard) build; at least your heading out!!

The one thing other than the electrical shenanigans I want to complete prior to departure is building a slide out for the frige.
One of the most ingenious DIY fridge slides I've seen was one a guy built for a side-opening fridge that pulled in and out of the bed along the axis of both the bed and the fridge, but then it had a lazy susan or something between the fridge and the slide so that he could spin it to open towards the tailgate once the slide was fully extended. LOL There's your mission!

I have been avoiding installing my heavy old hi-lift jack
You will find a lot of people that are anti-HiLift Jack. I have one on my crawling rig that I have never used in the 7 years it's been there. My only gripe with the concept of the HiLift style jack is that with the amount of travel in my suspension (2.5" Icon lift) it's a chore to get a wheel off the ground. I mean, it's do-able but something to go under the axle is simpler and quicker in most cases. I know the HiLift has other uses but it's mainly there for tire swaps. FWIW, the ARB Jack is supposed to be 15% lighter and easier/quicker to use and I've heard a lot of users rave about it.

I opted to just stick with the stock jack and a couple pieces of 4x4 to stack under it. The stock jack has a minimal footprint and tucks away nice enough. The blocks can be used for multiple things if needed and firewood as a last resort.

Now since we are talking about jacks, there is one thing you haven't called out and in fact, I can't say that I've ever heard anyone call this out. The first time I had to drop my spare from under the bed (a rock bent a rim lip under the vehicle) was on the Tabeguache Trail just outside of Grand Junction, CO and I personally found trying to use the stock tools to actuate the tire winch and lower the spare was a royal pain in the @$$. So when I went into Grand Junction to find a repair shop, I also bought an 18" (or maybe 24") 3/8" socket extension to keep with my jack. The female end of that extension actually fits down the tube and over the winch's operating mechanism. Then I use a ratchet with a socket to go on the male end and it goes so much quicker. You could use a socket and the extension the proper way but I worry about the socket getting stuck in the tube or on the operating mechanism and then not being able to get it back out.

Cheers
Sponsored


ttn333

Well-Known Member
First Name
Tuan
Joined
Sep 16, 2019
Threads
17
Messages
1,051
Reaction score
1,295
Location
Orange County, CA
Vehicle(s)
none
I've since removed the drifta drawer and am back to front runner wolf pack pro boxes. They stack nicely together and make a great step to reach into the truck. I find them to be quite durable and easy to unload and store when not in use.
 
First Name
Brian
Joined
Aug 5, 2023
Threads
1
Messages
13
Reaction score
10
Location
Colorado
Vehicle(s)
2022 Gladiator Rubicon Diesel
No time to dilly-dally here.

100Ah LIPO battery/charge controller/cables and a 175W flexible panel on order
Also ordered a 50 qt 12VDC fridge.
Need advice on which diesel heater to pick up? 5K or 8K?

The thing is we launch on the 20th of Sep, so have to get everything here so I can mount/sort everything before leaving.
Can vouch for the diesel heater option. Very nice to be sleeping in shorts on top of your sleeping bag in sub 30F temps. Camping in Colorado mountains is much easier at night and early mornings with one on hand. I've seen others suggest a heated blanket, but that requires a decent amount of power on hand.

Diesel heaters use a LOT of power when starting up (for the glow plug), but it's only for a short duration. They then drop down to a low draw once fully running. They sip diesel fuel, so you don't need a huge tank on hand (unless you're planning extended trips away from civilization).

Realistically, a 5k heater will be plenty if you're heating up a tent. You can spend the $1000+ on a Webasto or Eberspacher, or spend ~$150 on a chinese diesel heater. I'm no fan of buying from China if I don't have to, but if you want to try it out, a $150 experiment is easier to swallow than a $1000 one - imo.

If you go the chinese version route, check out John McK 47 on Youtube. He's an Australian gent who covers these devices in full depth:
https://www.youtube.com/@johnmck1147

Happy to help answer any other questions you have on these devices.
 
Last edited:
First Name
Brian
Joined
Aug 5, 2023
Threads
1
Messages
13
Reaction score
10
Location
Colorado
Vehicle(s)
2022 Gladiator Rubicon Diesel
The smaller the better. These are built for RVs and our tent is pretty small comparatively. It puts out too much heat even at the lowest setting. I had to vent the tent. I've ran a couple of these chinese one. Best form factor is my current Hcalory unit. Plastic case is pretty cheap but usable. Everything fits inside.
https://hcalory.com/products/hc-a01-diesel-heater-handheld-toolbox-all-in-one?variant=40357494784043
This is a really nice looking unit, but I see two potential long-term issues with it.


Jeep Gladiator Overlanding build out/Adventures ef0bd857-369b-420e-a8e0-b126c15b17dc

First, that green fuel line they provide is soft, flexible tubing. The fuel pumps push out a tiny tiny tiny amount of fuel (0.02 ml). It's not a smooth flow, but a pulse - caused by an electromagnetically driven cylinder moving back and forth, pushing fuel out in a "pulse". The "pulse" of the pump is used to help squirt the fuel into the atomizer screen inside the heater. These pumps will create very small air bubbles which it cannot push out of the soft fuel line and they will collect in any loop in the line. These air bubbles and the softer fuel line material absorb the pulse from the pump, and remove the pressure necessary for proper fuel delivery. The result is the fuel dribbles out into the heater, and over time the heater becomes less efficient. (No atomization of fuel -> less efficient burn = More carbon buildup)

To fix, if the line between the heater and the pump was replaced with harder, narrow bore fuel line (https://www.amazon.com/gp/product/B08PBN2HS3/ref=ppx_yo_dt_b_asin_title_o00_s02?ie=UTF8&psc=1), this would allow the fuel delivery system to work properly.


Second issue: They include a bracket to mount the exhaust pointing straight up, with a 45 degree bend at the bottom. The exhaust should point down and away from the unit, so any moisture or condensation can escape. Otherwise, it can pool up in the bend, and cause issues down the line.

Simple fix; bend the exhaust down.

Jeep Gladiator Overlanding build out/Adventures 94cc4c82-05bf-4403-8aca-cb3ee332317d


These Chinese diesel heaters all follow the same Eberspacher design that has been around since the 60's. The original patent expired and now Chinese vendors are selling them like crazy. They work perfectly fine though, so long as they're setup and maintained correctly.
 

ttn333

Well-Known Member
First Name
Tuan
Joined
Sep 16, 2019
Threads
17
Messages
1,051
Reaction score
1,295
Location
Orange County, CA
Vehicle(s)
none
This is a really nice looking unit, but I see two potential long-term issues with it.


ef0bd857-369b-420e-a8e0-b126c15b17dc.jpg

First, that green fuel line they provide is soft, flexible tubing. The fuel pumps push out a tiny tiny tiny amount of fuel (0.02 ml). It's not a smooth flow, but a pulse - caused by an electromagnetically driven cylinder moving back and forth, pushing fuel out in a "pulse". The "pulse" of the pump is used to help squirt the fuel into the atomizer screen inside the heater. These pumps will create very small air bubbles which it cannot push out of the soft fuel line and they will collect in any loop in the line. These air bubbles and the softer fuel line material absorb the pulse from the pump, and remove the pressure necessary for proper fuel delivery. The result is the fuel dribbles out into the heater, and over time the heater becomes less efficient. (No atomization of fuel -> less efficient burn = More carbon buildup)

To fix, if the line between the heater and the pump was replaced with harder, narrow bore fuel line (https://www.amazon.com/gp/product/B08PBN2HS3/ref=ppx_yo_dt_b_asin_title_o00_s02?ie=UTF8&psc=1), this would allow the fuel delivery system to work properly.


Second issue: They include a bracket to mount the exhaust pointing straight up, with a 45 degree bend at the bottom. The exhaust should point down and away from the unit, so any moisture or condensation can escape. Otherwise, it can pool up in the bend, and cause issues down the line.

Simple fix; bend the exhaust down.

94cc4c82-05bf-4403-8aca-cb3ee332317d.jpg


These Chinese diesel heaters all follow the same Eberspacher design that has been around since the 60's. The original patent expired and now Chinese vendors are selling them like crazy. They work perfectly fine though, so long as they're setup and maintained correctly.
It's really is quite good. First thing is to crack it open and tighten earthing up. Second, I just stick the exhaust muffler directly into the outlet. No need for the tube extension and much more compact.
 

Sponsored

OP
OP
Flyin6

Flyin6

Well-Known Member
First Name
Don
Joined
Jan 2, 2023
Threads
18
Messages
1,322
Reaction score
1,794
Location
Kintuckee
Vehicle(s)
22AEV JT370, 24 Ram 3500, 22 Caddy XT6
Build Thread
Link
Occupation
Aviator, rotary and fixed wing, Writer
So, it looks like I purchased that heater unit.

Good remarks and tips. Bend exhaust down or just the muffler: Check

I have also gone into the wilderness with an unproven design. Done quite a few combat sorties with unproven commanders, but I'm still here! The point is nothing ventured, nothing gained. I think the British 2-2 SAS say it best, "Who Dares, Wins!"

I have had an onslaught of boxes, so the process begins tomorrow.

And as the involved, casual observer of all this, I think I can point to a principle that continues to pop up. That is "Keep it simple."

I look at every single thing about the design and function of as much of this Jeep truck as I can. After considering the spare tire, I was all against carrying it beneath the vehicle. First I wanted to get a tire carrier on a new rear bumper. Well, too heavy, and too much work opening the tailgate. Next, it was inside the bed...The same bed that is too small already and then filled up by a 37" KM3. Finally, I decided it would remain in the factory location. I wrestled with the jack. I couldn't see relying on that spindly stocker, but I tested it and it worked fine. I also could not deal with the huge weight addition of mounting a 40" Hi-Lift that, I, too, have almost never used.

Again, gents, thanks for the discussion points and for sharing your experience.
 
OP
OP
Flyin6

Flyin6

Well-Known Member
First Name
Don
Joined
Jan 2, 2023
Threads
18
Messages
1,322
Reaction score
1,794
Location
Kintuckee
Vehicle(s)
22AEV JT370, 24 Ram 3500, 22 Caddy XT6
Build Thread
Link
Occupation
Aviator, rotary and fixed wing, Writer
I've since removed the drifta drawer and am back to front runner wolf pack pro boxes. They stack nicely together and make a great step to reach into the truck. I find them to be quite durable and easy to unload and store when not in use.
On one of my builds, an Overlander Suburban 2500, I used the stackable Bosch boxes. I started breaking them, but for a time they were working well
 
OP
OP
Flyin6

Flyin6

Well-Known Member
First Name
Don
Joined
Jan 2, 2023
Threads
18
Messages
1,322
Reaction score
1,794
Location
Kintuckee
Vehicle(s)
22AEV JT370, 24 Ram 3500, 22 Caddy XT6
Build Thread
Link
Occupation
Aviator, rotary and fixed wing, Writer
So I got after the Overland hardening of the back end of the Gladiator in preparation for the Colorado trip which is coming right up. Parts are rolling in 2X daily

Jeep Gladiator Overlanding build out/Adventures IMG_0278 (Medium).JPG


Jeep Gladiator Overlanding build out/Adventures IMG_0279 (Medium).JPG


Jeep Gladiator Overlanding build out/Adventures IMG_0282 (Medium).JPG
 
OP
OP
Flyin6

Flyin6

Well-Known Member
First Name
Don
Joined
Jan 2, 2023
Threads
18
Messages
1,322
Reaction score
1,794
Location
Kintuckee
Vehicle(s)
22AEV JT370, 24 Ram 3500, 22 Caddy XT6
Build Thread
Link
Occupation
Aviator, rotary and fixed wing, Writer
Notice the weight of the empty propane tank, just over 8 pounds.

I weighed a cooler, the one I have been using up to now along with a bag of ice and some drinks. That is a typical weight that I have been carrying already. Comes in at over 41 pounds. I want to think the 50 qt frig with some stuff in it should weigh about the same.

Oh I ordered an Ironman fridge slide to make that business workable.
 
OP
OP
Flyin6

Flyin6

Well-Known Member
First Name
Don
Joined
Jan 2, 2023
Threads
18
Messages
1,322
Reaction score
1,794
Location
Kintuckee
Vehicle(s)
22AEV JT370, 24 Ram 3500, 22 Caddy XT6
Build Thread
Link
Occupation
Aviator, rotary and fixed wing, Writer
So, missing the propane tank mount, I got after the Awning.

The Fishbone rack tilts in near the top negating a good place to mount the awning. To fix that, I fabbed up to flat extensions using 3/16" X 3" aluminum angle, about 9.5" long each. The weight was less than 2 pounds with hardware.

The concept as you can see works off the flat top of the fishbone rack and extends that outboard. I used straight-through bolting to attach to the rack but installed nutserts for the awning bracket to attach to

Jeep Gladiator Overlanding build out/Adventures IMG_0291 (Medium).JPG


Jeep Gladiator Overlanding build out/Adventures IMG_0292 (Medium).JPG


Jeep Gladiator Overlanding build out/Adventures IMG_0293 (Medium).JPG


Jeep Gladiator Overlanding build out/Adventures IMG_0294 (Medium).JPG
 

Sponsored

OP
OP
Flyin6

Flyin6

Well-Known Member
First Name
Don
Joined
Jan 2, 2023
Threads
18
Messages
1,322
Reaction score
1,794
Location
Kintuckee
Vehicle(s)
22AEV JT370, 24 Ram 3500, 22 Caddy XT6
Build Thread
Link
Occupation
Aviator, rotary and fixed wing, Writer
And here they are installed. 5 X 1/4" bolts, .75" long secure the angle to the rack

Jeep Gladiator Overlanding build out/Adventures IMG_0295 (Medium).JPG


Jeep Gladiator Overlanding build out/Adventures IMG_0294 (Medium).JPG


Jeep Gladiator Overlanding build out/Adventures IMG_0296 (Medium).JPG


Jeep Gladiator Overlanding build out/Adventures IMG_0297 (Medium).JPG
 
OP
OP
Flyin6

Flyin6

Well-Known Member
First Name
Don
Joined
Jan 2, 2023
Threads
18
Messages
1,322
Reaction score
1,794
Location
Kintuckee
Vehicle(s)
22AEV JT370, 24 Ram 3500, 22 Caddy XT6
Build Thread
Link
Occupation
Aviator, rotary and fixed wing, Writer
Busy day yestertag. I got the awning installed after some challenges. I switched out the mattresses in the SkyCamp, and started messing with the LiFePO4 battery. I am studying its requirements for heating/cooling, then I will design or buy a project box to get that all in place. I also started on the LED strip light installation.
I do not at the moment, have a propane tank mount, nor do I have the fridge or frige slide.

As per usual, the main writeup is over on the other web site.

Jeep Gladiator Overlanding build out/Adventures DSC01909 (Medium).JPG


Jeep Gladiator Overlanding build out/Adventures DSC01913 (Medium).JPG


Jeep Gladiator Overlanding build out/Adventures DSC01917 (Medium).JPG


Jeep Gladiator Overlanding build out/Adventures DSC01918 (Medium)


Jeep Gladiator Overlanding build out/Adventures DSC01921 (Medium)


Jeep Gladiator Overlanding build out/Adventures DSC01923 (Medium)


Jeep Gladiator Overlanding build out/Adventures DSC01924 (Medium).JPG
 
OP
OP
Flyin6

Flyin6

Well-Known Member
First Name
Don
Joined
Jan 2, 2023
Threads
18
Messages
1,322
Reaction score
1,794
Location
Kintuckee
Vehicle(s)
22AEV JT370, 24 Ram 3500, 22 Caddy XT6
Build Thread
Link
Occupation
Aviator, rotary and fixed wing, Writer
Had a no-notice health issue crop up which took a chunk out of my build time.

Anyway, back at it now at 1/2 speed. Some new things installed:

Jeep Gladiator Overlanding build out/Adventures DSC01949 (Medium)


Jeep Gladiator Overlanding build out/Adventures DSC01948 (Medium)
 
OP
OP
Flyin6

Flyin6

Well-Known Member
First Name
Don
Joined
Jan 2, 2023
Threads
18
Messages
1,322
Reaction score
1,794
Location
Kintuckee
Vehicle(s)
22AEV JT370, 24 Ram 3500, 22 Caddy XT6
Build Thread
Link
Occupation
Aviator, rotary and fixed wing, Writer
Battery box/power distribution panel is nearing completion. I used a Menards rigid tool box to house everything. It's strong and waterproof.

I fashioned up simple battery retainers that simply sit in place to hold the Lithium 100Ahp battery from taking a tour of surrounding areas.

Jeep Gladiator Overlanding build out/Adventures DSC01937 (Medium)


Jeep Gladiator Overlanding build out/Adventures DSC01938 (Medium)


Jeep Gladiator Overlanding build out/Adventures DSC01942 (Medium)


Jeep Gladiator Overlanding build out/Adventures DSC01944 (Medium)
 
OP
OP
Flyin6

Flyin6

Well-Known Member
First Name
Don
Joined
Jan 2, 2023
Threads
18
Messages
1,322
Reaction score
1,794
Location
Kintuckee
Vehicle(s)
22AEV JT370, 24 Ram 3500, 22 Caddy XT6
Build Thread
Link
Occupation
Aviator, rotary and fixed wing, Writer
Next up, the fuse panel, the solar charge controller and the ground wire bus went in:

Jeep Gladiator Overlanding build out/Adventures DSC01946 (Medium).JPG
Sponsored


Top