
g2020
Well-Known Member
- Thread starter
- #1
This is a set of written instructions on how to do a pan drop on a Jeep Gladiator or Wrangler 2018+. Reference docs and photos are also included. @Maximus Gladius, coauthor and technical advisor, has performed no fewer than ten pan drops on his two Jeep Gladiators. For more info on the correct fluid for the automatic transmission, see my post on ATF Equivalents.
Feedback
Pan Drop / Drain & Fill Instructions for ZF 8HP50 or Chrysler TorqueFlite 850RE Automatic Transmission
Based on ZF Process Flow Diagram with Additional Guidance
by @g2020 & @Maximus Gladius
Version 2: This version aligns with the flow charts on pages 4 & 5 of ZF Service Information Oil change kit for ZF 8HP automatic transmission, attached as "pan drop 010..." at the end of this post.
- These instructions also apply to the ZF 8HP75 installed on models equipped with the EcoDiesel 3.0L V6 engine.
DISCLAIMER #1: Perform a pan drop at your own risk. This is not a difficult job, but it needs to be done right.
DISCLAIMER #2: These instructions are for maintenance of the ZF 8HP50 or Chrysler 850RE automatic transmission on a Jeep Gladiator or Wrangler 2018+, and are not intended to fix mechanical issues. Vehicle owner accepts full responsibility whether or not the job is performed correctly.
DISCLAIMER #3: A DIY pan drop may void the 5/60 powertrain warranty in some circumstances, especially outside of the U.S.
This is not a short post. I spell out everything so a knowledgeable beginner can move to the next level and an expert can verify the content. A short list of the major steps is provided in the following summary.
Summary of Major Process Steps
Alignment with ZF Process Flow Diagrams
SECTION 1 - PREPARATION
SECTION 3 - TOOLS
Tools for (slightly) lowering exhaust Y-pipe to remove & reinstall Transmission Oil Pan:
SECTION 5 - TEMPERATURES
SECTION 6 - ATF DRAIN #1 of 2
SECTION 9 - TRANSMISSION OIL PAN INSTALLATION
SECTION 10 - ATF FILL #1 of 2 (Option A or Option B)
SECTION 11 - ATF FILL #2 of 2 (after ATF fill #1 of 2 has been completed)
>>> REQUIRED: For a pan drop, driving the vehicle and then turning off the engine when the Trans Temp reaches 160°F (71°C), described in step #9 below, are REQUIRED
IMPORTANT (for ATF FILL #2 OF 2): When using a 200 cc syringe, it is best to have two people involved: One person in the driver's seat ready to start the engine, and a second person underneath the vehicle to remove the fill plug and install the ATF as soon as the engine is started. The main goal here is NOT to allow the transmission pump to suck air (after the engine is started): IMMEDIATLELY after the fill plug is removed, install the ATF as described in the following steps.
If you do not have a helper, prepare your tools & ATF and complete these steps as as quickly & safely as possible.
- Reminder: SHAKE each bottle of ATF for at least 30 seconds
Note: Section 5.3 (optional, 15 steps) below could also be listed as "Option C" in the previous section, but it would be twice as long.
>>> If you are using a 1.5-liter syringe & ATF adapter ATF108 for this second of two fills, JUMP to step 5.3.1 (starting with "Before starting engine...")
NOTES:
>>> REQUIRED: For a pan drop, the timed shifting sequence and ATF level check, described below, are REQUIRED
- IMPORTANT: While the engine is running and the ATF level check is being completed, expect some ATF to come out of the transmission as a result of the 0.5-liter overfill. Results may vary depending on prior fill level, and it might be a very small amount. Add ATF if fluid level is low (unlikely). Allow ATF to run out until SINGLE DROPS drip over bottom edge of fill hole.
- If you are only doing an ATF level check (not the entire pan drop process) and the transmission was overfilled at the factory, advise your Jeep dealer.
- You should not need a helper for a level check. Prepare your tools, be ready to add (well-shaken) ATF if transmission is underfilled, and work quickly & safely.
- The timed shifting sequence, or "running the gears", should ALWAYS be done before an ATF level check.
SECTION 13 - ATF TESTING
"No-Drop" and "Pan Drop Light" Options
by @g2020
I believe that a pan drop is necessary only as often as recommended by ZF. The term "pan drop" is a nickname given to a drain & fill, using gravity only, in which the Transmission Oil Pan is removed, the parts are cleaned or replaced, and new ATF is installed.
The service interval recommended by ZF is 93,000 miles for a ("daily driver") vehicle that has never been off-road, towed a trailer, or faced other severe conditions. For severe duty including off-road use and trailer towing, the service interval is every 42,000 miles +/- 5,000 miles (my estimate). ZF also recommends changing the ATF in the automatic transmission in the case of "unknown vehicle use", or when purchasing a used vehicle. The service intervals mentioned here are not set in stone. Do what you believe is best for your vehicle given your driving and maintenance habits.
The following two limited, or light, versions of a (full) pan drop are not my original ideas, but they should be mentioned in this post.
No-drop (ATF-only) option: For those of us who want to maintain the transmission without dropping the pan every time, there is a "no-drop" (fluid-only) drain & fill option: Just skip sections 8 & 9 (Transmission Oil Pan removal & installation) in this post. A clean filter & clean magnets are important, but increasing the concentration of new ATF is most important. Performing a single "no-drop" will replace about 20% of the (original) ATF, three (3) no-drops will replace about 49%, and five (5) will replace about 67%. A list of no-drop replacement rates, with 0.5-Liter Overfill & Driving the Vehicle as recommended in the ZF instructions, is provided in the next section. Drive a minimum of 500 miles between each job.
In contrast, the estimated ATF replacement rates for a (full) pan drop are 55% after one job, 80% after two jobs, and 91% after three jobs. Replacement rates shown in other sources will be different if they do not adjust the fill amount and transmission capacity for the 0.5-liter overfill. Results may vary depending on whether the transmission was previously overfilled or underfilled, but you should be able to drain five quarts during each (full) pan drop. A list of pan drop replacement rates, with 0.5-Liter Overfill & Driving the Vehicle as recommended in the ZF instructions, is provided in the next section. Drive a minimum of 500 miles between each job.
Pan drop light (no filter replacement) option: If you don't mind dropping the pan each time, the same ATF replacement rates associated with a full pan drop are achieved by dropping the Transmission Oil Pan, cleaning & reinstalling the magnets, and installing new ATF. This "light" version of a pan drop maximizes the concentration of new ATF, removes metal particles captured by the magnets, and saves some time & money by skipping the filter replacement. Once again, drive a minimum of 500 miles between each job.
Avoid being lulled into thinking that a "no-drop" or a "pan drop light" can extend the (full) pan drop service interval. Over time, the filter becomes clogged and the magnets gather mounds of fine metallic particles. These two limited options will replenish additives between (full) pan drops, but a (full) pan drop must still be performed according to the pan drop service interval. Never do a transmission flush.
On the subject of transmission service intervals, I don't trust advice from Jeep dealers because between 2019 and 2025, several dealers swore up-and-down that the ATF in the transmission is a lifetime fluid (the company line). Then, in December 2025, my local Jeep dealer sent me a flyer in the mail recommending that I get a transmission service.
Do your research and then decide what is right for your vehicle.
SECTION 15 - REPLACEMENT RATES with 0.5-Liter Overfill & Driving the Vehicle
- The "0.5-Liter Overfill & Driving the Vehicle" steps are on the first page (page 4) of the two-page process shown in the ZF document, attached as "pan drop 010..."
- Conversion: 0.5 liters is simplified to 0.5 quarts; 0.5 liters = 0.52834 quarts = 16.907 fl oz
- Clarification of replacement rate: Replacement rate of original ATF present prior to the start of a job or series of jobs
- Drainable ATF: 5 quarts = 1.5 quarts above the fill hole + 3.5 quarts below the fill hole (in the Transmission Oil Pan)
- Capacity: Nominal refill capacity = 9.5 quarts
- Each calc can be dropped into Google search
Pan Drop Replacement Rates
1-(1-(5+0.5)/(9.5+0.5))^1 = 55.0%, Single-job replacement rate
1-(1-(5+0.5)/(9.5+0.5))^2 = 80.0%, >80% replaced after 2 jobs (79.75% rounded up)
1-(1-(5+0.5)/(9.5+0.5))^3 = 90.9%, >90% replaced after 3 jobs, <10% replaced per job after 3 jobs
1-(1-(5+0.5)/(9.5+0.5))^4 = 95.9%, >95% replaced after 4 jobs
1-(1-(5+0.5)/(9.5+0.5))^5 = 98.1%, <1.5% replaced per job after 5 jobs
1-(1-(5+0.5)/(9.5+0.5))^6 = 99.2%, >99% replaced after 6 jobs
Number of Jobs
1-(1-(1.5+0.5)/(9.5+0.5))^1 = 20.0%, Single-job replacement rate
1-(1-(1.5+0.5)/(9.5+0.5))^3 = 48.8%
1-(1-(1.5+0.5)/(9.5+0.5))^4 = 59.0%, <10% replaced per job after 4 jobs
1-(1-(1.5+0.5)/(9.5+0.5))^5 = 67.2%
1-(1-(1.5+0.5)/(9.5+0.5))^7 = 79.0%
1-(1-(1.5+0.5)/(9.5+0.5))^8 = 83.2%, >80% replaced after 8 jobs
1-(1-(1.5+0.5)/(9.5+0.5))^9 = 86.6%
1-(1-(1.5+0.5)/(9.5+0.5))^10 = 89.3%
1-(1-(1.5+0.5)/(9.5+0.5))^11 = 91.4%, >90% replaced after 11 jobs, <2% replaced per job after 11 jobs (diminishing return threshold A)
1-(1-(1.5+0.5)/(9.5+0.5))^12 = 93.1%, <1.5% replaced per job after 12 jobs (diminishing return threshold B)
1-(1-(1.5+0.5)/(9.5+0.5))^13 = 94.5%
1-(1-(1.5+0.5)/(9.5+0.5))^14 = 95.6%, >95% replaced after 14 jobs, <1% replaced per job after 14 jobs (diminishing return threshold C)
1-(1-(1.5+0.5)/(9.5+0.5))^15 = 96.5%
1-(1-(1.5+0.5)/(9.5+0.5))^20 = 98.8%
1-(1-(1.5+0.5)/(9.5+0.5))^21 = 99.1%, >99% replaced after 21 jobs
- A diminishing return threshold indicates where the percentage of original ATF replaced becomes so small that it may no longer be worth the cost per job
SECTION 16 - REFERENCES
People:
Websites:
SECTION 17 - RELATED POSTS
Specific: ATF Equivalents
Specific: Pan Drop Performed by a Jeep Dealership (Including Invoice)
Specific: Fluid Level Check, Transmission Cooler Lines, and Thermostatic Bypass Valve (TBV)
Specific: My Monthly Maintenance: Power Steering, Automatic Transmission, Radiator (more details on "no-drop")
Related: Manufacturer Specifications
Related: Links to Prices
Related: Fluid Equivalence
General: Oils, Fluids & Filters -- Lists & Guides For Jeep Gladiator
Sources of Pan Drop Instructions
Including This Post, Listed in Order of Relevance
SECTION 18 - ATTACHMENTS
Note: The first file (pan drop 010...) is attached at the end of this post because it is a six-page document
Full file name:
pan drop 010 ZF Service Information Oil change kit for ZF 8HP automatic transmission November 2024 original file name 50130 EN.pdf
Attachments, continued:
pan drop 015 Suggested Correction to Two-Page Flow Chart in ZF Service Information Oil change kit for ZF 8HP automatic transmission 2026-06-13.png
- This is a suggested correction to the ZF document, called pan drop 010..., that is attached at the end of this post

pan drop 020 8HP50 850RE versions of diagram 3647070 Transmission Oil Pan Bolt Tightening Sequence & Torque Specification sources MOPAR FCA Tech Authority originally posted by Hootbro and update provided by Maximus Gladius.png

pan drop 030 MOPAR FCA Instruction Sheet K6856018 Transmission Oil Filter Replacement 850RE 8HPXX with Steel Transmission Oil Pan page 1 of 2 steps 01 thru 08 text only credit Maximus Gladius 2025-12-30.jpg

pan drop 040 MOPAR FCA Instruction Sheet K6856018 Transmission Oil Filter Replacement 850RE 8HPXX with Steel Transmission Oil Pan page 2 of 2 steps 09 thru 11 text & bolt tightening sequence diagram credit Maximus Gladius 2025-12-30.jpg
pan drop 050 old fluid above fill hole (2 to 3 quarts) draining thru fill hole prior to removing transmission oil pan credit Maximus Gladius 2025-12-30.jpg

pan drop 060 old fluid above fill hole (2 to 3 quarts) draining thru fill hole prior to removing transmission oil pan credit Maximus Gladius 2025-12-30.jpg

pan drop 070 old fluid below fill hole (3 to 4 quarts) being extracted thru fill hole to empty the transmission oil pan (and for test sample sent to laboratory) prior to removing transmission oil pan credit Maximus Gladius 2025-12-30.jpg
pan drop 080 use brake cleaner to clean around transmission before removing transmission oil pan credit Maximus Gladius 2025-12-30.jpg
pan drop 090 detached MOPAR transmission oil pan & gasket (MOPAR 68522534AA) before being completely removed credit Maximus Gladius 2025-12-30.jpg
pan drop 100 850RE automatic transmission with oil pan and gasket removed and flange (gasket mating surface) cleaned credit Maximus Gladius 2025-12-30.jpg
pan drop 110 inside of reusable MOPAR transmission oil pan with 2 magnets (MOPAR 68207788AA) & filter (MOPAR 68417054AB) intact credit Maximus Gladius 2025-12-30.jpg
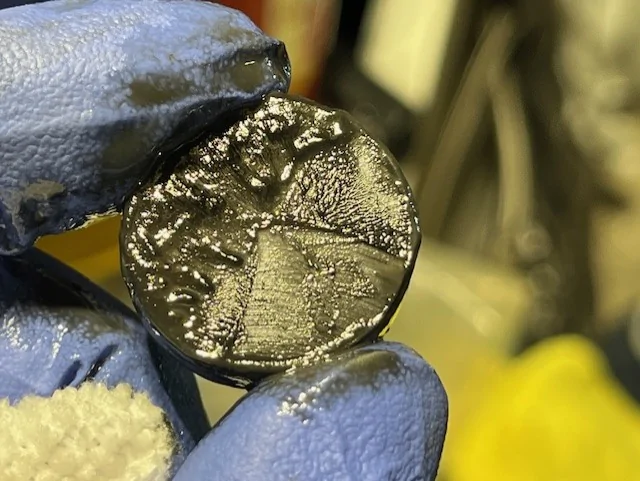
pan drop 120 metallic sludge accumulated on 1 of 2 transmission magnets (MOPAR 68207788AA) credit Maximus Gladius 2025-12-30.jpg
pan drop 130 metallic sludge accumulated on 1 of 2 transmission magnets (MOPAR 68207788AA) credit Maximus Gladius 2025-12-30.jpg
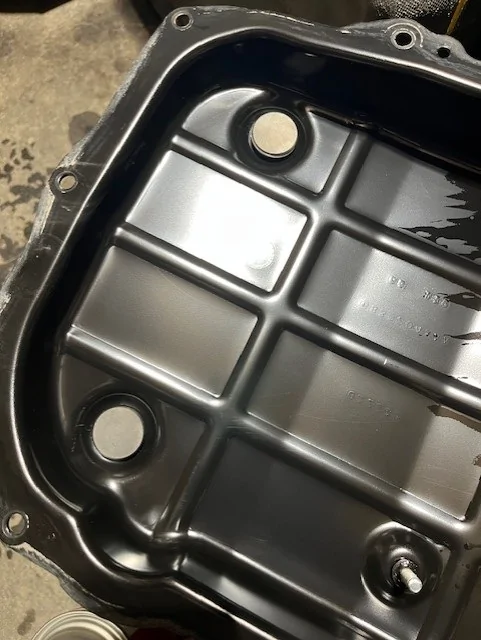
pan drop 140 inside of reusable MOPAR transmission oil pan after cleaning shown with clean magnets & without filter installed credit Maximus Gladius 2025-12-30.jpg
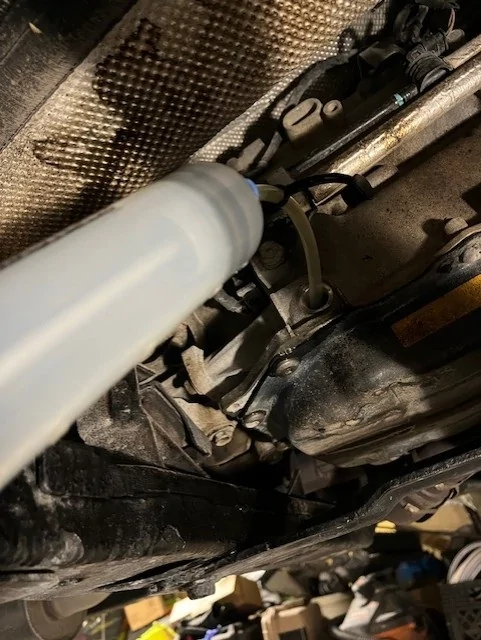
pan drop 150 new fluid being installed thru fill hole after installing clean transmission oil pan & new gasket & new filter & clean magnets credit Maximus Gladius 2025-12-30.jpg
Feedback
"Awesome description and explanation!" - @Superbike1, 93,110 miles
Pan Drop / Drain & Fill Instructions for ZF 8HP50 or Chrysler TorqueFlite 850RE Automatic Transmission
Based on ZF Process Flow Diagram with Additional Guidance
by @g2020 & @Maximus Gladius
Version 2: This version aligns with the flow charts on pages 4 & 5 of ZF Service Information Oil change kit for ZF 8HP automatic transmission, attached as "pan drop 010..." at the end of this post.
- These instructions also apply to the ZF 8HP75 installed on models equipped with the EcoDiesel 3.0L V6 engine.
DISCLAIMER #1: Perform a pan drop at your own risk. This is not a difficult job, but it needs to be done right.
DISCLAIMER #2: These instructions are for maintenance of the ZF 8HP50 or Chrysler 850RE automatic transmission on a Jeep Gladiator or Wrangler 2018+, and are not intended to fix mechanical issues. Vehicle owner accepts full responsibility whether or not the job is performed correctly.
DISCLAIMER #3: A DIY pan drop may void the 5/60 powertrain warranty in some circumstances, especially outside of the U.S.
This is not a short post. I spell out everything so a knowledgeable beginner can move to the next level and an expert can verify the content. A short list of the major steps is provided in the following summary.
Summary of Major Process Steps
- Drain ATF (see sections 6 & 7)
- Remove & reinstall transmission oil pan (see sections 8 & 9)
- Fill ATF (see sections 10 & 11)
- Controlled test drive: Drive vehicle and, when Trans Temp reaches 160°F (71°C), park vehicle & TURN OFF engine at maintenance location (see section 10 or 11, depending on fill method)
Allow vehicle to completely cool off overnight (see section 10 or 11, depending on fill method)
- Before starting timed shifting sequence & ATF level check, verify that Trans Temp is below 86°F (below 30°C) (see section 12)
- When Trans Temp reaches 86°F (30°C), complete timed shifting sequence and (then) ATF level check at Trans Temp of 86°F-122°F (30°C-50°C); completing this process on the cooler side of the temperature range is better (see section 12)
Note: For a brief description of ATF as it sits in the transmission (when sealed and completely cooled off), see the section called "Visualizing ATF in Automatic Transmission" in my reply in a different thread.
Alignment with ZF Process Flow Diagrams
This is version 2 of this post. The original version is archived & attached as a .txt file. The original version leads to the same result, but the order of operations differs slightly from the ZF flow charts.
Key revisions to this post on June 7, 2026:
- 0.5-liter ATF overfill is included in the instructions (section 10 or 11, depending on fill method)
- Although every step is required unless otherwise noted, some critical steps in sections 10-12 are emphasized as ">>> REQUIRED"
- Explanation of temperatures is provided (section 5)
- First temperature requirement (when driving vehicle) is in section 10 (ATF FILL #1 of 2) instead of section 6 (ATF DRAIN #1 of 2)
- Timed shifting sequence and ATF level check are shown one time in section 12 (ATF Level Check), and are no longer part of section 11 (ATF FILL #2 of 2)
- Order of operations aligns with ZF flow charts shown on pages 4 & 5 of the six-page ZF document: ZF Service Information Oil change kit for ZF 8HP automatic transmission, attached as "pan drop 010..." at the end of this post
- Suggested correction, to flow charts on pages 4 & 5 of pan drop 010..., is provided in pan drop 15... (posted on 2026-06-13)
- The correction does not affect the order of operations, but it does fix (in my opinion) a bug in the logic
- The "flow charts" are actually a single, 2-page flow chart
Is the 0.5-Liter ATF Overfill Optional?
Answer: The 0.5-liter overfill is included in the instructions in this post. Summaries of the guidance from the licensor and the manufacturer are provided below. The explanation of ZF's guidance digs deeper to explain why the overfill is required.
- Licensor guidance for overfill: "Overfill with 0.5 l."; see page 4 of the ZF document: ZF Service Information Oil change kit for ZF 8HP automatic transmission, attached as "pan drop 010..." at the end of this post
- "e.g. after a repair" means "for example, after a repair" and it is non-exhaustive; other examples, including a pan drop, can be added
- In the decision symbol (diamond) on page 4 of the ZF document, "Is transmission cooler present?" says "present" and does not say "being repaired" or "being replaced"
- Manufacturer guidance against overfill: "Do not over fill"; see Service Manual (posted by @drewcnit), click ALL FILES, download AUTOMATIC TRANSMISSION 8HP50_850RE Automatic Transmission (Service Information).pdf, page 21, NOTE in step 14
- In the section called "CHECK FLUID LEVEL", the advice "Do not over fill" appears just before doing the final fluid level check and reinstalling the fill plug
- In the ZF instructions, the 0.5-liter overfill is adjusted during the ATF level check, just before reinstalling the fill plug (see section 12.20 in this post); as mentioned below, the overfill prevents oil starvation
- As mentioned in the section called "TRANSMISSION FILL AFTER SERVICE", an overfill of 0.7L is required only when the transmission cooler is replaced
- In the section called "CHECK FLUID LEVEL", the advice "Do not over fill" appears just before doing the final fluid level check and reinstalling the fill plug
- Explanation of ZF 0.5-liter ATF overfill (when transmission oil cooler Is present):
- First, 0.5 liters is simplified to 0.5 quarts, in this post, because the difference is less than one fl oz and it is an overfill
- The 0.5 overfill is intended to prevent oil starvation
- The controlled test drive combines two separate volumes of ATF into one volume
- Controlled test drive: Drive vehicle and, when Trans Temp reaches 160°F (71°C), park vehicle & TURN OFF engine at maintenance location; at this Trans Temp, the TBV (thermostatic bypass valve) is open and the previously-separated volumes of ATF are combined
- The controlled test drive is a necessary maintenance step and takes about 15-25 minutes; stop & go traffic warms up the ATF faster than idling or highway speeds; watch Trans Temp and stay close to home to TURN OFF engine at target Trans Temp of 160°F (71°C)
- The vehicle is allowed to completely cool off overnight
- The ATF level check, performed immediately after the timed shifting sequence (running the gears), removes excess ATF introduced by overfill
- Because the ATF is one volume and is allowed to completely cool off overnight, it settles to its lowest possible level before the ATF level check is performed
- Results can vary depending on the prior fill level
SECTION 1 - PREPARATION
SECTION 2 - PARTS
SECTION 3 - TOOLS
SECTION 4 - TORQUES
SECTION 5 - TEMPERATURES
SECTION 6 - ATF DRAIN #1 of 2
SECTION 7 - ATF DRAIN #2 of 2
SECTION 8 - TRANSMISSION OIL PAN REMOVAL (the actual "pan drop")
SECTION 9 - TRANSMISSION OIL PAN INSTALLATION
SECTION 10 - ATF FILL #1 of 2 (Option A or Option B)
SECTION 11 - ATF FILL #2 of 2 (after ATF fill #1 of 2 has been completed)
SECTION 12 - ATF LEVEL CHECK (after vehicle has completely cooled off overnight)
SECTION 13 - ATF TESTING
SECTION 14 - OPINION
SECTION 15 - REPLACEMENT RATES
SECTION 16 - REFERENCES
SECTION 17 - RELATED POSTS
SECTION 18 - ATTACHMENTS
SECTION 1 - PREPARATION
- Park vehicle in a level position (vehicle frame must be level)
- Allow vehicle to completely cool off (overnight)
- Wear protective eyewear & gloves
- Engage parking brake
- Chock tires
- This process can be completed WITHOUT raising the vehicle; if vehicle is raised, disable electronic stability control
- Ensure that transmission is clean, work area is clean, and garage door is closed to prevent airborne contamination
- Use lint-free cloths or paper towels
- Work quickly but carefully
- Recommended: Document the job with photos
- Purchase seven (7) bottles of MOPAR 8 & 9 Speed ATF (68218925AB), ZF LifeguardFluid 9 (AA01.500.001), or equivalent; more may be needed for a vehicle with an aftermarket transmission oil pan
- Shake each bottle of ATF for at least 30 seconds before opening
- Prior to removing Transmission Skid Plate, use a propane torch or other method to loosen factory sealant on each skid plate fastener
- Remove Transmission Skid Plate; reinstall this skid plate after the job is done; for tools & torques, see Section 3 - Tools and Section 4 - Torques below
1. MOPAR 8 & 9 Speed ATF (68218925AB), ZF LifeguardFluid 9 (AA01.500.001), or equivalent; drainable fluid is 5.0 to 6.5 quarts; 7 quarts should provide one extra full quart; SHAKE each bottle of ATF for at least 30 seconds before opening
- For an explanation of MOPAR, ZF, and other ZF-approved equivalent ATF, see "Here is the very fine print..." under level #4 in Fluid Equivalence
2. MOPAR Transmission Oil Filter (68417054AB); this filter fits all gas & diesel models
3. MOPAR Oil Pan Gasket (68522534AA); keep this part on hand as a spare in case existing reusable gasket is punctured, crimped, or torn
Parts for reference only (should be cleaned & reused):
4. MOPAR Transmission Oil Pan and Filter (68362041AC); this kit also includes the gasket (68522534AA); Transmission Oil Pan is not sold individually; for reference only (Transmission Oil Pan should be cleaned & reused)
5. MOPAR Transmission Magnet (68207788AA); there are at least two magnets on the Transmission Oil Pan; for reference only (Transmission Magnets should be cleaned & reused)
6. MOPAR 06510056AA Transmission Oil Pan bolt (with T40 Torx head); for reference only (13 Transmission Oil Pan bolts should be cleaned & reused); keeping a few spare bolts for the oil pan is recommended
7. MOPAR 06104446AA 18 mm Transmission Skid Plate bolts; torque varies, see Section 4 - Torques below (Transmission Skid Plate fasteners should be cleaned & reused)
8. Depending on the model year and/or trim level, your vehicle may also have (one) MOPAR 06104716AA 1/2" Transmission Skid Plate flange nut; torque = 15 ft-lbs (Transmission Skid Plate fasteners should be cleaned & reused)
SECTION 3 - TOOLS
Preview: Before buying a fill pump or syringe(s), review section 10, option A, numbers 4.1-4.3. The explanation of each option may help you decide what to buy when you read steps 16, 17, 18, and 22 in this section below. Syringes & pump: I recommend buying two 200 cc automotive syringes (one each for extracting & dispensing/filling), one 1500 cc / 1.5-liter automotive syringe (extraction only, using a J-shaped pickup tube), one 2-gallon fill pump (dispensing/filling only), and one ATF adapter ATF108 (M18x1.5). The ATF adapter is available as part of a kit and may be bundled with some fill pumps.
- Trans Temp on instrument cluster display (use controls on steering wheel to toggle to Trans Temp)
- Bolt tightening sequence diagram (see second attachment: "pan drop 020...")
- 8 mm Allen socket, for Fill Plug
- T40 Torx bit socket, for Transmission Oil Pan bolts
- 10 mm socket, for Transmission Oil Filter nuts
- 18 mm socket, for Transmission Skid Plate bolts
- 1/2" socket, for Transmission Skid Plate flange nut (if applicable)
- 3" socket extension, for Transmission Skid Plate flange nut (if applicable)
- 6" socket extension, for Transmission Oil Pan bolts (this extension is required for some of the bolts)
- Ratchet
- Torque wrench (calibrated in ft-lbs), ONLY for fill plug and skid plate fasteners *** DO NOT USE ft-lb torque wrench for Transmission Oil Pan bolts ***
- Torque wrench (calibrated in in-lbs for low-torque applications), for Transmission Oil Pan bolts and, if applicable, exhaust flange bolts
- Plastic putty knife or trim tool, to remove gasket (may not be required)
- Propane torch or other heating tool, to loosen factory sealant on Transmission Skid Plate fasteners
- Permatex Threadlocker BLUE Medium Strength part number 24200, for Transmission Skid Plate fasteners; shake tube before use; some shops don't bother with Threadlocker, but this is your call
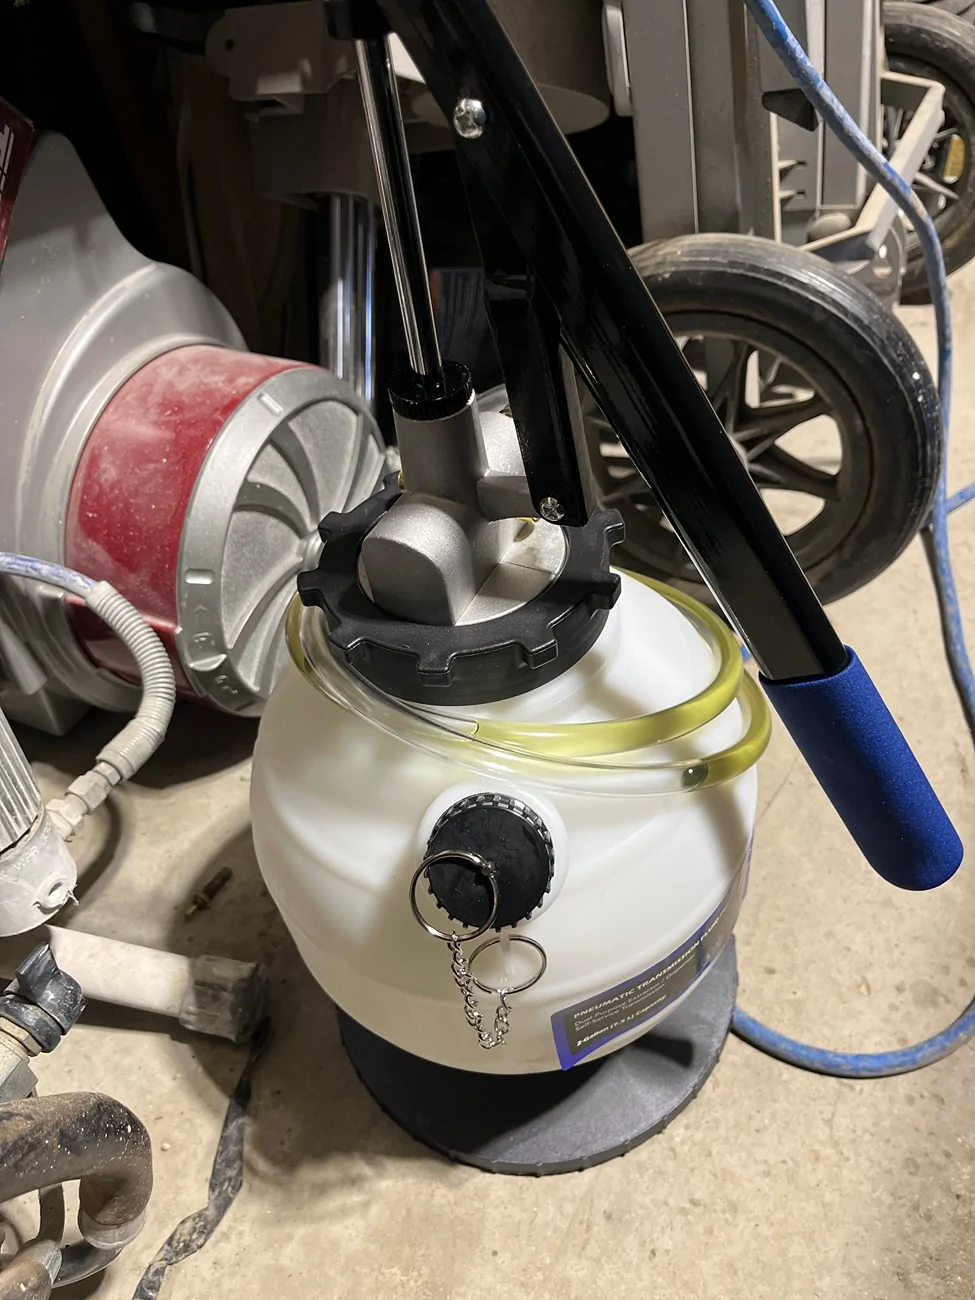
- Automotive fill pump with capacity of at least 2 gallons, such as Motive Power Fill Pro 1745, Orion Motor Tech BBT-D002-N1, or VEVOR YS-059A; use of manual hand pump recommended; use of Schrader valve & air compressor not recommended
- Motive has push/handle style pump, Orion has pitcher/lever style pump, and VEVOR also has pitcher/lever style pump
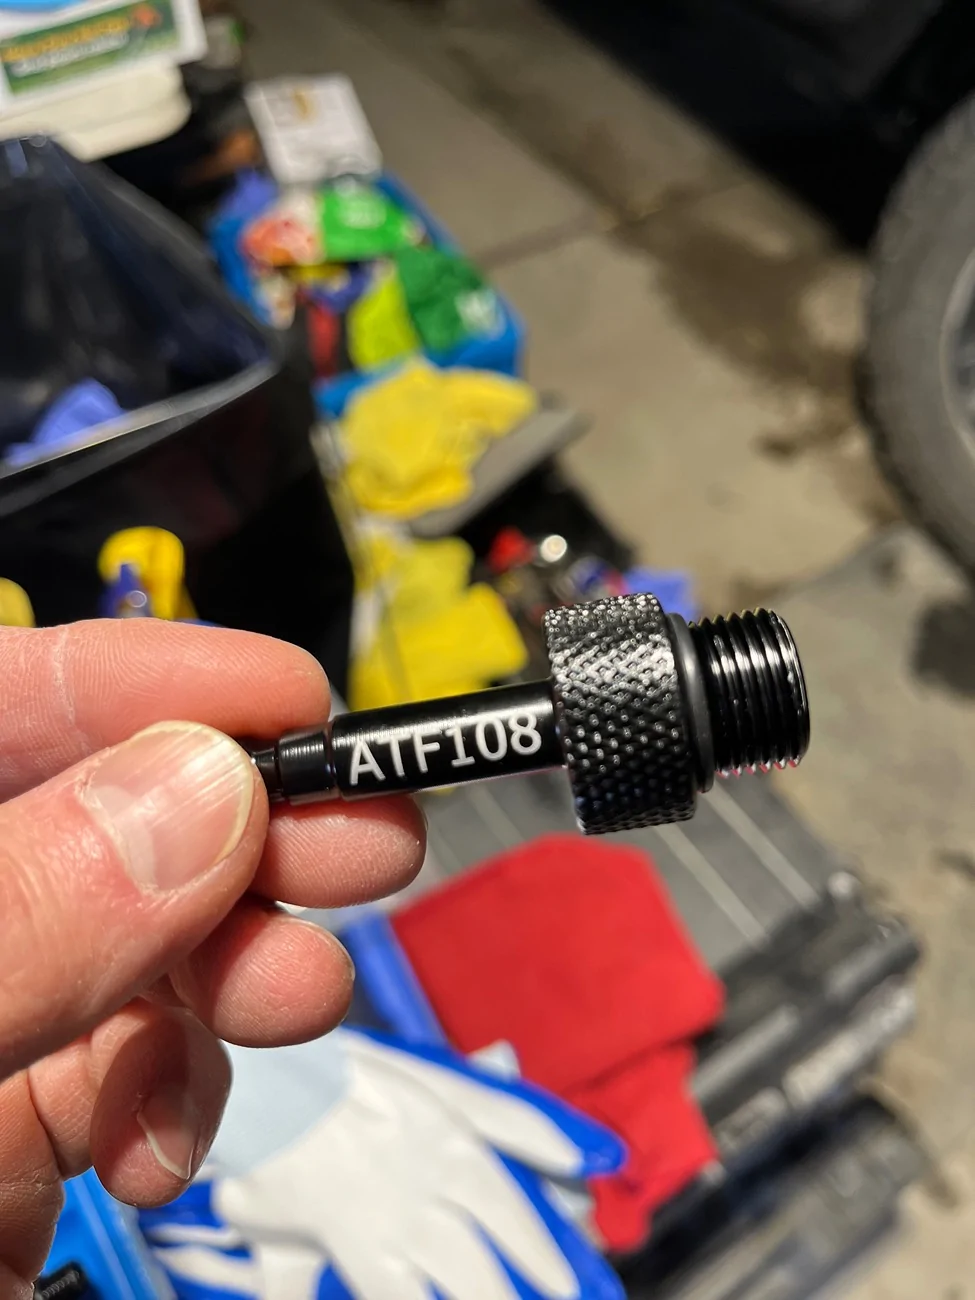
- The correct ATF adapter (ATF108, M18x1.5), which is part of a kit, may be bundled with the Orion pump, but it is not necessarily included with the Motive or the VEVOR
- Suggestion: Buy fill pump first to see whether ATF adapter ATF108 is included, and confirm fit after removing fill plug during an ATF level check as described in Section 12 - ATF Level Check
- ATF adapter ATF108, M18x1.5 (part of ACZCR 13-piece ATF adapter kit, ASIN B09ZB4BFRG); a kit that includes this adapter may be bundled with Orion pump BBT-D002-N1
- Automotive syringe with extension tube and capacity of 200 cc, such as SEDY 88082; two (2) of these syringes are recommended to prevent contamination: one for extracting, and one for dispensing/filling
- Two 200 cc syringes are essential because they make easy work of adding & removing small amounts of ATF
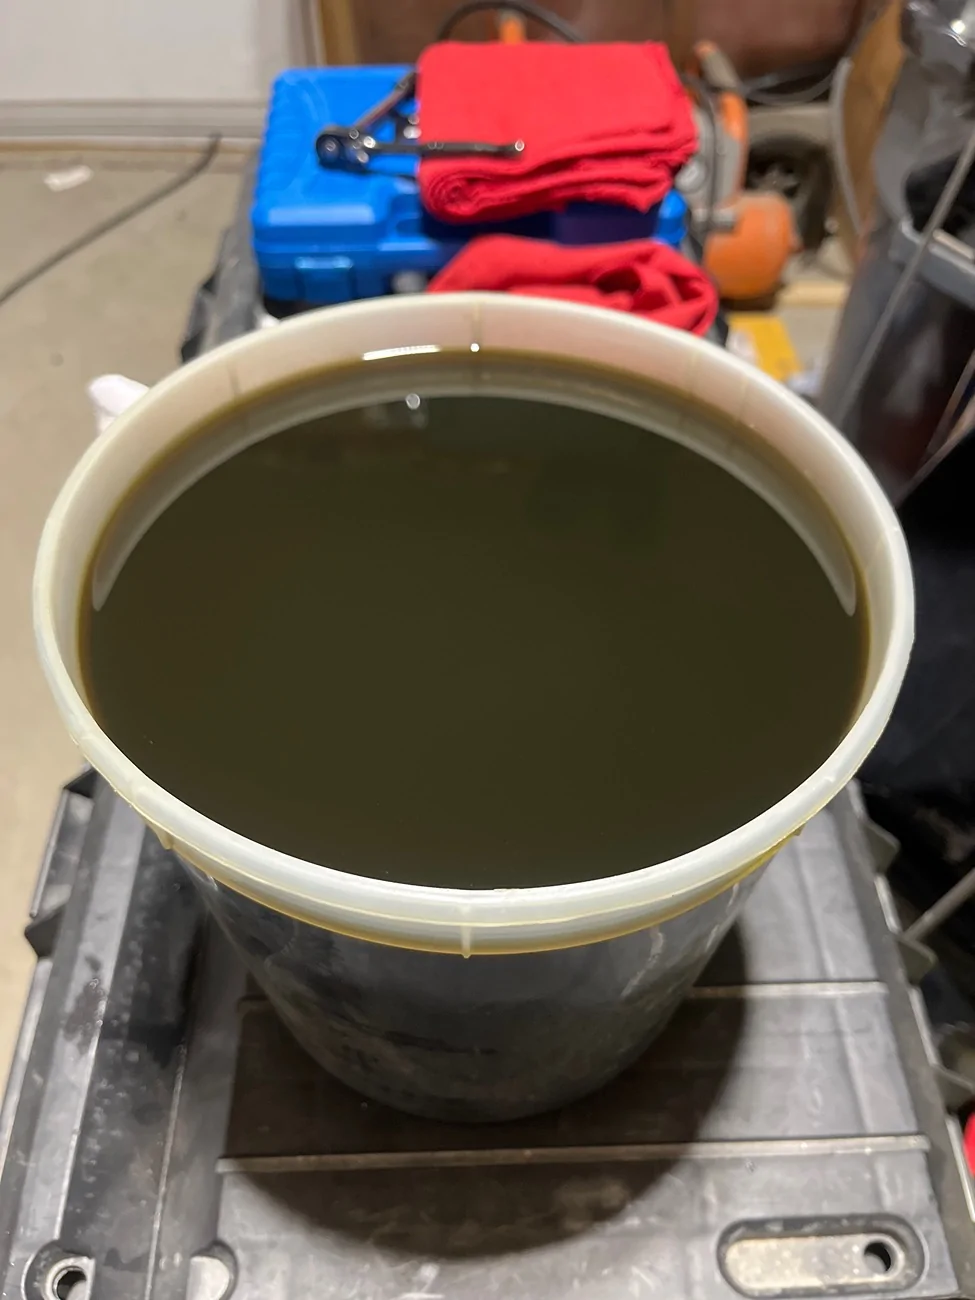
- Large drain tub, such as Lisle 17922 or other drain tub with similar dimensions
- Brake cleaner
- Lint-free cloths and/or lint-free paper towels
- Optional, but recommended: Automotive syringe with extension tube and capacity of 1500 cc, or 1.5 liters, such as VEVOR YS-0113
- A large syringe may be used to extract ATF from the Transmission Oil Pan using a J-shaped pickup tube
- On a separate note, if 2-gallon (or larger) fill pump is not being used, a second large syringe may be used to dispense/fill ATF; in this scenario, using a second large syringe will prevent contamination
- If an ATF108 adapter is also used, a 2" snip from the narrow end of a chopstick can be used to plug the adapter while the syringe is being refilled
- Optional, but recommended: A piece of bent (metal) brake line to make a J-shaped pickup tube (credit goes to @Gatorac for posting this technique)
- For brake line specifications, tube bending tool, and prices, also see my reply to Gatorac's post
- Optional, but recommended in case a bolt breaks: Lisle 61980 - Stripped Screw Extractor Set (set of 10 bits includes 62070 to extract broken T40 Torx bolt), for broken Transmission Oil Pan bolt; also see product details; single bit to extract broken T40 Torx bolt: Lisle 62070 Stripped Screw Extractor #7 (offered for individual sale by Lisle, but shipping costs more than the single bit)
- Optional, but recommended: ATF test kit from reputable test lab such as Blackstone or POLARIS (test kit usually shipped at no charge); also see Section 13 - ATF Testing, below
- Optional: Additional plastic tubing may be required to remove and install ATF
Tools for (slightly) lowering exhaust Y-pipe to remove & reinstall Transmission Oil Pan:
- 13 mm socket, for two exhaust flange bolts (06105052AA Hex Flange Head Bolt)
- The exhaust flange bolt displayed in the exhaust system diagram (06509967AA Hex Flange Head Bolt) is shorter than the original (06105052AA, confirmed) and much more expensive
- An aftermarket bolt, nut, & spring option (quantity of 2) is shown in this post by @DanJT (for this option, existing welded nuts may need to be cut off)
- Not required: 15 mm 12-point long socket (the nuts are welded to the exhaust flange, and are not specified in the exhaust system diagram)
- Ratchet (this tool is already listed above)
- Torque wrench (calibrated in in-lbs) (this tool is already listed above)
- Torque = 156 in-lbs (13 ft-lbs), as listed in the torque spreadsheet provided on this forum; use of an in-lb torque wrench is recommended
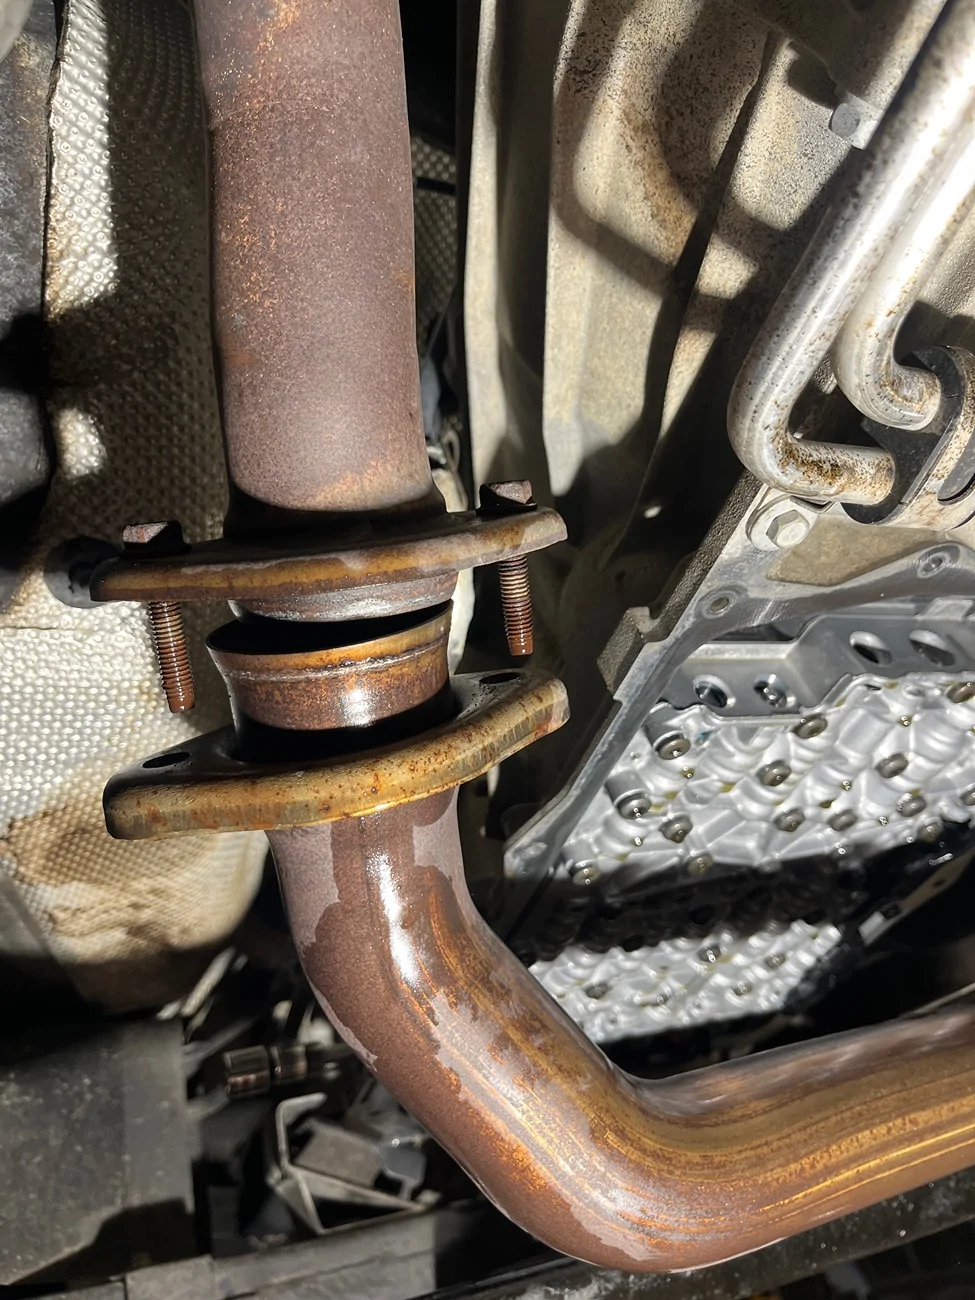
- Detaching the exhaust Y-pipe from the catalytic converter (only) will allow an extra 1/4" of clearance for removing & reinstalling the Transmission Oil Pan; this small amount of extra clearance can make a big difference, especially when reinstalling the Transmission Oil Pan & gasket
- If this technique still does not provide enough clearance, please advise in the comments
1. Automatic transmission Fill Plug: 26 ft-lbs
2. Transmission Oil Pan bolts (13 bolts):
A. Follow proper bolt tightening sequence (see diagram in second attachment: "pan drop 020...")
B. Torque round 1 (ONE-HALF torque): 48 in-lbs (use proper bolt tightening sequence) AND (use torque wrench calibrated in in-lbs)
C. Torque round 2 (final/full torque): 96 in-lbs (use proper bolt tightening sequence) AND (use torque wrench calibrated in in-lbs)
3. Transmission Oil Filter nuts: No torque; use the technique described in Section 9 - Transmission Oil Pan Installation
4. Transmission Skid Plate fasteners:
A. 3-bolt configuration: 48 ft-lbs (one bolt in middle), and 52 ft-lbs (two bolts; one to frame on each side)
B. 4-bolt + 1 flange nut configuration: 55 ft-lbs (four bolts), and 15 ft-lbs (one flange nut to fuel tank); please verify the torques for this configuration
5. Exhaust flange bolts: 156 in-lbs (13 ft-lbs); use of an in-lb torque wrench is recommended
SECTION 5 - TEMPERATURES
Trans Temp: Transmission Fluid Temperature (TFT) as indicated on OBD-II scanner or instrument cluster display (use controls on steering wheel to toggle to Trans Temp)
- OBD-II/OBD2 scanner, with engine ON, provides most reliable reading of TFT
- OBD = on-board diagnostics
- Popular options include OBD JScan (OBD only, less expensive) and Tazer JL Mini (OBD + vehicle programming, more expensive); also see TAZER MINI vs JSCAN (reply posted by @IamPro2A)
- Ensure scanner supports manufacturer-specific live data, or select TCM (Transmission Control Module) from menu
- Trans Temp, on instrument cluster display, is accurate when gear selector is in D or R
- In other scenarios, Trans Temp may default to Coolant Temp
- As mentioned by others on this forum, temperature of ATF in torque converter can be much hotter if vehicle has been recently parked
- Some content in this section paraphrased from Google AI
Trans Temp Requirements
Driving Vehicle (near end of ATF fill in section 10 or 11)
- Controlled test drive: Drive vehicle and, when Trans Temp reaches 160°F (71°C), park vehicle & TURN OFF engine at maintenance location (to allow vehicle to completely cool off overnight)
- TBV (thermostatic bypass valve) opens at Trans Temp between 140°F and 158°F (between 60°C and 70°C) and Trans Temp must not exceed 167°F (75°C)
ATF Level Check (section 12)
- Trans Temp must be below 86°F (below 30°C) before starting timed shifting sequence AND ATF level check
- Trans Temp must be between 86°F and 122°F (between 30°C and 50°C) during timed shifting sequence AND ATF level check
Ambient Temperature
- For the timed shifting sequence & ATF level check (section 12), the ambient temperature should be low enough to start the timed shifting sequence at a Trans Temp of 86°F (30°C); from my experience, an ambient temperature above 79°F (26°C) may be too high unless you work very quickly
- For best results, plan to complete the drain & fill and then controlled test drive by late afternoon, and then do the timed shifting sequence & ATF level check early the following morning
- Do NOT start engine
- Place large drain tub under transmission
- Drain ATF by removing fill plug using 8 mm Allen socket & ratchet; this is the drainable ATF located above the fill hole (1.5+ quarts)
- Proceed to ATF Drain #2 of 2
- Extract ATF, using 200 cc syringe (for extracting ATF), by inserting narrow plastic tube into the fill hole, down and toward the rear of the transmission, until it touches any component in (or the bottom of) the Transmission Oil Pan; do not force plastic tube to the bottom; this is the drainable ATF located below the fill hole (3.5+ quarts)
- Extracting some of the ATF before dropping (removing) Transmission Oil Pan is optional, but doing so allows for less splash when removing the pan
- Note: Also see "Recommendation" in the next section
- If sending ATF to a lab to be tested (recommended), take a sample during this extraction process
- If taking a break, reinstall fill plug finger tight (do not torque fill plug yet)
- Proceed to Transmission Oil Pan Removal (the actual "pan drop")
1. Before removing Transmission Oil Pan, use brake cleaner to thoroughly clean exterior of oil pan and areas around edges of oil pan
2. Transmission Oil Pan is reusable, but it must be cleaned, the magnets must be cleaned, and the filter must be replaced
3. Oil Pan Gasket (MOPAR 68522534AA) is reusable, but it must be cleaned with a lint-free cloth
- If performing a series of pan drops within a short period of time (minimum of 500 miles between each pan drop), Oil Pan Gasket should A) always be replaced during the last pan drop, and B) replaced during a preceding pan drop if damage to gasket is found
4. Keep new gasket on hand in case existing gasket is punctured, crimped, or torn
5. Transmission Oil Filter (MOPAR 68417054AB) must be replaced
- If performing a series of pan drops within a short period of time (minimum of 500 miles between each pan drop), Transmission Oil Filter may be replaced A) every time (optimal), B) every other time (reasonable), C) on a first & last pan drop basis (economical), or D) on a last pan drop basis (more economical); during a series of pan drops, a clean filter is important, but increasing the concentration of new ATF is most important; "optimal" option recommended by @Maximus Gladius, "reasonable" option mentioned by @Hootbro, and other options suggested by @g2020
6. Transmission Magnets (68207788AA) are reusable, but they must be cleaned
Recommendation: Before continuing with this part of the process, consider using a J-shaped pickup tube to extract almost all of the ATF remaining in the oil pan. This is optional, but it will reduce mess. Credit goes to @Gatorac for sharing this technique. Start by keeping the bolts in the four corners loosened, but not removed, to create enough space to insert the tube. The J-shaped pickup tube should maintain contact with the bottom of the oil pan.
7. Carefully remove thirteen (13) Transmission Oil Pan bolts (MOPAR 06510056AA) using T40 Torx bit socket & ratchet
8. Loosen bolts in four corners first and remove them last; if ATF was not extracted from oil pan, allow ATF to spill/pour into large drain tub before completely removing four corner bolts
9. Note: When installing Transmission Oil Pan later, follow proper bolt tightening sequence
10. Carefully remove Transmission Oil Pan (if at least some ATF in the pan was extracted, there will be less spill)
11. Remove Transmission Oil Filter nuts from Transmission Oil Pan using 10 mm socket & ratchet, then remove Transmission Oil Filter
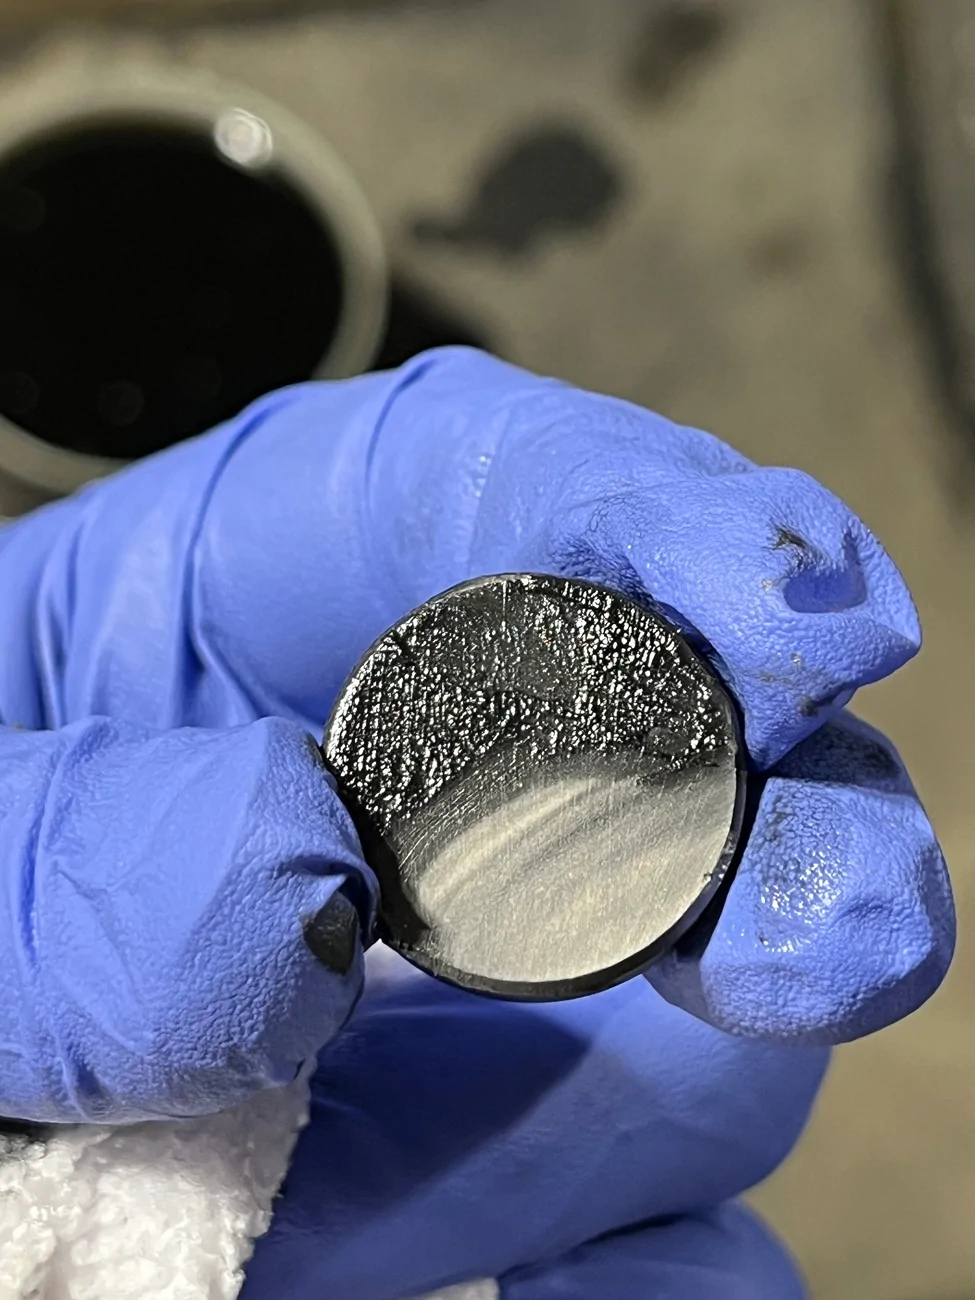
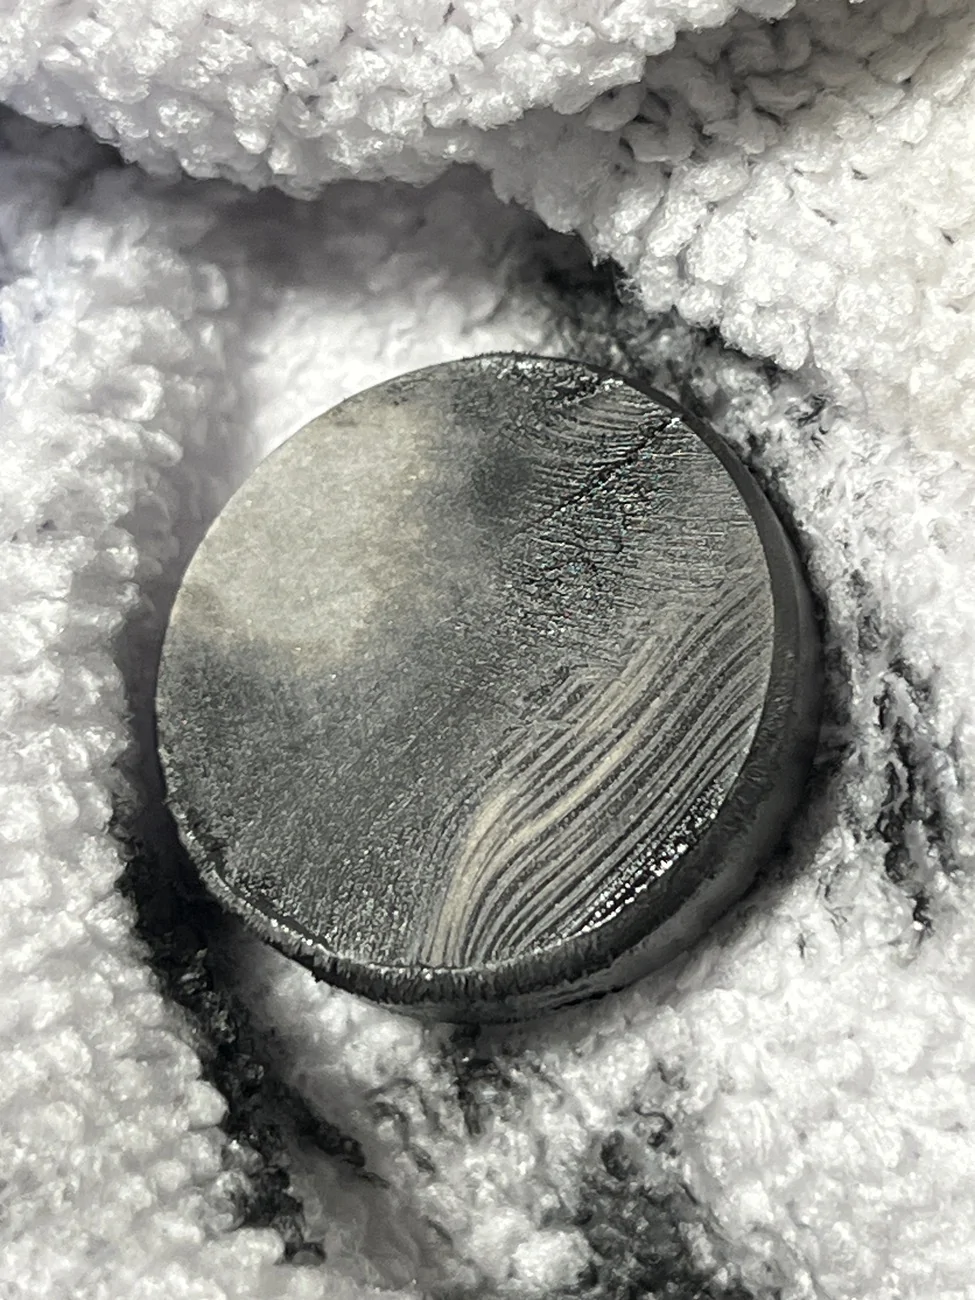
12. Remove Transmission Magnets from Transmission Oil Pan, inspect metallic sludge, and clean off the magnets using a lint-free cloth; fine particles in the sludge are normal
13. Carefully remove Oil Pan Gasket and clean it using a lint-free cloth; remove it using a plastic putty knife & minimal force to avoid bending or otherwise damaging the gasket
14. Clean the Transmission Oil Pan using brake cleaner and a lint-free cloth
15. Clean transmission flange (gasket mating surface, which is metal) using brake cleaner sprayed into a lint-free cloth
16. Proceed to Transmission Oil Pan Installation
SECTION 9 - TRANSMISSION OIL PAN INSTALLATION
1. Install new Transmission Oil Filter and new Transmission Oil Filter nuts (included with filter)
2. When installing Transmission Oil Filter, use 10 mm socket & ratchet to turn each (new) Transmission Oil Filter nut until it makes contact, then LOOSEN each nut one-half turn (to allow filter to move horizontally but NOT vertically)
3. As a check on correct filter movement, Transmission Oil Filter should be "unconstrained on horizontal plane"
4. Easy-to-miss (metal filings): Use brake cleaner and a lint-free cloth to carefully clean the nuts, bolts and Transmission Oil Pan, wiping away any metal filings released by the new nuts
- This step prevents "instant contamination" that occurs just by installing the filter
- The nuts have a different thread grip and are for onetime use; do not reuse/reinstall the nuts
5. Apply thin coat of new ATF to filter O-ring (O-ring comes already installed in its proper place)
6. Place clean magnets in original locations on Transmission Oil Pan
7. Fit the four rubber stubs on the Oil Pan Gasket into the slots in the Transmission Oil Pan
8. If necessary, pull exhaust Y-pipe down slightly (1/4") to allow extra clearance for replacing Transmission Oil Pan (to detach exhaust Y-pipe from catalytic converter, see end of Section 3 - Tools)
9. Align Transmission Oil Pan & Oil Pan Gasket with transmission flange
10. Follow proper bolt tightening sequence to torque Transmission Oil Pan bolts (see bolt tightening sequence diagram in second attachment: "pan drop 020...")
11. *** IMPORTANT: Use an INCH-POUND TORQUE WRENCH to tighten Transmission Oil Pan bolts ***
12. Torque round 1 (ONE-HALF torque): Carefully install Transmission Oil Pan & gasket using a T40 Torx bit socket & INCH-POUND TORQUE WRENCH, the proper bolt tightening sequence, and ONE-HALF torque (48 in-lbs)
13. Torque round 2 (final/full torque): Carefully tighten each Transmission Oil Pan bolt using a T40 Torx bit socket & INCH-POUND TORQUE WRENCH, the proper bolt tightening sequence, and FULL torque (96 in-lbs)
14. Proceed to ATF Fill #1 of 2 (Option A or Option B)
SECTION 10 - ATF FILL #1 of 2 (Option A or Option B)
Option A (requires 2 people): Follow these steps if you are NOT using a 2-gallon (or larger) fill pump
Note: Step 4 also includes an explanation of each fill option (numbers 4.1-4.3). Each option will work, but fewer fill steps are required, of course, as the syringe or pump gets bigger.
1. Before opening any bottle of ATF, SHAKE each bottle for at least 30 seconds to remix important additives that are known to settle to bottom of bottle
2. Do NOT start engine
3. Remove fill plug using 8 mm Allen socket & ratchet
4. Using 200 cc syringe (for dispensing/filling ATF), install new ATF until it drips over bottom edge of fill hole (3.5+ quarts for this first of two fills)
1. In this first fill (ATF FILL #1 of 2), a 200 cc syringe allows you to easily stop the flow of ATF when it starts to run out of the fill hole; if this syringe is the only fill tool being used, it will need to be filled at least 26 times during the entire pan drop process >>> A 200 cc syringe is IDEAL for adding & removing small amounts of ATF, such as adding the last half-quart of ATF during this fill (ATF FILL #1 of 2) or adding ATF during the ATF level check (see section 12.21)
>>> Total fills using 200 cc syringe: Minimum of 26 during entire pan drop process (not including ATF level check in all cases); in this context, a fill means the number of times a syringe or pump needs to be filled
Additional fill options:
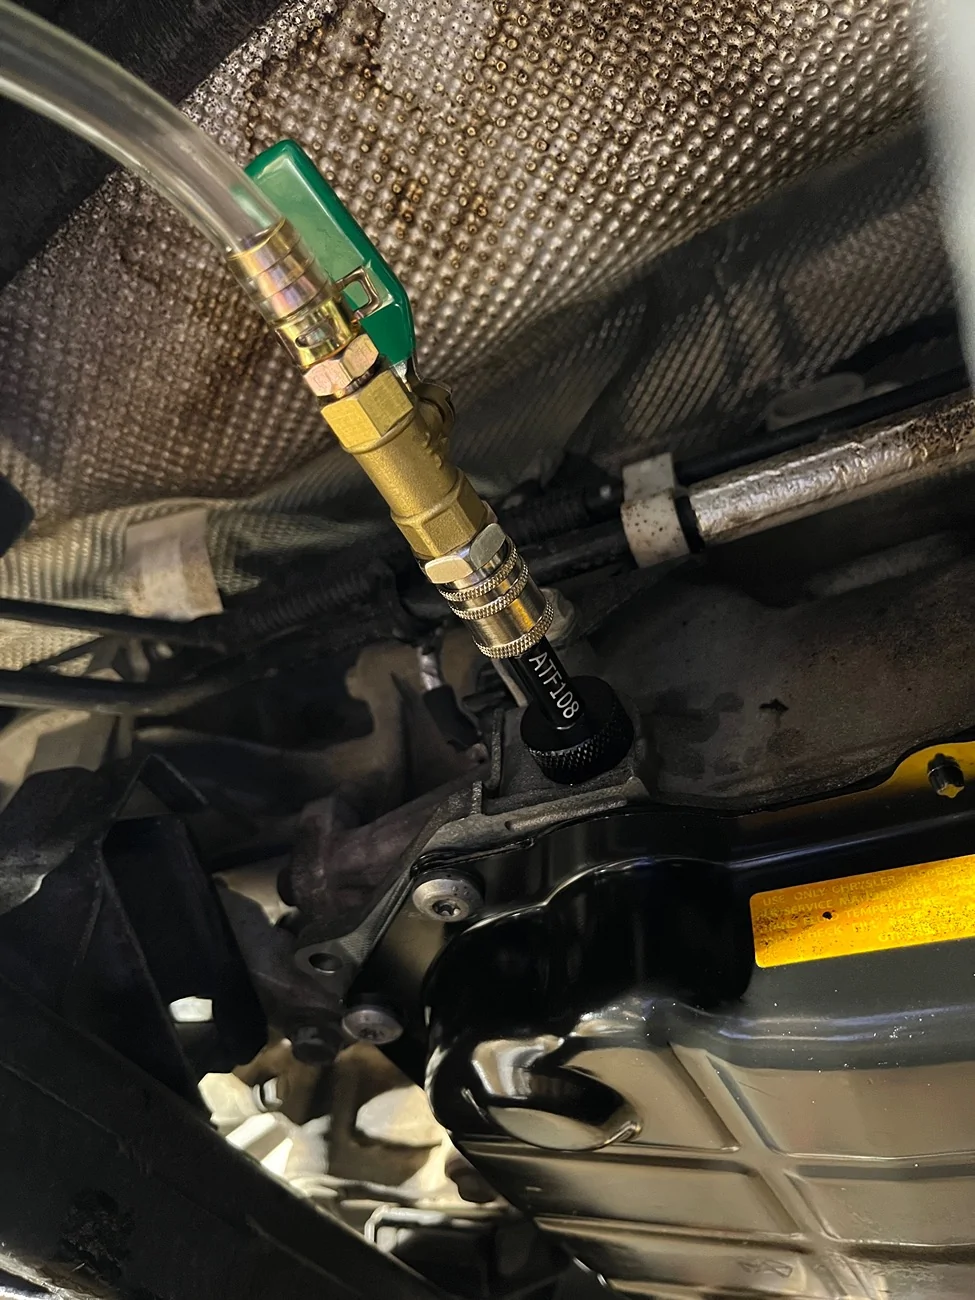
2. The combination of a 1.5-liter syringe, such as the VEVOR YS-0113, and ATF adapter ATF108 is a faster option for dispensing/filling the ATF (also see section 11.5.3, below), and can allow the ATF to be installed without any air entering the transmission >>> This is a GOOD option for the first three quarts of this fill (ATF FILL #1 of 2) and all of ATF FILL #2 of 2
>>> Total fills using 1.5-liter syringe & ATF adapter ATF108 (4) and 200 cc syringe (3): Seven (7) during entire pan drop process
3. For less than $100, the combination of a 2-gallon fill pump and ATF adapter ATF108 is the fastest option (see Option B, below), and allows the ATF to be installed without any air entering the transmission >>> As an all-in-one fill, this is the BEST option
>>> Total fills using 2-gallon fill pump & ATF adapter ATF108: One (1) during entire pan drop process
5. If taking a break, reinstall fill plug finger tight (do not torque fill plug yet)
6. Proceed to Section 11 - ATF Fill #2 of 2
Option B (no helper required): Follow these steps if you are using a 2-gallon (or larger) fill pump and an ATF adapter (ATF108, M18x1.5)
>>> REQUIRED: For a pan drop, driving the vehicle and then turning off the engine when the Trans Temp reaches 160°F (71°C), described in step #16 below, are REQUIRED
1. Before opening any bottle of ATF, SHAKE each bottle for at least 30 seconds to remix important additives that are known to settle to bottom of bottle
2. Do NOT start engine
3. Ensure that plastic fluid transfer tube is properly installed on fill pump, and then slide two hose clamps (if provided) over tube
4. Unscrew cap from oil pour point on fill pump and add 5.5 quarts of new ATF
- The 0.5-liter overfill, included in the 5.5 quarts, is recommended by ZF when a transmission oil cooler is present, and will be adjusted during the required ATF level check in section 12
- Reminder: SHAKE each bottle for at least 30 seconds
5. Refasten cap on fill pump
6. Remove fill plug using 8 mm Allen socket & ratchet
7. Install ATF adapter (ATF108, M18x1.5) finger tight, plus a quarter-turn so it doesn't leak
8. Attach plastic tube to ATF adapter, and, if provided, tighten hose clamps one-half turn after resistance is met to prevent leaks
9. Pump the ATF until all of it has been transferred to the transmission (5.5 quarts for this all-in-one fill)
10. Start engine
11. Remove plastic tube from ATF adapter
12. Remove ATF adapter
13. If some ATF dribbles out of fill hole, do not be alarmed
14. Reinstall fill plug, using 8 mm Allen socket and torque wrench, with torque of 26 ft-lbs
15. Before driving vehicle, plan to park vehicle & TURN OFF engine at maintenance location overnight
16. Drive vehicle and, when Trans Temp reaches 160°F (71°C), park vehicle & TURN OFF engine at maintenance location (to allow vehicle to completely cool off overnight)
- TBV opens at Trans Temp between 140°F and 158°F (between 60°C and 70°C), and Trans Temp must not exceed 167°F (75°C)
- Early TBV design: TBV starts to open at 140°F (60°C); sources = @Hootbro, Google AI
- Revised TBV design: TBV is fully open at 158°F (70°C) (most common); source = Google AI
17. Allow vehicle to completely cool off overnight
18. Proceed to Section 12 - ATF Level Check (SKIP section 11)
SECTION 11 - ATF FILL #2 of 2 (after ATF fill #1 of 2 has been completed)
>>> REQUIRED: For a pan drop, driving the vehicle and then turning off the engine when the Trans Temp reaches 160°F (71°C), described in step #9 below, are REQUIRED
IMPORTANT (for ATF FILL #2 OF 2): When using a 200 cc syringe, it is best to have two people involved: One person in the driver's seat ready to start the engine, and a second person underneath the vehicle to remove the fill plug and install the ATF as soon as the engine is started. The main goal here is NOT to allow the transmission pump to suck air (after the engine is started): IMMEDIATLELY after the fill plug is removed, install the ATF as described in the following steps.
If you do not have a helper, prepare your tools & ATF and complete these steps as as quickly & safely as possible.
- Reminder: SHAKE each bottle of ATF for at least 30 seconds
Note: Section 5.3 (optional, 15 steps) below could also be listed as "Option C" in the previous section, but it would be twice as long.
>>> If you are using a 1.5-liter syringe & ATF adapter ATF108 for this second of two fills, JUMP to step 5.3.1 (starting with "Before starting engine...")
- Before starting engine, vehicle frame must be level
- Start engine
- Remove fill plug using 8 mm Allen socket & ratchet
- Using 200 cc syringe (for dispensing/filling ATF), install new ATF until it drips over bottom edge of fill hole (1.5+ quarts for this second of two fills)
- Install more ATF: Install an additional 0.5 liters (0.53 quarts) of new ATF to overfill transmission (note: 0.03 quarts is less than one fl oz)
- The 0.5-liter overfill is recommended by ZF when a transmission oil cooler is present, and will be adjusted during the required ATF level check in section 12
- If you are using a 200 cc syringe, JUMP to step 6 (starting with "If some ATF dribbles out...")
- Optional (using 1.5-liter syringe & ATF108 adapter; the following steps replace steps 2-5 above)
- Before starting engine, remove fill plug using 8 mm Allen socket & ratchet
- Install ATF108 adapter finger tight, plus a quarter-turn so it doesn't leak
- Ensure that plastic fluid transfer tube is properly installed on 1.5-liter syringe, and then slide two hose clamps over tube
- Pour two (well-shaken) one-quart/liter bottles of new ATF into a (clean) separate container, such as a one-gallon plastic pitcher
- With the plunger pushed down, draw/pull ATF into 1.5-liter syringe (for dispensing/filling ATF) until plunger rod is fully retracted (up to 1.5 quarts); use cap to prevent drips; do not pour ATF into syringe
- Attach plastic tube to ATF adapter, and tighten hose clamps one-half turn after resistance is met to prevent leaks
- Install ATF (first part of 2 quarts total, up to 1.5 quarts); do not detach plastic tube yet
- Quickly start engine
- Push down plunger again, detach plastic tube, and quickly plug ATF108 adapter (using a 2" snip from the narrow end of a chopstick) to prevent air from entering transmission
- Draw/pull remainder of new ATF (0.5+ quarts) into 1.5-liter syringe; use cap to prevent drips; do not pour ATF into syringe; the plus (+) sign means "whatever amount is remaining in the separate container"
- Remove (chopstick) plug from ATF adapter and reattach plastic tube
- Install ATF (second part of 2 quarts total, 0.5+ quarts)
- Remove plastic tube from ATF adapter
- Remove ATF adapter and proceed to next step (step 6)
- Replacing steps 2-5 with these optional steps allows ATF FILL #2 of 2 to be a one-person job (no helper required)
- If some ATF dribbles out of fill hole, do not be alarmed
- Reinstall fill plug, using 8 mm Allen socket and torque wrench, with torque of 26 ft-lbs
- Before driving vehicle, plan to park vehicle & TURN OFF engine at maintenance location overnight
- Drive vehicle and, when Trans Temp reaches 160°F (71°C), park vehicle & TURN OFF engine at maintenance location (to allow vehicle to cool off overnight)
- TBV opens at Trans Temp between 140°F and 158°F (between 60°C and 70°C), and Trans Temp must not exceed 167°F (75°C)
- Early TBV design: TBV starts to open at 140°F (60°C); sources = @Hootbro, Google AI
- Revised TBV design: TBV is fully open at 158°F (70°C) (most common); source = Google AI
- TBV opens at Trans Temp between 140°F and 158°F (between 60°C and 70°C), and Trans Temp must not exceed 167°F (75°C)
- Allow vehicle to completely cool off overnight
- Proceed to Section 12 - ATF Level Check
NOTES:
>>> REQUIRED: For a pan drop, the timed shifting sequence and ATF level check, described below, are REQUIRED
- IMPORTANT: While the engine is running and the ATF level check is being completed, expect some ATF to come out of the transmission as a result of the 0.5-liter overfill. Results may vary depending on prior fill level, and it might be a very small amount. Add ATF if fluid level is low (unlikely). Allow ATF to run out until SINGLE DROPS drip over bottom edge of fill hole.
- If you are only doing an ATF level check (not the entire pan drop process) and the transmission was overfilled at the factory, advise your Jeep dealer.
- You should not need a helper for a level check. Prepare your tools, be ready to add (well-shaken) ATF if transmission is underfilled, and work quickly & safely.
- The timed shifting sequence, or "running the gears", should ALWAYS be done before an ATF level check.
1. Before starting engine, Trans Temp must be below 86°F (below 30°C); see Trans Temp on instrument cluster display
2. Before starting engine, vehicle frame must be level
3. Before starting engine, loosen fill plug 1/8 turn, using 8 mm Allen socket & ratchet, to release torque on fill plug and avoid a delay (no fluid should come out, and torque should be finger tight)
4. Start engine
5. For remainder of process, Trans Temp must be between 86°F and 122°F (between 30°C and 50°C)
6. When Trans Temp reaches 86°F (30°C), start the following timed shifting sequence
7. Firmly depress brake pedal, shift to N, and rev engine at 2,000 rpm for 30 seconds to fill torque converter
8. PAUSE: Before proceeding to next step, let engine come down to idle speed
9. Firmly depress brake pedal, shift to P, and let engine idle for 10 seconds
10. Firmly depress brake pedal, shift to R, and let engine idle for 10 seconds
11. Firmly depress brake pedal, shift to N, and pause briefly (not specified in ZF process flow, but recommended)
12. Firmly depress brake pedal, shift to D, and let engine idle for 10 seconds
13. Firmly depress brake pedal, shift to D1 (manual), and let engine idle for 10 seconds
14. Firmly depress brake pedal, shift to D2 (manual), and let engine idle for 10 seconds
15. Firmly depress brake pedal, shift back to N, and pause briefly (not specified in ZF process flow, but recommended)
16. Firmly depress brake pedal, shift back to P, and let engine idle
17. Confirm Trans Temp is between 86°F and 122°F (between 30°C and 50°C); completing this process on the cooler side of the temperature range is better because cooler ATF takes up less space and installing it just above 86°F (30°C) maximizes the amount of ATF that is installed
18. If Trans Temp is near 122°F (50°C) or higher, stop and restart timed shifting sequence at temperature of 86°F (30°C)
19. Remove fill plug using 8 mm Allen socket & ratchet
20. Check fluid level using your finger
21. If fluid level is low (transmission underfilled), use a 200 cc syringe (for dispensing/filling ATF) to add new ATF until it drips over bottom edge of fill hole
22. If fluid level is high (transmission overfilled), allow ATF to run out until SINGLE DROPS drip over bottom edge of fill hole
23. Reinstall fill plug, using 8 mm Allen socket and torque wrench, with torque of 26 ft-lbs
24. Clean area around fill plug using a lint-free cloth
25. Check transmission for leaks
26. Test drive vehicle to normal operating temperature
SECTION 13 - ATF TESTING
- Optional but recommended: Obtain ATF test kit from reputable test lab, such as Blackstone or POLARIS (test kit usually shipped at no charge)
- For important testing tips, see section called "Testing" in my post on ATF Equivalents
"No-Drop" and "Pan Drop Light" Options
by @g2020
I believe that a pan drop is necessary only as often as recommended by ZF. The term "pan drop" is a nickname given to a drain & fill, using gravity only, in which the Transmission Oil Pan is removed, the parts are cleaned or replaced, and new ATF is installed.
The service interval recommended by ZF is 93,000 miles for a ("daily driver") vehicle that has never been off-road, towed a trailer, or faced other severe conditions. For severe duty including off-road use and trailer towing, the service interval is every 42,000 miles +/- 5,000 miles (my estimate). ZF also recommends changing the ATF in the automatic transmission in the case of "unknown vehicle use", or when purchasing a used vehicle. The service intervals mentioned here are not set in stone. Do what you believe is best for your vehicle given your driving and maintenance habits.
The following two limited, or light, versions of a (full) pan drop are not my original ideas, but they should be mentioned in this post.
No-drop (ATF-only) option: For those of us who want to maintain the transmission without dropping the pan every time, there is a "no-drop" (fluid-only) drain & fill option: Just skip sections 8 & 9 (Transmission Oil Pan removal & installation) in this post. A clean filter & clean magnets are important, but increasing the concentration of new ATF is most important. Performing a single "no-drop" will replace about 20% of the (original) ATF, three (3) no-drops will replace about 49%, and five (5) will replace about 67%. A list of no-drop replacement rates, with 0.5-Liter Overfill & Driving the Vehicle as recommended in the ZF instructions, is provided in the next section. Drive a minimum of 500 miles between each job.
In contrast, the estimated ATF replacement rates for a (full) pan drop are 55% after one job, 80% after two jobs, and 91% after three jobs. Replacement rates shown in other sources will be different if they do not adjust the fill amount and transmission capacity for the 0.5-liter overfill. Results may vary depending on whether the transmission was previously overfilled or underfilled, but you should be able to drain five quarts during each (full) pan drop. A list of pan drop replacement rates, with 0.5-Liter Overfill & Driving the Vehicle as recommended in the ZF instructions, is provided in the next section. Drive a minimum of 500 miles between each job.
Pan drop light (no filter replacement) option: If you don't mind dropping the pan each time, the same ATF replacement rates associated with a full pan drop are achieved by dropping the Transmission Oil Pan, cleaning & reinstalling the magnets, and installing new ATF. This "light" version of a pan drop maximizes the concentration of new ATF, removes metal particles captured by the magnets, and saves some time & money by skipping the filter replacement. Once again, drive a minimum of 500 miles between each job.
Avoid being lulled into thinking that a "no-drop" or a "pan drop light" can extend the (full) pan drop service interval. Over time, the filter becomes clogged and the magnets gather mounds of fine metallic particles. These two limited options will replenish additives between (full) pan drops, but a (full) pan drop must still be performed according to the pan drop service interval. Never do a transmission flush.
On the subject of transmission service intervals, I don't trust advice from Jeep dealers because between 2019 and 2025, several dealers swore up-and-down that the ATF in the transmission is a lifetime fluid (the company line). Then, in December 2025, my local Jeep dealer sent me a flyer in the mail recommending that I get a transmission service.
Do your research and then decide what is right for your vehicle.
SECTION 15 - REPLACEMENT RATES with 0.5-Liter Overfill & Driving the Vehicle
- The "0.5-Liter Overfill & Driving the Vehicle" steps are on the first page (page 4) of the two-page process shown in the ZF document, attached as "pan drop 010..."
- Conversion: 0.5 liters is simplified to 0.5 quarts; 0.5 liters = 0.52834 quarts = 16.907 fl oz
- Clarification of replacement rate: Replacement rate of original ATF present prior to the start of a job or series of jobs
- Drainable ATF: 5 quarts = 1.5 quarts above the fill hole + 3.5 quarts below the fill hole (in the Transmission Oil Pan)
- Capacity: Nominal refill capacity = 9.5 quarts
- Each calc can be dropped into Google search
Pan Drop Replacement Rates
1-(1-(5+0.5)/(9.5+0.5))^1 = 55.0%, Single-job replacement rate
1-(1-(5+0.5)/(9.5+0.5))^2 = 80.0%, >80% replaced after 2 jobs (79.75% rounded up)
1-(1-(5+0.5)/(9.5+0.5))^3 = 90.9%, >90% replaced after 3 jobs, <10% replaced per job after 3 jobs
1-(1-(5+0.5)/(9.5+0.5))^4 = 95.9%, >95% replaced after 4 jobs
1-(1-(5+0.5)/(9.5+0.5))^5 = 98.1%, <1.5% replaced per job after 5 jobs
1-(1-(5+0.5)/(9.5+0.5))^6 = 99.2%, >99% replaced after 6 jobs
Number of Jobs
- 1-3 pan drops when using ZF-approved equivalent ATF such as MOPAR 8 & 9 Speed ATF or ZF LifeguardFluid 9
- 4-6 pan drops when switching to aftermarket ATF (not ZF-approved and not recommended, but some use it)
- Drive a minimum of 500 miles between each job
1-(1-(1.5+0.5)/(9.5+0.5))^1 = 20.0%, Single-job replacement rate
1-(1-(1.5+0.5)/(9.5+0.5))^3 = 48.8%
1-(1-(1.5+0.5)/(9.5+0.5))^4 = 59.0%, <10% replaced per job after 4 jobs
1-(1-(1.5+0.5)/(9.5+0.5))^5 = 67.2%
1-(1-(1.5+0.5)/(9.5+0.5))^7 = 79.0%
1-(1-(1.5+0.5)/(9.5+0.5))^8 = 83.2%, >80% replaced after 8 jobs
1-(1-(1.5+0.5)/(9.5+0.5))^9 = 86.6%
1-(1-(1.5+0.5)/(9.5+0.5))^10 = 89.3%
1-(1-(1.5+0.5)/(9.5+0.5))^11 = 91.4%, >90% replaced after 11 jobs, <2% replaced per job after 11 jobs (diminishing return threshold A)
1-(1-(1.5+0.5)/(9.5+0.5))^12 = 93.1%, <1.5% replaced per job after 12 jobs (diminishing return threshold B)
1-(1-(1.5+0.5)/(9.5+0.5))^13 = 94.5%
1-(1-(1.5+0.5)/(9.5+0.5))^14 = 95.6%, >95% replaced after 14 jobs, <1% replaced per job after 14 jobs (diminishing return threshold C)
1-(1-(1.5+0.5)/(9.5+0.5))^15 = 96.5%
1-(1-(1.5+0.5)/(9.5+0.5))^20 = 98.8%
1-(1-(1.5+0.5)/(9.5+0.5))^21 = 99.1%, >99% replaced after 21 jobs
- A diminishing return threshold indicates where the percentage of original ATF replaced becomes so small that it may no longer be worth the cost per job
SECTION 16 - REFERENCES
People:
@Maximus Gladius (coauthor & technical advisor; photographer of several attachments)
@DanJT (aftermarket bolt, nut, & spring option, at end of section 3)
@drewcnit (.pdf file for automatic transmission from Service Manual, before Table of Contents)
@Gatorac (J-shaped pickup tube, in section 3 and section 8)
@Hootbro ("reasonable" filter replacement option, in section 8; also referenced in second attachment, pan drop 020..., in section 18)
@IamPro2A (reply to TAZER MINI vs JSCAN, in section 5)
Websites:
he following link is also listed in the next section as Fluid Equivalence:
The following link is also listed in the next section as Manufacturer Specifications:
The following link is also listed in the next section as ATF Equivalents:
Direct link to first attachment (pan drop 010...):
SECTION 17 - RELATED POSTS
Specific: ATF Equivalents
Specific: Pan Drop Performed by a Jeep Dealership (Including Invoice)
Specific: Fluid Level Check, Transmission Cooler Lines, and Thermostatic Bypass Valve (TBV)
Specific: My Monthly Maintenance: Power Steering, Automatic Transmission, Radiator (more details on "no-drop")
Related: Manufacturer Specifications
Related: Links to Prices
Related: Fluid Equivalence
General: Oils, Fluids & Filters -- Lists & Guides For Jeep Gladiator
Sources of Pan Drop Instructions
Including This Post, Listed in Order of Relevance
1. This post:
Pan Drop / Drain & Fill Instructions for ZF 8HP50 or Chrysler TorqueFlite 850RE Automatic Transmission, March 4, 2026
- Based on ZF process flow diagram with additional guidance
- Updated to version 2 on June 7, 2026
- Original version attached at the end of this post: Archive - Pan Drop Instructions - Original Version - 2026-06-07.txt
2. Licensor:
ZF Service Information Oil change kit for ZF 8HP automatic transmission, November 2024, pages 4-5
- Attached as "pan drop 010..." at the end of this post
- Flow charts on pages 4-5 are the basis of this post
3. Manufacturer:
- Click ALL FILES, download AUTOMATIC TRANSMISSION 8HP50_850RE Automatic Transmission (Service Information).pdf, for 2021 AUTOMATIC TRANSMISSION, pages 20-27
- Posted by @drewcnit
4. Post on JL WRANGLER FORUMS .COM:
ZF8 50K Mile Transmission Service -- DIY How-To Instructions, May 21, 2022
- Posted by @CarbonSteel
- Last edited July 27, 2023
5. Video on FCP Euro:
How to Change the Oil in a ZF 8-Speed Transmission, October 18, 2021
- Video & article on how to change the oil in a ZF 8HP transmission in a BMW
- Originally posted by @Viper501
SECTION 18 - ATTACHMENTS
- The following 16 attachments cover many of the key steps in the pan drop process.
- The guides & diagrams in the first five attachments are useful as reference docs, but some docs contain some content that is outdated (torque spec) or unnecessary (raise vehicle). In this post, only current info applicable to a DIY pan drop is used.
- The remaining 11 files, starting with "pan drop 050...", are photos taken by @Maximus Gladius of the pan drop that he completed in December 2025.
File names:
Note: Original estimates of drain & fill volumes, embedded in some of the following file names, have been revised: "2 to 3 quarts" (original) = 1.5+ quarts (revised), and "3 to 4 quarts" (original) = 3.5+ quarts (revised)
- pan drop 010 ZF Service Information Oil change kit for ZF 8HP automatic transmission November 2024 original file name 50130 EN.pdf
- pan drop 015 Suggested Correction to Two-Page Flow Chart in ZF Service Information Oil change kit for ZF 8HP automatic transmission 2026-06-13.png
- pan drop 020 8HP50 850RE versions of diagram 3647070 Transmission Oil Pan Bolt Tightening Sequence & Torque Specification sources MOPAR FCA Tech Authority originally posted by Hootbro and update provided by Maximus Gladius.png
- pan drop 030 MOPAR FCA Instruction Sheet K6856018 Transmission Oil Filter Replacement 850RE 8HPXX with Steel Transmission Oil Pan page 1 of 2 steps 01 thru 08 text only credit Maximus Gladius 2025-12-30.jpg
- pan drop 040 MOPAR FCA Instruction Sheet K6856018 Transmission Oil Filter Replacement 850RE 8HPXX with Steel Transmission Oil Pan page 2 of 2 steps 09 thru 11 text & bolt tightening sequence diagram credit Maximus Gladius 2025-12-30.jpg
- pan drop 050 old fluid above fill hole (2 to 3 quarts) draining thru fill hole prior to removing transmission oil pan credit Maximus Gladius 2025-12-30.jpg
- pan drop 060 old fluid above fill hole (2 to 3 quarts) draining thru fill hole prior to removing transmission oil pan credit Maximus Gladius 2025-12-30.jpg
- pan drop 070 old fluid below fill hole (3 to 4 quarts) being extracted thru fill hole to empty the transmission oil pan (and for test sample sent to laboratory) prior to removing transmission oil pan credit Maximus Gladius 2025-12-30.jpg
- pan drop 080 use brake cleaner to clean around transmission before removing transmission oil pan credit Maximus Gladius 2025-12-30.jpg
- pan drop 090 detached MOPAR transmission oil pan & gasket (MOPAR 68522534AA) before being completely removed credit Maximus Gladius 2025-12-30.jpg
- pan drop 100 850RE automatic transmission with oil pan and gasket removed and flange (gasket mating surface) cleaned credit Maximus Gladius 2025-12-30.jpg
- pan drop 110 inside of reusable MOPAR transmission oil pan with 2 magnets (MOPAR 68207788AA) & filter (MOPAR 68417054AB) intact credit Maximus Gladius 2025-12-30.jpg
- pan drop 120 metallic sludge accumulated on 1 of 2 transmission magnets (MOPAR 68207788AA) credit Maximus Gladius 2025-12-30.jpg
- pan drop 130 metallic sludge accumulated on 1 of 2 transmission magnets (MOPAR 68207788AA) credit Maximus Gladius 2025-12-30.jpg
- pan drop 140 inside of reusable MOPAR transmission oil pan after cleaning shown with clean magnets & without filter installed credit Maximus Gladius 2025-12-30.jpg
- pan drop 150 new fluid being installed thru fill hole after installing clean transmission oil pan & new gasket & new filter & clean magnets credit Maximus Gladius 2025-12-30.jpg
Archive of original version of this post: Archive - Pan Drop Instructions - Original Version - 2026-06-07.txt
(attached at the end of this post because it is a multipage document)
Note: The first file (pan drop 010...) is attached at the end of this post because it is a six-page document
Full file name:
pan drop 010 ZF Service Information Oil change kit for ZF 8HP automatic transmission November 2024 original file name 50130 EN.pdf
- On zf.com, file name 50130 EN.pdf has been changed
- Name of updated version of same file on zf.com as of May 2026: c6f6d6c4-a254-11ef-a30a-00505690da53.pdf
- Name of earlier version of same file attached to ATF Equivalents: SOURCE_GladiatorPilot23_FILE_NAME ZF oil change kit.pdf
Attachments, continued:
pan drop 015 Suggested Correction to Two-Page Flow Chart in ZF Service Information Oil change kit for ZF 8HP automatic transmission 2026-06-13.png
- This is a suggested correction to the ZF document, called pan drop 010..., that is attached at the end of this post
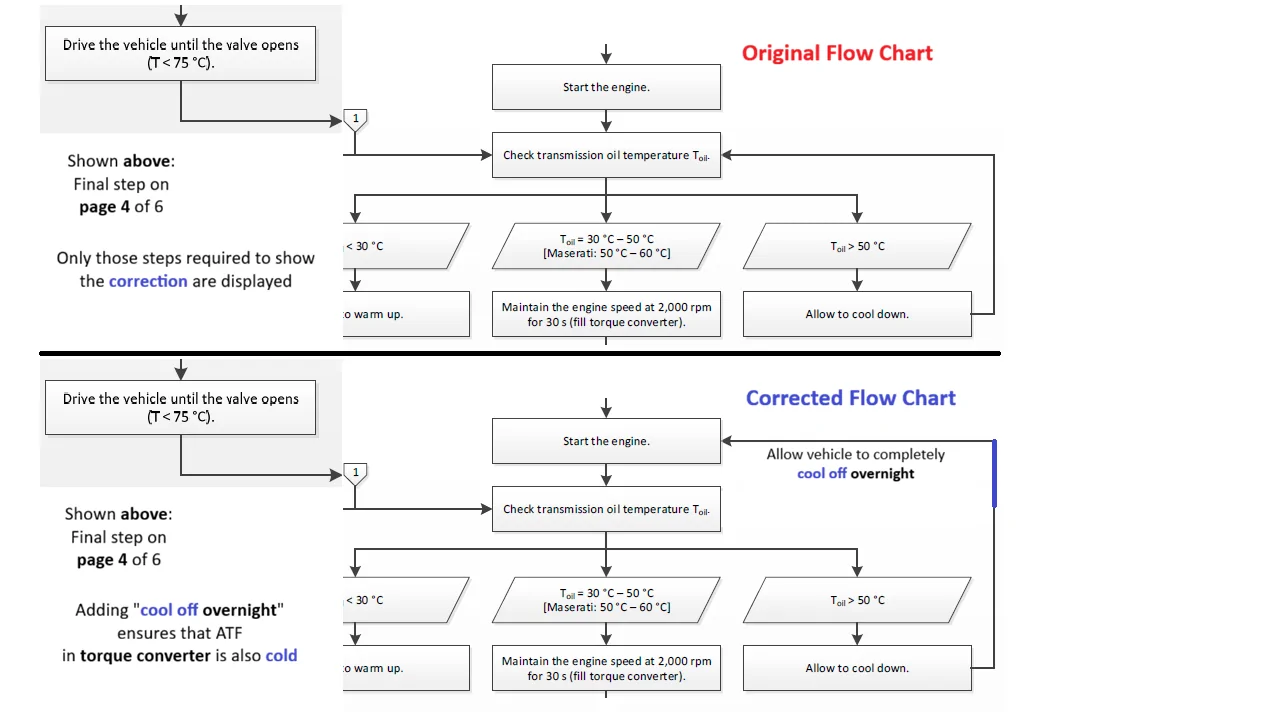
pan drop 020 8HP50 850RE versions of diagram 3647070 Transmission Oil Pan Bolt Tightening Sequence & Torque Specification sources MOPAR FCA Tech Authority originally posted by Hootbro and update provided by Maximus Gladius.png
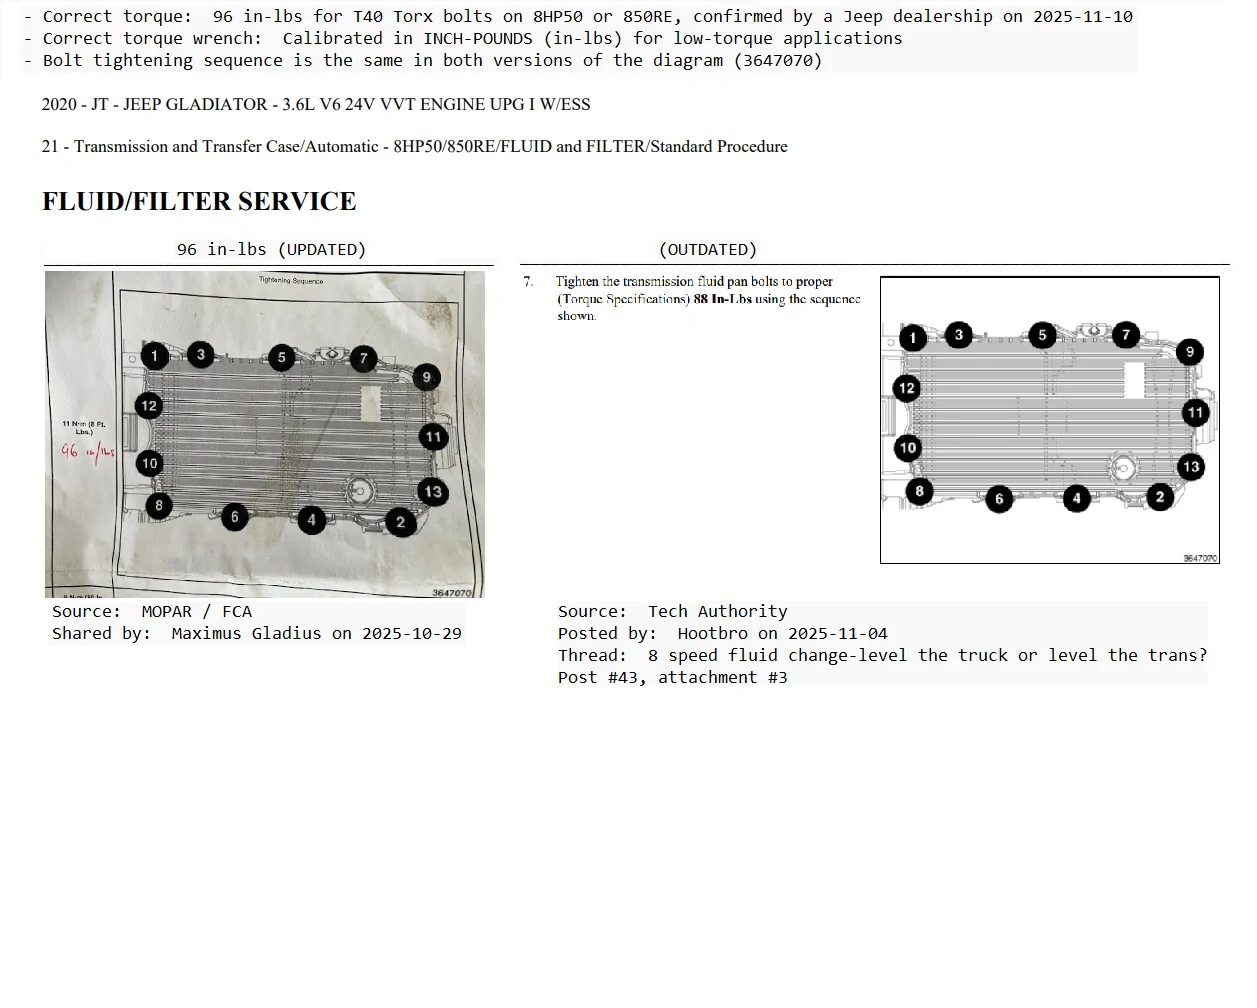
pan drop 030 MOPAR FCA Instruction Sheet K6856018 Transmission Oil Filter Replacement 850RE 8HPXX with Steel Transmission Oil Pan page 1 of 2 steps 01 thru 08 text only credit Maximus Gladius 2025-12-30.jpg
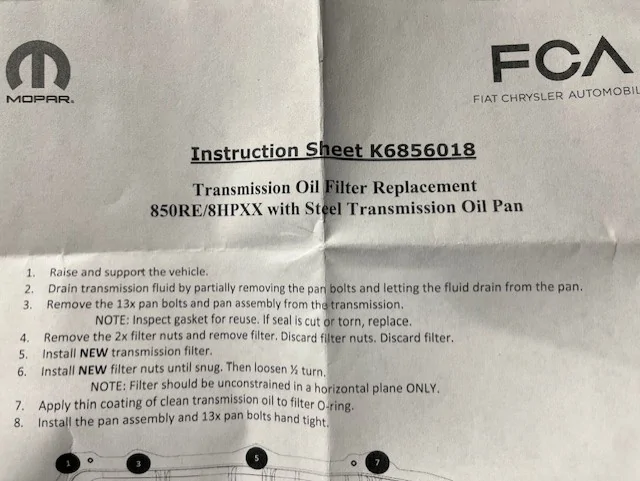
pan drop 040 MOPAR FCA Instruction Sheet K6856018 Transmission Oil Filter Replacement 850RE 8HPXX with Steel Transmission Oil Pan page 2 of 2 steps 09 thru 11 text & bolt tightening sequence diagram credit Maximus Gladius 2025-12-30.jpg
pan drop 050 old fluid above fill hole (2 to 3 quarts) draining thru fill hole prior to removing transmission oil pan credit Maximus Gladius 2025-12-30.jpg
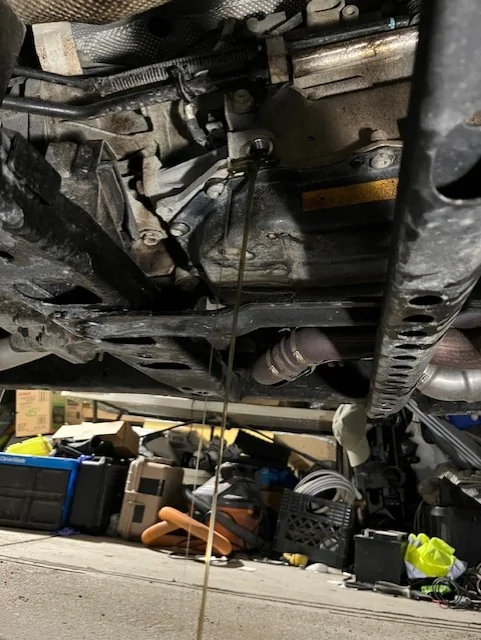
pan drop 060 old fluid above fill hole (2 to 3 quarts) draining thru fill hole prior to removing transmission oil pan credit Maximus Gladius 2025-12-30.jpg
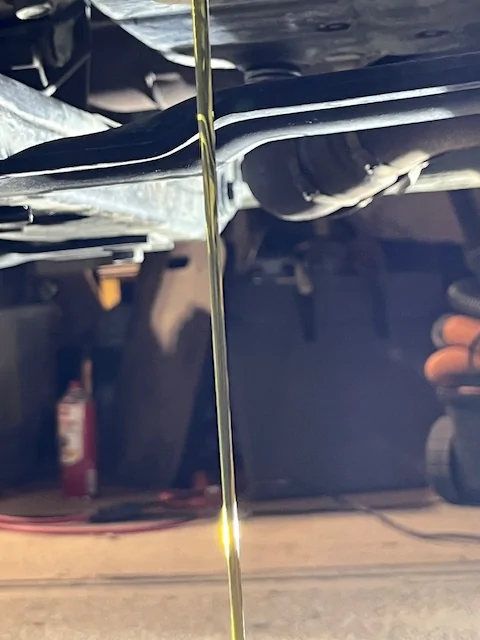
pan drop 070 old fluid below fill hole (3 to 4 quarts) being extracted thru fill hole to empty the transmission oil pan (and for test sample sent to laboratory) prior to removing transmission oil pan credit Maximus Gladius 2025-12-30.jpg
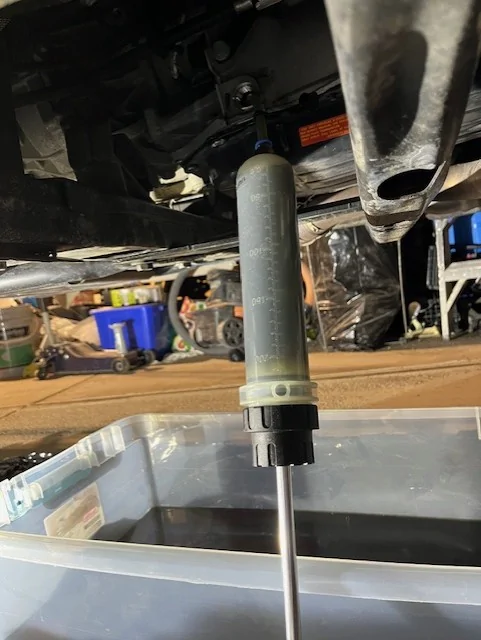
pan drop 080 use brake cleaner to clean around transmission before removing transmission oil pan credit Maximus Gladius 2025-12-30.jpg
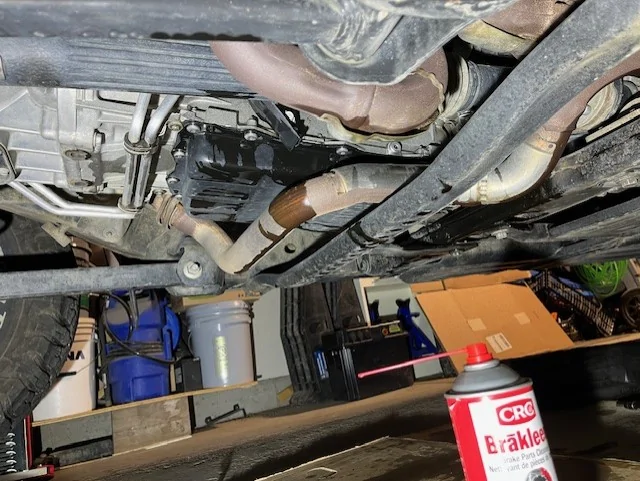
pan drop 090 detached MOPAR transmission oil pan & gasket (MOPAR 68522534AA) before being completely removed credit Maximus Gladius 2025-12-30.jpg
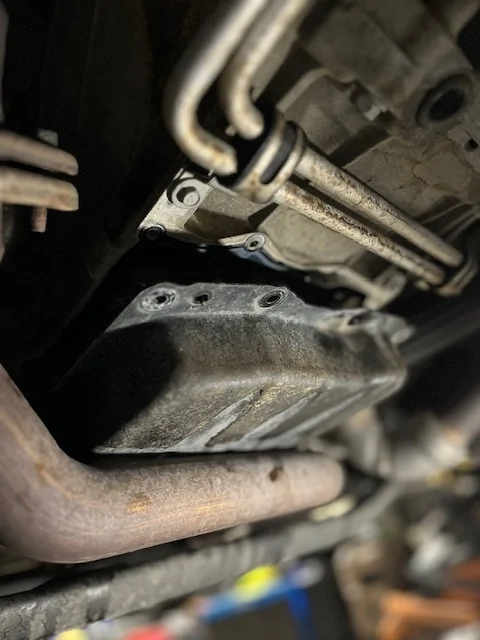
pan drop 100 850RE automatic transmission with oil pan and gasket removed and flange (gasket mating surface) cleaned credit Maximus Gladius 2025-12-30.jpg
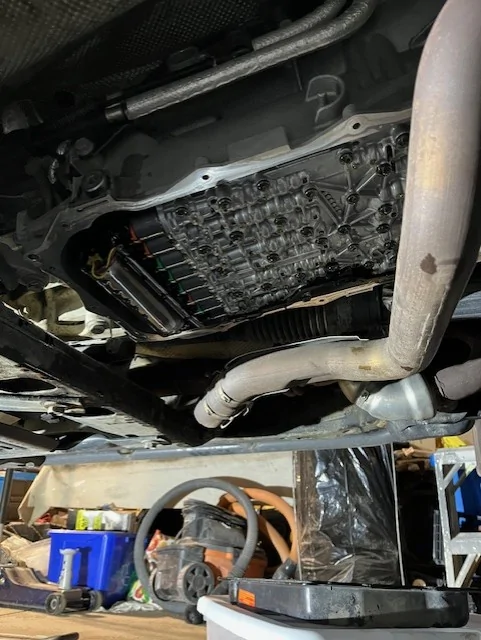
pan drop 110 inside of reusable MOPAR transmission oil pan with 2 magnets (MOPAR 68207788AA) & filter (MOPAR 68417054AB) intact credit Maximus Gladius 2025-12-30.jpg
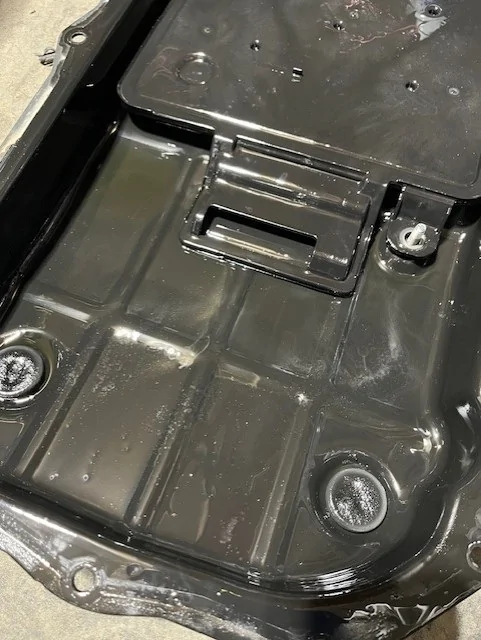
pan drop 120 metallic sludge accumulated on 1 of 2 transmission magnets (MOPAR 68207788AA) credit Maximus Gladius 2025-12-30.jpg
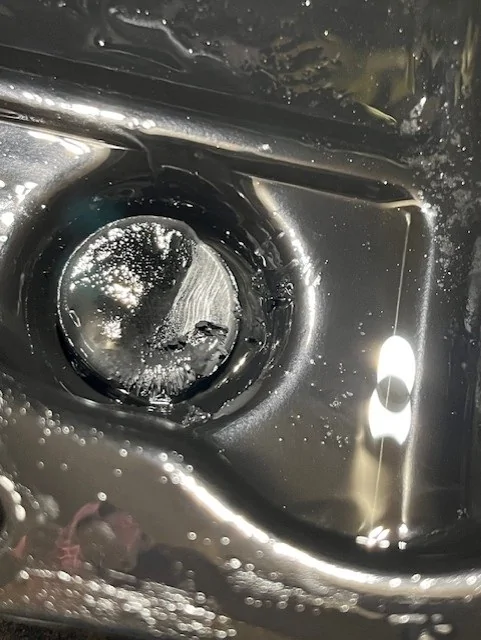
pan drop 130 metallic sludge accumulated on 1 of 2 transmission magnets (MOPAR 68207788AA) credit Maximus Gladius 2025-12-30.jpg
pan drop 140 inside of reusable MOPAR transmission oil pan after cleaning shown with clean magnets & without filter installed credit Maximus Gladius 2025-12-30.jpg
pan drop 150 new fluid being installed thru fill hole after installing clean transmission oil pan & new gasket & new filter & clean magnets credit Maximus Gladius 2025-12-30.jpg
Sponsored
Attachments
-
pan_drop_010_ZF_Service_Information_Oil_change_kit_for_ZF_8HP_automatic_transmission_November_...pdf1.2 MB Views: 228
-
41.5 KB Views: 13
Last edited: