Sponsored
What did you do TO your Gladiator today? [ADMIN WARNING: NO POLITICS, NO GUN TALK]
- Thread starter The4x4Guys
- Start date
- Watchers 1,484
![Jeep Gladiator What did you do TO your Gladiator today? [ADMIN WARNING: NO POLITICS, NO GUN TALK] 20200921_182626](https://cdn.jeepgladiatorforum.com/attachments/104/104982-b645bef83e5d93332ba72882abbb2d5c.jpg)
![Jeep Gladiator What did you do TO your Gladiator today? [ADMIN WARNING: NO POLITICS, NO GUN TALK] IMG_0948 (1)](https://cdn.jeepgladiatorforum.com/attachments/104/104987-787c29b06e1235fba90d35879d2a0835.jpg)
Logan94605
Well-Known Member
- First Name
- Logan
- Joined
- Sep 11, 2020
- Threads
- 14
- Messages
- 166
- Reaction score
- 148
- Location
- San Francisco Bay Area
- Vehicle(s)
- Jeep Gladiator Mojave
- Occupation
- Things & Stuff
I learned a lesson today.... Never use 303 on your floor mats! Them things a slippery as ice and super annoying.I haven't tried 303, but I've heard great stuff about it. Supposed to be fantastic on the tonneau too, it's next on the chemical bucket list lol.
![Jeep Gladiator What did you do TO your Gladiator today? [ADMIN WARNING: NO POLITICS, NO GUN TALK] IMG_20200921_135611](https://cdn.jeepgladiatorforum.com/attachments/105/105001-7c8c1b88532b6fe2ba5a3189a48605aa.jpg)
![Jeep Gladiator What did you do TO your Gladiator today? [ADMIN WARNING: NO POLITICS, NO GUN TALK] IMG_20200921_135600](https://cdn.jeepgladiatorforum.com/attachments/105/105002-fa6decfb9e6997976f6ee4b41eb8ec90.jpg)
Deleted member 30519
I've been using 303 since I had my 18 Wrangler and now the JT. I'll never use anything else.I haven't tried 303, but I've heard great stuff about it. Supposed to be fantastic on the tonneau too, it's next on the chemical bucket list lol.
Logan94605
Well-Known Member
- First Name
- Logan
- Joined
- Sep 11, 2020
- Threads
- 14
- Messages
- 166
- Reaction score
- 148
- Location
- San Francisco Bay Area
- Vehicle(s)
- Jeep Gladiator Mojave
- Occupation
- Things & Stuff
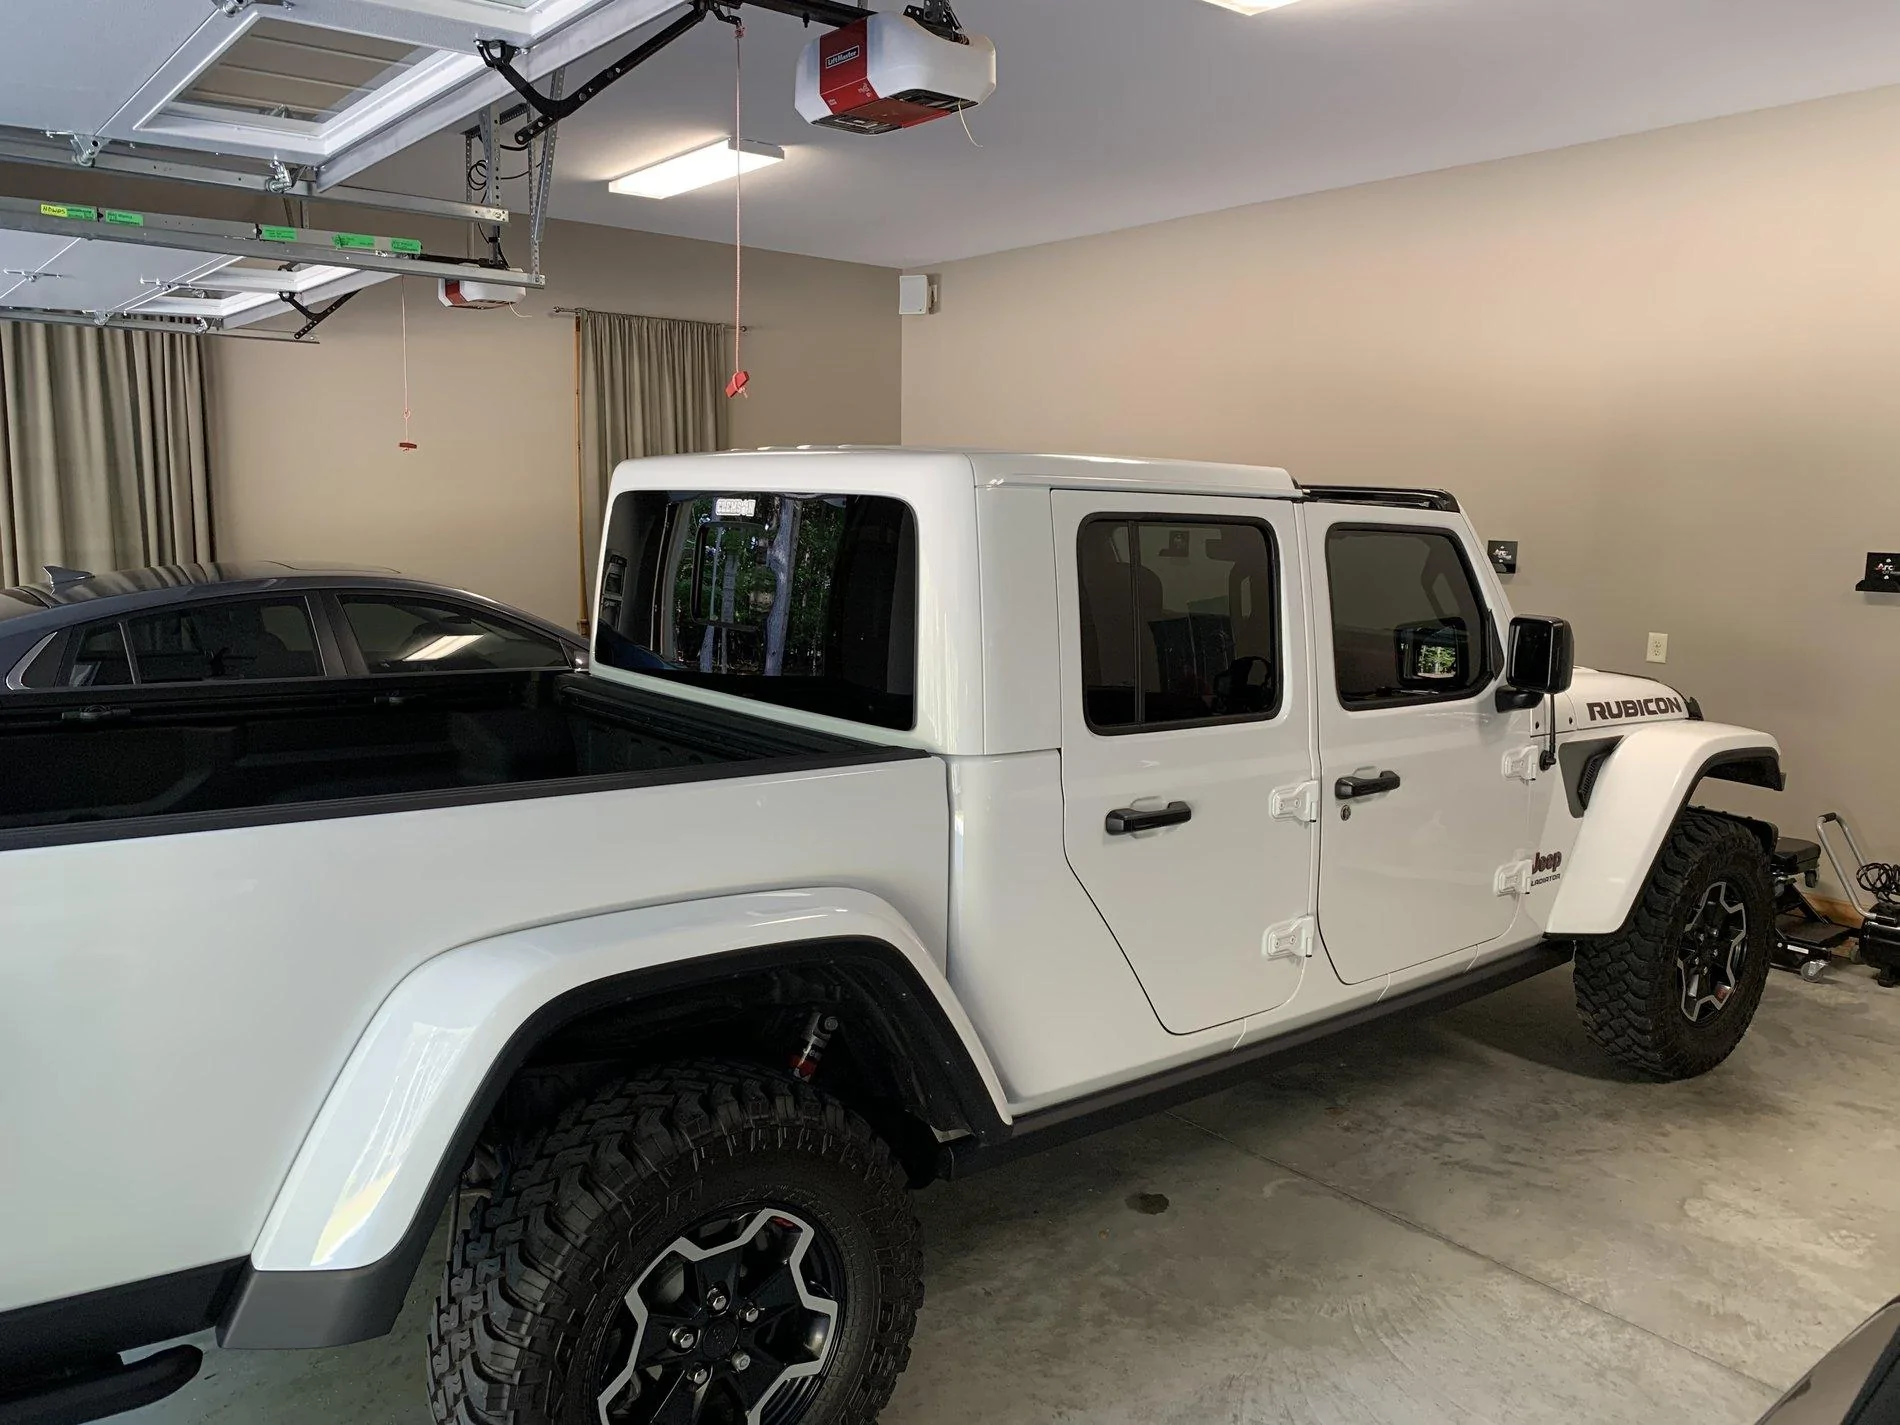
Dammm I want your garage!Sad day, went from an entire summer of open air & nakedness (4+ months straight with no top and doors).

To unnaked and starting to winterize.
Tough day!

Sponsored
brain
Well-Known Member
- First Name
- brian
- Joined
- Feb 5, 2018
- Threads
- 7
- Messages
- 190
- Reaction score
- 216
- Location
- Georgia
- Website
- www.unsinkablebriancork.com
- Vehicle(s)
- 2020 Wrangler JT (Gladiator) Mojave | Gobi
- Occupation
- Business and Executive Coach
I just took delivery of a set of 35" Mickey Thompson BAJA MTZP3s wrapped around Black Rhino Armory Wheels for my Mojave.
I liked the 33" Falken Wildpeaks that came with the Gladiator but these Mickey Thompson lean more towards the offroad and mud view of the world.
NOTE: I'll be selling the Falken's and the gray Gladiator takeoff wheels (also pictured).
![Jeep Gladiator What did you do TO your Gladiator today? [ADMIN WARNING: NO POLITICS, NO GUN TALK] 2020 Jeep Gladiator Mojav](data:image/svg+xml;charset=utf-8,%3Csvg xmlns%3D'http%3A%2F%2Fwww.w3.org%2F2000%2Fsvg' width='1280' height='960' viewBox%3D'0 0 1280 960'%2F%3E)
![Jeep Gladiator What did you do TO your Gladiator today? [ADMIN WARNING: NO POLITICS, NO GUN TALK] 62241347699__F9F05BB2-8141-414A-AEF1-BFAD0D385327](data:image/svg+xml;charset=utf-8,%3Csvg xmlns%3D'http%3A%2F%2Fwww.w3.org%2F2000%2Fsvg' width='1200' height='1600' viewBox%3D'0 0 1200 1600'%2F%3E)
I liked the 33" Falken Wildpeaks that came with the Gladiator but these Mickey Thompson lean more towards the offroad and mud view of the world.
NOTE: I'll be selling the Falken's and the gray Gladiator takeoff wheels (also pictured).
![Jeep Gladiator What did you do TO your Gladiator today? [ADMIN WARNING: NO POLITICS, NO GUN TALK] 2020 Jeep Gladiator Mojav](https://cdn.jeepgladiatorforum.com/attachments/105/105113-aa05cd3cec178ed207674099ba18fa85.jpeg)
![Jeep Gladiator What did you do TO your Gladiator today? [ADMIN WARNING: NO POLITICS, NO GUN TALK] 62241347699__F9F05BB2-8141-414A-AEF1-BFAD0D385327](https://cdn.jeepgladiatorforum.com/attachments/105/105114-3723fd7baa2d80f952c4d39fe162c012.jpeg)
![Jeep Gladiator What did you do TO your Gladiator today? [ADMIN WARNING: NO POLITICS, NO GUN TALK] IMG_0124](https://cdn.jeepgladiatorforum.com/attachments/105/105115-6a9154eacc10f7b38dd82c344557919a.jpeg)
SloW8
Well-Known Member
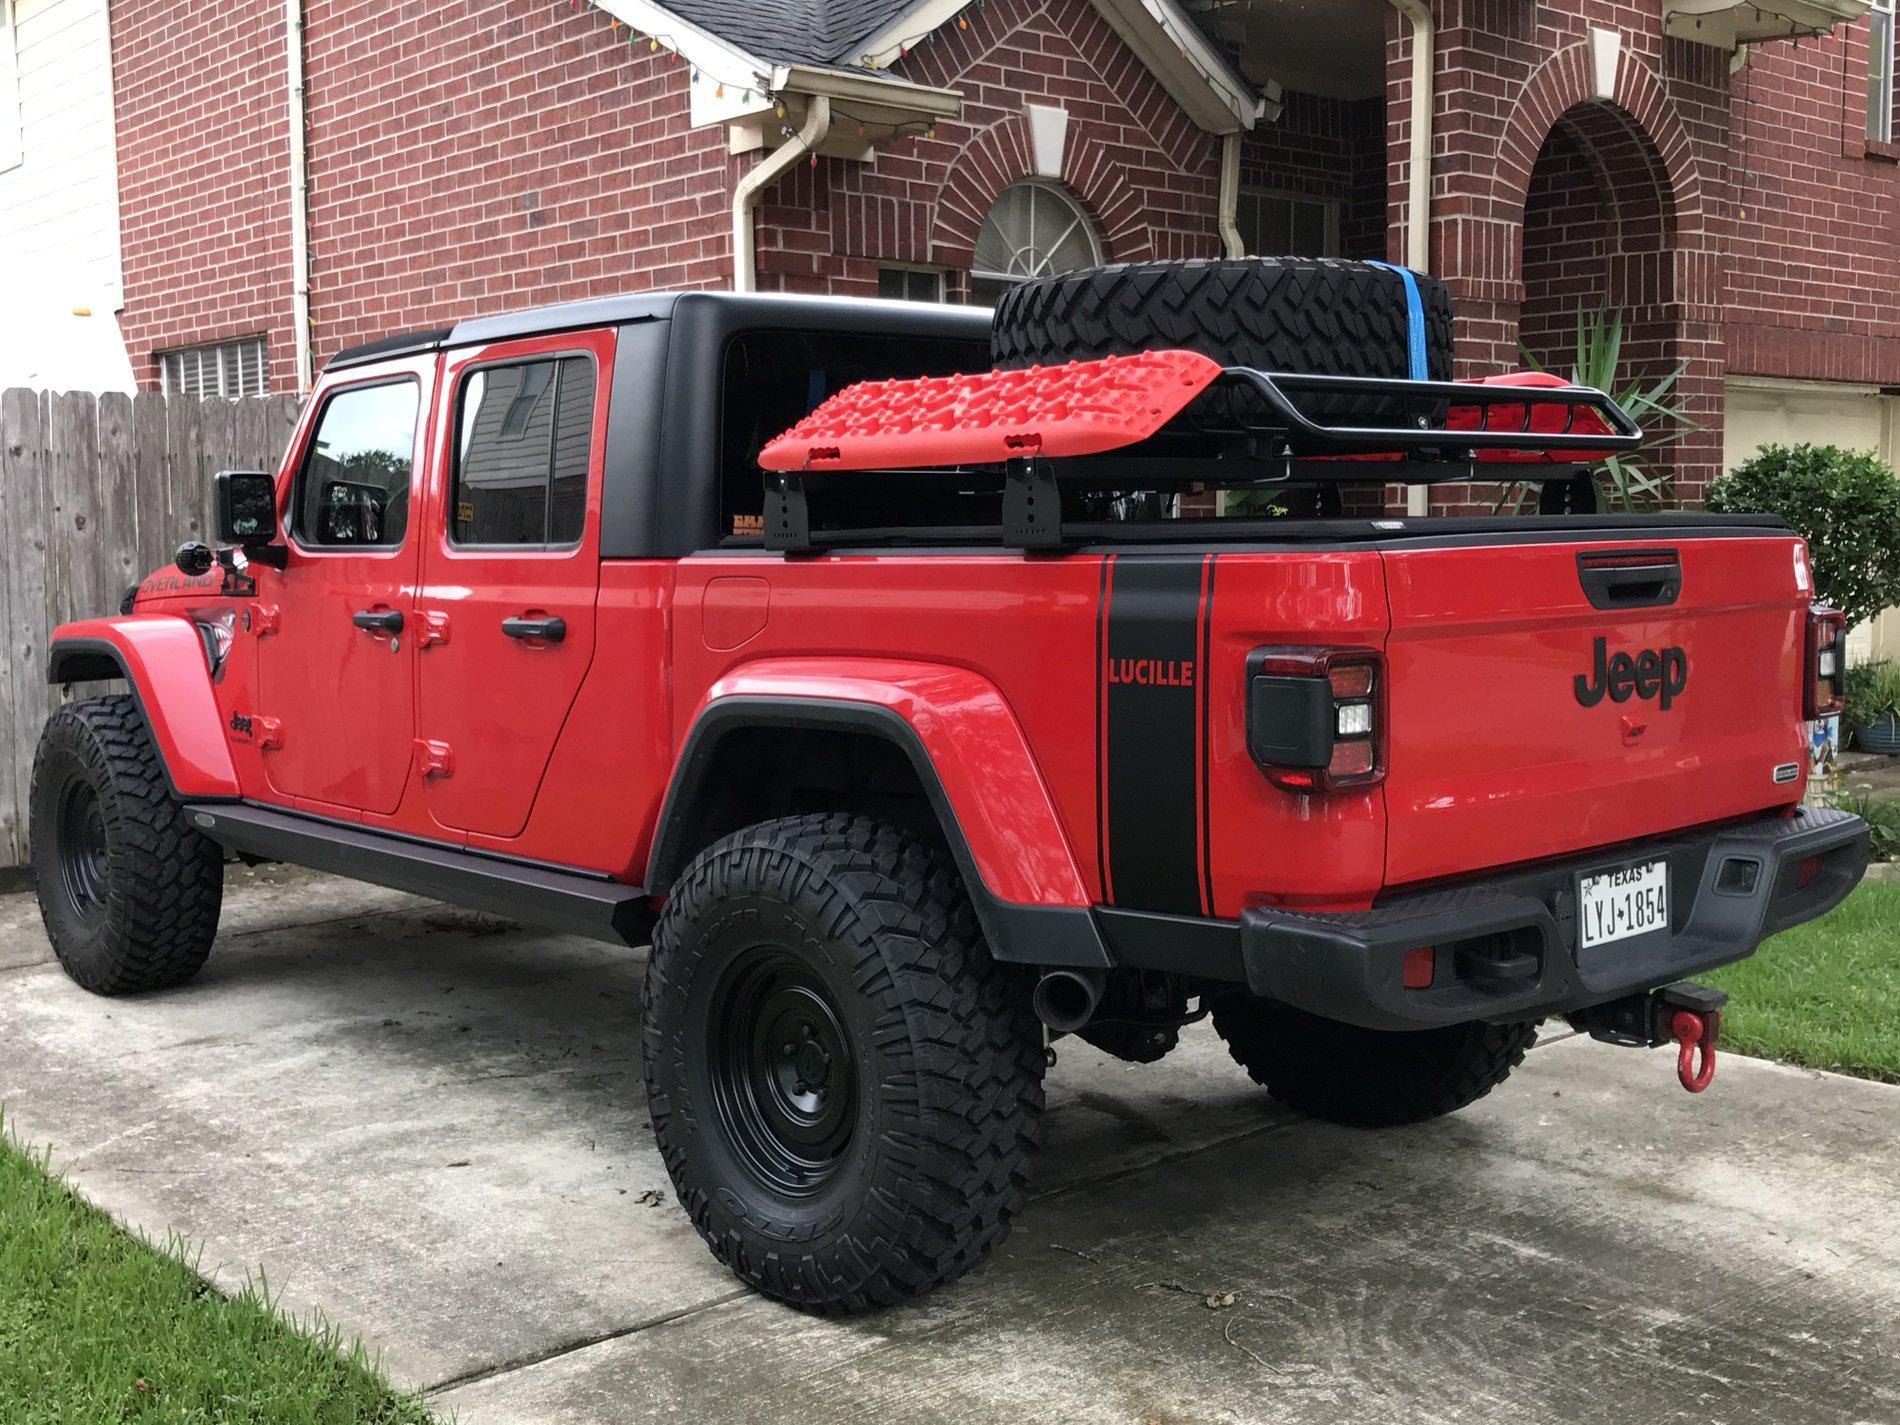
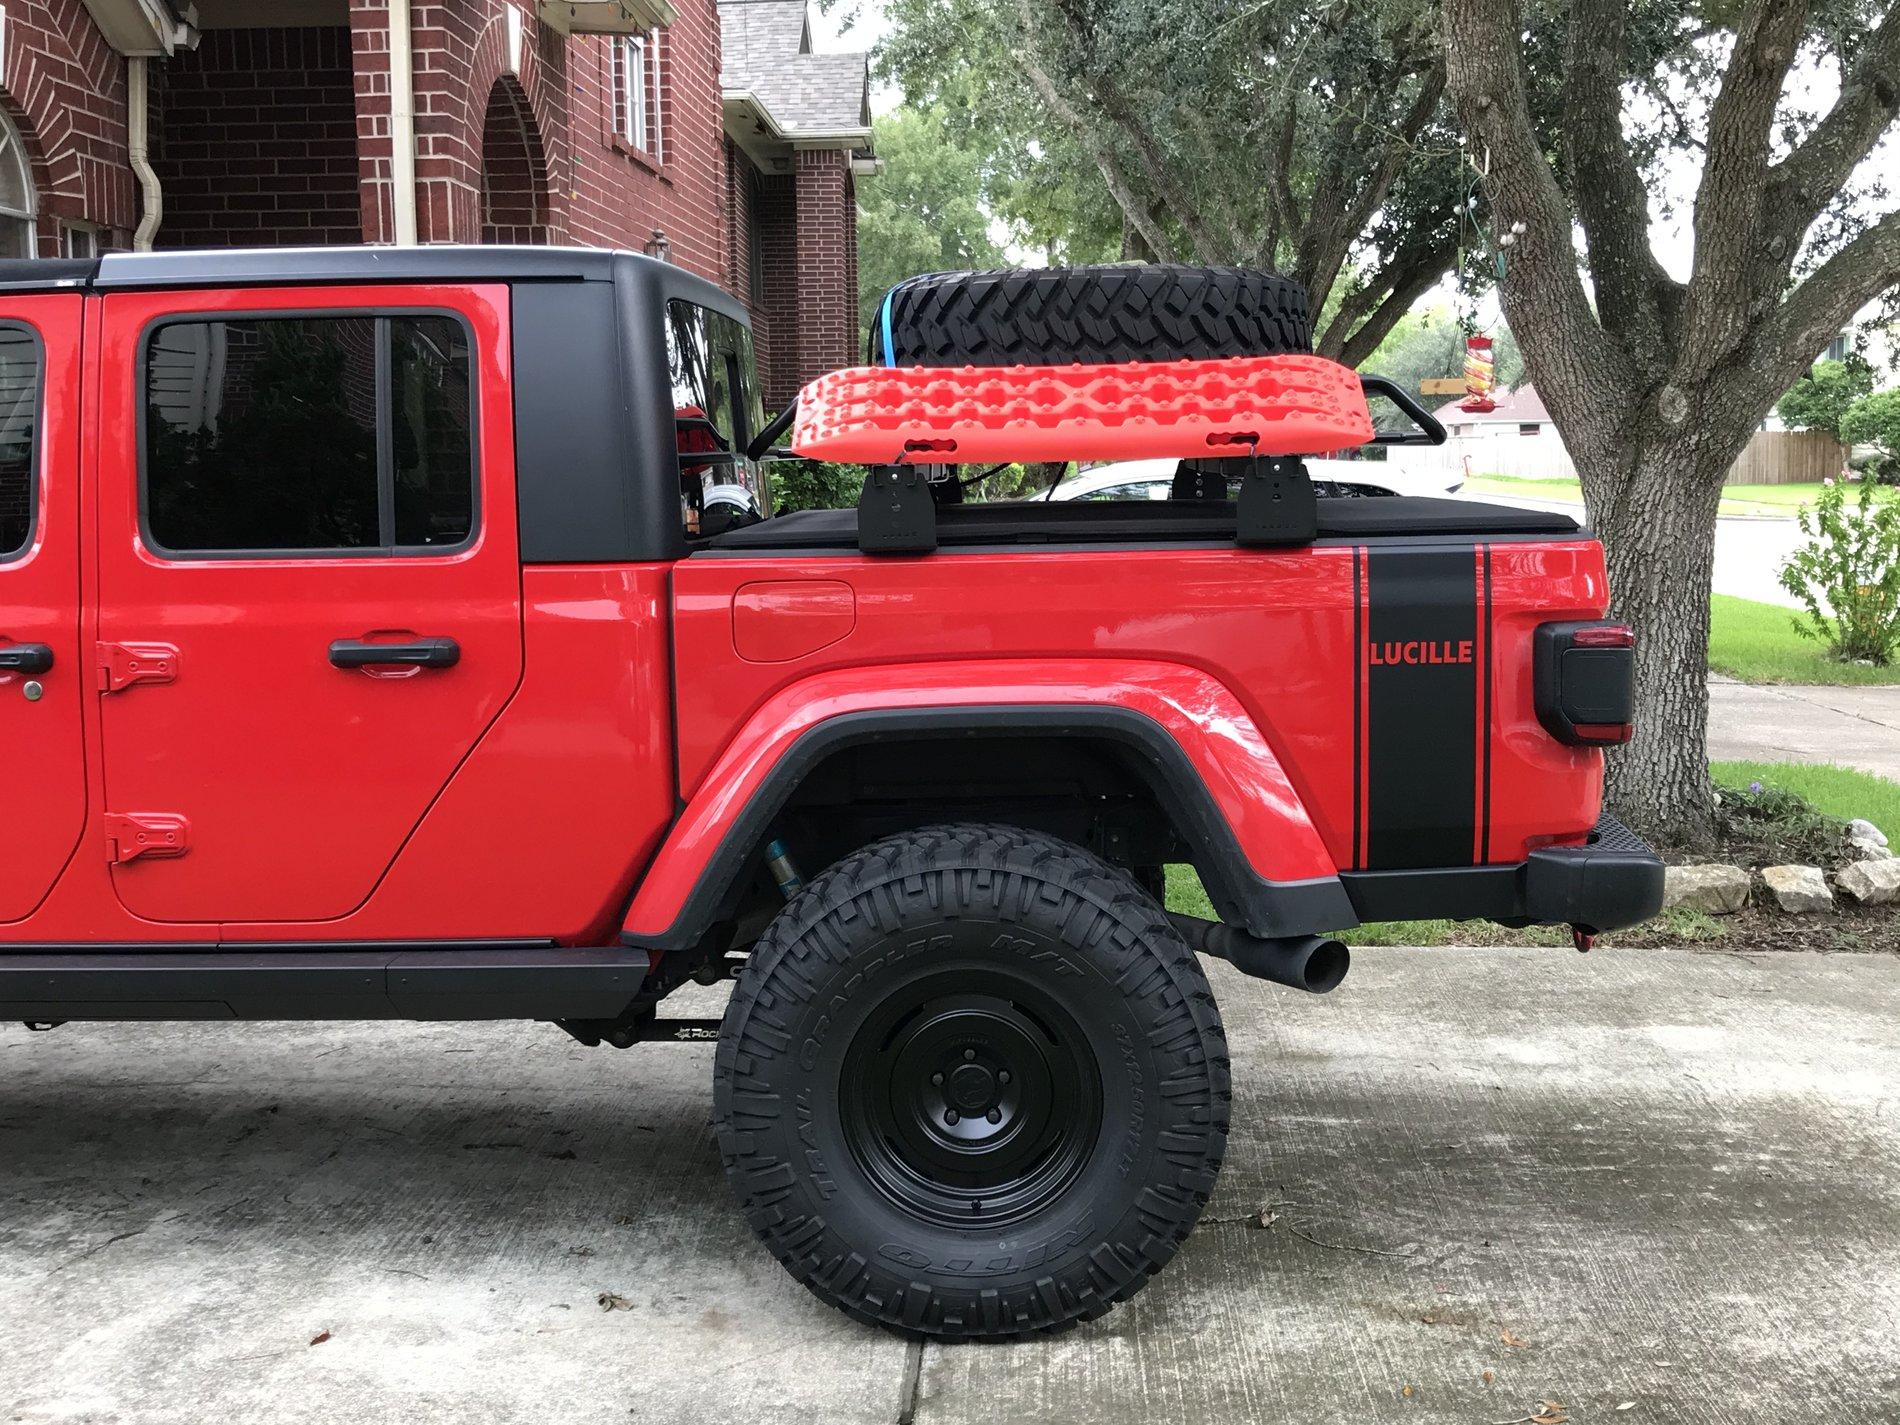
How did you mount your traction mats?I have a Voodoo rack a safari rack and tire strap.
https://www.amazon.com/N-Fab-BM1TSBL-Rapid-Strap-Universal/dp/B076ZZY5KF
https://www.kbvoodoo.com/shop
https://www.amazon.com/Mild-Steel-Cargo-Carrier-Basket/dp/B06Y4GLGDN
Rubi_Rhod
Well-Known Member
- First Name
- Aaron
- Joined
- Sep 2, 2020
- Threads
- 1
- Messages
- 376
- Reaction score
- 754
- Location
- Washington
- Vehicle(s)
- '20 JTR 6MT, '55 Manx Clone Bug
- Build Thread
- Link
Installed the Rugged Ridge HiLo snorkel.
Have the low on now. While the hi mount is badass looking, its far more a liability as it just rests on the window. It’s bolted down, but theres no upper support. So I think its more prone to accidents, especially as I’m involved. We got a lot of tree lined trails so while I don’t see it being so flimsy that one hit will do it it, I’ll save it for “adventure weekends”.
I do have a K and N filter in as well. Along with the exhaust, it was a “fun”-ctional mod. I wanted more noise from the Powertrain, and this snorkel has the added benefit of bringing in cooler, dryer air than the underhood intake. Which in previous rigs have gotten wet many times with just splashing around. So this kit seals up the box and routes all the plumbing to the cowl out of the way from everything.
![Jeep Gladiator What did you do TO your Gladiator today? [ADMIN WARNING: NO POLITICS, NO GUN TALK] E863A669-1997-4FFF-B04D-55024FDA6B96](data:image/svg+xml;charset=utf-8,%3Csvg xmlns%3D'http%3A%2F%2Fwww.w3.org%2F2000%2Fsvg' width='640' height='480' viewBox%3D'0 0 640 480'%2F%3E)
Have the low on now. While the hi mount is badass looking, its far more a liability as it just rests on the window. It’s bolted down, but theres no upper support. So I think its more prone to accidents, especially as I’m involved. We got a lot of tree lined trails so while I don’t see it being so flimsy that one hit will do it it, I’ll save it for “adventure weekends”.
I do have a K and N filter in as well. Along with the exhaust, it was a “fun”-ctional mod. I wanted more noise from the Powertrain, and this snorkel has the added benefit of bringing in cooler, dryer air than the underhood intake. Which in previous rigs have gotten wet many times with just splashing around. So this kit seals up the box and routes all the plumbing to the cowl out of the way from everything.
![Jeep Gladiator What did you do TO your Gladiator today? [ADMIN WARNING: NO POLITICS, NO GUN TALK] E863A669-1997-4FFF-B04D-55024FDA6B96](https://cdn.jeepgladiatorforum.com/attachments/105/105126-4d3a3e294e6da4e2c8a2d974d641b978.jpeg)
![Jeep Gladiator What did you do TO your Gladiator today? [ADMIN WARNING: NO POLITICS, NO GUN TALK] 8D66C5DC-3BC6-4307-97A6-95DD5B1E0679](https://cdn.jeepgladiatorforum.com/attachments/105/105127-2c8bf2590a410a579fc2f707e01257d0.webp)
![Jeep Gladiator What did you do TO your Gladiator today? [ADMIN WARNING: NO POLITICS, NO GUN TALK] 00EED710-52F0-4A79-BA66-DC84BDE18A33](https://cdn.jeepgladiatorforum.com/attachments/105/105128-6ec239702c274119bbd91e5000e351ba.jpeg)
![Jeep Gladiator What did you do TO your Gladiator today? [ADMIN WARNING: NO POLITICS, NO GUN TALK] F09B1E12-02B7-4124-BD03-AE55BEAC1EA1](https://cdn.jeepgladiatorforum.com/attachments/105/105129-3fea15b5a2b0ce76549ccfcd33eebaac.webp)
![Jeep Gladiator What did you do TO your Gladiator today? [ADMIN WARNING: NO POLITICS, NO GUN TALK] C635A9B8-E1A5-49B3-B844-AA1B3F45389C](https://cdn.jeepgladiatorforum.com/attachments/105/105130-b2a9546348347153e6b1bcd0d0b78dac.webp)
![Jeep Gladiator What did you do TO your Gladiator today? [ADMIN WARNING: NO POLITICS, NO GUN TALK] 245B6F21-9DFC-40EB-8493-2EF12E6D54F2](https://cdn.jeepgladiatorforum.com/attachments/105/105131-0cf8d432f2c157d99ea005e4efeed238.webp)
![Jeep Gladiator What did you do TO your Gladiator today? [ADMIN WARNING: NO POLITICS, NO GUN TALK] 1A492B8C-237D-4100-86CA-E17108DB3188](https://cdn.jeepgladiatorforum.com/attachments/105/105132-c32612ee598275959bb1e02f8c9fcd88.webp)
![Jeep Gladiator What did you do TO your Gladiator today? [ADMIN WARNING: NO POLITICS, NO GUN TALK] E236003E-BCD2-4B69-84E5-B18E9883AAD8](https://cdn.jeepgladiatorforum.com/attachments/105/105133-569cea5bc76baf626008219ac1c87d72.webp)
![Jeep Gladiator What did you do TO your Gladiator today? [ADMIN WARNING: NO POLITICS, NO GUN TALK] B0DA9EFA-95D6-43A7-B088-CB05CE3B4294](https://cdn.jeepgladiatorforum.com/attachments/105/105134-5ea688767a9f0d40370801df50188abe.webp)
![Jeep Gladiator What did you do TO your Gladiator today? [ADMIN WARNING: NO POLITICS, NO GUN TALK] CDA4A4BD-53F1-4863-80DC-84C46420BA85](https://cdn.jeepgladiatorforum.com/attachments/105/105135-4cbdf20e9aea511225ecfcb4ba89b643.webp)
![Jeep Gladiator What did you do TO your Gladiator today? [ADMIN WARNING: NO POLITICS, NO GUN TALK] E1045E74-35F2-4276-8DD1-C81808F062B0](https://cdn.jeepgladiatorforum.com/attachments/105/105136-3d249c87eeb4e2a16de89cc64e321212.webp)
immaechu
Well-Known Member
- First Name
- Eric
- Joined
- Aug 3, 2020
- Threads
- 40
- Messages
- 232
- Reaction score
- 165
- Location
- Chino Hills, CA
- Vehicle(s)
- 2020 Gladiator Sport S w/ Max Tow / 2005 Honda Accord Coupe w/ Air Suspension
- Occupation
- Owner of printing company
- Vehicle Showcase
- 1
Installed the Rugged Ridge HiLo snorkel.
Have the low on now. While the hi mount is badass looking, its far more a liability as it just rests on the window. It’s bolted down, but theres no upper support. So I think its more prone to accidents, especially as I’m involved. We got a lot of tree lined trails so while I don’t see it being so flimsy that one hit will do it it, I’ll save it for “adventure weekends”.
I do have a K and N filter in as well. Along with the exhaust, it was a “fun”-ctional mod. I wanted more noise from the Powertrain, and this snorkel has the added benefit of bringing in cooler, dryer air than the underhood intake. Which in previous rigs have gotten wet many times with just splashing around. So this kit seals up the box and routes all the plumbing to the cowl out of the way from everything.
This i so cool! Did you have to do any cutting to get the tubing to fit.
Rubi_Rhod
Well-Known Member
- First Name
- Aaron
- Joined
- Sep 2, 2020
- Threads
- 1
- Messages
- 376
- Reaction score
- 754
- Location
- Washington
- Vehicle(s)
- '20 JTR 6MT, '55 Manx Clone Bug
- Build Thread
- Link
This was the only cutting casualty. A bit of hidden plastic on the cowl trim. This install is really slick as far as snorkels go.This i so cool! Did you have to do any cutting to get the tubing to fit.
![Jeep Gladiator What did you do TO your Gladiator today? [ADMIN WARNING: NO POLITICS, NO GUN TALK] 2DD3402C-7B33-4F89-A4BA-E16586CA28D0](https://cdn.jeepgladiatorforum.com/attachments/105/105165-c20f8220e949f2c68a8dd85b9a8843ea.webp)
Sponsored
Rubi_Rhod
Well-Known Member
- First Name
- Aaron
- Joined
- Sep 2, 2020
- Threads
- 1
- Messages
- 376
- Reaction score
- 754
- Location
- Washington
- Vehicle(s)
- '20 JTR 6MT, '55 Manx Clone Bug
- Build Thread
- Link
Also, no more prop rods. They drive me nuts. From maintenance to attaching the compressor to the battery, its better without the damn rod.
This one is from redline tuning. For the fancy types, they also have a stainless steel strut case finish. NGL it did look pretty snazzy, so for the fancy types its a nice bit of bling. But trying to show restraint damnit! So I got the black.
Also, has nice quick disconnects so its no problem at all to swing the hood all the way back.
And am glad it clears the snorkel no problem.
![Jeep Gladiator What did you do TO your Gladiator today? [ADMIN WARNING: NO POLITICS, NO GUN TALK] B6E403AC-4204-45E2-812C-0B26F1E68C8F](https://cdn.jeepgladiatorforum.com/attachments/105/105166-71e04c9dc3c1b3952428c59466de7ab6.jpeg)
![Jeep Gladiator What did you do TO your Gladiator today? [ADMIN WARNING: NO POLITICS, NO GUN TALK] EE906CDF-1E76-444F-96B2-243D4D70A606](https://cdn.jeepgladiatorforum.com/attachments/105/105167-b7cf143ca579e8ee1feeaf76cbaee972.jpeg)
![Jeep Gladiator What did you do TO your Gladiator today? [ADMIN WARNING: NO POLITICS, NO GUN TALK] CB1AED6E-7565-4812-AB22-BC3662127AB7](https://cdn.jeepgladiatorforum.com/attachments/105/105168-db025b4c240a28a5b2657023a2099b35.webp)
![Jeep Gladiator What did you do TO your Gladiator today? [ADMIN WARNING: NO POLITICS, NO GUN TALK] 8530ECC1-4C08-4483-8825-F2C77DC08C5B](https://cdn.jeepgladiatorforum.com/attachments/105/105169-54f45598113b30a6d2f0e8ee92525c1b.webp)
![Jeep Gladiator What did you do TO your Gladiator today? [ADMIN WARNING: NO POLITICS, NO GUN TALK] 6E9AE753-62CA-4111-80FB-B717B484608F](https://cdn.jeepgladiatorforum.com/attachments/105/105171-343e0c6fdbe13ee2ddf87fe298d80223.webp)
Last edited:
JeepTrucker
Well-Known Member
I like these as well. My Gladiator is the 3rd vehicle I have installed the Redline hood struts on, and it was the easiest.Also, no more prop rods. They drive me nuts. From maintenance to attaching the compressor to the battery, its better without the damn rod.
This one is from redline tuning. For the fancy types, they also have a stainless steel strut case finish. NGL it did look pretty snazzy, so for the fancy types its a nice bit of bling. But trying to show restraint damnit! So I got the black.
Also, has nice quick disconnects so its no problem at all to swing the hood all the way back.
And am glad it clears the snorkel no problem.
DaleG
Well-Known Member
- First Name
- Dale
- Joined
- Sep 5, 2020
- Threads
- 9
- Messages
- 175
- Reaction score
- 246
- Location
- N Fort Myers, Florida
- Website
- www.disinfecting4u.com
- Vehicle(s)
- 2020 Gladiator Overland, 2019 Infiniti QX50, 2015 Cruisers Yacht 45 Cantius
- Occupation
- Self Employed
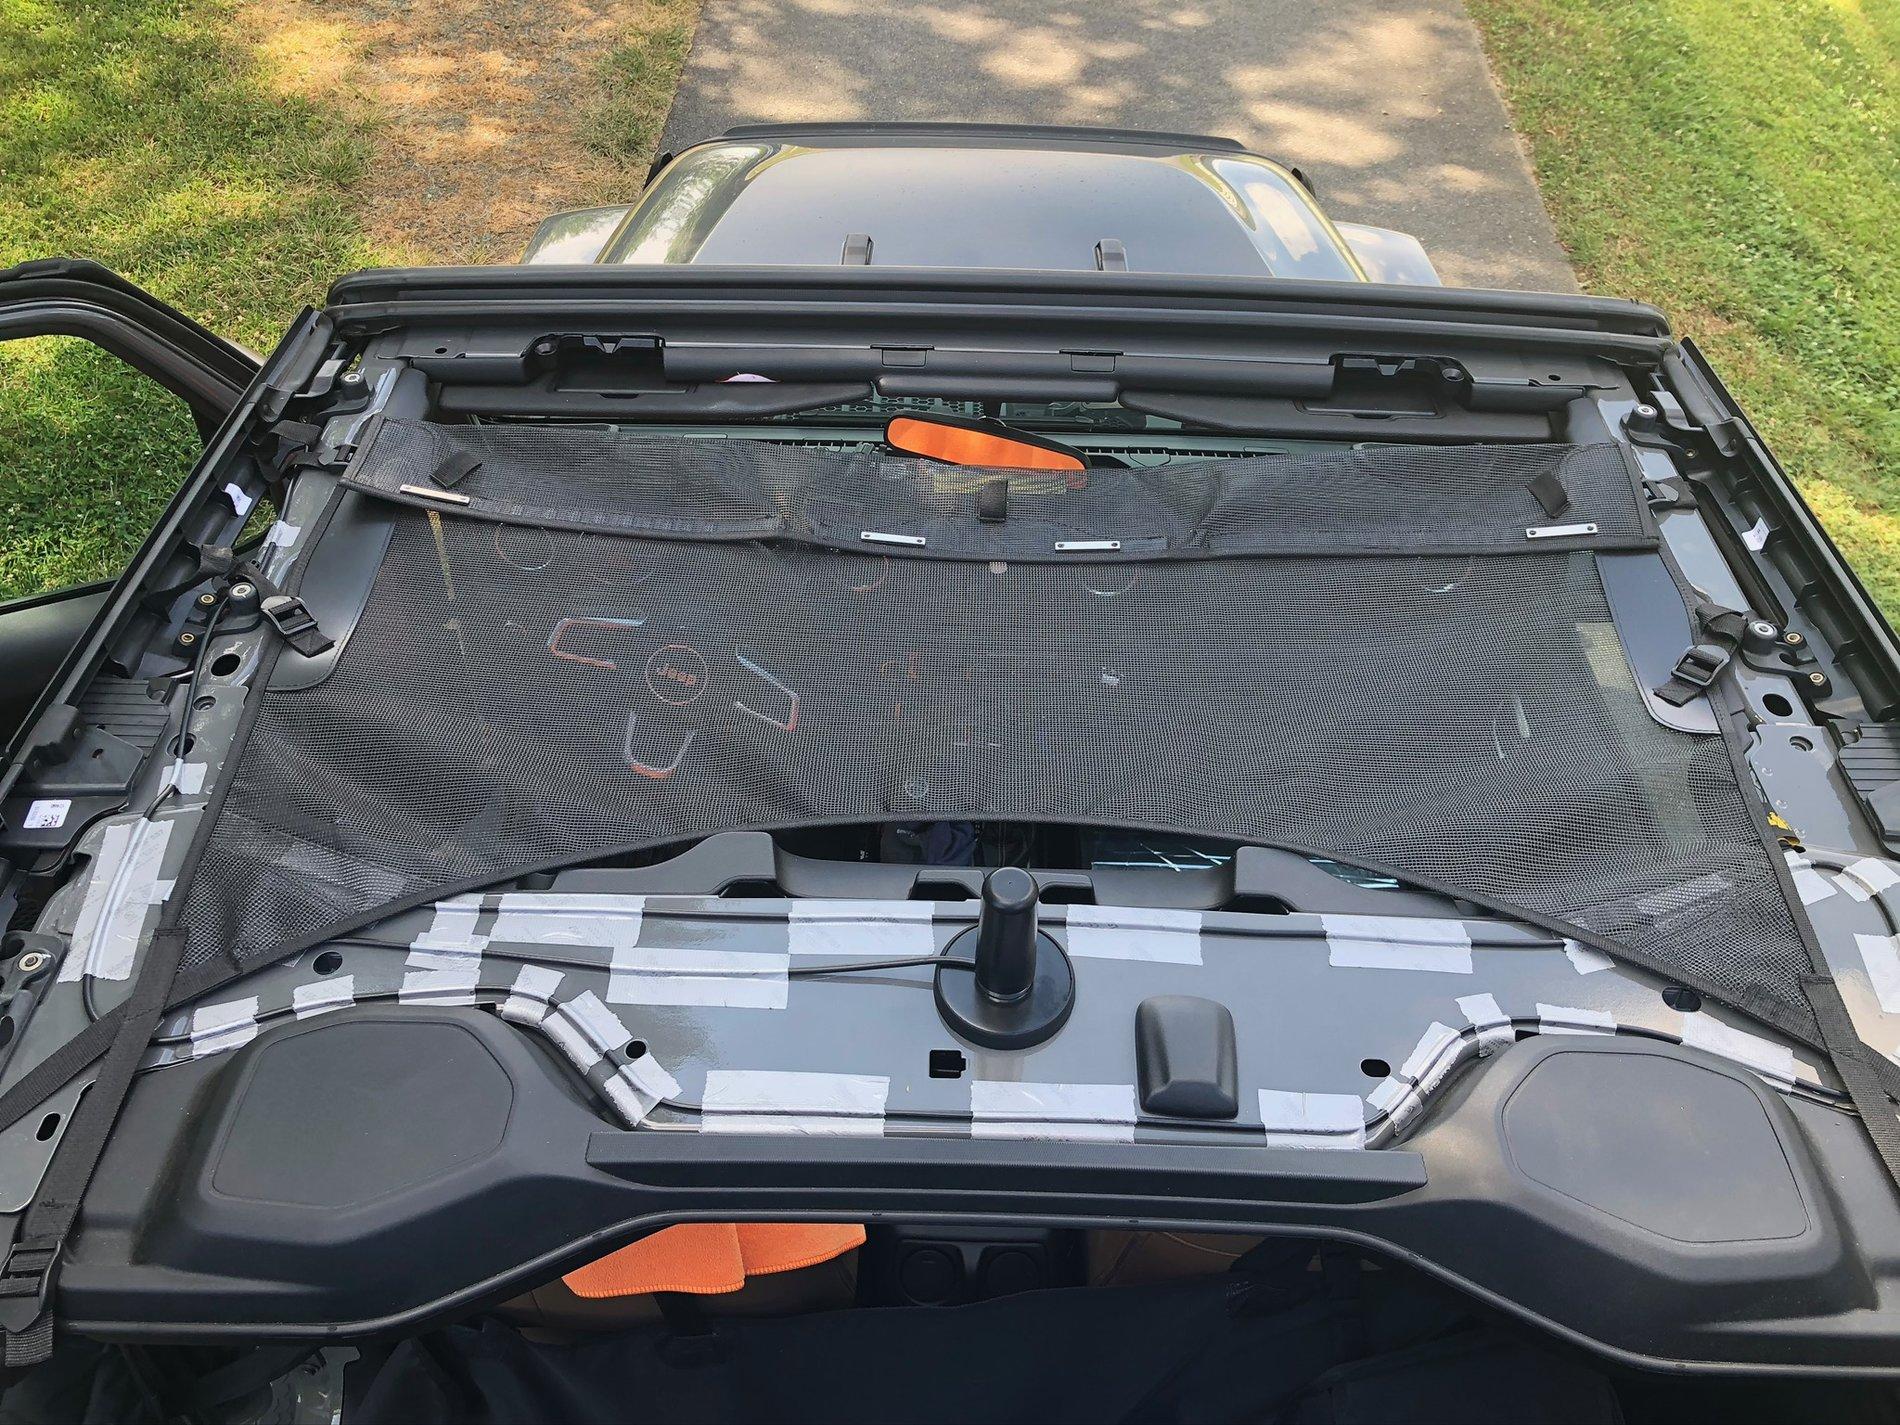
Stripped it naked for the first time and installed the Tan Spiderweb Sunshade...nice sunshade!
![Jeep Gladiator What did you do TO your Gladiator today? [ADMIN WARNING: NO POLITICS, NO GUN TALK] 77147DEA-069C-4680-8A6F-D383E1E875FA](https://cdn.jeepgladiatorforum.com/attachments/105/105209-75b3d41d65a225fb5a390aa25374cab7.jpeg)
![Jeep Gladiator What did you do TO your Gladiator today? [ADMIN WARNING: NO POLITICS, NO GUN TALK] B7B0CEF6-AF82-450F-80FB-80CDF5053D07](https://cdn.jeepgladiatorforum.com/attachments/105/105210-6b5055ab23d1f7a89515d6912735dc25.jpeg)
Texops
Well-Known Member
- First Name
- Todd
- Joined
- Jan 31, 2019
- Threads
- 14
- Messages
- 1,002
- Reaction score
- 1,689
- Location
- LaPorte Texas
- Vehicle(s)
- 2022 Mojave, sold, 2023 Rubicon Gladiator
- Occupation
- Retirement Refinery Operator
- Vehicle Showcase
- 2
right now i have big tie wrapsHow did you mount your traction mats?
Ols5370
Well-Known Member
Question. What did you use on your a/c ventsIt's been a while since I last got around to posting any WDYDTYGT, so this covers everything back to probably July when I started getting ready for our big Rocky Mountains trip last month. Trying to remember the order I did all these things, but I guess it doesn't really matter...
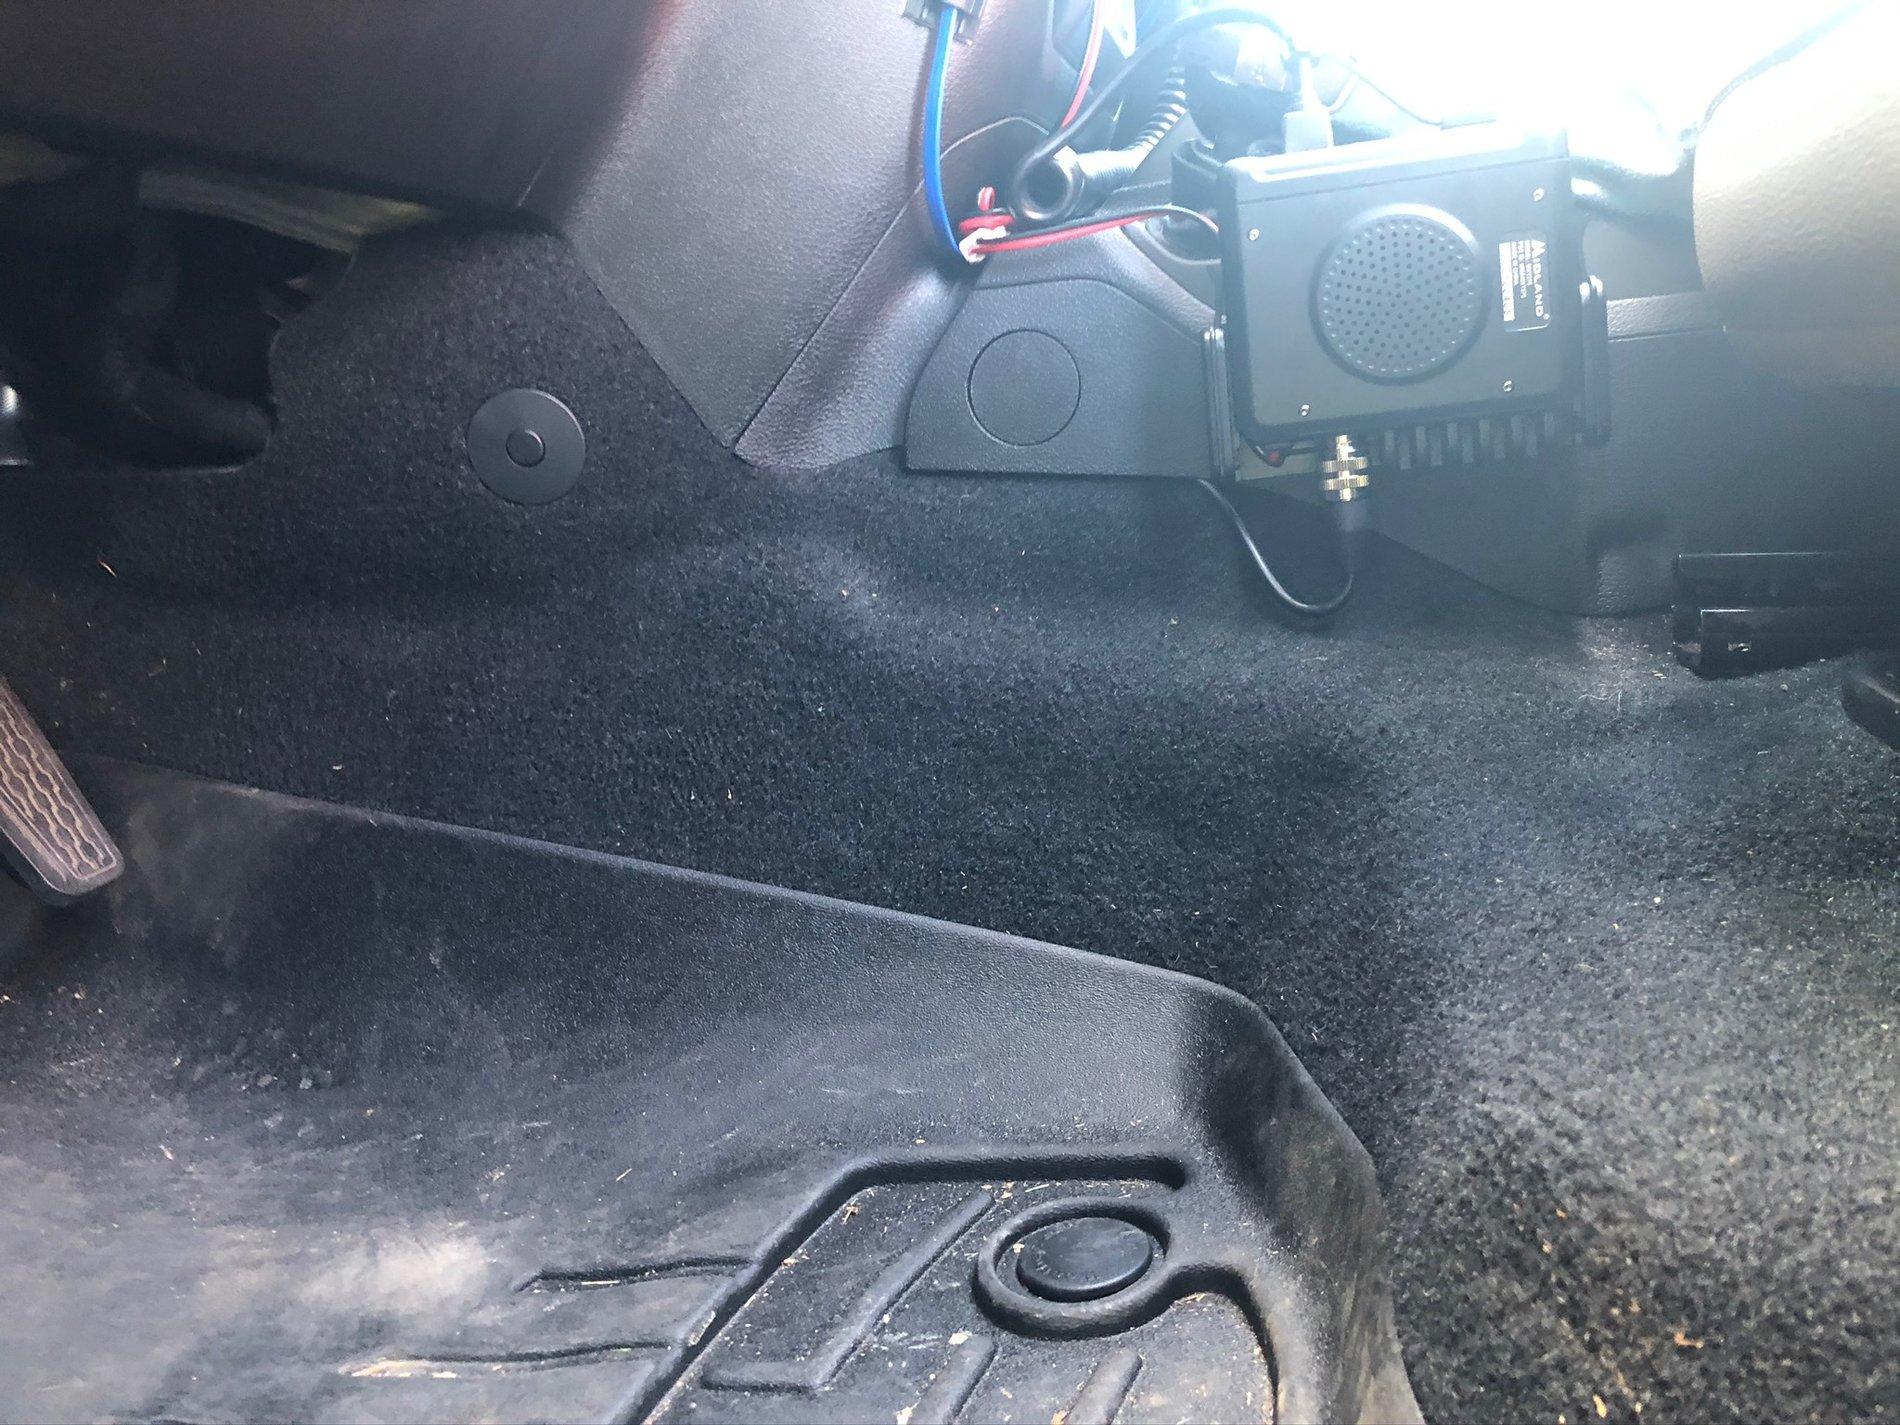
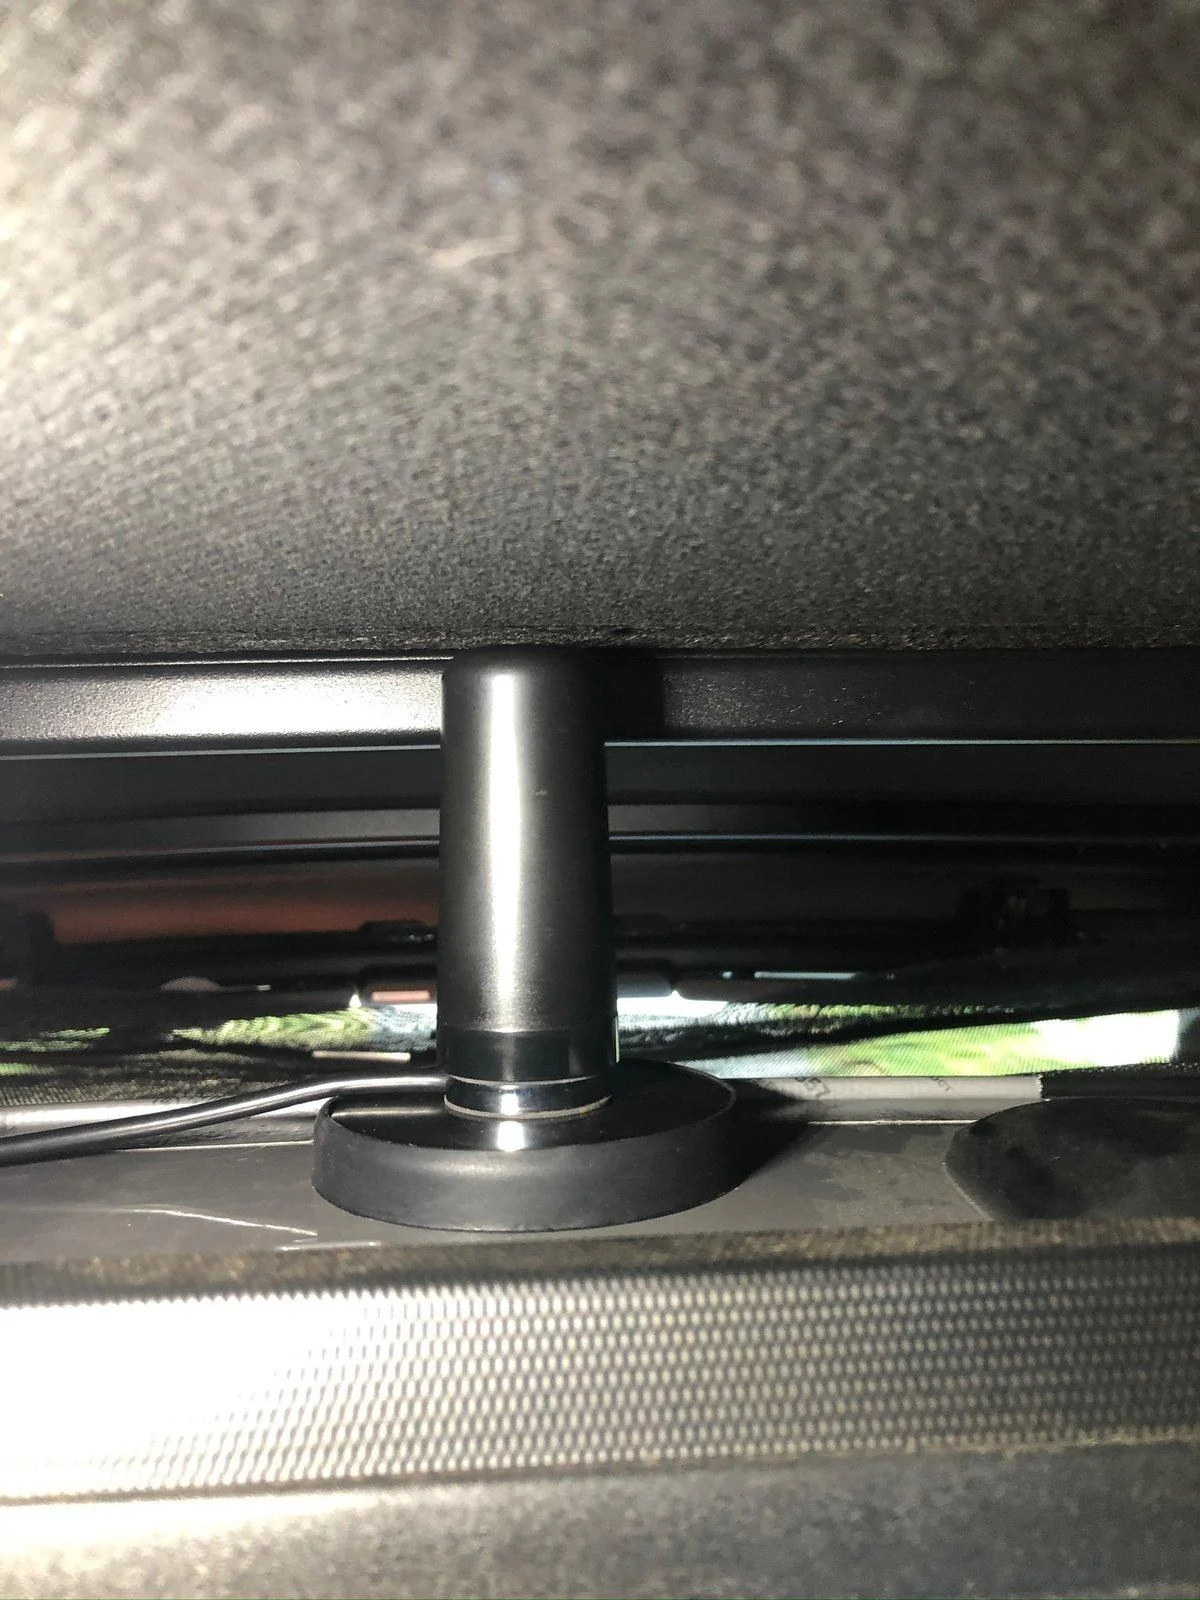
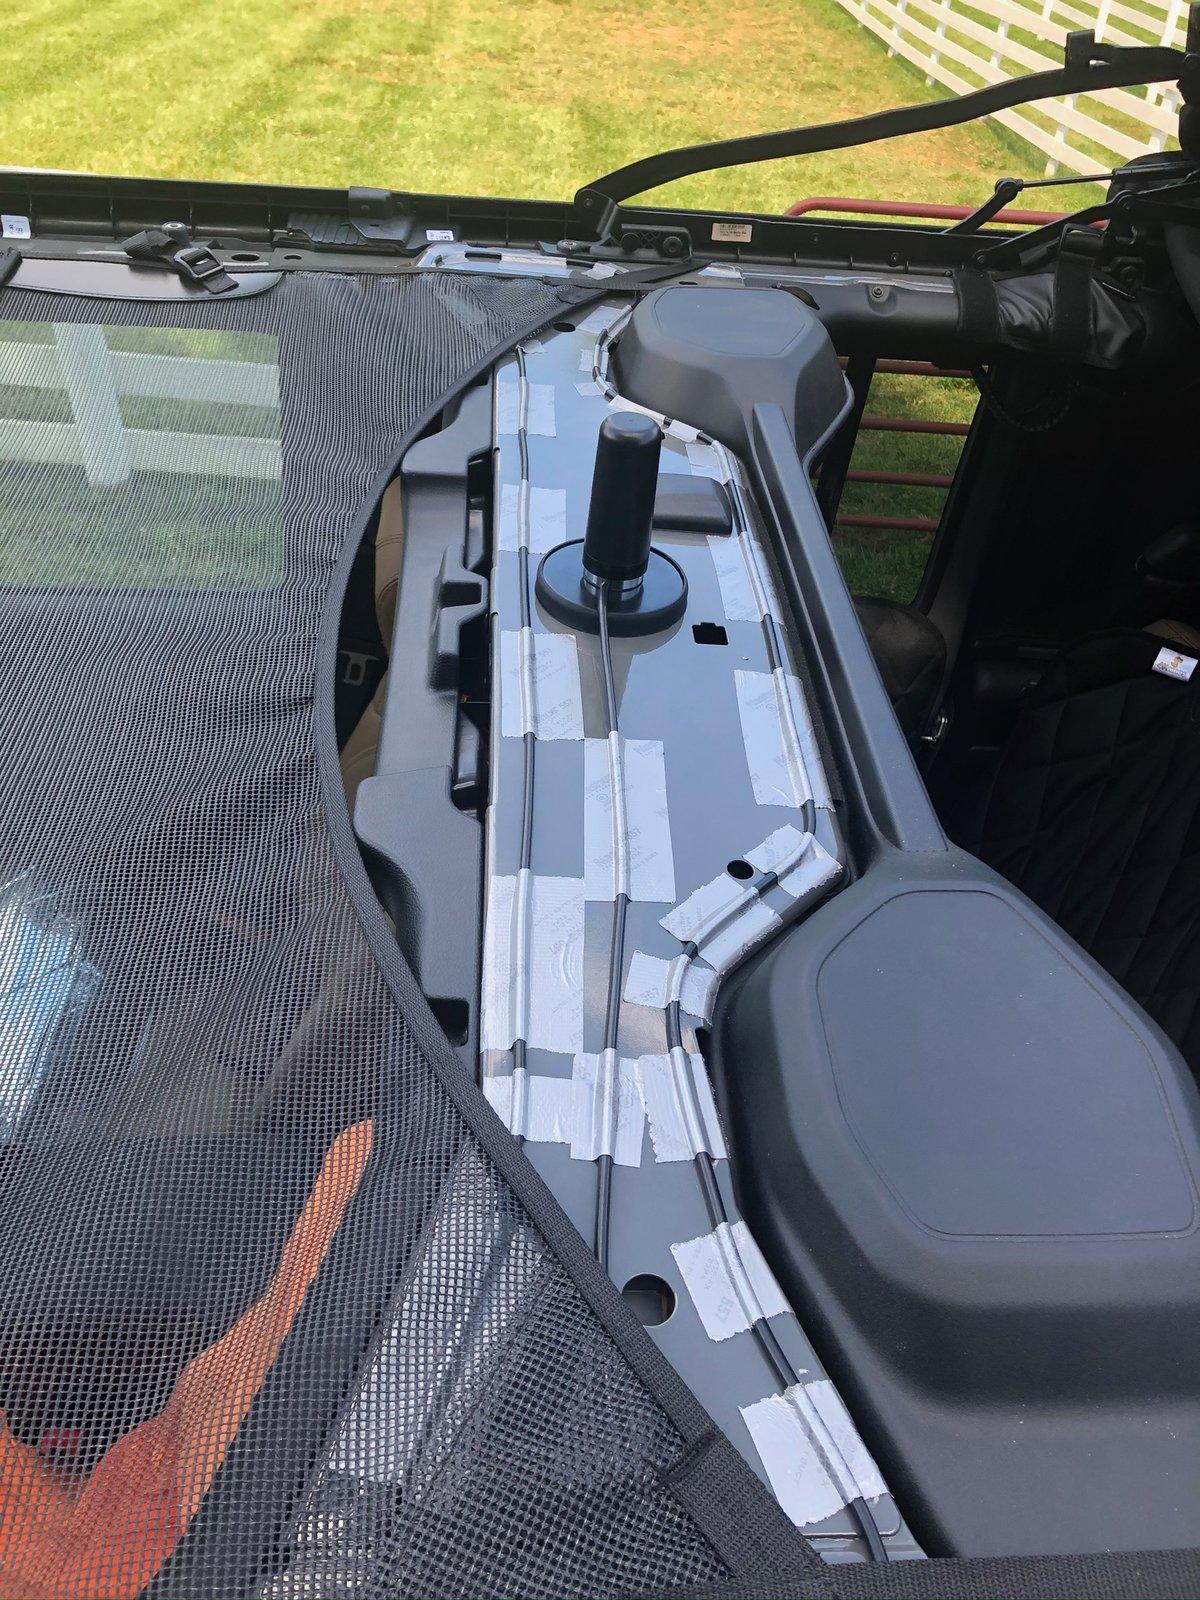
Installed a Midland GMRS radio on the side of the center console, and put the ghost antenna on top of the speaker bar. Antenna fits under the soft top like a glove.
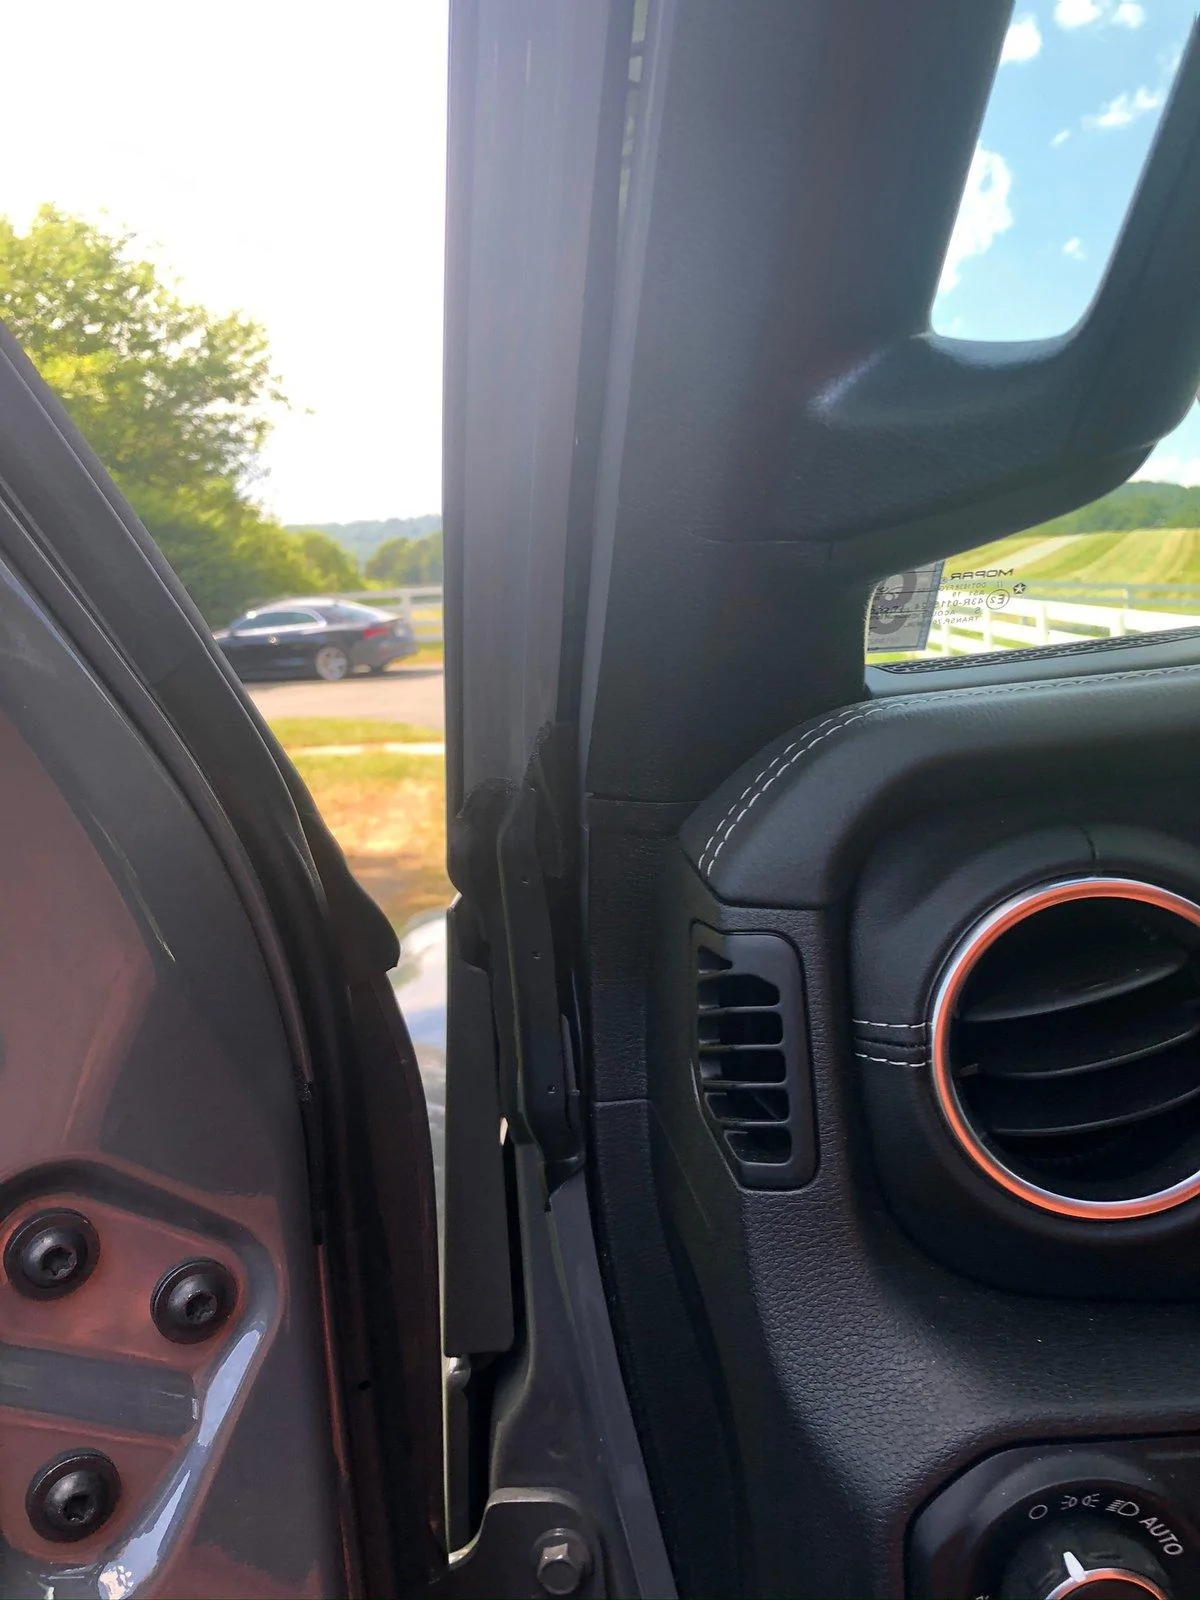
Ran the antenna cable under the center console/dash trim, behind the driver's knee panel (used a couple of stick-on cable clips on the back side of the panel to keep the cable from sagging down into view), then up the door frame beside the windshield (shoved it behind the weather stripping)
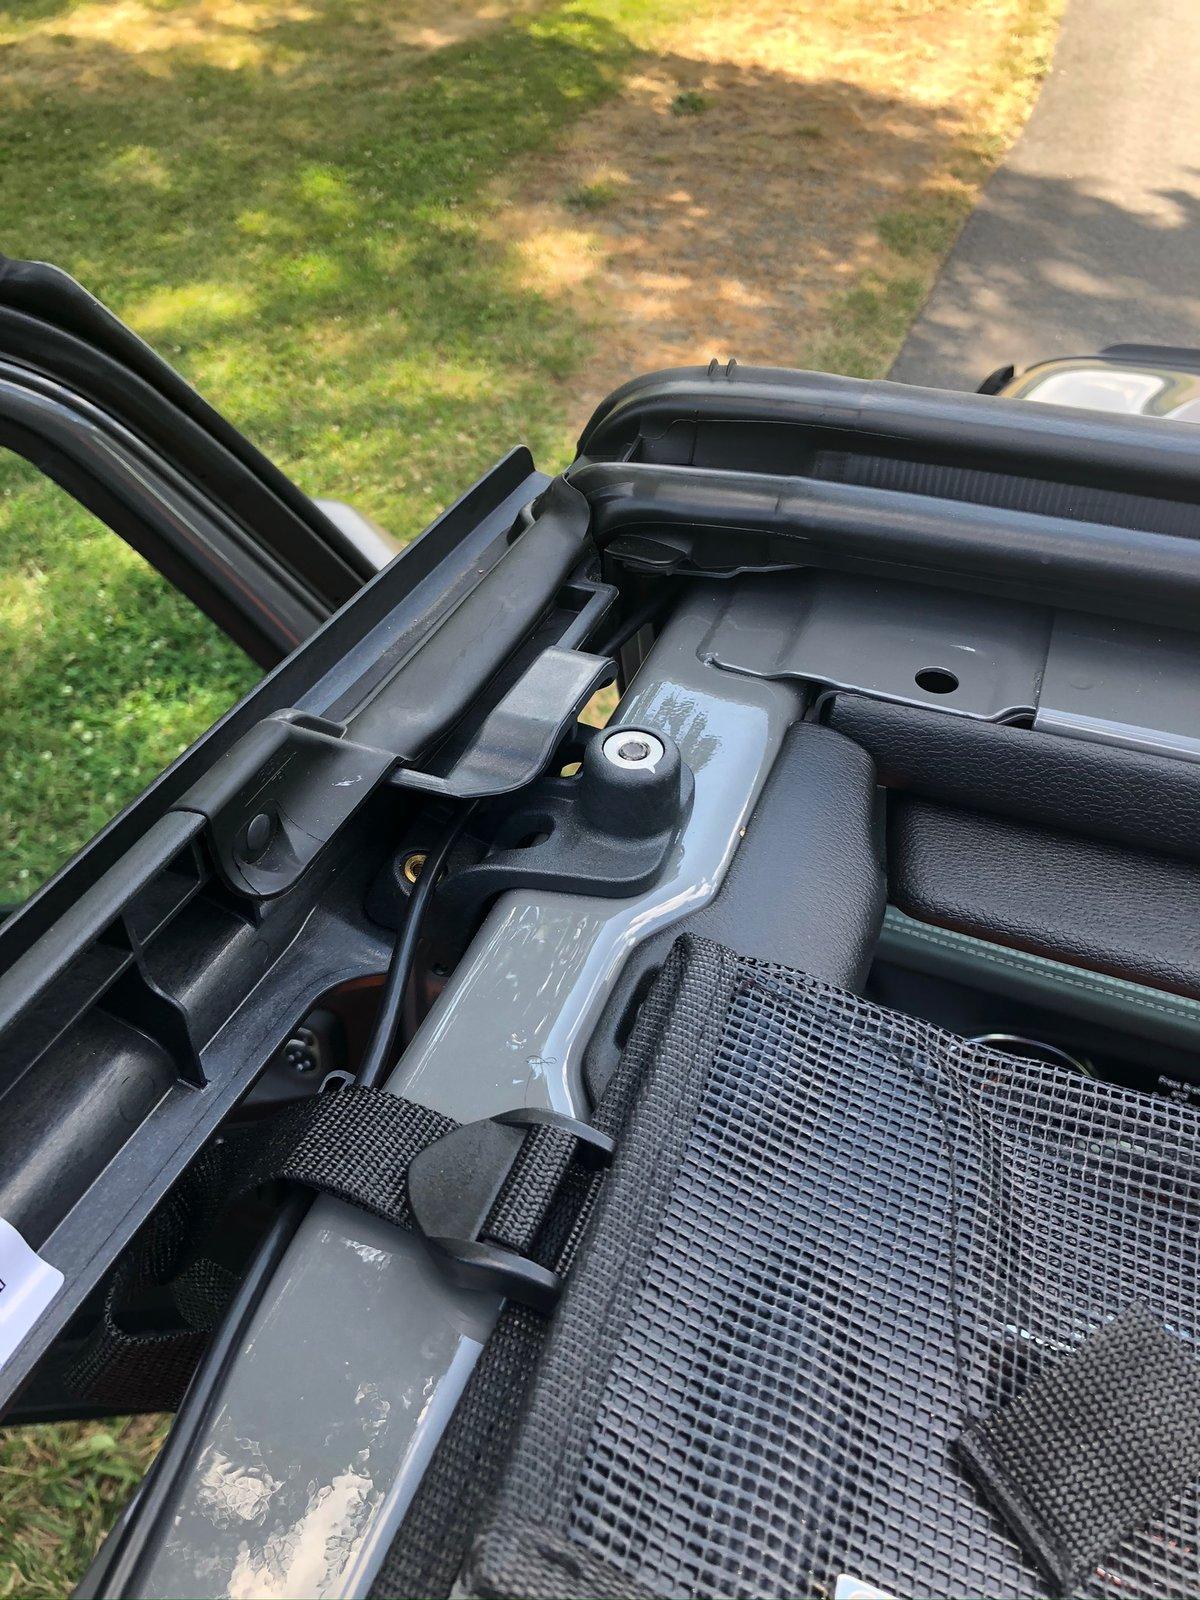
and back across the top of the door frame
to the speaker bar, where I snaked all the extra cable around and taped it down to keep it all from overlapping or looping.
I may have gone a little overboard on the tape...
Getting ready for our trip I picked up a pair of hard MOLLE panels from Greyman Tactical
vehicleseatbackorganizer-15-25x25rmp
to hang on the back of the Driver and Passenger front seats, and loaded them up with a FAK, a folding knife, a multitool, a utility pouch, two handheld GMRS radios, a holster for my pistol, and a BFK (for ... you know ... chopping kindling and stuff...)
Also installed a 67Designs mount with a RAM Mounts claw for my iPad ... for the navigation station (i.e. my wife). After the trip I changed that claw mount out for a RAM Tab-Tite Holder for 9" Tablets with Heavy Duty Cases...which doesn't look like it's going to give you eight puncture wounds in the chest if the airbag goes off.
We had a lot of gear in the bed, and since there's no way to mount a tonneau with the Fab Fours Overland Rack (and that's not the only reason I'm thinking of ditching it...), I picked up a Tuff Truck bed bag Tuff Truck Bag - Black Waterproof Truck Bed Cargo Carrier, 40'' x 50'' x 22''
and a Gladiator cargo net Gladiator Cargo Net - RipProof Mesh Cargo Tarp - Small - 4.75' x 6' (SMT-100) .
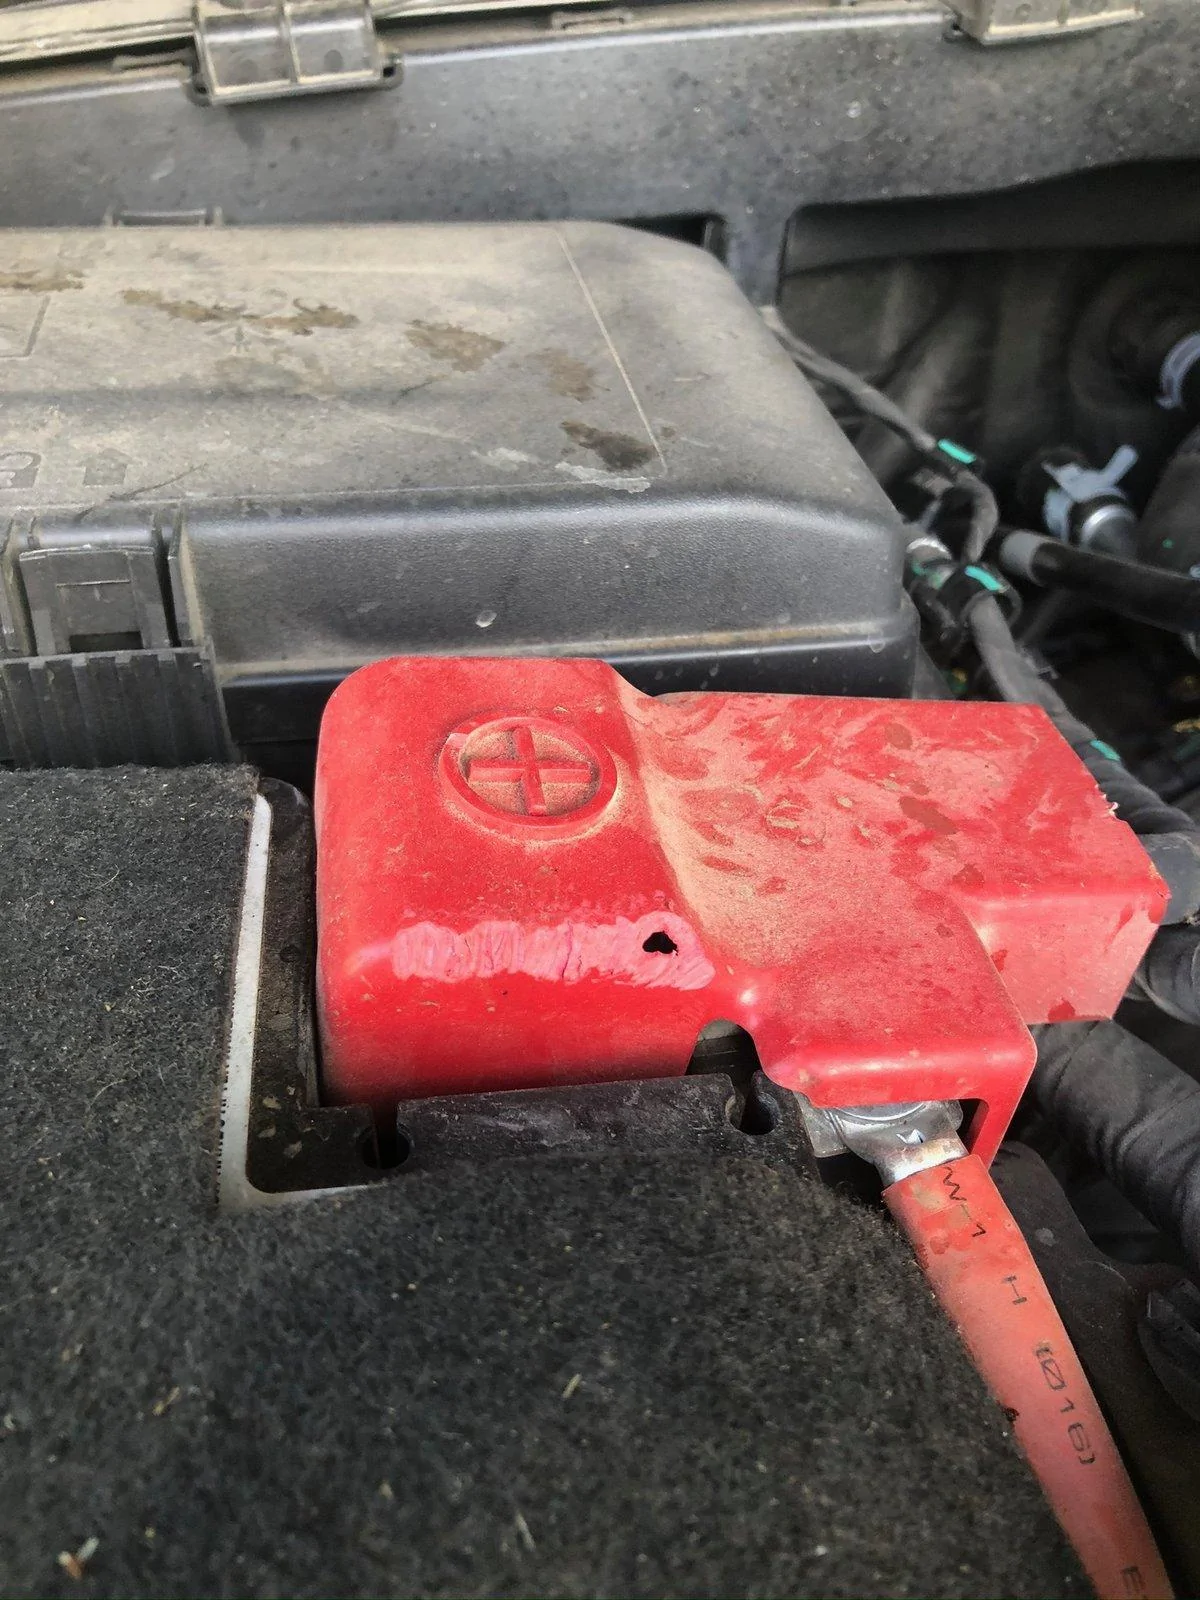
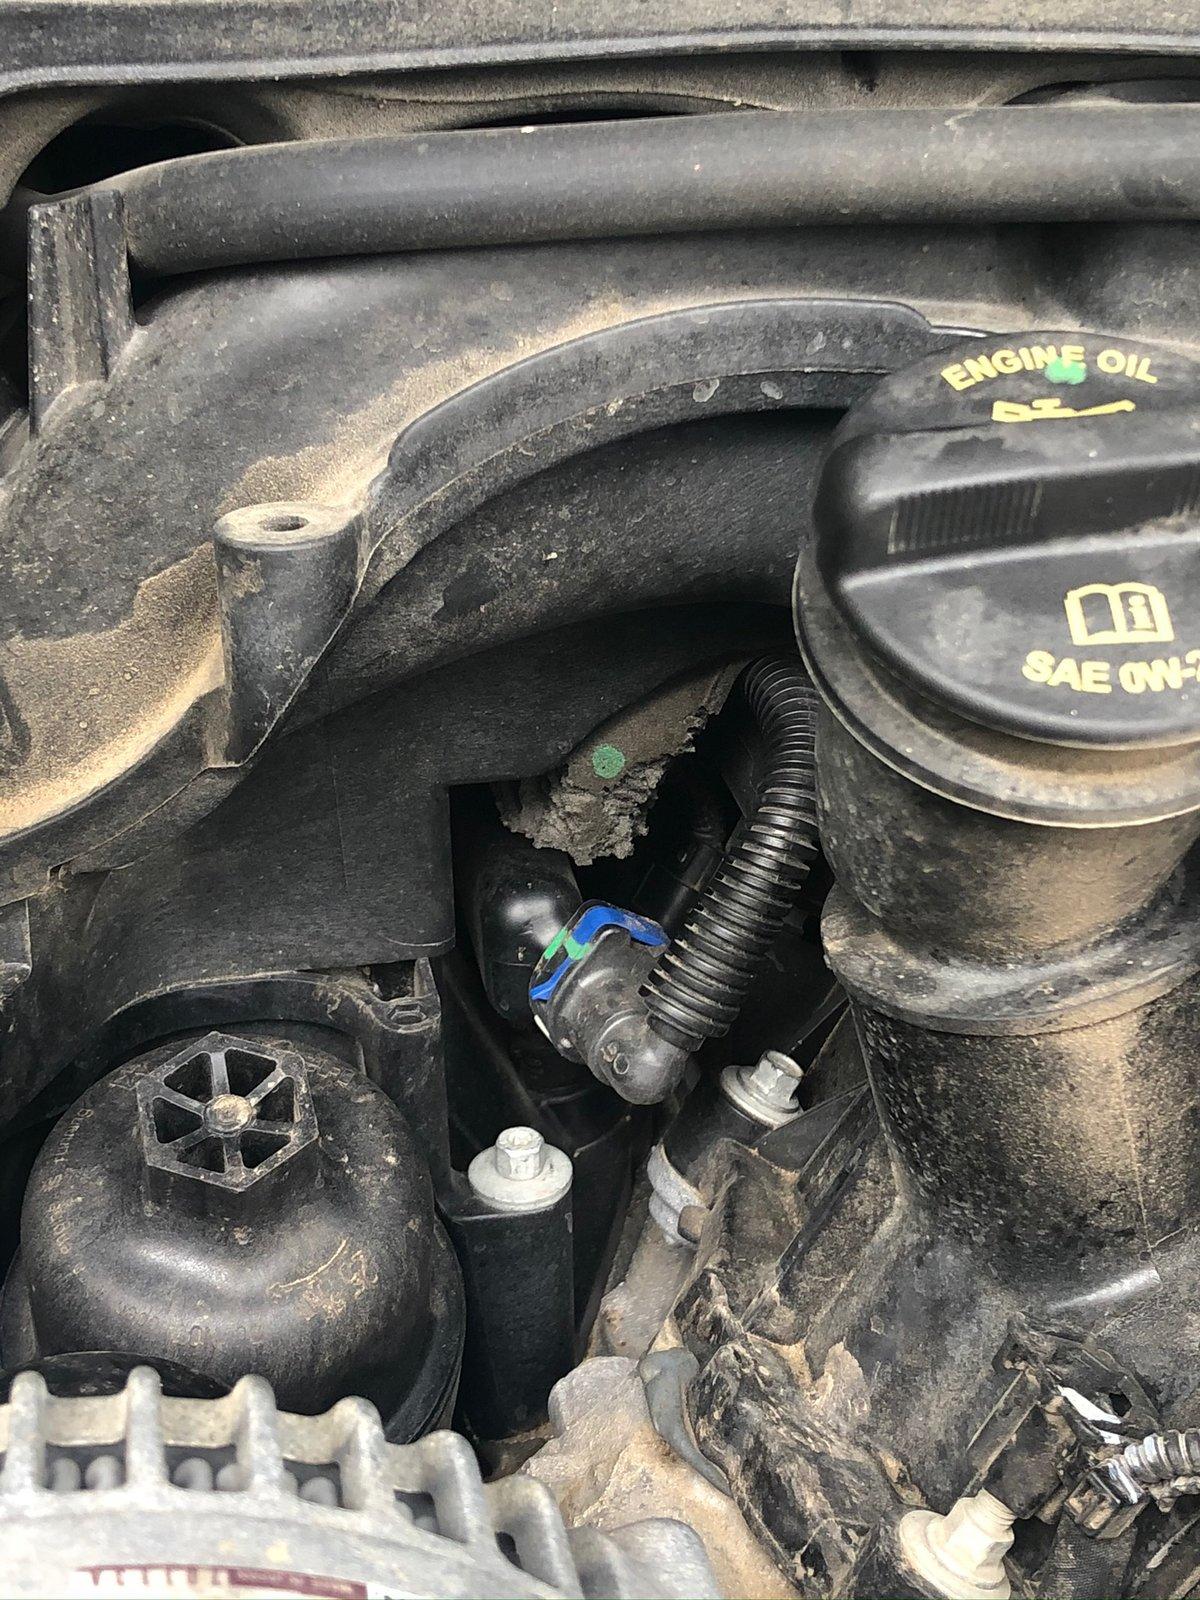
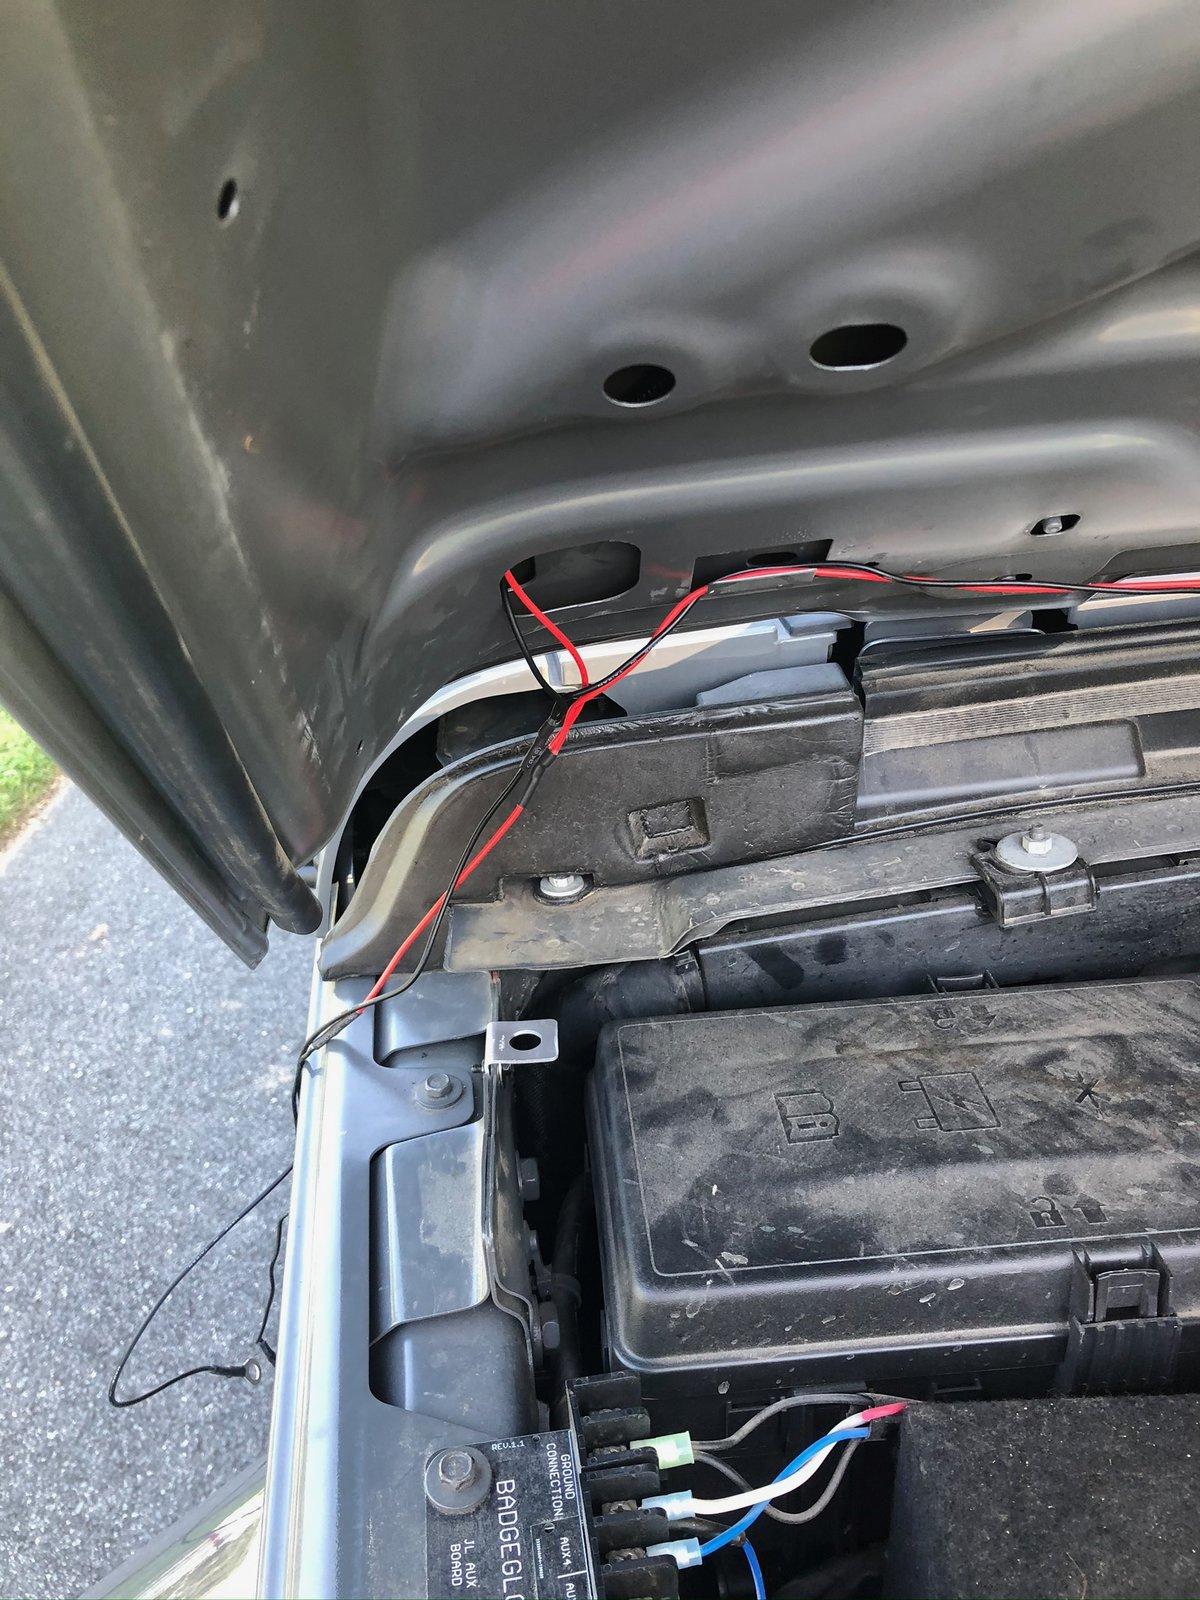
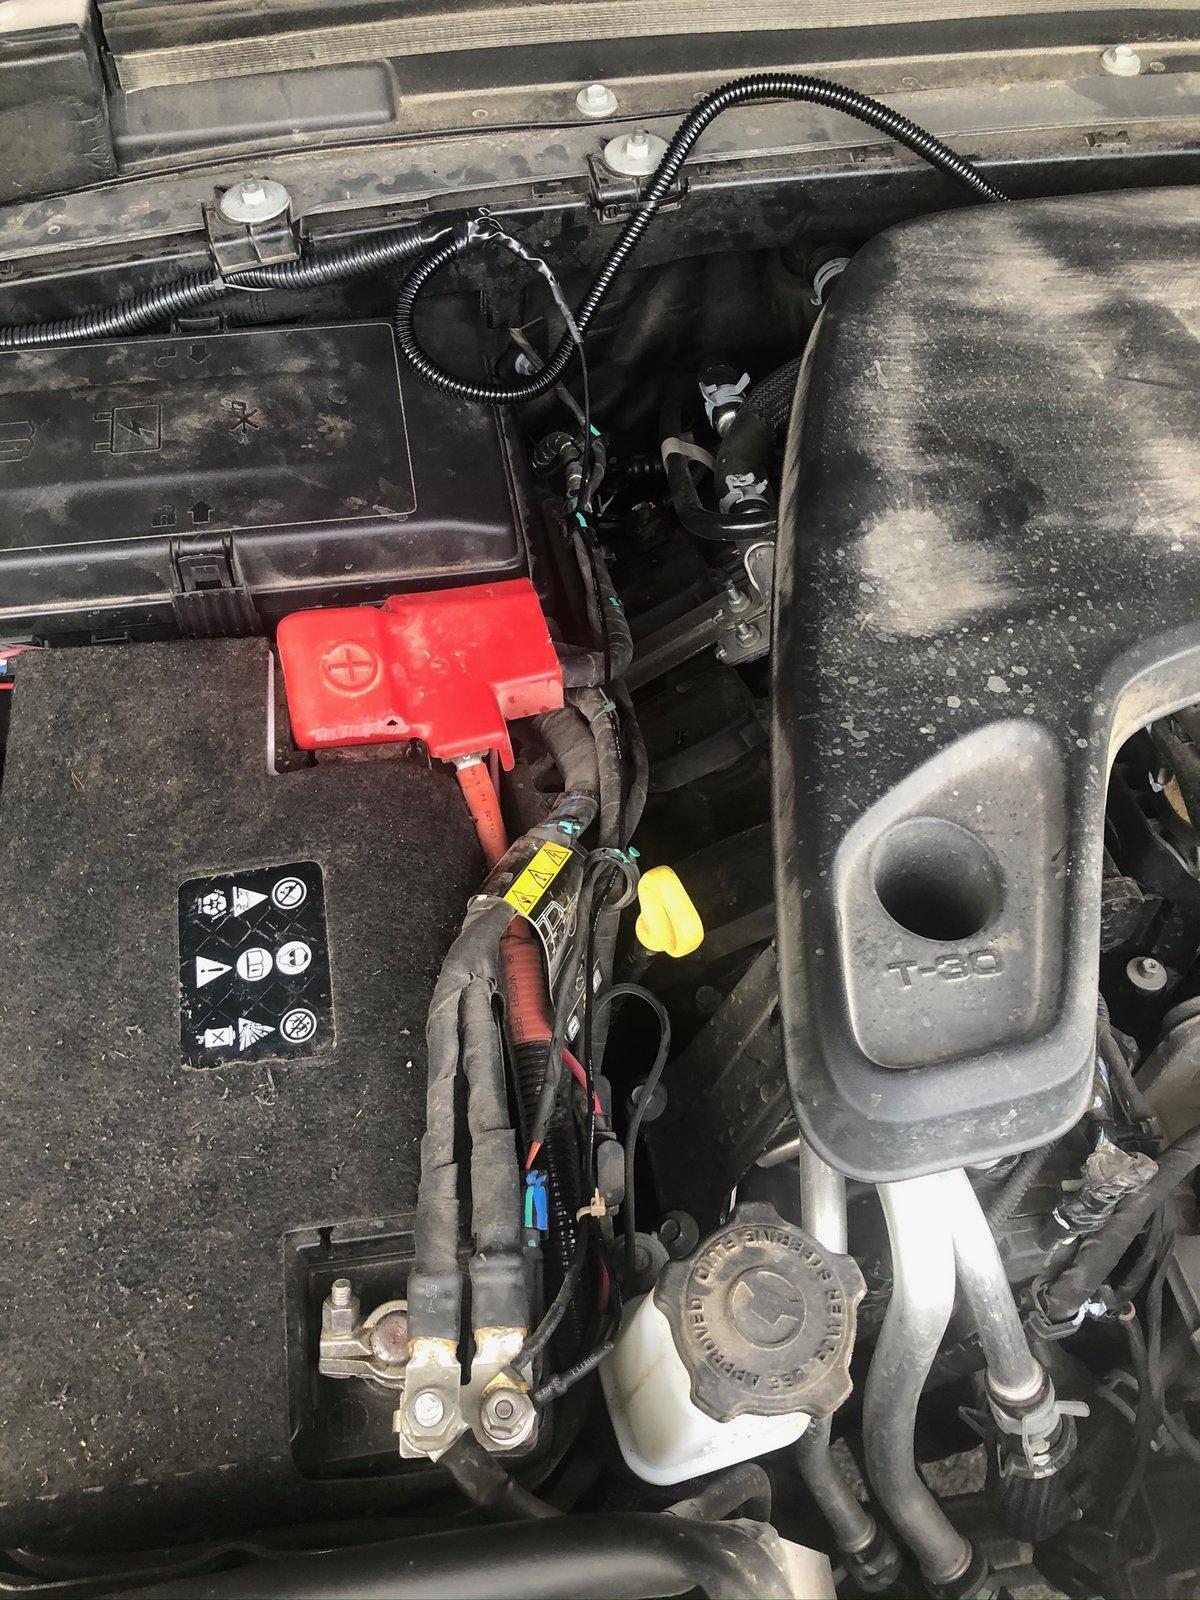
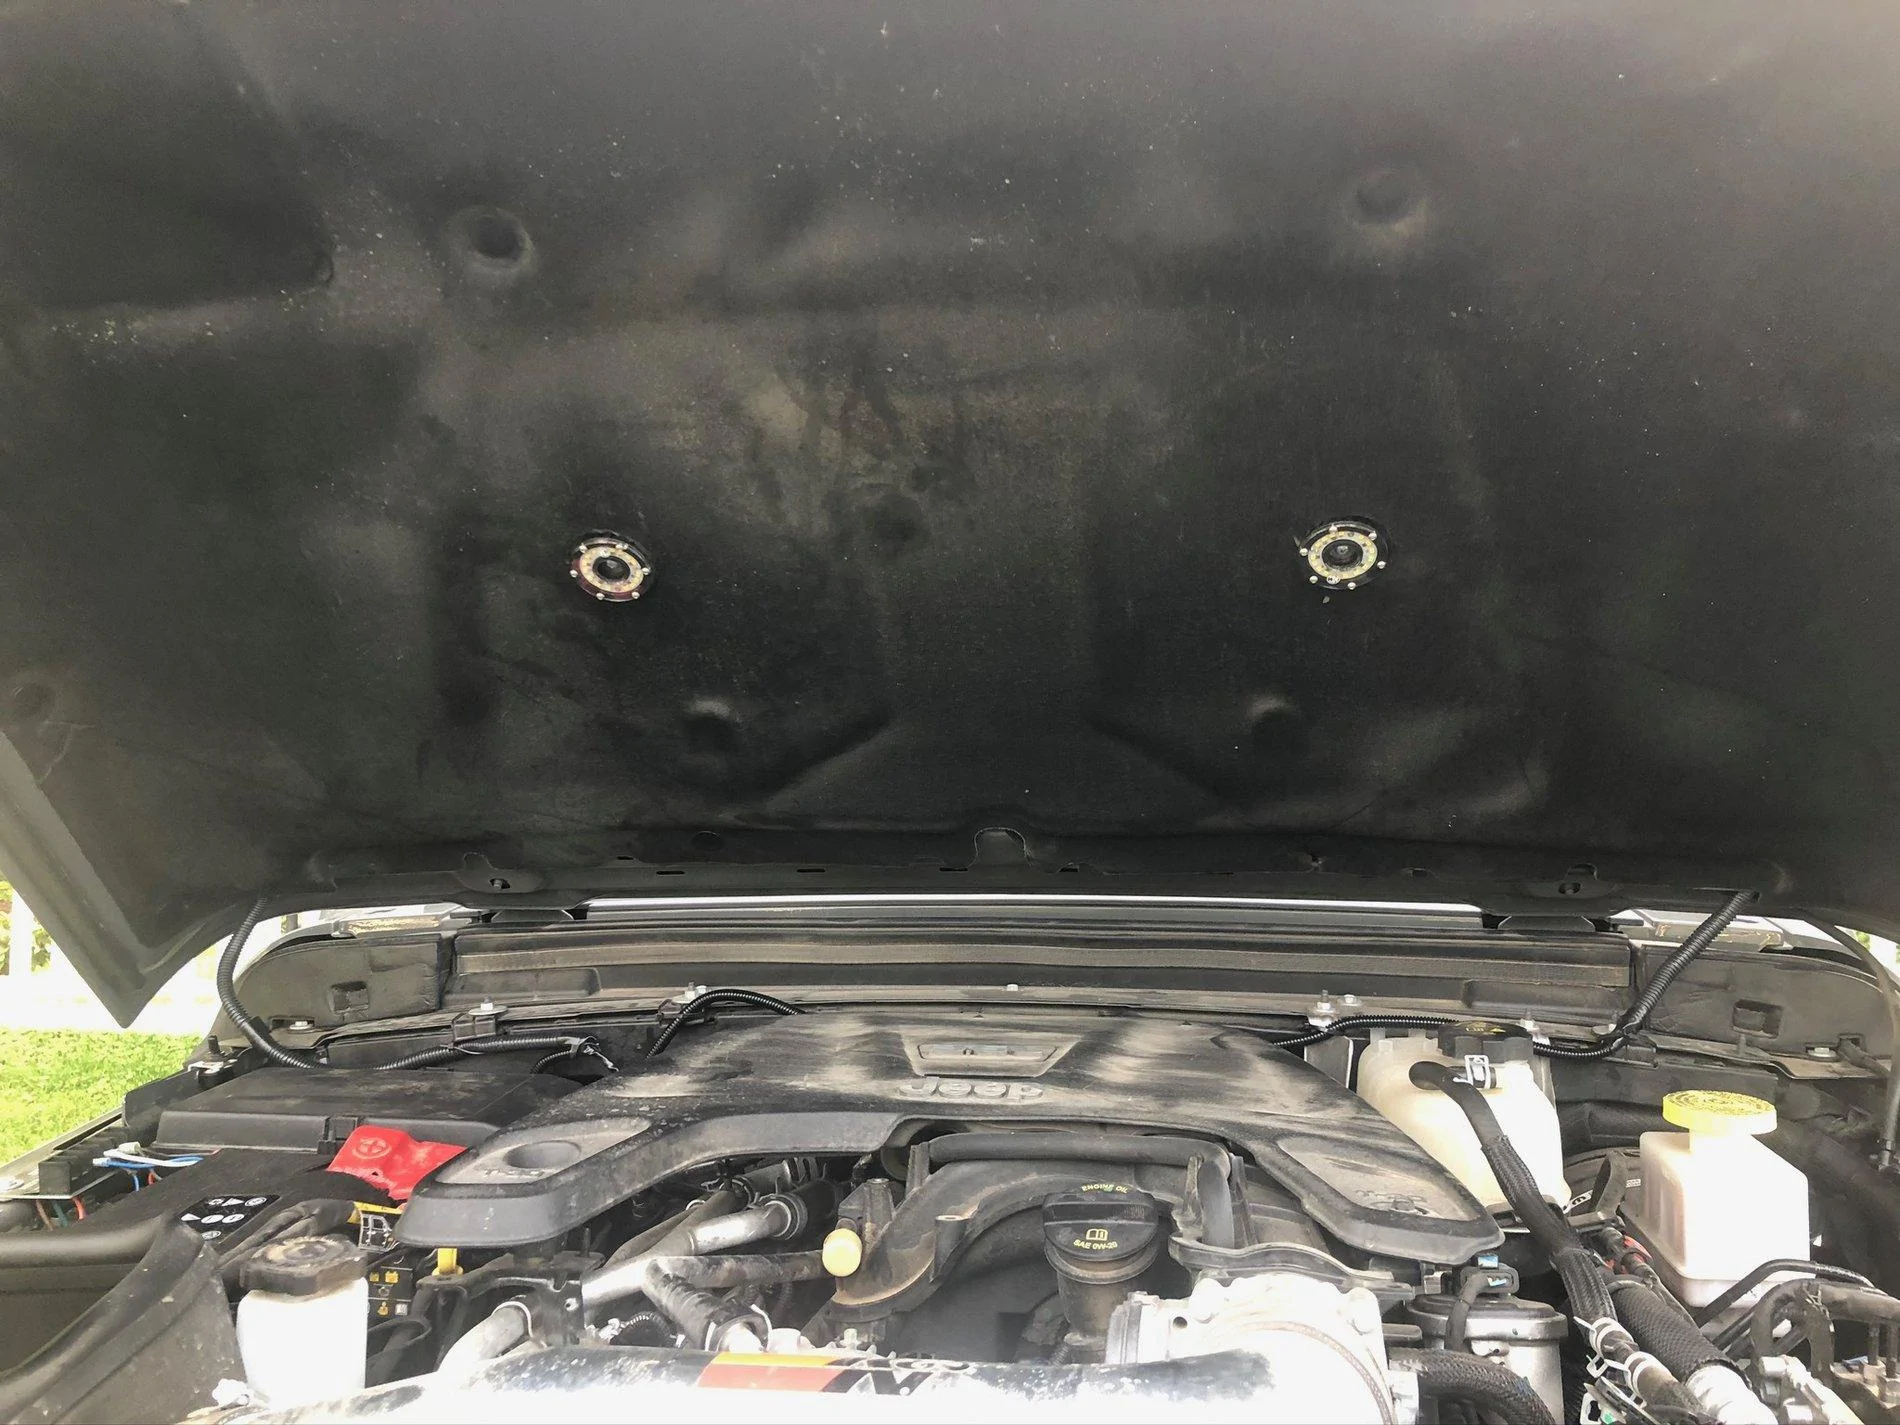
After we got back from our two week overlanding trip through 12 states and 7 national parks, wherein we had a Mountain Lion walk through our campsite and decide not to eat our dog, and had a mutant Utah Desert Weasel climb into our engine bay and decide to eat our truck,
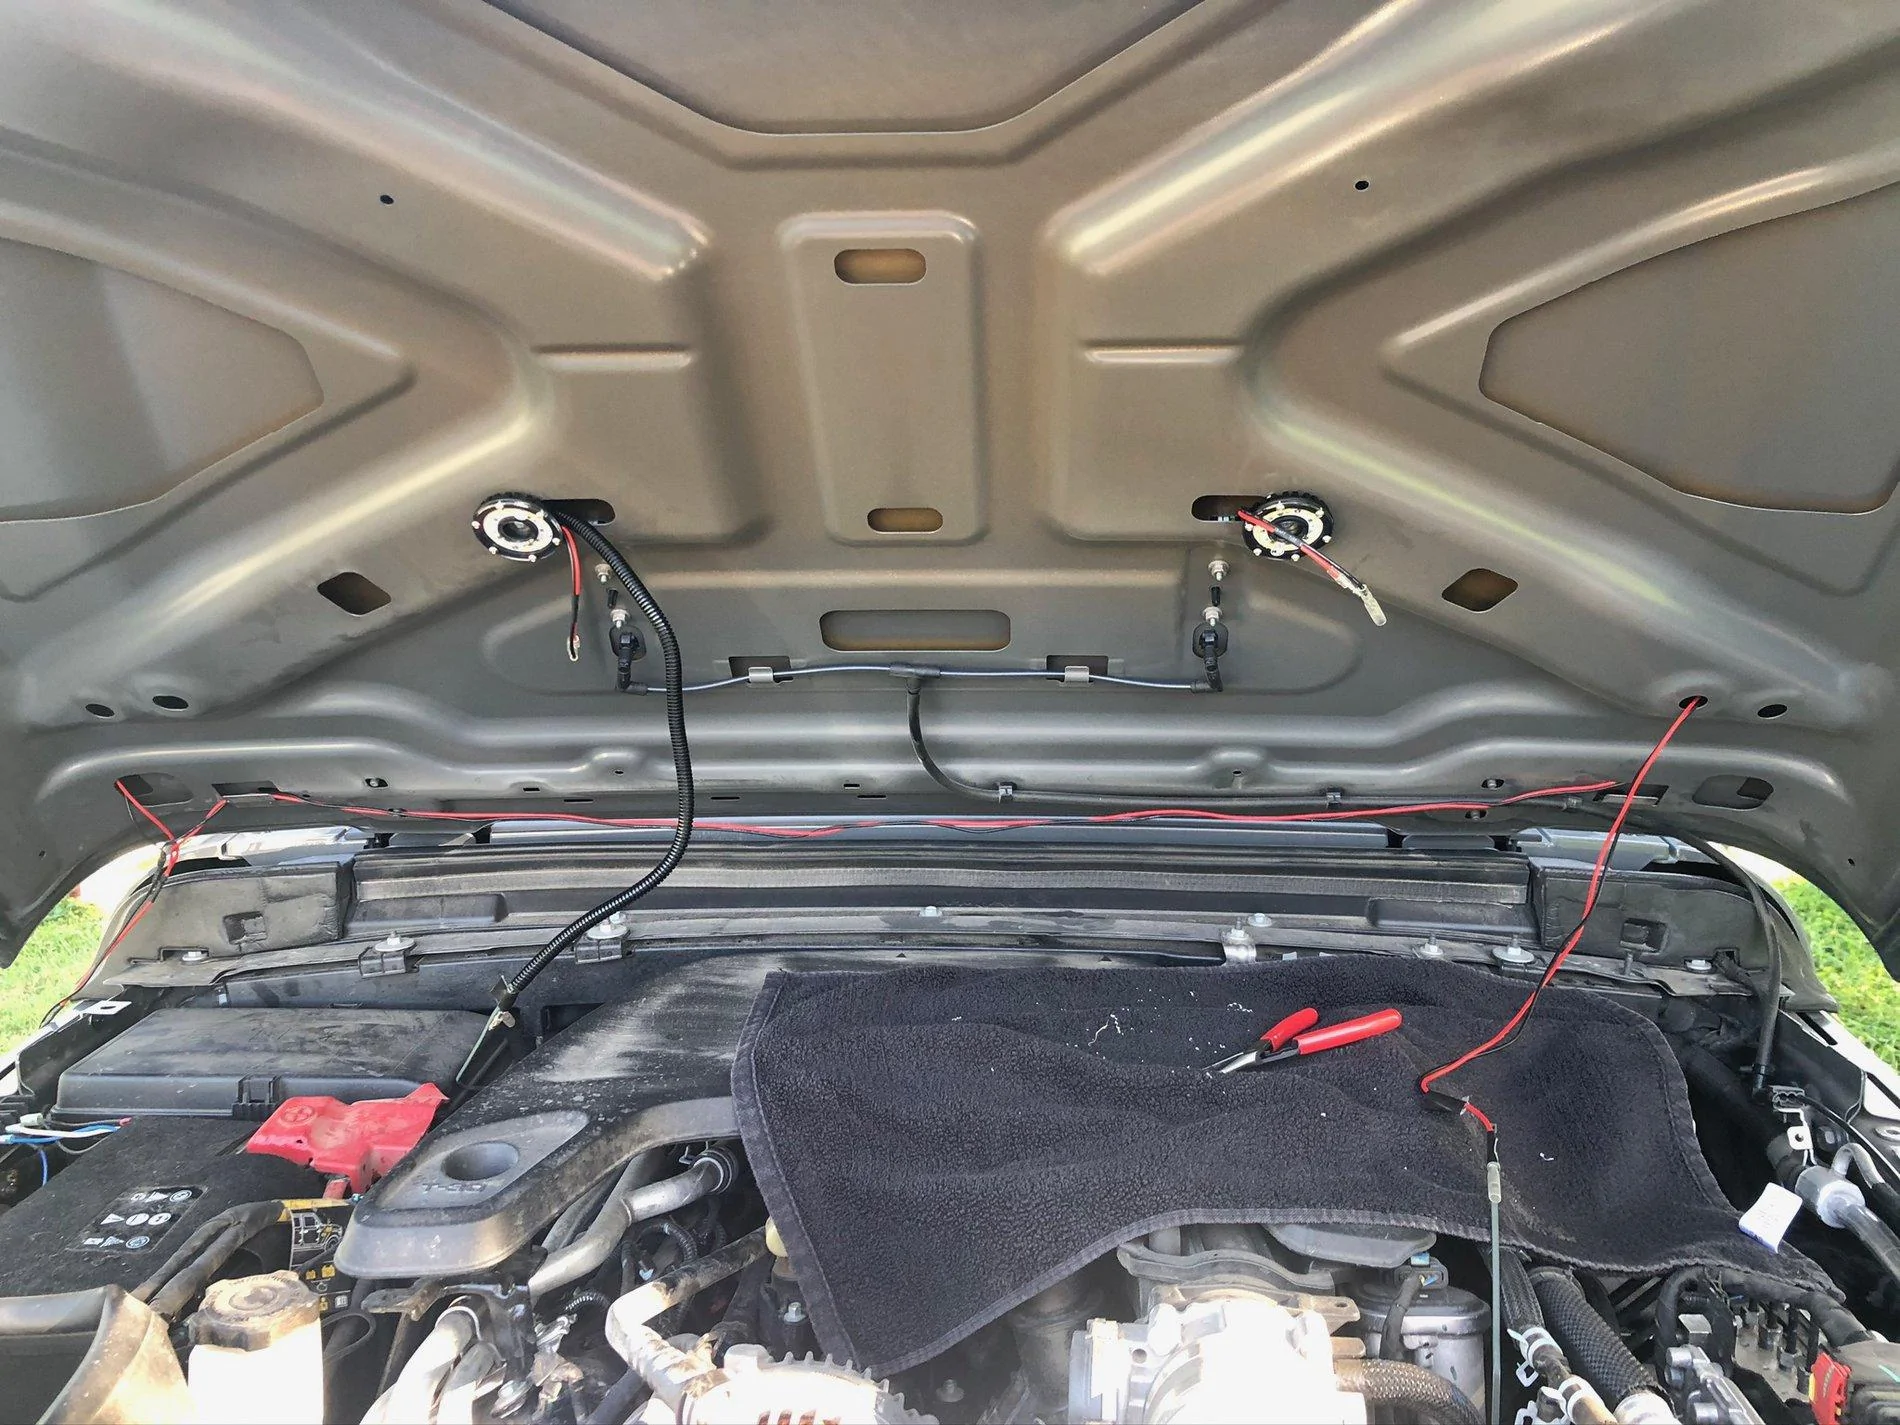
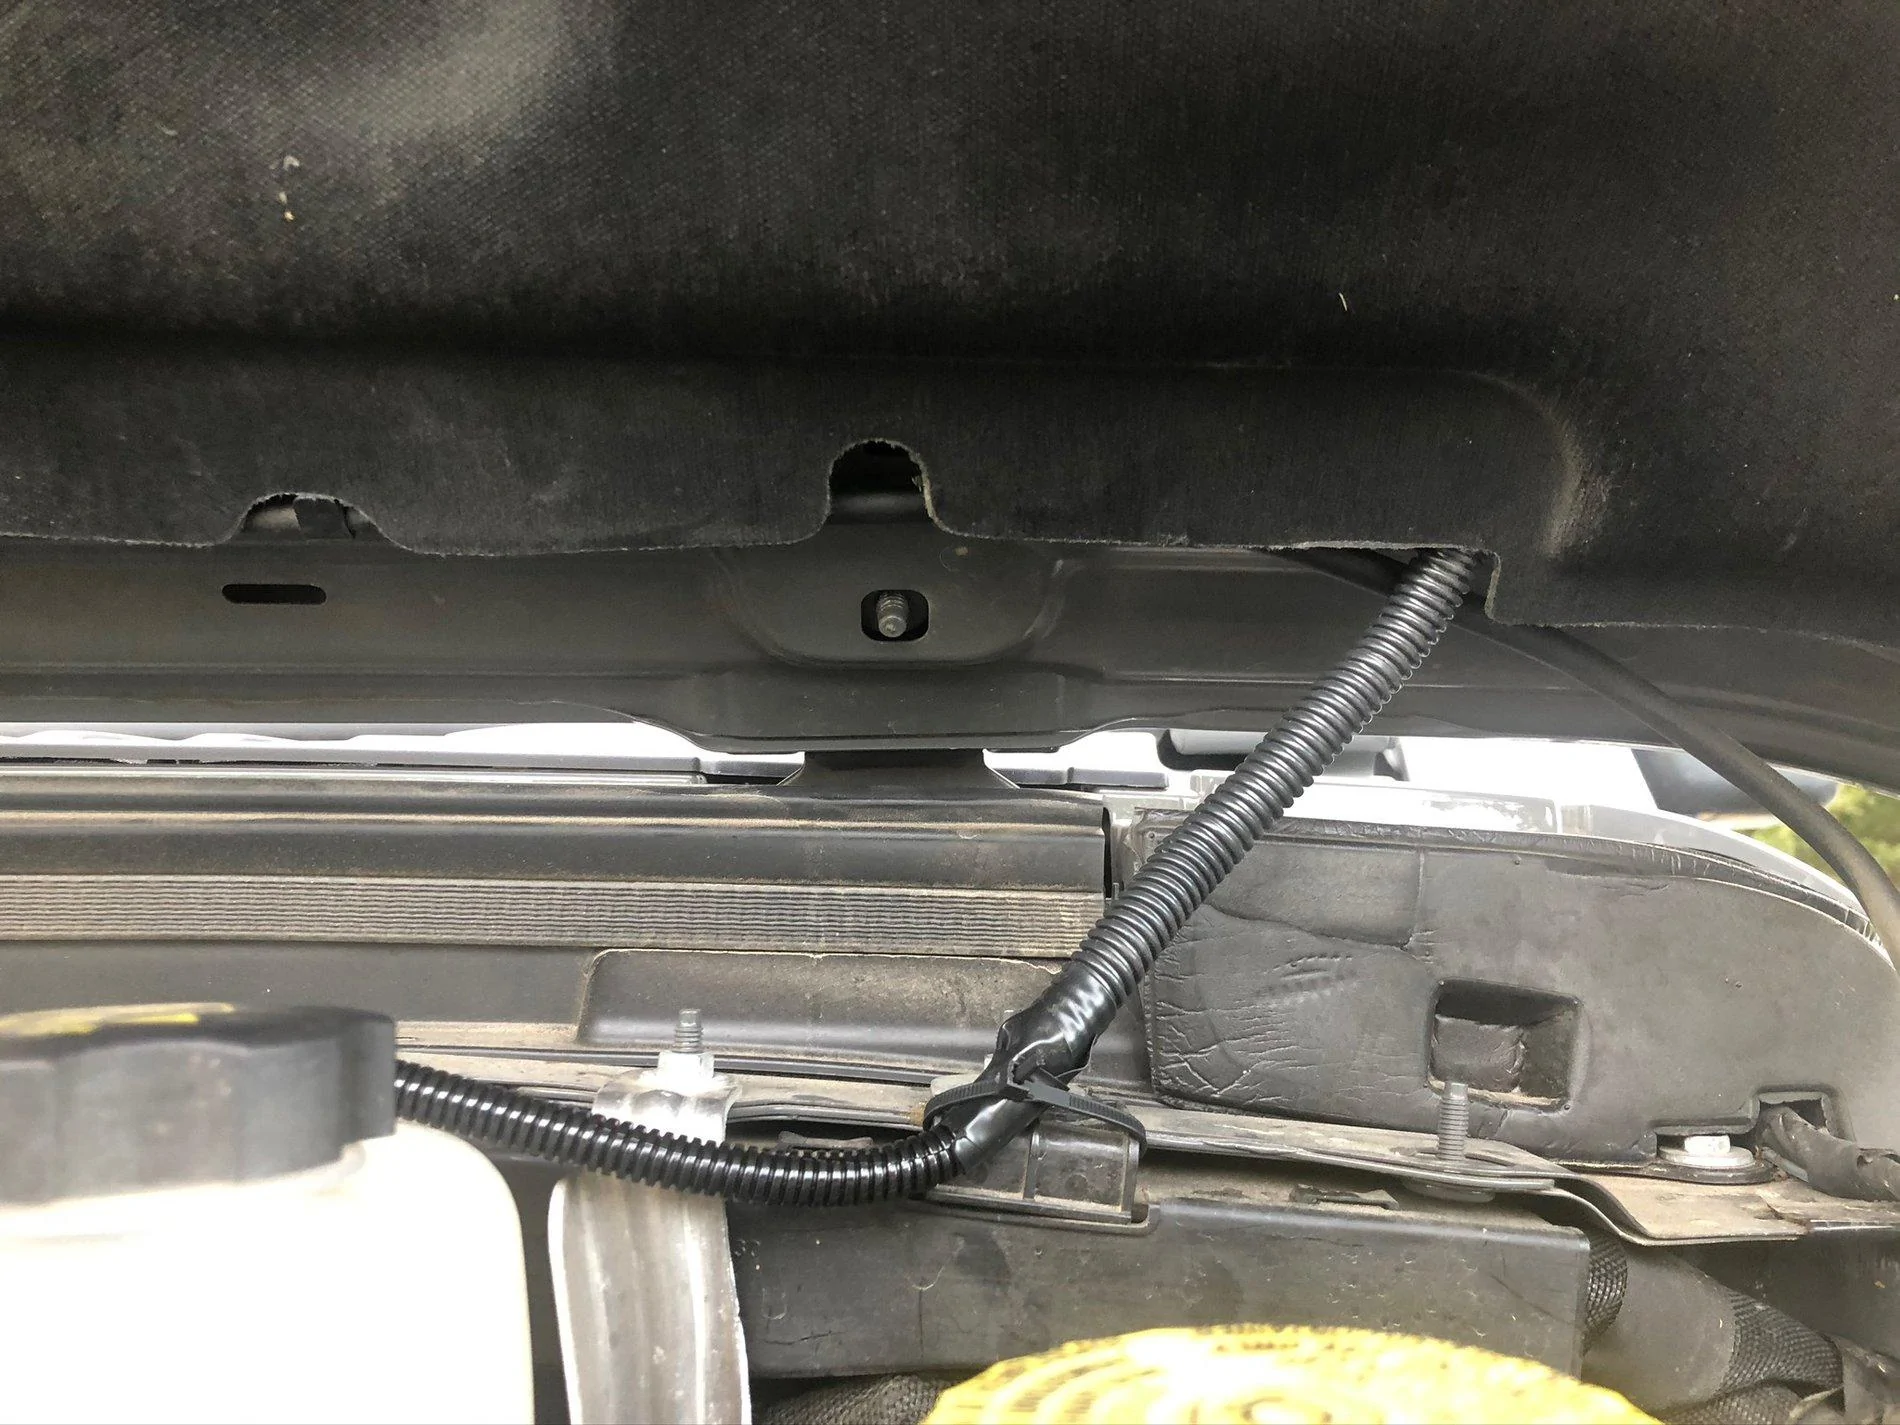
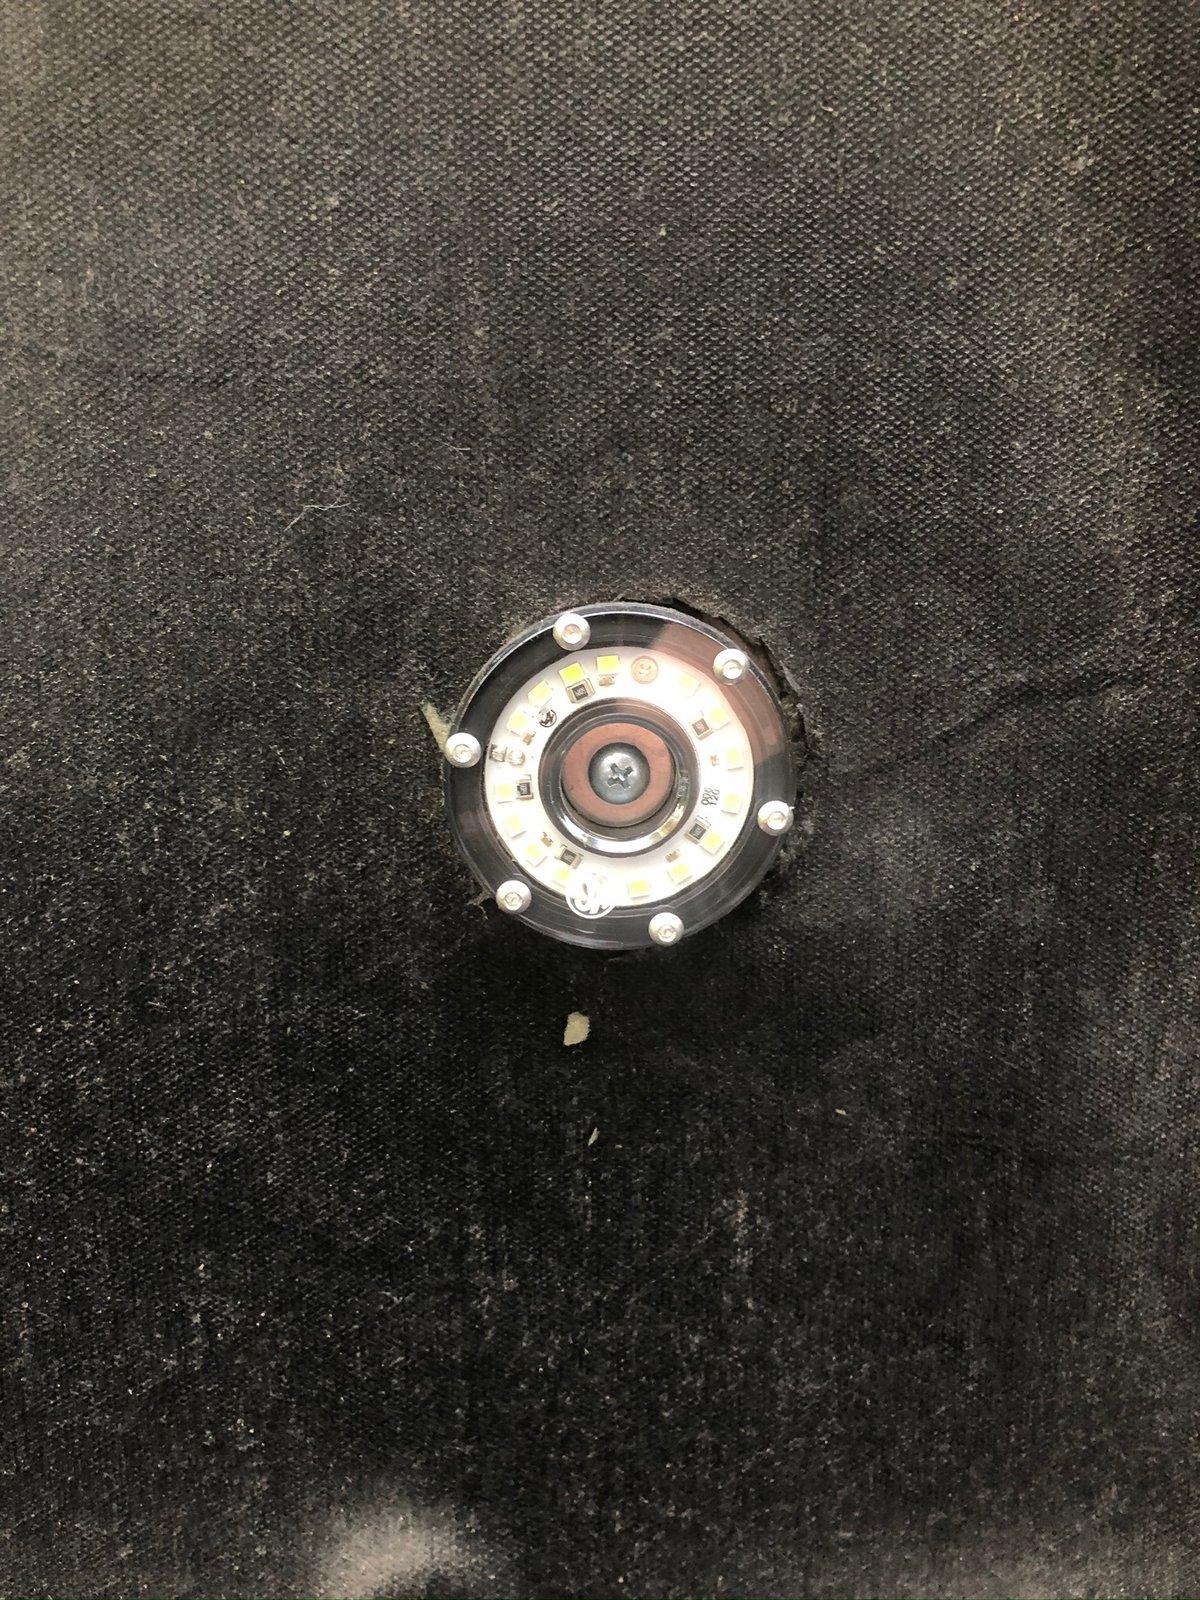
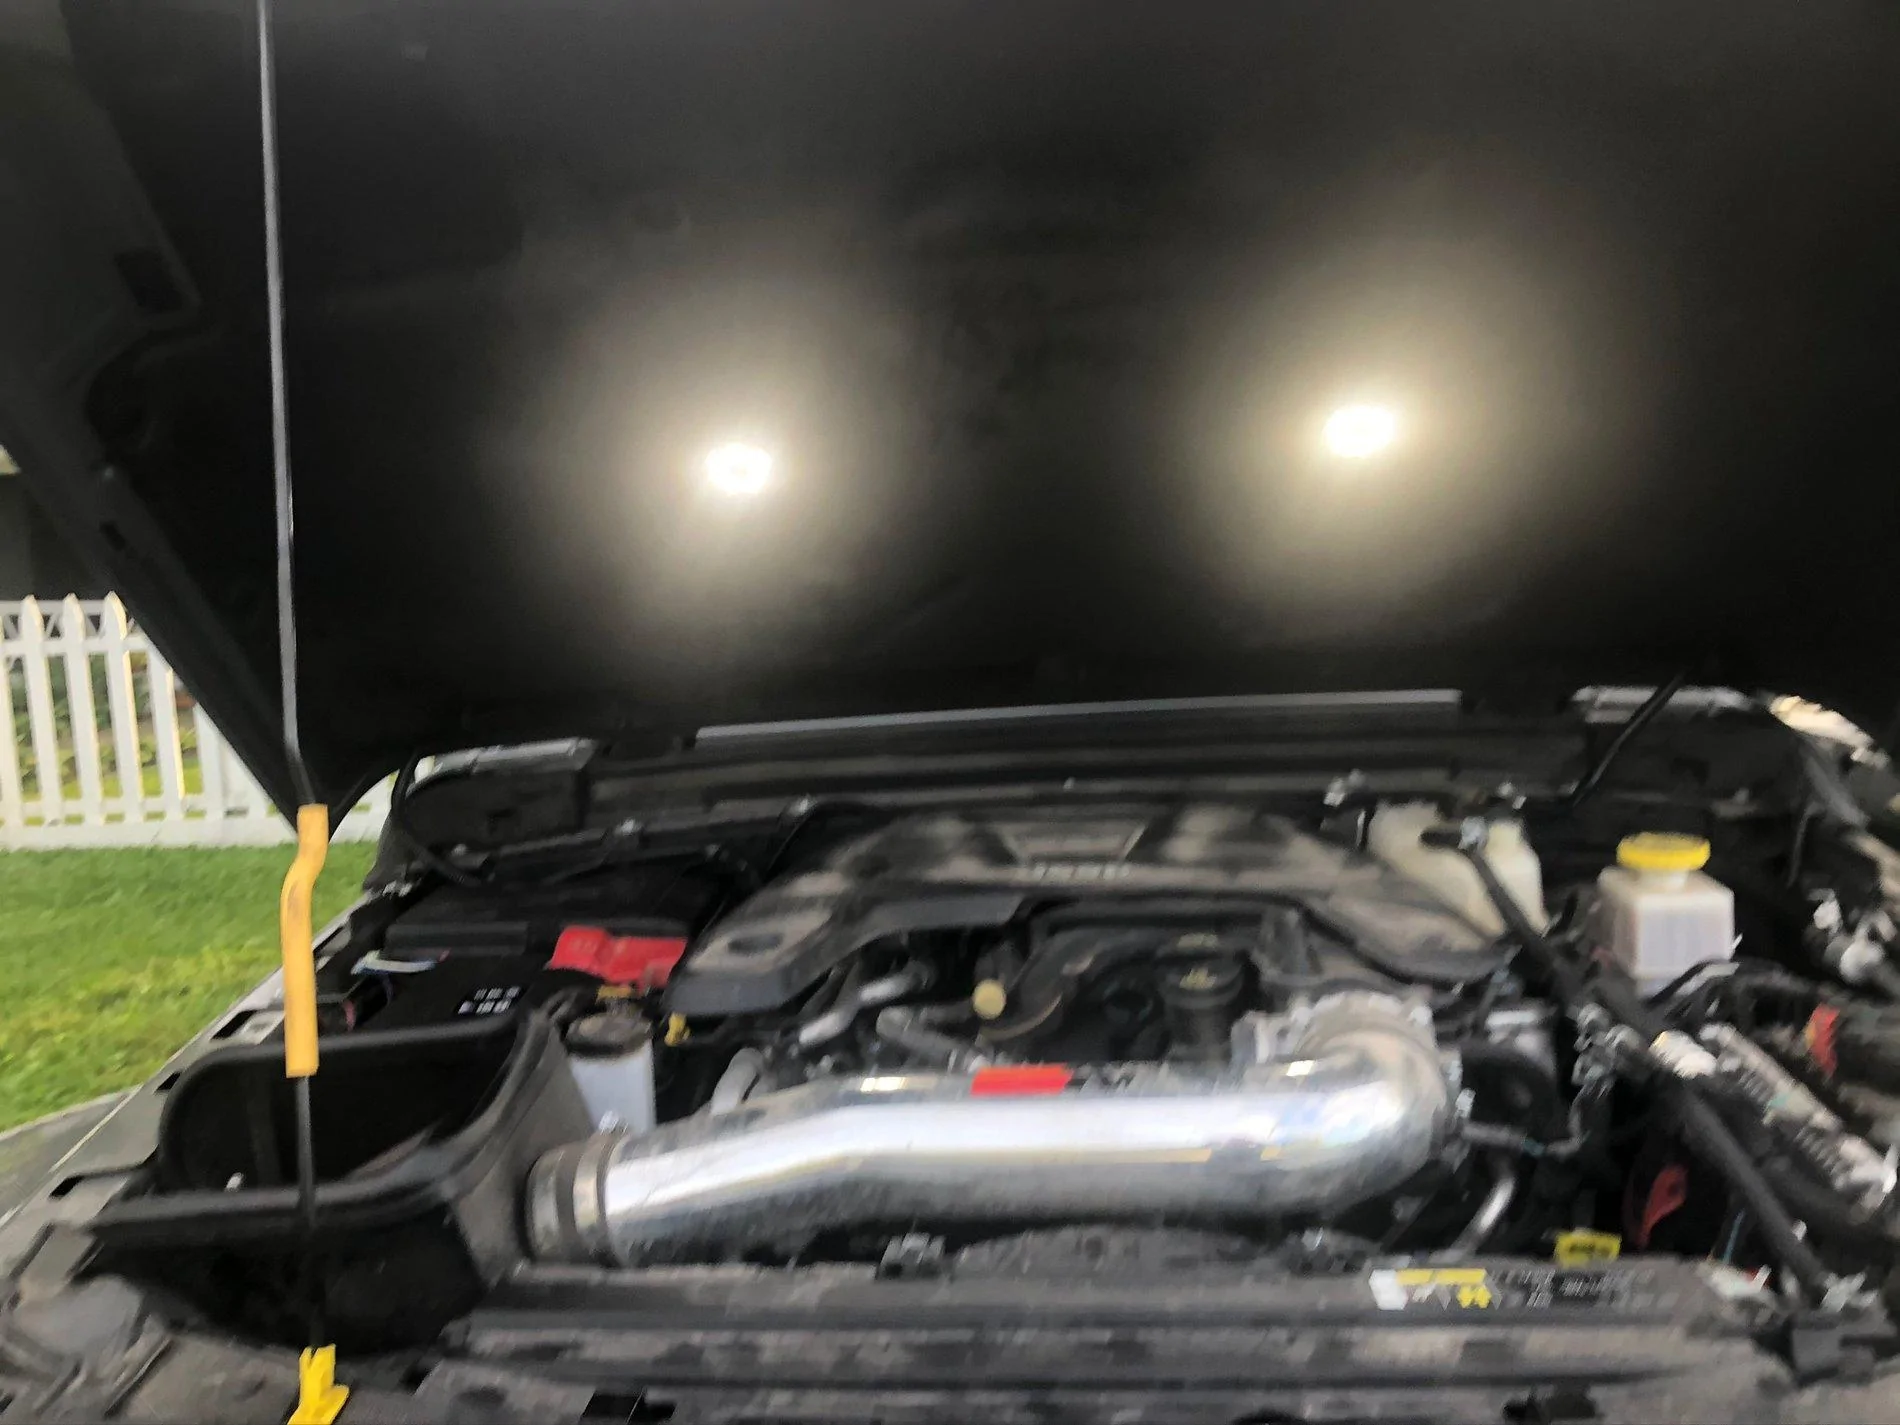
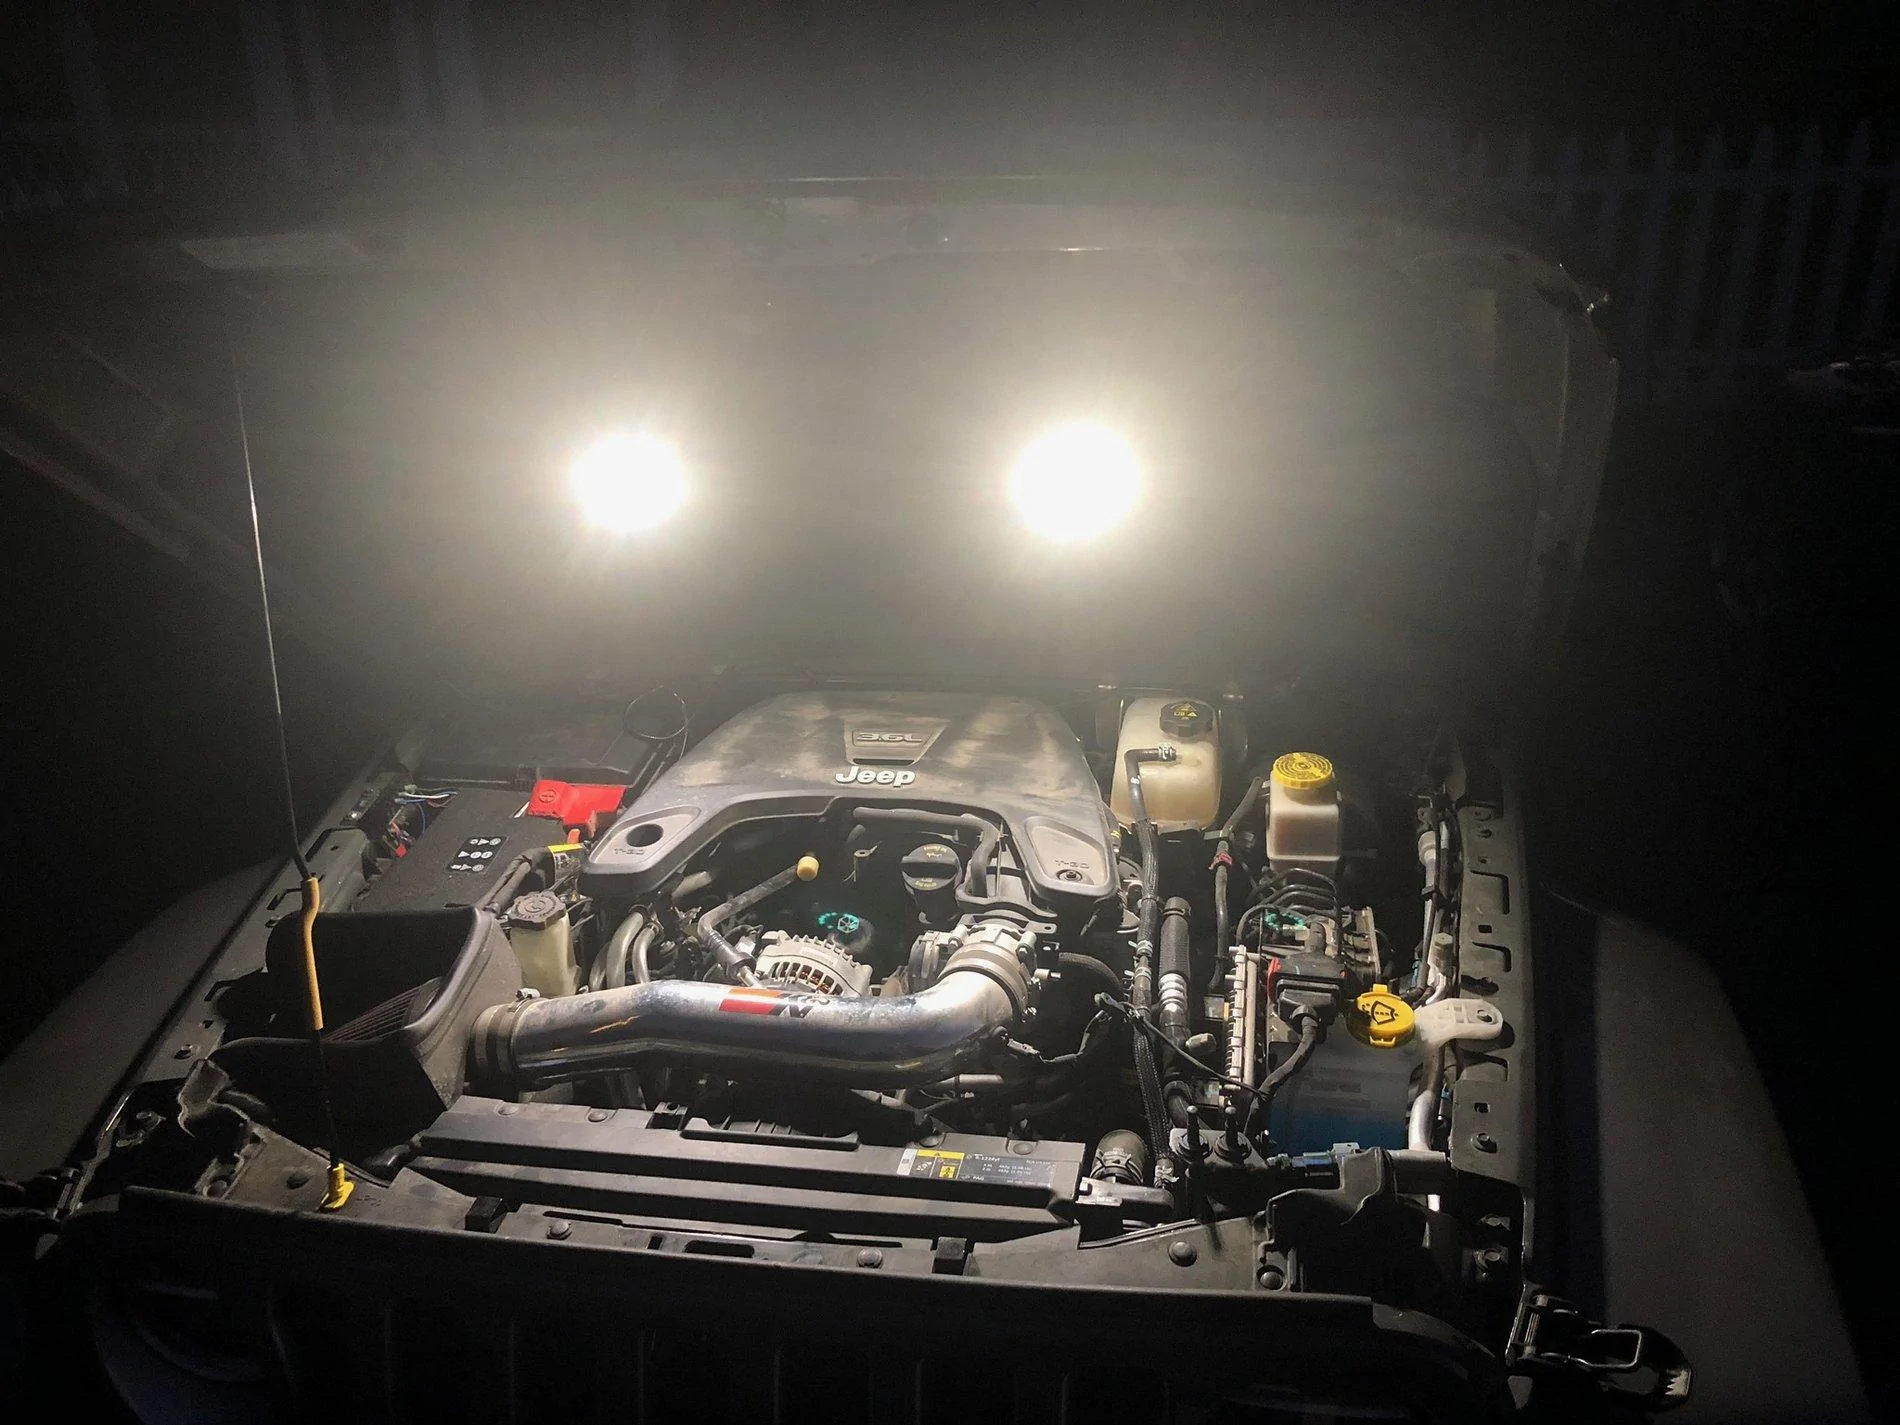
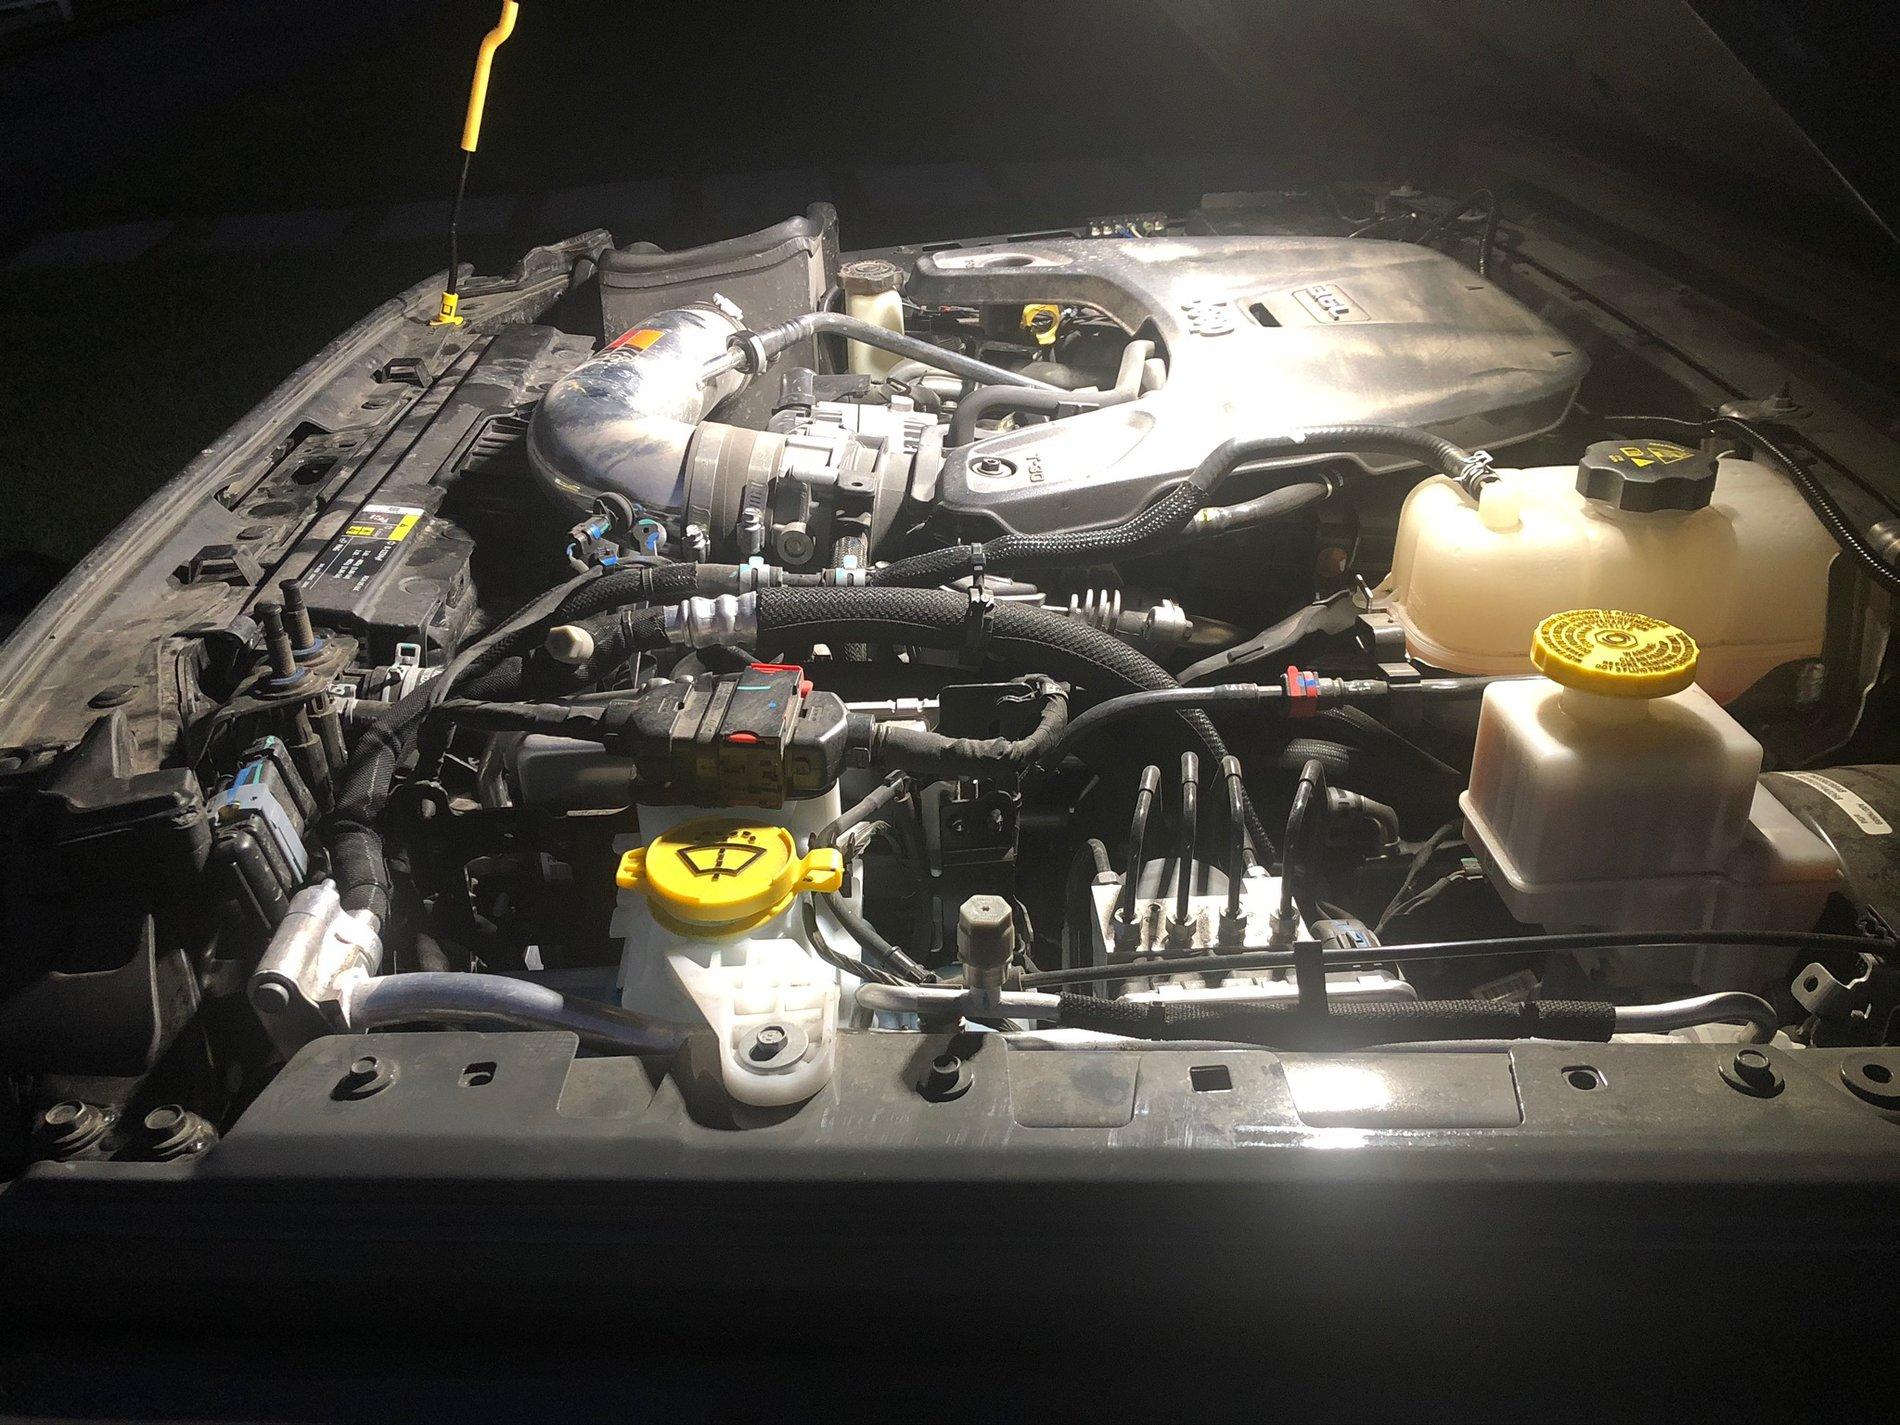
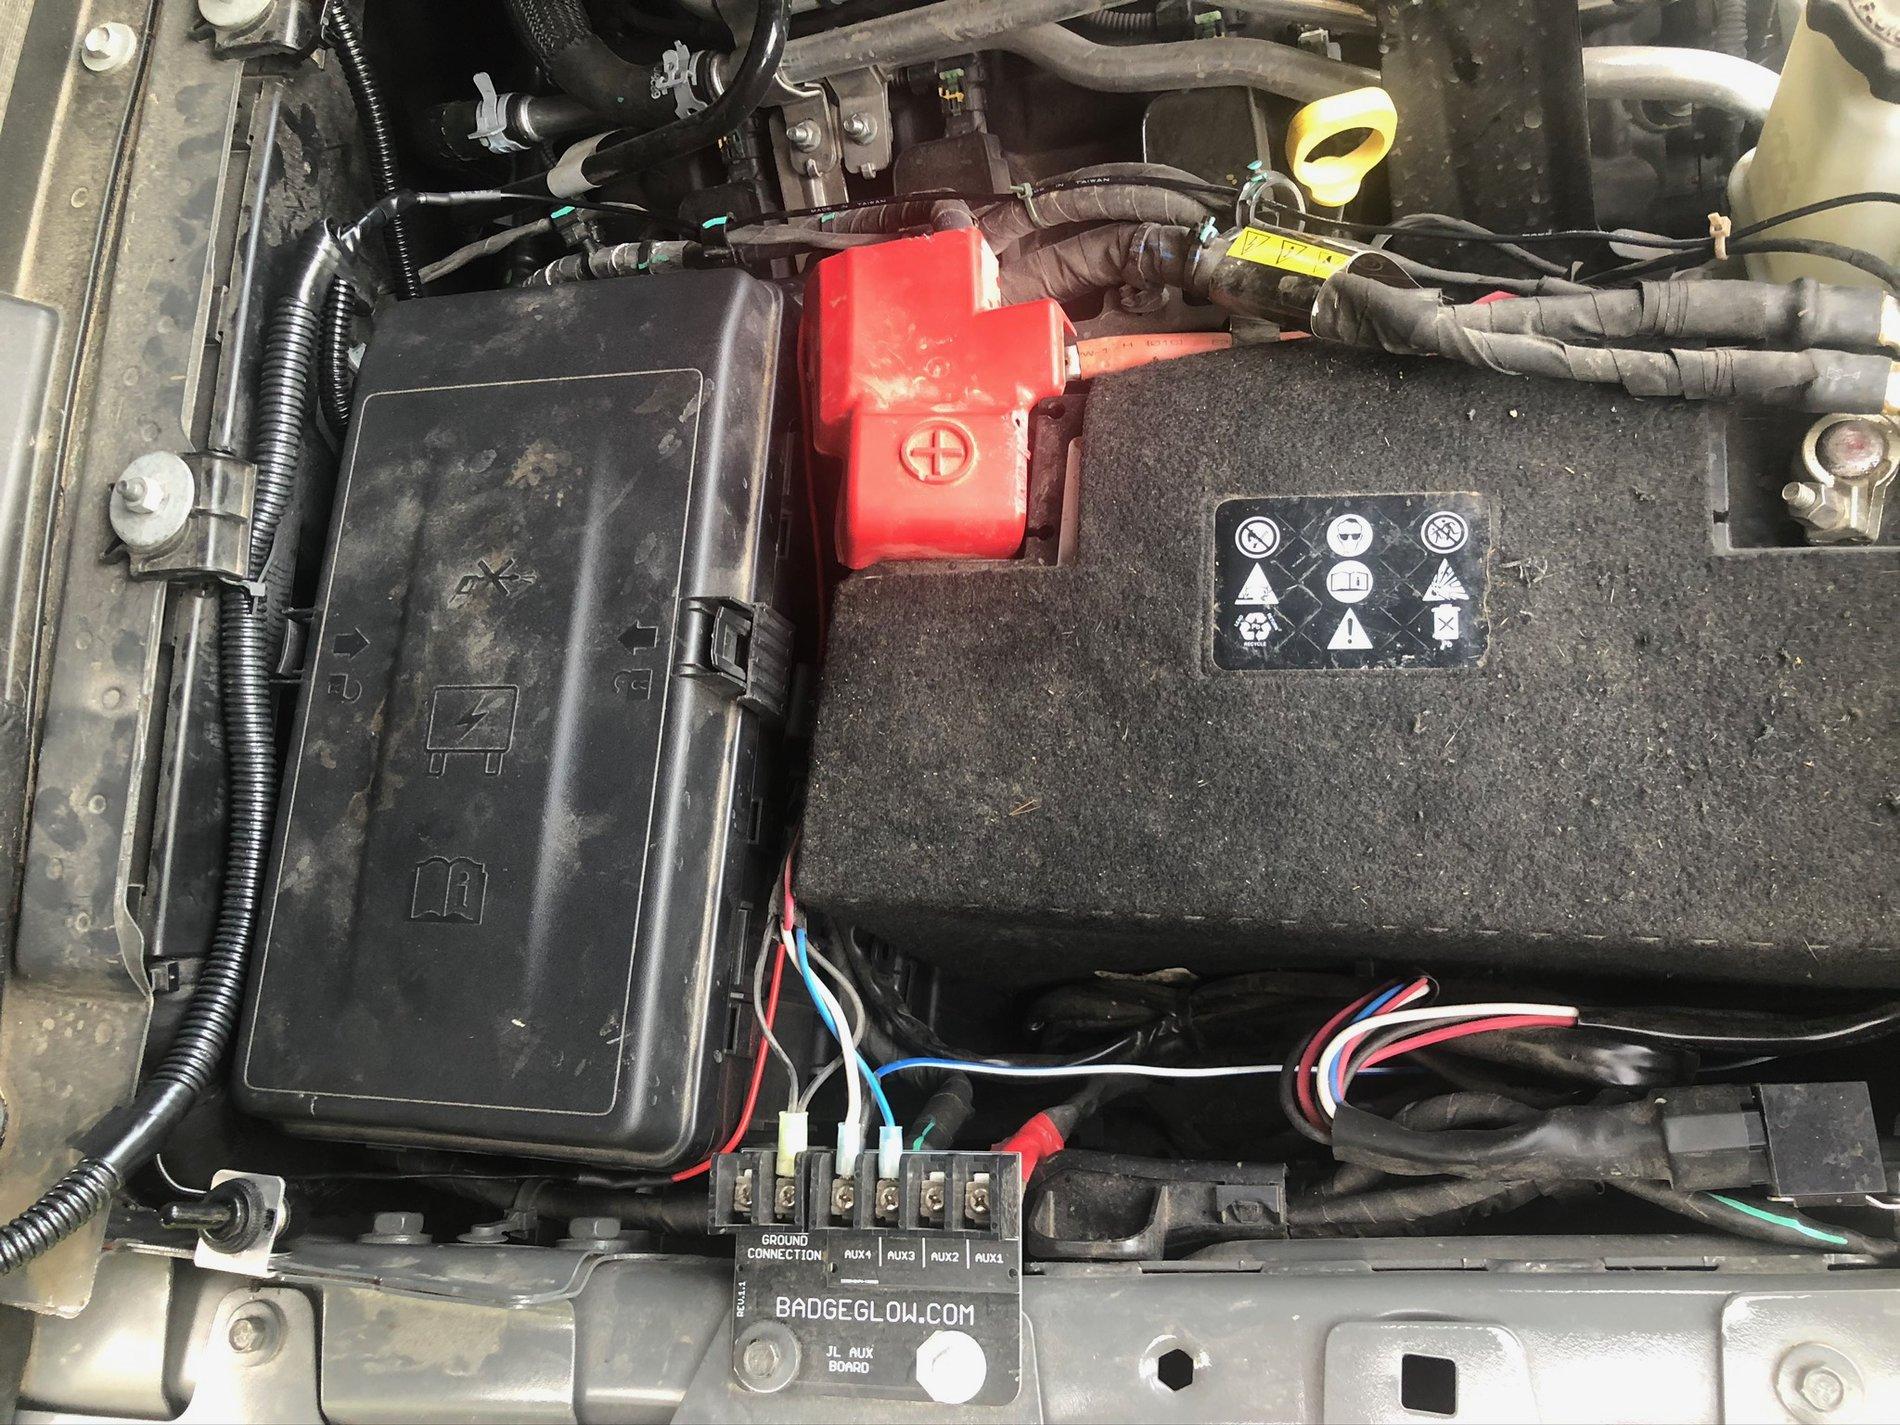
(apparently red rubber terminal covers and gray foam insulation are tasty treats for desert vermin), I installed the KC Cyclone underhood light set (not that it would have had any impact whatsoever on either of those critters, but it is a cool, useful and easy mod...)
I probably could have used the existing holes for the plastic clips that hold the heat/noise shield in that area, but decided to drill new holes for the self-tapping screws that come with the kit. Then I mounted the switch in the corner of the engine bay, next to the fuse box, and snaked the wires up through the hood channels on either side (since you can't get across the middle of the inside of the hood...grrrrrr). Long Zip-ties make great wire guides for snaking through tight spaces, just in case you didn't already know that. Once I got the wires in there, I fed some split-tube wire loom over them - probably didn't need it inside the hood, but didn't like seeing that red wire flopping around in there. The I did the same for the wires inside the engine bay, cut out some holes in the heat/noise shield for the lights with a pair of tin snips, and reinstalled the heat/noise shield.
And here's what they look like, night and day (so to speak...)
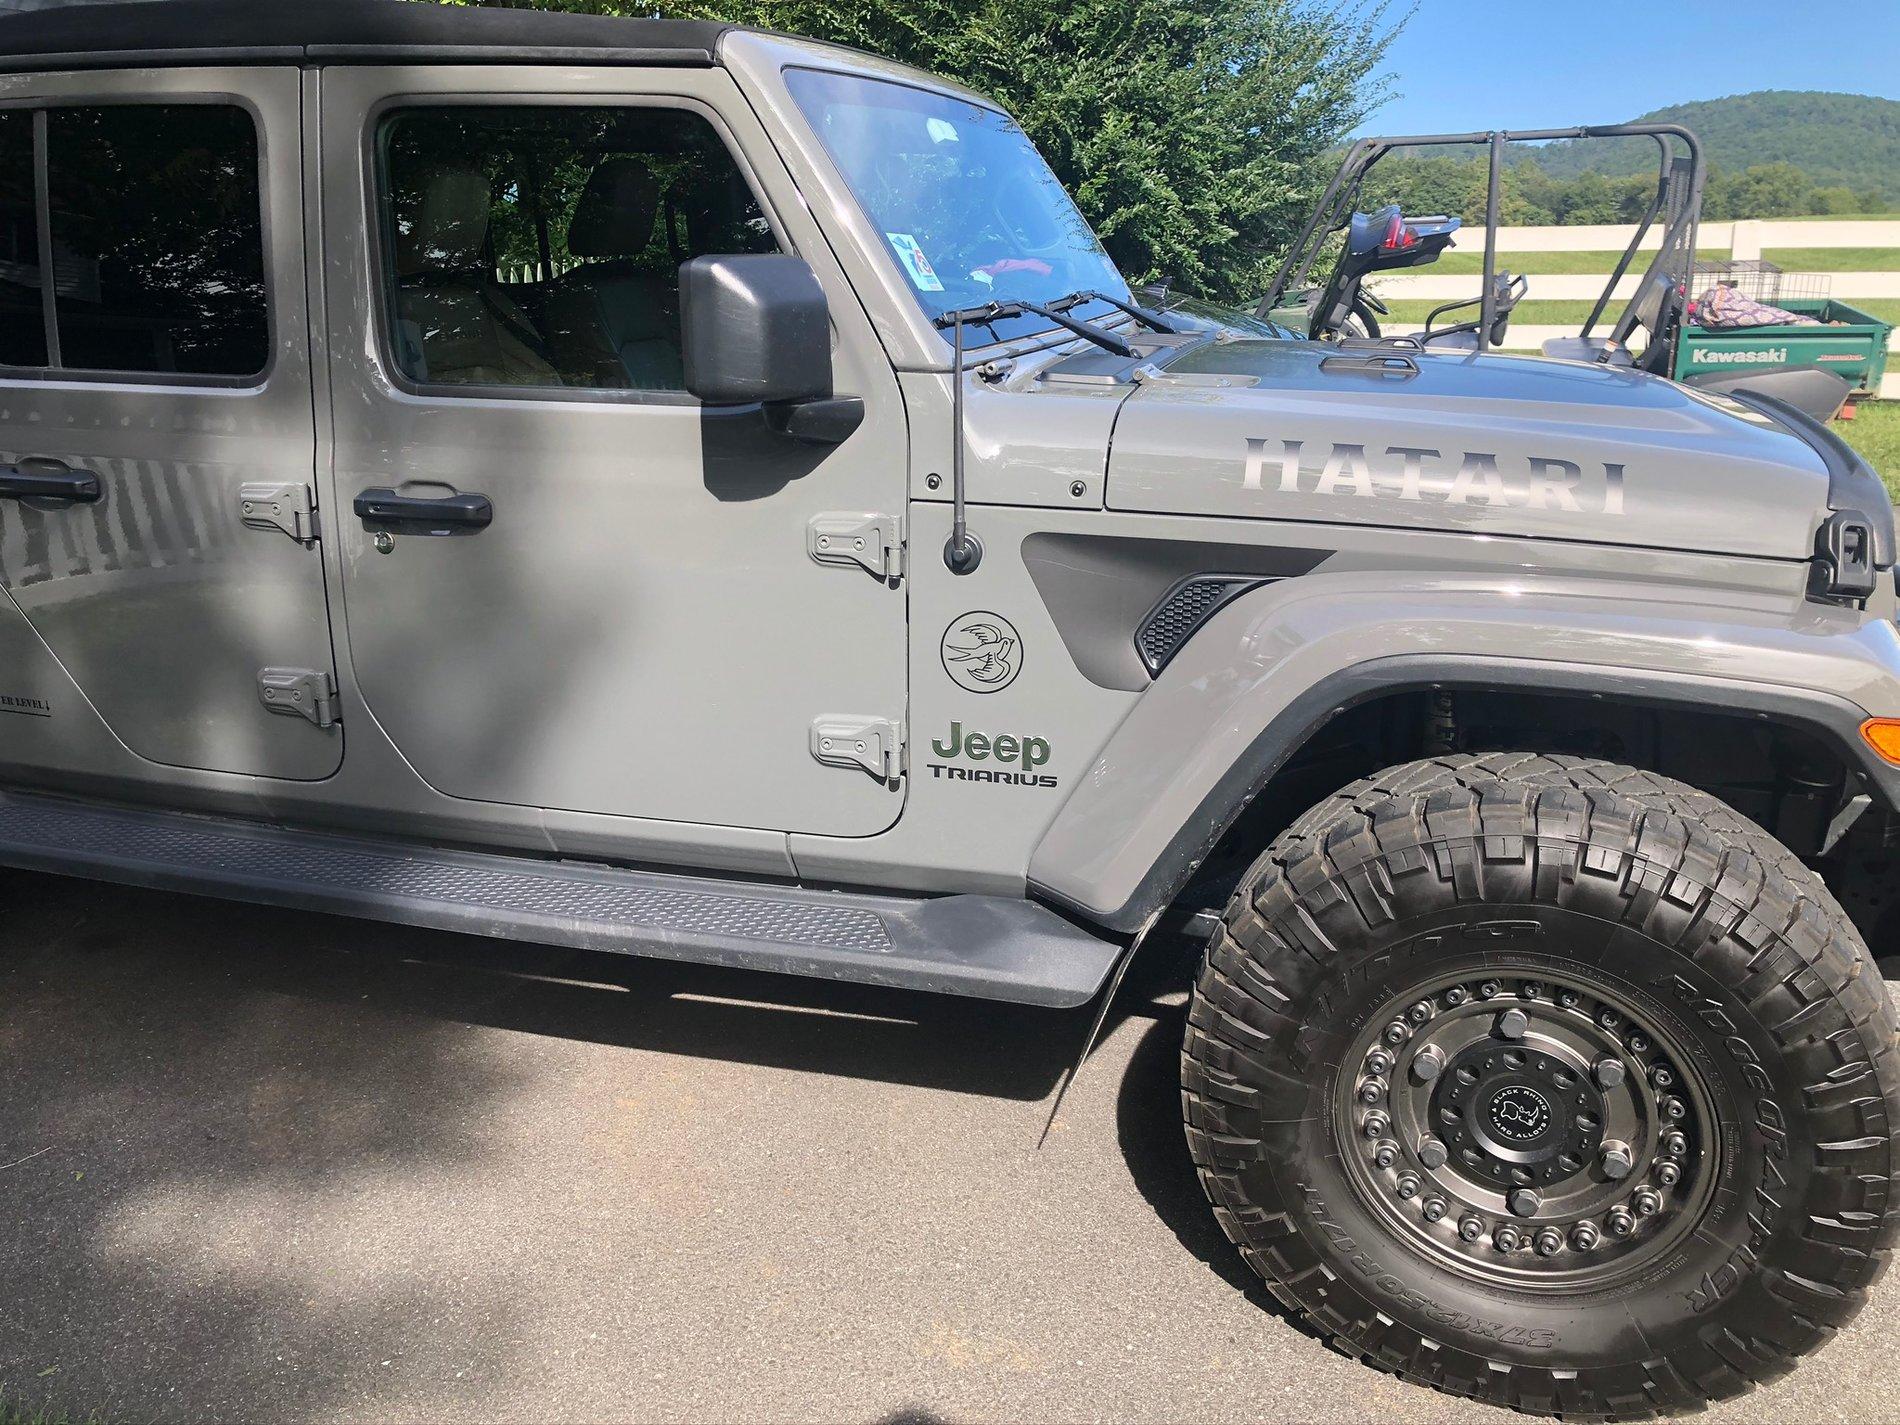
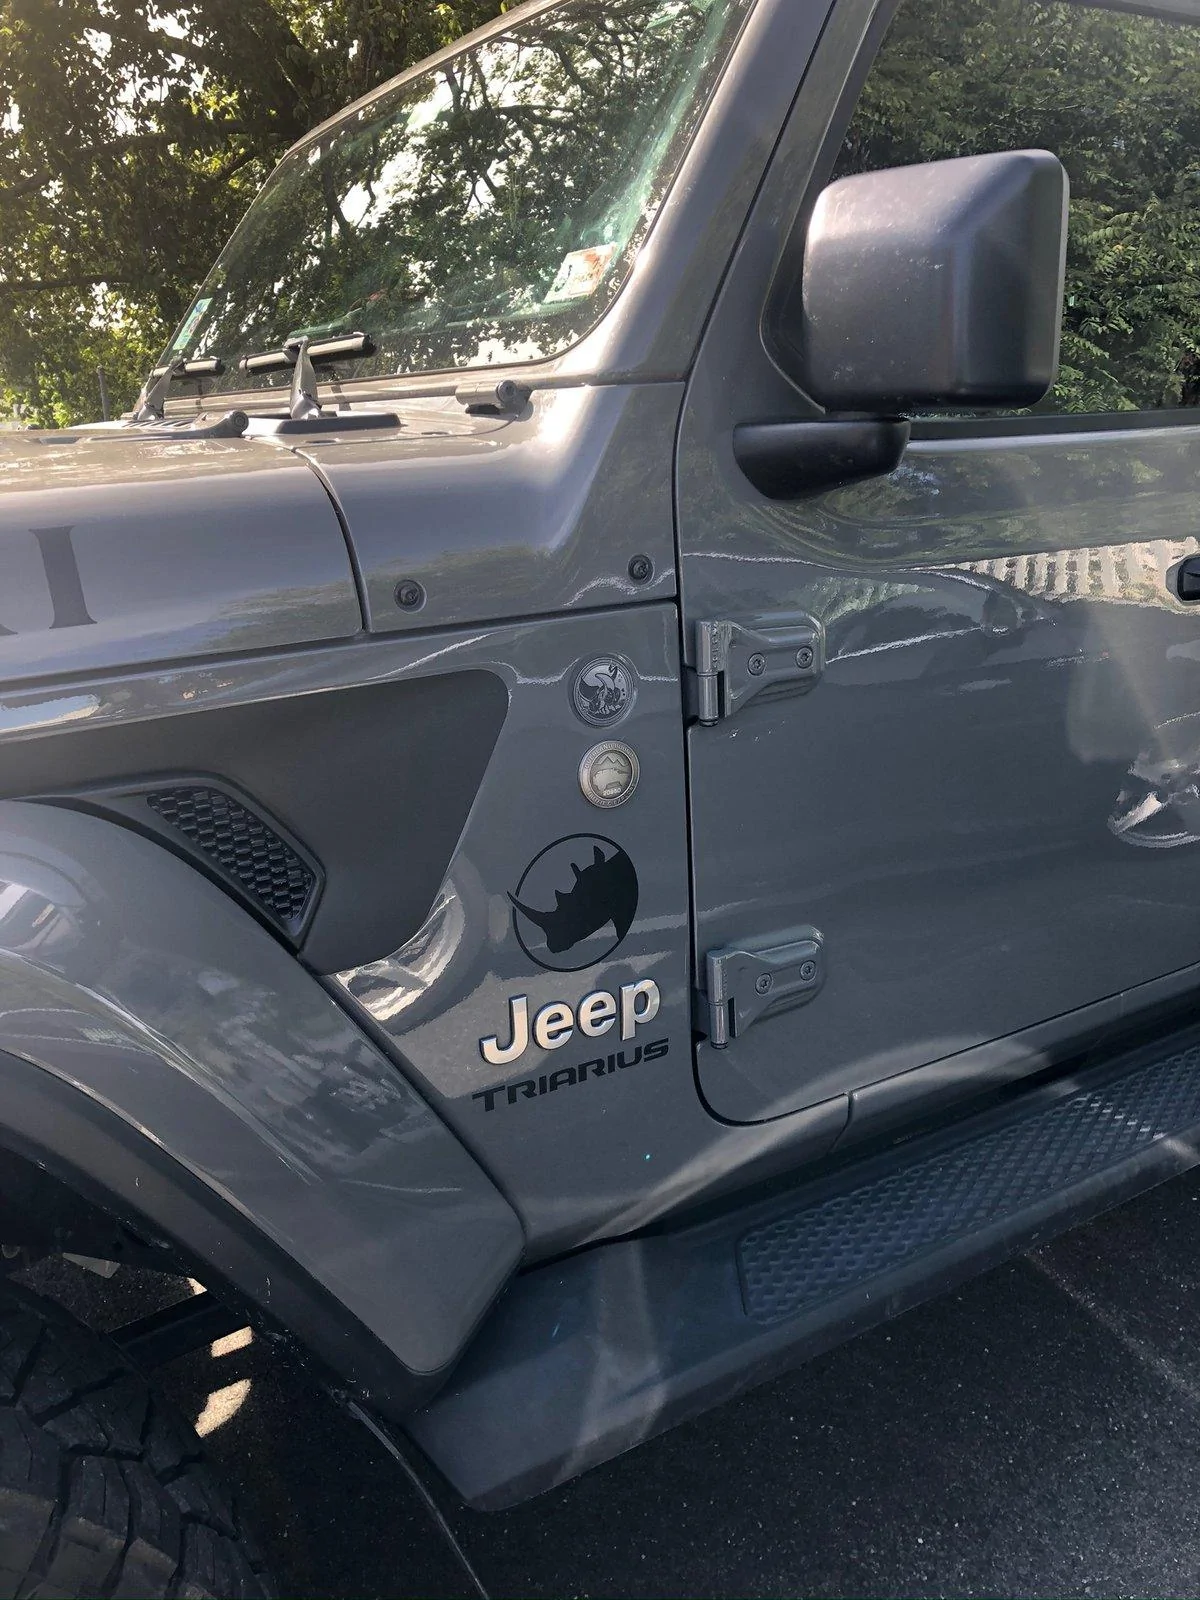
And then, icing on the cake, installed some new graphics from Pixeldecals:
On the passenger side, my wife's sigil -- a Bluebird in flight, and
on the driver's side mine -- a Black Rhino.
Sponsored
Similar threads
- Replies
- 102
- Views
- 10,058
- Replies
- 307
- Views
- 50,554

- Replies
- 3,881
- Views
- 358,347