DailyDrivenTJ
Well-Known Member
- Thread starter
- #1
This write up will be written in segments and iterations. While the physical install is not hard at all, but there are few things that requires certain hardware and subscription for programming to calibrate sensors and make the ACC function.
9/11/2024 - Auto Highbeam Video and Photo Added.
9/5/2024 - Part Numbers Added, Install Photos added.
Introduction:

We all remember COVID shortages on everything. During these shortages, a lot of Jeeps were made and shipped without chip heavy options.
When I was looking for my JT, there were certain options that were incredibly hard to find. I wanted Rubicon, Diesel with advanced safety group. None in my area had diesel Rubicon with Adaptive Cruise Control.

I have been trying to figure out see if the ACC can be installed after the Jeep leaves the factory. Dealers unequivocally said no. Many owners repeated that answer.
There was some anecdotal information about how a person installed it a few years back on a Gladiator but had absolutely no documentation whatsoever, I wrote multiple times with no response, another wrote some post about it but also fizzled out after a couple of messages. Besides, I saw no a single photo of the installation process. This always made me wonder if the install was actually ever done.
@sapientiam as of late finished this install and I have been in touch with him to learn about the process. He was one of the several I reached out and but only one nice enough to keep in touch. I appreciate him for that and all the information he has sent me. He confirmed multiple part numbers that I was researching and he indeed reached the summit before I did.
With some confirmed information at hand, I approached this project and finally got it to work after months of extrapolating information from Ram forum and whatever I could from a little and scattered over the internet. I sure appreciate them for sharing what they know.
Now that I got it to work, I will lay out all the information I have learned here so that you can approach this with a little more confidence.
Operations Overview:
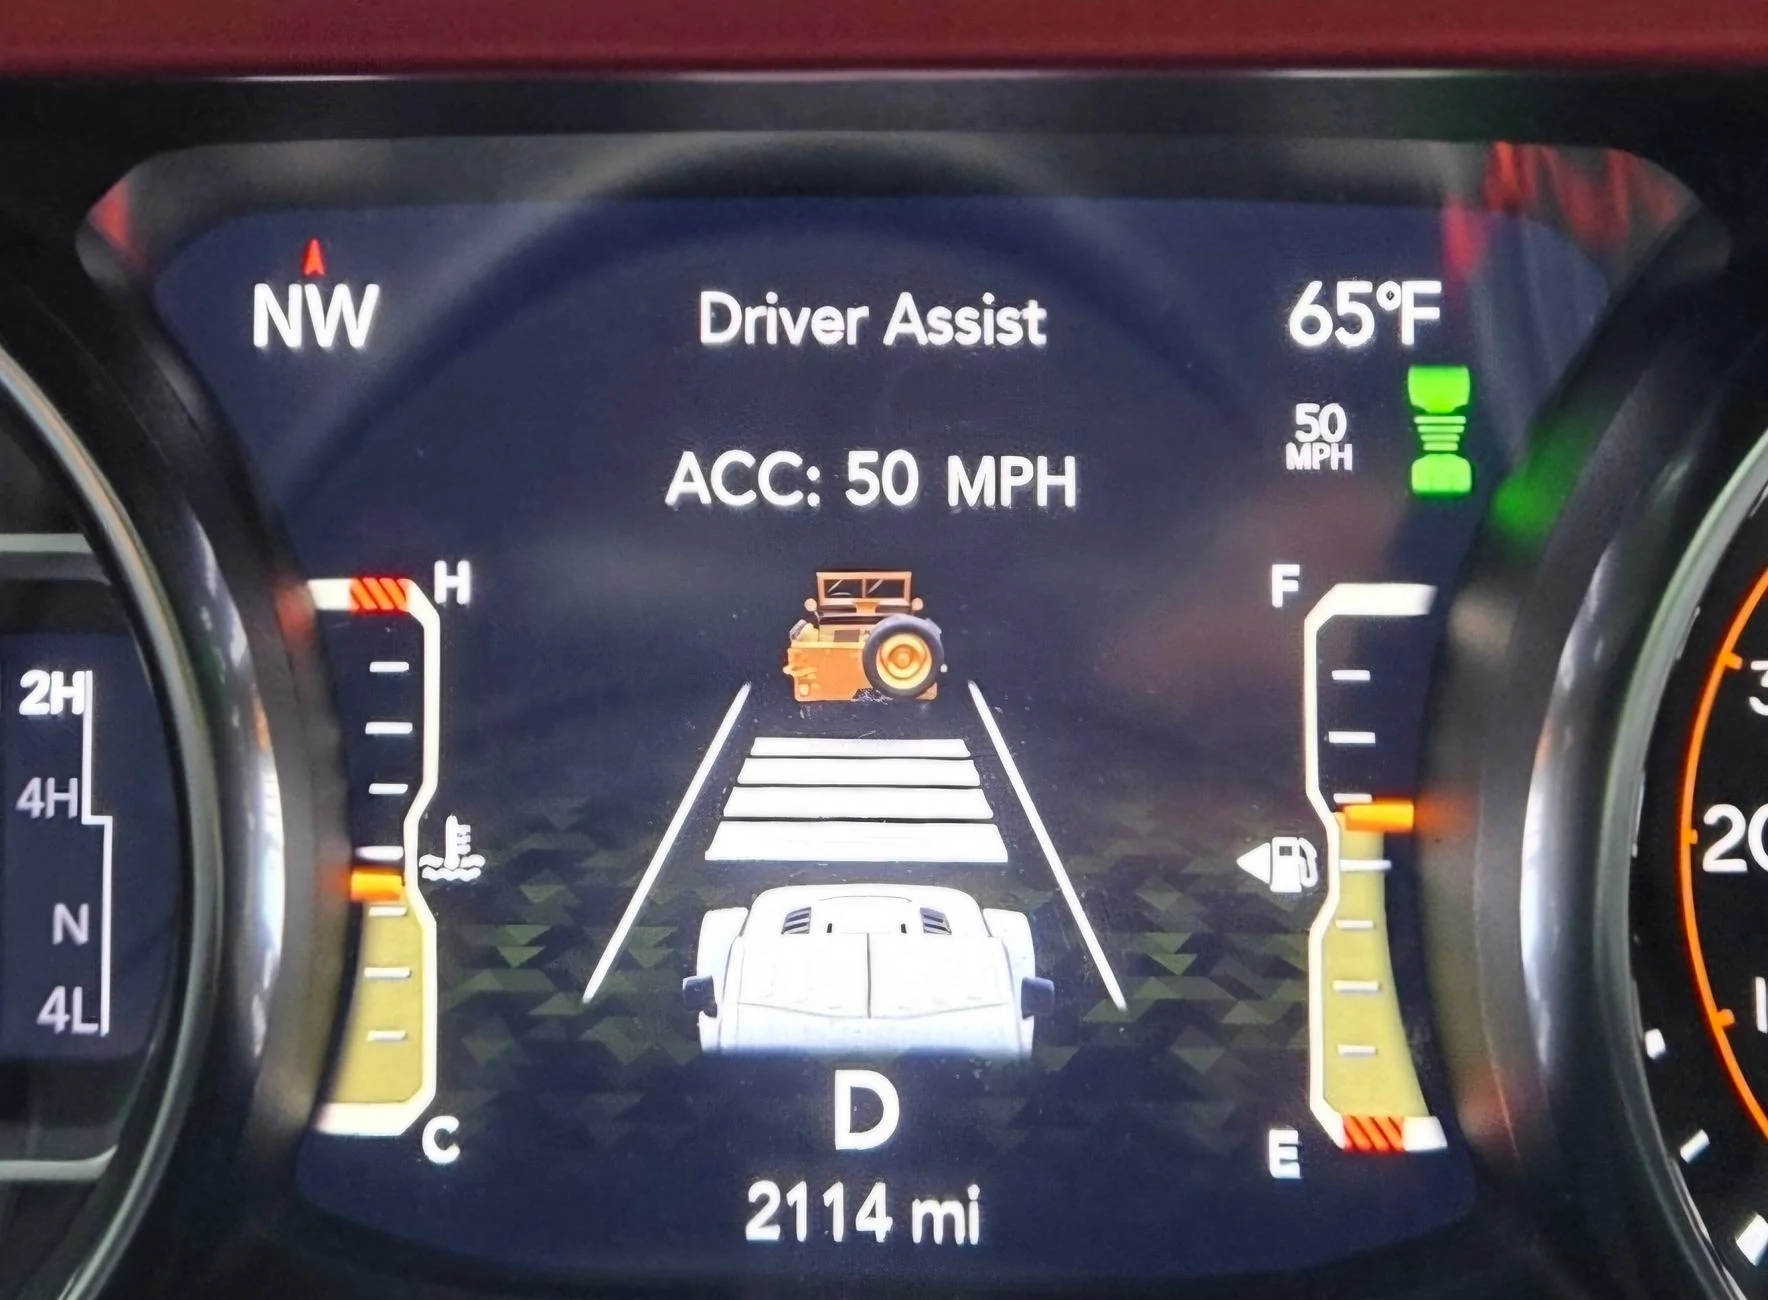
Adaptive Cruise Control utilizes RADAR and camera input to decide distance to an object in front of the vehicle and controls both acceleation and deceleration using more engine input or brake input. It can also stop your vehicle if the vehicle in front of you stops and will resume if the vehicle in front of you starts moving again as long as the stoppage is within a few seconds.
Hardware
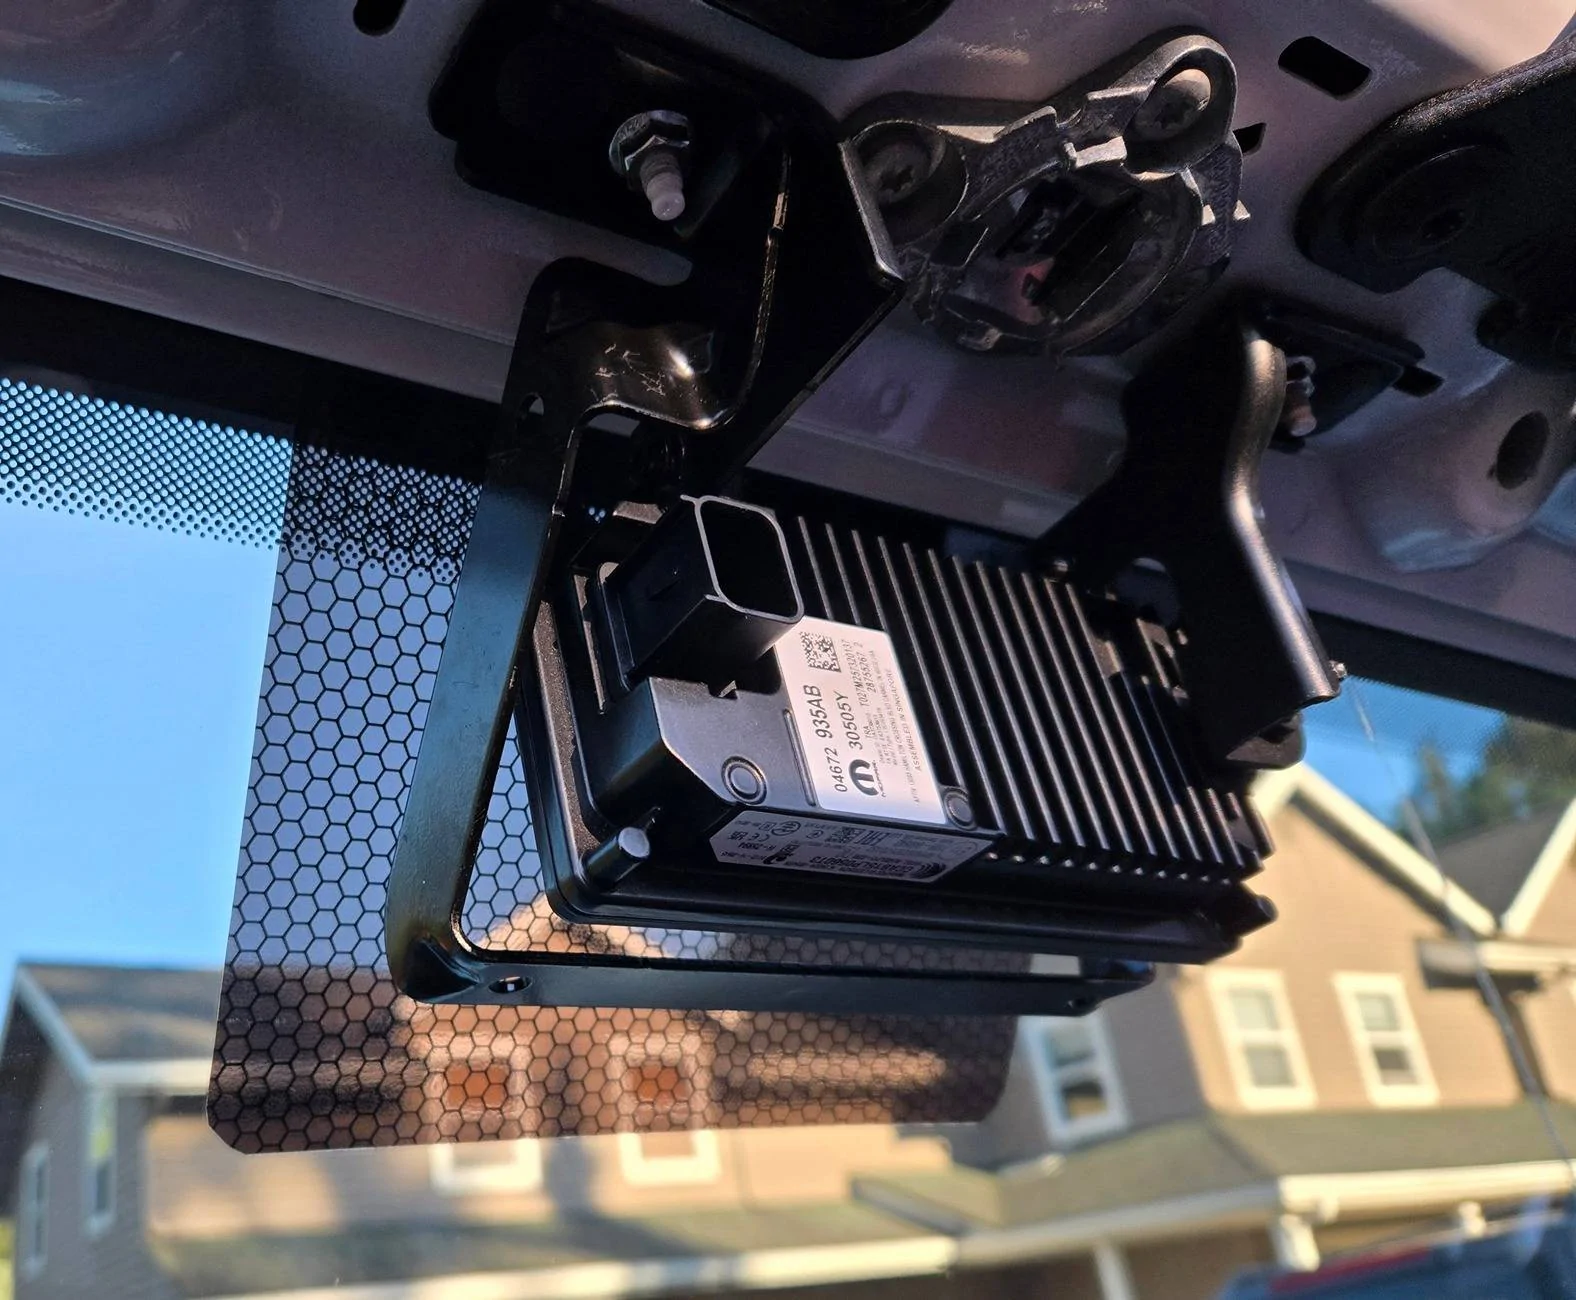
Jeep uses DASM (Driver Assistant System Module, check SP) which is mounted above the rearview mirror. This determines the distance to object ahead of the vehicle. This also talks to ABS and PCM to maintain acceleration and deceleration.

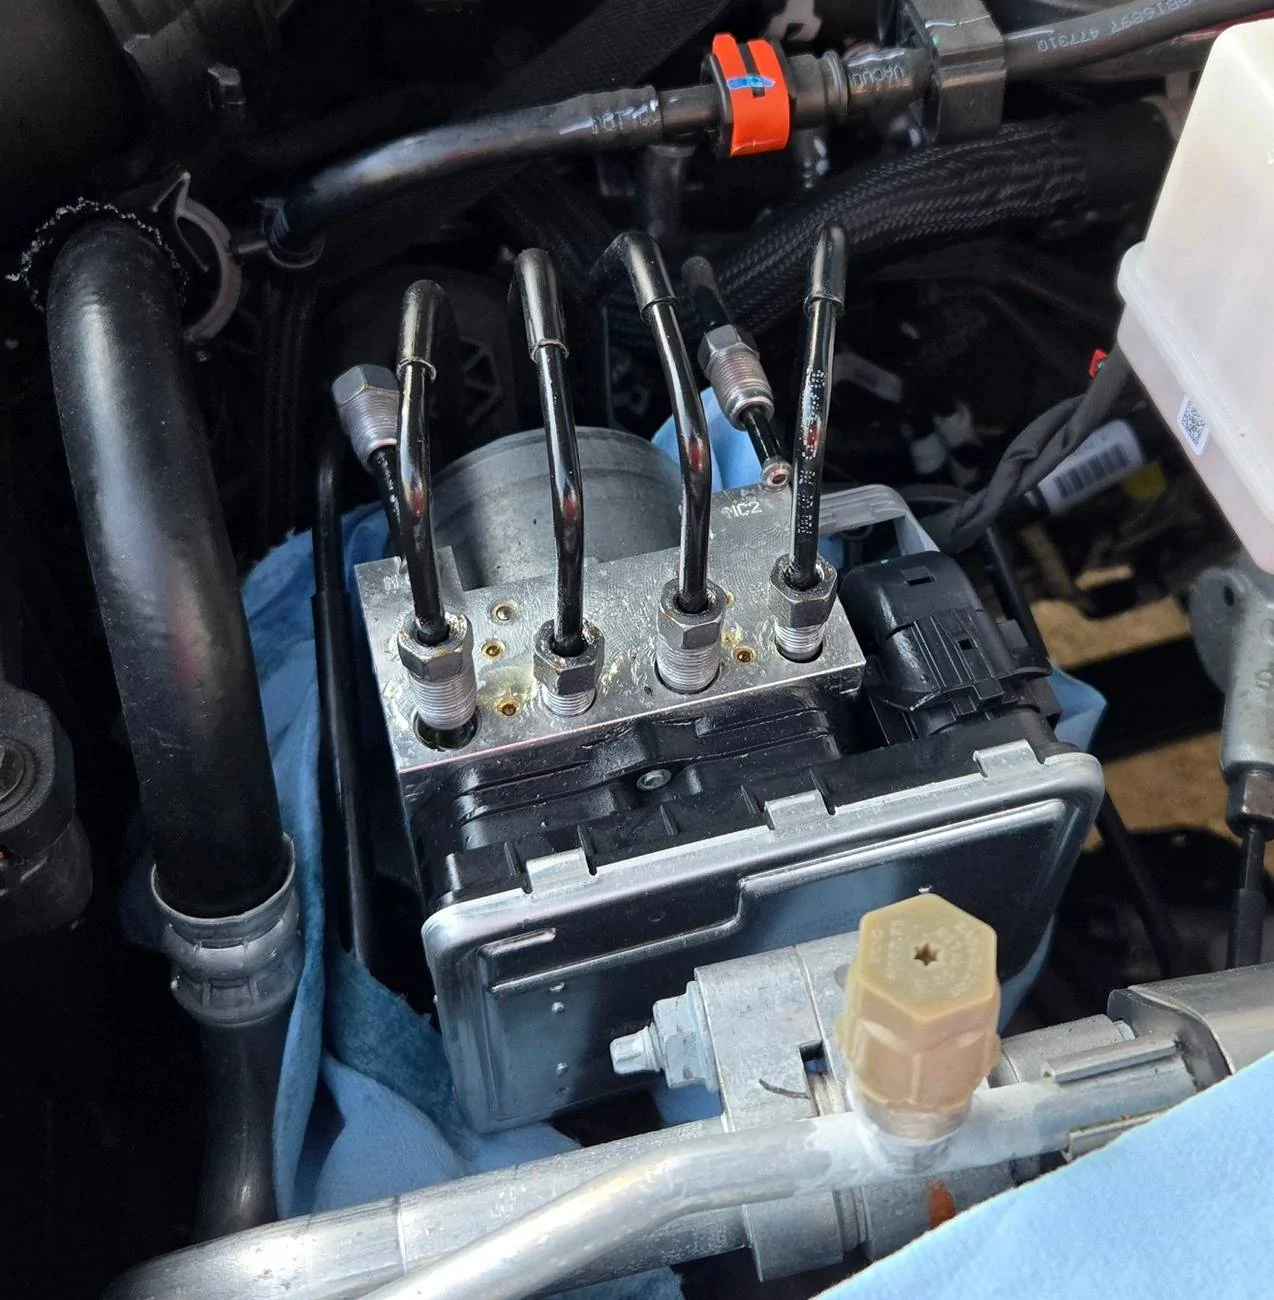
For this to happen, obviously you need the DASM unit, NEW* ABS control unit and ABS system module that the DASM can control. Your existing ABS module is not capable of receiving input from DASM.

While these are the components that make the ACC possible, but the calibration using certain software and hardware do take some effort to make these hardware work.
Software
I used AlfaOBD with Security bypass plus Bluetooth OBD connector, Mongoose J2534 Cable for Chrysler vehicles to be used withOUT Security bypass plus Witech2.0 subscription to install the new ABS components and DASM.
Witech2.0 subscription is required to perform ABS initialization and other required sensor calibration for the new ABS module and control unit. I tried for half day to figure out if I can get the new ABS components programmed with AlfaOBD. It just does NOT work.
Having said that, AlfaOBD is very important in this install because there was not a clear way for me to enable the DASM from Witech2.0.
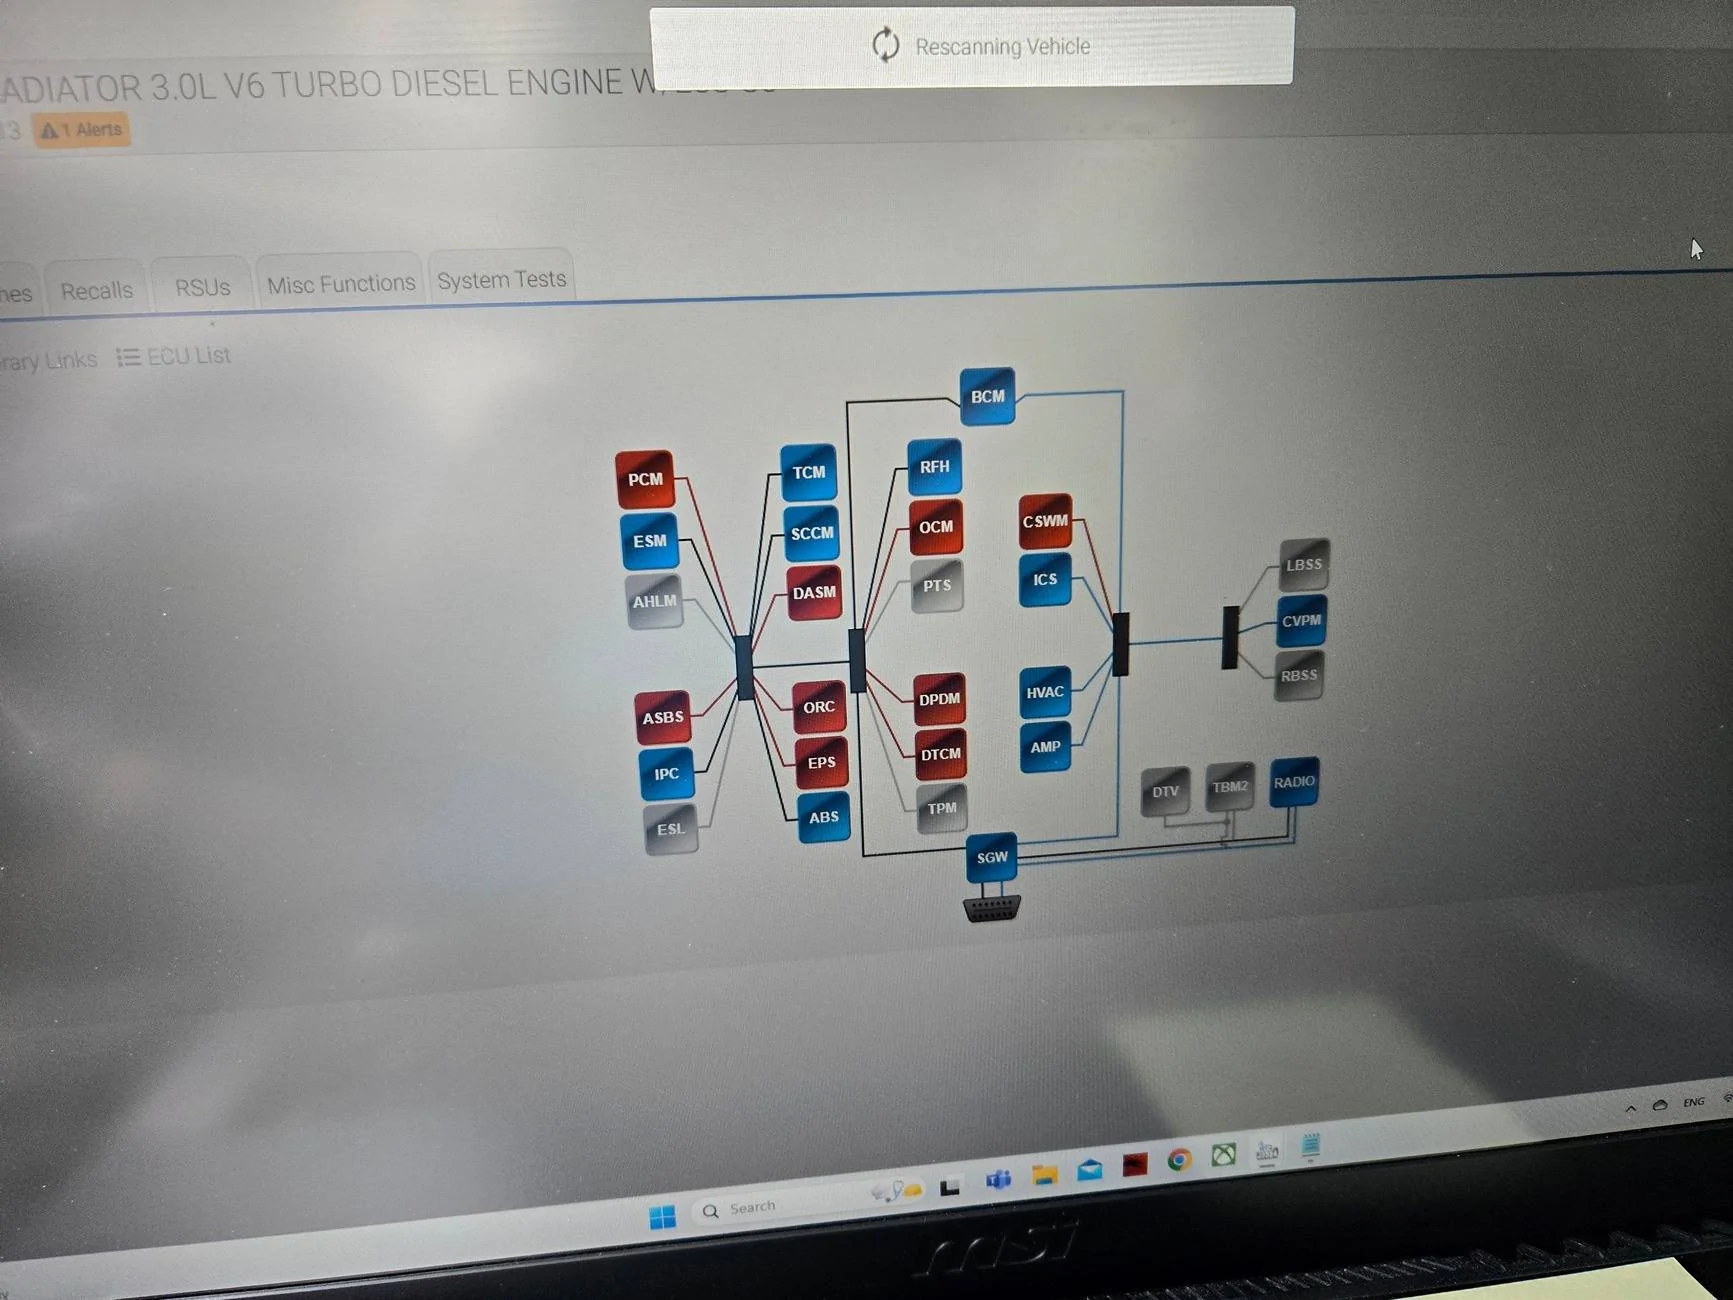
Once, the DASM is enabled through AlfaOBD, you can see the DASM selectable from the topology view on Witech screen. Only then you can go through the DASM calibration.
Parts Required: Part numbers will have to be verified to work with your year model. **I have heard that soft-topped vehicle may need different steering wheel switch harness to accommodate the ACC switch. This is NOT a verified information.
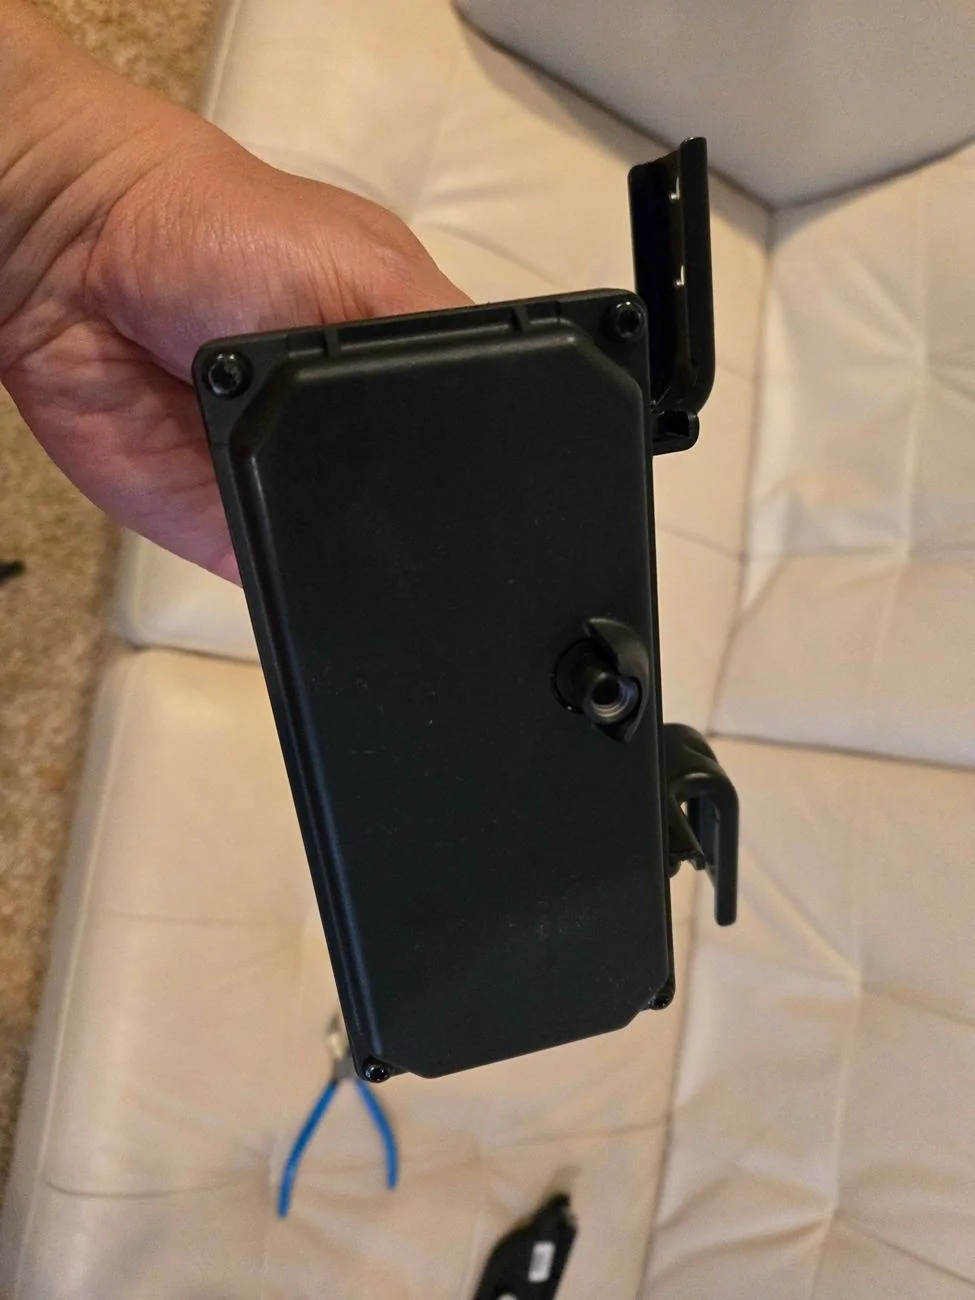
Forward Facing Camera, Driver Assistance System Module, DASM - 04672935AB
ABS control unit that is ACC capable - 68461636AA
ABS system module that is ACC capable - 68621091AA
New overhead wiring harness (without trim, SOS switch, microphone) - 68357530AD
Overhead trim piece AND wiring harness - 7JY99TX7AB
ACC Protective Cover - 56029828AA
ACC Bracket - 68422194AB
Sensor Cover - 6QD20TX7AA
Close Out Cover - 6QD21TX7AB
Speed Control Switch - Mopar 68481677AB
Wiring Harness for Heating Element "Antenna wiring harness" - 68398637AD
Zip ties
Basic hand tools and Jeep Tools in your glove box
DOT3 Brake Fluid
Means to bleed brake lines
Pedal holder or broom stick to keep brake pedal in place.
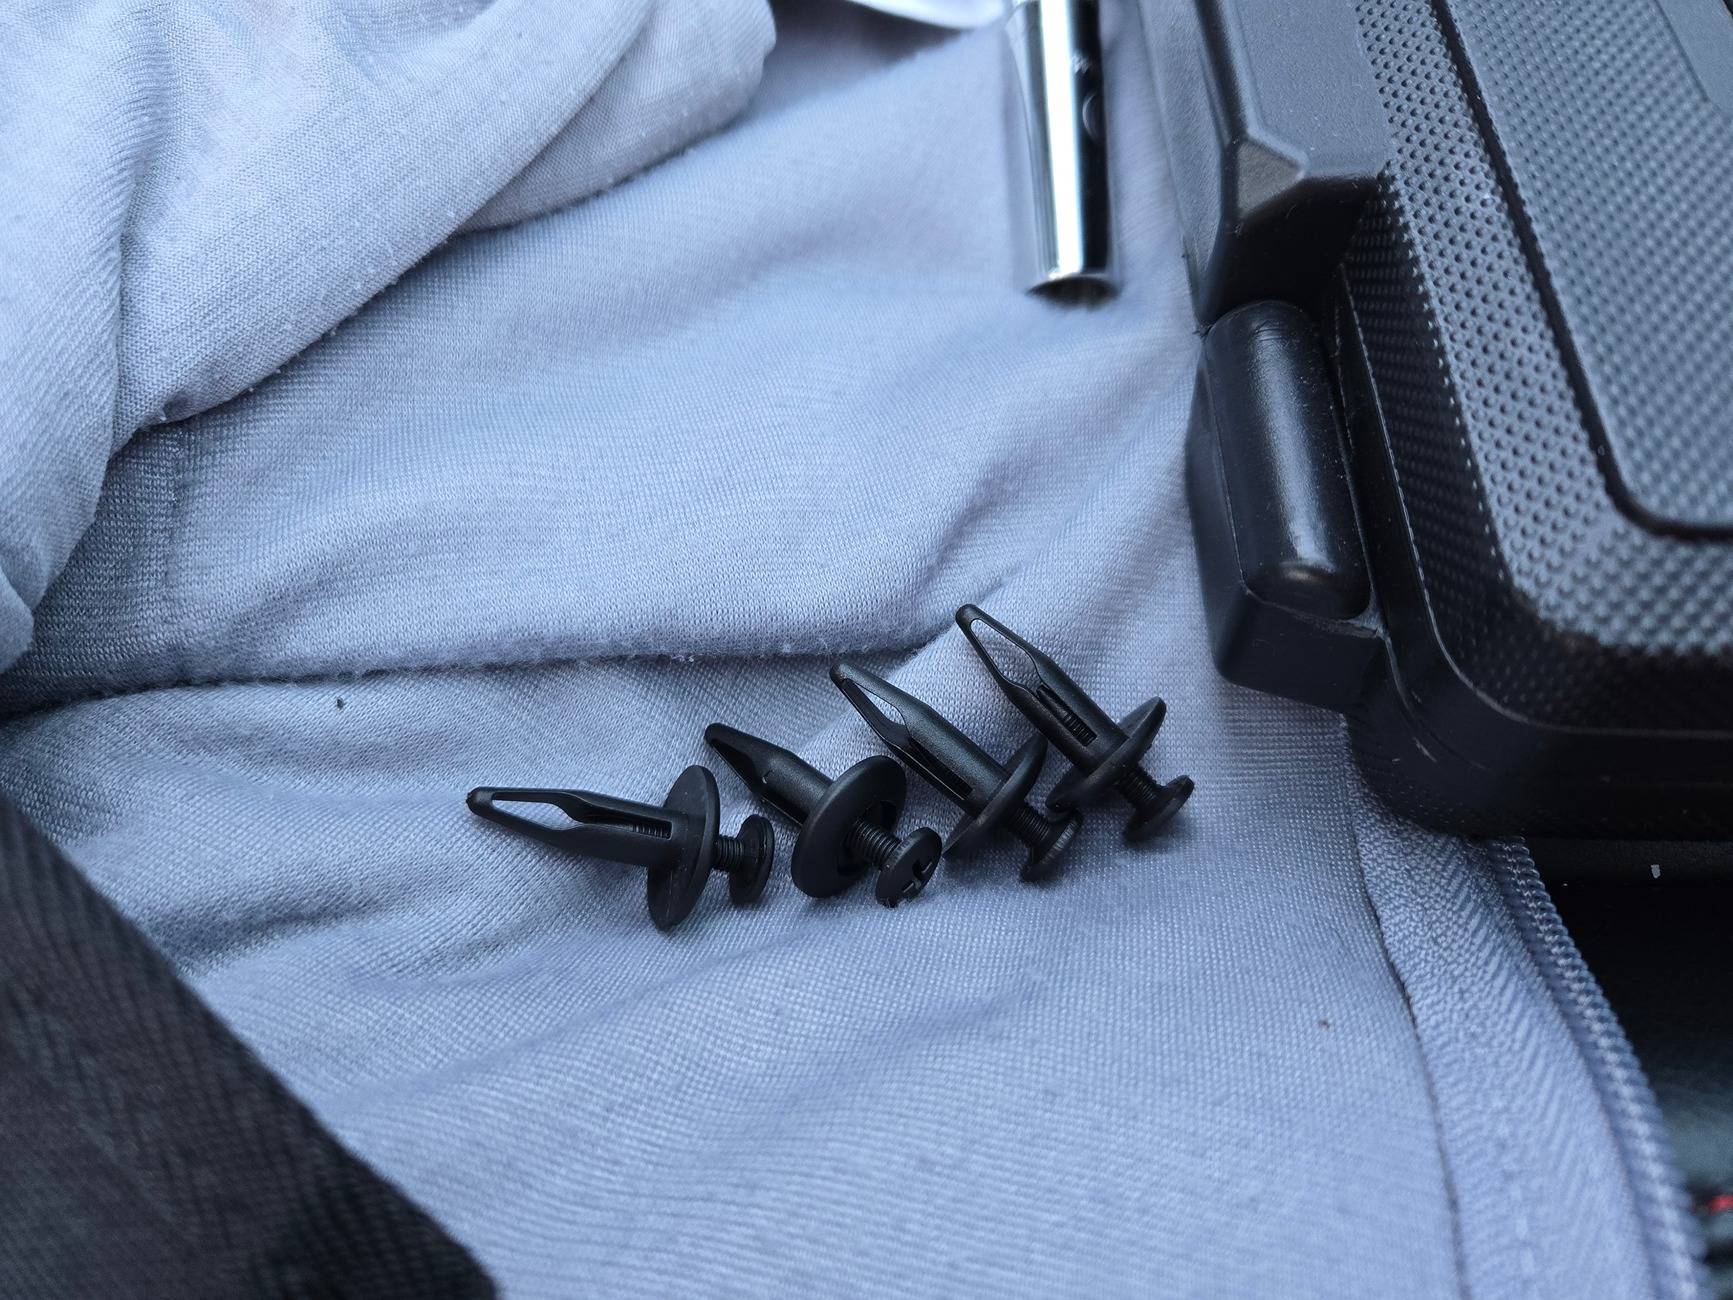
Plastic trim Screw QTY of 4 (GM 20664092 Ford N804570S, https://a.co/d/0qpKidE)
M6 Flared Nuts QTY of 2
Functioning AlfaOBD setup with Bluetooth Bidirectional OBD Programmer.
Witech 2.0 (and Tech Authority subscription)
Steering Wheel Switch for ACC
Mongoose Chrysler J2534 Cable
A laptop that is running recent windows and have USB connections.
Yes. Witech2.0 is a MUST if you are initializing ABS and calibrating DASM unit. AlfaOBD cannot perform "ABS initialization" and other necessary sensor calibration for DASM.
[Starting Vehicle Spec]
The following is how my vehicle was setup prior to starting the retrofit.
2023 Rubicon Diesel
UConnect 8.4"
Paddle Shifter and associated steering wheel harness
[Physical Install]
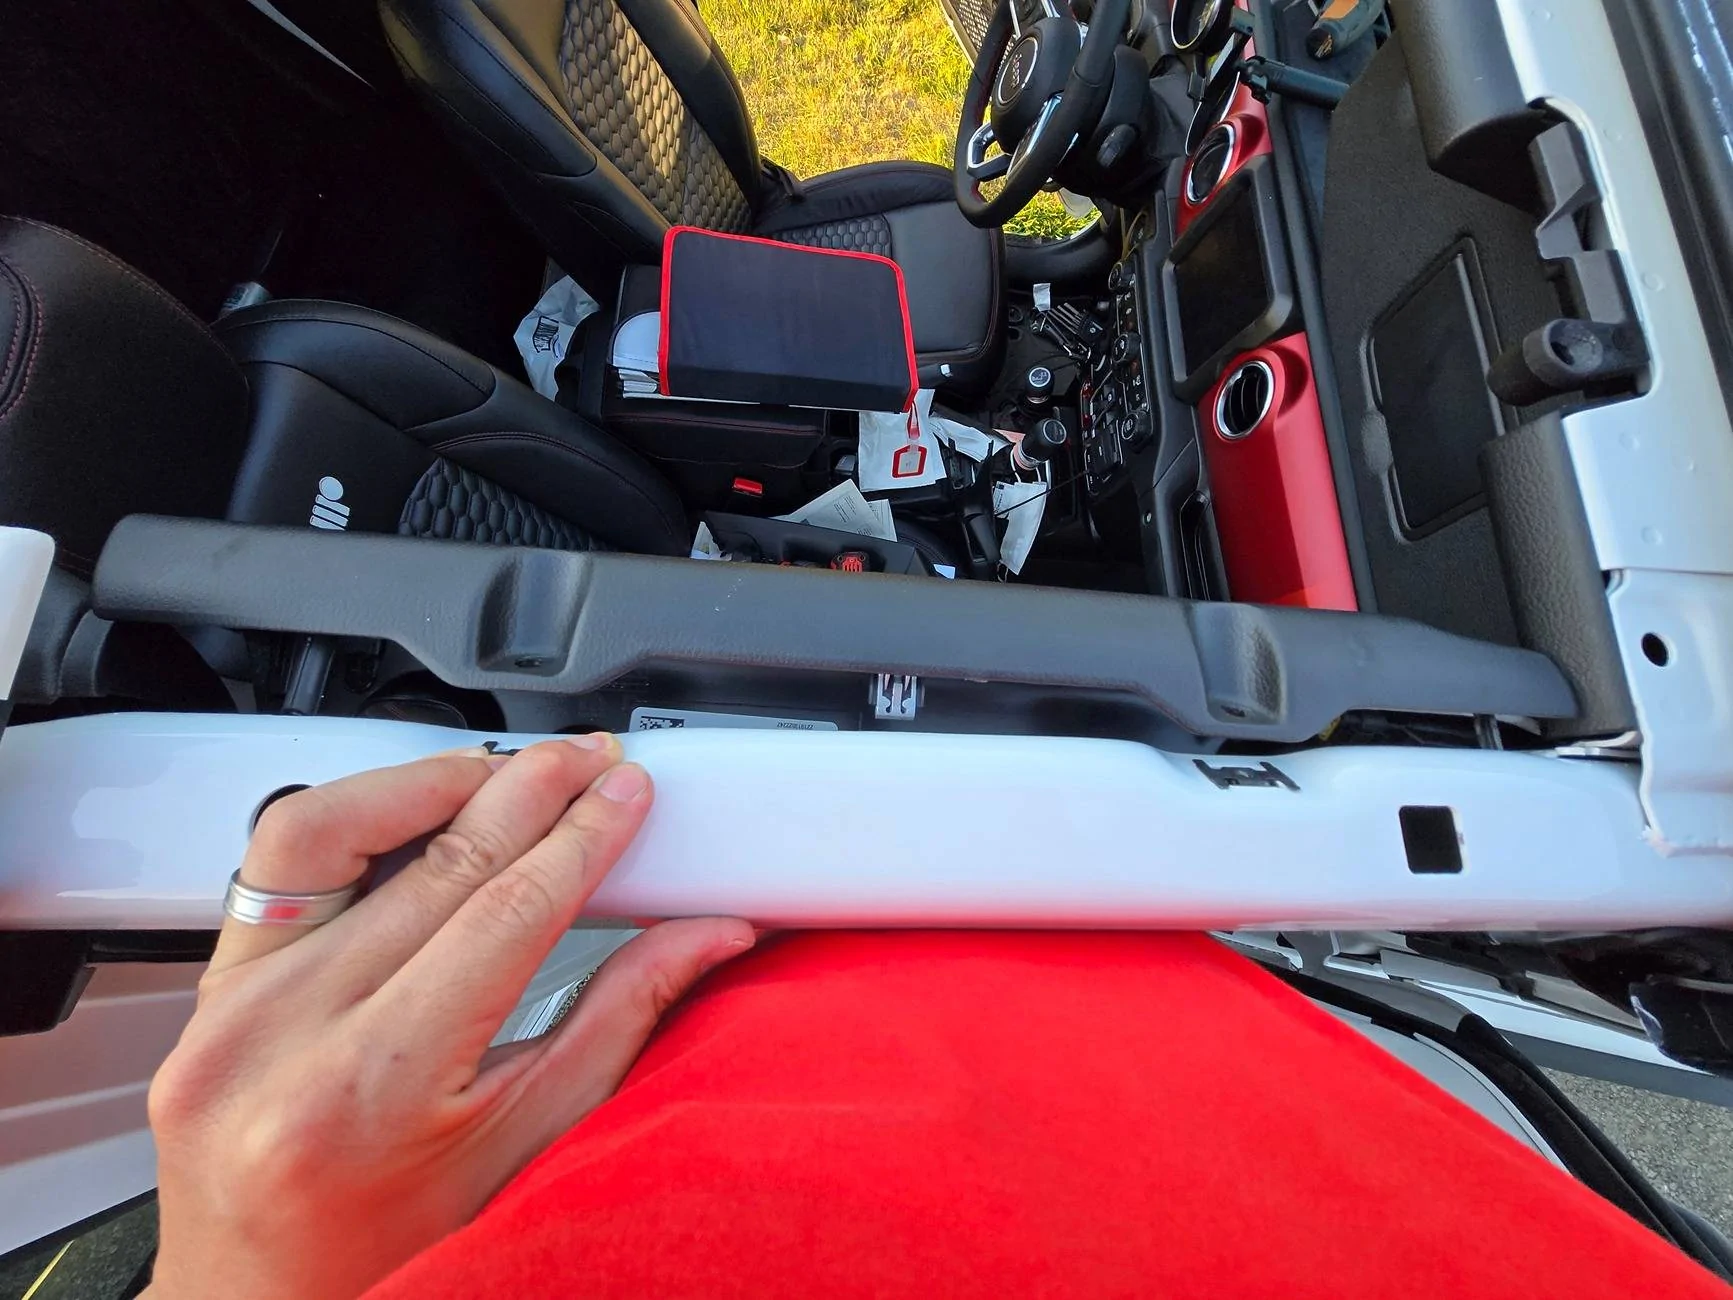
1. Remove the both front portion of the hard top.
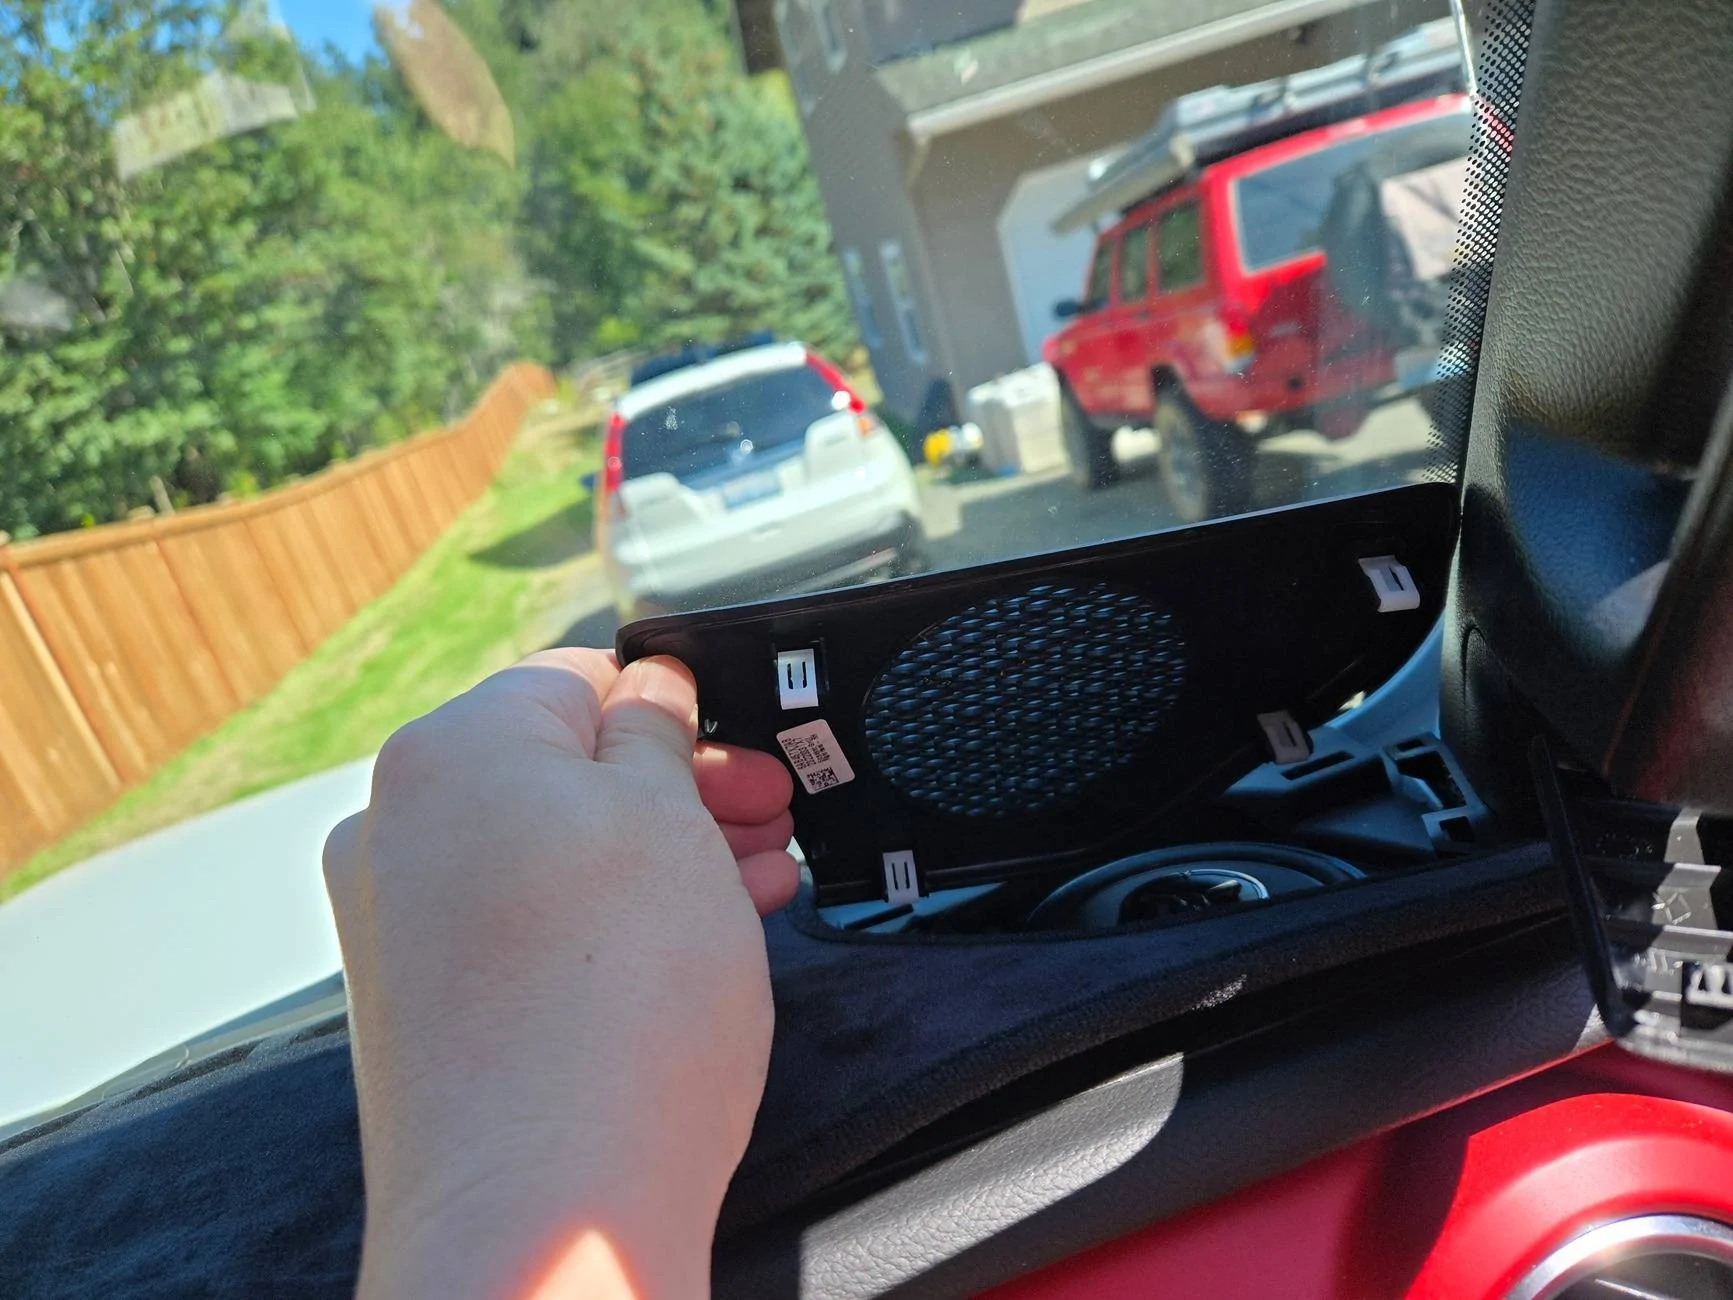
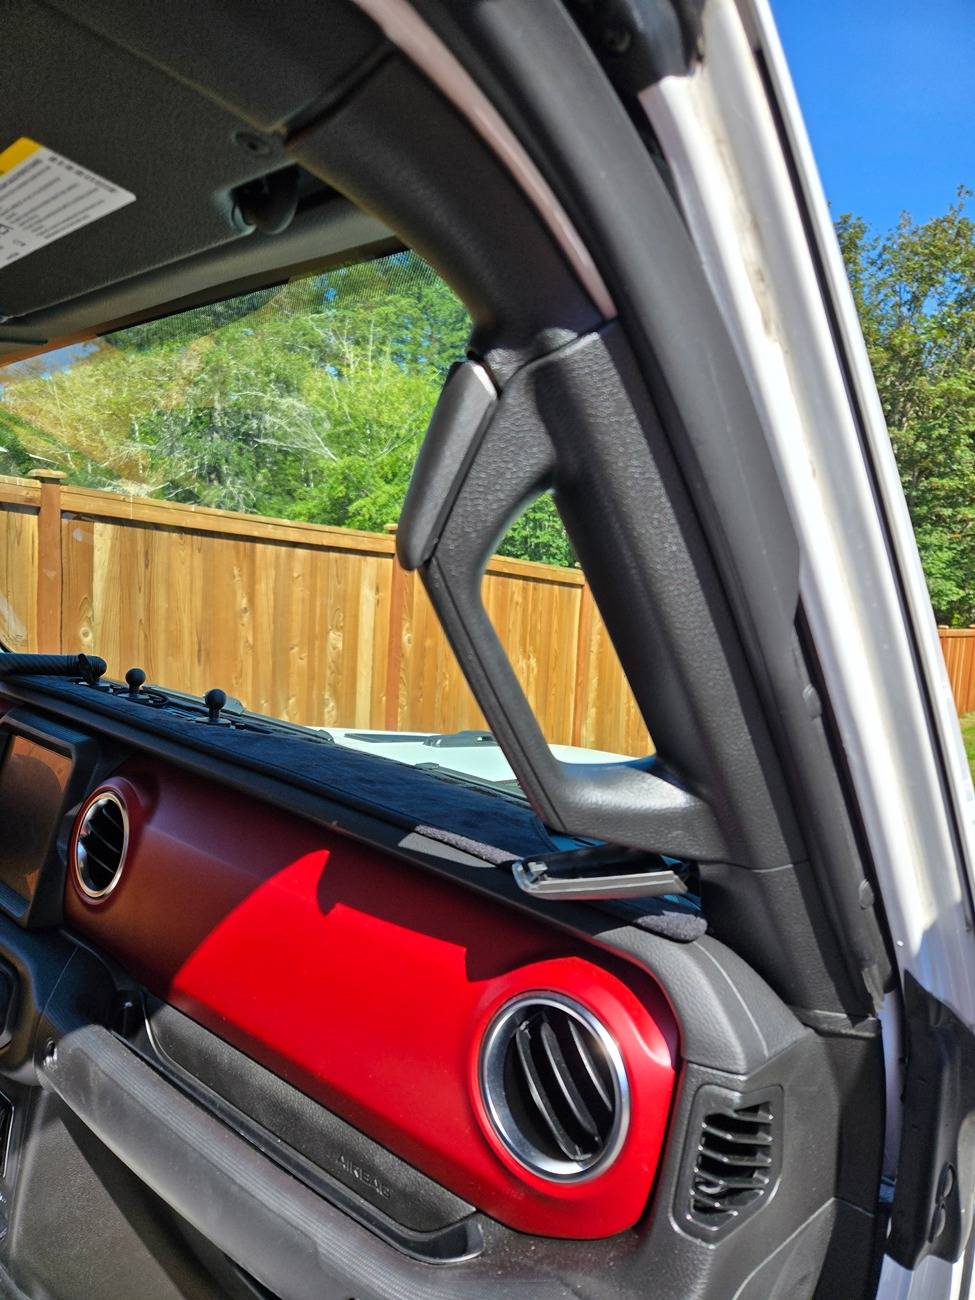
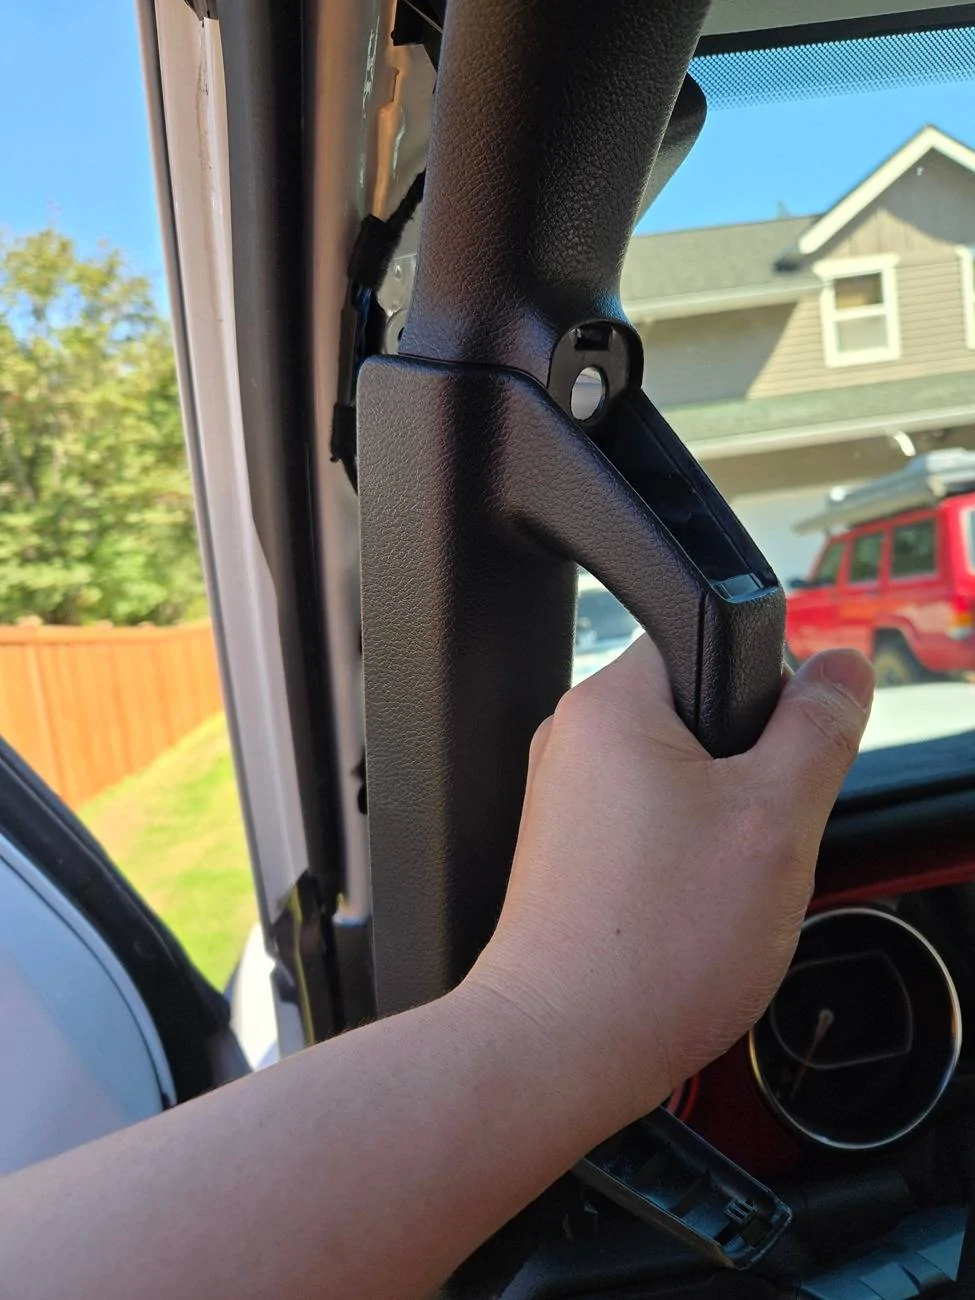
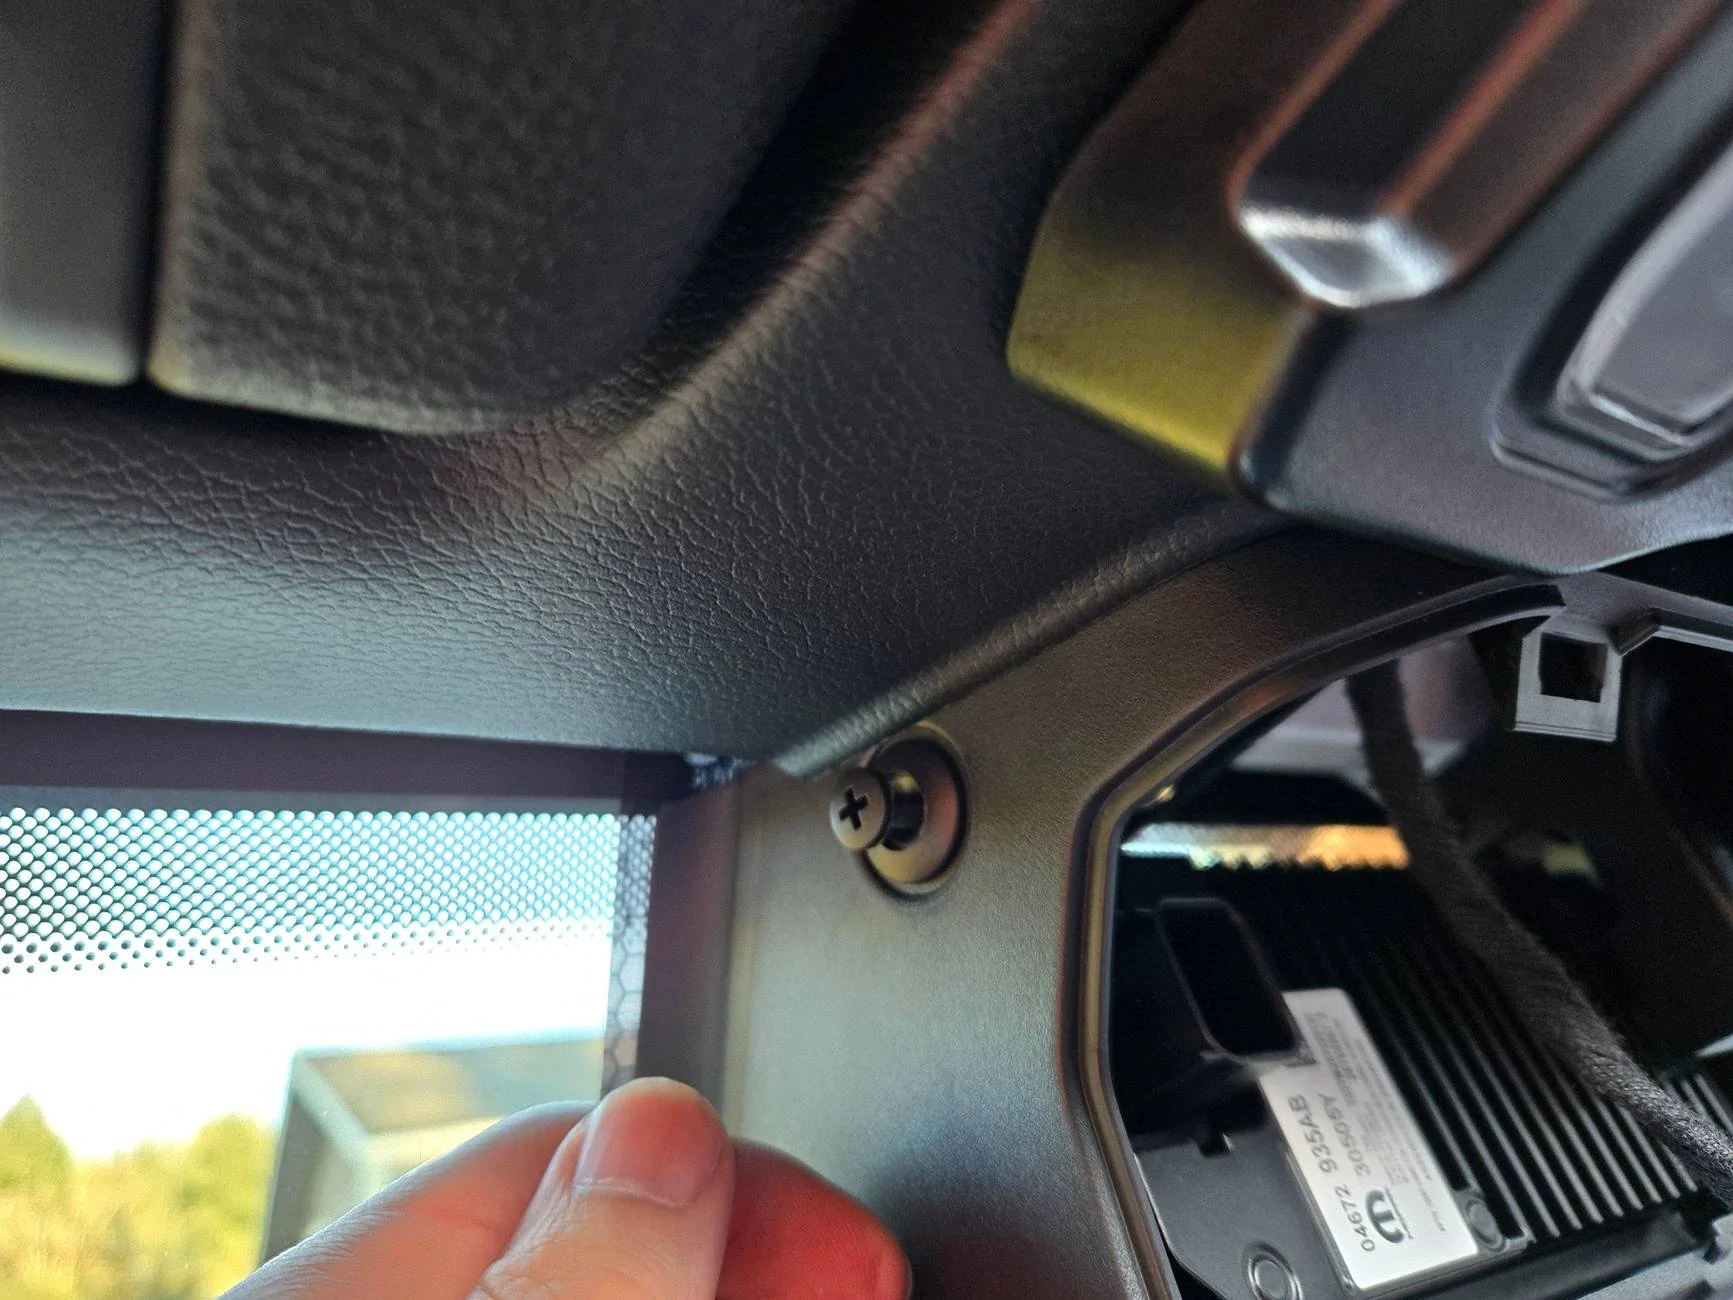
2. Remove the dash speaker grill by using plastic pry tool. Then remove the OSH (Oh Sh!t Handle) by peeling back the bolt covers and remove the bolts keeping the handle in place. Once the two bolts are removed, you can remove the handle trim by simple pulling away from where it is attached. Repeat on the other side.

3. Remove driver and passenger side roll cage trim pieces. Each piece of the panels are held by 4 screws. 2 on top and 2 below. You can remove the trim by pulling the piece horizontally toward the middle of the vehicle after the mounting screws are removed.
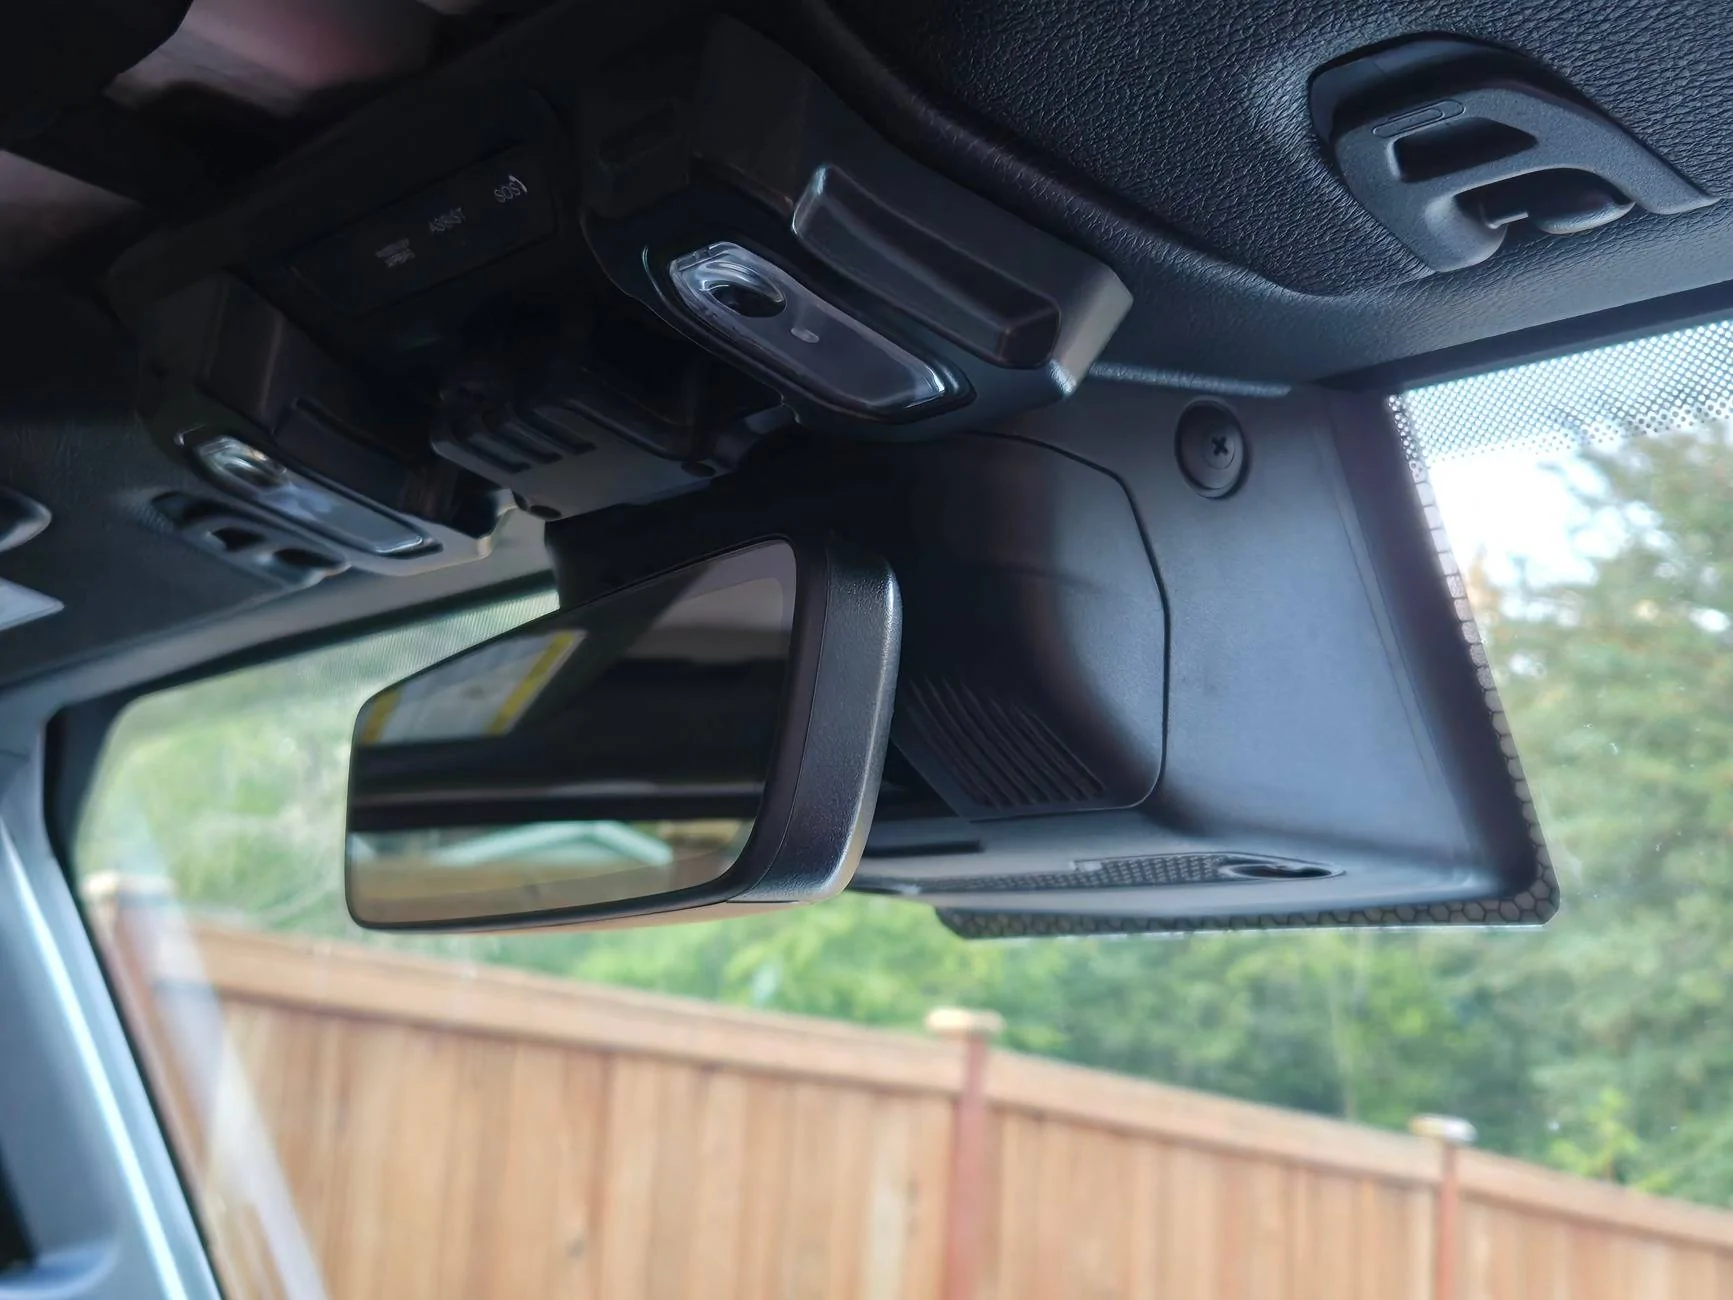
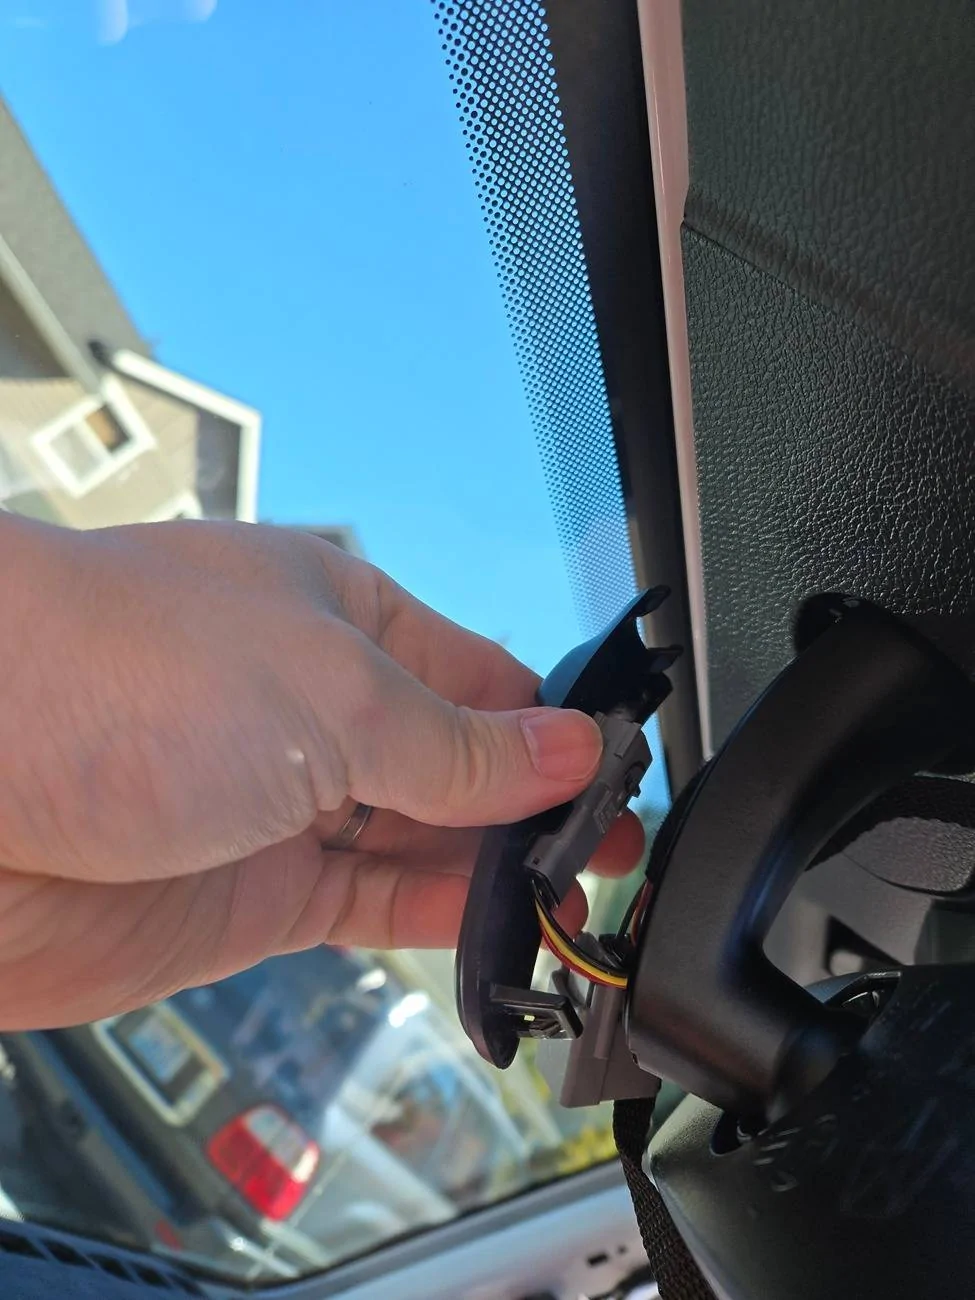
4. Remove the rearview mirror by disconnecting the power cable. Then you can rotate the entire assembly/stalk left or right 90 degrees and it will drop.
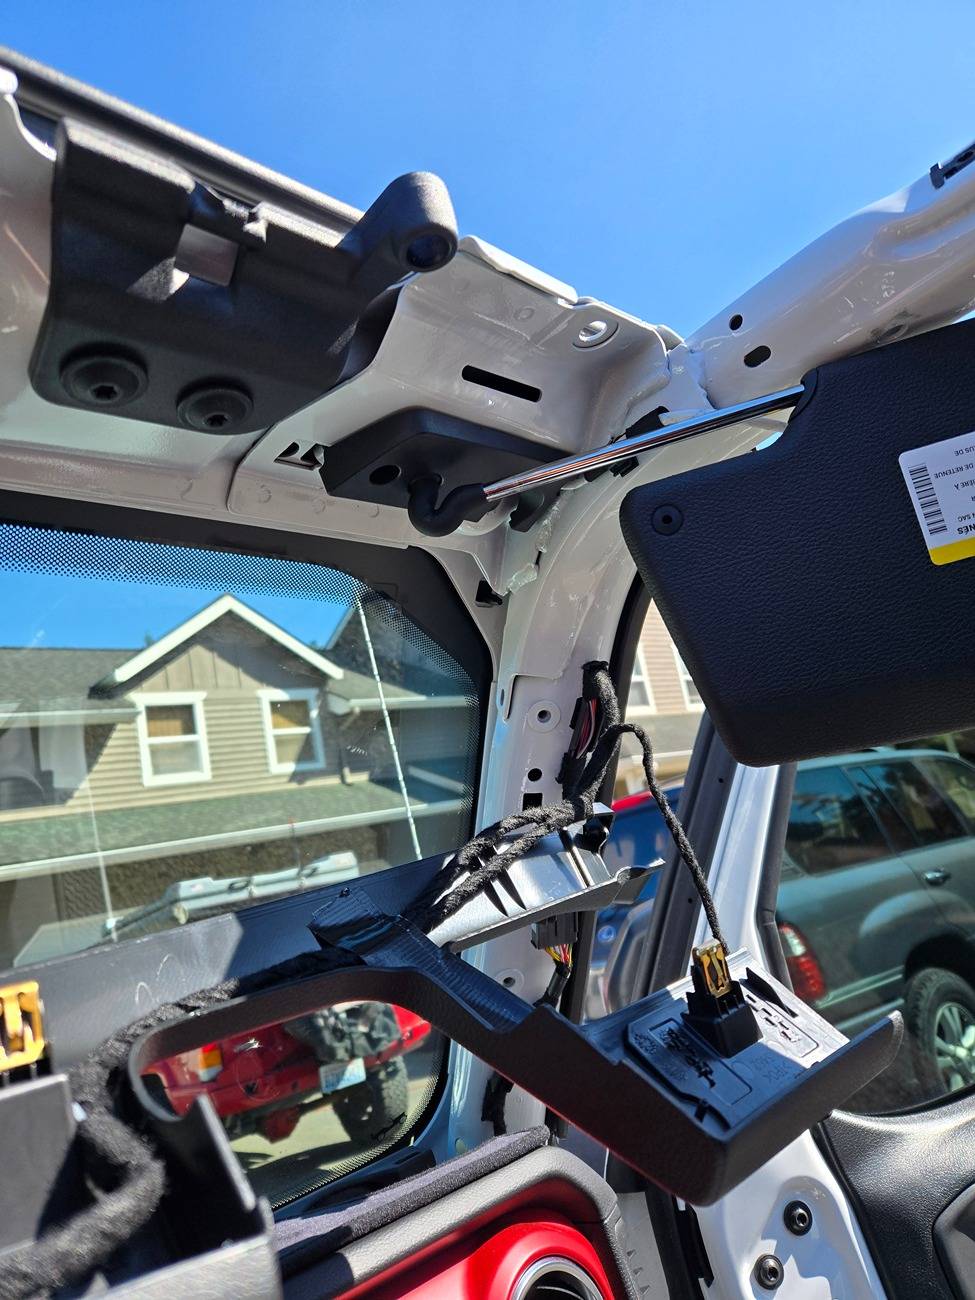
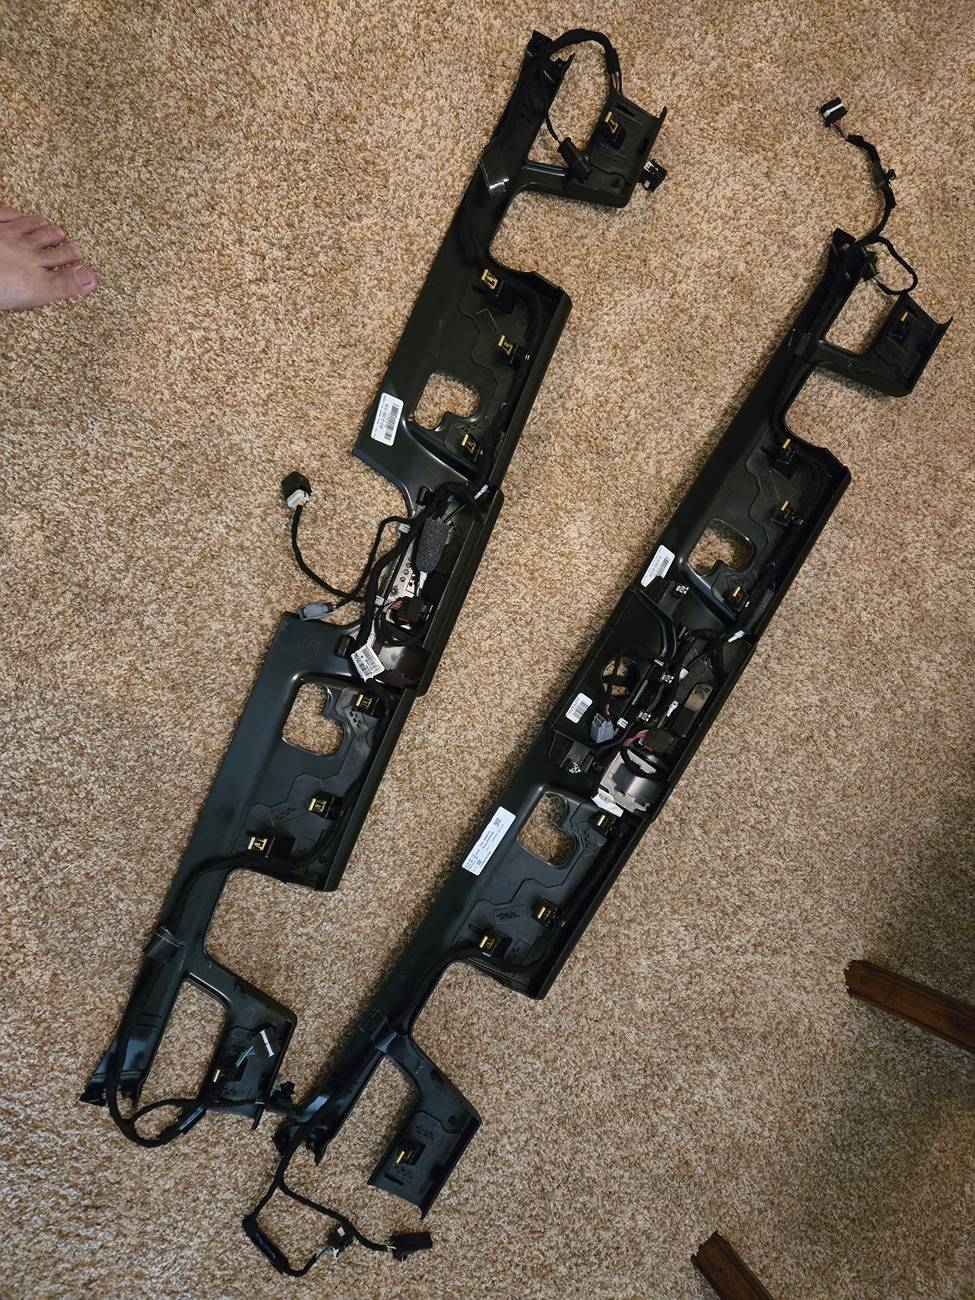
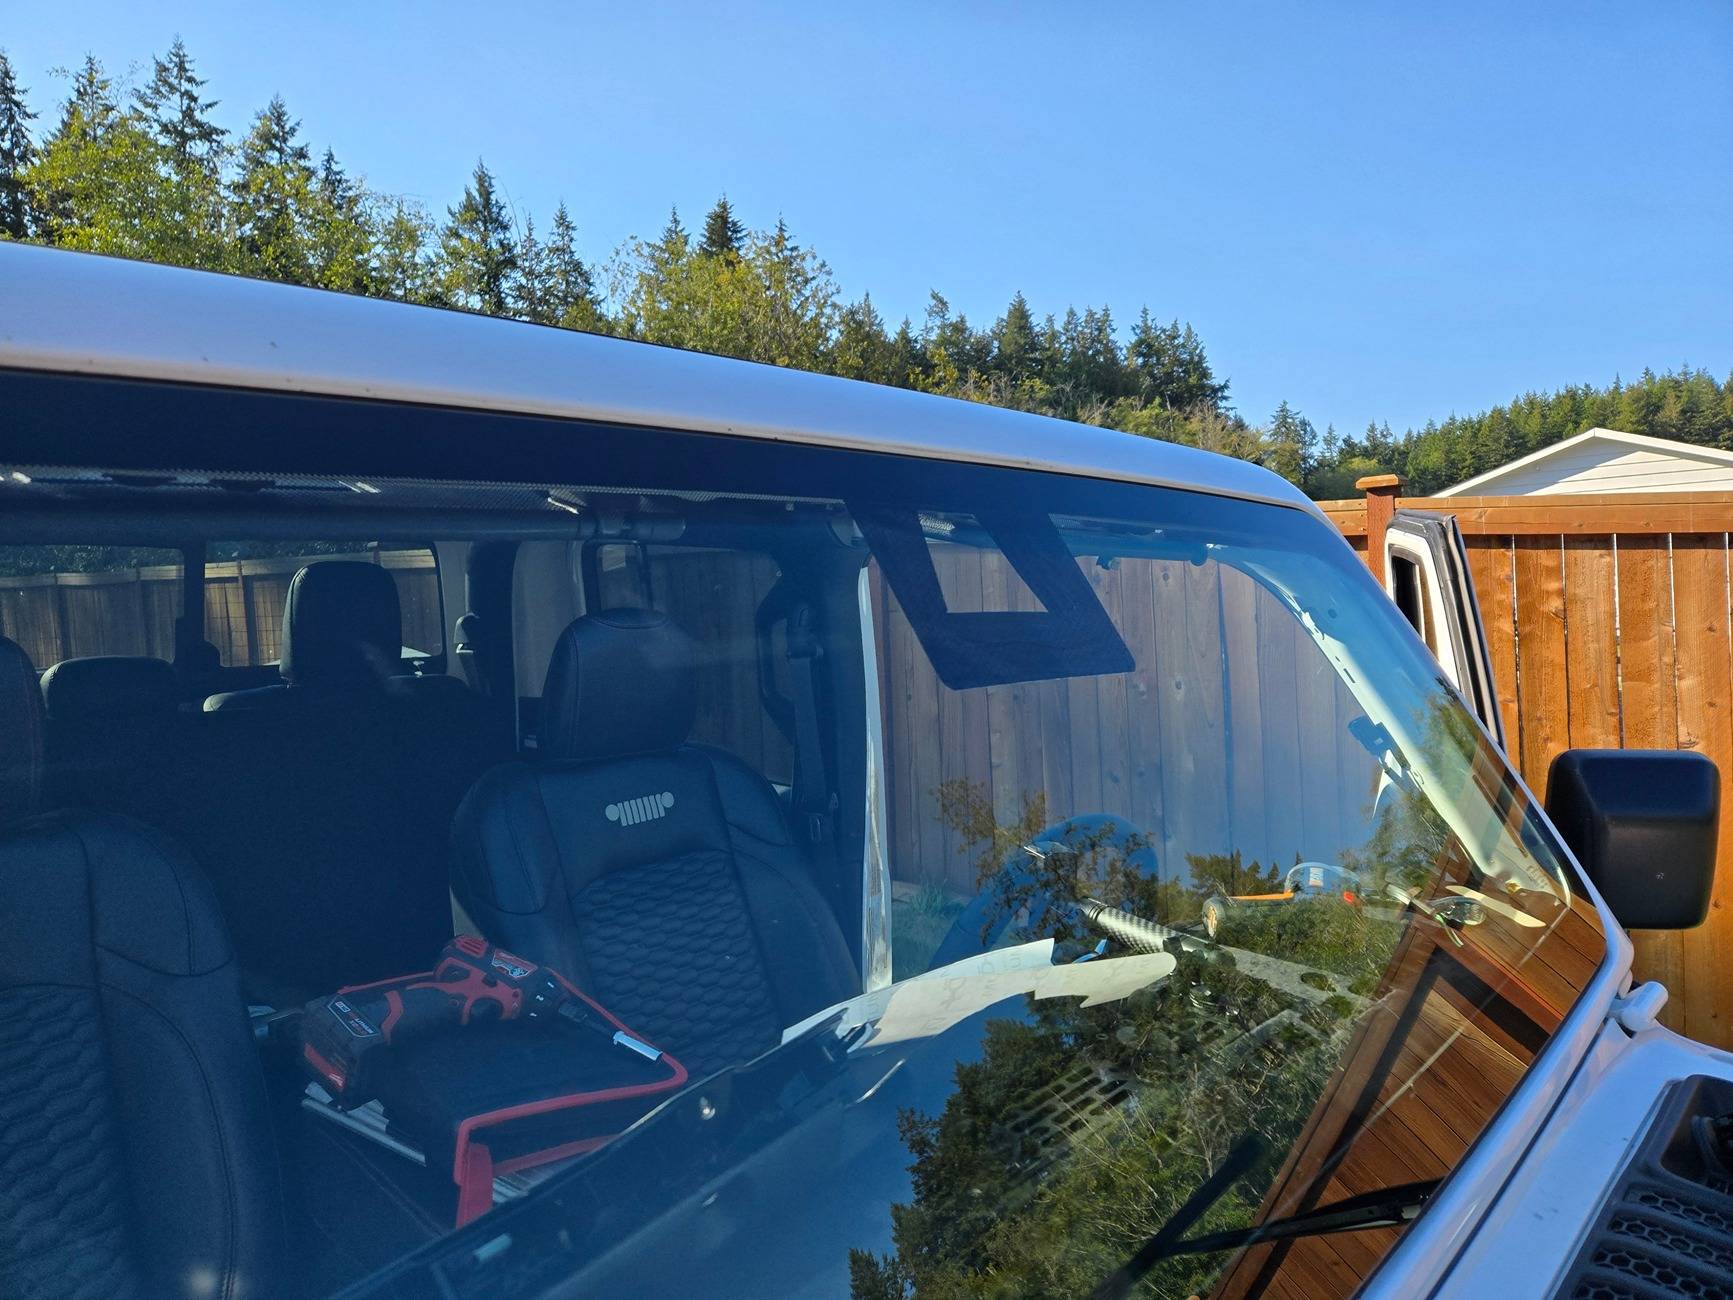
5. Remove the top trim piece by pulling down and toward you. There is no mounting screw for this trim piece. Notice there are two connections per side. Left side has 2 connections and right has 2 connections that you will have to undo. Remember where the cables went and plugged to reduce the chance of loose cable which will result in rattle.
Take note on the visor position to have room to remove the top trim piece.
6. Remove the 4 torx screws for the windshield. You will need the Jeep Tools in your glove box for this. *Remember removal of these bolts will allow you to unfold the windshield. You push it hard enough the windshield will fold and will fold your wipers along with it. Do NOT fold you windshield. We will just tilt the windshield slightly just to route the ACC defrost cable later.
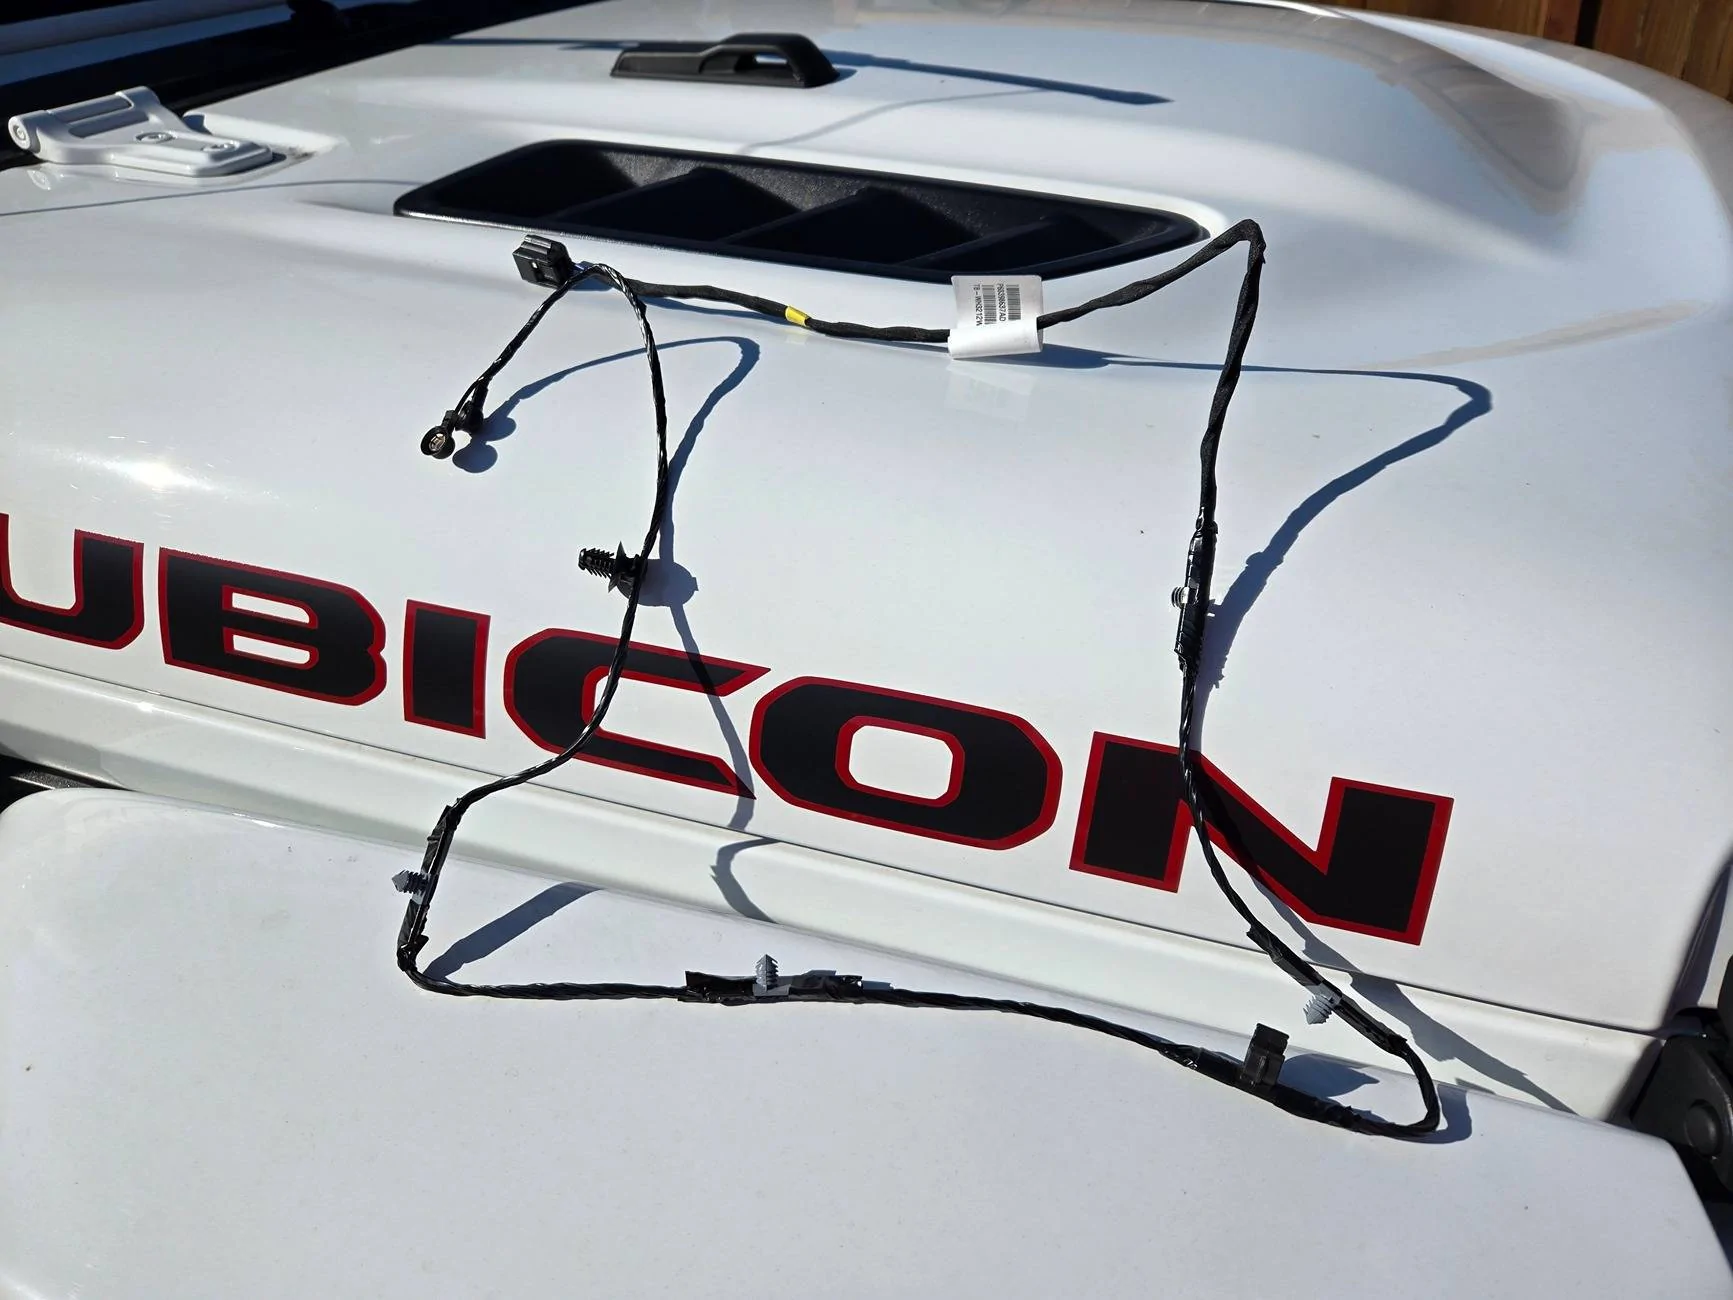
7. Transfer the ordered DASM cable to the top windshield trim. Or if you ordered the entire new assembly with SOS, assistance, and MIC preinstalled, you will use that instead.
Take note how your original cable polarity as they are different left and right side
Mount the DASM in place as shown below. M6 Flange nut is used to mount the unit in place. Because the thread is painted, it feels like you are cross threading the nut initially.
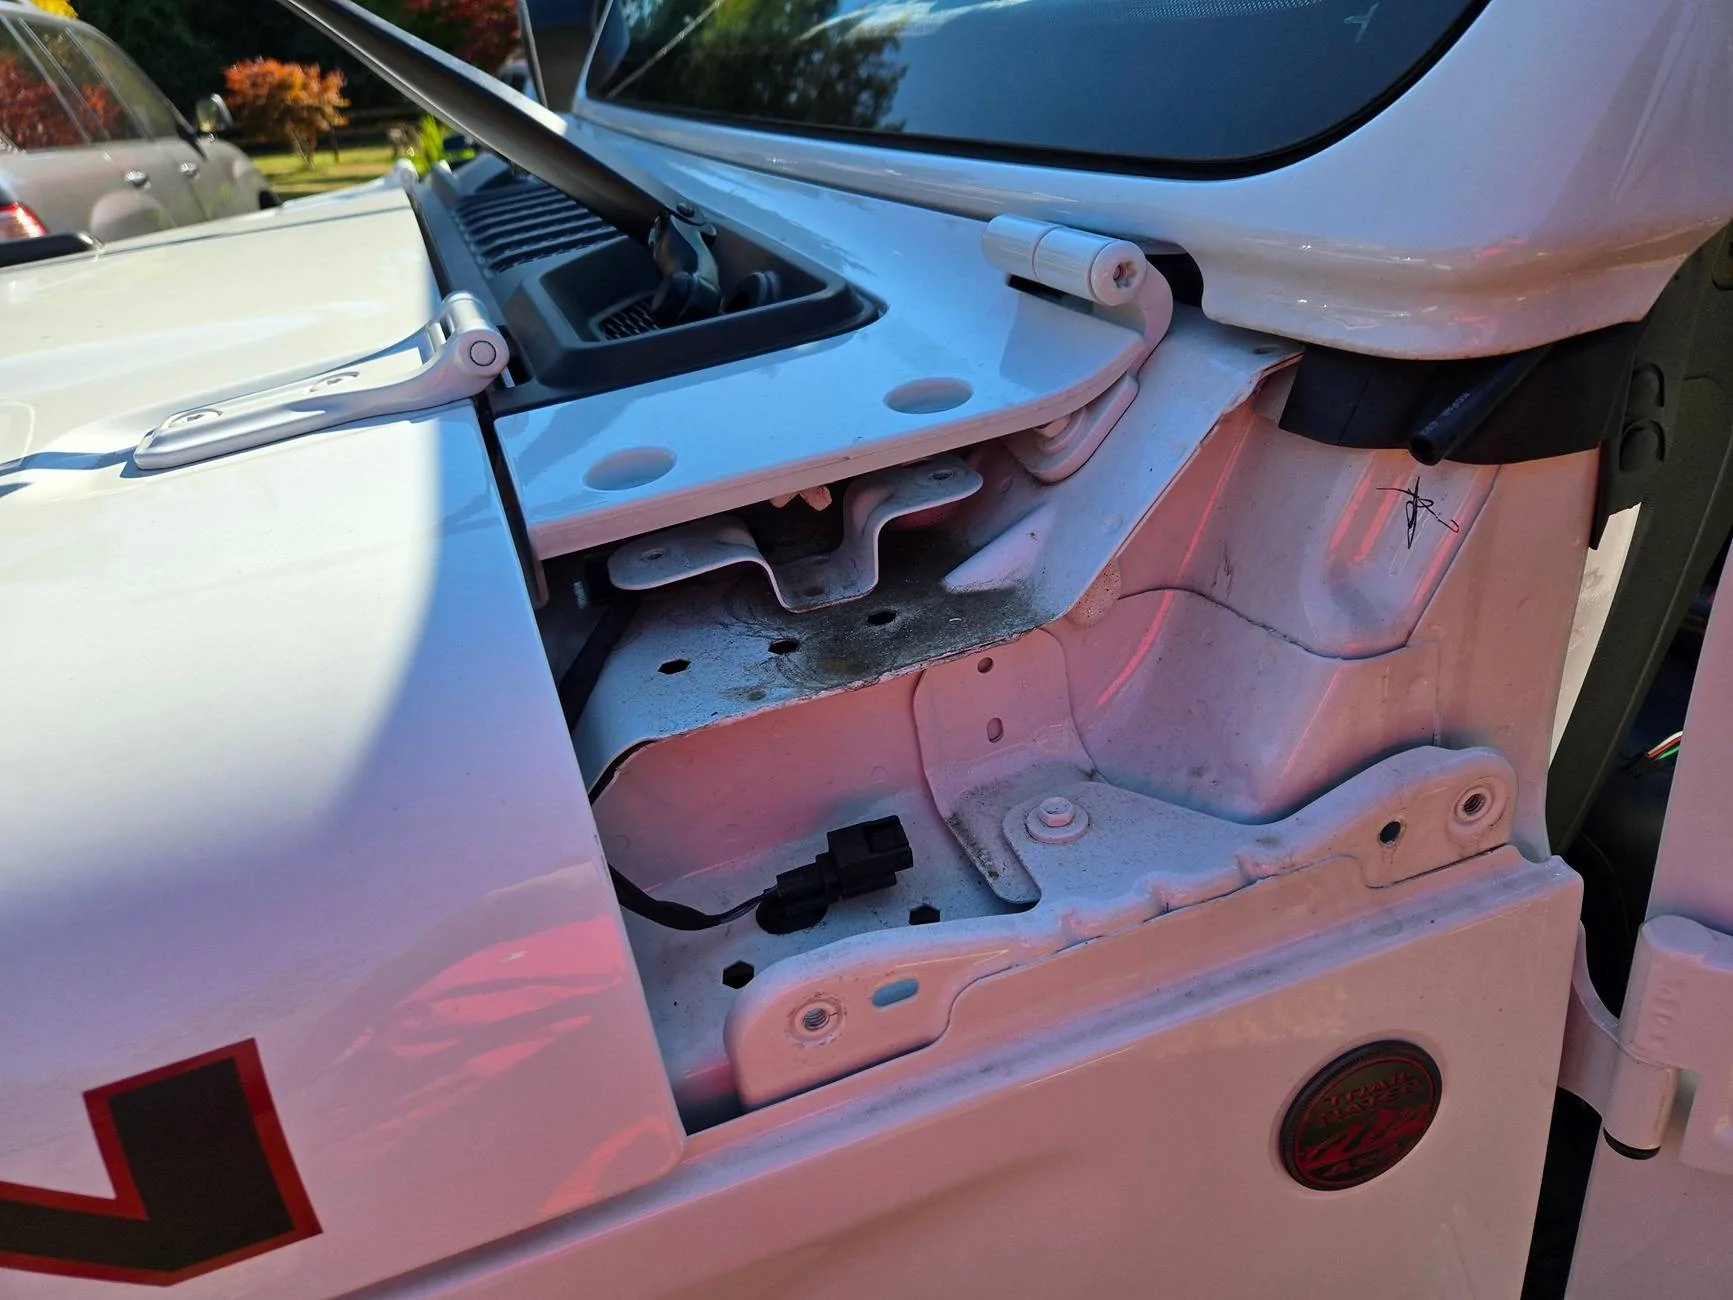
8. Optional - I have added tinting film between the windshield and the DASM to hide some of the DASM mounting hardware.
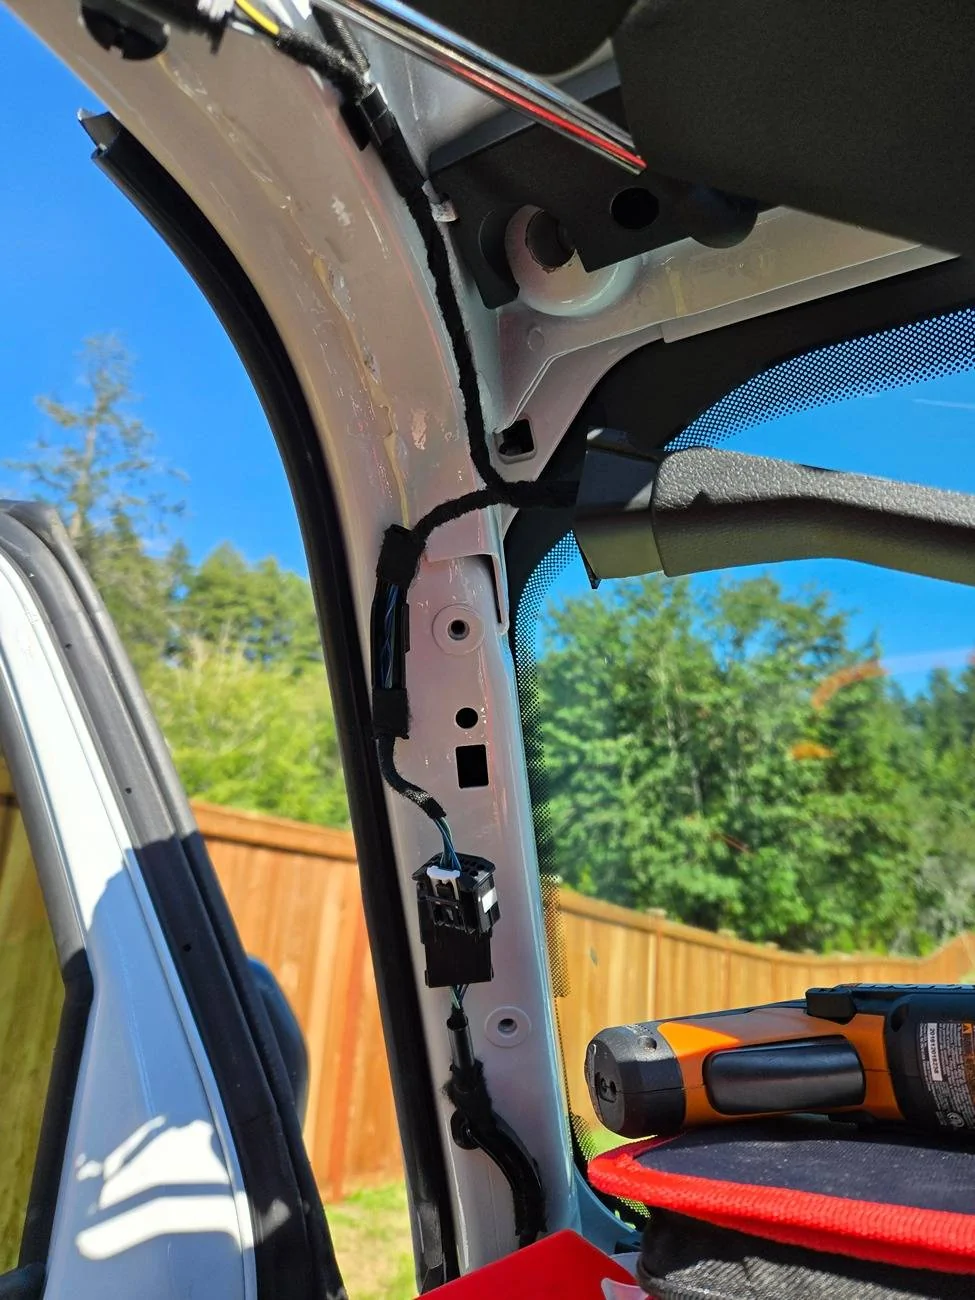
Windshield Heat Element Cable needs to be routed.
Button connectors go toward the top of the windshield. The other connector end mates to the connector in the cowl.
I have routed the defrost cable and zip tied it to the new ACC cable and run it down A pillar toward the cowl connector. Note where the trim piece retaining clips will locate themselves and route the cables to avoid pinching.
9. Install the rearview mirror. Now with the DASM in its place it takes a little trick to rotate the assembly back in. Position the rearview mirror kind of 11 and 5 o'clock position with stalk at 12 o'clock position. With this configuration, you get enough space to rotate the mirror into its mounting position. Reconnect all the connectors on both sides of the windshield.
10. Reinstall all the trim pieces. Roll bar trims then the OSH then the speaker grill.
To be continued..
[ABS Module]
Installation
[Steering Wheel Switch Install]
[AlfaOBD]
ABS VIN Reset
[Witech Registration]
Subscription Purchase
Download Witech
Mongoose Programmer
Serial Number Registration and assignment
Okta Registration
[ABS Initialization]
Done through Witech2.0
[Calibration]
Done through Witech2.0
......
DISCLAIMER
**You are free to do what you do with the write up. I do not warranty your installation and you do this installation at your risk.
9/11/2024 - Auto Highbeam Video and Photo Added.
9/5/2024 - Part Numbers Added, Install Photos added.
Introduction:
We all remember COVID shortages on everything. During these shortages, a lot of Jeeps were made and shipped without chip heavy options.
When I was looking for my JT, there were certain options that were incredibly hard to find. I wanted Rubicon, Diesel with advanced safety group. None in my area had diesel Rubicon with Adaptive Cruise Control.
I have been trying to figure out see if the ACC can be installed after the Jeep leaves the factory. Dealers unequivocally said no. Many owners repeated that answer.
There was some anecdotal information about how a person installed it a few years back on a Gladiator but had absolutely no documentation whatsoever, I wrote multiple times with no response, another wrote some post about it but also fizzled out after a couple of messages. Besides, I saw no a single photo of the installation process. This always made me wonder if the install was actually ever done.
@sapientiam as of late finished this install and I have been in touch with him to learn about the process. He was one of the several I reached out and but only one nice enough to keep in touch. I appreciate him for that and all the information he has sent me. He confirmed multiple part numbers that I was researching and he indeed reached the summit before I did.
With some confirmed information at hand, I approached this project and finally got it to work after months of extrapolating information from Ram forum and whatever I could from a little and scattered over the internet. I sure appreciate them for sharing what they know.
Now that I got it to work, I will lay out all the information I have learned here so that you can approach this with a little more confidence.
Operations Overview:
Adaptive Cruise Control utilizes RADAR and camera input to decide distance to an object in front of the vehicle and controls both acceleation and deceleration using more engine input or brake input. It can also stop your vehicle if the vehicle in front of you stops and will resume if the vehicle in front of you starts moving again as long as the stoppage is within a few seconds.
Hardware
Jeep uses DASM (Driver Assistant System Module, check SP) which is mounted above the rearview mirror. This determines the distance to object ahead of the vehicle. This also talks to ABS and PCM to maintain acceleration and deceleration.
For this to happen, obviously you need the DASM unit, NEW* ABS control unit and ABS system module that the DASM can control. Your existing ABS module is not capable of receiving input from DASM.
While these are the components that make the ACC possible, but the calibration using certain software and hardware do take some effort to make these hardware work.
Software
I used AlfaOBD with Security bypass plus Bluetooth OBD connector, Mongoose J2534 Cable for Chrysler vehicles to be used withOUT Security bypass plus Witech2.0 subscription to install the new ABS components and DASM.
Witech2.0 subscription is required to perform ABS initialization and other required sensor calibration for the new ABS module and control unit. I tried for half day to figure out if I can get the new ABS components programmed with AlfaOBD. It just does NOT work.
Having said that, AlfaOBD is very important in this install because there was not a clear way for me to enable the DASM from Witech2.0.
Once, the DASM is enabled through AlfaOBD, you can see the DASM selectable from the topology view on Witech screen. Only then you can go through the DASM calibration.
Parts Required: Part numbers will have to be verified to work with your year model. **I have heard that soft-topped vehicle may need different steering wheel switch harness to accommodate the ACC switch. This is NOT a verified information.
Forward Facing Camera, Driver Assistance System Module, DASM - 04672935AB
ABS control unit that is ACC capable - 68461636AA
ABS system module that is ACC capable - 68621091AA
New overhead wiring harness (without trim, SOS switch, microphone) - 68357530AD
Overhead trim piece AND wiring harness - 7JY99TX7AB
ACC Protective Cover - 56029828AA
ACC Bracket - 68422194AB
Sensor Cover - 6QD20TX7AA
Close Out Cover - 6QD21TX7AB
Speed Control Switch - Mopar 68481677AB
Wiring Harness for Heating Element "Antenna wiring harness" - 68398637AD
Zip ties
Basic hand tools and Jeep Tools in your glove box
DOT3 Brake Fluid
Means to bleed brake lines
Pedal holder or broom stick to keep brake pedal in place.
Plastic trim Screw QTY of 4 (GM 20664092 Ford N804570S, https://a.co/d/0qpKidE)
M6 Flared Nuts QTY of 2
Functioning AlfaOBD setup with Bluetooth Bidirectional OBD Programmer.
Witech 2.0 (and Tech Authority subscription)
Steering Wheel Switch for ACC
Mongoose Chrysler J2534 Cable
A laptop that is running recent windows and have USB connections.
Yes. Witech2.0 is a MUST if you are initializing ABS and calibrating DASM unit. AlfaOBD cannot perform "ABS initialization" and other necessary sensor calibration for DASM.
[Starting Vehicle Spec]
The following is how my vehicle was setup prior to starting the retrofit.
2023 Rubicon Diesel
UConnect 8.4"
Paddle Shifter and associated steering wheel harness
[Physical Install]
1. Remove the both front portion of the hard top.
2. Remove the dash speaker grill by using plastic pry tool. Then remove the OSH (Oh Sh!t Handle) by peeling back the bolt covers and remove the bolts keeping the handle in place. Once the two bolts are removed, you can remove the handle trim by simple pulling away from where it is attached. Repeat on the other side.
3. Remove driver and passenger side roll cage trim pieces. Each piece of the panels are held by 4 screws. 2 on top and 2 below. You can remove the trim by pulling the piece horizontally toward the middle of the vehicle after the mounting screws are removed.
4. Remove the rearview mirror by disconnecting the power cable. Then you can rotate the entire assembly/stalk left or right 90 degrees and it will drop.
5. Remove the top trim piece by pulling down and toward you. There is no mounting screw for this trim piece. Notice there are two connections per side. Left side has 2 connections and right has 2 connections that you will have to undo. Remember where the cables went and plugged to reduce the chance of loose cable which will result in rattle.
Take note on the visor position to have room to remove the top trim piece.
6. Remove the 4 torx screws for the windshield. You will need the Jeep Tools in your glove box for this. *Remember removal of these bolts will allow you to unfold the windshield. You push it hard enough the windshield will fold and will fold your wipers along with it. Do NOT fold you windshield. We will just tilt the windshield slightly just to route the ACC defrost cable later.
7. Transfer the ordered DASM cable to the top windshield trim. Or if you ordered the entire new assembly with SOS, assistance, and MIC preinstalled, you will use that instead.
Take note how your original cable polarity as they are different left and right side
Mount the DASM in place as shown below. M6 Flange nut is used to mount the unit in place. Because the thread is painted, it feels like you are cross threading the nut initially.
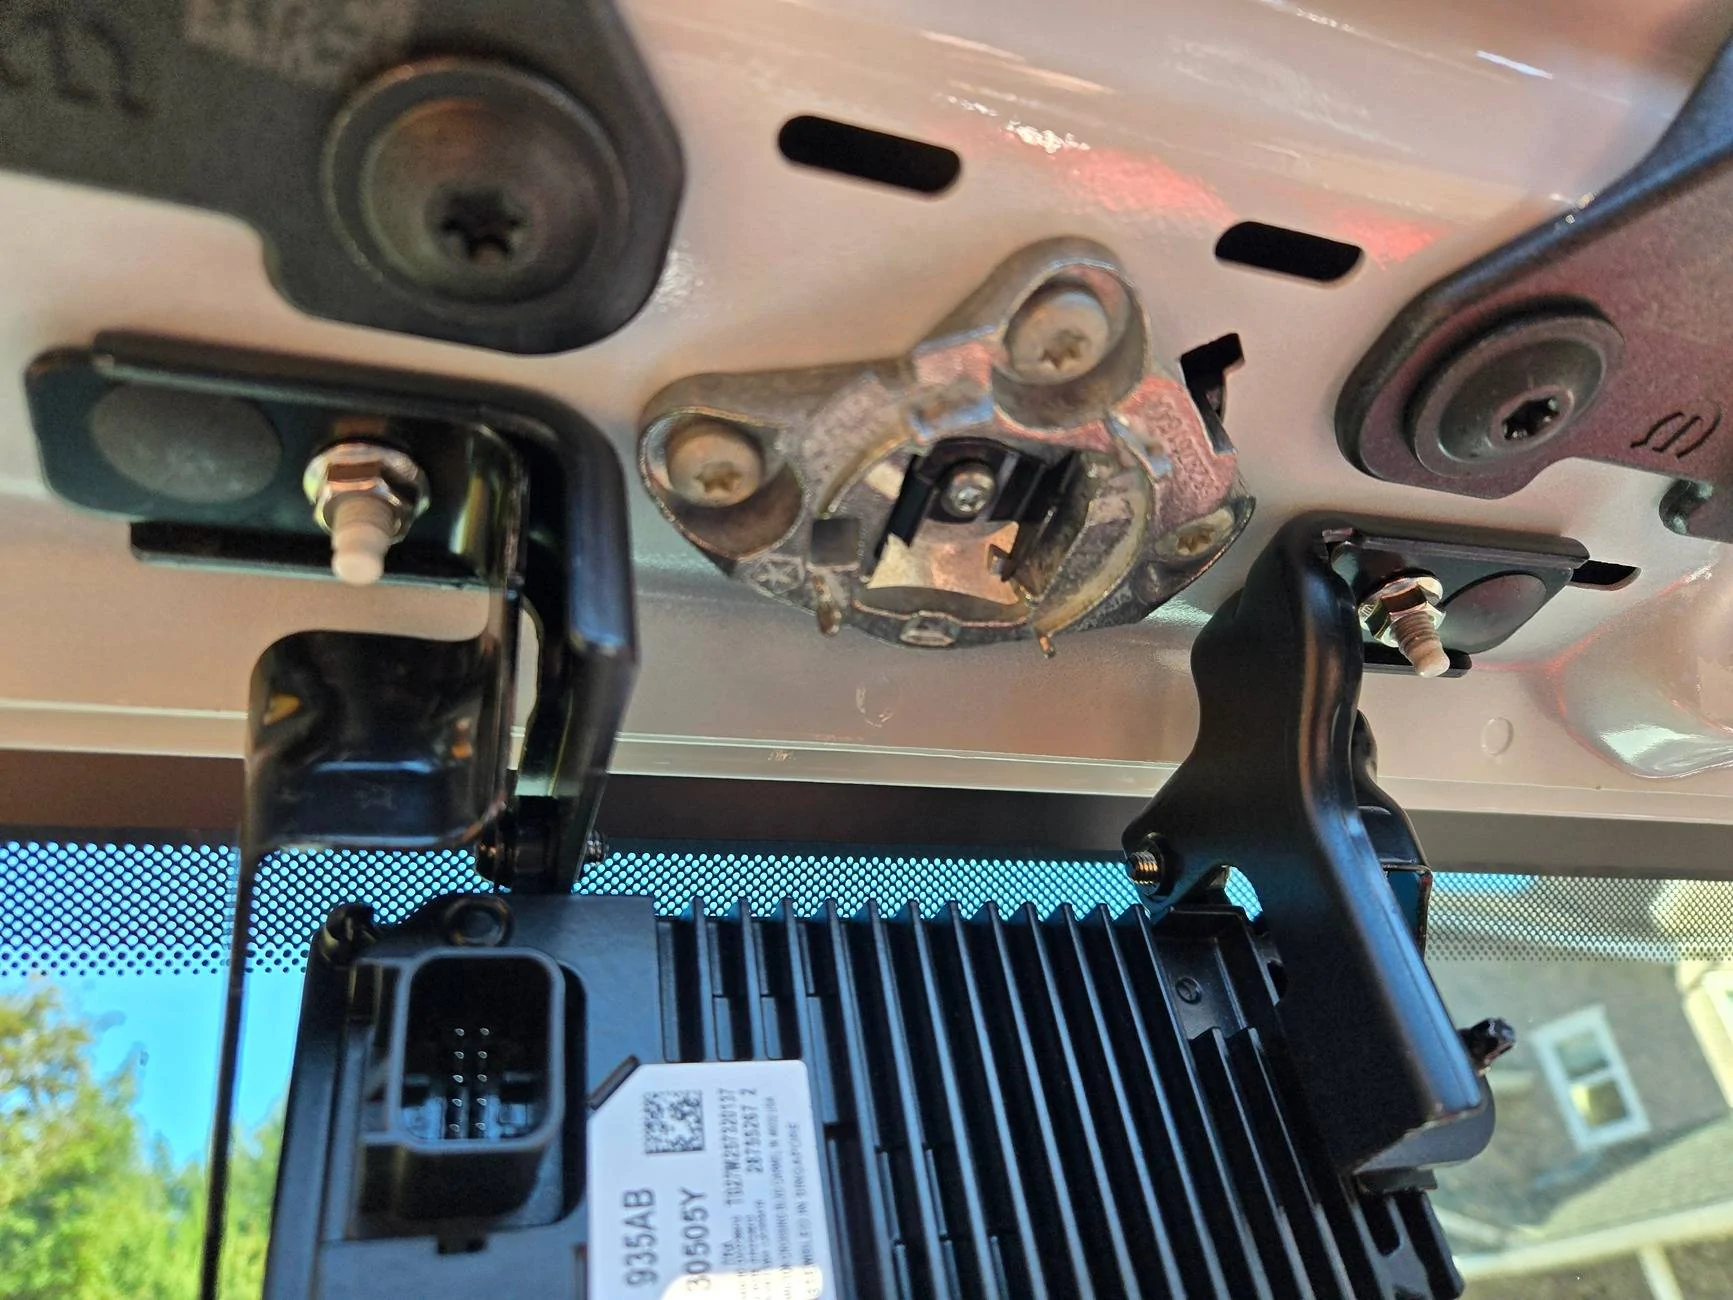
8. Optional - I have added tinting film between the windshield and the DASM to hide some of the DASM mounting hardware.

Windshield Heat Element Cable needs to be routed.
Button connectors go toward the top of the windshield. The other connector end mates to the connector in the cowl.
I have routed the defrost cable and zip tied it to the new ACC cable and run it down A pillar toward the cowl connector. Note where the trim piece retaining clips will locate themselves and route the cables to avoid pinching.
9. Install the rearview mirror. Now with the DASM in its place it takes a little trick to rotate the assembly back in. Position the rearview mirror kind of 11 and 5 o'clock position with stalk at 12 o'clock position. With this configuration, you get enough space to rotate the mirror into its mounting position. Reconnect all the connectors on both sides of the windshield.

10. Reinstall all the trim pieces. Roll bar trims then the OSH then the speaker grill.
To be continued..
[ABS Module]
Installation
[Steering Wheel Switch Install]
[AlfaOBD]
ABS VIN Reset
[Witech Registration]
Subscription Purchase
Download Witech
Mongoose Programmer
Serial Number Registration and assignment
Okta Registration
[ABS Initialization]
Done through Witech2.0
[Calibration]
Done through Witech2.0
......
DISCLAIMER
**You are free to do what you do with the write up. I do not warranty your installation and you do this installation at your risk.
Sponsored
Last edited:
