Sponsored

krweatherl

Well-Known Member
First Name
Ken
Joined
Sep 14, 2019
Threads
2
Messages
136
Reaction score
209
Location
Kelso Wa
Vehicle(s)
2022 JTRD
Occupation
Heavy Haul Truck Driver
Been a few days of wheeling since I last broke something, so it was bound to happen again :/

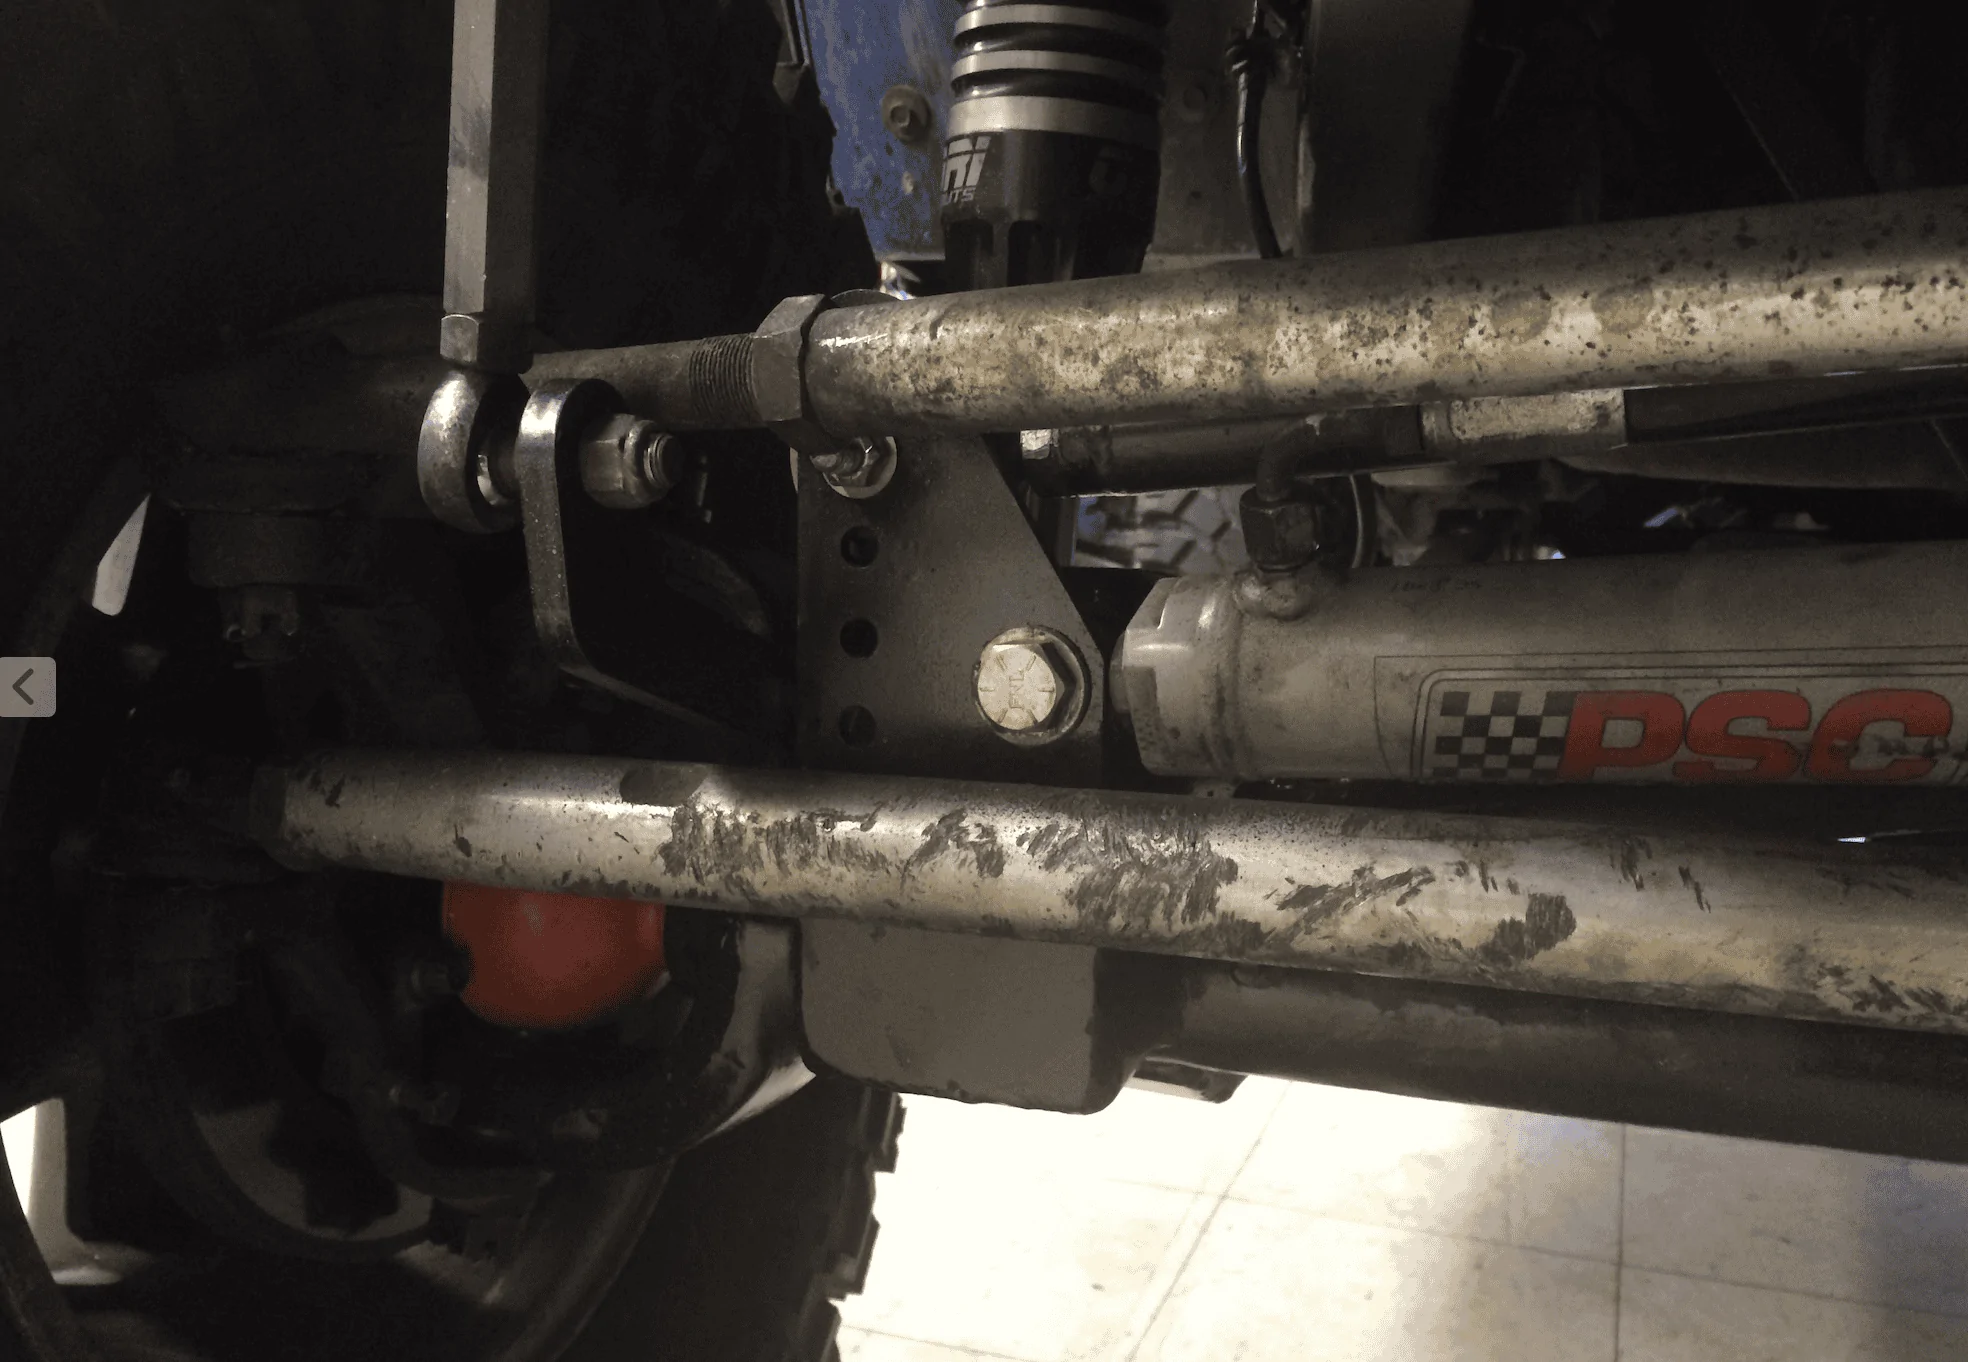
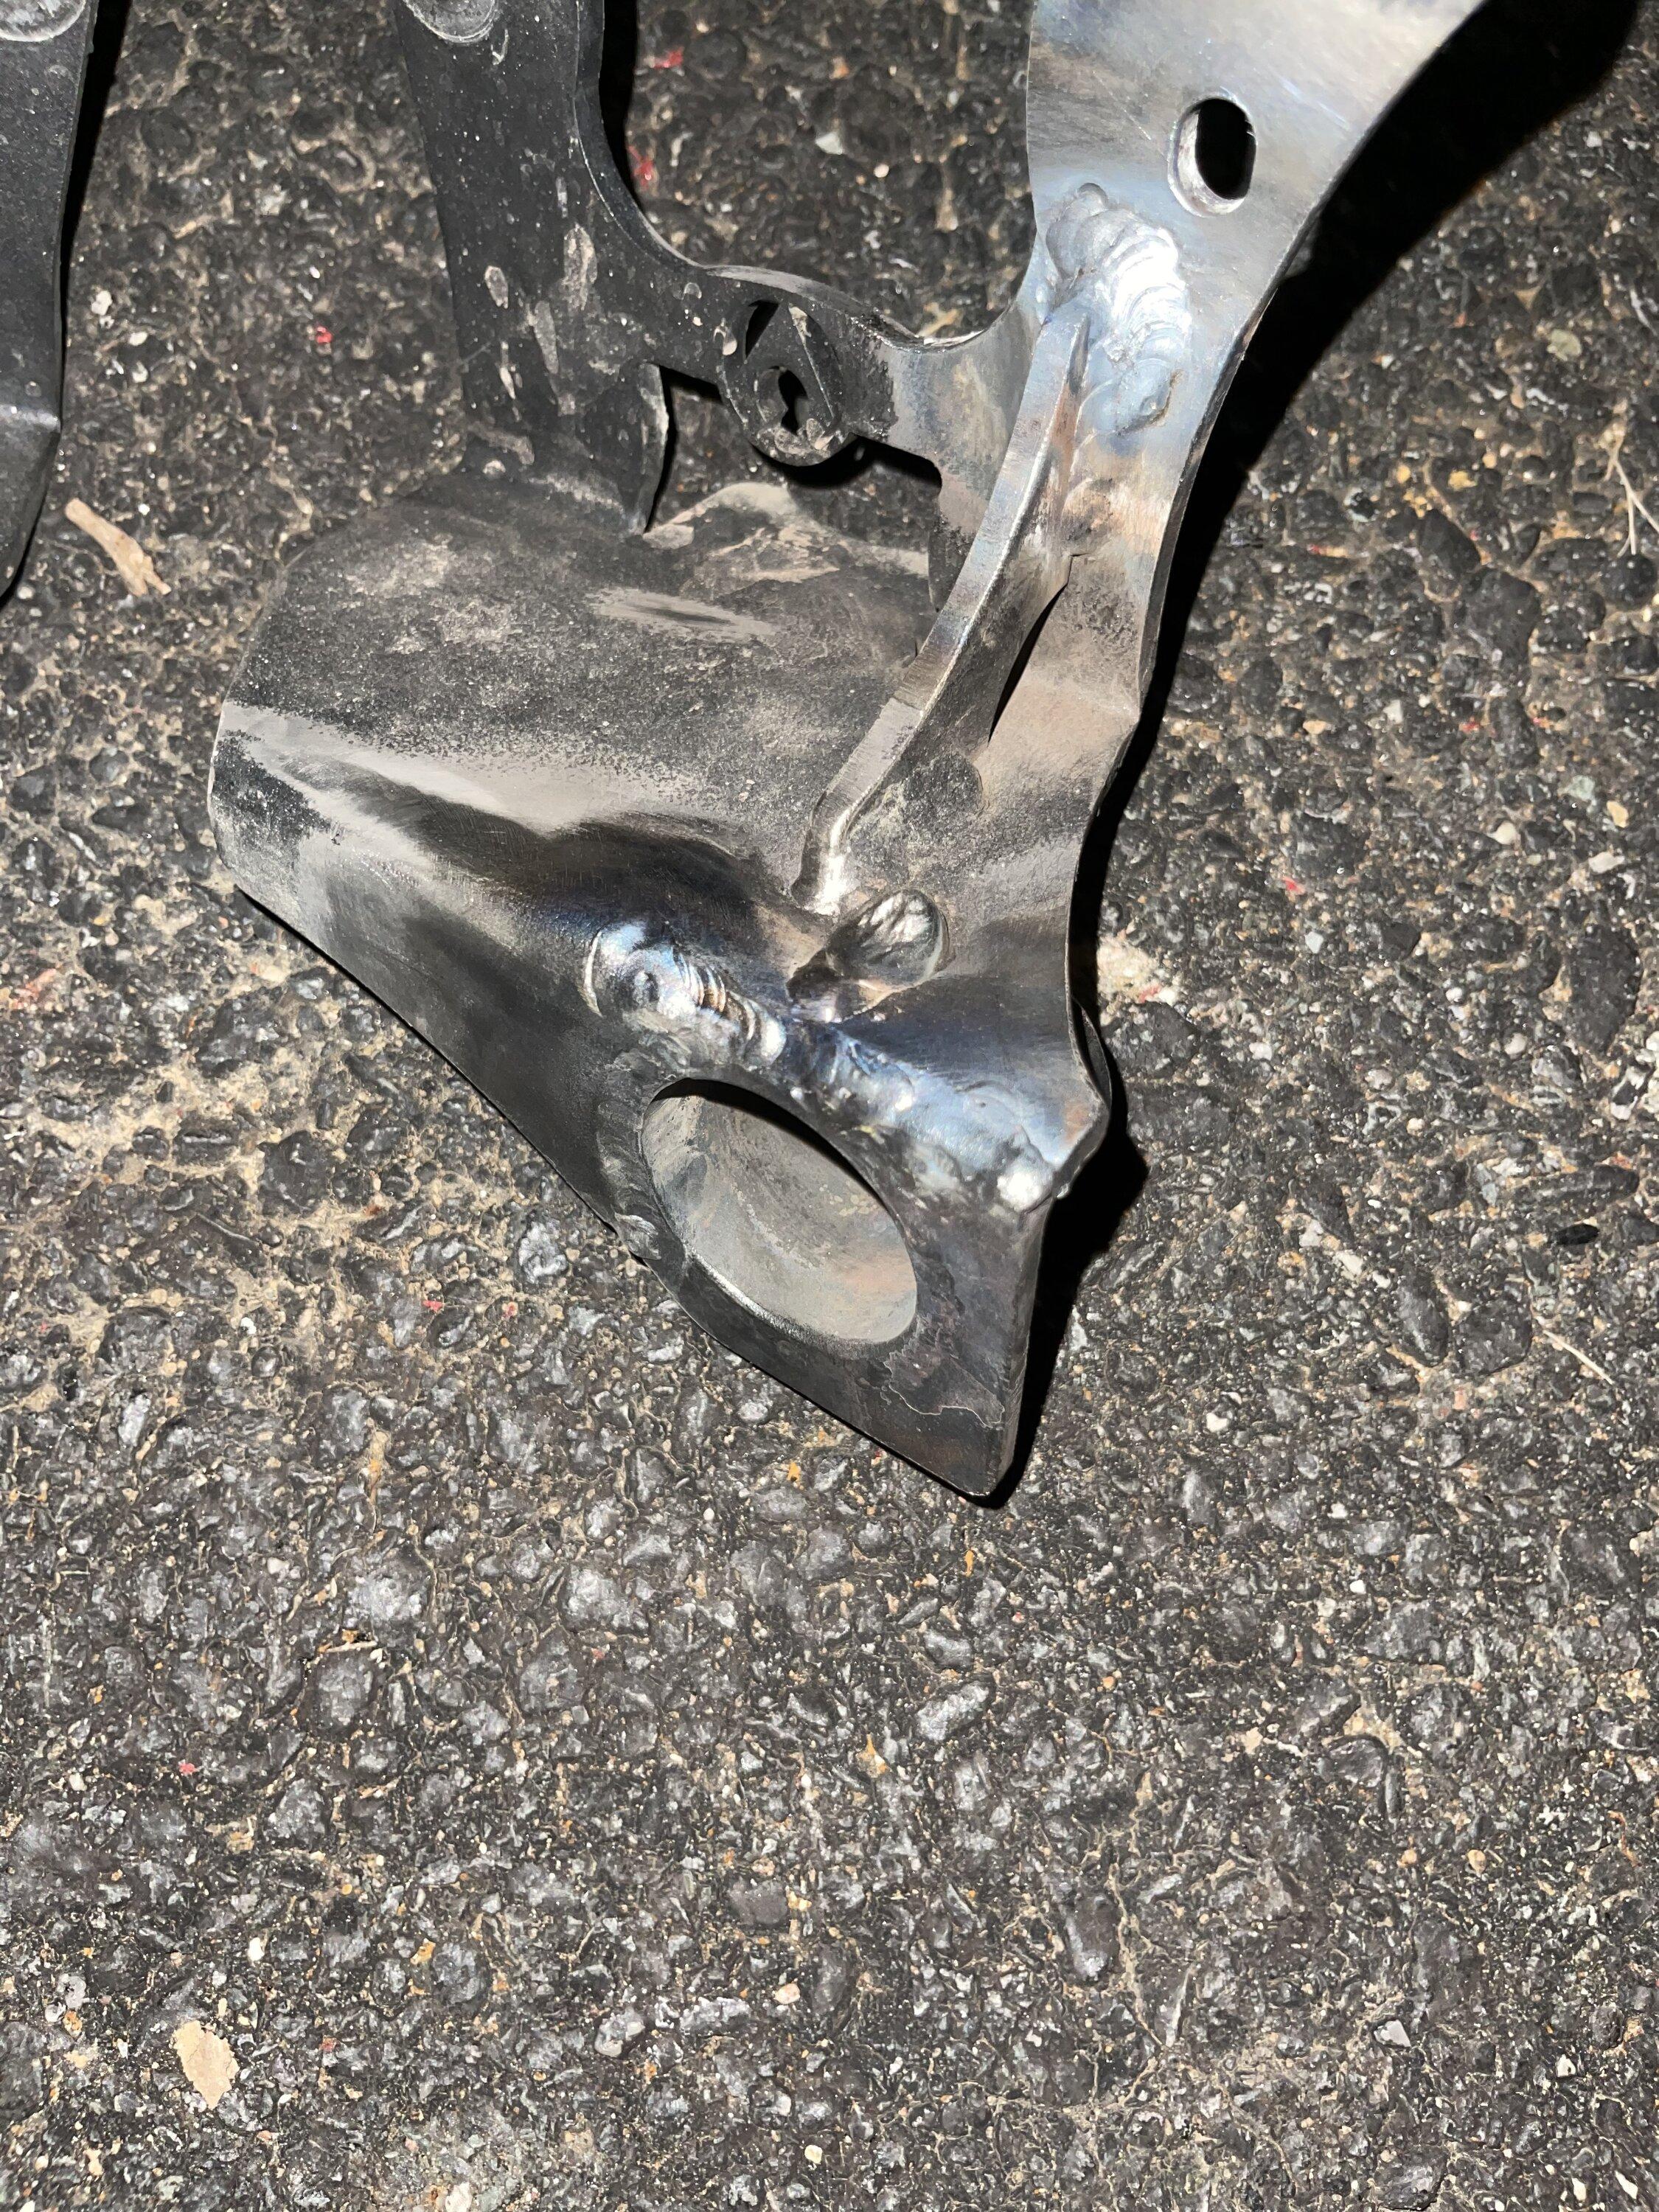
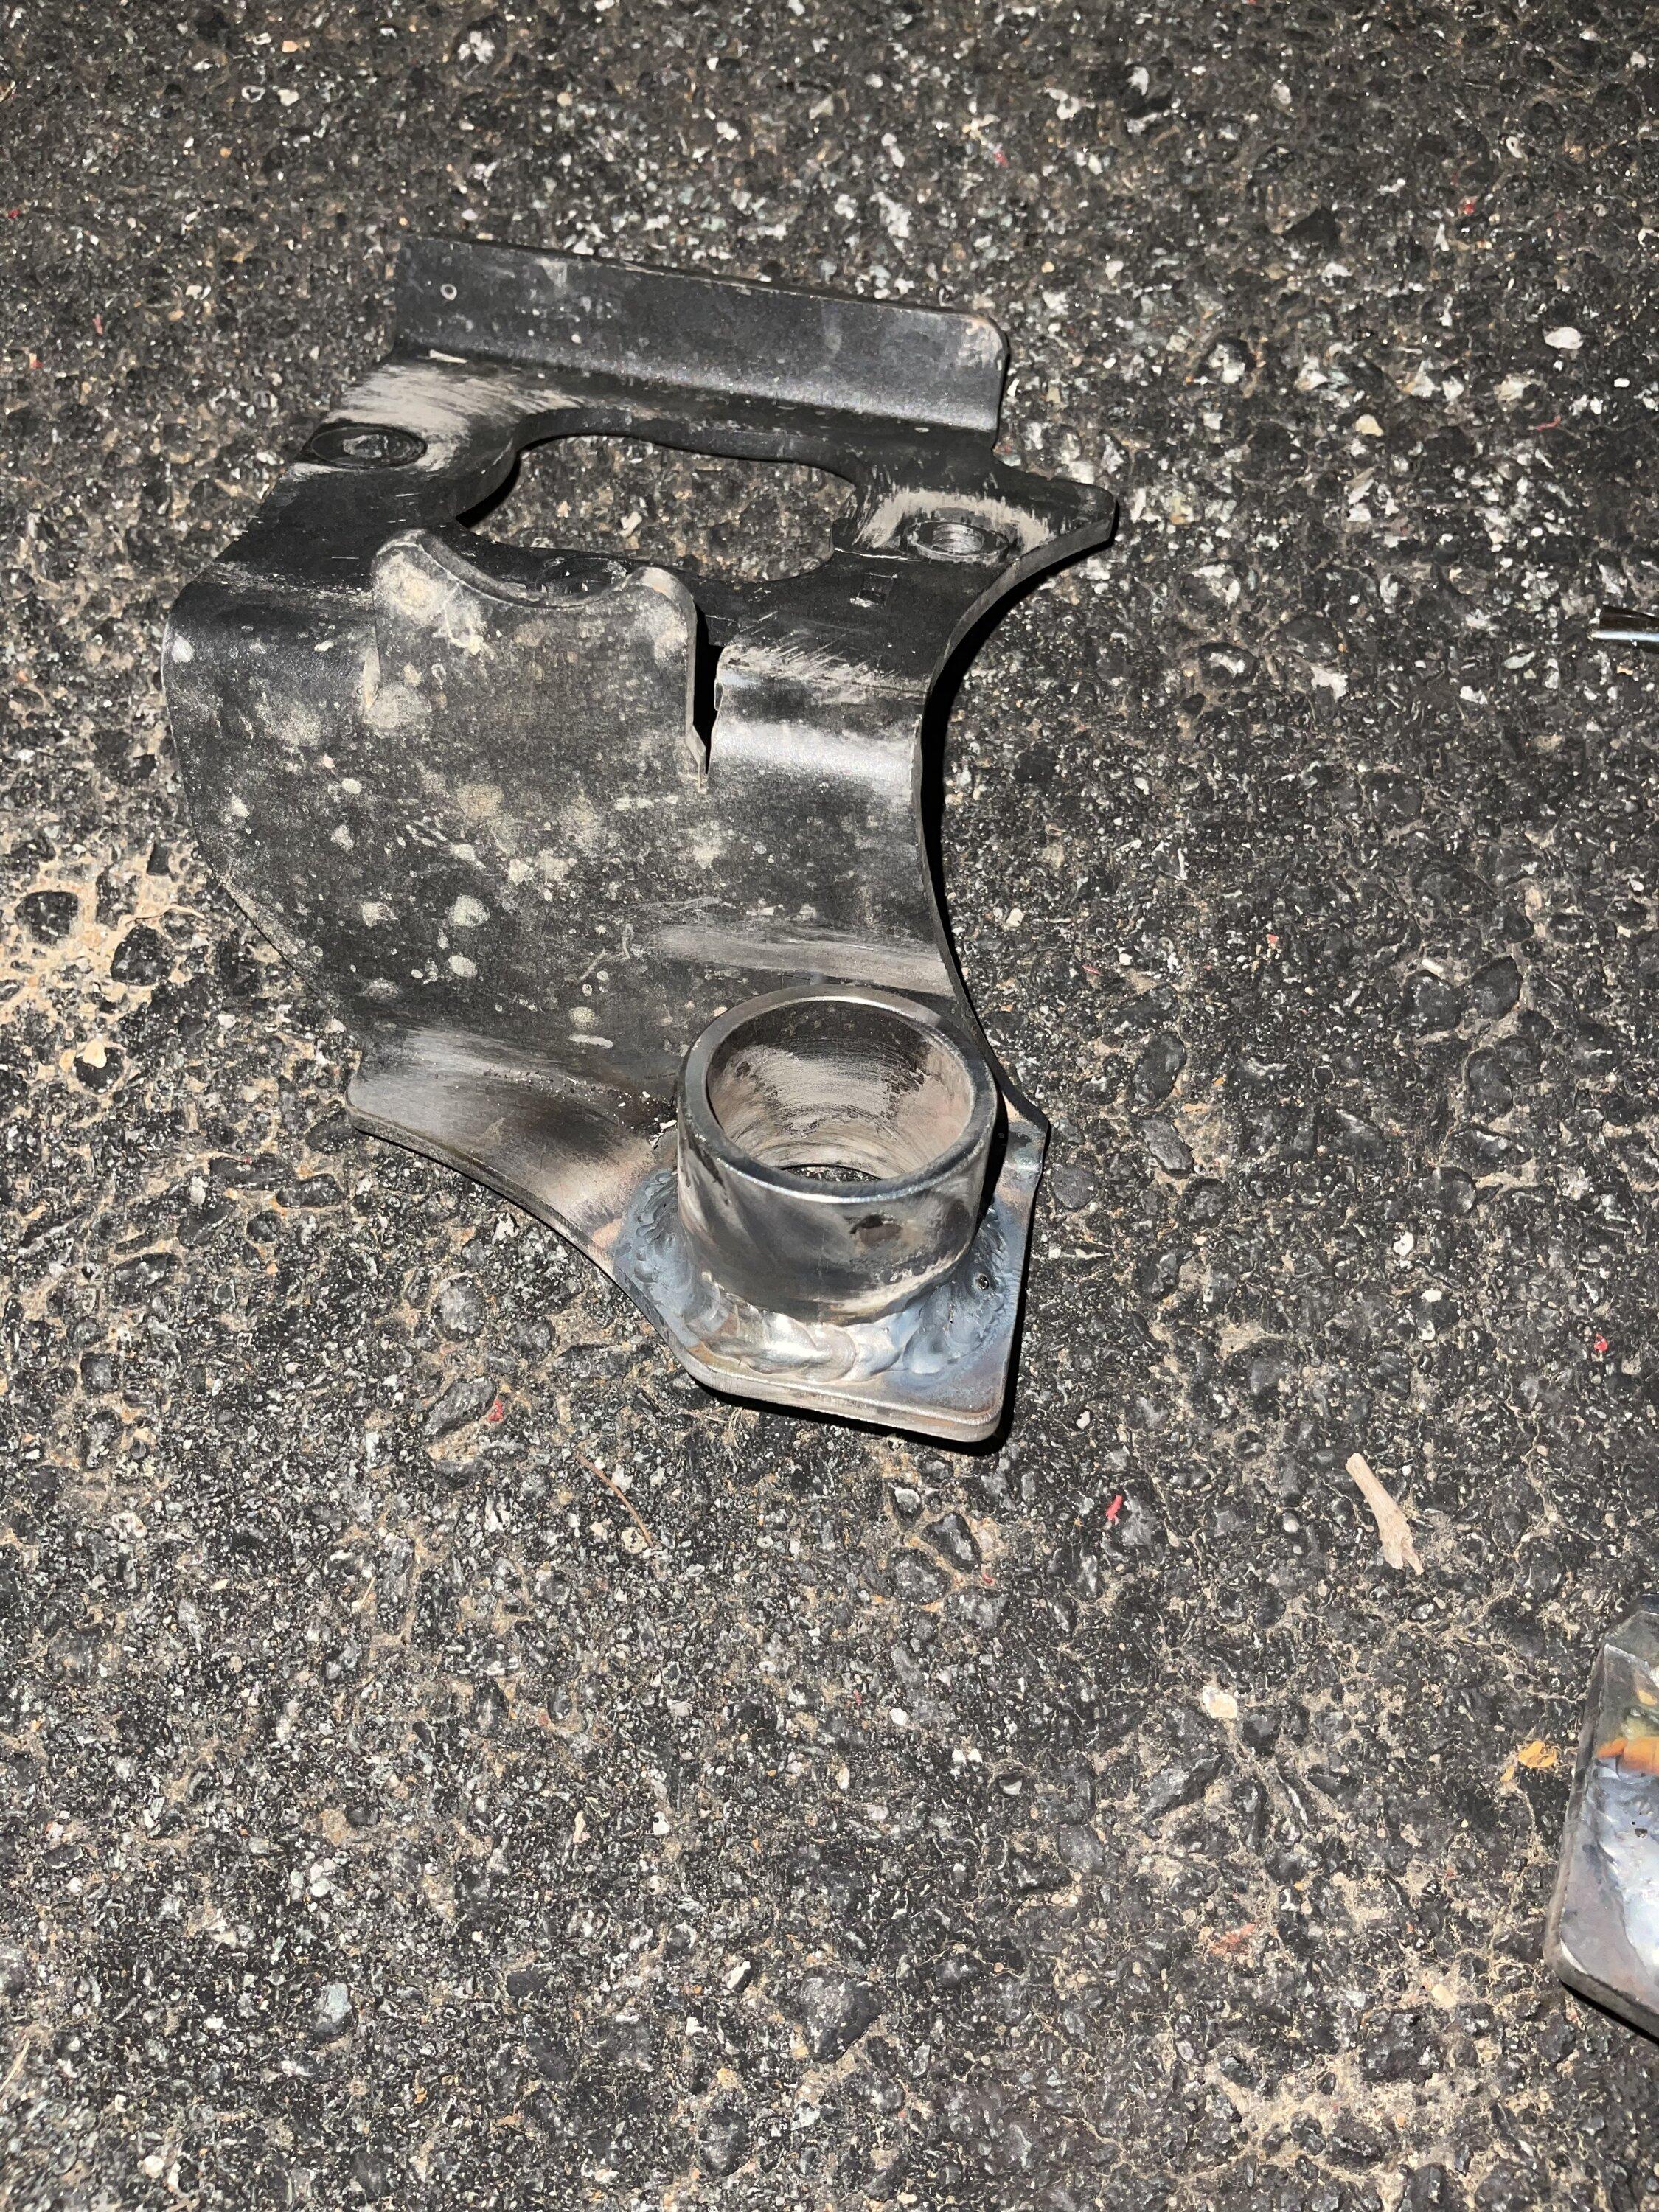
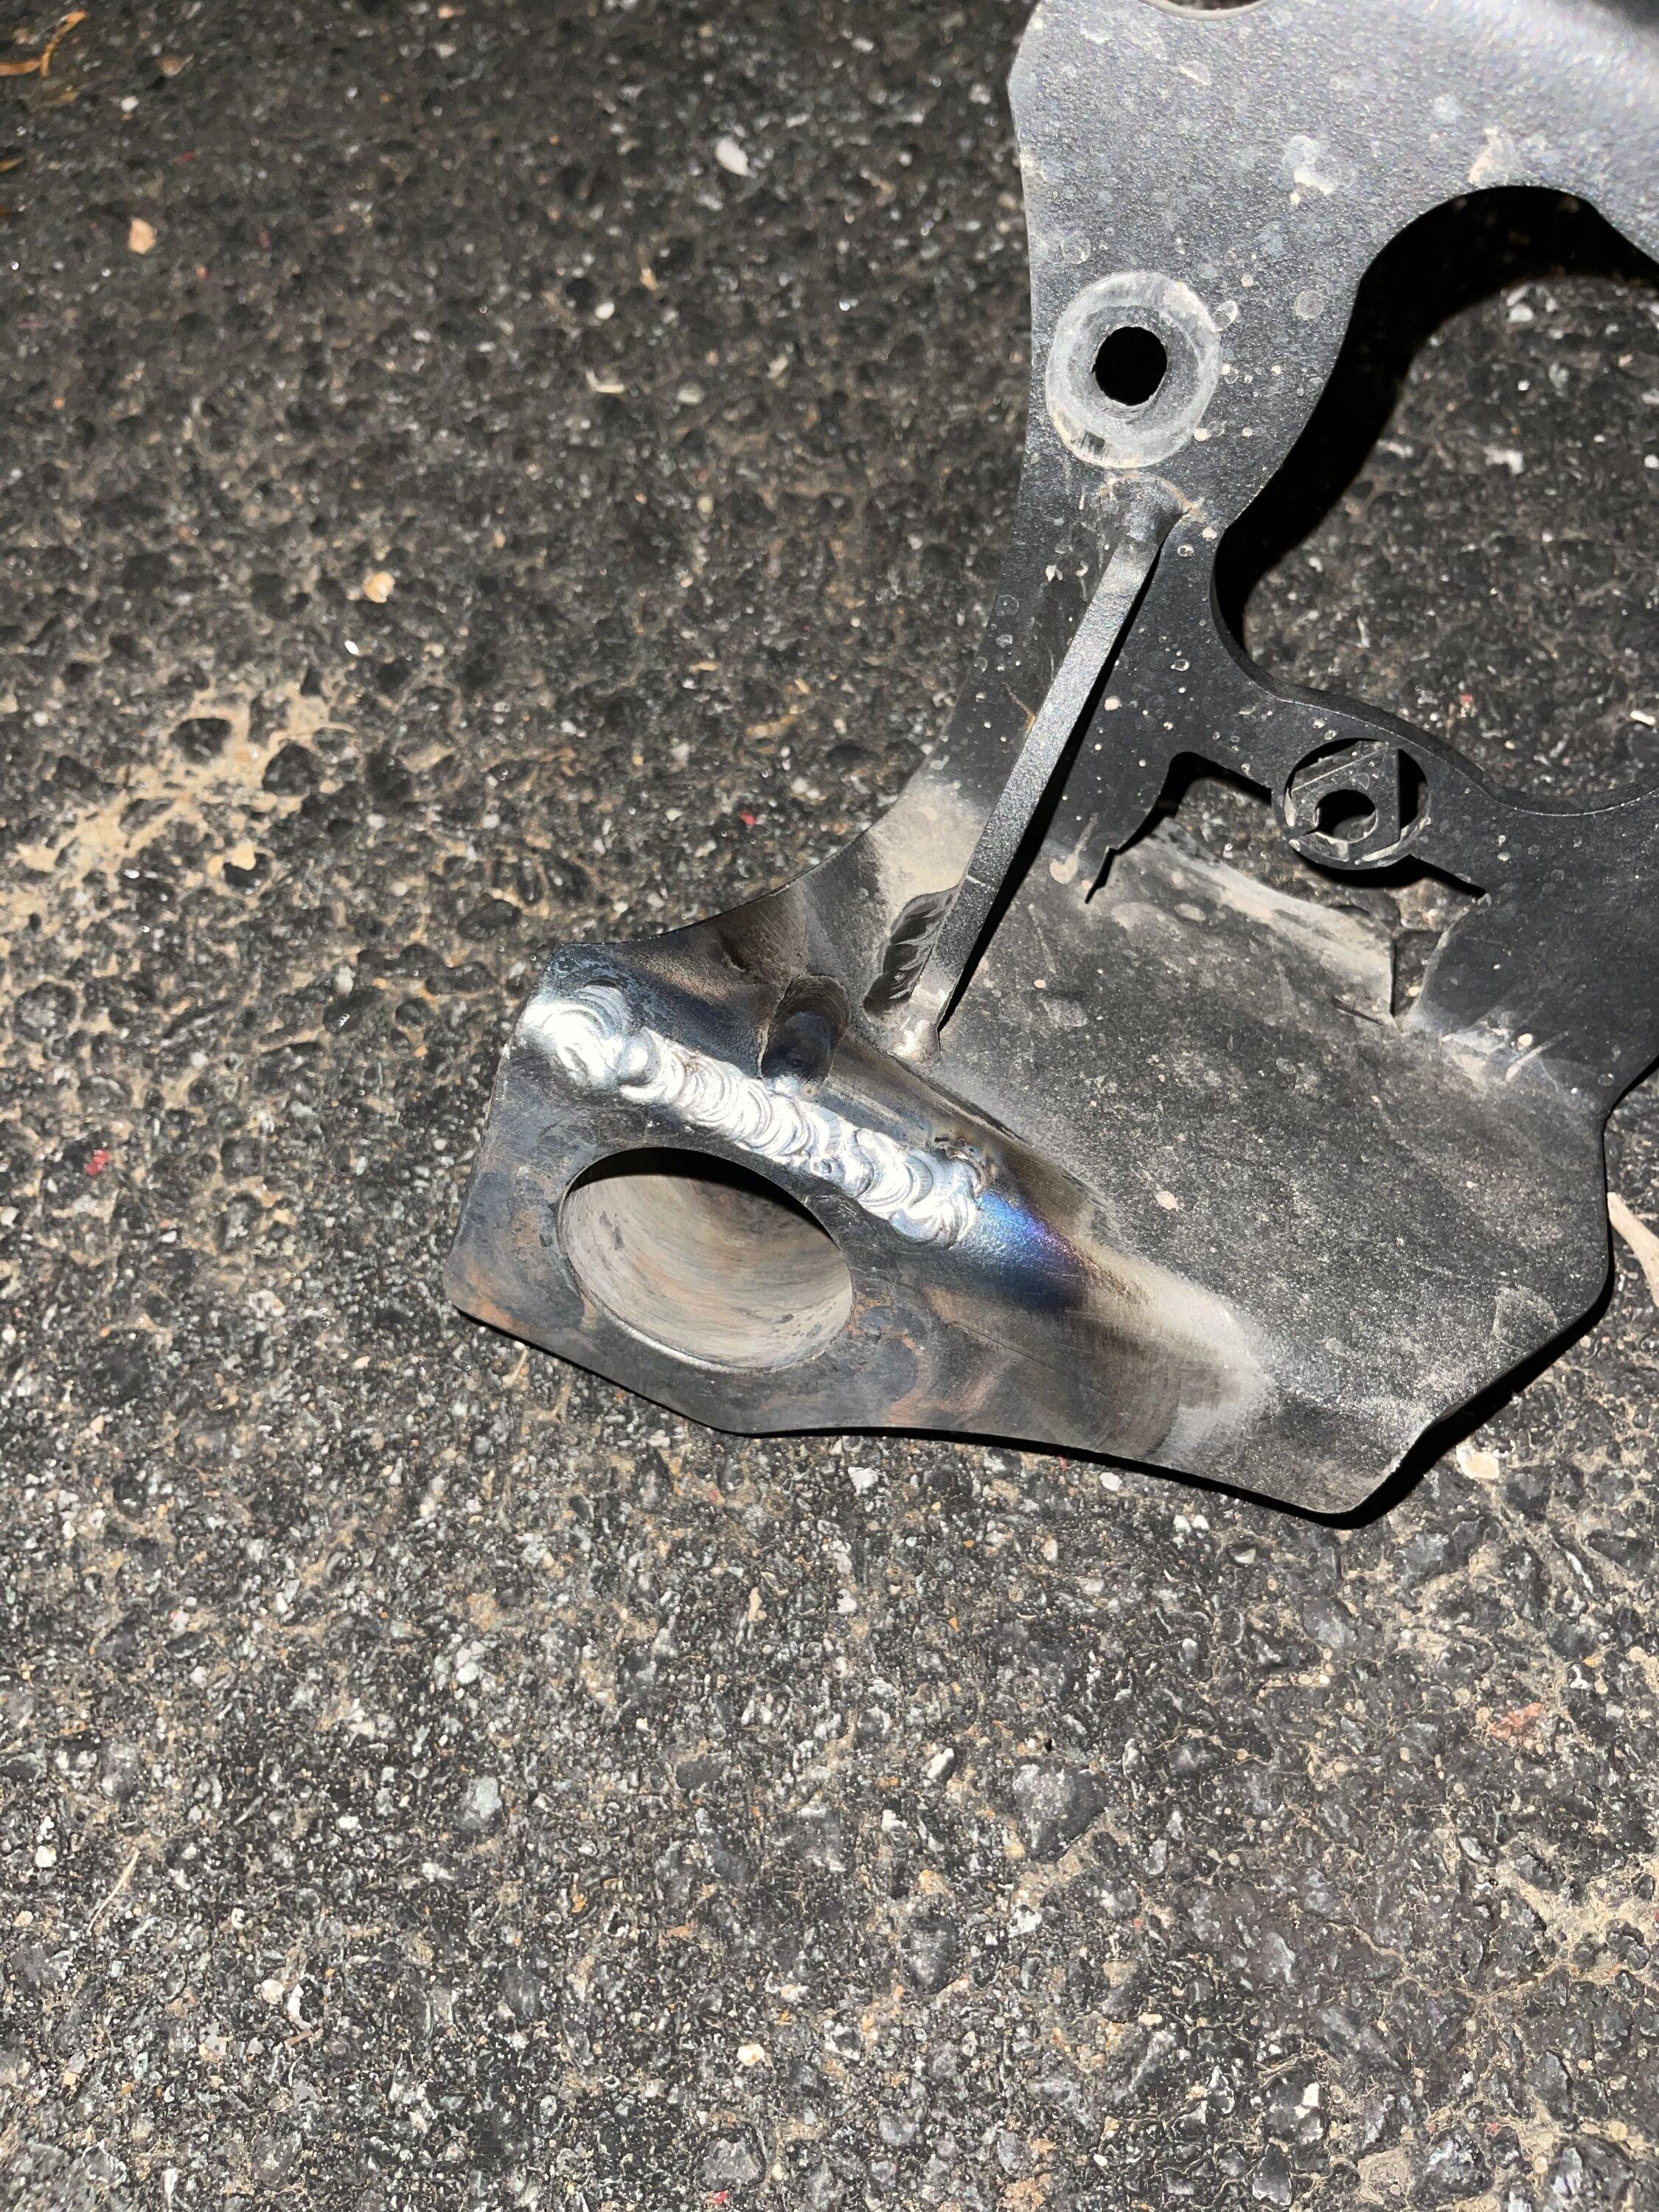
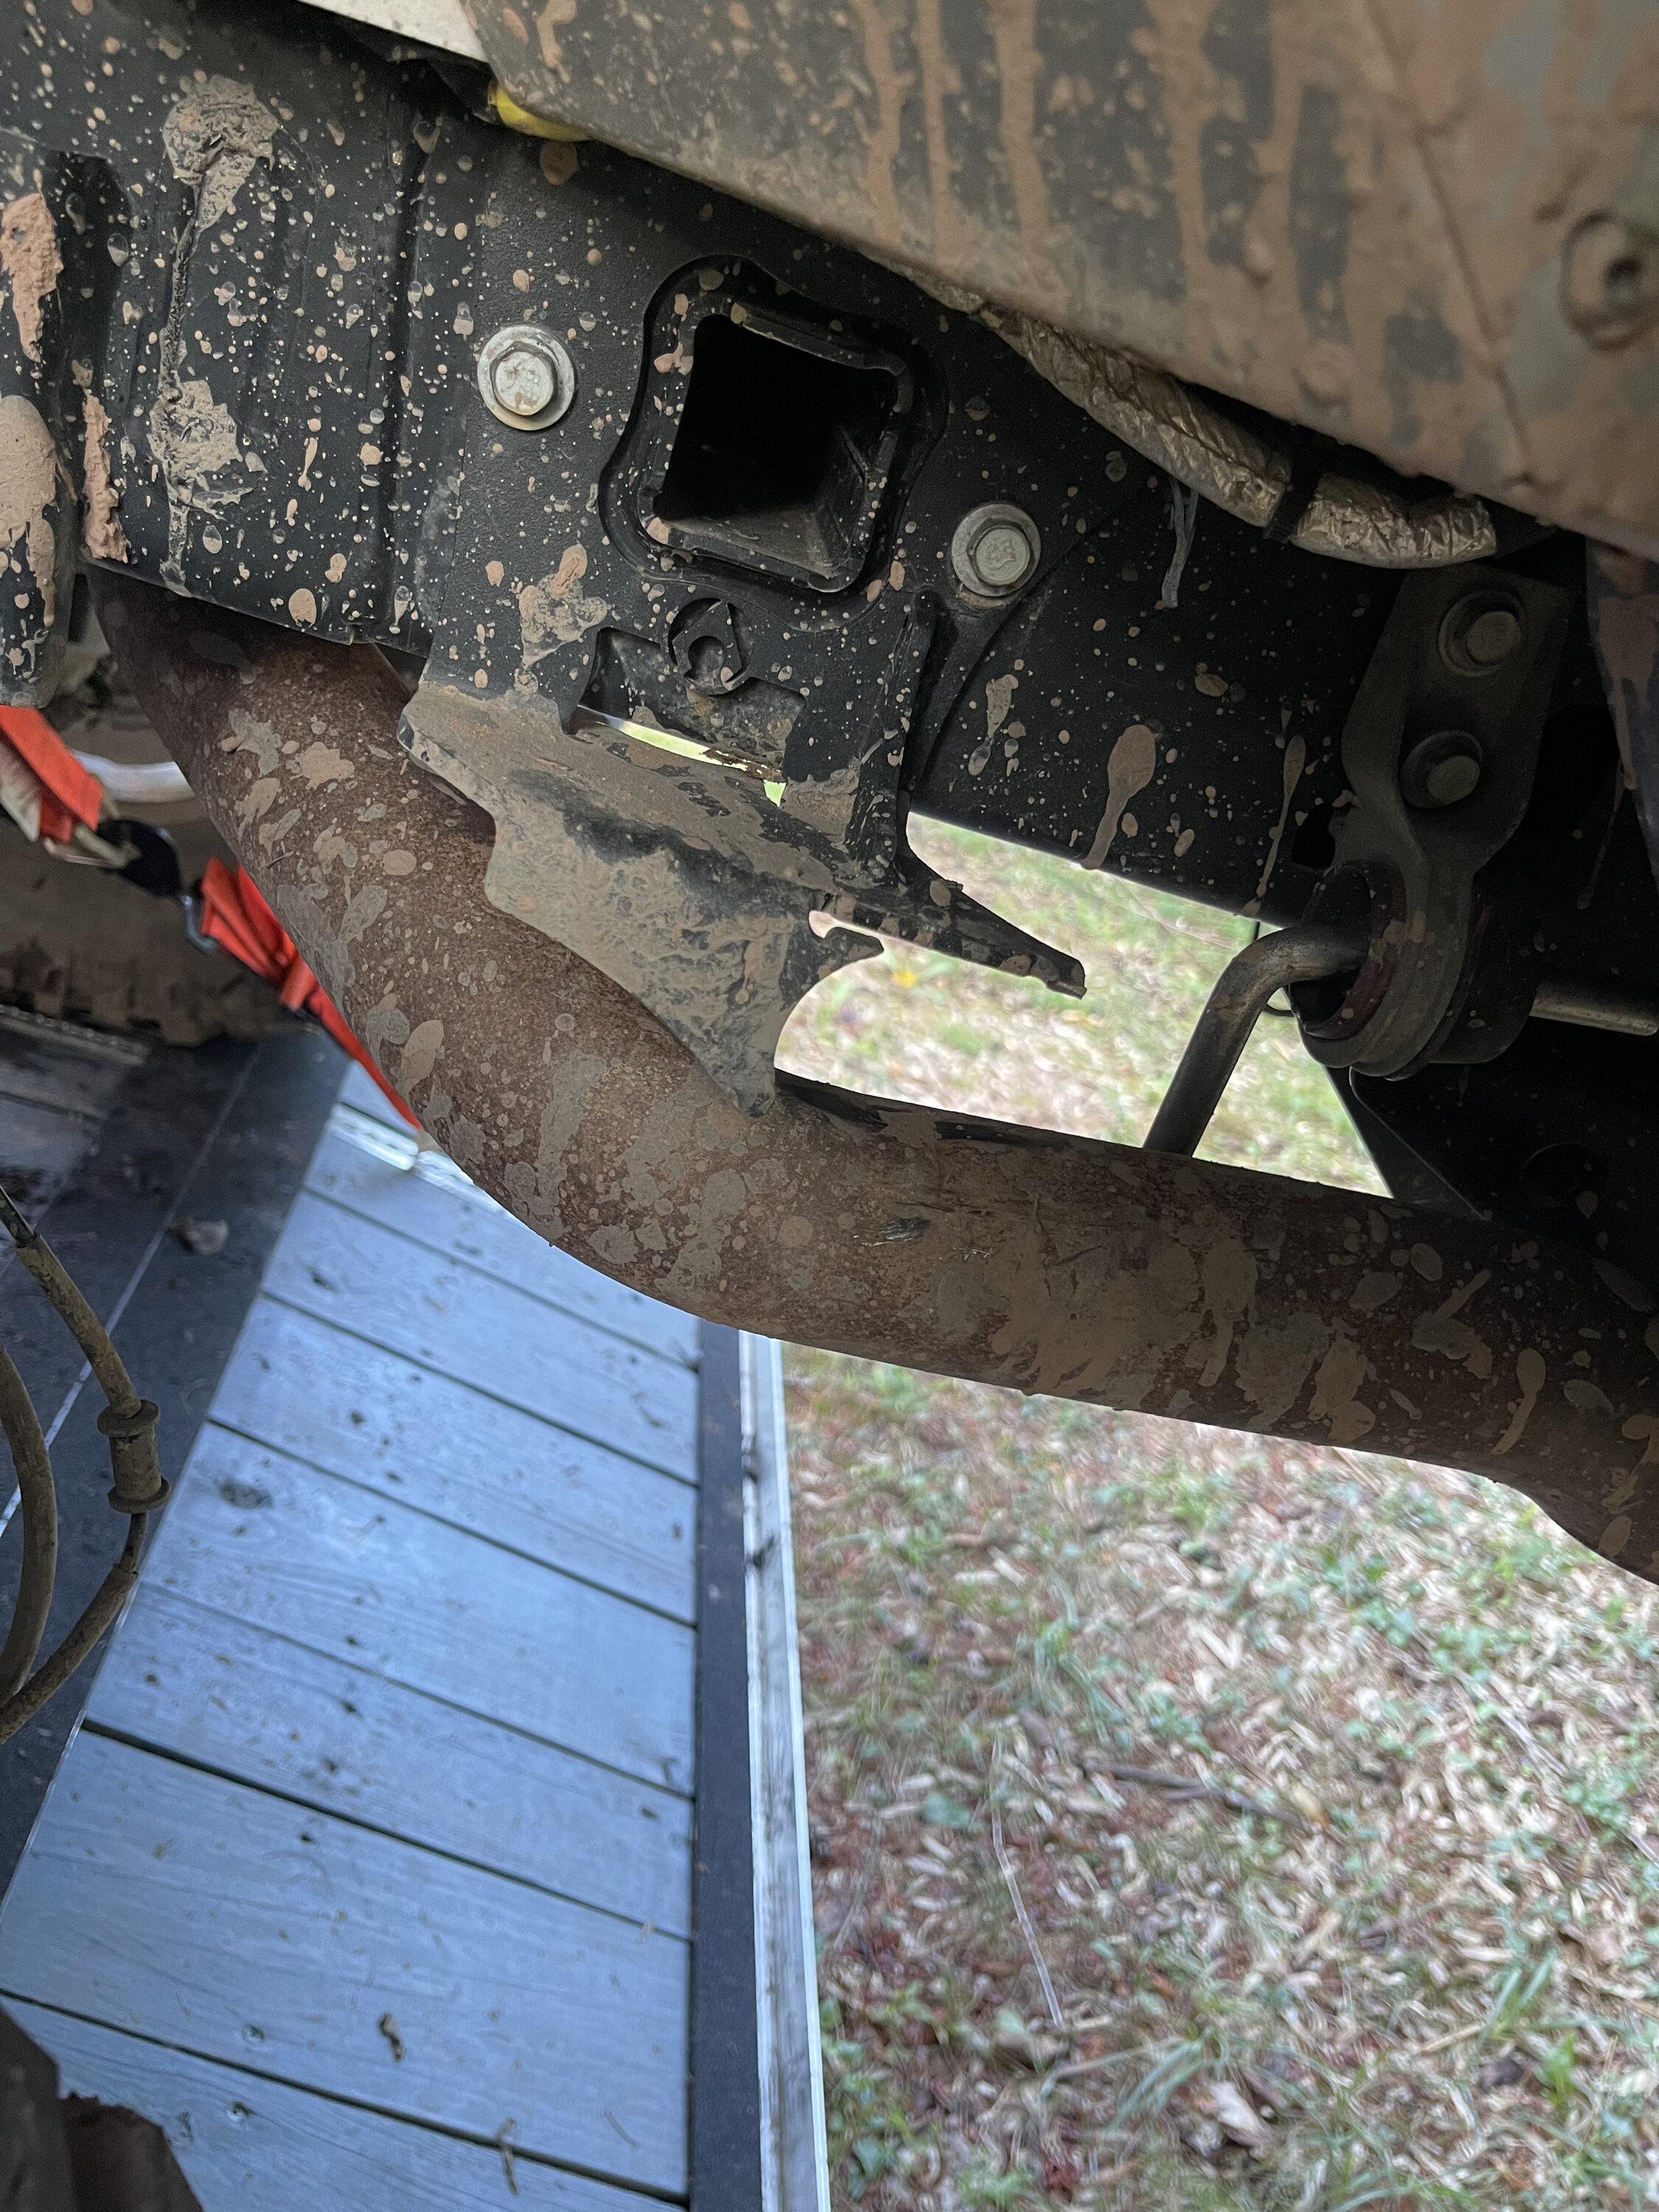
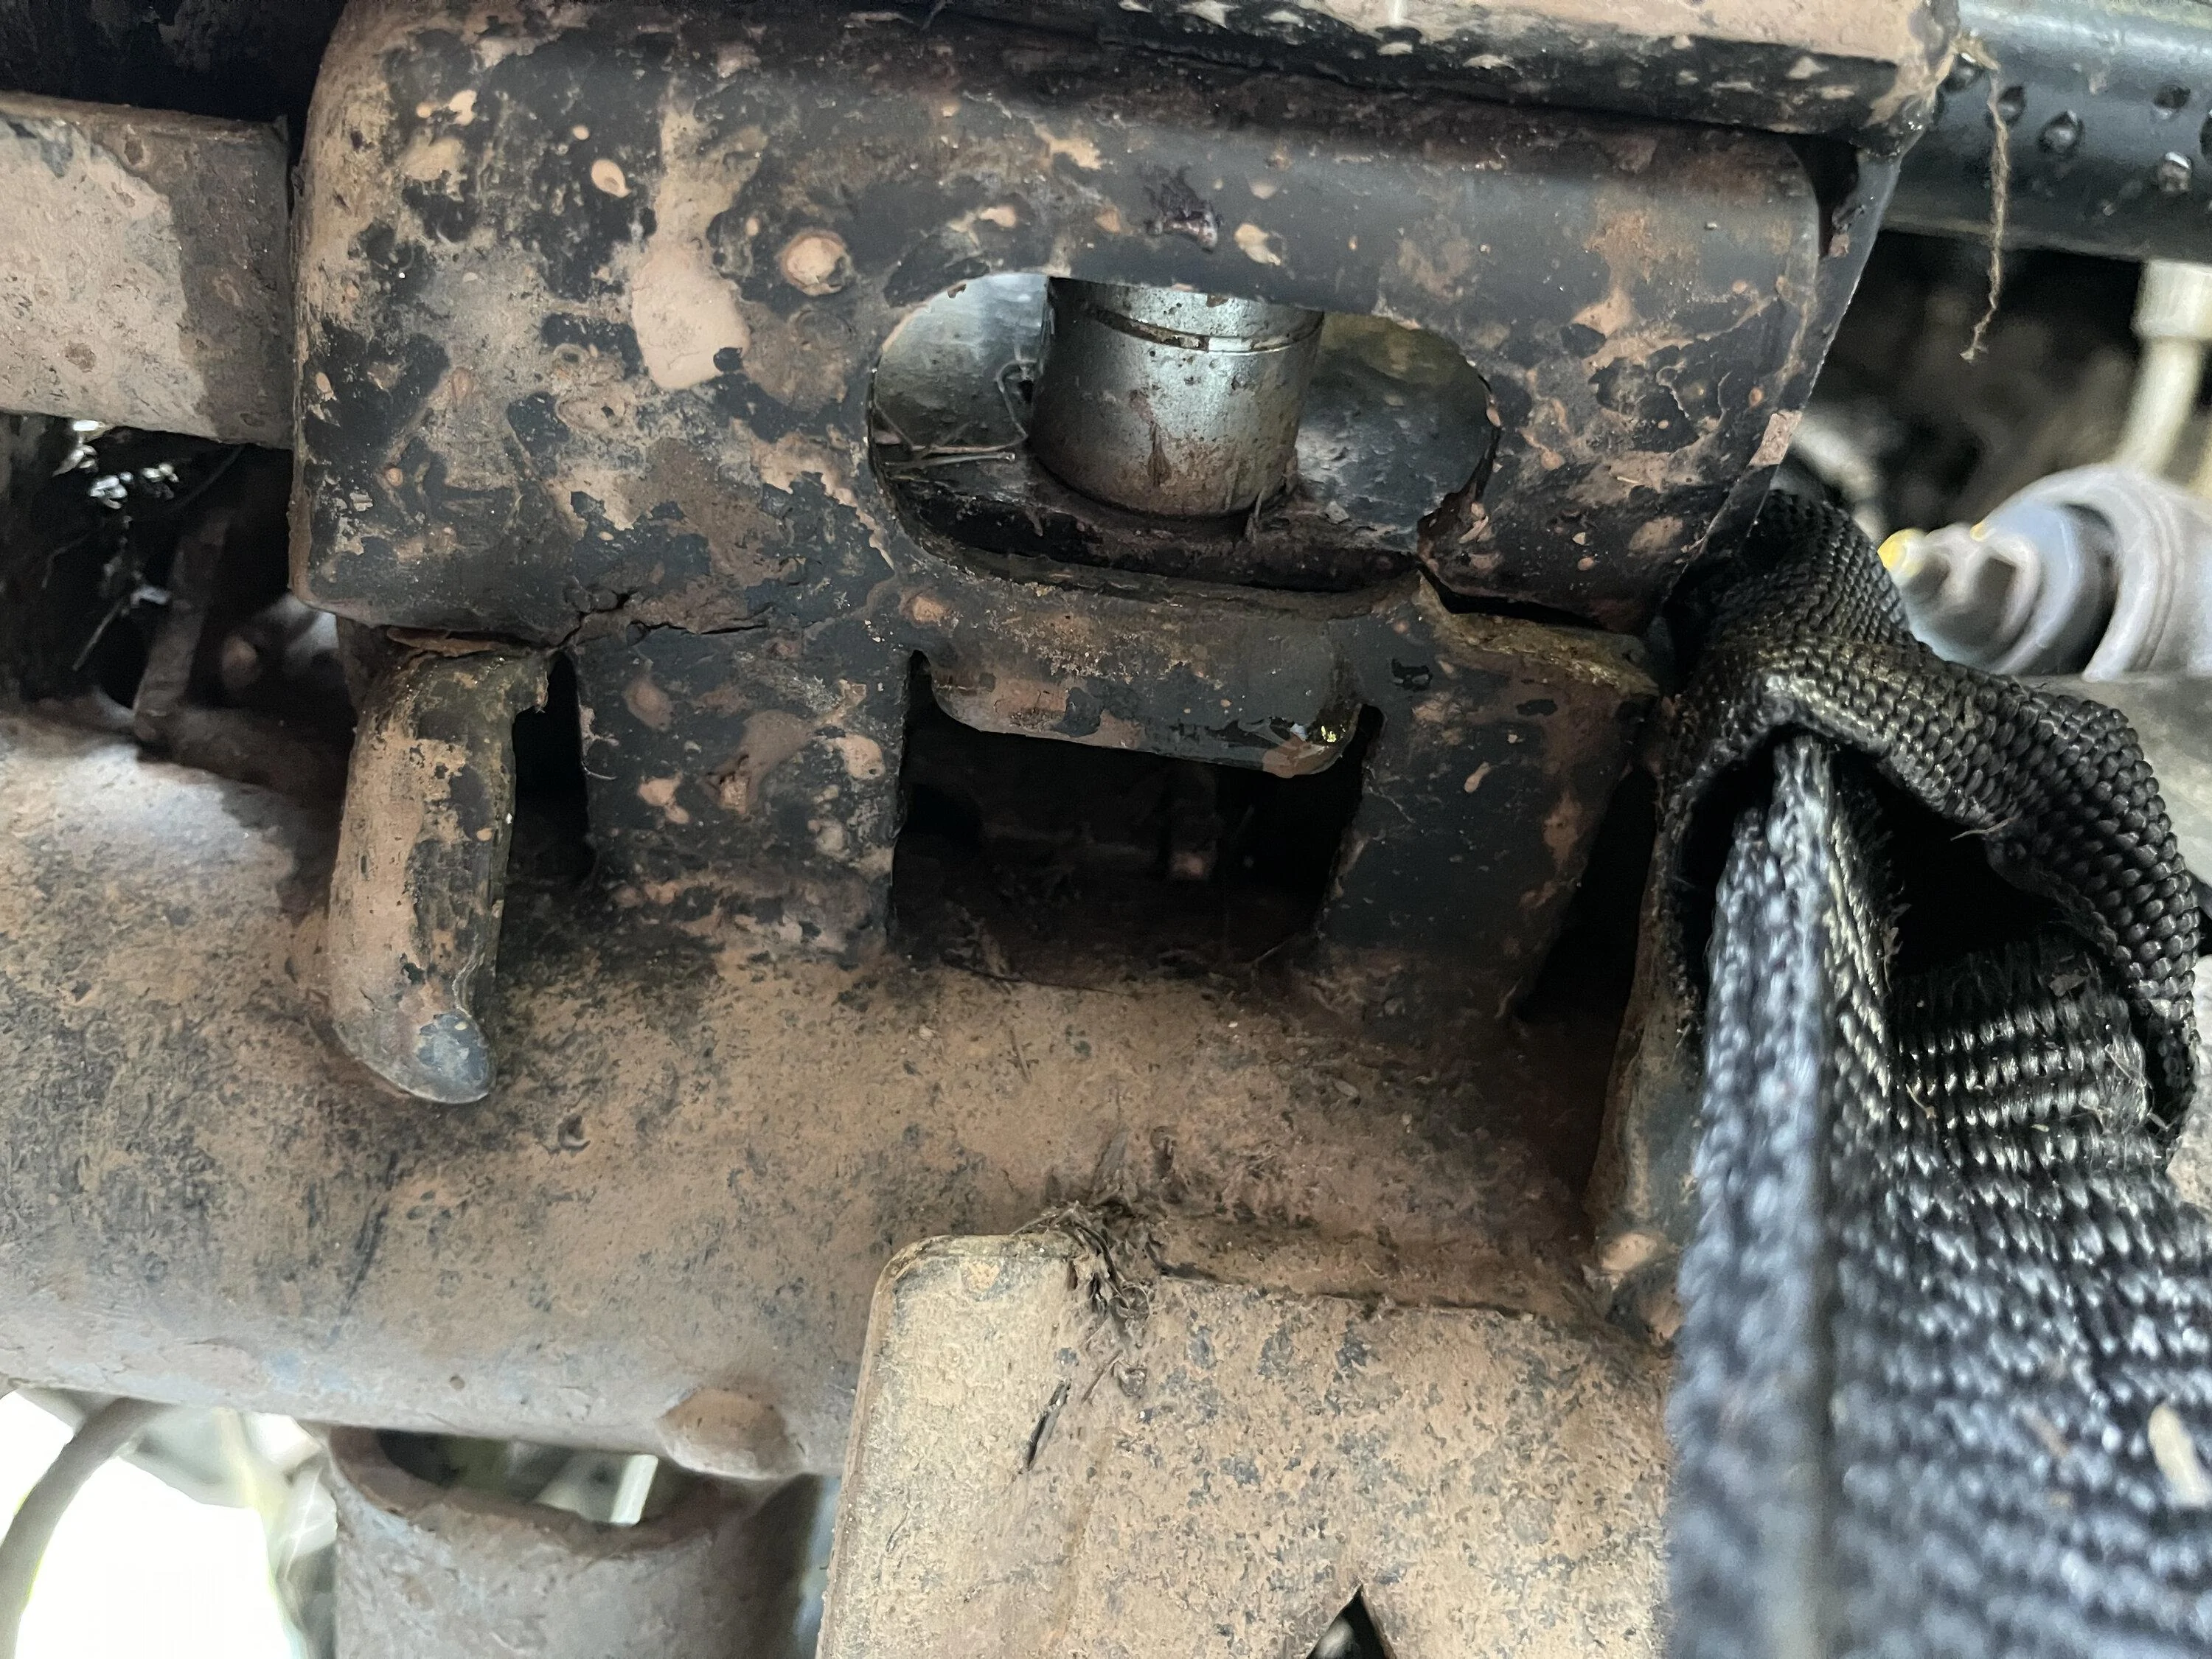
This time it was a crack in the front track bar mount AND a failure in the rear sway bar mount (from Artec).

IMG_2183.jpeg

IMG_2181.jpeg


In hind sight, the setup of the Artec bracket isn't super strong out of the box. The welds are minimal and there are a couple weak spots that could have been fixed by running a bead along the full length of the bend and connection points between parts. I'll be reinforcing both brackets when I weld the broken one back together this week.

For my trip next week, I'm also going to do a quick fix on the track bar bracket. At this point, I'm going to replace it in the next couple weeks though. I just don't think the factory bracket is designed to take the kinds of pressure I'm putting on it with the track bar riser AND hydro assist.
Something like this will fix the rear sway bar shortcomings. Had it on my JTR and will have it soon on my JTRD.
https://www.rivercityoffroad.com/Te...r-15-Inch-and-Up-Rear-Lift_p_17680.html?amp=1
Sponsored


Elff

Banned
Banned
Joined
Dec 20, 2021
Threads
15
Messages
1,363
Reaction score
3,983
Location
Keebler
Vehicle(s)
TJ Rubicon, Buell XBRS
Occupation
Interwebs
Vehicle Showcase
2
40's life

Am I right?

:rock:
 
OP
OP
Kindafearless

Kindafearless

Well-Known Member
First Name
Elise
Joined
Aug 19, 2019
Threads
12
Messages
437
Reaction score
1,098
Location
Virginia
Vehicle(s)
2020 Jeep Gladiator Rublicon
Build Thread
Link
Occupation
Enginerd

Elff

Banned
Banned
Joined
Dec 20, 2021
Threads
15
Messages
1,363
Reaction score
3,983
Location
Keebler
Vehicle(s)
TJ Rubicon, Buell XBRS
Occupation
Interwebs
Vehicle Showcase
2
My comp rig had everything gusseted and welded when I added Hydro Assist.
Just look at how beefy this combo track bar, hydro mount is on the axle side

Jeep Gladiator Practical Truck for the Over Prepared Woman 1663597813262


I can't find a pic of the frame side mount. But we bolted that on, and once bolted in place we welded it. That was not going anyway.
 

Sponsored

kevman65

Well-Known Member
Joined
Mar 8, 2020
Threads
44
Messages
3,022
Reaction score
4,141
Location
H
Vehicle(s)
J
@Kindafearless

I fear you will be repairing that again. My personal opinion from a CWI in the piping world, the metal is too thin for the stresses being put on it. You drive your truck like it's meant to be driven. With the bigger tires and the hydraulic steering assist, the stresses in specific areas are going to be huge.

From what I can tell from your pictures, the base metal sheared along with some weld failures. That tells me it wasn't engineered for what you're doing.
 
OP
OP
Kindafearless

Kindafearless

Well-Known Member
First Name
Elise
Joined
Aug 19, 2019
Threads
12
Messages
437
Reaction score
1,098
Location
Virginia
Vehicle(s)
2020 Jeep Gladiator Rublicon
Build Thread
Link
Occupation
Enginerd
@Kindafearless

I fear you will be repairing that again. My personal opinion from a CWI in the piping world, the metal is too thin for the stresses being put on it. You drive your truck like it's meant to be driven. With the bigger tires and the hydraulic steering assist, the stresses in specific areas are going to be huge.

From what I can tell from your pictures, the base metal sheared along with some weld failures. That tells me it wasn't engineered for what you're doing.
I’m glad you said that, I was feeling the same while fixing it :/ Pretty disappointed with Artec on this one. Everything else has been so well designed. This repair just needs to survive two more trips before I’m calling it a season to catch up on O&M.

My thought right now is to buy a length of tube with the same inside diameter and run it straight through the frame. Since it’s behind the axle, that shouldn’t compromise any structural integrity and would create an option that should be mostly unbreakable.

What you think of that option?
 

kevman65

Well-Known Member
Joined
Mar 8, 2020
Threads
44
Messages
3,022
Reaction score
4,141
Location
H
Vehicle(s)
J
How would you be attaching it to the frame? Mechanical or welded?

Is it going to be mounted on each frame rail? These frames are designed to flex and twist some, so you may take flexibility away and a problem may show up elsewhere.

From what I've read from you, you're very intelligent, not afraid to get dirty doing your thing, and you're willing to think outside the box. LOL, you sure you're an engineer? 🤪

All I can say is, try what you think will work, but listen to your rig when running her after the changes. If it doesn't sound or feel right, back up and look at it from a different perspective.
 

kevman65

Well-Known Member
Joined
Mar 8, 2020
Threads
44
Messages
3,022
Reaction score
4,141
Location
H
Vehicle(s)
J
Okay, after thinking about it for a minute, you might be able to save the Artec mount.

I would lose the fancy looking gusset. Get some 1/4" flat stock, big enough to cut a triangle out of with equal length legs. If you can make the legs long enough for the one coming out to flush above the round tube WITHOUT blocking the mounting hole on the vertical section I would go with that.

Tack the new gusset up, then flip it over and weld the top of the round tube to the bottom of the horizontal plate. Then flip it back over and do a 1/4" fillet all around the new gusset.

You will have to grind the point of the pyramid to fit the inside corner of the vertical to horizontal bend.

That SHOULD make the whole thing strong enough to withstand the stresses and take the flex out of the round tube.
 

Dougstdig

Well-Known Member
First Name
Doug
Joined
Sep 5, 2017
Threads
19
Messages
1,351
Reaction score
1,285
Location
FL
Vehicle(s)
‘21 JTRD - '08 Dodge Ram 2500 4x4

Sponsored

OP
OP
Kindafearless

Kindafearless

Well-Known Member
First Name
Elise
Joined
Aug 19, 2019
Threads
12
Messages
437
Reaction score
1,098
Location
Virginia
Vehicle(s)
2020 Jeep Gladiator Rublicon
Build Thread
Link
Occupation
Enginerd
How would you be attaching it to the frame? Mechanical or welded?

Is it going to be mounted on each frame rail? These frames are designed to flex and twist some, so you may take flexibility away and a problem may show up elsewhere.

From what I've read from you, you're very intelligent, not afraid to get dirty doing your thing, and you're willing to think outside the box. LOL, you sure you're an engineer? 🤪

All I can say is, try what you think will work, but listen to your rig when running her after the changes. If it doesn't sound or feel right, back up and look at it from a different perspective.
So, my thought was to cut the pipe into a couple 6-ish inch sections. I would then drill a hole straight through the frame and put the pipe in there. Do a fillet weld around each side, and run the sway bar through the whole thing.

In theory, I think, it shouldn’t greatly change any of the torsional qualities of the truck since it’s not a rigid continuous pipe.
 

kevman65

Well-Known Member
Joined
Mar 8, 2020
Threads
44
Messages
3,022
Reaction score
4,141
Location
H
Vehicle(s)
J
So, my thought was to cut the pipe into a couple 6-ish inch sections. I would then drill a hole straight through the frame and put the pipe in there. Do a fillet weld around each side, and run the sway bar through the whole thing.

In theory, I think, it shouldn’t greatly change any of the torsional qualities of the truck since it’s not a rigid continuous pipe.
Okay, from your initial comment I was picturing a solid tube frame rail to frame rail.

What I would suggest to add strength, cut square washers whatever fits between the inside legs of the frame rail. Then cut holes to tightly fit the OD of the round tube. Weld a washer on the end of one of the round tubes, with the tube either just under or just over flush with the face of the washer. Slide the whole assembly through the hole in your frame, slide another washer over the other end and have it flat against frame rail. Tack washer to inside of frame rail, push washer and tube flush with frame from outside and tack that washer to frame, then tack tube to inside washer. Weld top and bottom of outside washer, then inside washer, then weld tube to inside washer.

Do NOT weld the vertical sides of the square washers. You will weaken the frame if you do. By welding across the top and bottom, you are welding with the strength of the frame. If you have any structural engineering books, you can look this up.

By welding it in this manner, you are maintaining the strength of the frame rail ( actually making that section stronger) AND making your attachment stronger and not as apt to tear the frame rail.

It's just a touch more work than you were thinking, and will make everything stronger.

Again, I would use 1/4" flat stock for washers, if you can find 1/4" thick round stock in the size you need, use that. If not I wouldn't go thinner than 1/8"
 
OP
OP
Kindafearless

Kindafearless

Well-Known Member
First Name
Elise
Joined
Aug 19, 2019
Threads
12
Messages
437
Reaction score
1,098
Location
Virginia
Vehicle(s)
2020 Jeep Gladiator Rublicon
Build Thread
Link
Occupation
Enginerd
I was gonna recommend the exact same thing, but didn’t know that there was a limitation of a 37 inch tire. Here’s the section that shows requirements/limitations.

AF4A9B64-C5D7-4A81-A315-94C4B0BF4B03.png
Ya, it looks cool, but I feel like a lot of these bolt on parts just aren’t holding up longer than a season. Too expensive to keep buying them. Probably perfect for most people, but my truck is being treated like a dedicated rock crawler.

Like the Artec brackets, I’ve also destroyed a Synergy track bar bracket, bent up the frame side LCA brackets, trashed the rear shock mounts, and screwed up the winch plate. Not to mention the Tie Rod drama a couple months ago. I’m sure the list will be longer when I start taking things apart for inspection soon :(

Everything new going into the truck is coming as builder parts from buggy builders :/ Or stuff I’m fabbing myself.

It costs less, the metal is stronger, and I don’t have to worry about parts working loose.
 

kevman65

Well-Known Member
Joined
Mar 8, 2020
Threads
44
Messages
3,022
Reaction score
4,141
Location
H
Vehicle(s)
J
Turn your wire speed down on your MIG, you should like the results ;)
 
OP
OP
Kindafearless

Kindafearless

Well-Known Member
First Name
Elise
Joined
Aug 19, 2019
Threads
12
Messages
437
Reaction score
1,098
Location
Virginia
Vehicle(s)
2020 Jeep Gladiator Rublicon
Build Thread
Link
Occupation
Enginerd
Okay, from your initial comment I was picturing a solid tube frame rail to frame rail.

What I would suggest to add strength, cut square washers whatever fits between the inside legs of the frame rail. Then cut holes to tightly fit the OD of the round tube. Weld a washer on the end of one of the round tubes, with the tube either just under or just over flush with the face of the washer. Slide the whole assembly through the hole in your frame, slide another washer over the other end and have it flat against frame rail. Tack washer to inside of frame rail, push washer and tube flush with frame from outside and tack that washer to frame, then tack tube to inside washer. Weld top and bottom of outside washer, then inside washer, then weld tube to inside washer.

Do NOT weld the vertical sides of the square washers. You will weaken the frame if you do. By welding across the top and bottom, you are welding with the strength of the frame. If you have any structural engineering books, you can look this up.

By welding it in this manner, you are maintaining the strength of the frame rail ( actually making that section stronger) AND making your attachment stronger and not as apt to tear the frame rail.

It's just a touch more work than you were thinking, and will make everything stronger.

Again, I would use 1/4" flat stock for washers, if you can find 1/4" thick round stock in the size you need, use that. If not I wouldn't go thinner than 1/8"
Huh, I like what you are saying I think. Going to draw what I think you are describing to be sure though. Just not tonight :) It’s past my bed time!
Sponsored


Top