Sponsored
What did you do TO your Gladiator today? [ADMIN WARNING: NO POLITICS, NO GUN TALK]
- Thread starter The4x4Guys
- Start date
- Watchers 1,485
![Jeep Gladiator What did you do TO your Gladiator today? [ADMIN WARNING: NO POLITICS, NO GUN TALK] IMG_5985_](https://cdn.jeepgladiatorforum.com/attachments/312/312690-64777f1a94c6d361dff1558ea1d49dd4.jpeg)
![Jeep Gladiator What did you do TO your Gladiator today? [ADMIN WARNING: NO POLITICS, NO GUN TALK] IMG_6378](https://cdn.jeepgladiatorforum.com/attachments/312/312691-e14e2e1b2cf7d814772ab6300c4d111a.jpeg)
![Jeep Gladiator What did you do TO your Gladiator today? [ADMIN WARNING: NO POLITICS, NO GUN TALK] IMG_6379](https://cdn.jeepgladiatorforum.com/attachments/312/312692-a45c355ebbe15ba59e16ad5df62a93cb.jpeg)
![Jeep Gladiator What did you do TO your Gladiator today? [ADMIN WARNING: NO POLITICS, NO GUN TALK] IMG_6381](https://cdn.jeepgladiatorforum.com/attachments/312/312693-c4e18ac8c41be7861edeabc7b492b3c0.jpeg)
![Jeep Gladiator What did you do TO your Gladiator today? [ADMIN WARNING: NO POLITICS, NO GUN TALK] IMG_6382](https://cdn.jeepgladiatorforum.com/attachments/312/312694-1b75af735d01d572334619a175cb2d2e.webp)
![Jeep Gladiator What did you do TO your Gladiator today? [ADMIN WARNING: NO POLITICS, NO GUN TALK] IMG_6390](https://cdn.jeepgladiatorforum.com/attachments/312/312695-91d2c29567b834f3399e3bdbd18a3998.jpeg)
Gatorized
Well-Known Member
clever how you suspended your JT from tHe ceiling using ratchet straps while working on the lift install… LOL!Finally got around to installing my AEV 2" Spacer lift

Sarge502
Well-Known Member
haha kinda does look like that huh. Wish it were that easy.clever how you suspended your JT from tHe ceiling using ratchet straps while working on the lift install… LOL!
redman43
Well-Known Member
Finally had a nice day today, so I took the afternoon off. Got the front shocks done today and the falcon adjustable through shaft SS.Got the Falcon rear shocks installed. Need to find some time to do the fronts.
![Jeep Gladiator What did you do TO your Gladiator today? [ADMIN WARNING: NO POLITICS, NO GUN TALK] 20230421_190425](https://cdn.jeepgladiatorforum.com/attachments/312/312711-30d89e48ef1c811cf229136670418d34.jpg)
Sponsored
ospreyfe55
Well-Known Member
- First Name
- Marc
- Joined
- Apr 28, 2021
- Threads
- 33
- Messages
- 275
- Reaction score
- 337
- Location
- Navarre, FL
- Vehicle(s)
- 2020 Gladiator Rubicon
- Occupation
- F-35 Weapons Instructor
What fender flares are those?Switched out my 39 ko2 to the 40 Baja boss

![Jeep Gladiator What did you do TO your Gladiator today? [ADMIN WARNING: NO POLITICS, NO GUN TALK] ED8132E5-B59C-4906-9B3F-B6E36C7DADDC](https://cdn.jeepgladiatorforum.com/attachments/312/312712-fe3557bc6bc0eae75269e4cb9f5a792a.webp)
![Jeep Gladiator What did you do TO your Gladiator today? [ADMIN WARNING: NO POLITICS, NO GUN TALK] 2824FE6F-41C6-4877-9D78-E5322055437A](https://cdn.jeepgladiatorforum.com/attachments/312/312713-d1e1dd351871be6f00e199b6625e28c3.jpeg)
![Jeep Gladiator What did you do TO your Gladiator today? [ADMIN WARNING: NO POLITICS, NO GUN TALK] D3AF811C-38CE-4E63-9383-4FFD9B538B1C](https://cdn.jeepgladiatorforum.com/attachments/312/312714-90bc886706a8eab132765c5a1e61f840.webp)
![Jeep Gladiator What did you do TO your Gladiator today? [ADMIN WARNING: NO POLITICS, NO GUN TALK] C8CBB309-1353-43AA-888F-7620A1C4DC52](https://cdn.jeepgladiatorforum.com/attachments/312/312715-abd870fe31760a2a5f476d8101d5f037.jpeg)
Chief_jeep
Well-Known Member
- First Name
- Justin
- Joined
- Nov 7, 2022
- Threads
- 17
- Messages
- 389
- Reaction score
- 448
- Location
- Park City, UT
- Vehicle(s)
- 2022 Gladiator Ecodiesel
- Occupation
- Real Estate Agent
motobilt highline flaresWhat fender flares are those?
pm4045
Well-Known Member
- Joined
- Sep 21, 2019
- Threads
- 1
- Messages
- 81
- Reaction score
- 179
- Location
- Iowa
- Website
- www.jeepgladiatorforum.com
- Vehicle(s)
- 2021 Gladiator JT Max Tow
- Vehicle Showcase
- 1
https://www.spiderwebshade.com/products/custom-printed-shadereally like that who does custom printing or what material must a person get to do that?
Glad Jeeper
Well-Known Member
- First Name
- Patrick
- Joined
- Sep 6, 2021
- Threads
- 29
- Messages
- 284
- Reaction score
- 446
- Location
- Longview, Wa
- Vehicle(s)
- 2021 Gladiator Mojave
Since we finally had a dry day I continued installing some things!!!
Month ago AVS for windows, these are awesome they really help keep the road spray off the side windows and side mirrors.
Today, Fishbone bed rack to compliment the Decked system.
Today, Tie hooks installed into the bolt mounting holes for trail rail system.
Next DIY seat delete.
Getting excited to begin our summer overlanding trips.
![Jeep Gladiator What did you do TO your Gladiator today? [ADMIN WARNING: NO POLITICS, NO GUN TALK] IMG_2181](data:image/svg+xml;charset=utf-8,%3Csvg xmlns%3D'http%3A%2F%2Fwww.w3.org%2F2000%2Fsvg' width='640' height='480' viewBox%3D'0 0 640 480'%2F%3E)
Month ago AVS for windows, these are awesome they really help keep the road spray off the side windows and side mirrors.
Today, Fishbone bed rack to compliment the Decked system.
Today, Tie hooks installed into the bolt mounting holes for trail rail system.
Next DIY seat delete.
Getting excited to begin our summer overlanding trips.
![Jeep Gladiator What did you do TO your Gladiator today? [ADMIN WARNING: NO POLITICS, NO GUN TALK] IMG_2181](https://cdn.jeepgladiatorforum.com/attachments/312/312743-b9c371b17221490d897adedcb4f499ac.jpg)
![Jeep Gladiator What did you do TO your Gladiator today? [ADMIN WARNING: NO POLITICS, NO GUN TALK] IMG_2182](https://cdn.jeepgladiatorforum.com/attachments/312/312744-d79fbdc80a29bbf38a4434470ab785c5.jpg)
![Jeep Gladiator What did you do TO your Gladiator today? [ADMIN WARNING: NO POLITICS, NO GUN TALK] IMG_2189](https://cdn.jeepgladiatorforum.com/attachments/312/312745-0d7dc194ed881da9374b1d452f0d5d77.jpg)
![Jeep Gladiator What did you do TO your Gladiator today? [ADMIN WARNING: NO POLITICS, NO GUN TALK] IMG_2183](https://cdn.jeepgladiatorforum.com/attachments/312/312746-4a750d2825c4a6a6736563c350c0e2d2.jpg)
![Jeep Gladiator What did you do TO your Gladiator today? [ADMIN WARNING: NO POLITICS, NO GUN TALK] IMG_2184](https://cdn.jeepgladiatorforum.com/attachments/312/312747-6dbbd8023c2c7ec2adc286723c921471.jpg)
![Jeep Gladiator What did you do TO your Gladiator today? [ADMIN WARNING: NO POLITICS, NO GUN TALK] IMG_2188](https://cdn.jeepgladiatorforum.com/attachments/312/312748-85f062f12093b05f6b49c4a255399c56.jpg)
![Jeep Gladiator What did you do TO your Gladiator today? [ADMIN WARNING: NO POLITICS, NO GUN TALK] IMG_2186](https://cdn.jeepgladiatorforum.com/attachments/312/312749-5a03680eb72e5296d07738dc74114e2a.jpg)
![Jeep Gladiator What did you do TO your Gladiator today? [ADMIN WARNING: NO POLITICS, NO GUN TALK] IMG_2185](https://cdn.jeepgladiatorforum.com/attachments/312/312750-740a66b71fd384509f6d5a182f8a4a39.jpg)
Sponsored
mx5red
Well-Known Member
May I suggest Metalcloak rear sway link reinforcement?Finally got around to installing my AEV 2" Spacer lift
I bought that lift used and one sway bar still had the captive OEM nut attached, he was one of those people that had ripped it right through the bottom of the OEM bracket. Maybe AEV links too short?
Anyways it’s an easy install and piece of mind.
Angler3
Well-Known Member
Any lights on dash after deleting?Did the aux battery delete today.

been considering it.
do you have a link for the how to?
Hootbro
Well-Known Member
No lights. There has been few threads on the subject. You have to search those out. There is a couple of methods but doing the full wire delete is the more tougher of them. There is no "A to Z" instruction sets. You just have to follow some common sense and dive into it and be mechanically inclined and not afraid. The method I used involved having to remove the fuse box, battery tray and air box to get access to the wiring for removal. Plus you need to fabricate a heavy gauge jumper to go between N1 and N3. Only difference I made from the diagram below is I ran the ground cable that went to the aux battery negative to a body ground rather than removed it as it saved me the hassle of having to hack it off the "current" sensor.Any lights on dash after deleting?
been considering it.
do you have a link for the how to?
Below is a link I used to get a 6 gauge jumper cable made with 1/4" eyelet terminals installed. Cost me less than $10 to get made and delivered.
https://www.batterycablesusa.com/
![Jeep Gladiator What did you do TO your Gladiator today? [ADMIN WARNING: NO POLITICS, NO GUN TALK] 36L dual batteries](https://cdn.jeepgladiatorforum.com/attachments/312/312803-2c36bf251b6dd6654b354b764b2fc8ac.png)
mx5red
Well-Known Member
Took some time to throw the front 2.5” springs in, though I didn’t quite finish before had to reassemble and pick the kids up.This was a big one!
Finished installing my Rock Krawler Pro-X cradle and upper control arms, and new Clayton 2.5” HD springs.
Spent all night monday jacking up the truck and drilling/tapping the bosses on the axle. Took me hours to finish, I couldn’t get the included drill bit to drill in. Granted, I kept the axle dropped but attached so there was not a lot of room to put my weight behind it…
So, I used couple of my smaller cheap bits and they worked like a charm, eventually the RK bit worked.
I removed the bracket for the e-locker since it was in the way.

there was a pretty big gap under the cradle, but torquing the bolts down laid it flush.
I didn’t get to finish putting arms in until today. I cheaped out and didn’t get other control arms… for now.
I tried to keep the lowers attached and undo one upper at a time so I wouldn’t have trouble getting the bolts in.
Well, the RK Pro-X arms are supposed to be for 3”+ lifts and they really raised the pinion angle. The joint ends are basically screwed all the way into the arms so not much shorter adjustment. If I had adjustable lowers I could tinker with them but I didn’t want to at this point.
So, they were not easy to get in. I had to use another jack under the front of the diff to raise the pinion and get the arms to line up.
Pro Tip - attach the cradle ends first, easily, then struggle to get the frame ends in. Way easier!
Now I’m all set!
Stock springs with spacers 20.5” to Clayton ~22” (21.625 +\- .25)

I think I gained ~2.5” over my OEM Rubicon springs with 2” AEV spacers. I’ve gotten too heavy and I only had ~2” between the bumps stops and the pads, which is why I got the Clayton springs. Otherwise I had been content with the spacer lift.
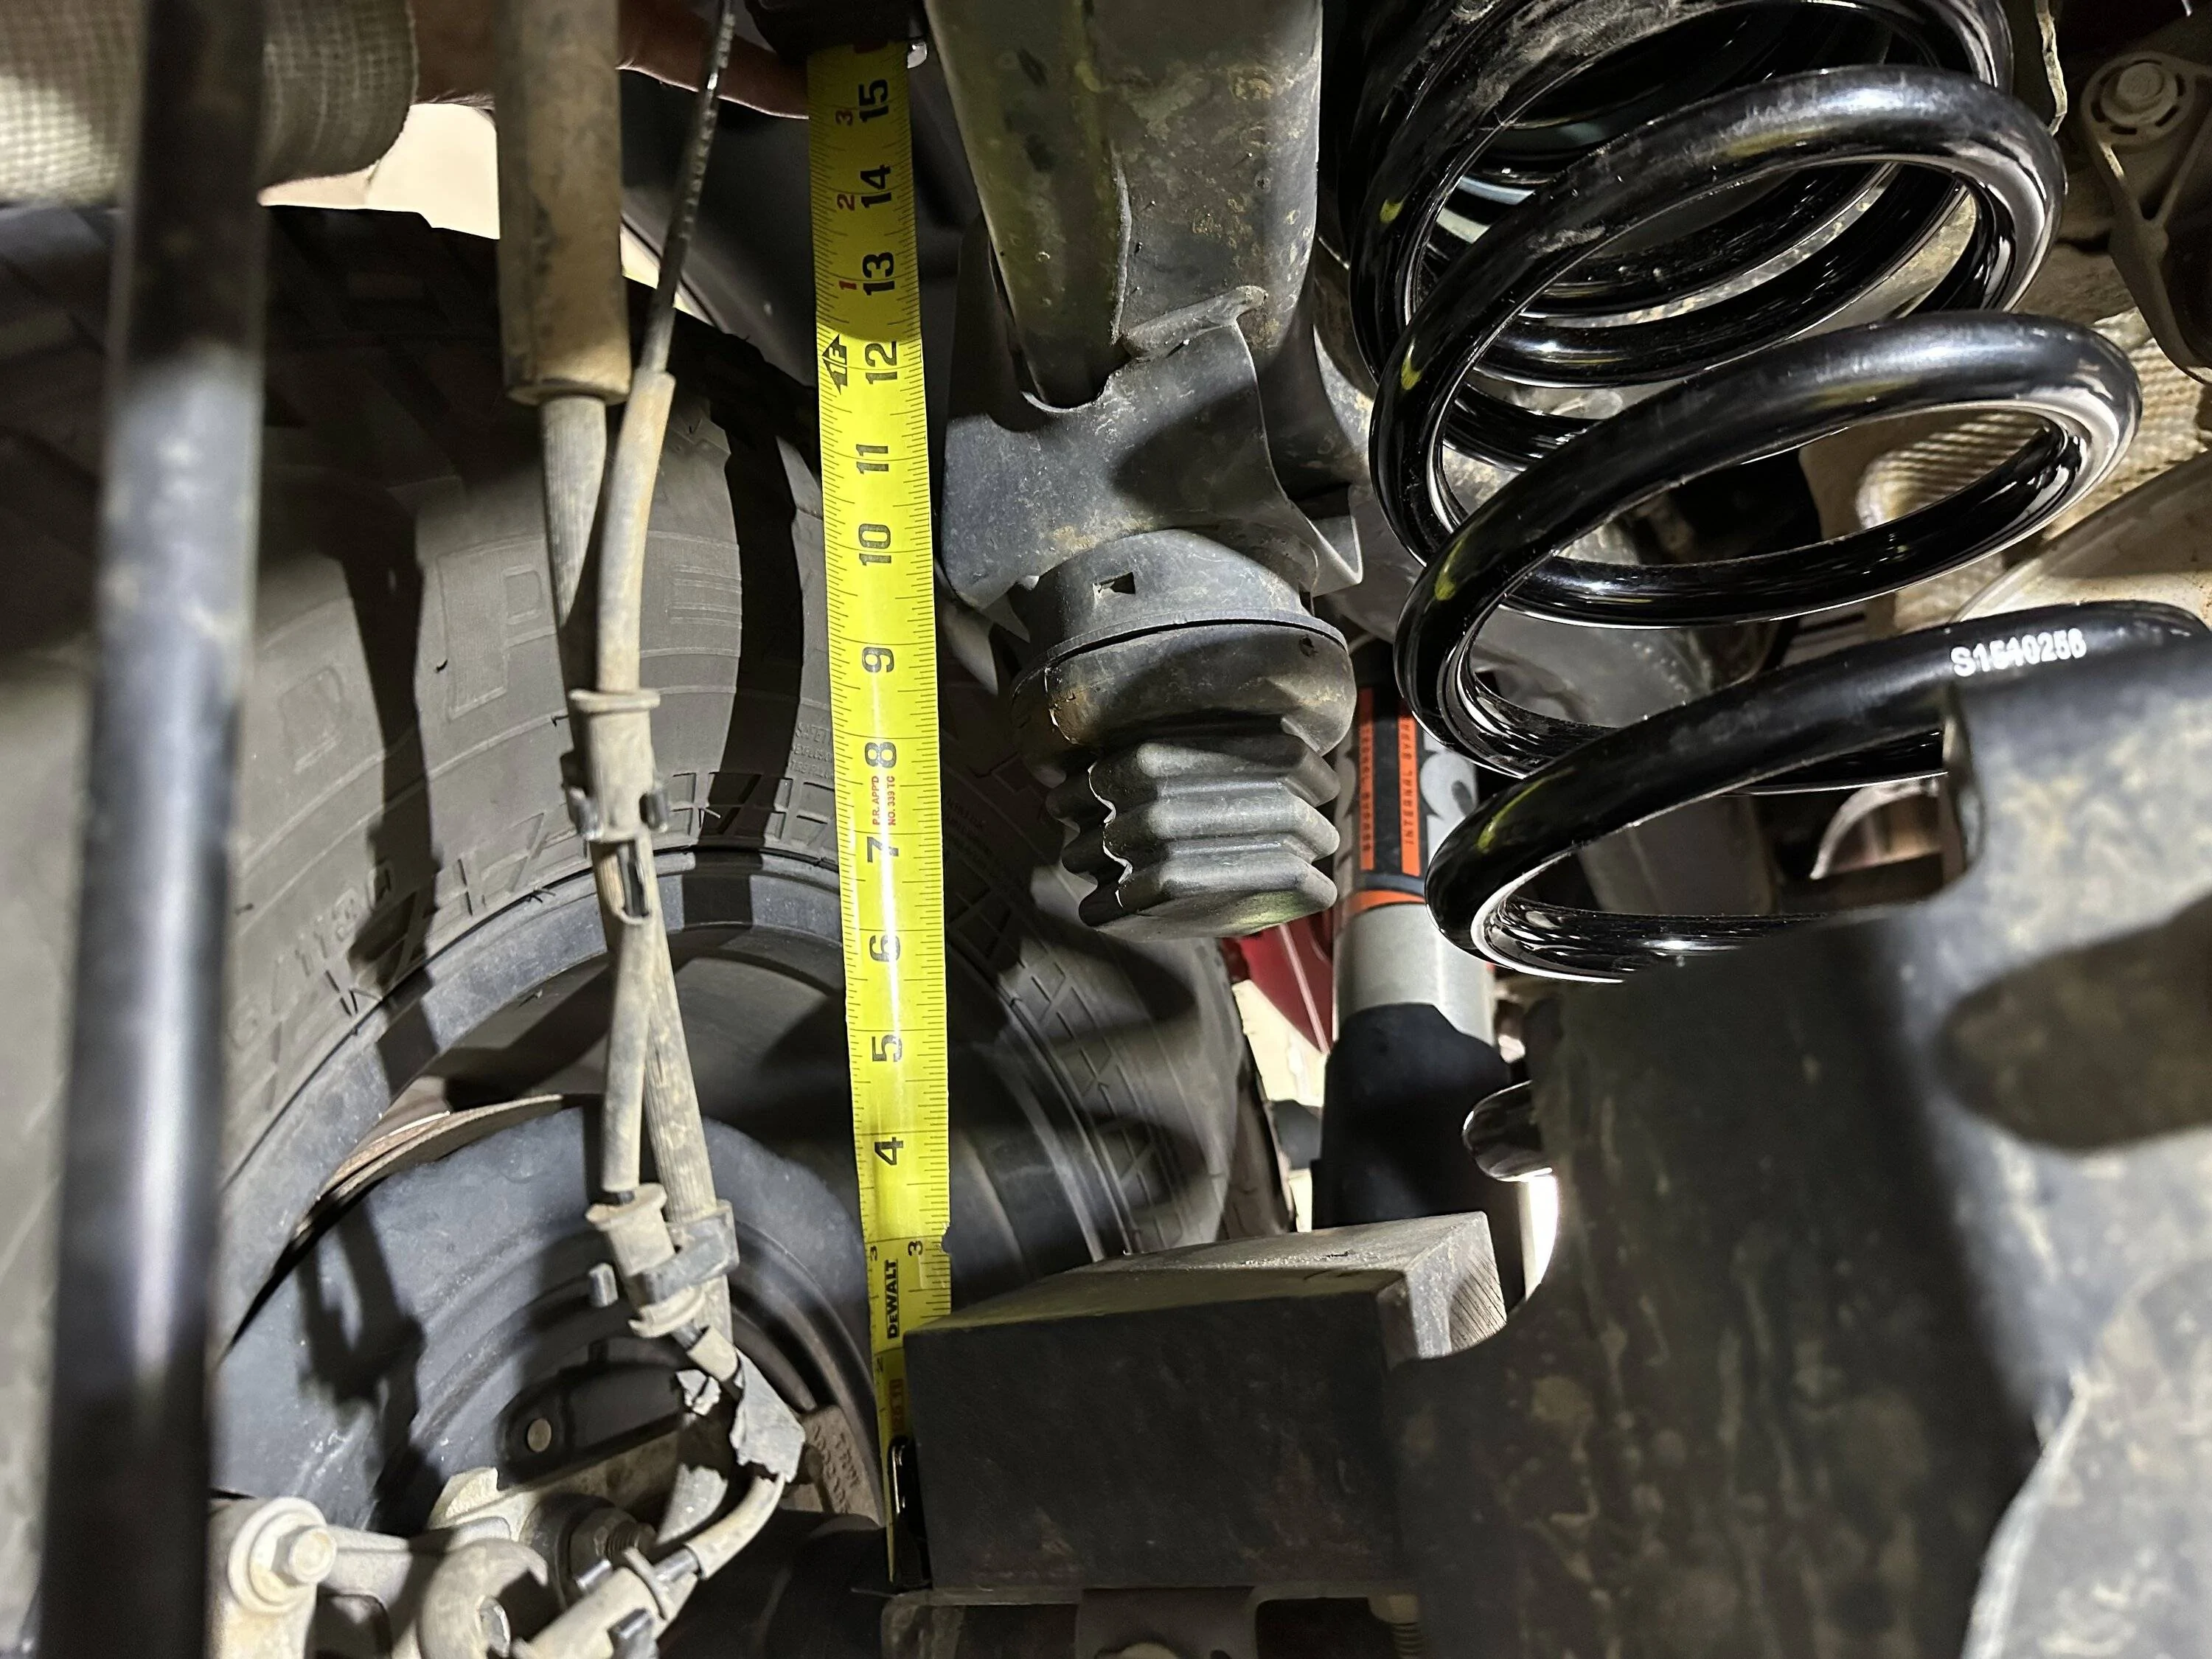
Now
I think the pinion angle looks pretty good to me (I have a carrier bearing spacer from my spacer lift).
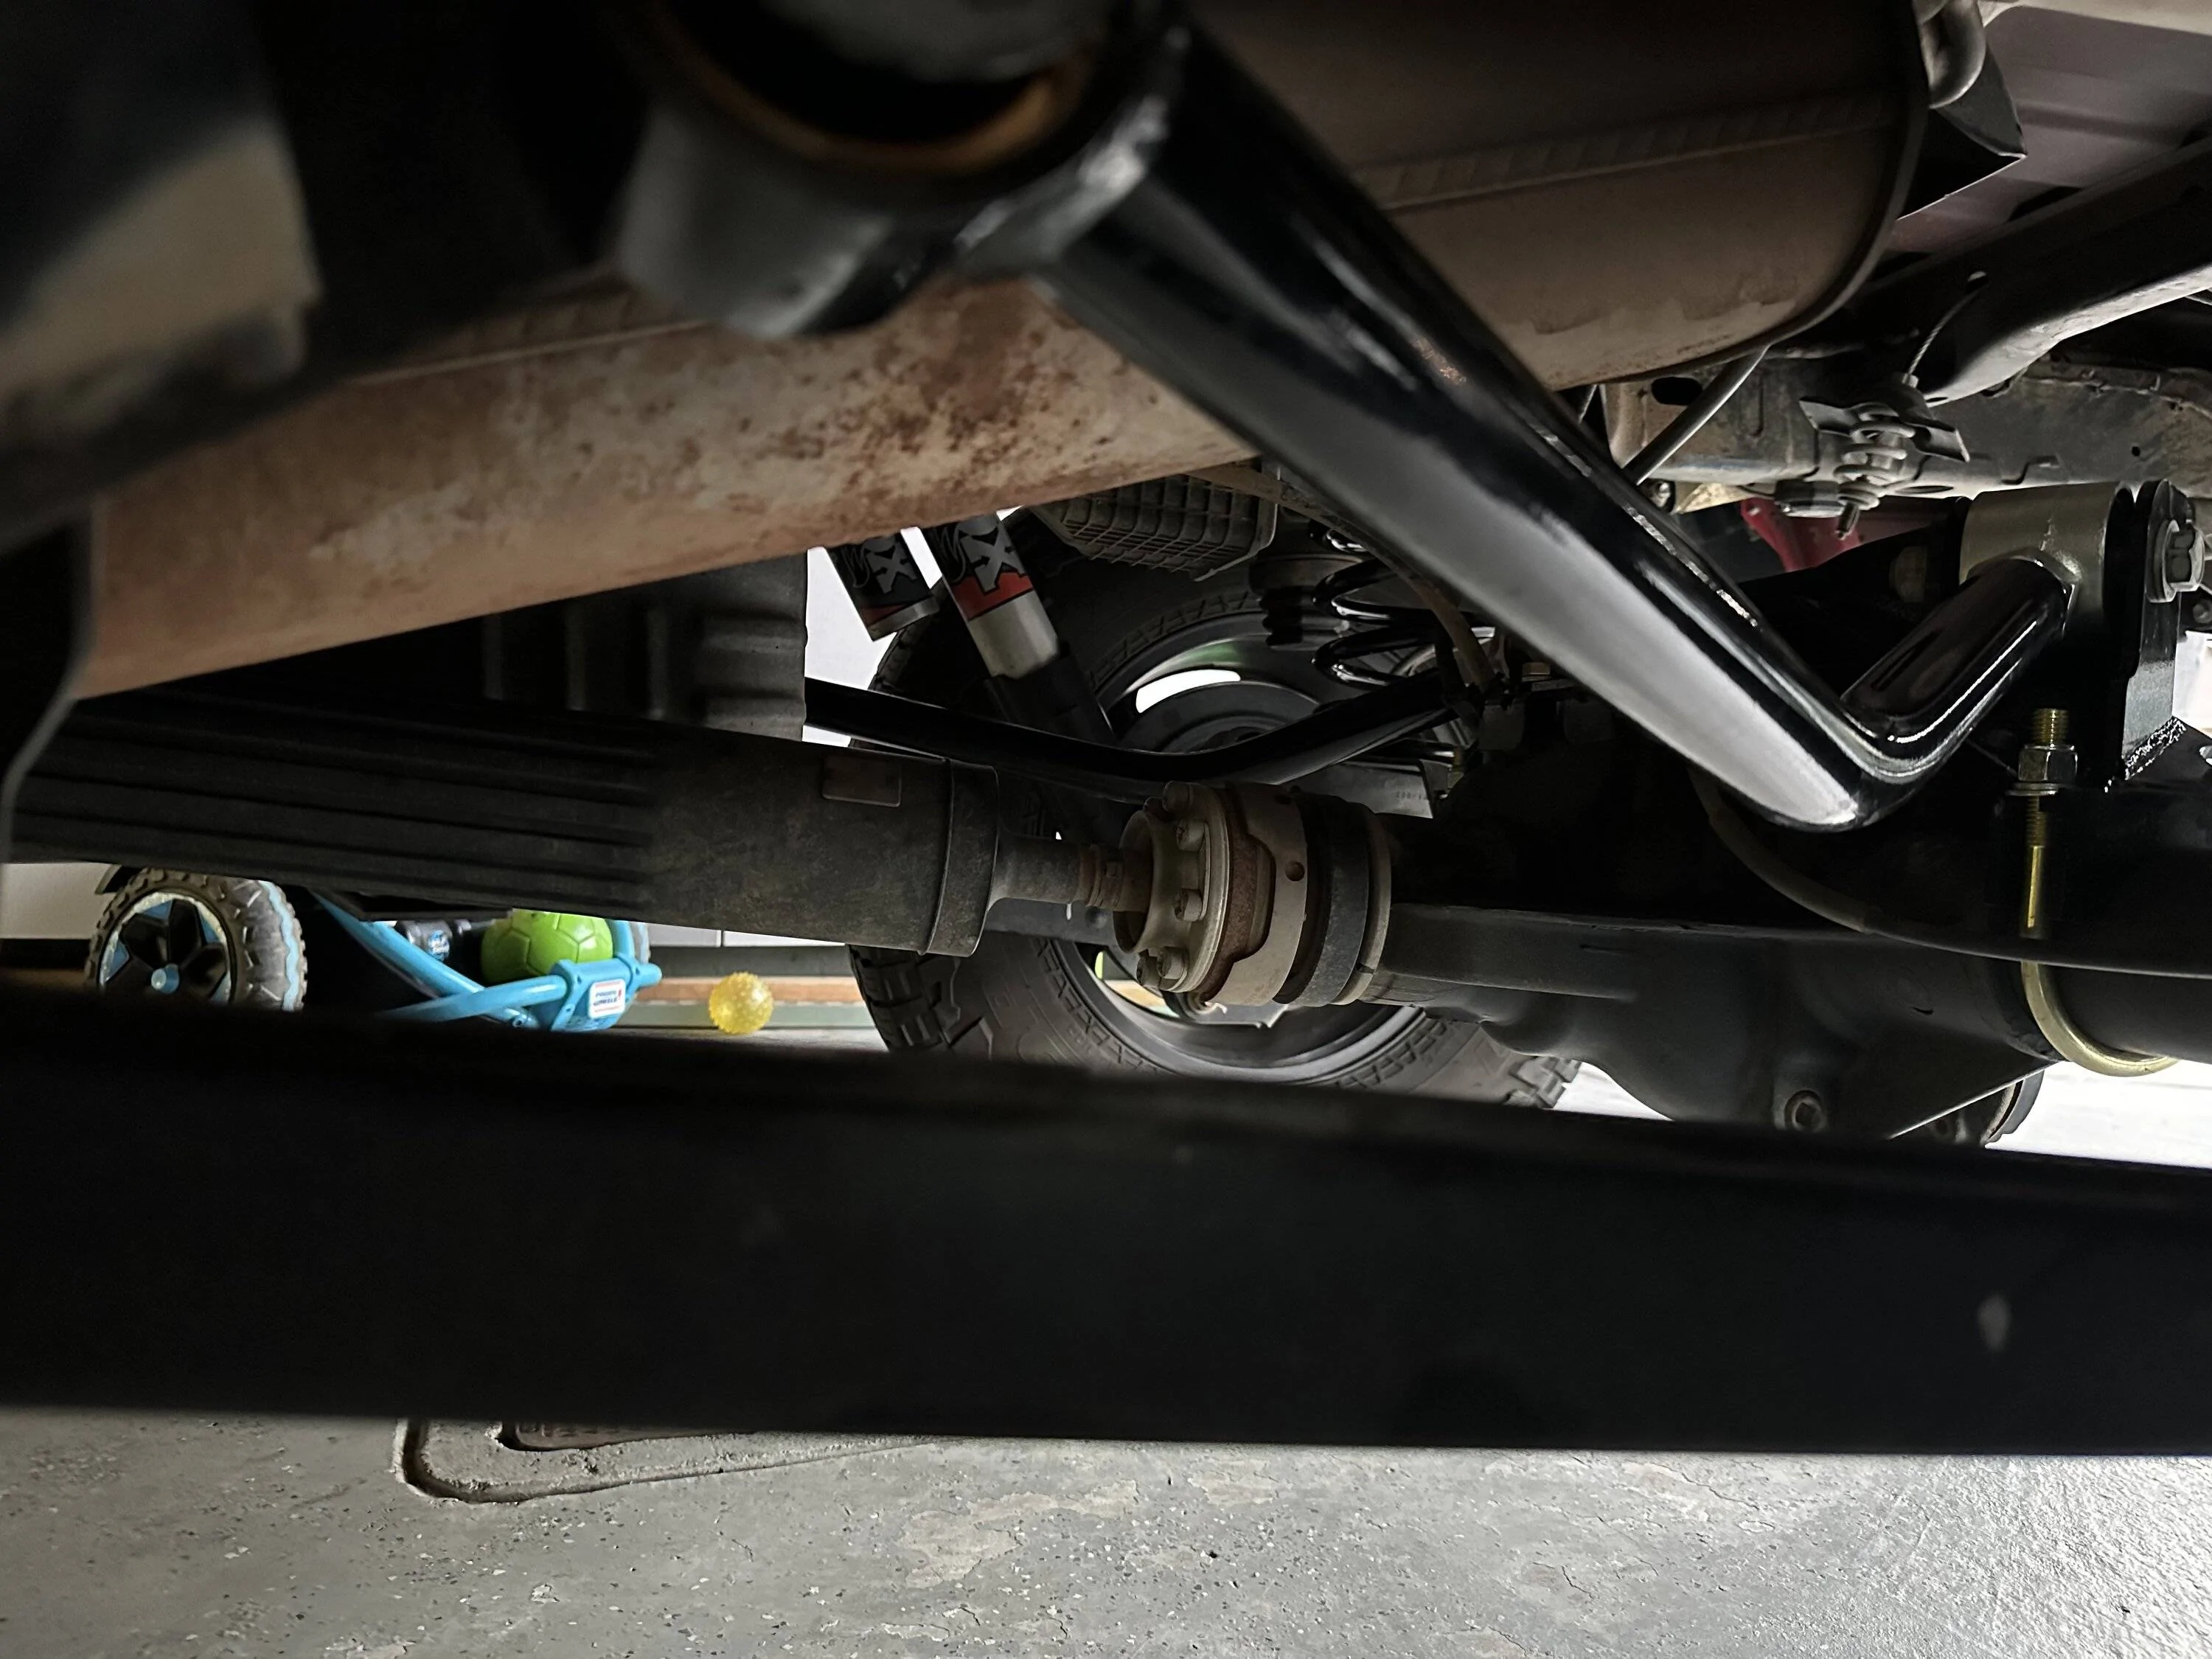
now to find a day to put the front Clayton springs in.
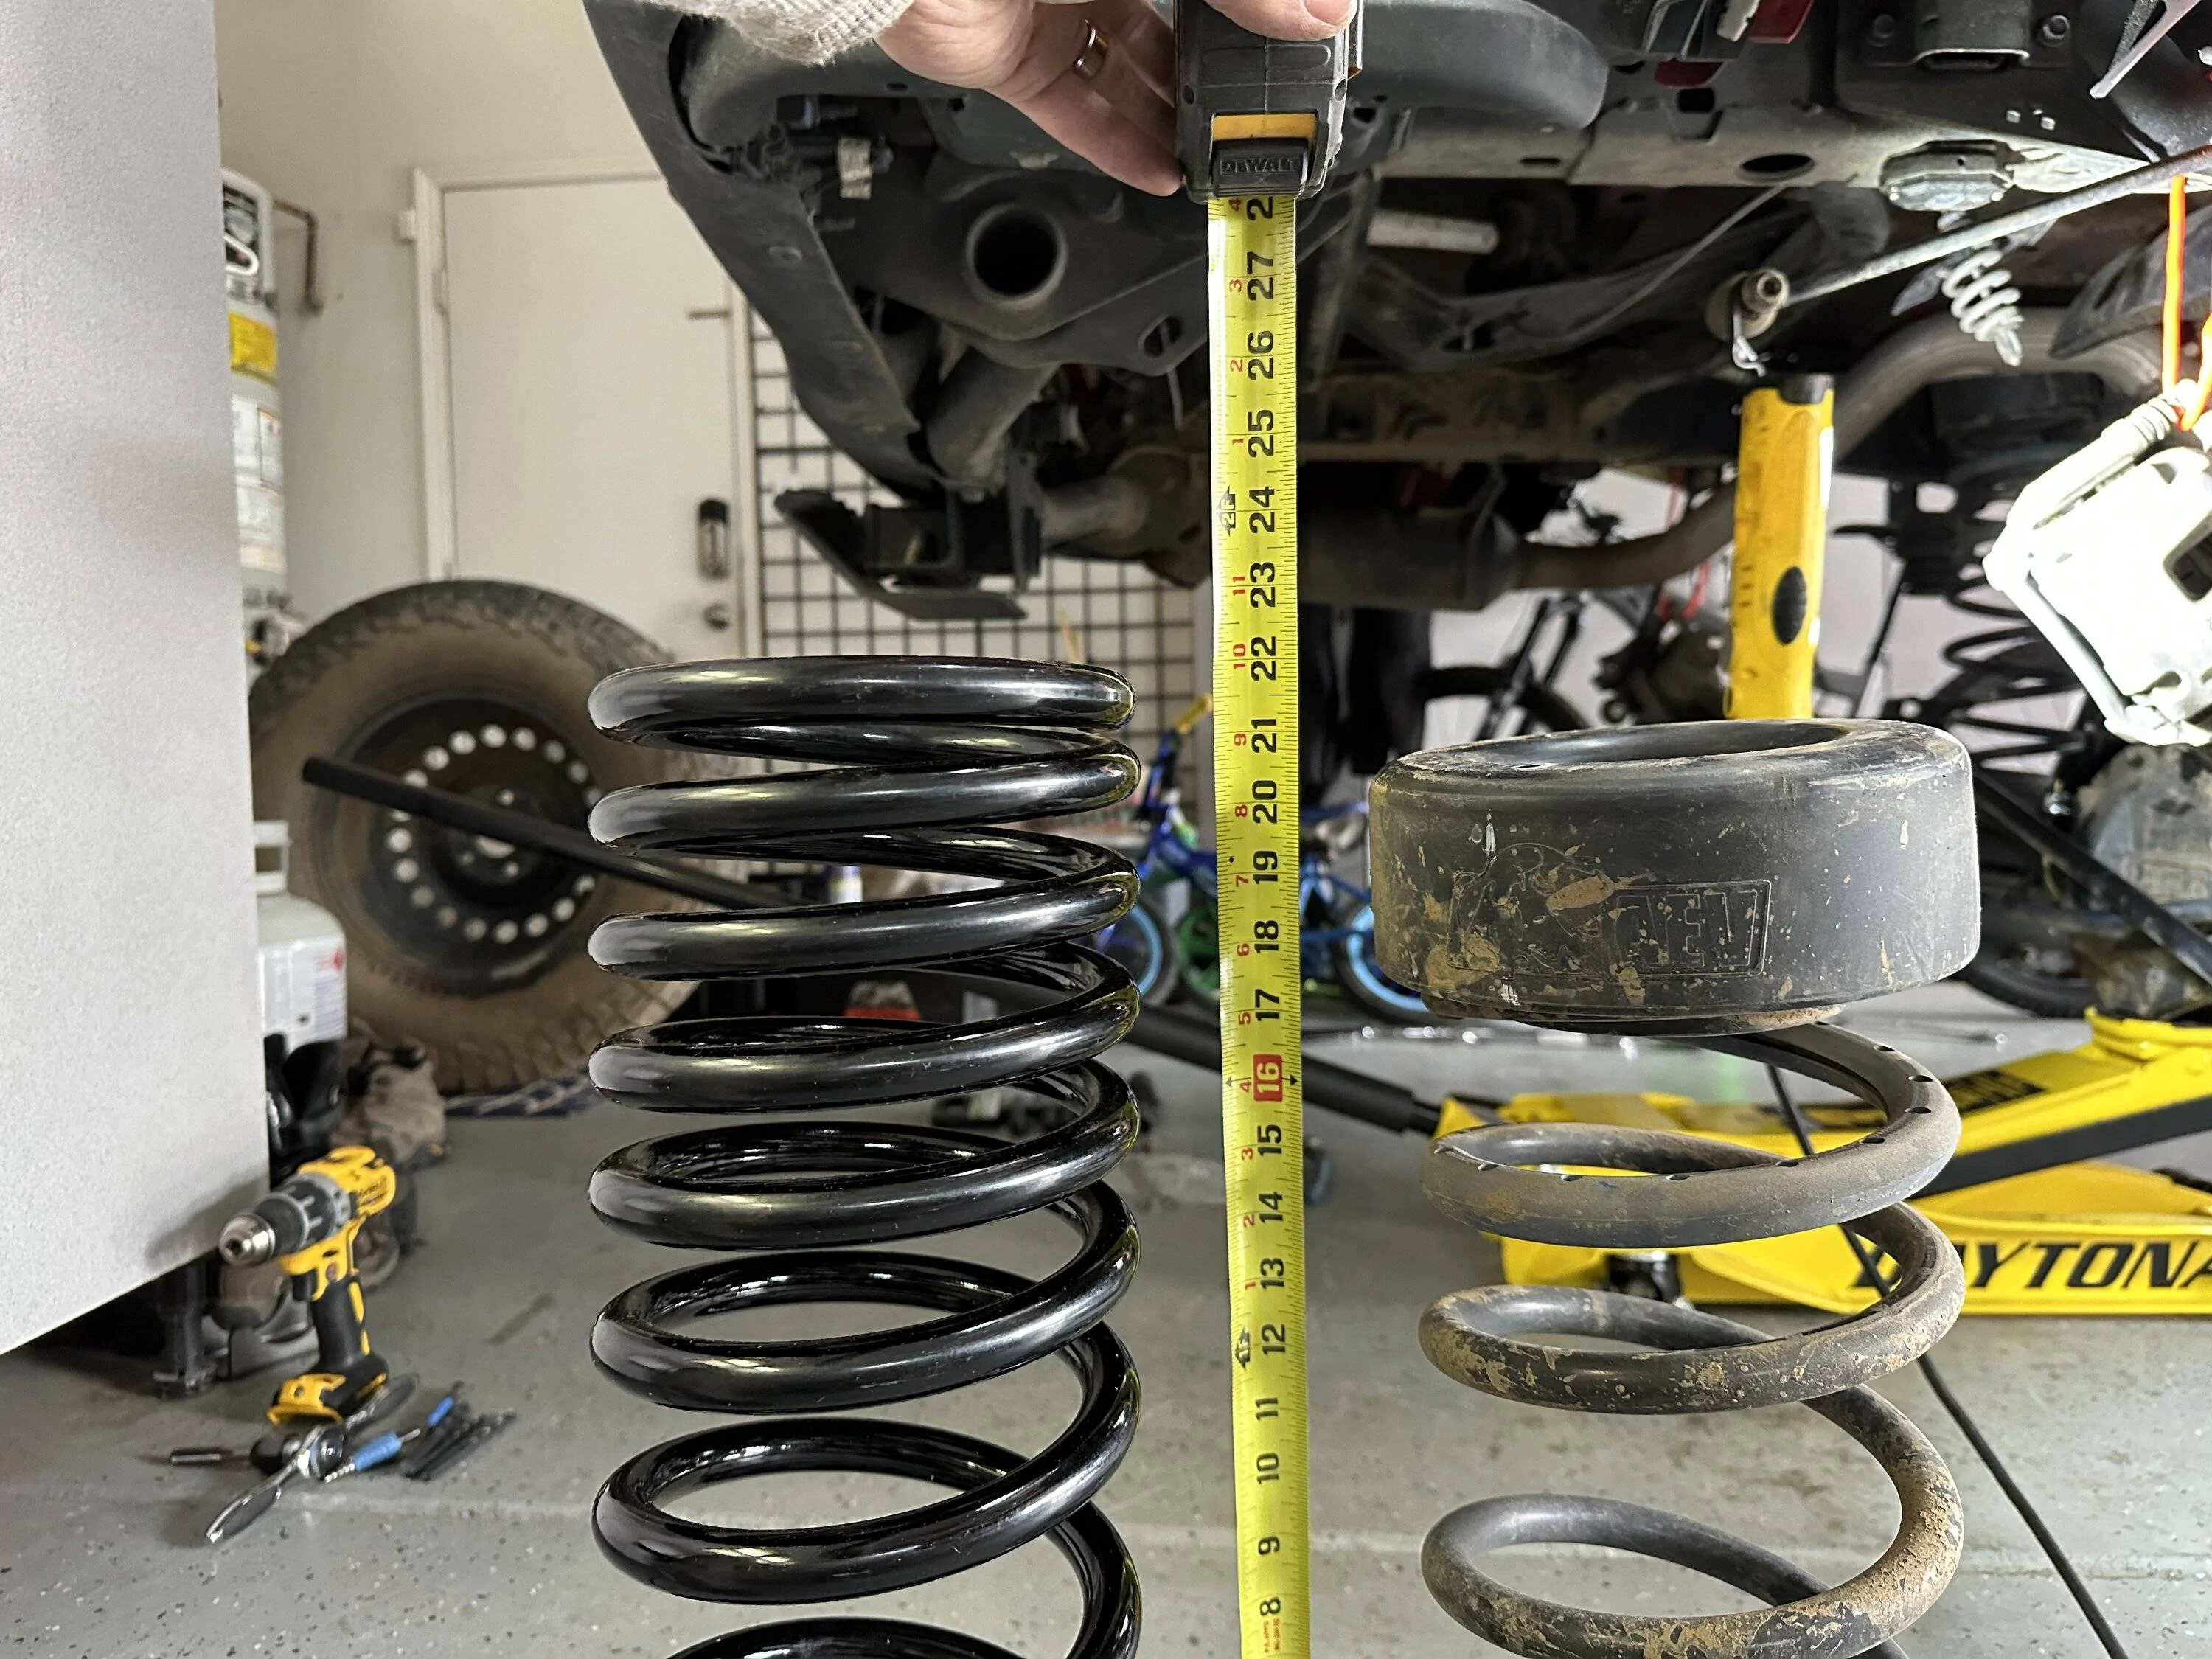

Clayton 2.5” (~19.375”) compared to OEM with AEV spacer
![Jeep Gladiator What did you do TO your Gladiator today? [ADMIN WARNING: NO POLITICS, NO GUN TALK] IMG_3048](https://cdn.jeepgladiatorforum.com/attachments/312/312796-c6a87c412b66e4d4a24896546e1d40cd.webp)
Metalcloak durospring bump stops about 1” longer… though I’m not sure if they add an inch or are they supposed to compress to the same length?
![Jeep Gladiator What did you do TO your Gladiator today? [ADMIN WARNING: NO POLITICS, NO GUN TALK] IMG_3047](https://cdn.jeepgladiatorforum.com/attachments/312/312797-917b64ac3a78caf7783c34a3a7a2e933.jpeg)
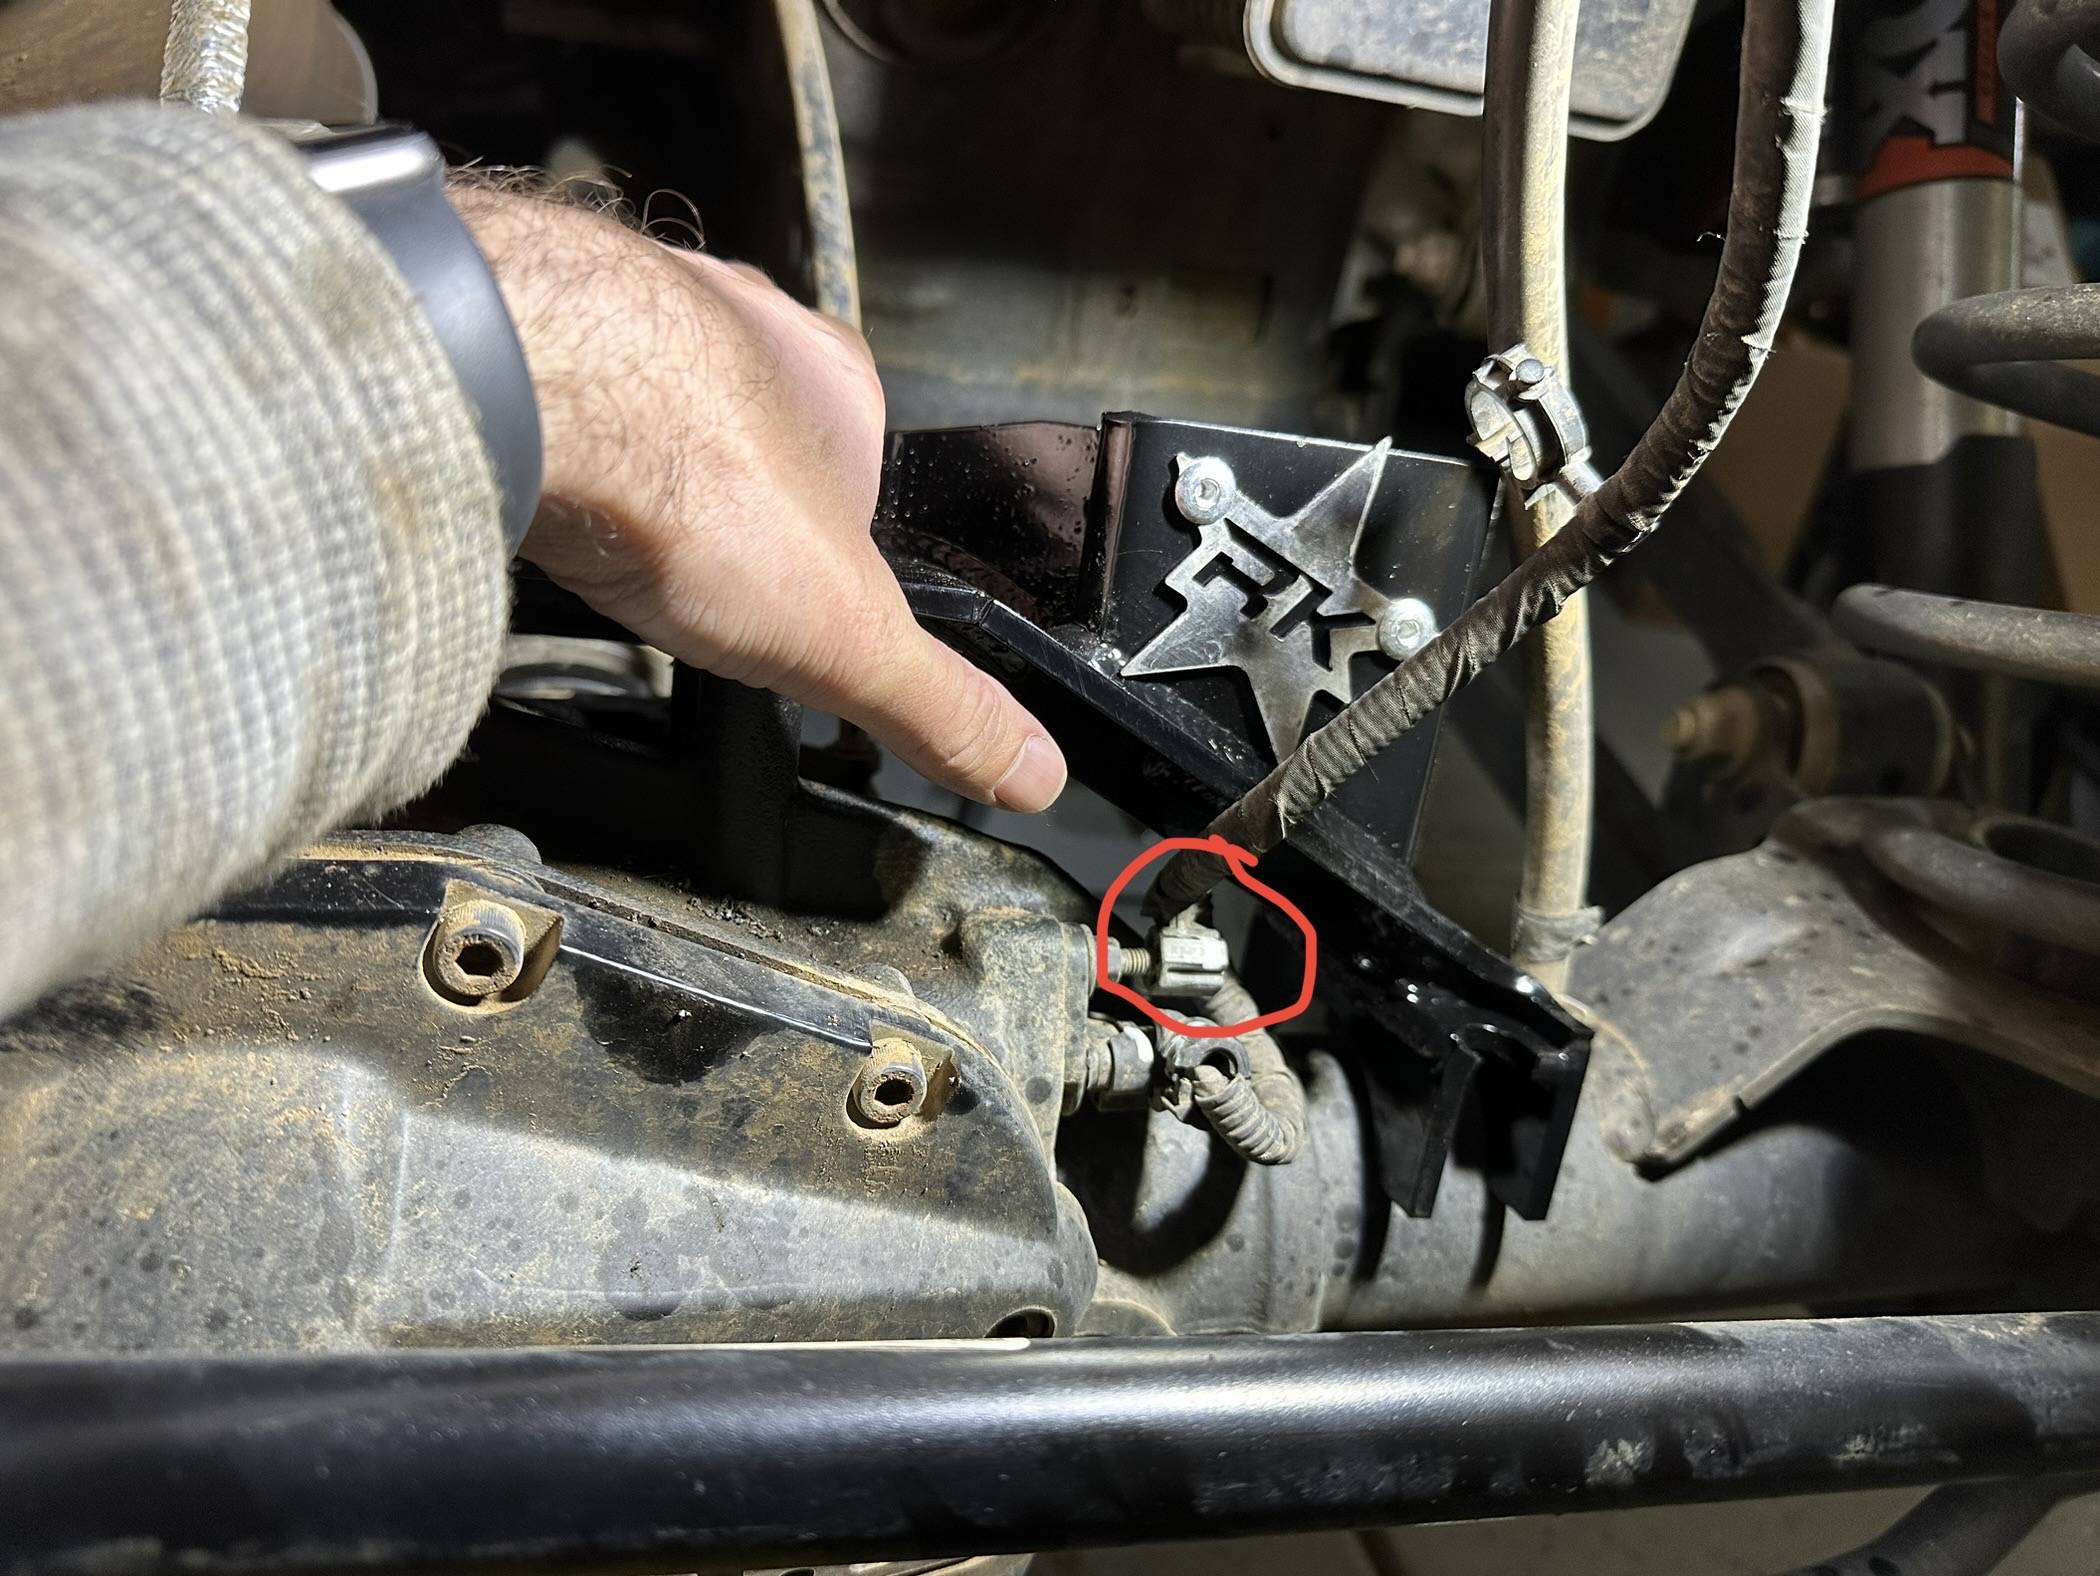
Jacking up/dropping the axle with the track bar attached led to the axle pulling so far driver that it pulled the left upper control arm bushing half way out! Think next project will be putting in the RockJock JJ bushings and some other control arms.
![Jeep Gladiator What did you do TO your Gladiator today? [ADMIN WARNING: NO POLITICS, NO GUN TALK] IMG_3049](https://cdn.jeepgladiatorforum.com/attachments/312/312800-e0d6d5994cdc17ccf6d103d15443b0b8.jpeg)
I’m a little confused because by the coil bucket measurements I gained 2”, but there was about the same gap between the bump stop with the 1” longer durospring so I would’ve thought it was only 1”… can’t ignore the coil spring measurement though.
Before:
![Jeep Gladiator What did you do TO your Gladiator today? [ADMIN WARNING: NO POLITICS, NO GUN TALK] IMG_2385](https://cdn.jeepgladiatorforum.com/attachments/312/312801-680e3c2bb163b73b4d977667141dcad3.webp)
After:
![Jeep Gladiator What did you do TO your Gladiator today? [ADMIN WARNING: NO POLITICS, NO GUN TALK] IMG_3057](https://cdn.jeepgladiatorforum.com/attachments/312/312802-df2c39621a3c58b4745b76708a88f64c.jpeg)
On a related note, I was waiting to do this to swap out track bars to see if that helps clear my AEV stabilizer, has been hitting either Rock Krawler track bar or drag link depending on placement.
Well, I didn’t finish grinding out the track bar bracket to fit the Metalcloak Bar

So I’ll have to find another day to do that when I can make noise.
Side by side Rock Krawler and Metalcloak:
![Jeep Gladiator What did you do TO your Gladiator today? [ADMIN WARNING: NO POLITICS, NO GUN TALK] IMG_3051](https://cdn.jeepgladiatorforum.com/attachments/312/312804-ad4a86550149dadfb3d95a70957e318b.jpeg)
![Jeep Gladiator What did you do TO your Gladiator today? [ADMIN WARNING: NO POLITICS, NO GUN TALK] IMG_3053](https://cdn.jeepgladiatorforum.com/attachments/312/312805-3a3fc93cc24595b8e298c9ebdde95a28.jpeg)
The diff bend is waaay more driver and up higher on the Metalcloak.
Last edited:
loganjeeps
Well-Known Member
- First Name
- Austin
- Joined
- Feb 11, 2023
- Threads
- 15
- Messages
- 358
- Reaction score
- 466
- Location
- Atlanta, GA
- Vehicle(s)
- 24 JTR 6MT, 96 Chevy 3500 5MT, 89 XJ (project)
New shoes today. Dropped the Falken MTs (soon to be on the marketplace ") ) for Mickey Baja ATs. Rides much better and I love white walls. Showing signs of getting better gas mileage too. Wussed out on going bigger as I was worried about tire poke and more spray.
) for Mickey Baja ATs. Rides much better and I love white walls. Showing signs of getting better gas mileage too. Wussed out on going bigger as I was worried about tire poke and more spray.
![Jeep Gladiator What did you do TO your Gladiator today? [ADMIN WARNING: NO POLITICS, NO GUN TALK] IMG_20230422_1028575](data:image/svg+xml;charset=utf-8,%3Csvg xmlns%3D'http%3A%2F%2Fwww.w3.org%2F2000%2Fsvg' width='3000' height='2000' viewBox%3D'0 0 3000 2000'%2F%3E)
) for Mickey Baja ATs. Rides much better and I love white walls. Showing signs of getting better gas mileage too. Wussed out on going bigger as I was worried about tire poke and more spray.![Jeep Gladiator What did you do TO your Gladiator today? [ADMIN WARNING: NO POLITICS, NO GUN TALK] IMG_20230422_1028575](https://cdn.jeepgladiatorforum.com/attachments/312/312827-cf3f7e5c74f73e12e37ac30cac53a96d.jpg)
![Jeep Gladiator What did you do TO your Gladiator today? [ADMIN WARNING: NO POLITICS, NO GUN TALK] IMG_20230422_1029126](https://cdn.jeepgladiatorforum.com/attachments/312/312828-d80844b919153f5609649aa0024a8a9f.jpg)
Sponsored
Similar threads
- Replies
- 102
- Views
- 10,094
- Replies
- 307
- Views
- 51,049
